Import Large Data files using Zoho Databridge
Zoho Analytics allows you to import large data files (more than 100 MB) such as CSV, TSV, Excel, HTML, JSON, XML, Statistical File, Avro and Parquet using the Zoho Databridge. The Zoho Databridge bridges your local data source and Zoho Analytics server to fetch data from large files you have saved on your premises. With this, you can also automate the import process to synchronize the data into Zoho Analytics at a periodic interval.
On this Page
- Prerequisites
- Choose Data to Import
- Import Settings and Preview
- Schedule Data Import
- Manage Data Sources
- Manage Table Synchronization Settings
- Data Blending
Prerequisites
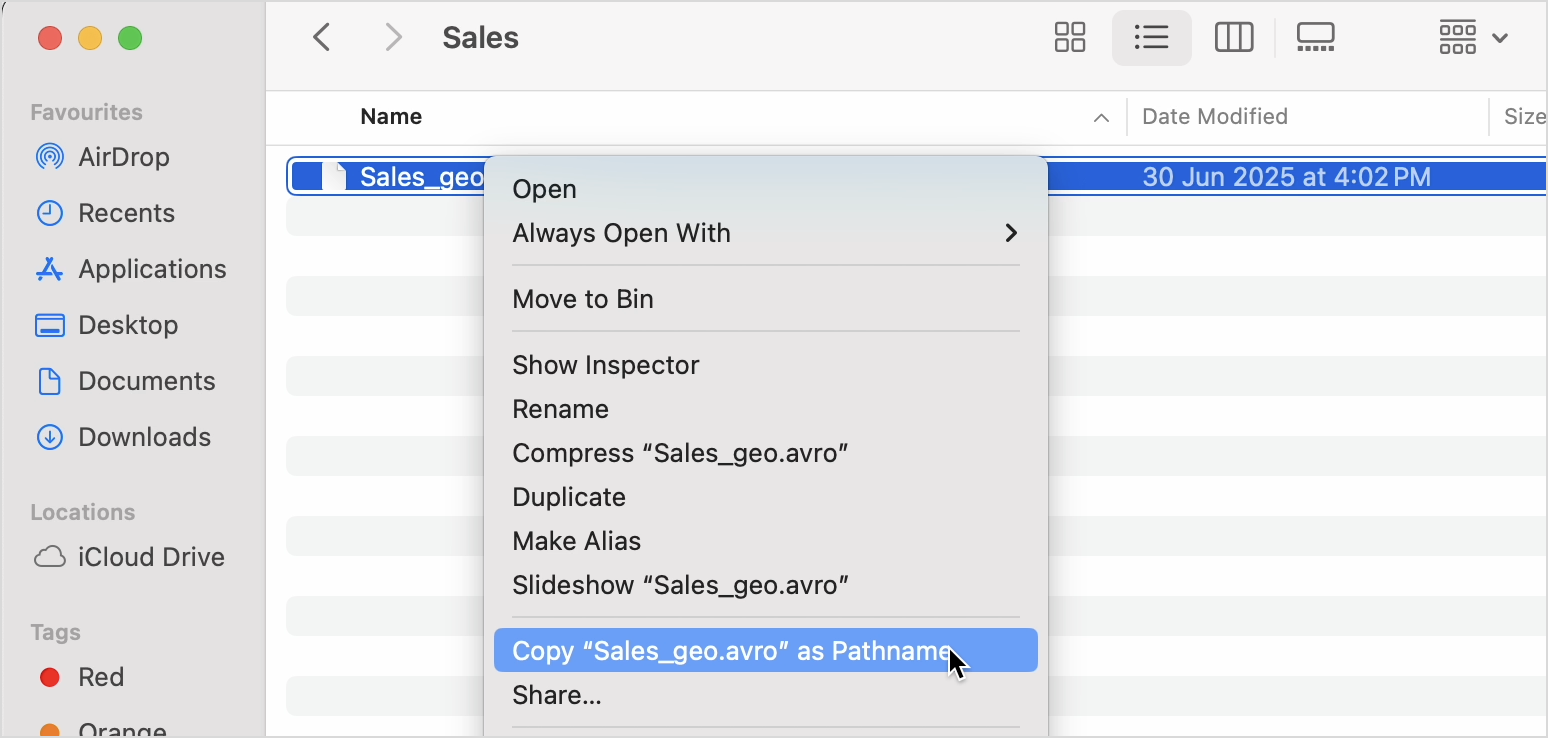
To find the File Path on Mac:
- Right-click (Secondary click) the file and then hold down the Option key
- Choose Copy [file Name] as pathname from the drop-down menu.
To find the File Path on Windows,
- Hold the Shift key and right-click on the file.
- Select Copy as Path.
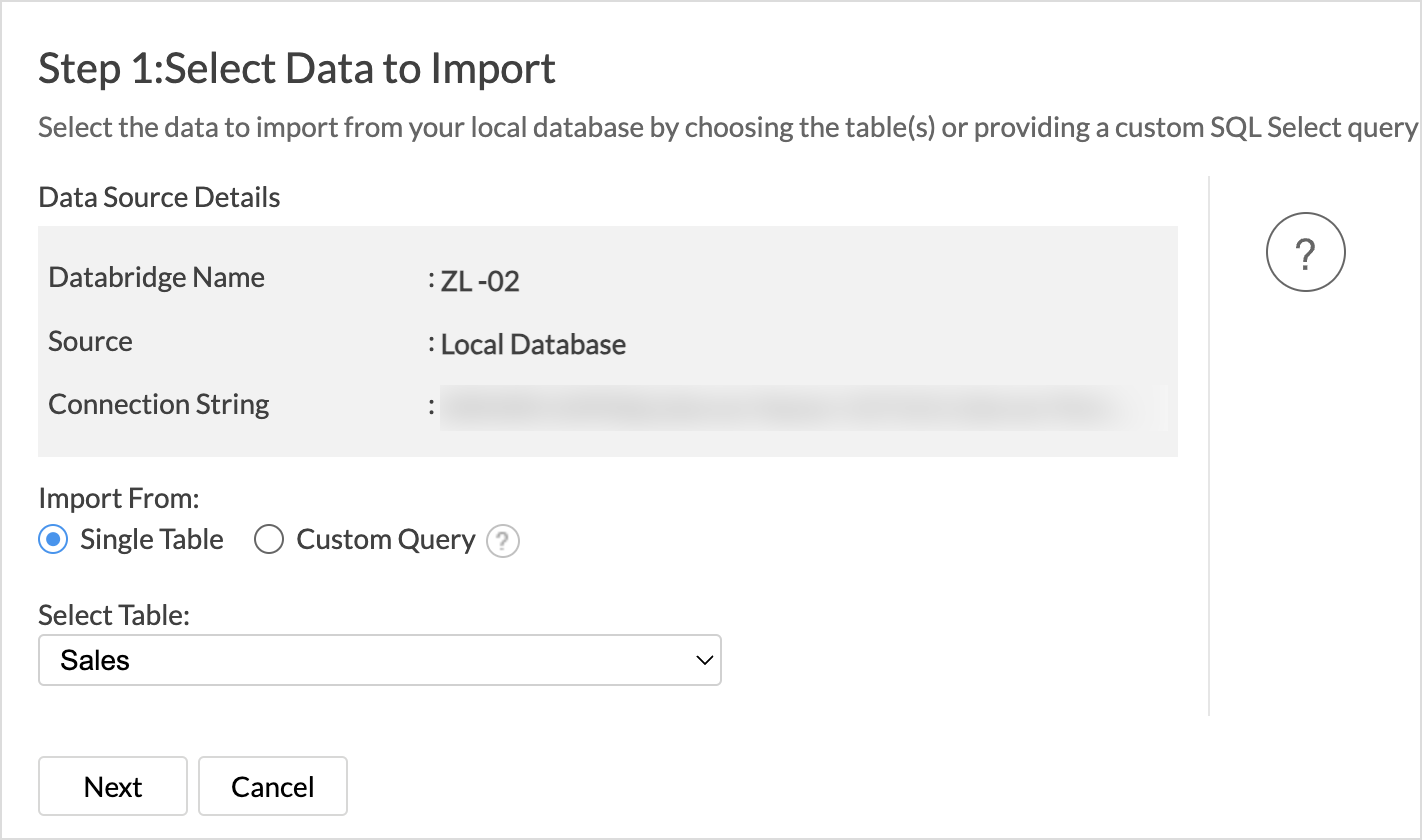
Choose Data to Import
- From the Zoho Analytics homepage, click Import your Data.
- Click Files & Feeds > Local File.
- Choose the preferred File Type format from the drop-down menu. Supported file types include CSV, TSV, Excel, HTML, JSON, XML, Statistical File, Parquet and Avro.
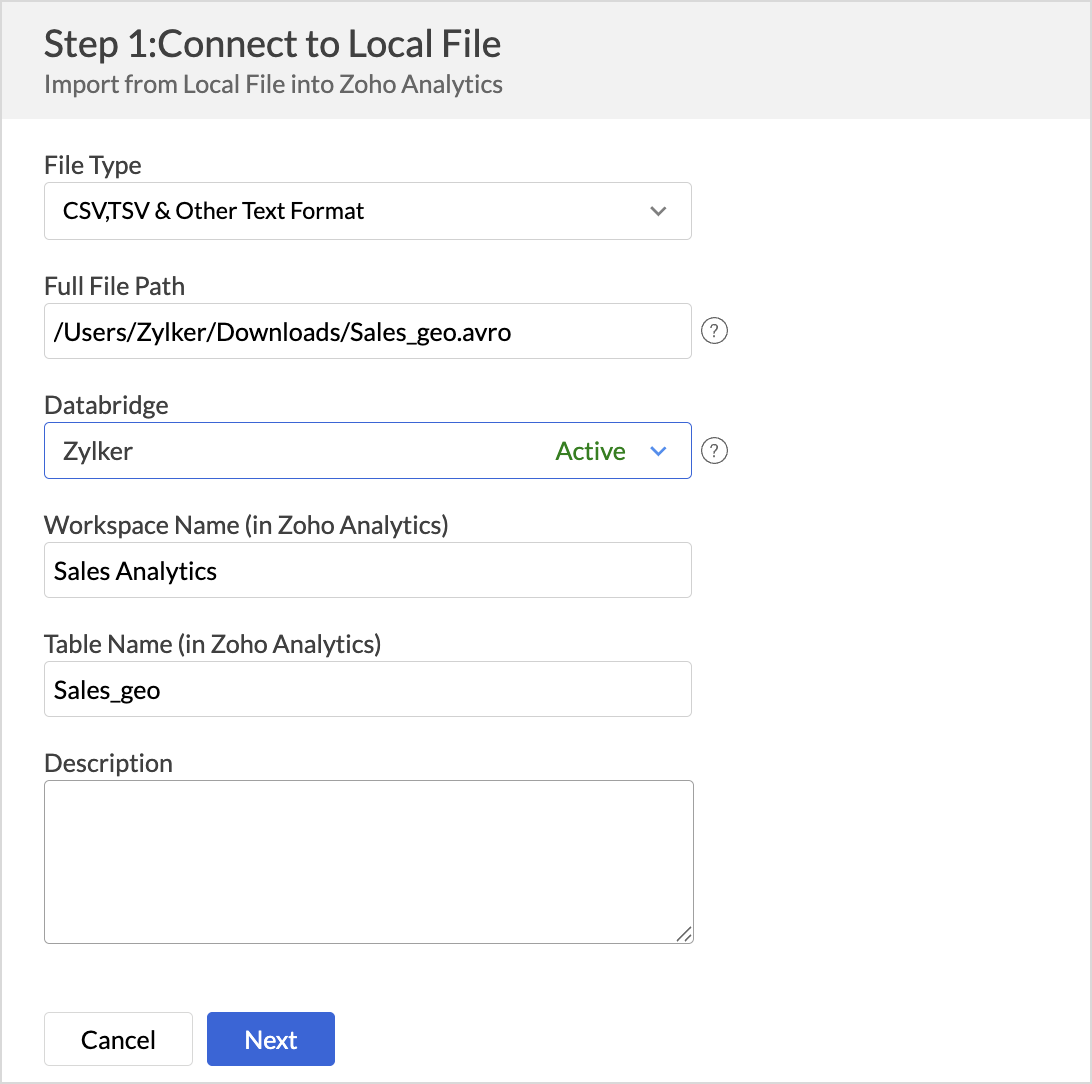
- Choose the Zoho Databridge which has access to the file to be imported. Refer to Zoho Databridge article to learn more.
- Specify the Workspace Name, Table Name to be displayed in Zoho Analytics, and Description.
- Click Next.
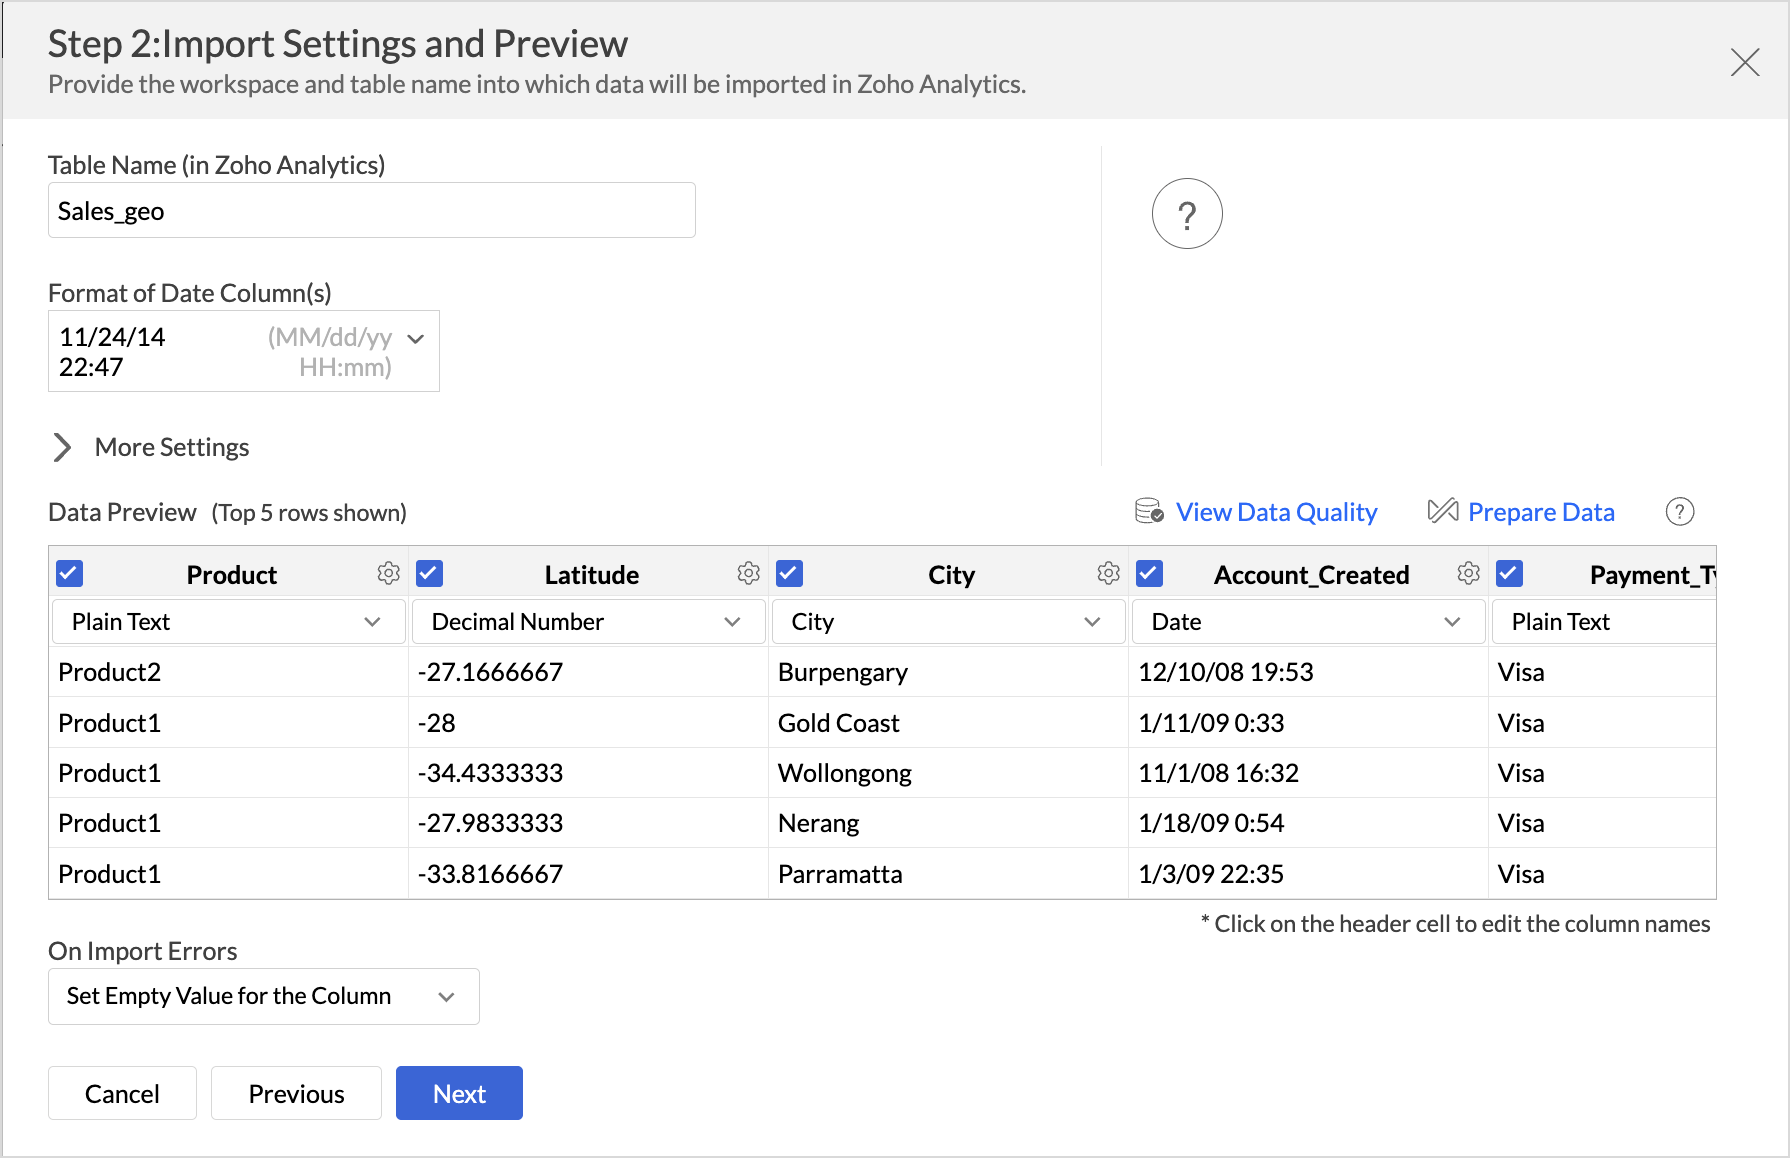
Import Settings and Preview
The Import Settings and Preview displays a few records of the data to be imported; You can view the Data Quality, verify the data type of the columns, and the format of the date columns.
The On Import Errors section helps to define how to handle errors that occur while importing.
Once you have reviewed all the settings, click Next. Data Import will be initiated.
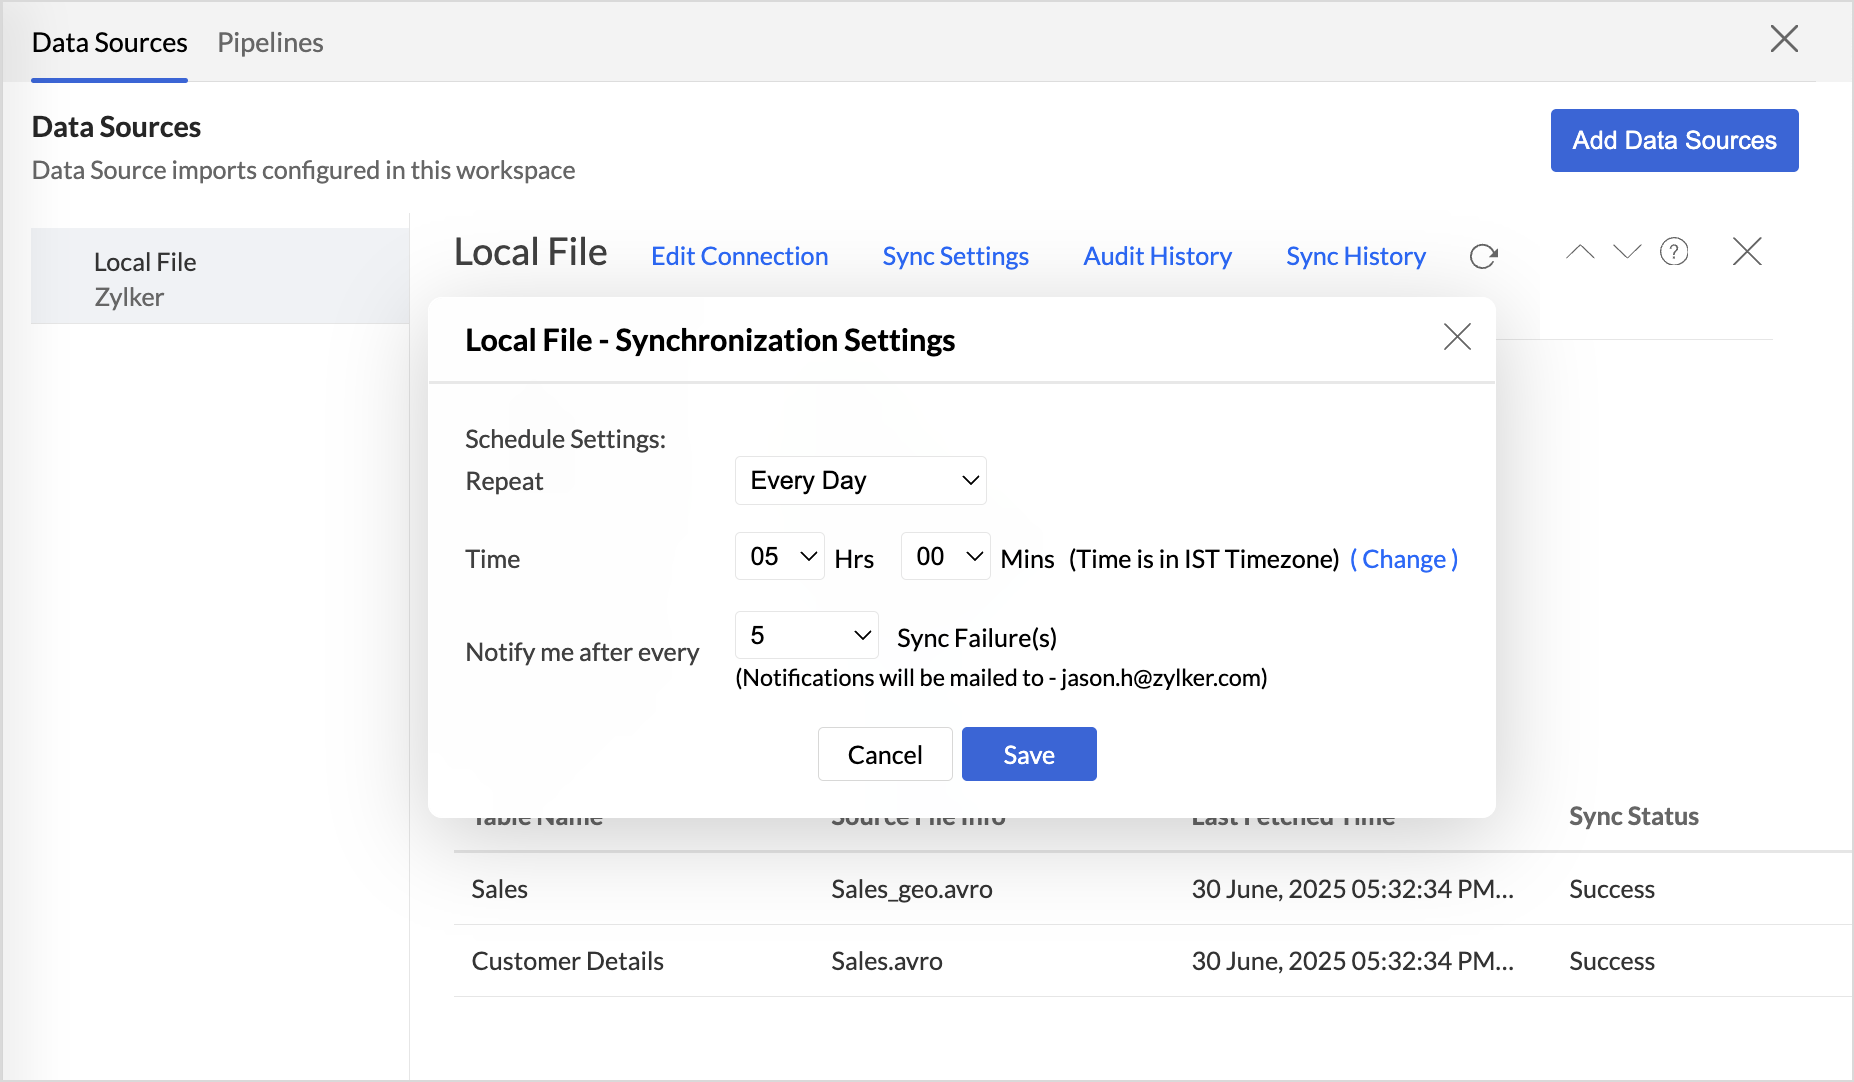
Schedule Data Import
Zoho Analytics offers flexible sync schedules to ensure that the data is always up-to-date for effective analysis. It also allows you to configure which data should be fetched in each schedule. You can choose to import all the records in each schedule, or only the new and modified records, based on the requirement.
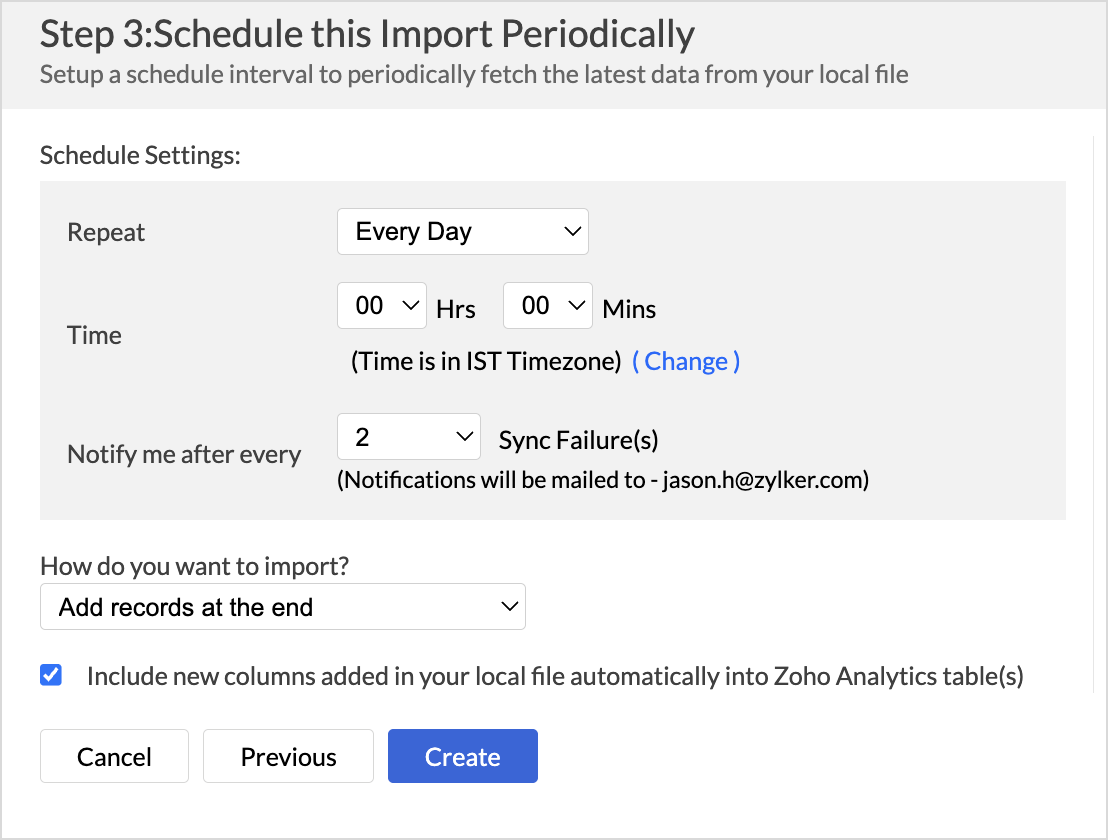
Note: Import will take from a few minutes to hours depending on the volume of the data. Please note that, if you access the workspace before the initial fetch, it will not display any data.
Manage Data Sources
The Data Sources tab is the central hub that helps manage all the connection settings of the data sources in the workspace. It also helps keep tabs on the data sync status and notifies in the case of data sync failures. User with the Administrator Privilege can access the Data Sources tab and make necessary changes when needed.
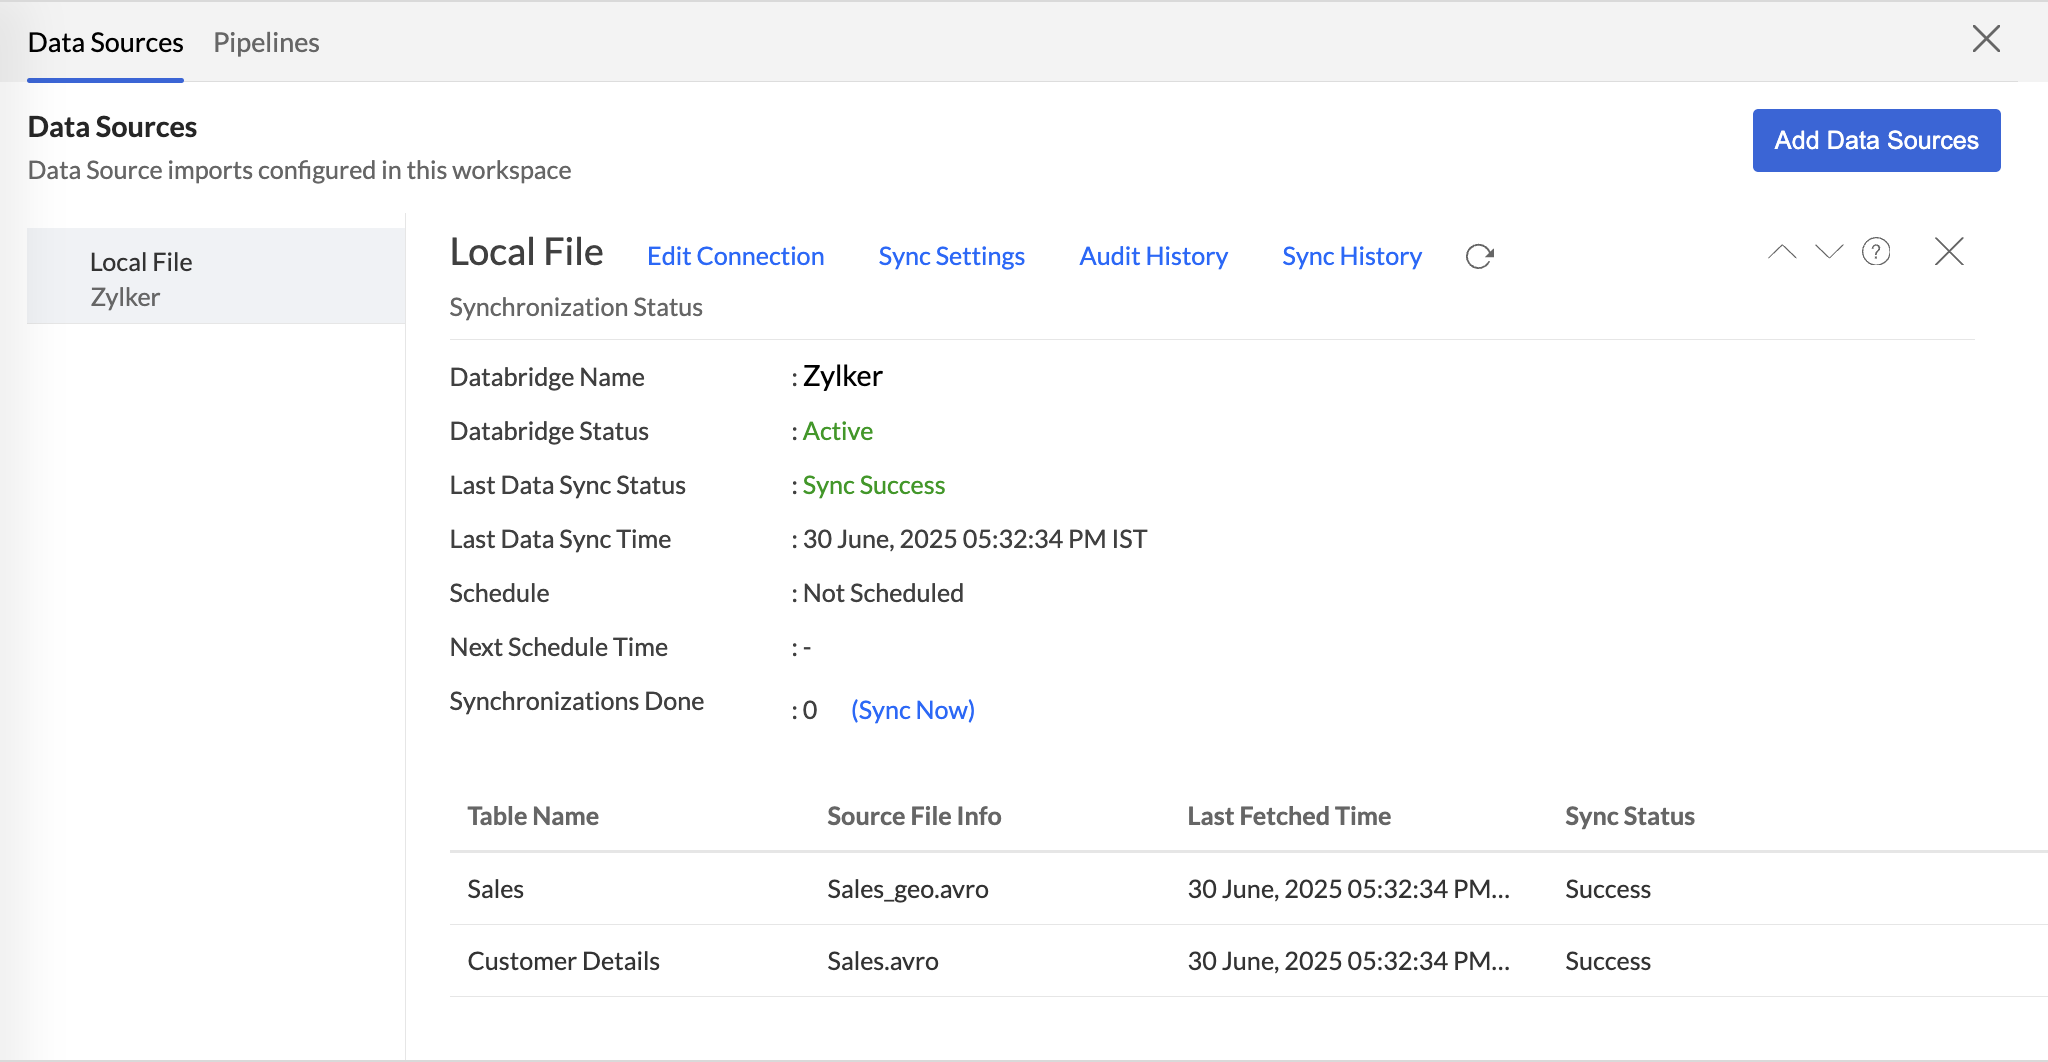
Edit Connection: Enables admins to re-authenticate and update the connection details such as credentials or configuration settings without causing any interruption to the existing data flow.
Sync Settings: Helps modify the frequency of data synchronization (e.g., change from daily to hourly syncs) based on the current needs of your analysis.
Audit History: Audit logs are crucial for maintaining security and troubleshooting issues. They provide a comprehensive record of User and System Actions, including details of the time when the action occurred and information about the administrator who performed the action. Audit logs are maintained for each data source in the workspace.
Sync History: Provides a detailed record of data synchronization activities, making it easy for the administrators to track the status of each data sync. The sync operations are color-coded for immediate recognition. Successful data syncs are indicated in green, signaling that the data sync is completed without any issues. Failed data syncs are marked in red with the reasons for failure along with the necessary action to be taken.
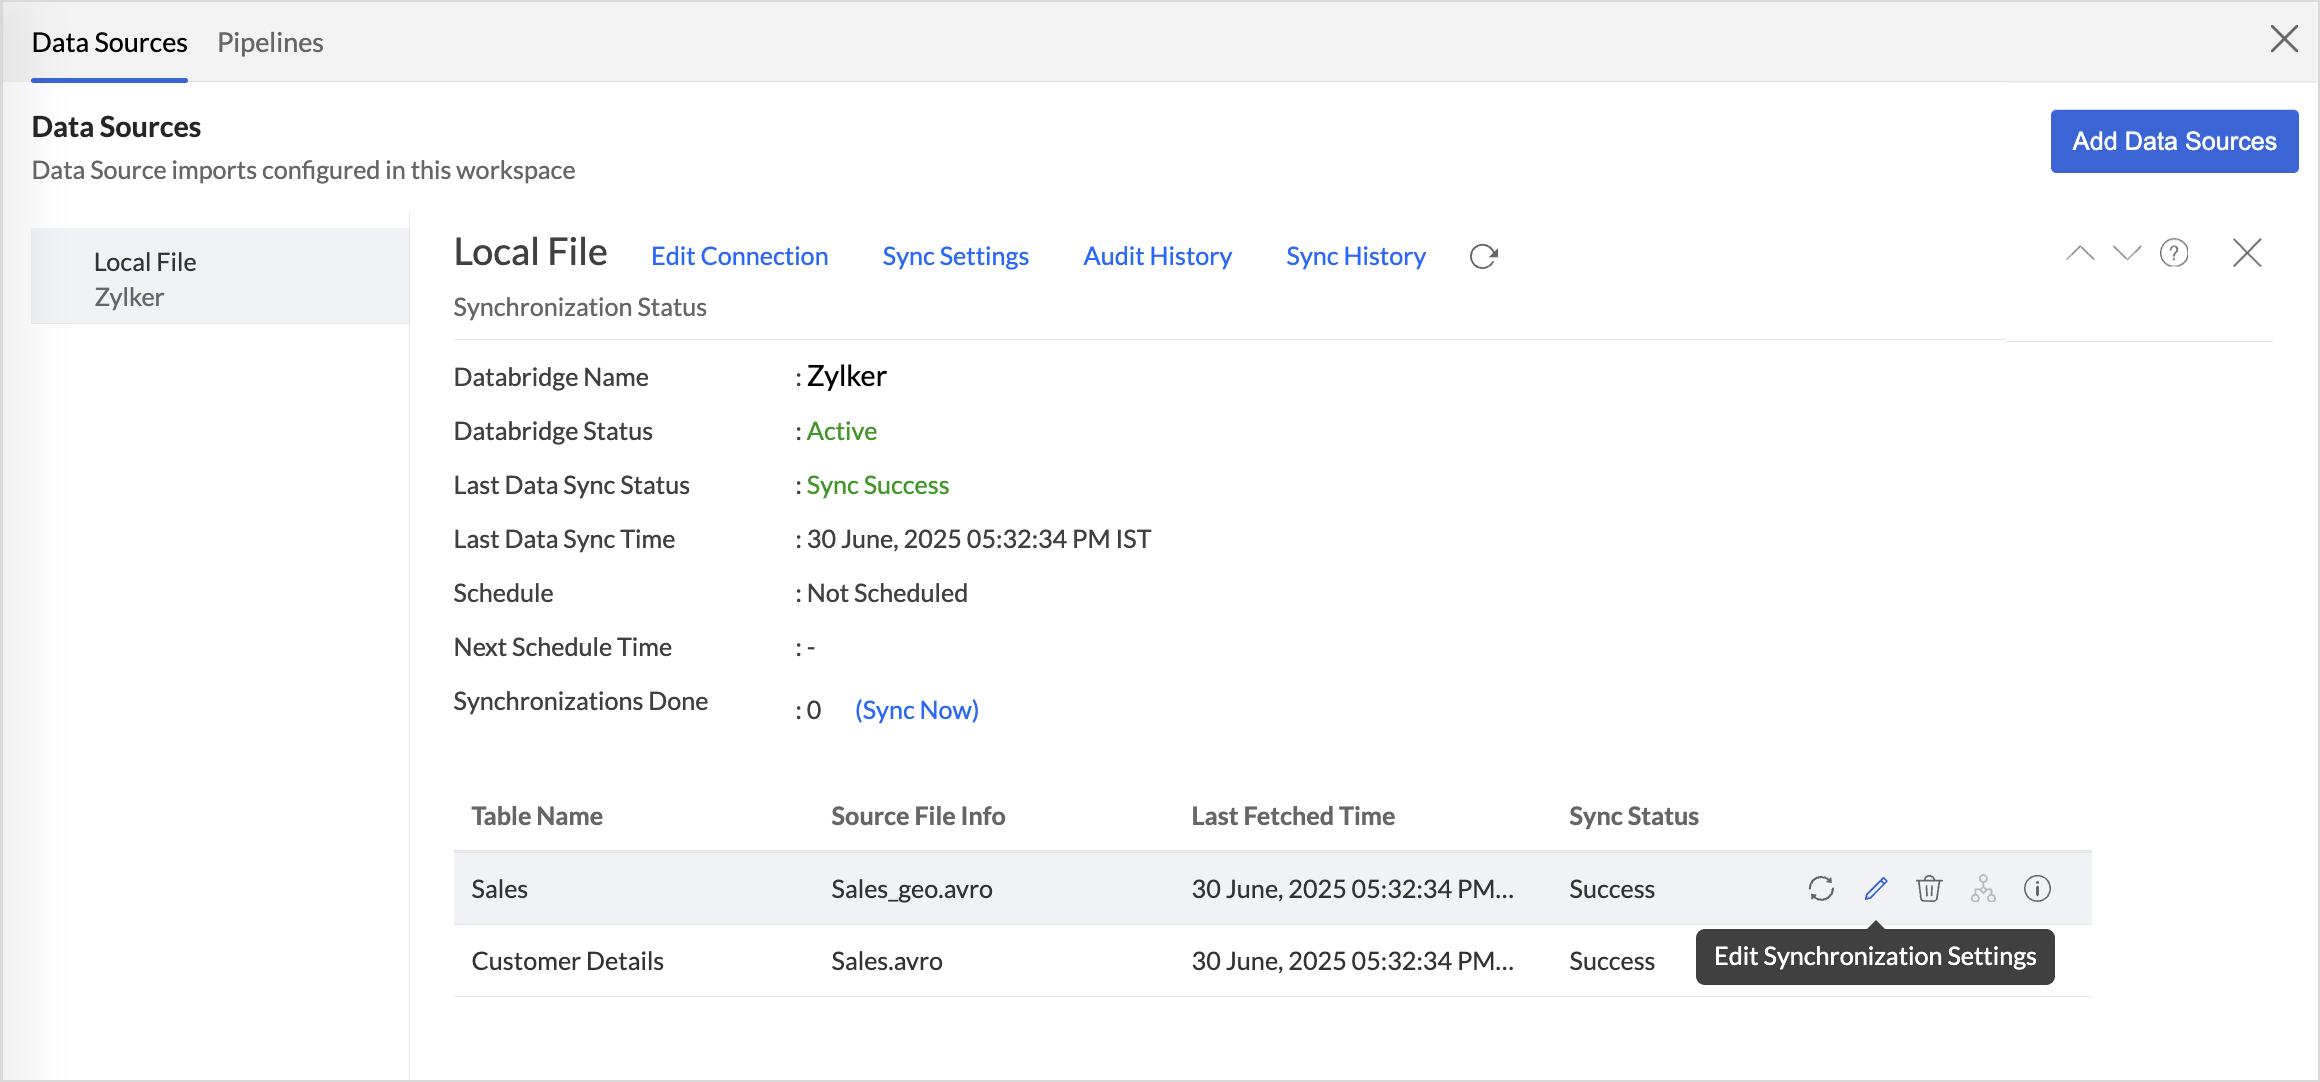
Manage Table Synchronization Settings
Zoho Analytics provides flexible data fetch options like full data and incremental fetch, which imports only the new records. Each table can have different data fetch configurations. All the tables imported from the database will be listed with the Table and Source Table Name, What data is fetched in each sync, Last Fetch Time, and its Sync status.
- Hover the mouse over the table for which you want to modify the settings.
- Click the Sync Now icon to include the recent changes made in the source database.
- Click the Edit icon to modify the synchronization settings of the table. You can choose whether all the data should be fetched from the source or only the new records in each data sync schedule.
- Click the Info icon to view the Import Details. Get a Summary of the data that was successfully imported and the data that had errors while importing.
Data Blending
Combine data from various data sources, such as Files, Feeds,Cloud storageDatabases, and Business applications, for in-depth analysis. While importing data in an existing workspace, Zoho Analytics auto identifies columns of the same data type and provides suggestions for lookup. With Query Tables, you can combine data from different tables in the workspace.
Import Data into an Existing Workspace
To import data into an existing workspace, click the Create icon on the side navigation panel and choose New Table/Import Data from the drop-down menu. Successive steps are similar to the steps mentioned in this section.
Import Data into an Existing Table
- Click Import > Import data into this table.
- Select the File Type and provide the Full File Path you want to import.
- Choose how you want to import the data into the existing table and select how to handle import errors.
- Click Import.