Managing Users
Zoho Analytics allows you to add and manage users with different roles to collaborate effectively within your organization. The number of users you can add depends on your subscription plan.
Zoho Analytics supports the following user roles:
- Account Administrator
- Organization Administrator
- Workspace Administrator
- Shared User
- Viewer
- Custom roles
For detailed information on each role, see User Roles in Zoho Analytics.
Here's what you'll find in this document:
- Adding Users to Your Organization
- Managing Users in Your Organization
- Transferring Account Ownership to Another Admin
- Frequently Asked Questions
Adding Users to Your Organization
You can add users to your Zoho Analytics organization from the Manage Users tab under Organization Settings.Depending on your workflow, you can invite users in one of the following ways:
- From the Organization Settings or Workspace Settings
- While sharing Views via email addresses (reports or dashboards)
- By adding users to Groups
All users will receive an invitation email and must accept the invite to join the organization.
Note: Users will only gain access to the organization and its content after accepting the invitation. If the invitation is not accepted, the organization will not be listed in the user's account.
Add Users from Organization Settings
You can invite users directly from the Manage Users tab (at the org level).
To add a user:
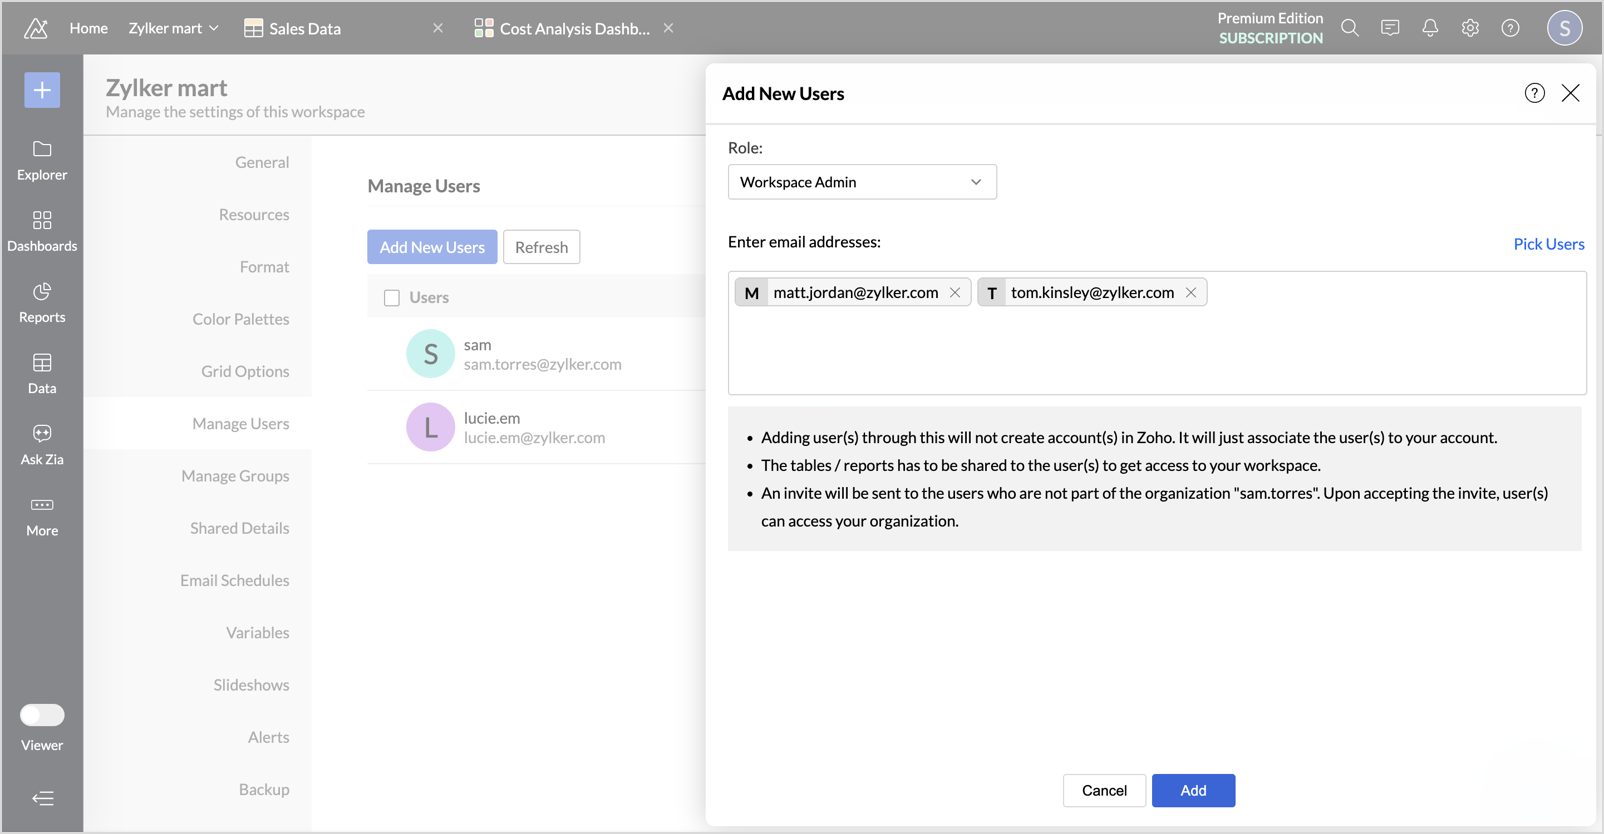
- Go to Organization Settings > General > Manage Users.
- Click Add New Users.
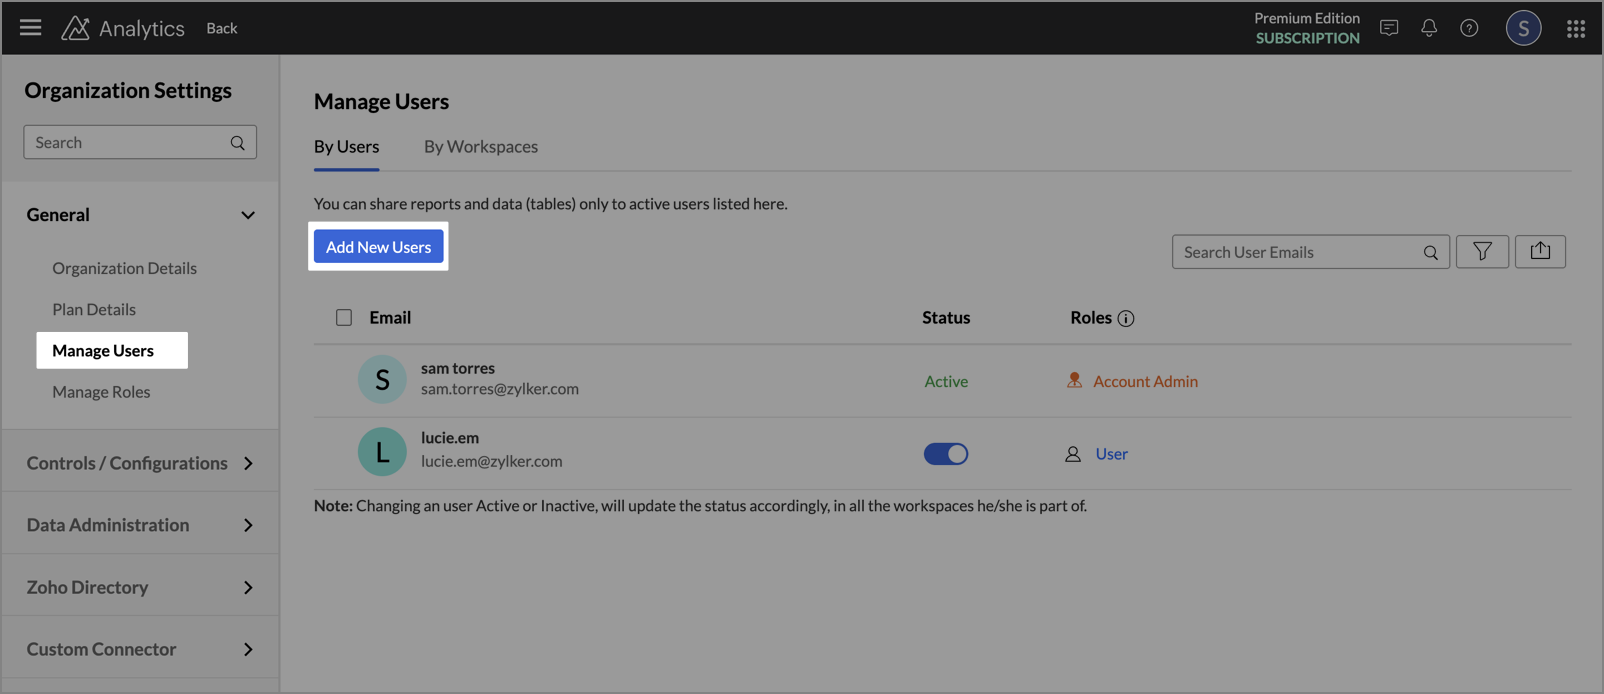
- Select the appropriate Role (User, Viewer, Workspace Admin, Organization Admin, or Custom roles).
- Enter the user's Email Addresses.
- Click Add.
The user will receive an invitation email with an option to accept or decline the invite. The user will be added to your organization only after accepting.
- If the user is new to Zoho analytics, clicking Join Organization takes them to a page where they’re presented with two options: Sign up & Accept or Reject.
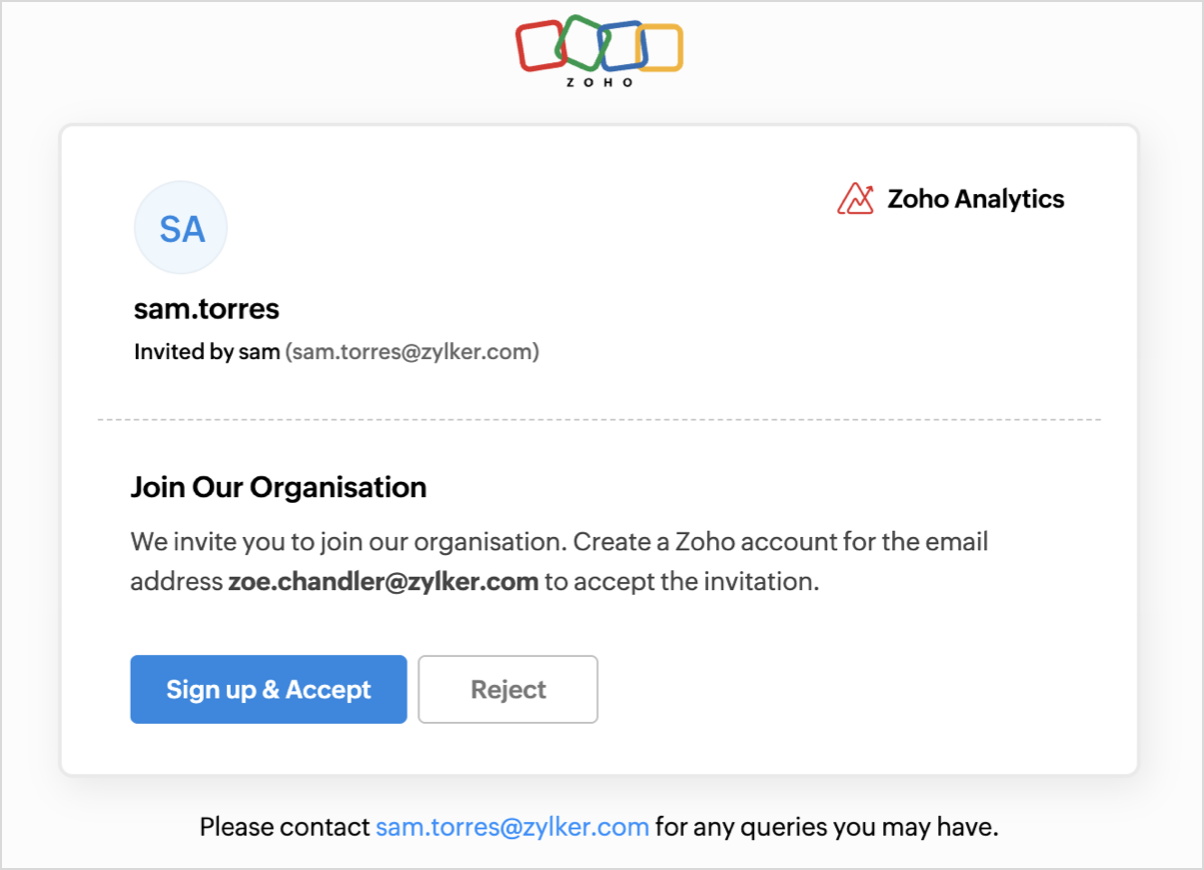
- Choosing Sign Up & Accept takes them through the Zoho account creation process.
- After signing up, they are automatically added to the organization and redirected to the org’s home page.
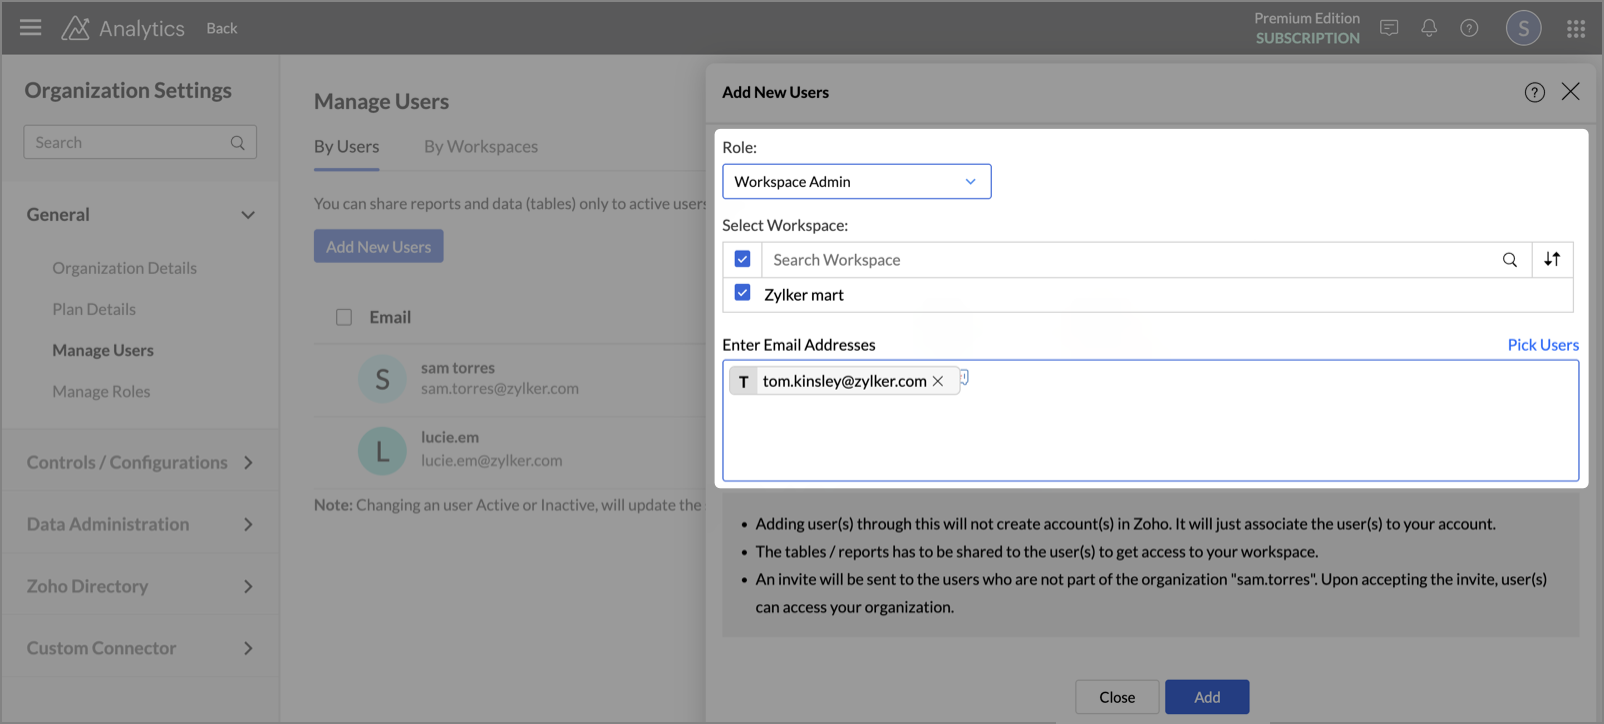
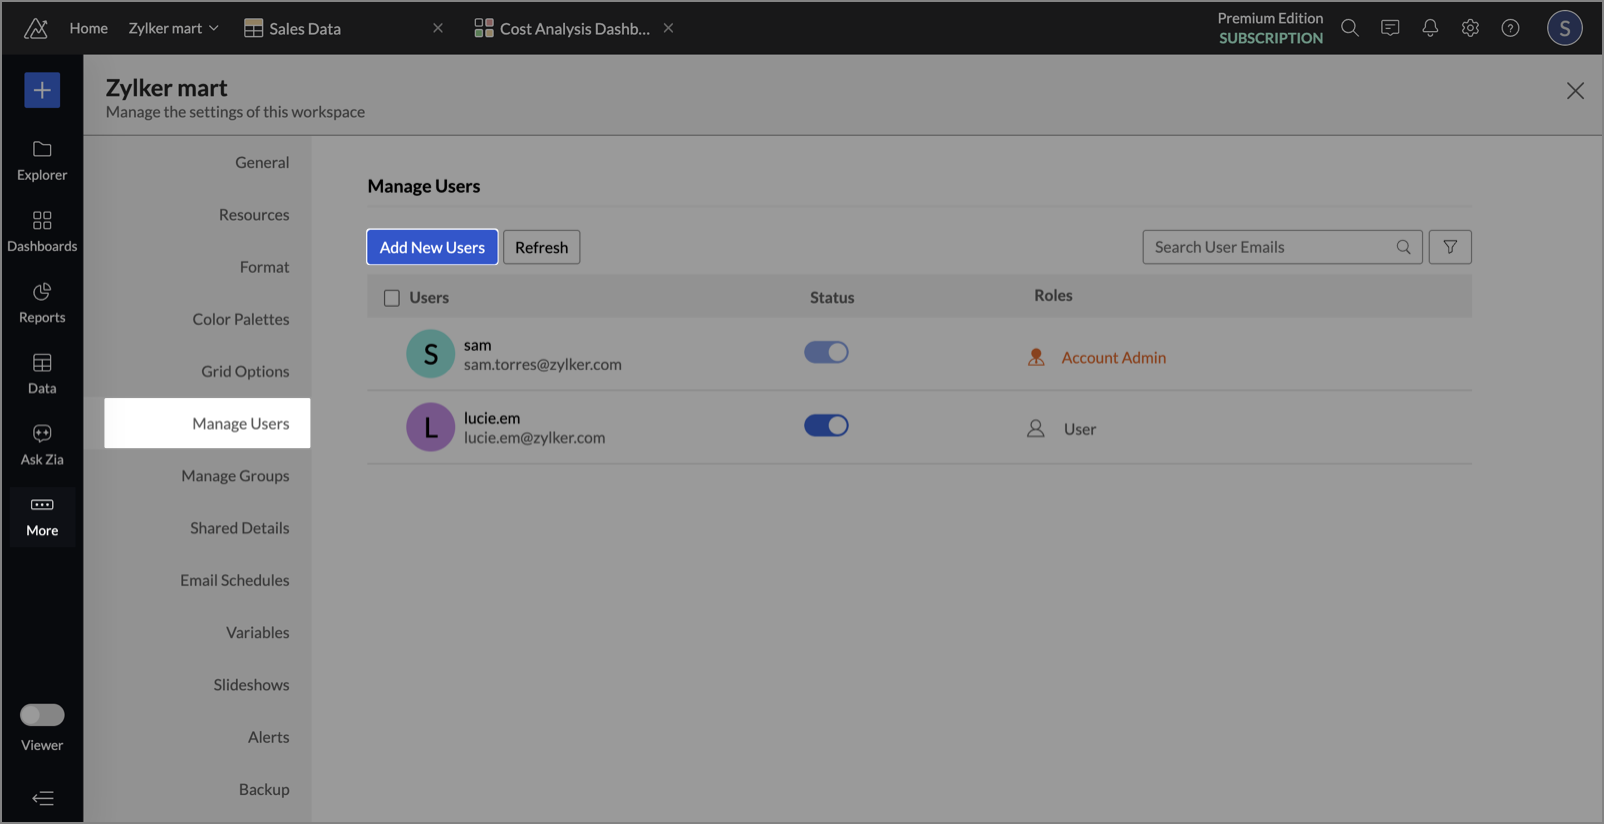
Add Users from Workspace Settings
You can invite users to a specific workspace if you have the workspace admin or above control.
To add a user:
- Open the workspace you want to add the users.
- In the left pane, go to Settings > Manage Users.
- Click Add New Users.
- Select the appropriate Role (User, Workspace Admin, or Custom roles).
- Enter the user's Email Addresses.
- Click Add.
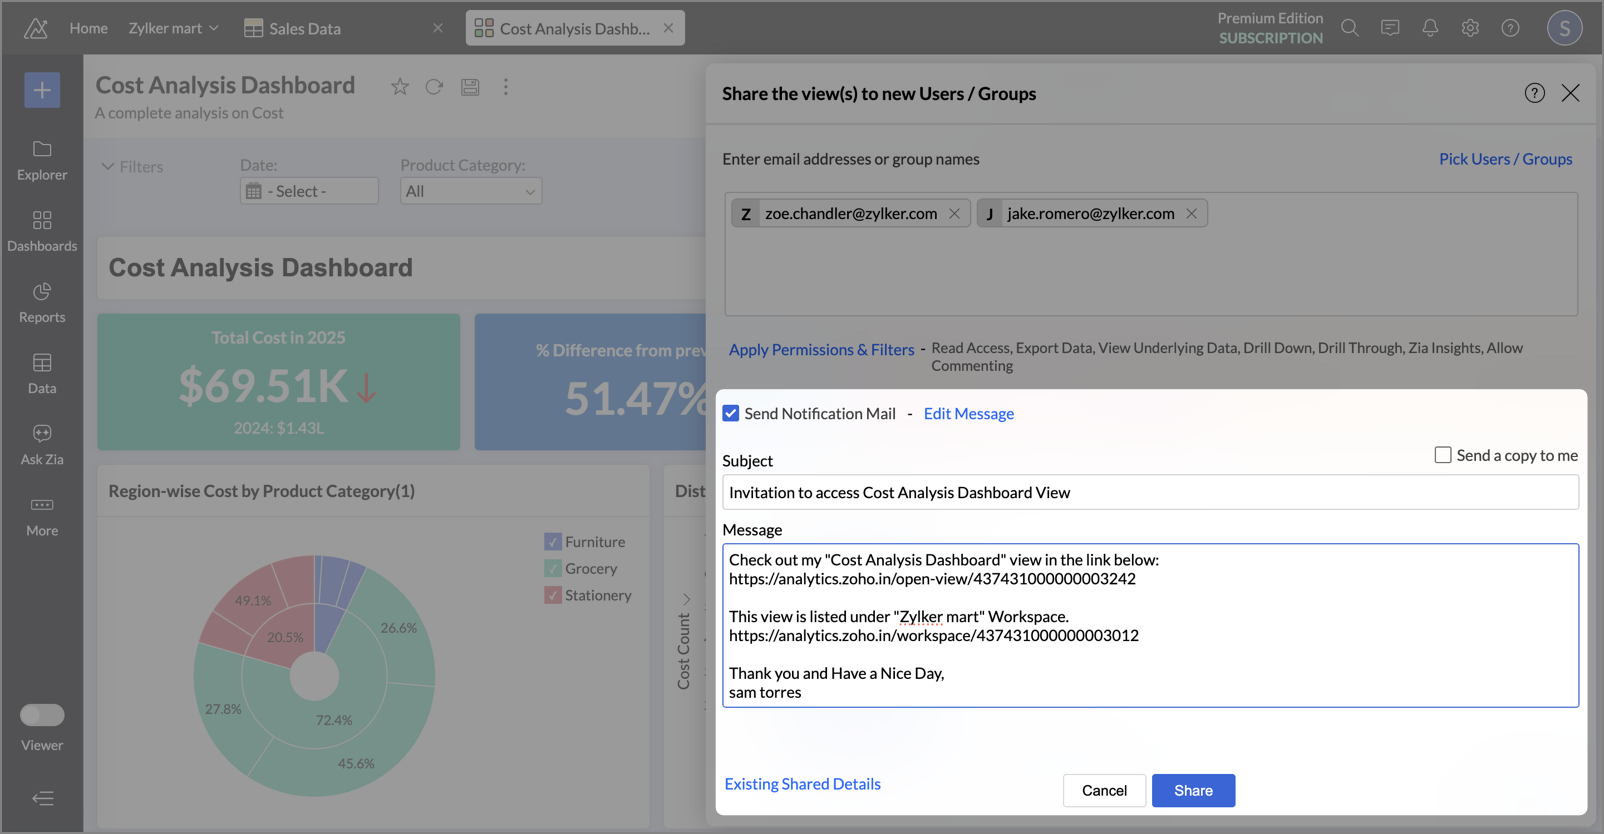
Add Users While Sharing Views
You can also invite users when you share a report or dashboard.
- To invite a user while sharing a view:
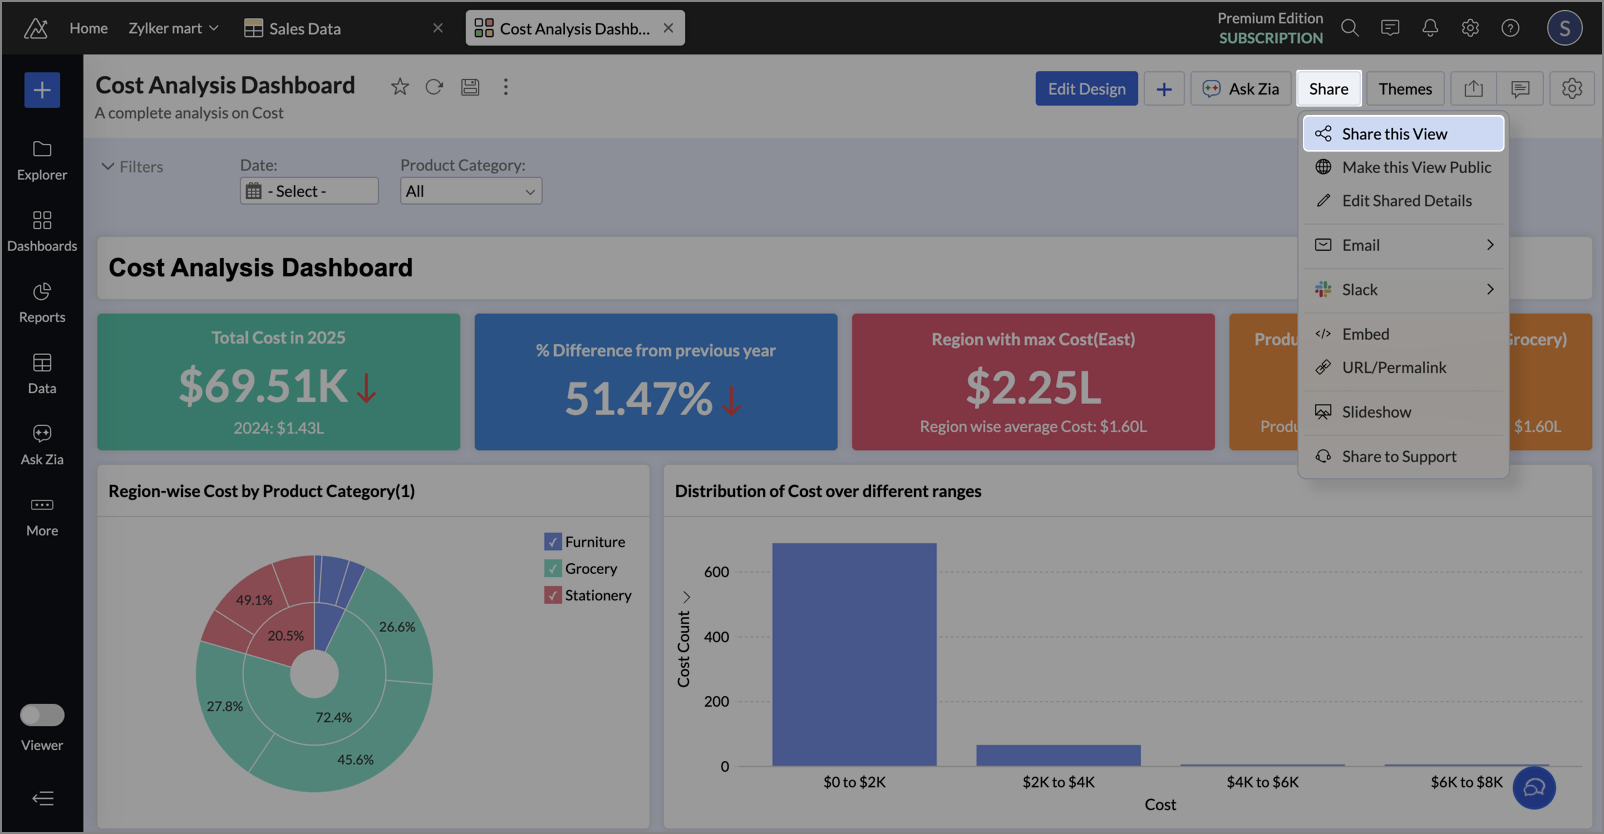
- Open the report or dashboard you want to share.
- Click Share > Share this View.
- Enter the user's Email addresses.
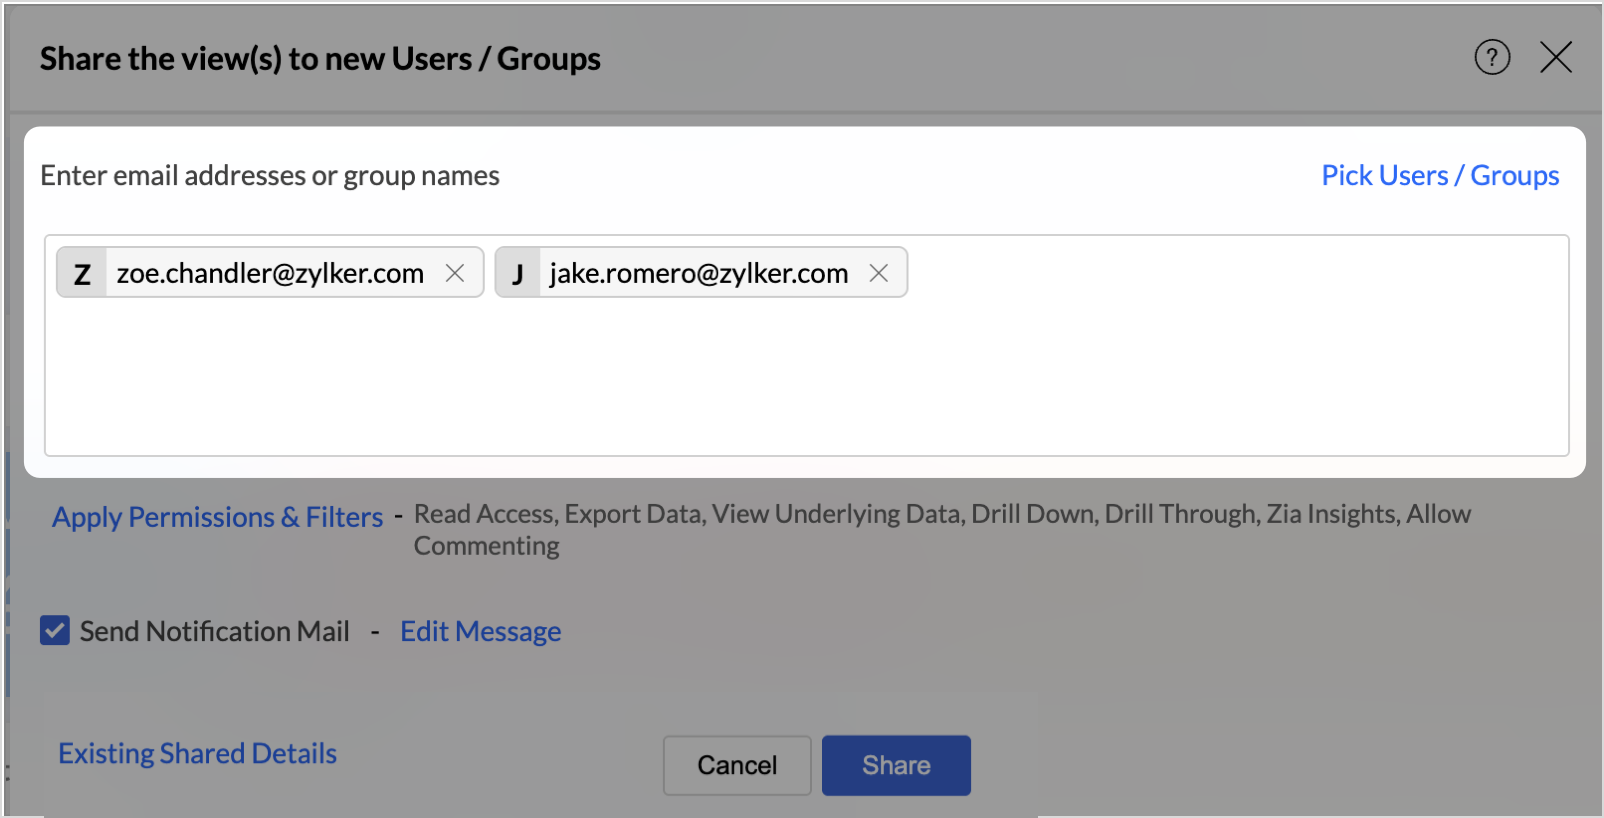
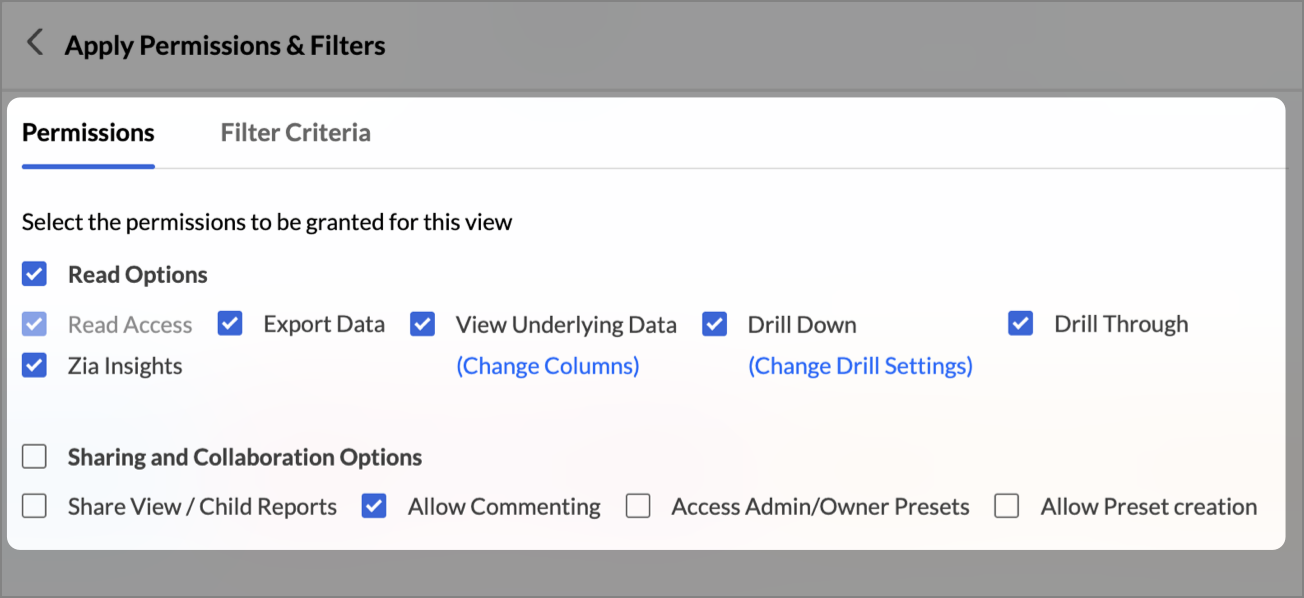
- Choose the access Permissions (Read, Export, Share etc.) and apply Filter Criteria if needed.
- Check the Send Notification Email to notify the users and edit the mail message as required.
- Click Share.
The user will receive:
- An invitation email to join the organization.
- A separate email with the link to the shared View.
If the user clicks the view link before accepting the org invitation, they will be shown an intermediate screen prompting them to join the organization first.
Add Users to Groups
Groups help you manage user access at scale.
To add a user to a group:
- Go to Workspace Settings > Manage Groups.
- Locate the group and click Add Members or Add New Group.
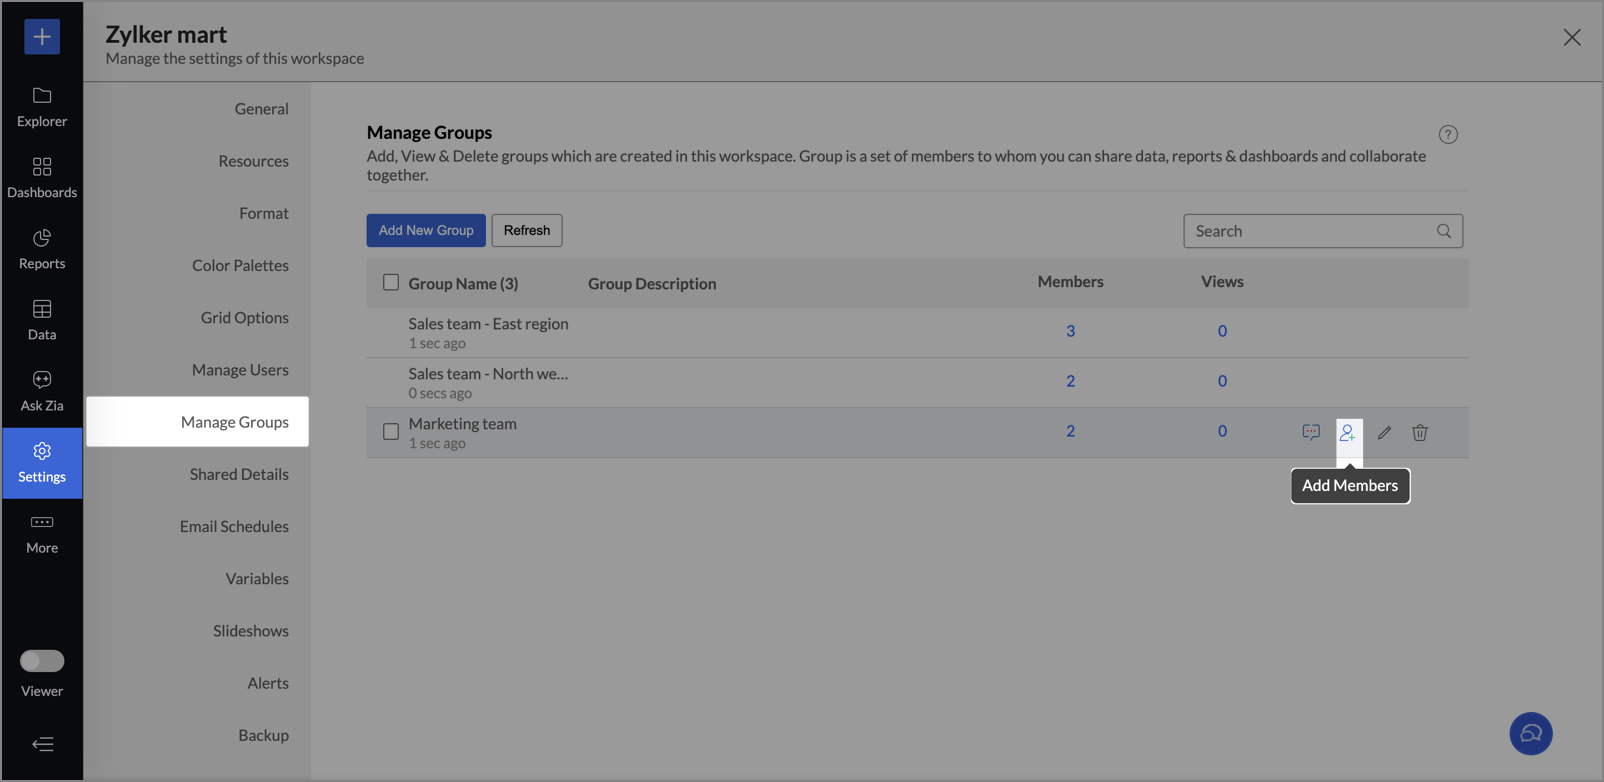
- Enter the user's Email addresses and click Add.
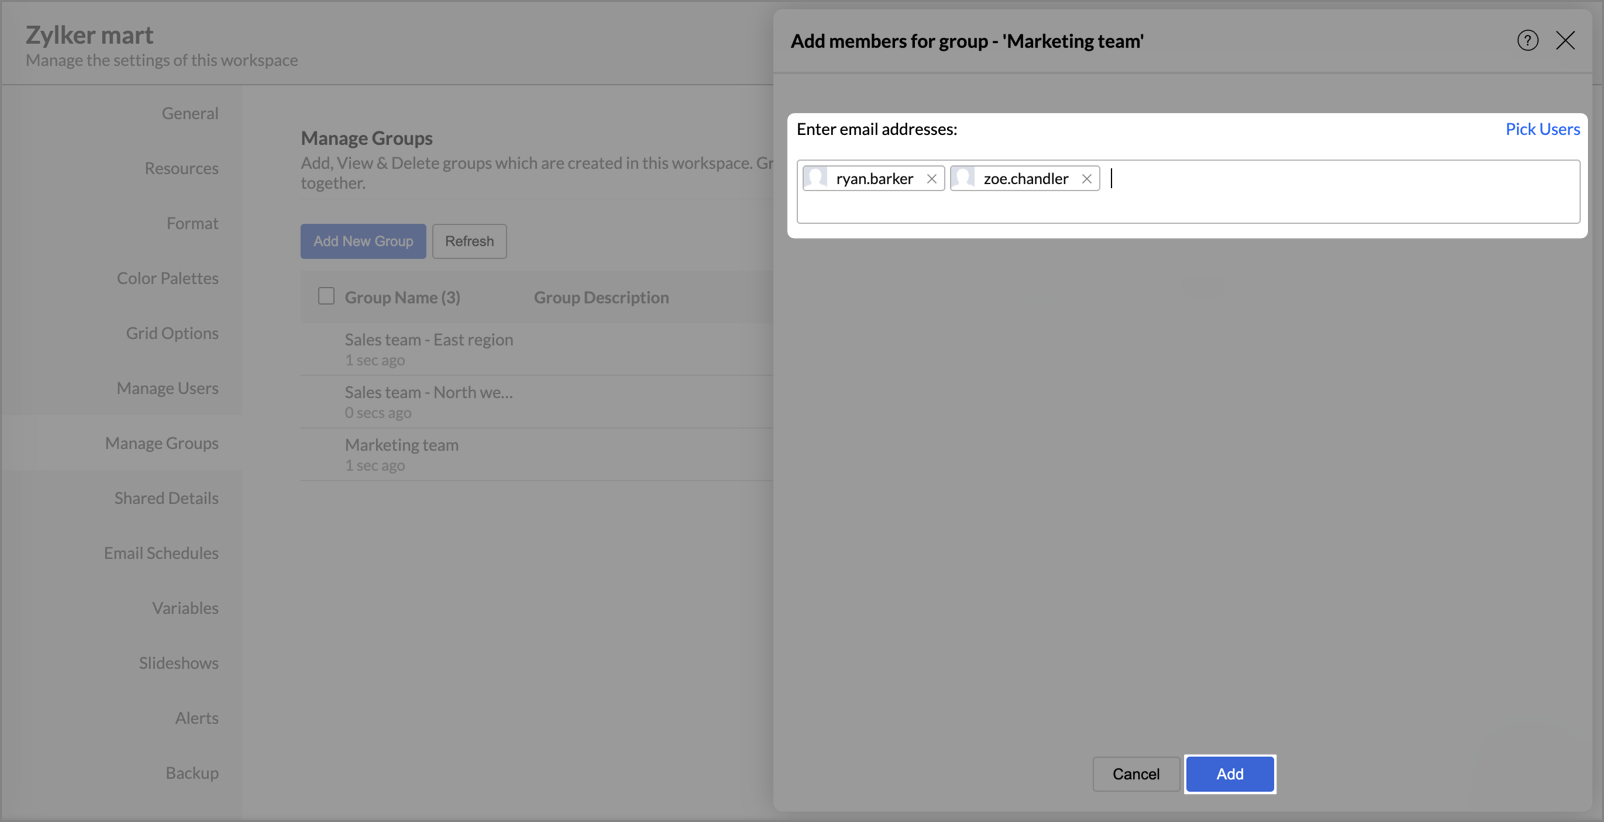
If the user is not part of your organization, they will first receive an invitation email to join. After they accept, they will be added to the group and gain access to all shared content associated with the group.
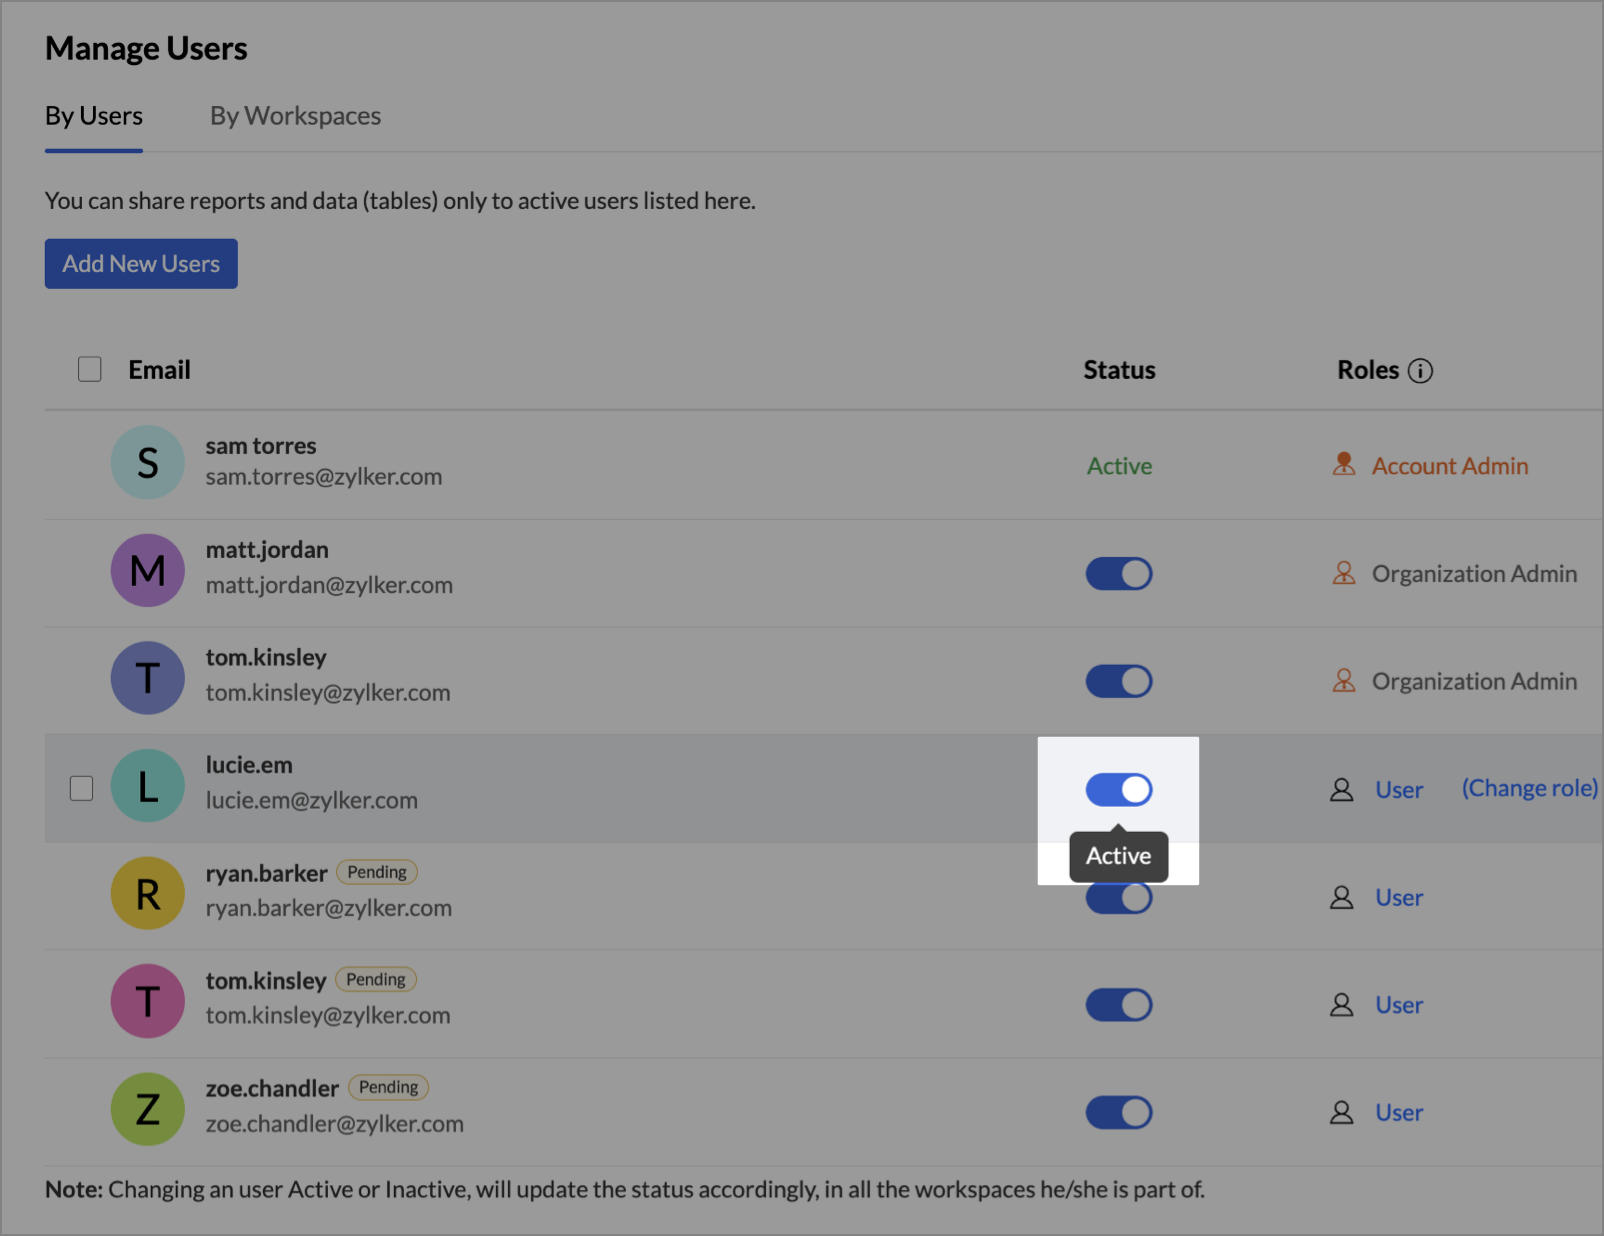
Tracking Invitation Status
When an admin invites users, whether via Organization Settings, Workspace Settings, Groups, or by sharing views, a Pending label will appear next to the user's name.
This indicates that the user has not yet accepted or declined the invitation.![]()
Managing Users in Your Organization
You can manage all users in your Zoho Analytics organization from the Manage Users tab in the Organization Settings page.
From this tab, you can:
- View a list of all users
- Activate or deactivate users
- Add or remove users
- Change user roles
Note:
The roles Organization Administrator and Workspace Administrator are available in the Standard plan and above. Learn more about Administrator roles.
Activate or Deactivate a User
Zoho Analytics allows you to temporarily deactivate users without deleting them.Only active users are counted toward your license limit.
When reactivated, users retain their previously assigned roles and permissions.
To activate/deactivate a user:
- Go to Organization Settings > General > Manage Users.
- Locate the user in the list.
- Under the Status column, use the toggle button next to the user’s name to activate or deactivate them.
- When toggled off, the user is deactivated and cannot access the organization.
- When toggled on, the user is reactivated and can access the organization as before.
Change a User Role
You can change a user’s role at any time. Roles determine access to features and data.
To change a user’s role:
- Go to Organization Settings > General > Manage Users.
- Hover over the user whose role you want to change.
- Click Change role under the Roles column.
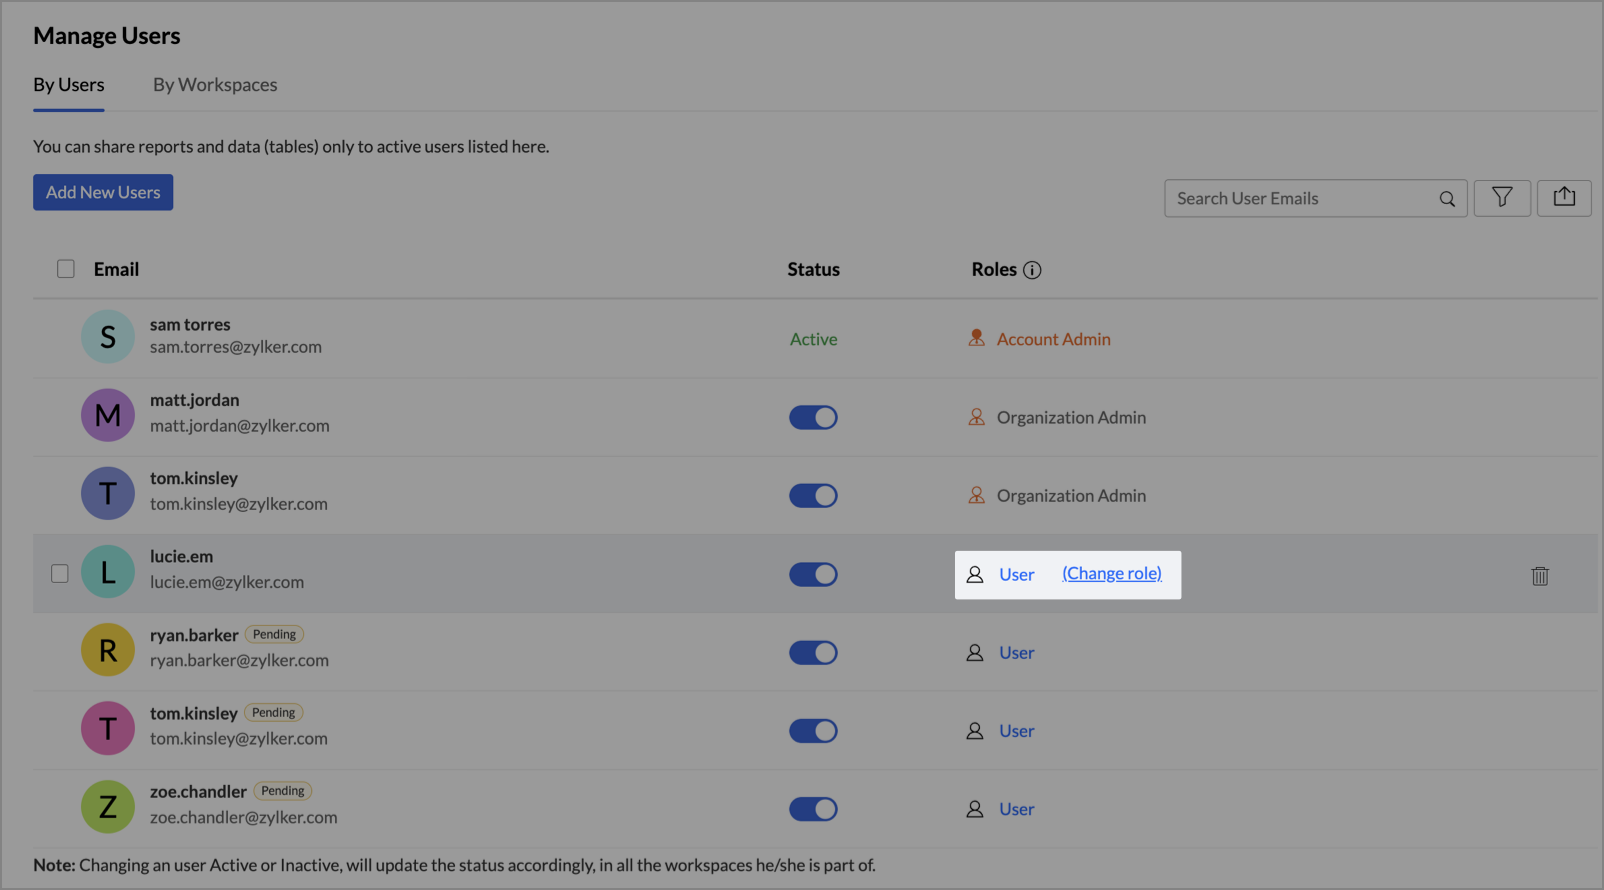
- Select the new role (User, Viewer, Org Admin) from the drop-down.
- Select the checkbox to notify the users about the role change through email.
- Click Apply.
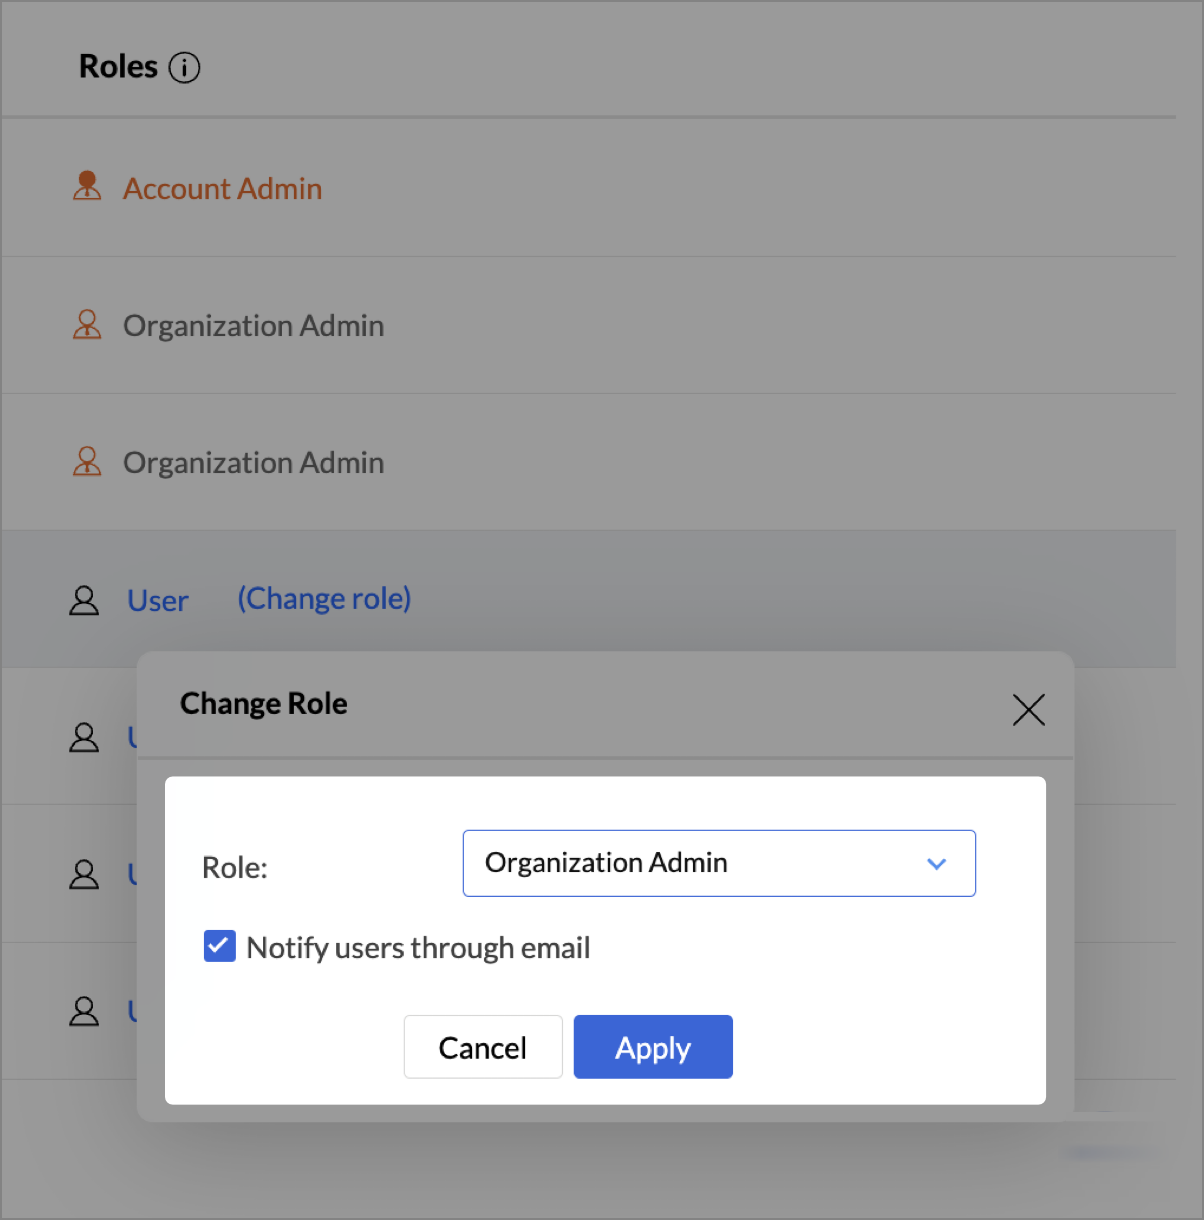
The change takes effect immediately.
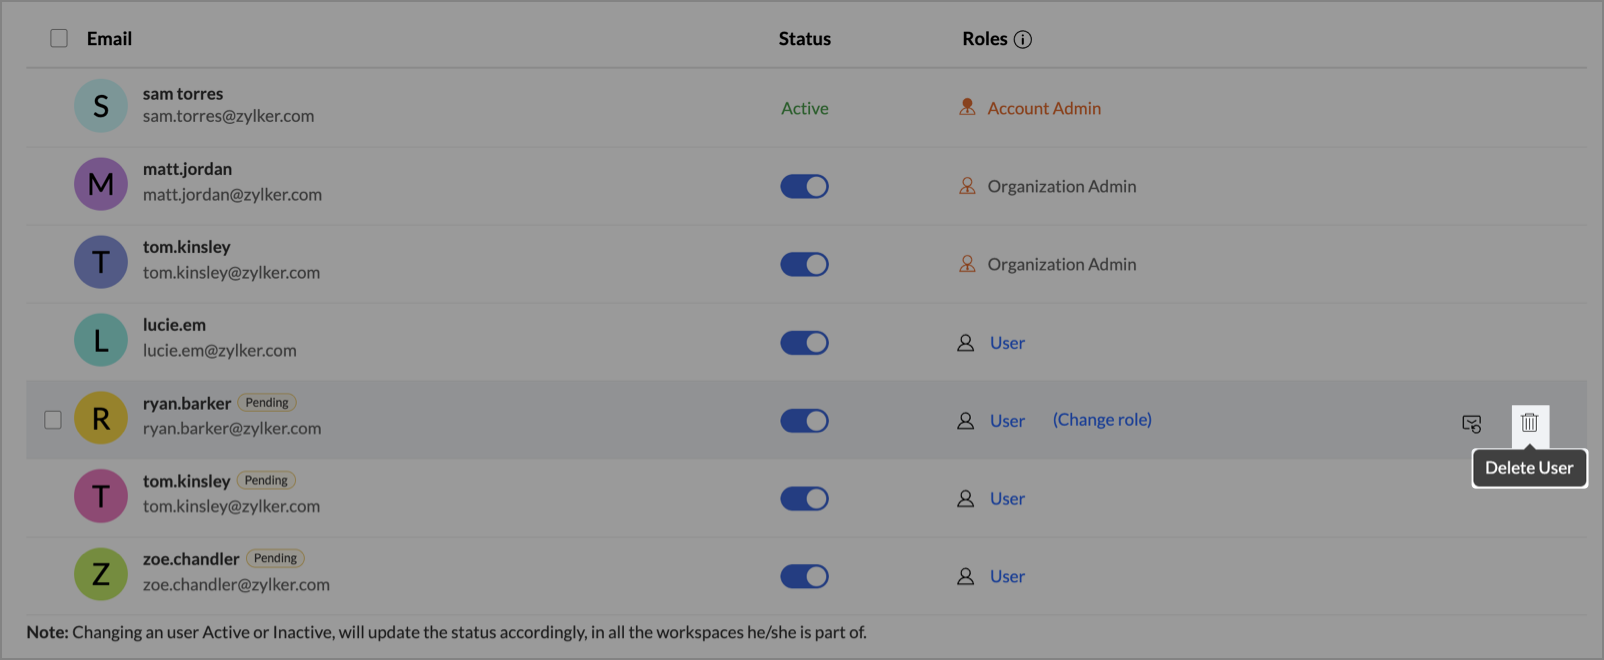
Delete a User
Deleting a user removes their access to the organization permanently. You can re-invite the user later if needed.
To delete a user:
- Go to Organization Settings > Manage Users.
- Hover over the user you want to remove.
- Click the Delete icon.
Note
- Deleting a user does not affect the reports or dashboards they created.
- If the user has shared views such as reports created from shared tables with administrators, you’ll be prompted with two options before deletion:
- Transferring the views to Account Admin, granting them full data access
- Permanently delete the shared views
Transferring Account Ownership to Another Admin
Zoho Analytics allows the transfer of account ownership when the Account Administrator needs to step down or no longer has access. Ownership can only be transferred to an Organization Administrator within the same organization.
Transfer Ownership as the Current Account Administrator
If you're the current Account Administrator and still have access to your account, you can transfer ownership to any Organization Administrator in your org.
When to use this:
- You are stepping away from your responsibilities.
- You want to delegate full control to another administrator.
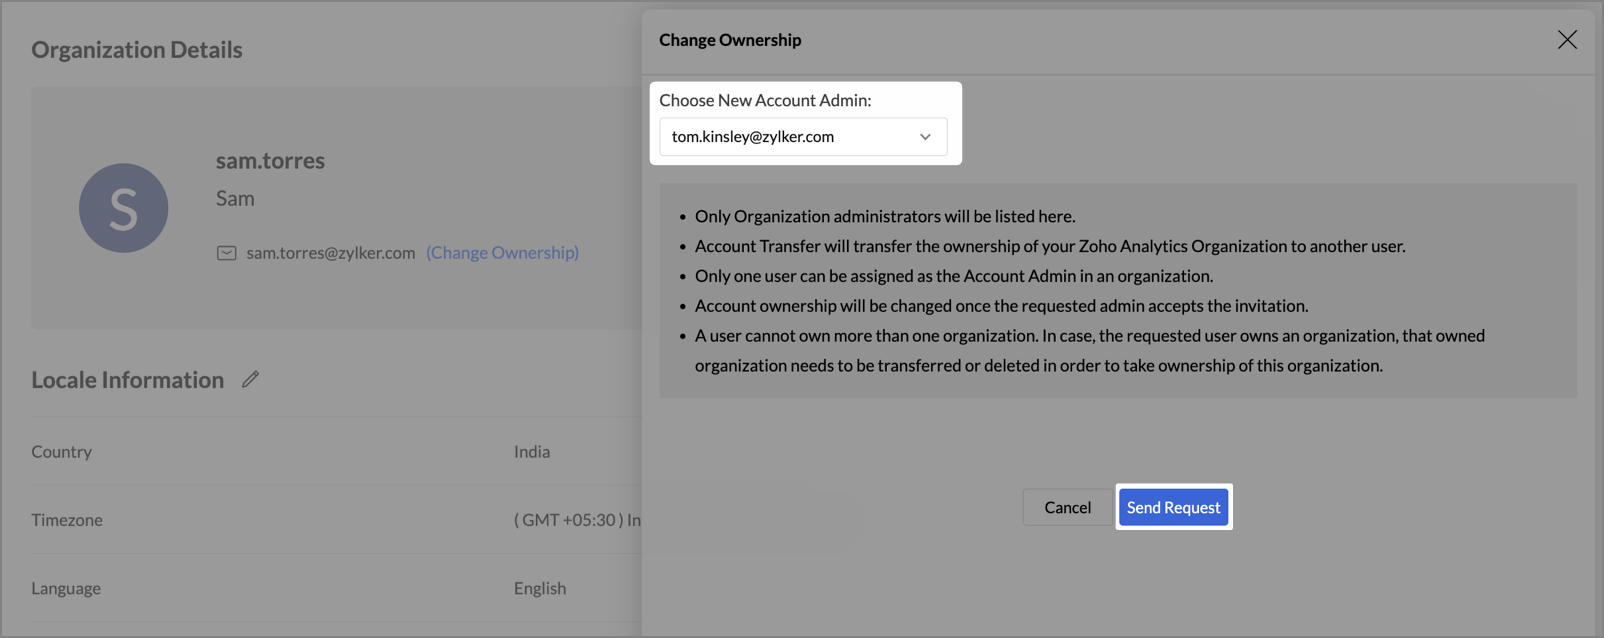
To transfer ownership:
- Go to Organization Settings > General > Organization Details.
- Click the Change Ownership link next to your email address.
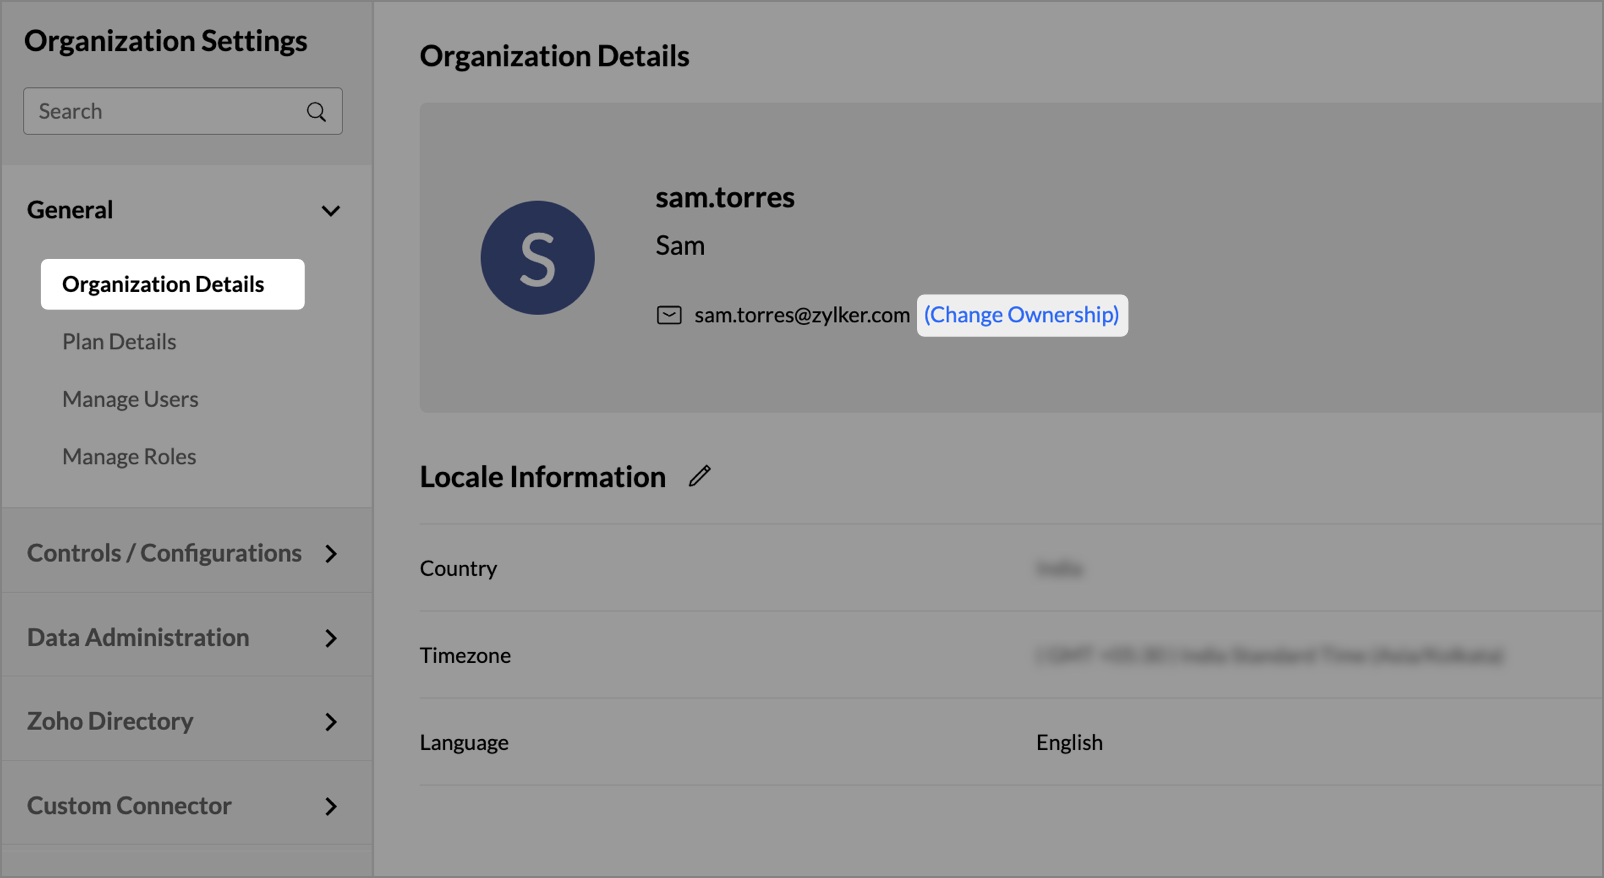
- In the Change Ownership dialog, select the new Account Administrator from the Choose New Account Admin dropdown.
- Click Send Request.
The selected user (Organization Administrator) will receive a notification.
To accept the transfer:
- Log in to the Organization Administrator account.
- Click the Accept option in the account transfer notification.
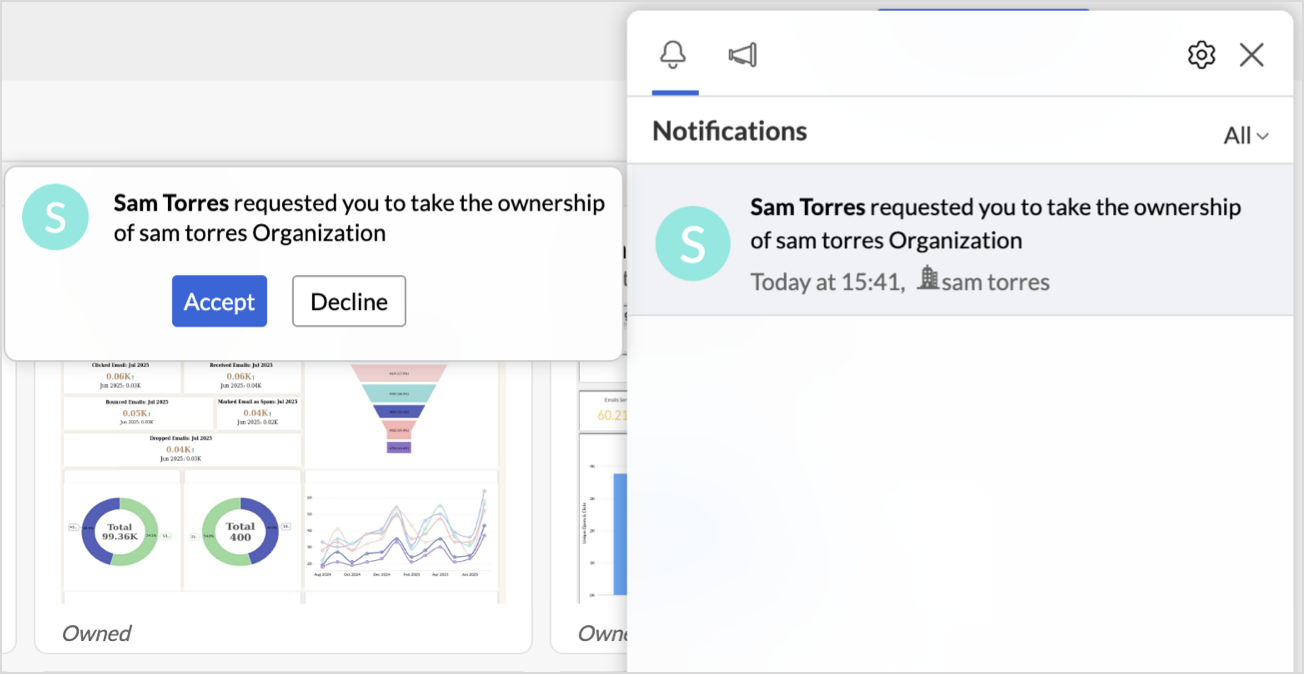
Once accepted, ownership is transferred to the new user.
Request Ownership Transfer If Account Admin No Longer Have Access
If the current Account Administrator cannot access their account, for example, due to departure, loss of credentials, or deactivation - ownership must be reassigned manually.
When to use this:
- The Account Administrator has left the organization.
- The account is inaccessible due to login issues.
To request ownership transfer:
- Write to us at support@zohoanalytics.com details of your organization and your relationship to the account.
- Our support team will verify your request and assist in transferring the account ownership.
If an Organization Administrator Has Left the Organization
All data owned by the former Organization administrator will remain intact within your organization.Views they created will automatically be transferred to the Account Administrator.
You can safely remove the user from your organization after confirming the transfer.
If the former Organization administrator had configured any Business Application Connector, ownership of the connector must be manually reassigned.
To take ownership of a connector:
- Open the Advanced Analytics connector.
- Click Data Source to open the connector’s settings.
- Click Take Ownership.
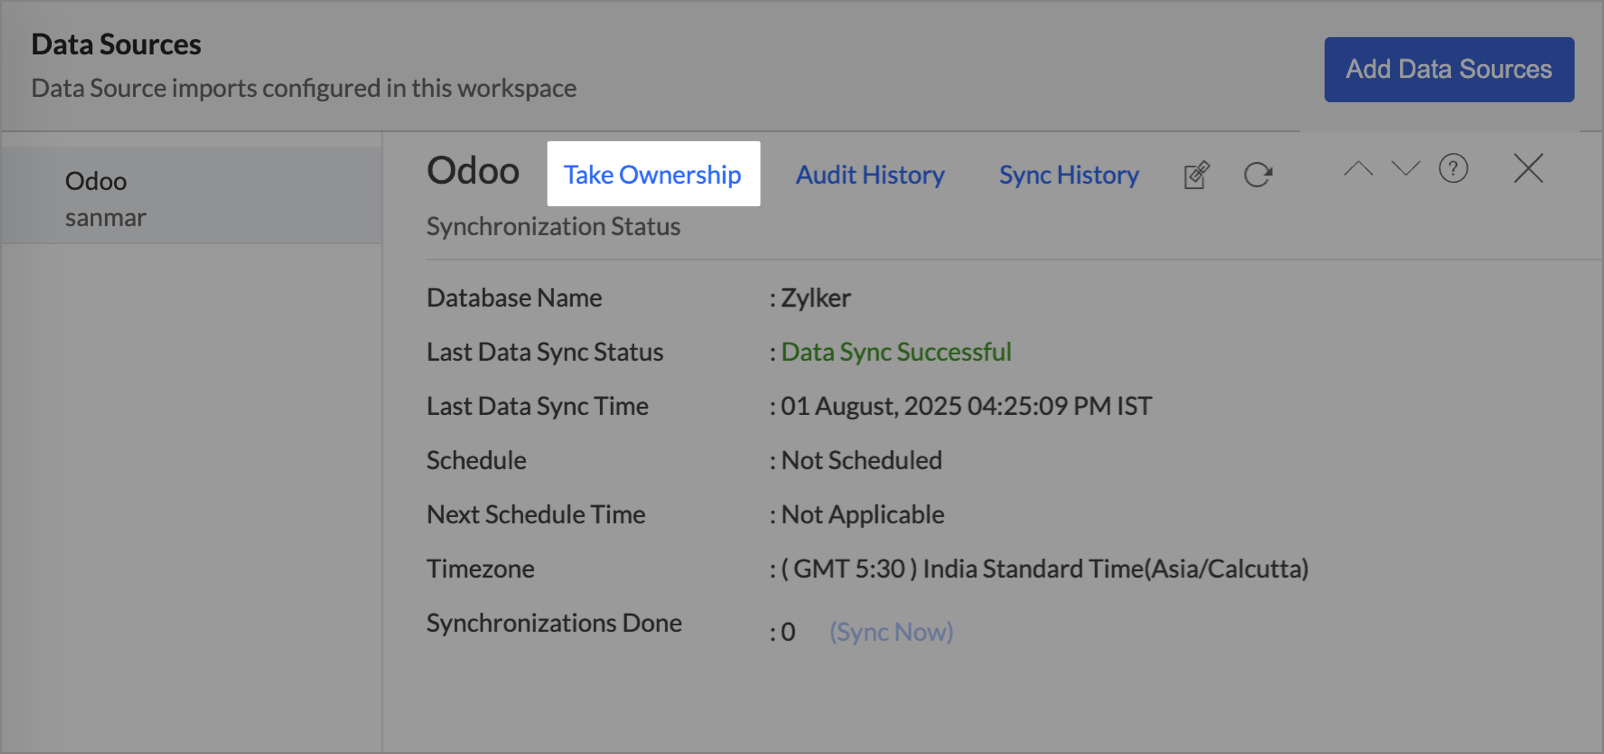
- For Zoho apps, ownership is transferred immediately.
- For third-party apps, you'll be prompted to log in before confirming the transfer.
Frequently Asked Questions
Can my Workspace Administrator create a new workspace?
No, Workspace Administrators cannot create a new workspace. They can only manage the Workspaces in which they are administrators. Only the Account Administrator and the Organization Administrators can create new workspaces.
I have added Shared Users/Viewers in my organization, but they do not see any report. Why?
You add a Shared User or Viewer to your organization (account). At this point, no views are shared with them, and so they won't be able to see any reports. Now, an Administrator shares one or more views with them. Only then will they be able to access the views that are specifically shared with them. Refer to Sharing Reports and Dashboards section to know more on this.
What will happen when I delete a user?
The user will be removed from your organization. In case they are one of the administrators, all the views they own will be transferred to the Account Administrator.