Sharing Views to Users
Overview
Zoho Analytics lets you share reports, dashboards, and data tables with individual users or groups. Shared views are accessible online from anywhere, always reflect the latest data, and do not require email attachments. You can control what each user sees and does through fine-grained permissions, column-level access, and row-level filter criteria.
What's in this page:
- Key Concepts
- Sharing Views to Users
- Sharing Multiple Views
- Sharing Views in a Folder
- Sharing Selected Columns
- Setting Sharing Permissions
- Applying Filter Criteria (Row-Level Security)
- Using Variables for Dynamic Filtering
- Setting Up Viewer Mode
- Enabling User-to-User Sharing
- Editing or Removing Shared Permissions
- Sending Invitation Notifications
- Unsubscribing from a Shared Workspace
- Frequently Asked Questions
Key Concepts
Before you begin sharing, review the following concepts.
Permissions: When you share a view, you assign specific permissions that control what the shared user can do. Permissions include read access, data export, drill-down, and more. See <<Setting Sharing Permissions>> for the full list.
Row-level security (RLS): You can apply filter criteria while sharing a view. The filter restricts the data each user can see in the shared report. This eliminates the need to create separate reports for different users.
Variables: A variable is a placeholder that takes a different value for each user who opens a shared view. Instead of building one report per user, you apply a single filter criteria that uses a variable, and each user sees only the rows that match their own value. Zoho Analytics provides system variables that fill in automatically from the logged-in user's profile, such as System.login.email. Account Admins and Workspace Admins can also create custom variables and assign a value to each user. See <<Using Variables for Dynamic Filtering>>
Viewer role: A Viewer is a user who can only view reports shared with them. Viewers cannot create reports or share views with others.
Sharing Views to Users
You can open the Share dialog from two locations: the Explorer tab or the view mode of a table, report, or dashboard.
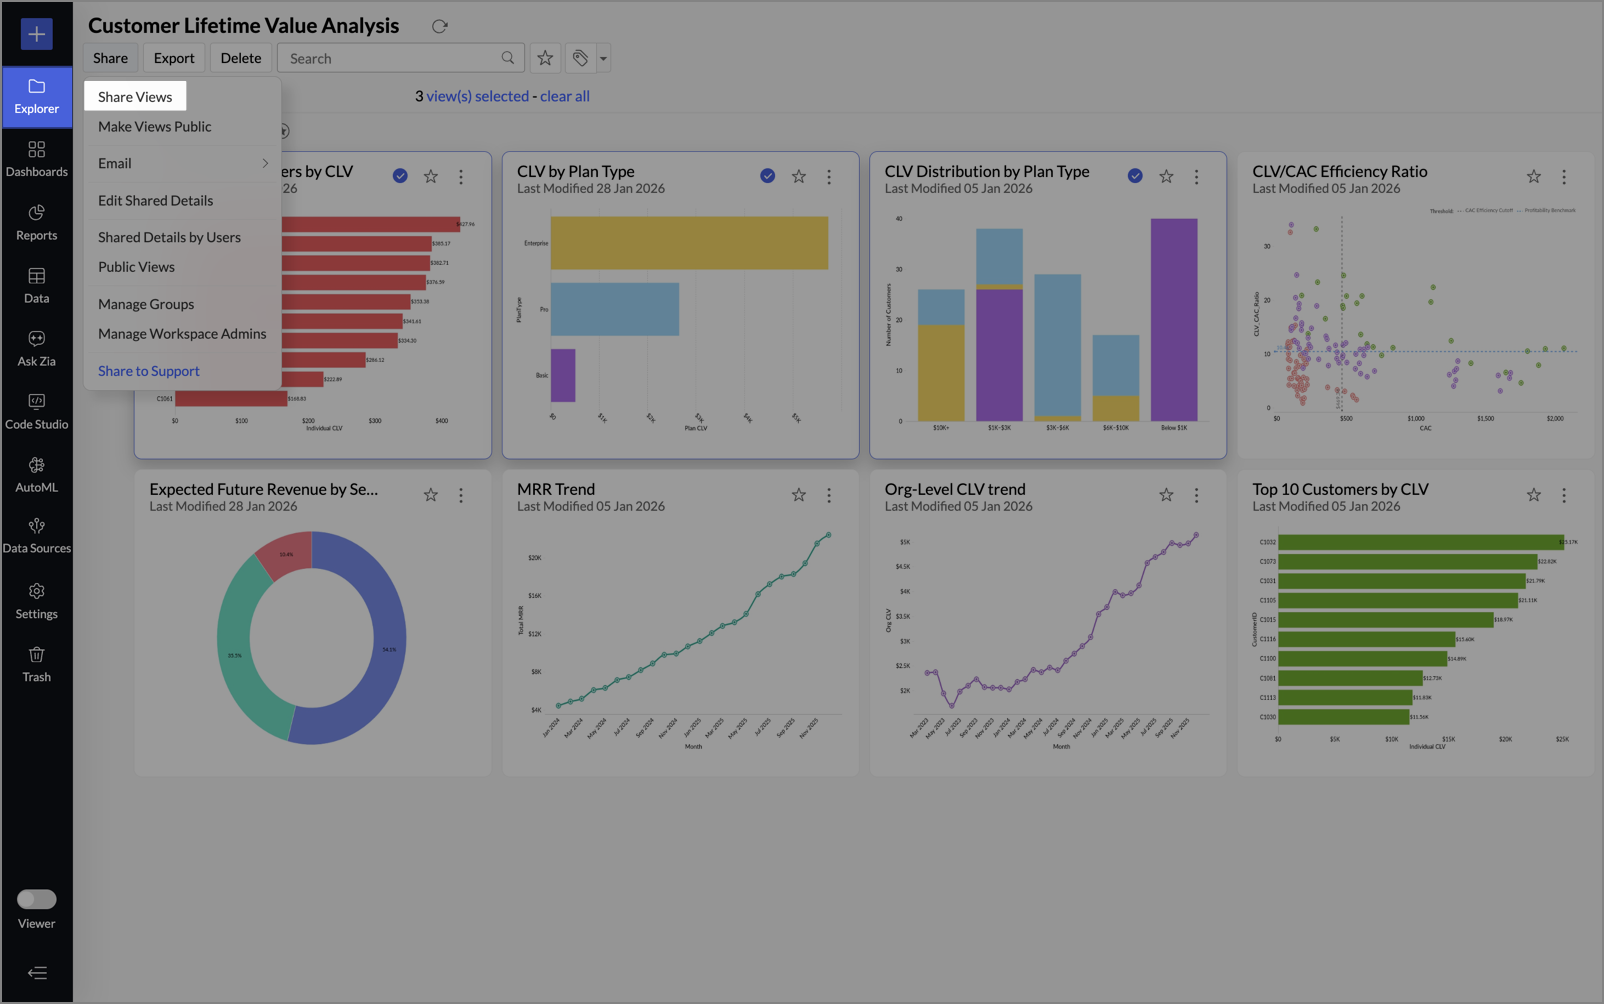
From the Explorer tab:
- Open the Explorer tab.
- Select the views you want to share.
- Click Share > Share Views.
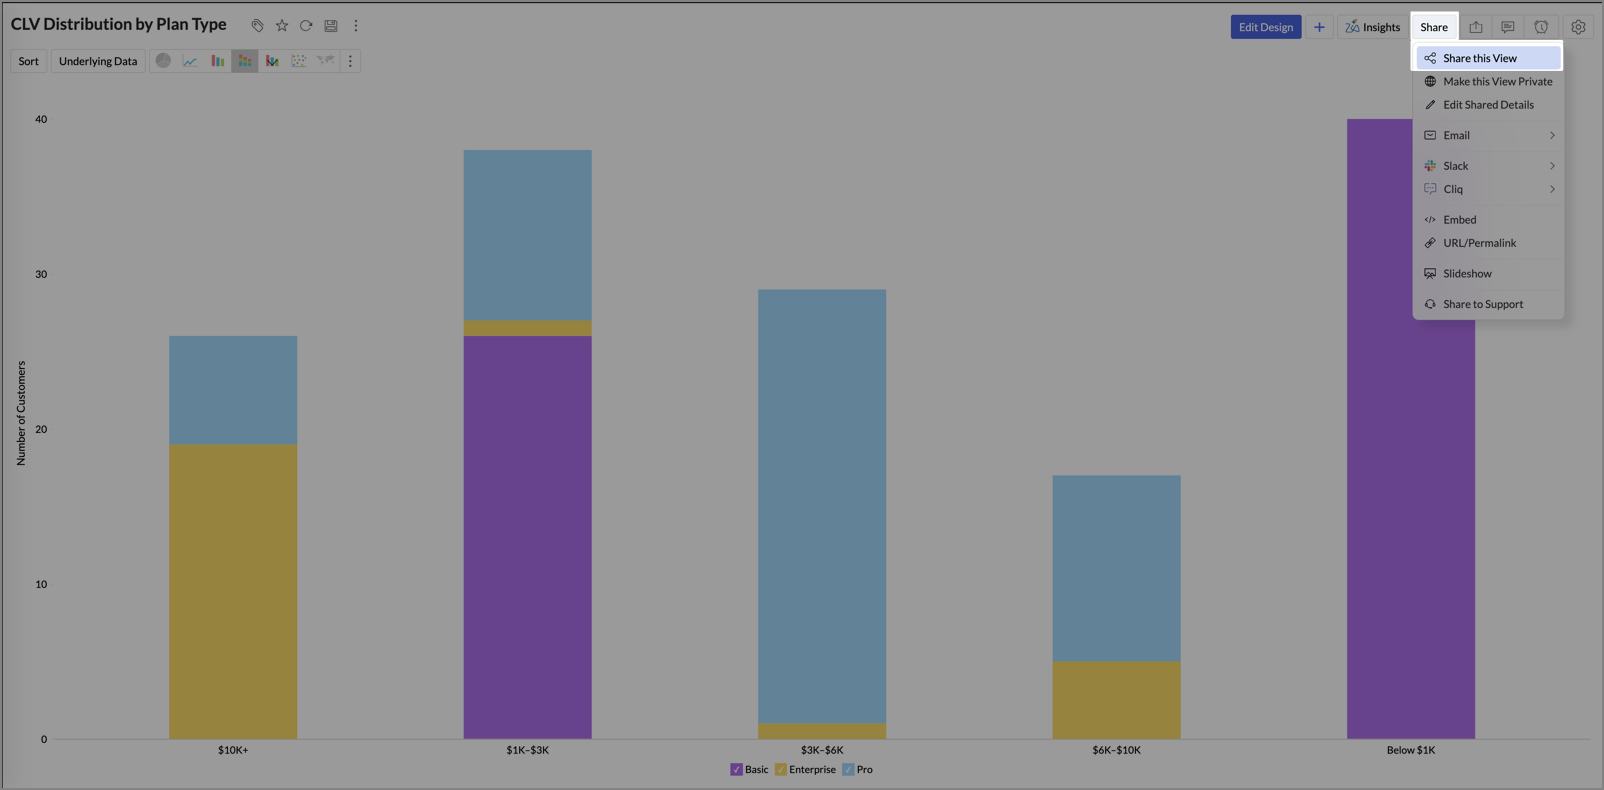
From the view mode:
- Open the table, dashboard or report you want to share.
- Click Share > Share this View.
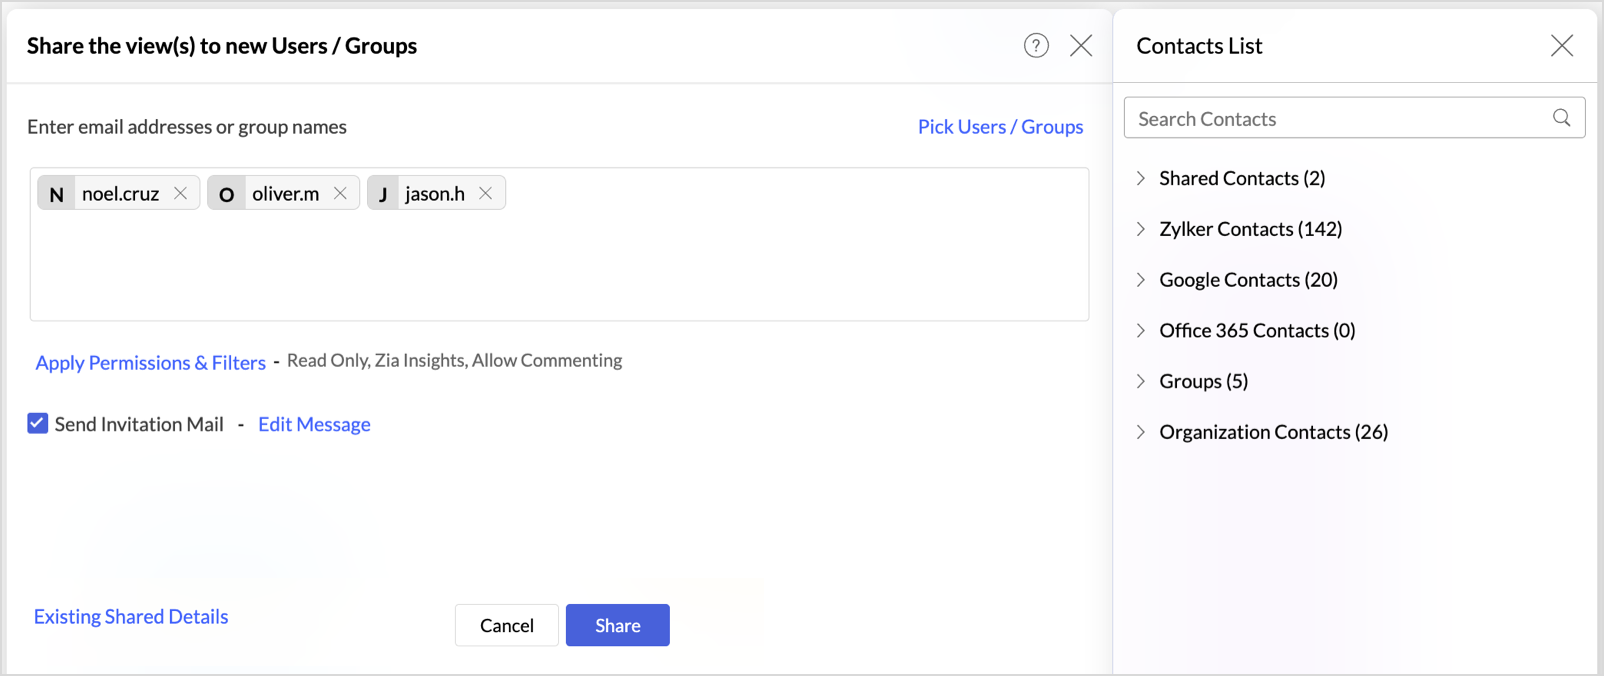
The Share the View(s) to new Users/Groups dialog opens.
- Enter email addresses or click Pick Users/Groups to select the users or groups you want to share with.
- Set the required permissions. See Setting Sharing Permissions for details.
- Click Share to apply the sharing settings.
Sharing Multiple Views
You can share multiple views simultaneously. In the Explorer tab, select all the views you want to share, then follow the sharing steps described above.
Sharing Views in a Folder
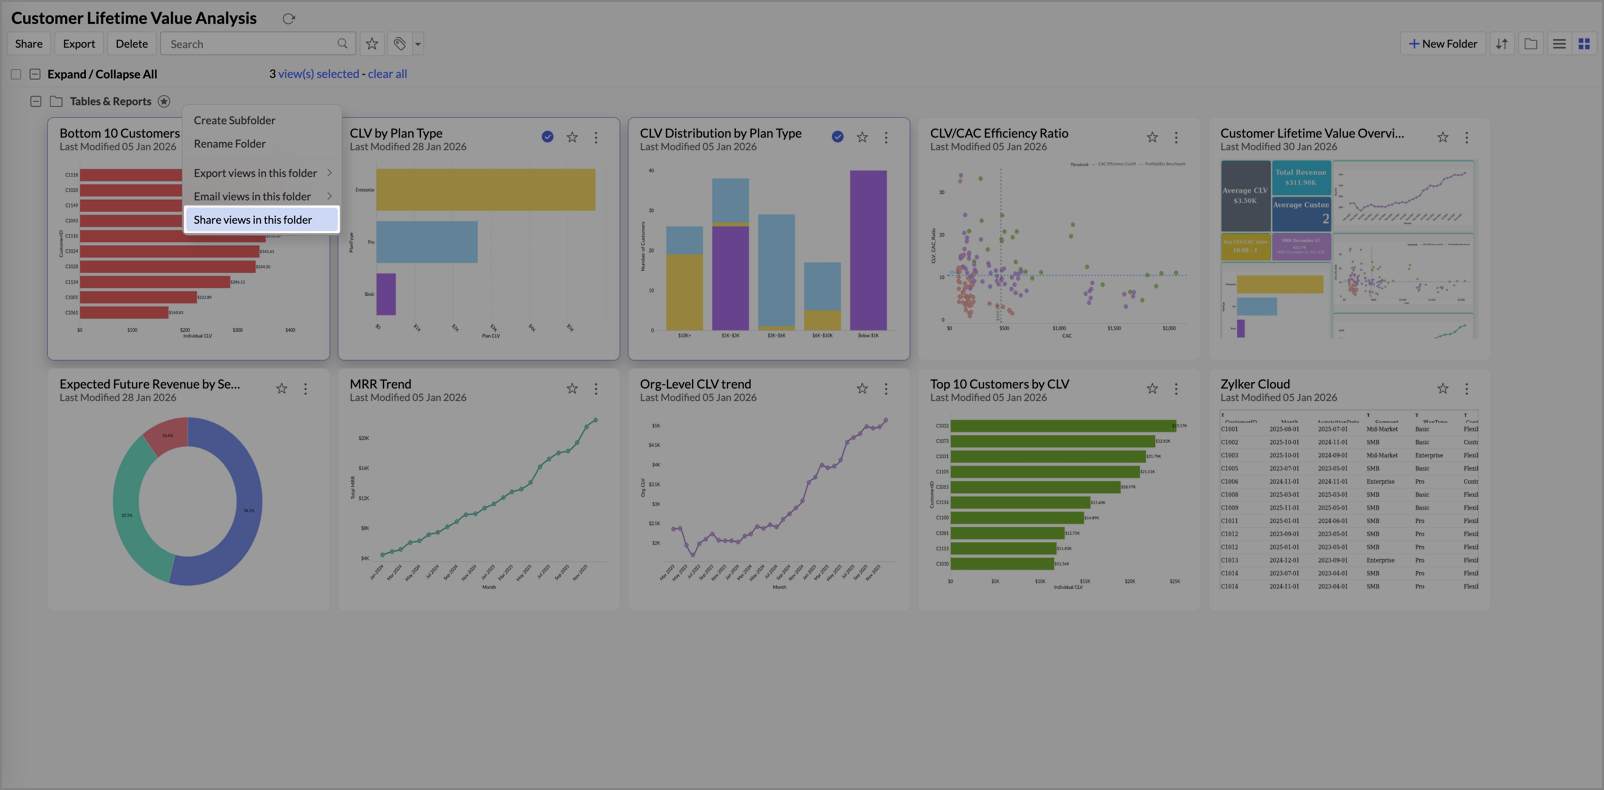
To share all views inside a folder:
- In the Explorer tab, hover over the folder name.
- Click the Ellipsis icon that appears.
- Select Share views in this folder.
Sharing Selected Columns
You can restrict which columns a user sees in a shared table. This is useful when the table contains sensitive data.
- Open the data table you want to share.
- Set the sharing options as described in Sharing Views to Users.
- Click the Apply Permissions & Filters link. The Apply Permissions & Filters dialog opens.
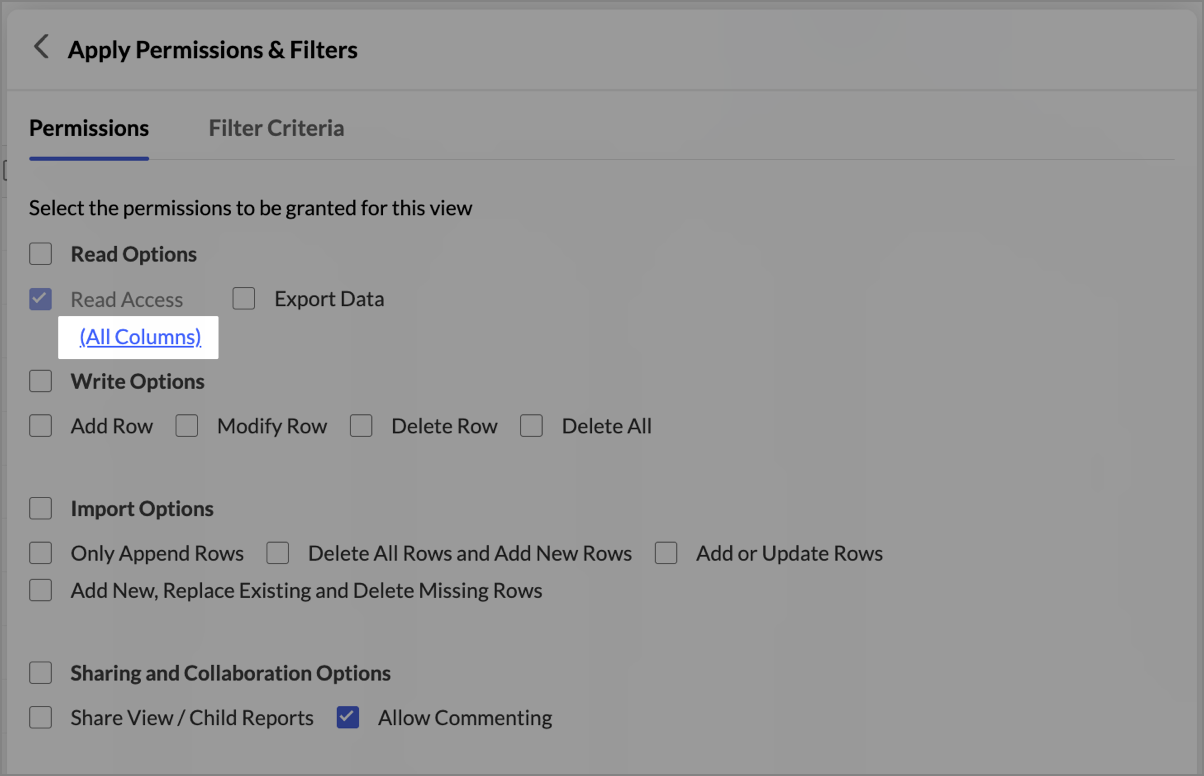
- Click the All Columns link under Read Access.
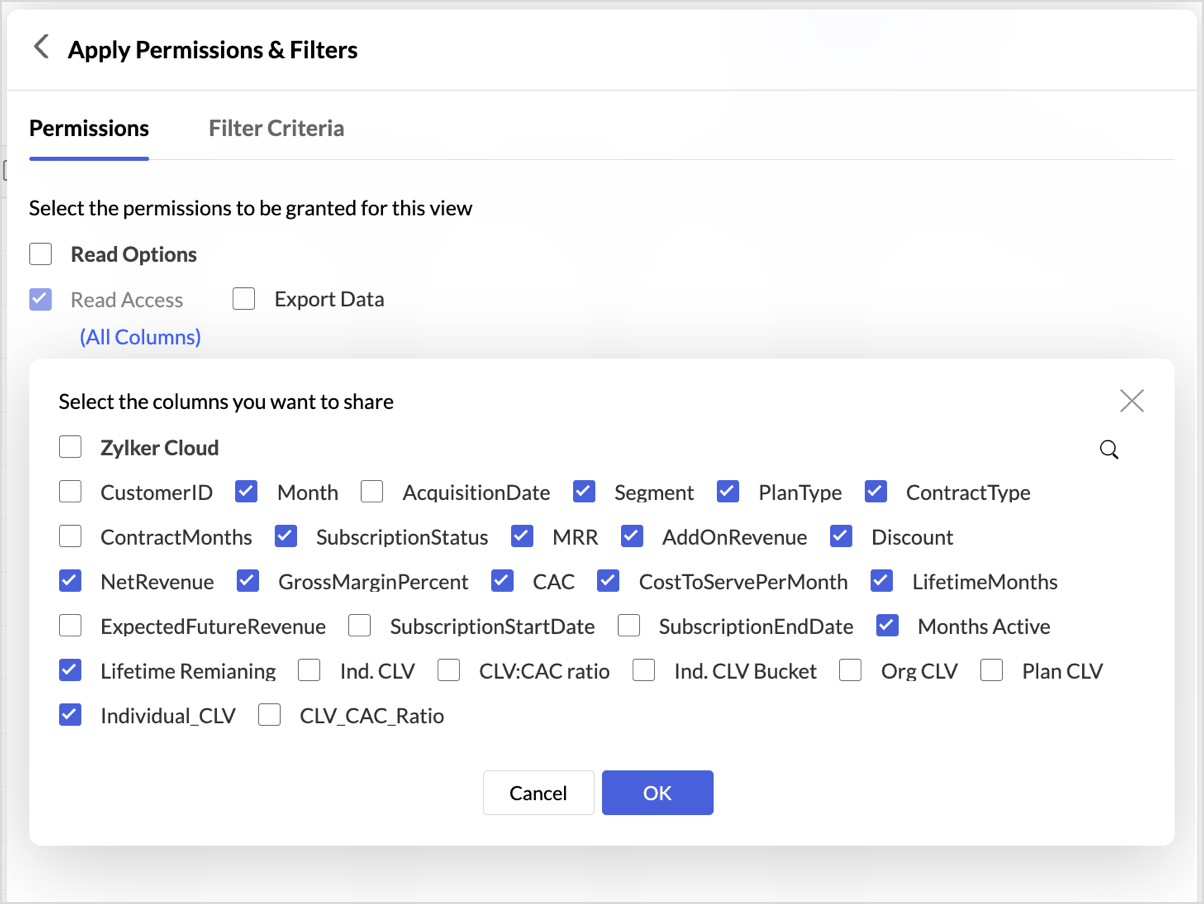
- Select the columns you want to share.
- Click OK to confirm.
The shared user can only view and create reports on the selected columns.
Setting Sharing Permissions
Zoho Analytics provides fine-grained permissions that control what a shared user can do with the views. You configure these permissions in the Apply Permissions & Filters dialog. The available permissions vary depending on the type of view you share.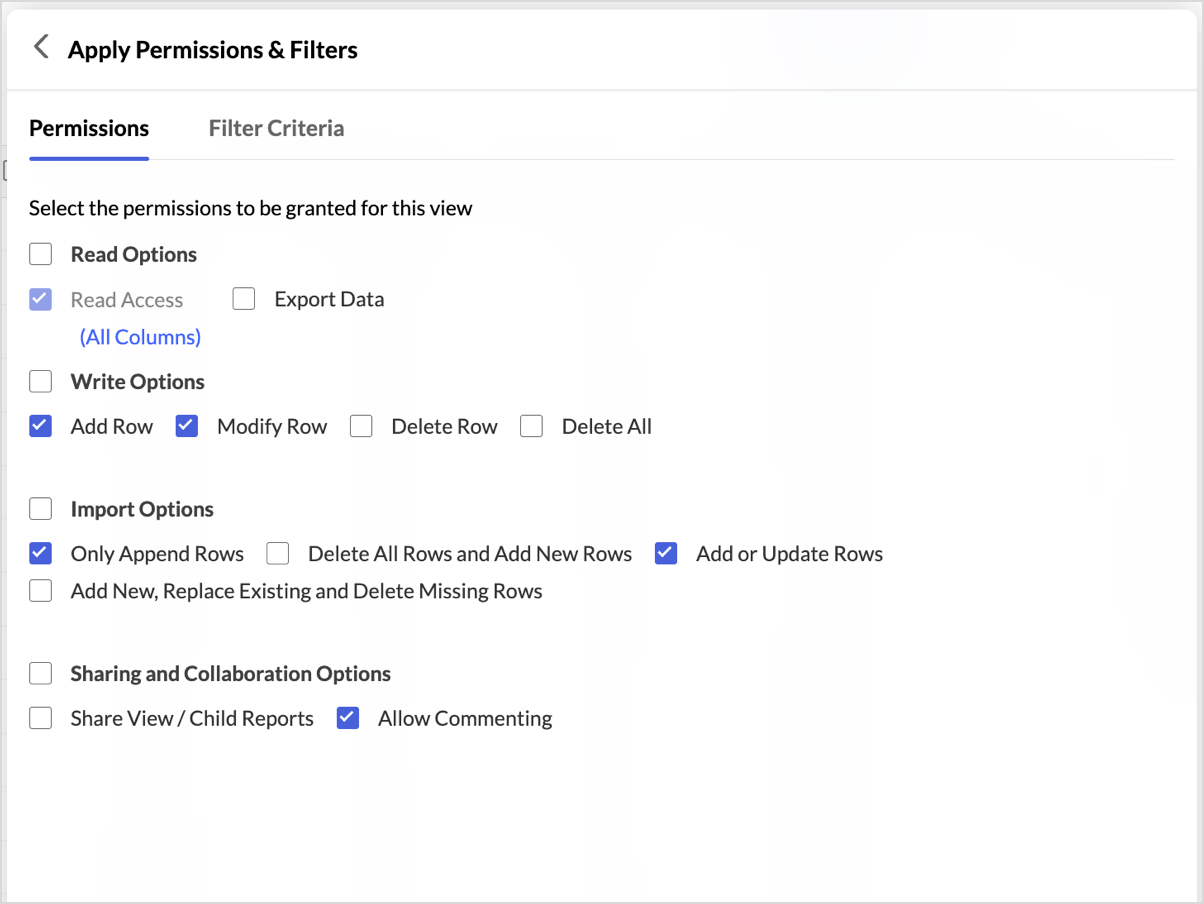
Read Options
The following read permissions are available for all view types.
Read Access: This is the default permission. It allows the user to view the shared report or dashboard.
Export Data: This allows the user to download the reports in the shared dashboard.
View Underlying Data: This allows the user to view the raw data behind the reports. Click the Change Columns link to select which columns appear in the underlying data view.
Drill Down: This allows the user to drill down into chart data along predefined drill paths. Click Change Drill Settings to edit the drill paths for the reports in the dashboard.
Drill Through: This allows the user to navigate from a data point in one report to a related report for deeper analysis.
Drill Actions: This allows the user to perform configured actions when drilling into data points in a chart.
Zia Insights: This allows the user to view Zia-generated insights for the report.
Write Options
The following permissions are available only when you share a data table. They control whether the shared user can modify the data in the table.
Add Row: This allows the user to add new rows to the shared table.
Modify Row: This allows the user to edit existing rows in the shared table.
Delete Row: This allows the user to delete individual rows from the shared table.
Delete All: This allows the user to delete all rows from the shared table.
Import Options
The following permissions are available only when you share a data table. They control how the shared user can import data into the table.
Only Append Rows: This allows the user to add new rows to the table without modifying existing data.
Delete All Rows and Add New Rows: This allows the user to clear all existing rows and replace them with newly imported data.
Add or Update Rows: This allows the user to add new rows and update existing rows that match the import data.
Add New, Replace Existing and Delete Missing Rows: This allows the user to fully synchronize the table with the imported data. New rows are added, matching rows are replaced, and rows not present in the import are deleted.
Sharing and Collaboration Options
The following permissions are available for all view types.
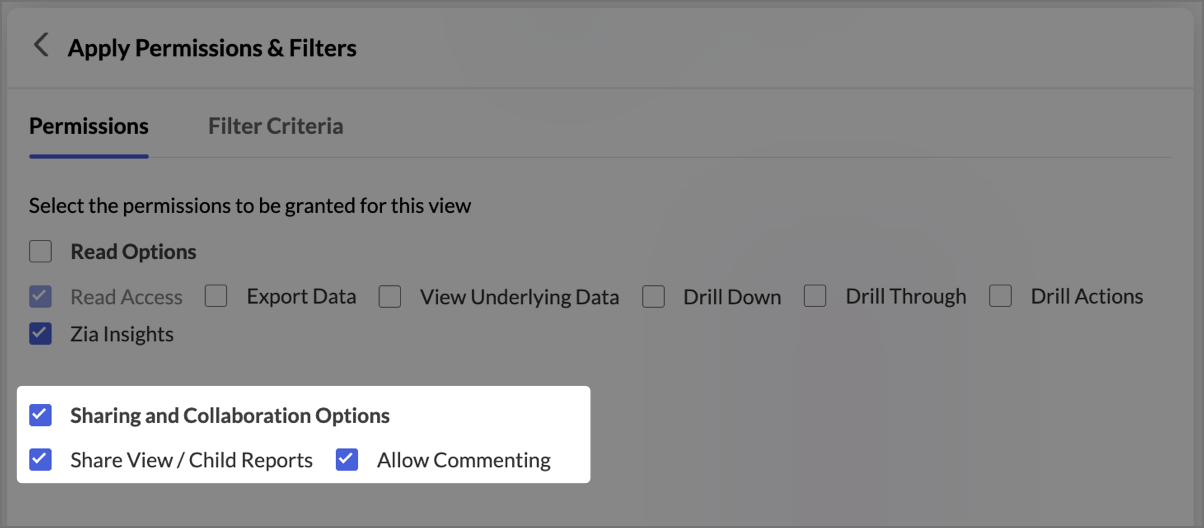
Share View/Child Reports: This allows the user to share the dashboard or report with other users. See <<Enabling User-to-User Sharing>> for more details.
Allow Commenting: This allows the user to add comments in the comment thread of the shared view.
Applying Filter Criteria (Row-Level Security)
You can apply filter criteria while sharing a view to enforce row-level security. When a shared user opens the report, the filter restricts the data they can see.
- Open the view you want to share.
- Click the Apply Permissions & Filters link.
- Open the Filter Criteria tab.
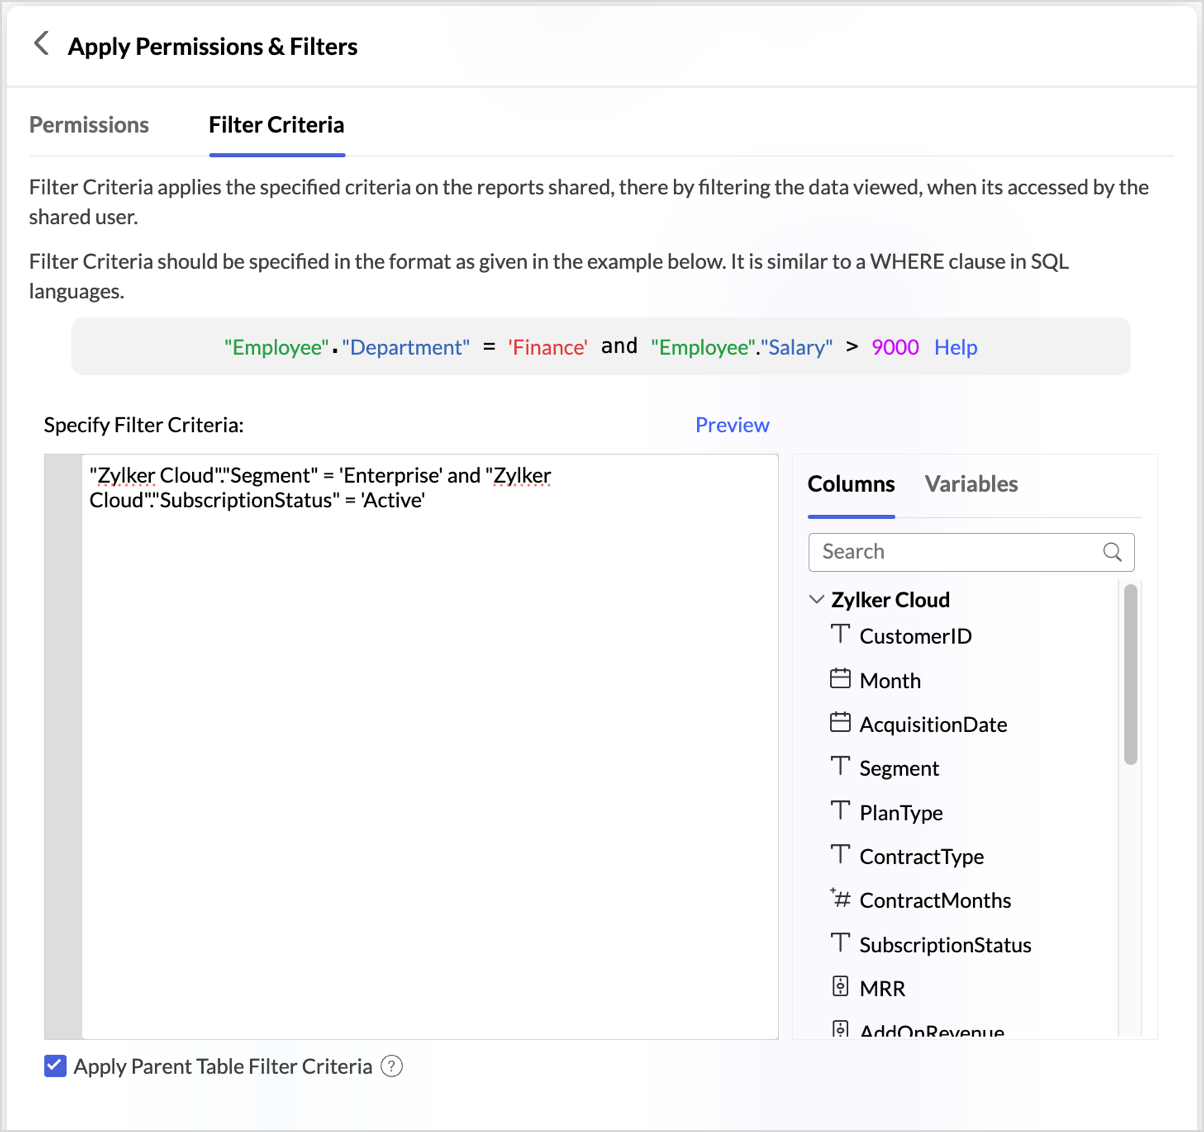
- Enter the filter condition in the Specify Filter Criteria text box. You can type column names directly or click the required column from the Columns pane. Click Preview to validate the filter criteria before sharing.
Defining Filter Criteria
You define filter criteria using a syntax similar to a WHERE clause in SQL. Zoho Analytics supports built-in functions from ANSI, Oracle, MS SQL Server, MySQL, DB2, Sybase, Informix, and PostgreSQL dialects.
Basic format:
(<Table name.column name / SQL expression / SQL function call> <relational operator> <value / column / expression / variable>)
Example using a date function:
year("Sales"."Date") = 2011
Combining conditions with AND, OR, and NOT:
(("Sales"."Region" = 'South' AND "Sales"."Sales" > 10000) OR ("Sales"."Region" = 'West' AND "Sales"."Sales" < 8000))
This criteria does the following:
- Includes only South region records with sales greater than $10,000.
- Includes only West region records with sales less than $8,000.
- Excludes all other records from the shared view.
Applying Filter Criteria Across Multiple Tables
For reports built on data from multiple joined tables, you can use columns from all related tables in the filter criteria.
Example: To filter a chart that joins the Sales and Sales Person tables, showing only salespersons in Fairfax with sales less than $1,000:
(("Sales Person"."City" = 'Fairfax') AND ("Sales"."Sales" < 1000))
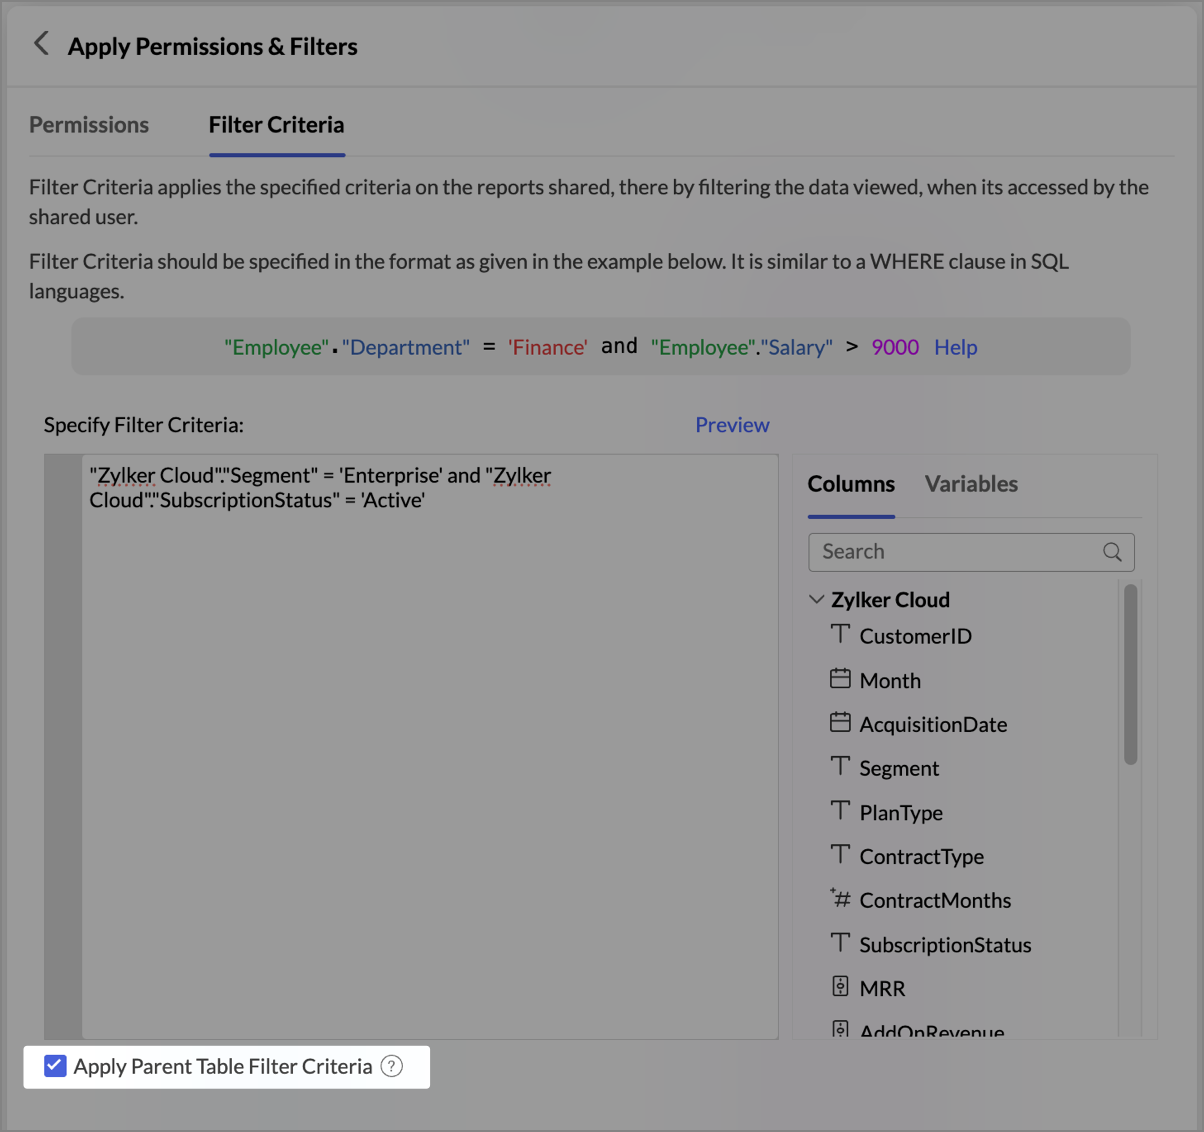
Applying Parent Table Filter Criteria
The Apply Parent Table Filter Criteria option extends the row-level security defined on a parent table to its dependent views (reports and dashboards).
- Open the view you want to share.
- Click the Apply Permissions & Filters link.
- Open the Filter Criteria tab.
- Select the Apply Parent Table Filter Criteria checkbox.
The parent table's row-level access criteria now applies to the associated reports and dashboards.
Note:
- When you share a report with its own filter criteria, the system combines the parent table's filter and the report's filter using the AND condition. Both filters must be satisfied for a row to appear.
- When you share a dashboard, the system combines three filters using the AND condition: the parent table's filter, the report's filter, and the dashboard's filter.
Using Variables for Dynamic Filtering
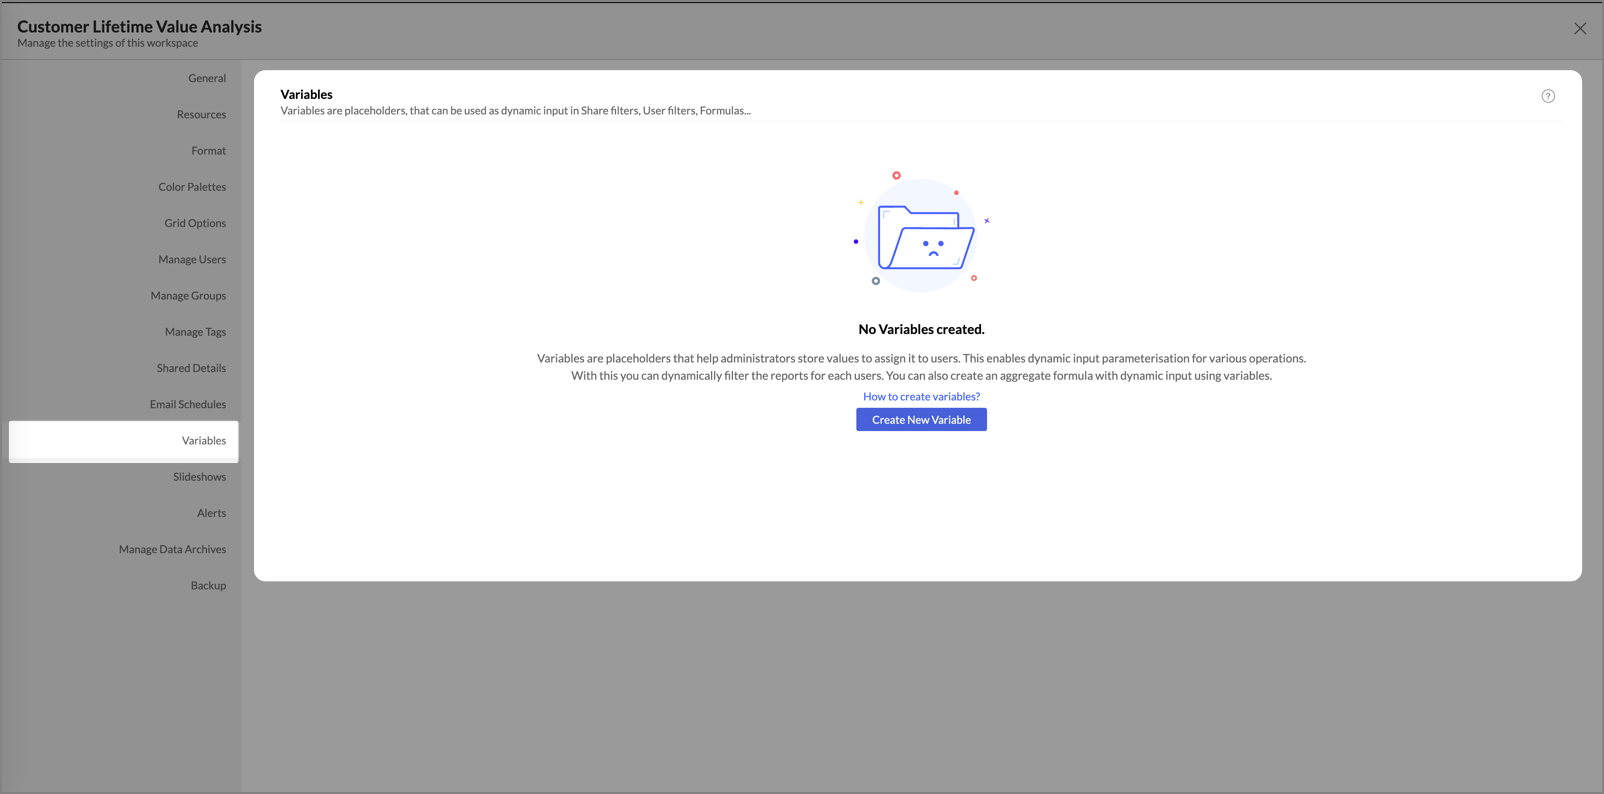
Variables are placeholders that resolve to user-specific values at runtime. Account Admins and Workspace Admins can assign dynamic values to individual users through variables. You can use variables inside filter criteria to personalize shared views automatically.
For detailed steps on applying variables in filter criteria, see Dynamic Filtering with Variables.
Default System Variables
Zoho Analytics provides the following predefined system variables.
| System Variable | Description |
| System.login.email | Returns the email address of the logged-in user |
| System.login.firstname | Returns the first name of the logged-in user |
| System.login.lastname | Returns the last name of the logged-in user |
| System.login.fullname | Returns the full name of the logged-in user |
Creating a Custom Variable
You can create custom variables from the Workspace Settings page. For detailed steps, see Variables in Workspace Settings.
Setting Up Viewer Mode
Viewers can only view reports shared with them. They cannot create reports or share views. To assign the Viewer role to a user:
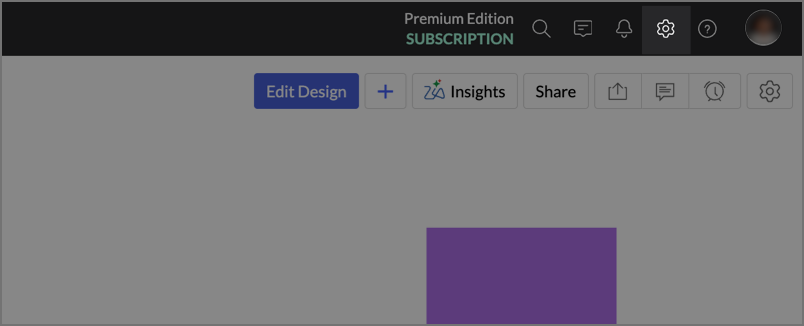
- Open the Organization Settings.
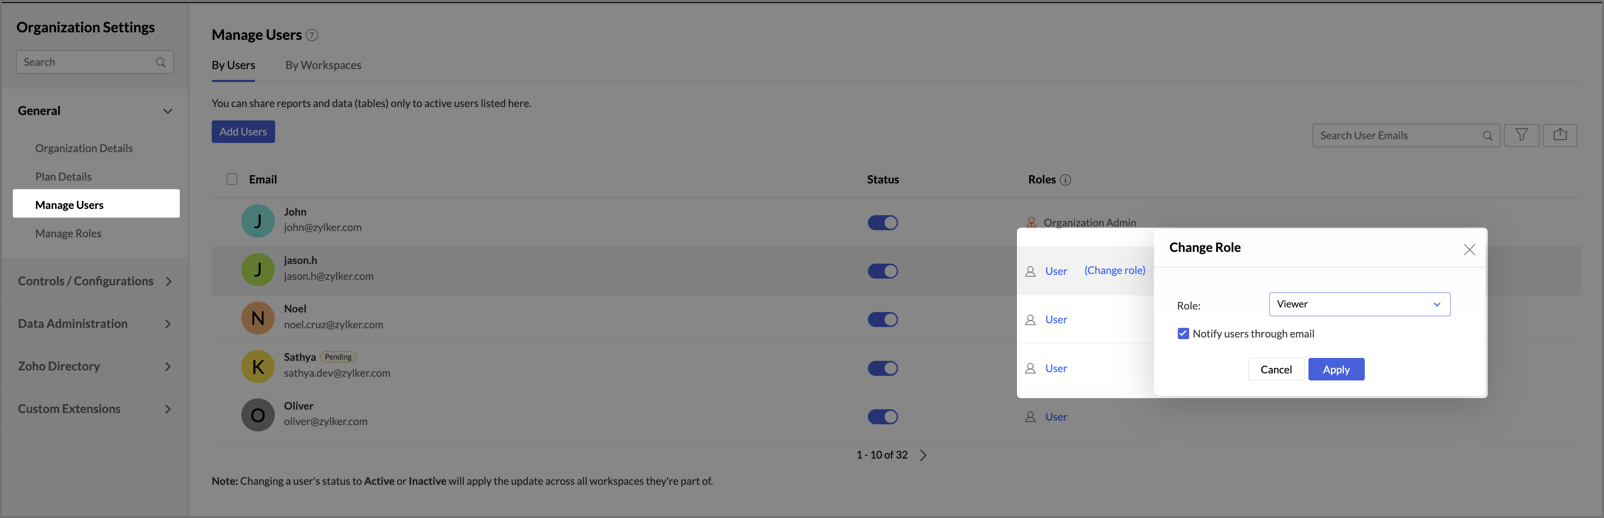
- Click Manage Users.
- Hover over the user whose role you want to change.
- Click the Change Role link that appears.
- In the Change Role dialog, set the Role field to Viewer.
- Click Apply.
All views shared with this user are now in Viewer mode.
Enabling User-to-User Sharing
By default, only administrators can share views. Administrators can extend sharing capabilities to users through the Share View/Child Reports permission. This permission enables two sharing flows.
Allowing Users to Re-share Shared Views
When an administrator shares a view, data table, or dashboard with a user, the administrator can allow that user to share the same view with others.
- Share the view by following the steps in Sharing Views to Users.
- In the Apply Permissions & Filters dialog, open the Permissions tab.
- Select the Share View/Child Reports checkbox under Sharing and Collaboration Options.
- Navigate back and click Share.
The user can now share that specific view with other administrators or users in the organization.
Allowing Users to Share Their Own Reports
When an administrator shares a data table with a user, the user can create their own reports on that data. If the administrator grants the Share View/Child Reports permission while sharing the data table, the user can also share the reports they create with others.
- Share the data table with the user by following the steps in Sharing Views to Users.
- In the Apply Permissions & Filters dialog, open the Permissions tab.
- Select the Share View/Child Reports checkbox under Sharing and Collaboration Options.
- Navigate back and click Share.
The user can now create reports on the shared data table and share those reports with other members of the organization.
Managing Views Shared by Users
For administrators, views shared by users appear under the Shared Views folder. Each entry shows the name of the user who shared the report.
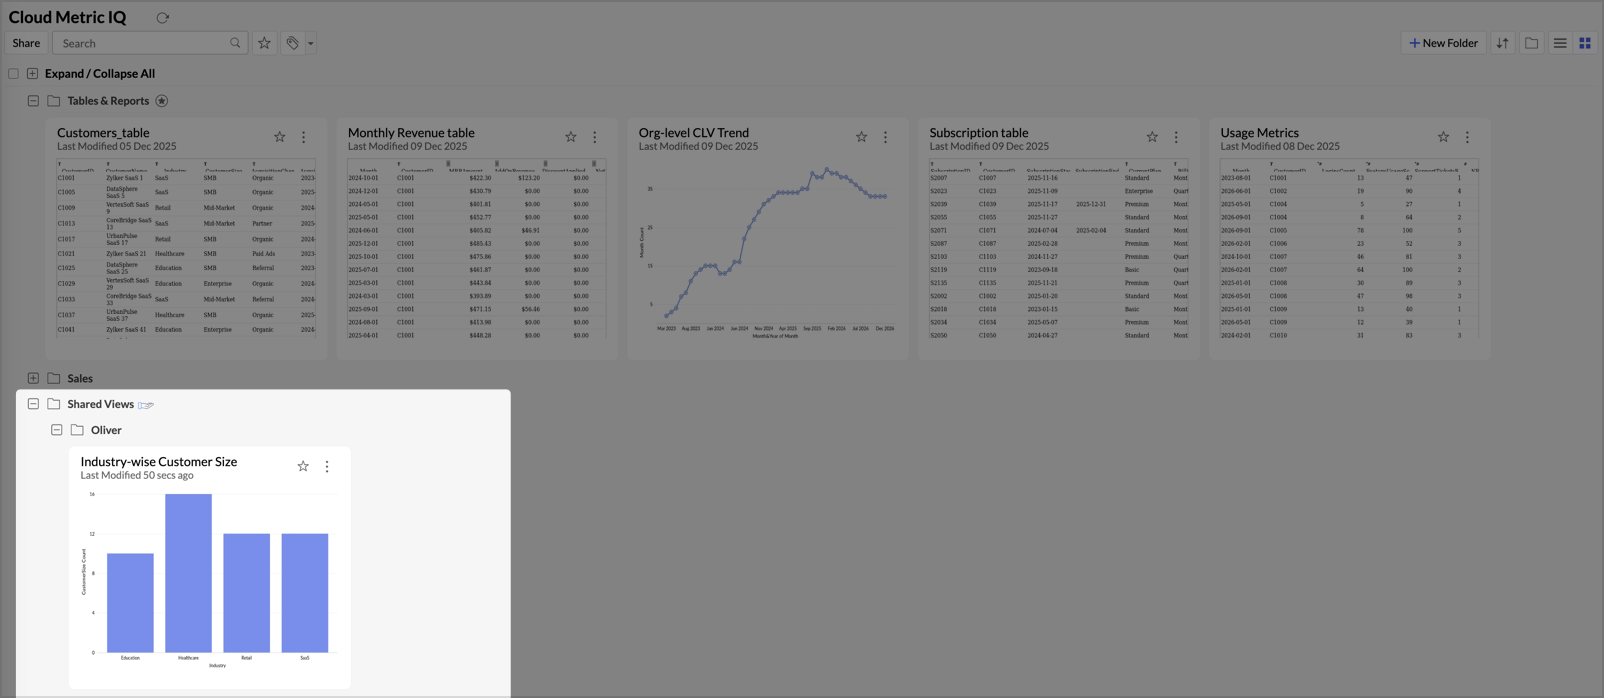
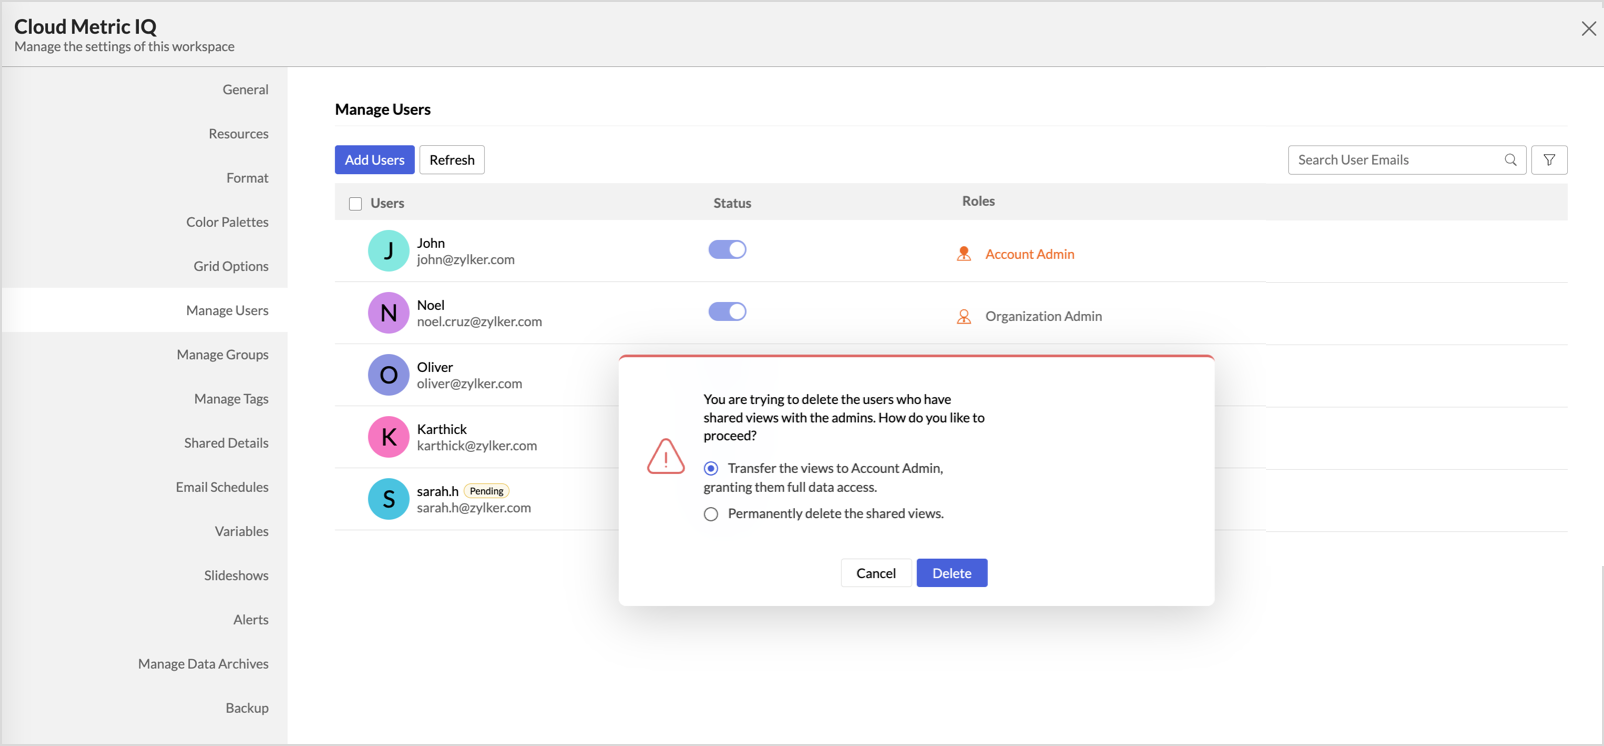
When an administrator removes a user from the organization, they can choose what happens to the views that user shared:
- Transfer the views to the Account Admin, granting them full data access.
- Permanently delete the shared views.
Editing or Removing Shared Permissions
Editing Shared Permissions
- In the Explorer tab, click on the ellipsis (⋮) of the views you want to modify.
- Click Edit Shared Details.
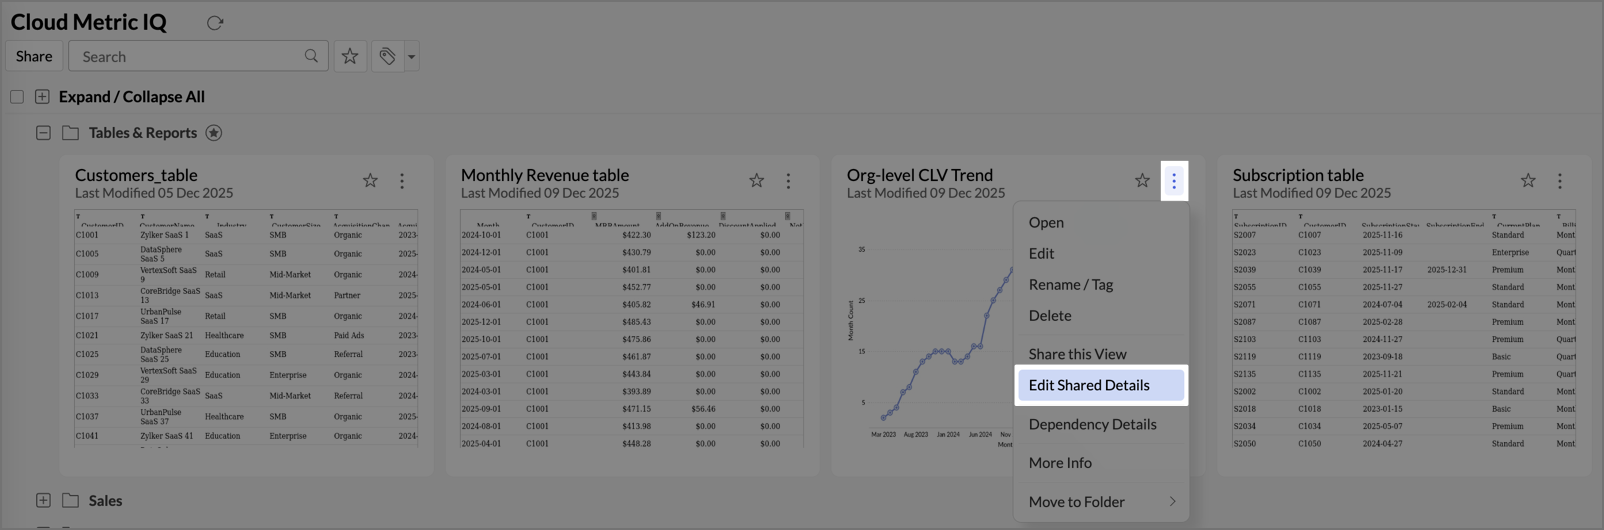
- The Existing Shared Details dialog opens. Hover over a user and click the edit icon to modify their permissions.
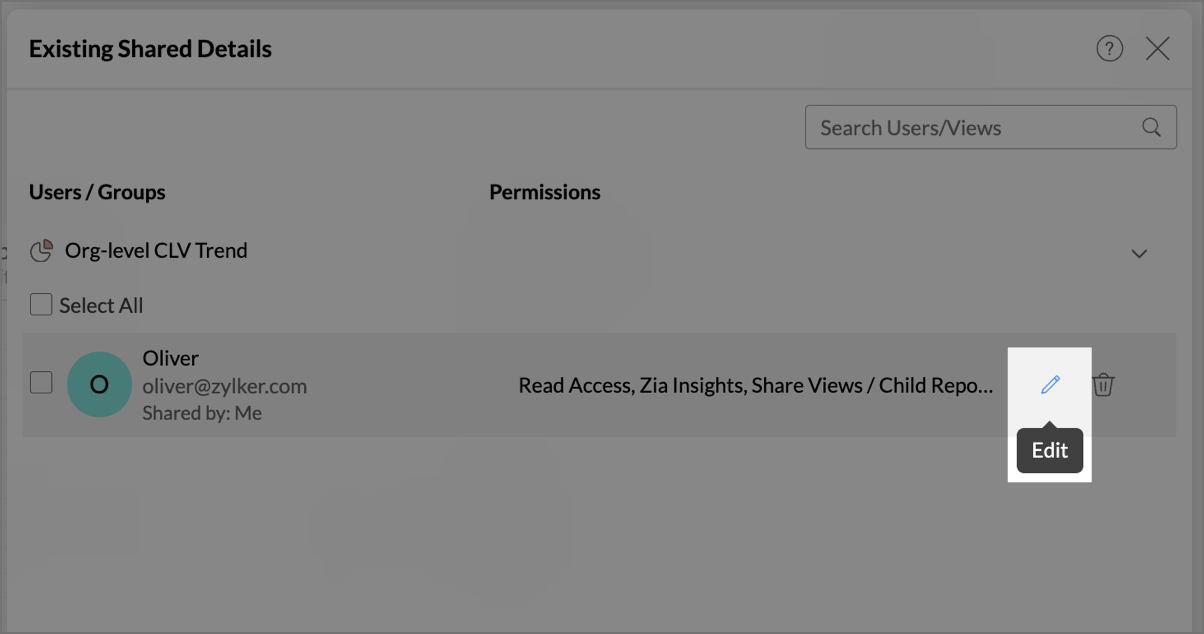
You can also edit permissions from the Shared Details tab in Workspace Settings.
Removing Sharing
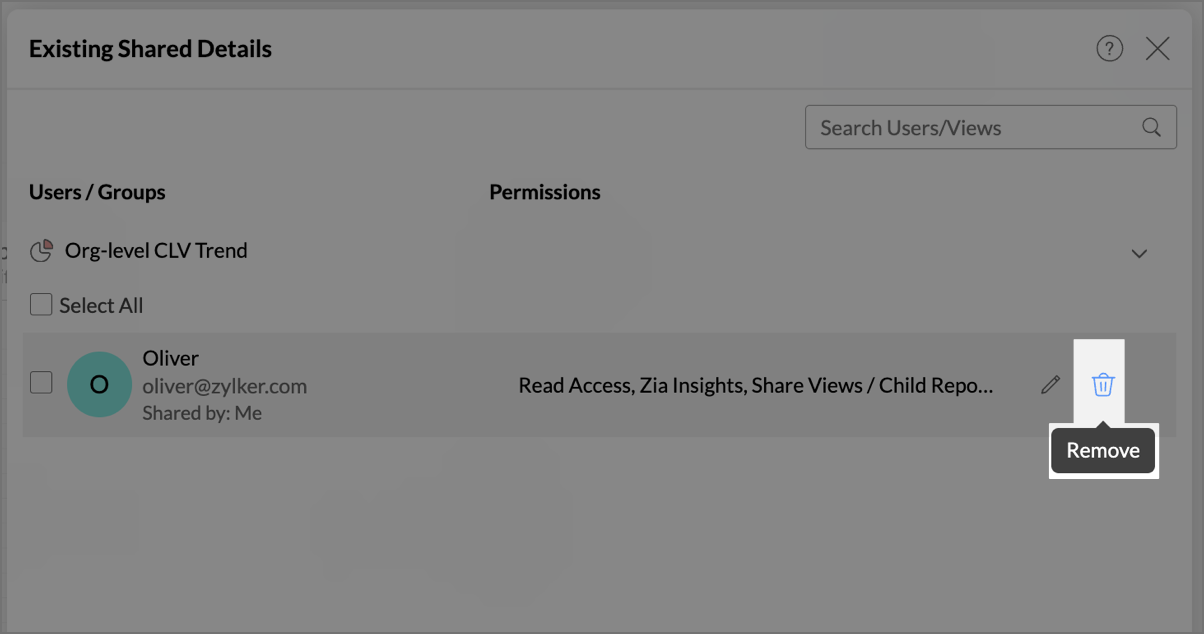
- Open the Existing Shared Details dialog as described above.
- Click the Trash icon next to the view you want to remove sharing from.
Sending Invitation Notifications
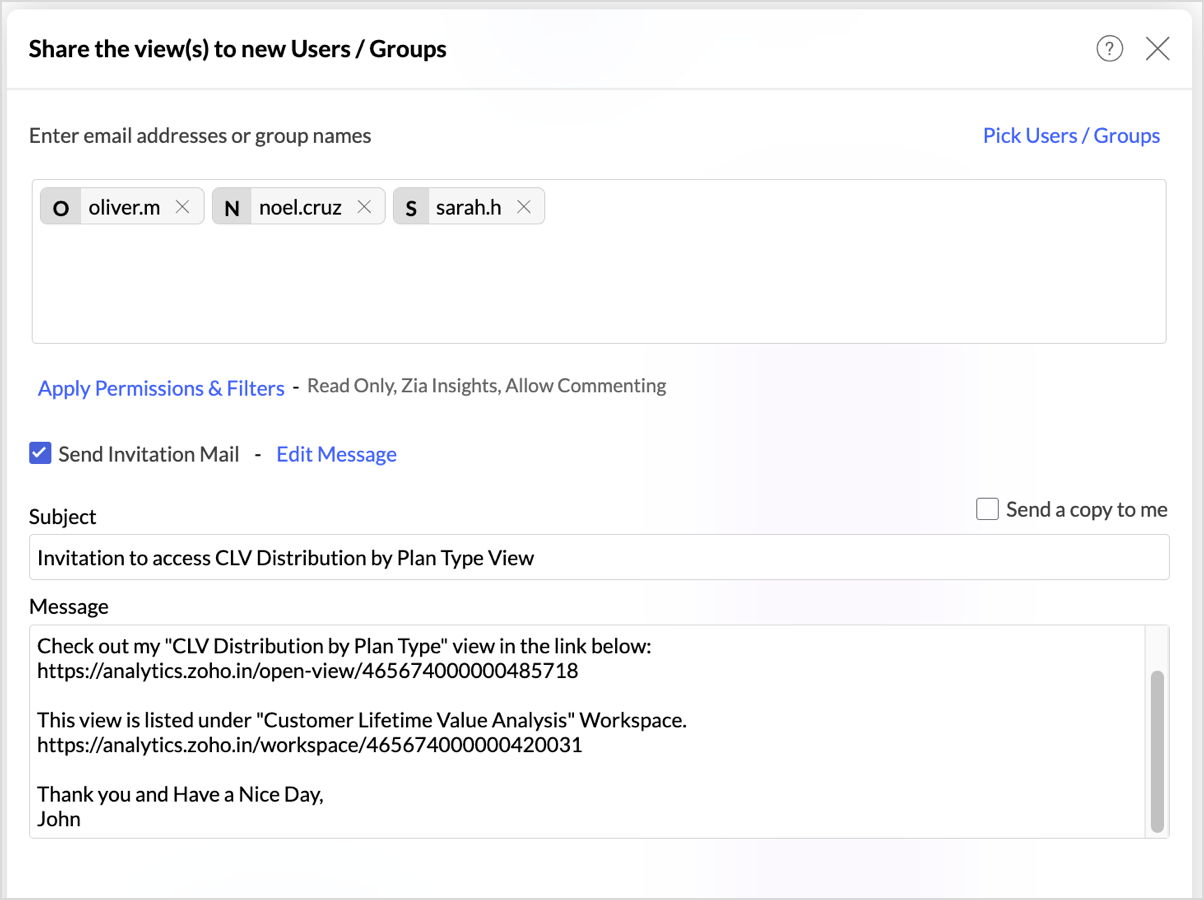
You can notify users about shared views by sending an invitation email.
- In the Share dialog, check the Send Invitation Mail.
- Click Edit Message to modify the notification message.
- Optionally, select the checkbox to send a copy of the notification email to yourself.
Unsubscribing from a Shared Workspace
A user can unsubscribe from a workspace that was shared with them. After unsubscribing, the user can no longer access the views in that workspace. To regain access, the user must request the administrator to share the views again.
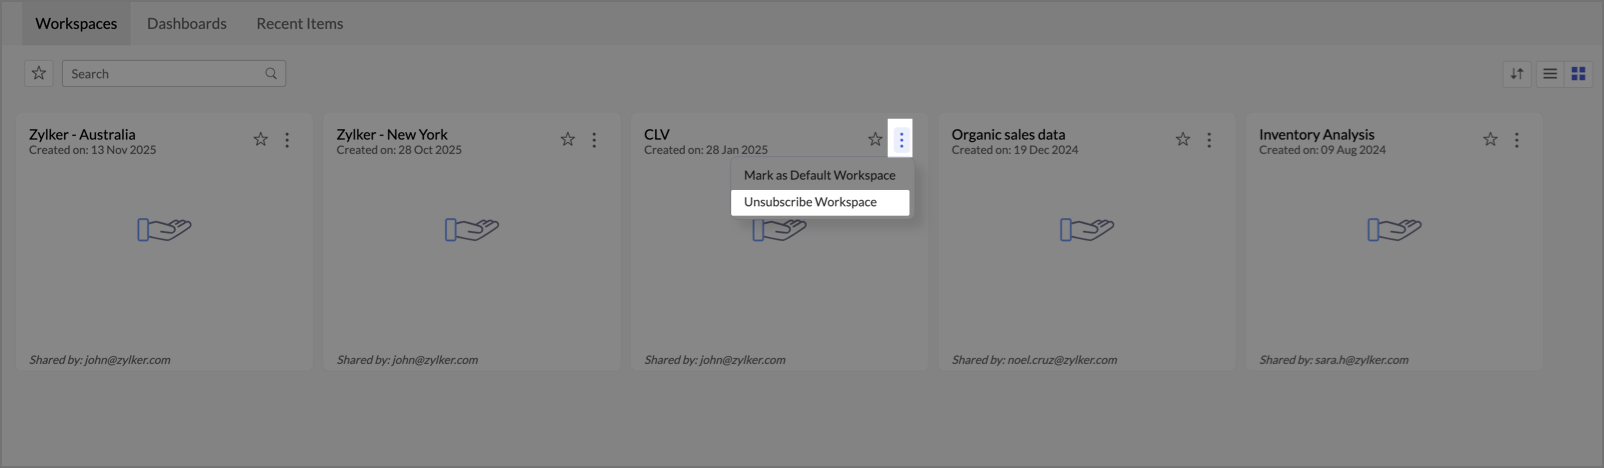
- On the Home page, click the More Actions icon next to the workspace.
- Click Unsubscribe Workspace.
- A confirmation message appears. Click Yes to confirm.
Frequently Asked Questions
- How can I collaborate with my users?
You can create a Zoho Cliq group linked to your Workspace Group. First, enable Cliq integration from the Organization Settings page.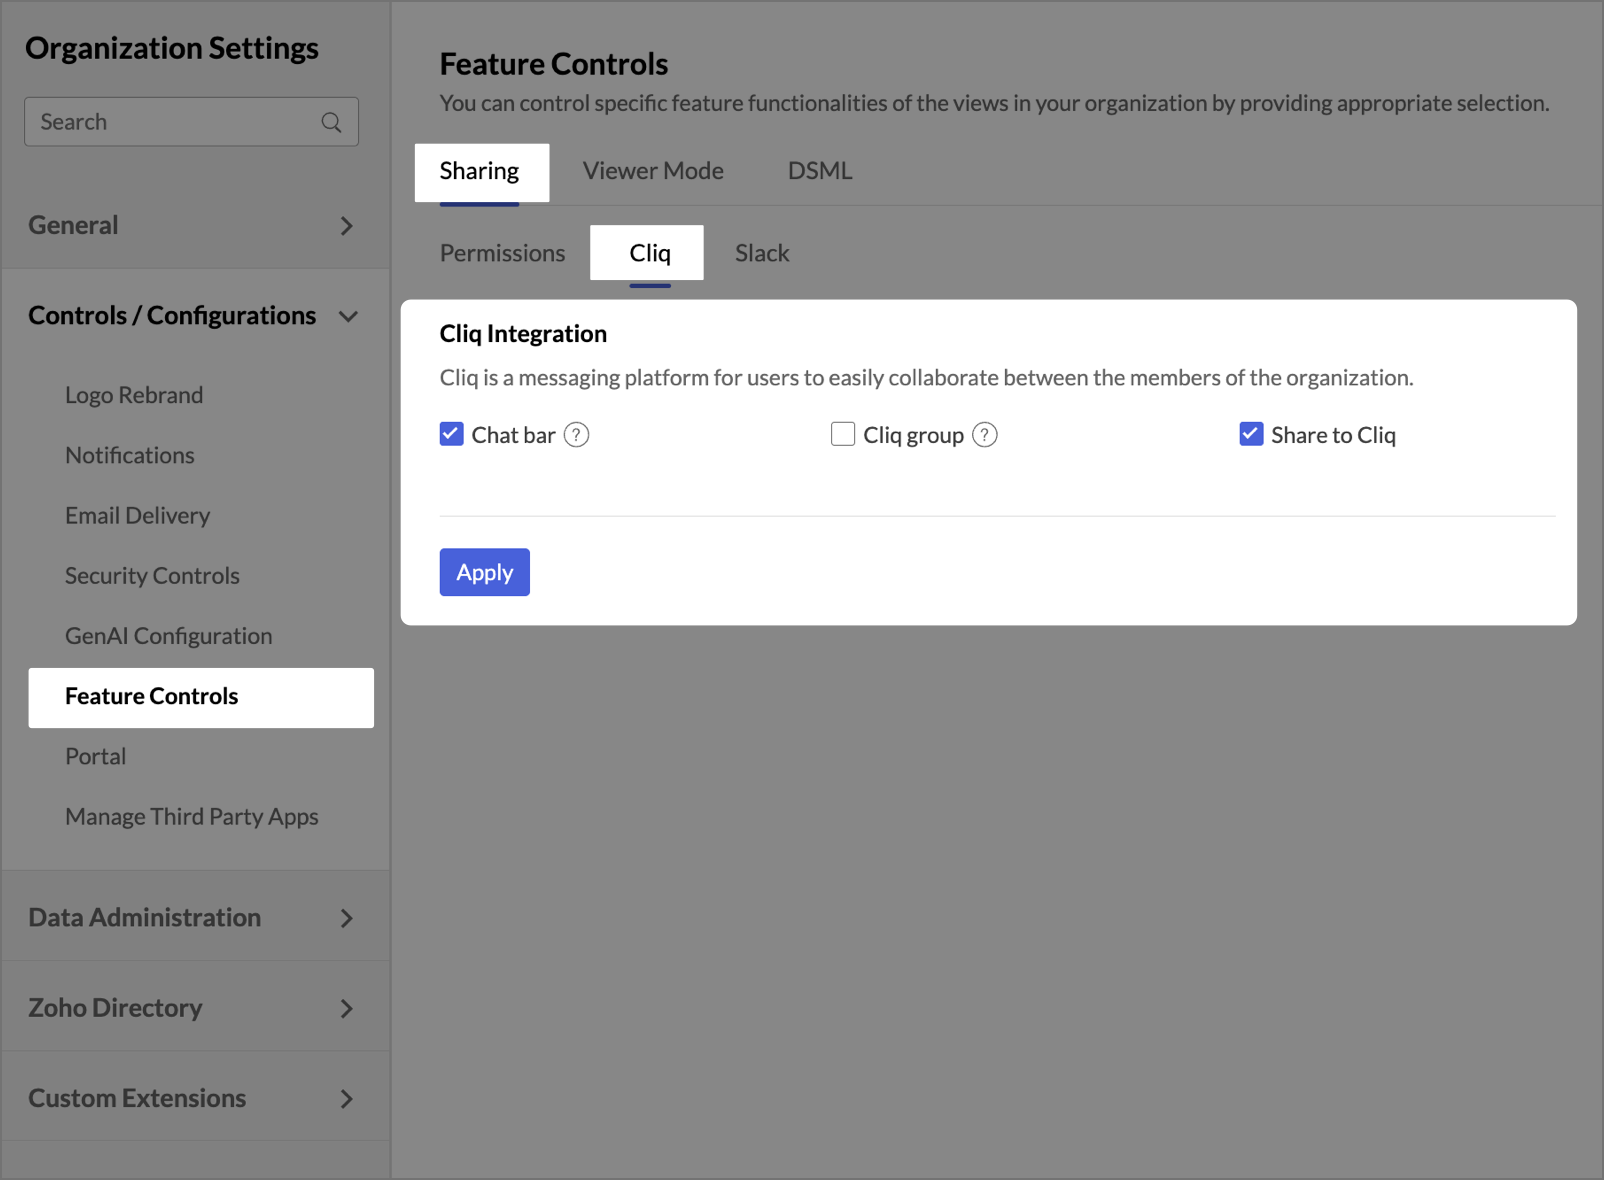
Then, go to Settings > Manage Groups, hover over the group, and click the Cliq icon. The Cliq group and Workspace Group remain linked. You cannot add or remove members directly from the Cliq group.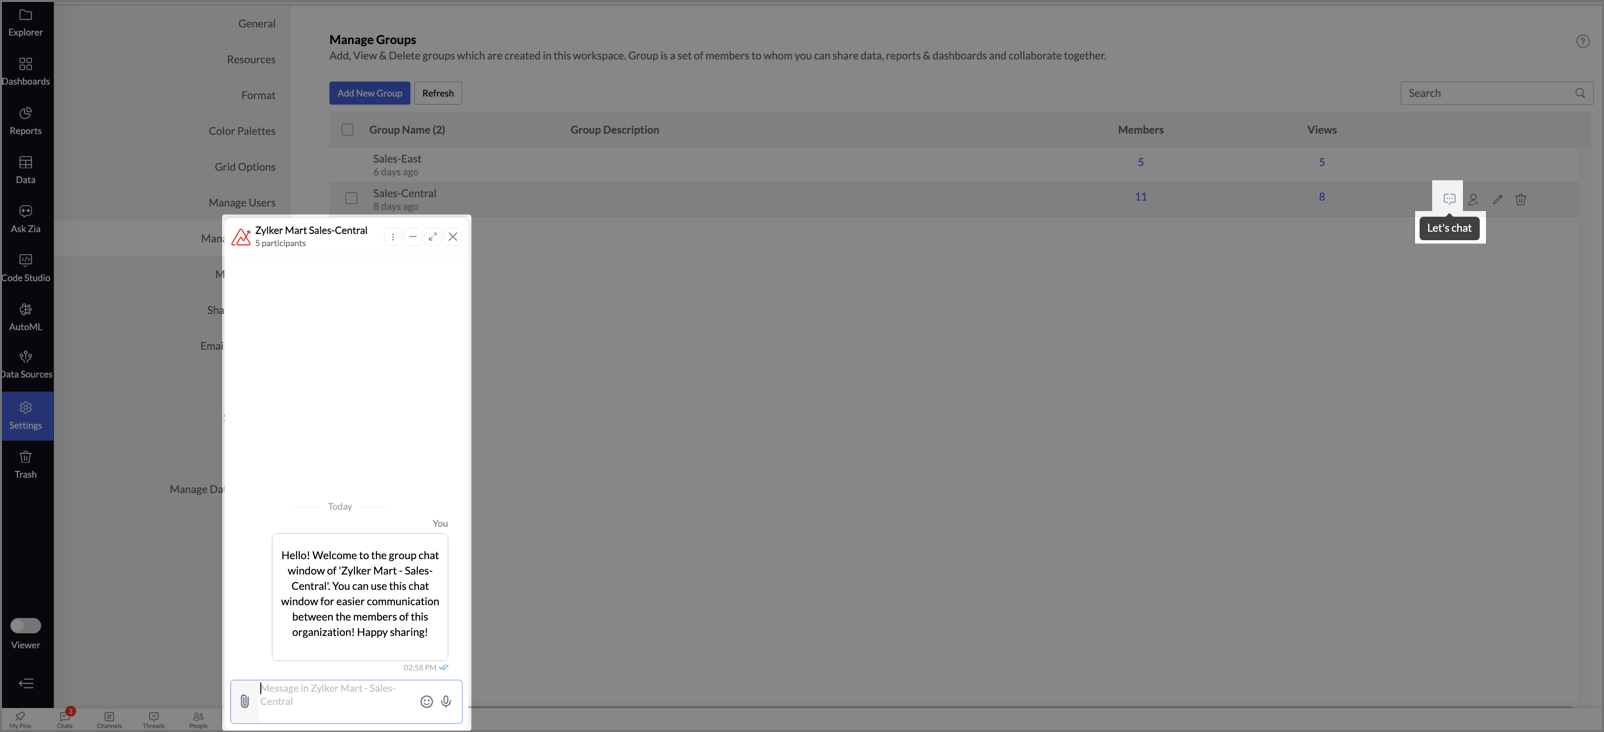
- Can I share views to users from my contacts list?
Yes. In the Share dialog, click Pick Users/Groups. The Contacts dialog opens, listing your Zoho Contacts, Google Contacts, and Shared Contacts. You can share views to users from any of these lists.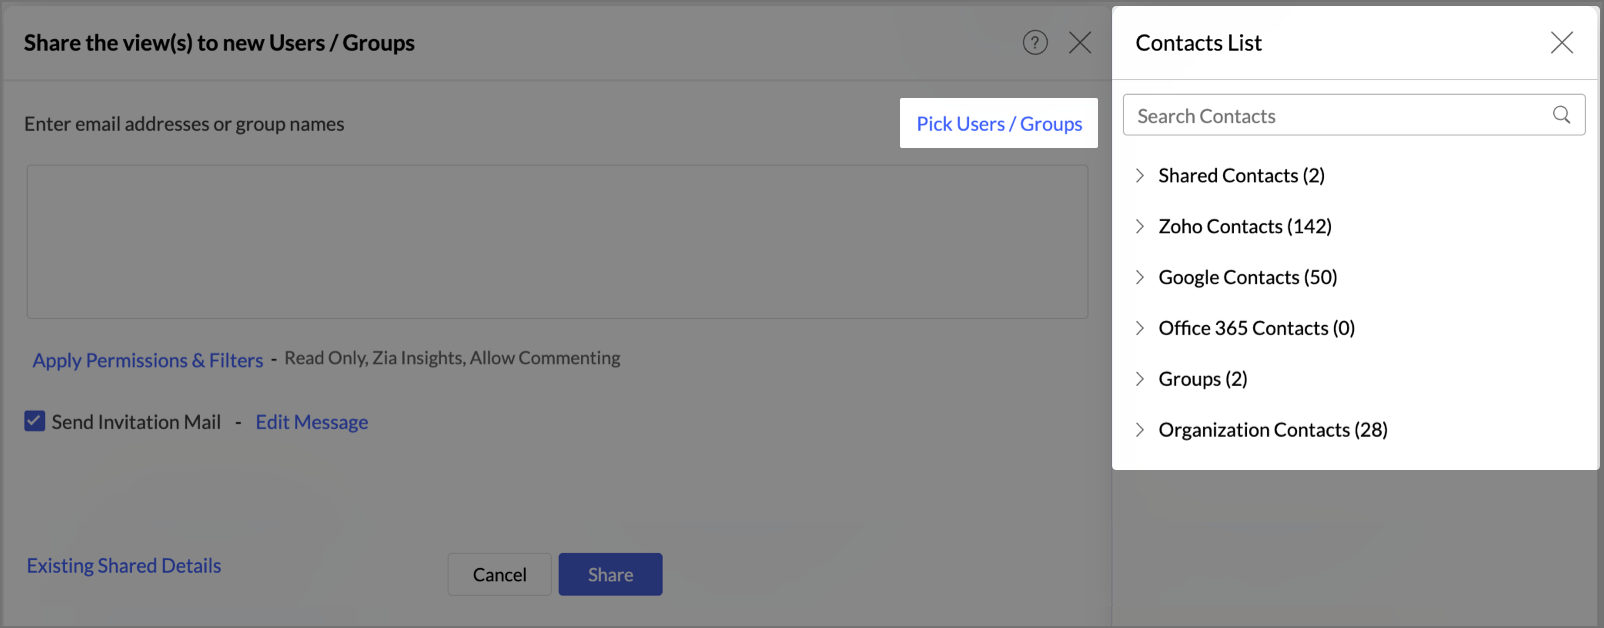
- How many users can I share my reports with?
The number of users you can share with depends on your plan. For details, refer to the Zoho Analytics Pricing page. - Can I send notification emails to shared users?
Yes. In the Share dialog, open the Send Invitation Mail tab. Click Edit Message to customize the notification content. You can also send a copy of the notification to yourself. - What should I do if a shared user cannot see certain data in a report?
Check whether a filter criteria is applied to the shared view. Filter criteria restricts the data visible to each user. Open the Existing Shared Details dialog, hover over the user, and review the filter criteria assigned. Also verify that the parent table filter criteria is not unintentionally restricting the data. - Can a shared user create reports on the data I shared?
This depends on the permissions you assign. A user with the default Read Access permission can view reports but cannot create new ones. To allow report creation, share the underlying data table and grant the necessary permissions. Users with the Viewer role cannot create reports regardless of permissions.