Admin guide
This section helps you navigate through Apptics on the account level. You can understand how to:
Manage the organizations and projects created by you in Apptics
Learn how to provide role-based access with user roles and privileges
Manage AI features
Super admin: Super admin is the individual who creates an organization in Apptics and is the org owner. A super admin can manage (add, edit, and delete) the orgs they create.
Organization members: Organization members are members of the organization who use Apptics, while an Apptics organization is an entity that represents the organization. Once you create an organization, you can invite users to the org, create projects ( containing apps across multiple platforms), and provide role-based access to the org members.
Managing organizations
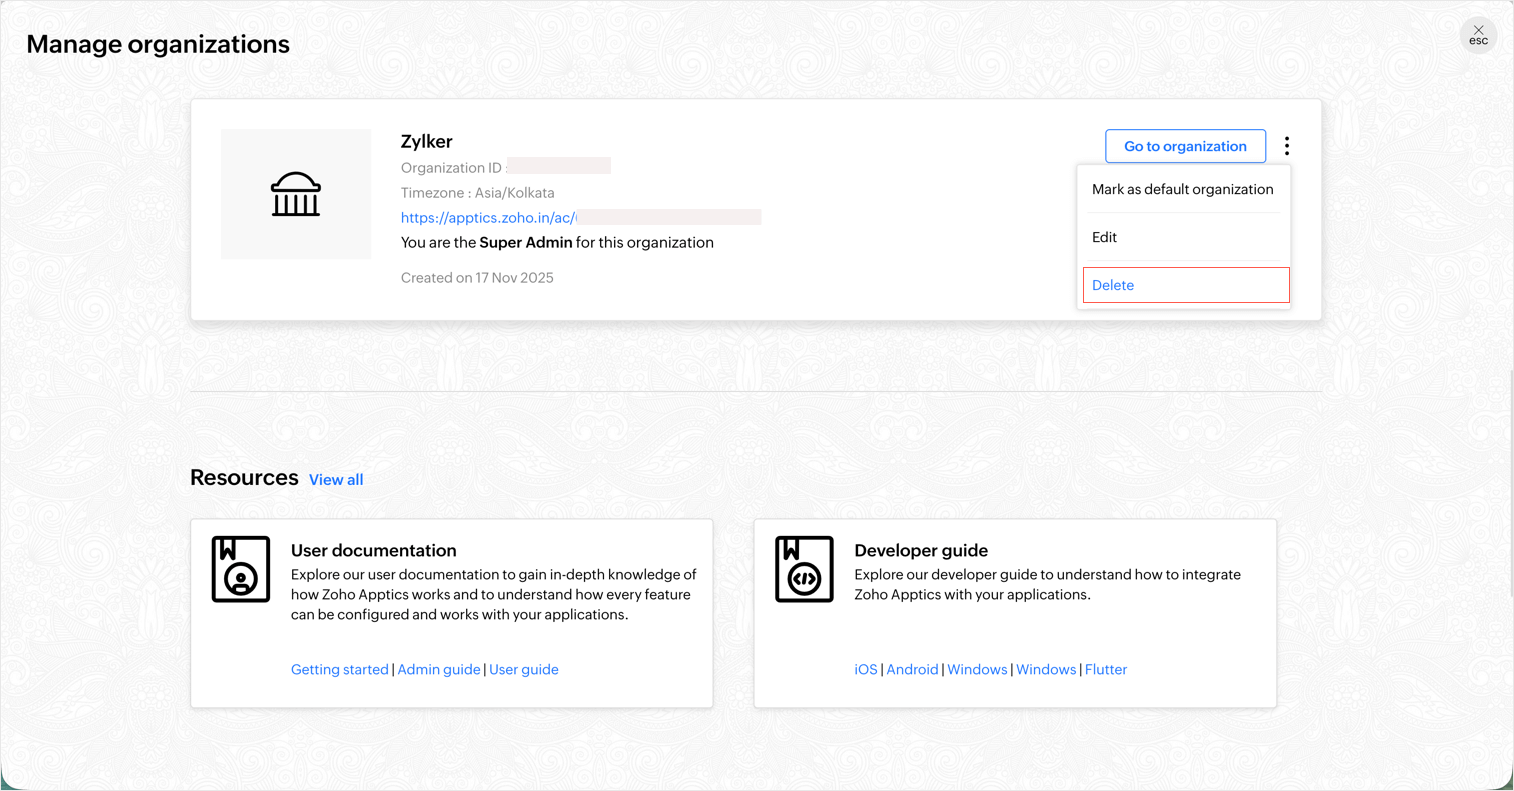
Once you create a new organization or become a member of an existing organization, you will see a list of all the orgs you can access with your role for each org.
- Navigate to the right menu by clicking on the profile.
- Click Manage organizations and you will be able to see a list of all the organizations you are part of.
- Click on the menu to mark an organization as a default organization, edit the organization details, or delete the organization.
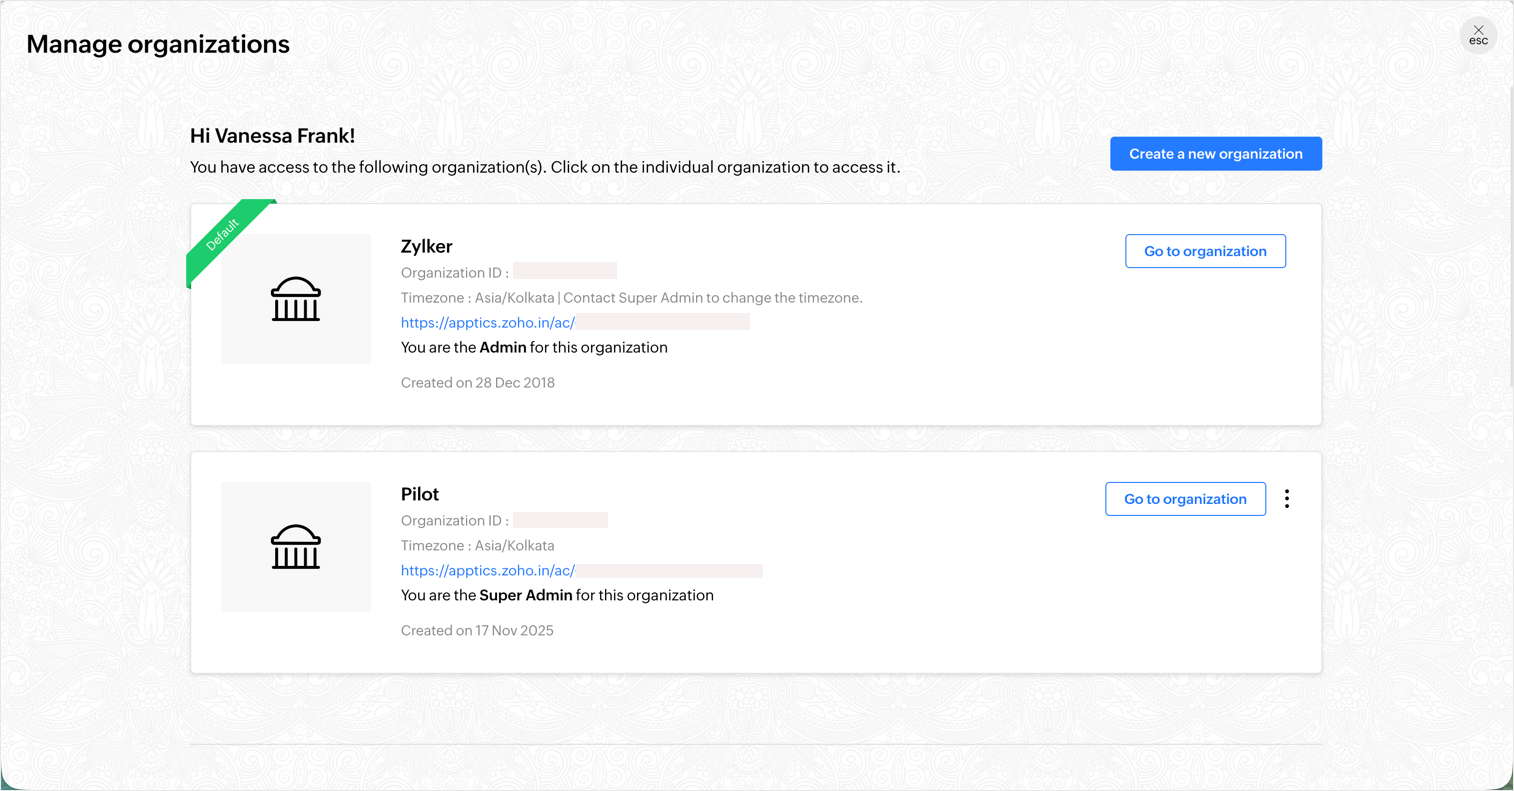
- When you choose a org as default, you will be directed to the same org whenever you access Apptics. To access other orgs, you need to navigate to Profile > Manage organizations.
Note: Only the super admin can edit the organization name or delete an organization in Apptics.
Update organization details
As a super admin you can change the organization's name, timezone, and user consent management preference as per your convenience.
- Go to Profile>Manage organizations.
- Click on menu near the organization and click Edit. A pop-up will appear on the screen with the options to change the current org name, timezone, and consent preference.
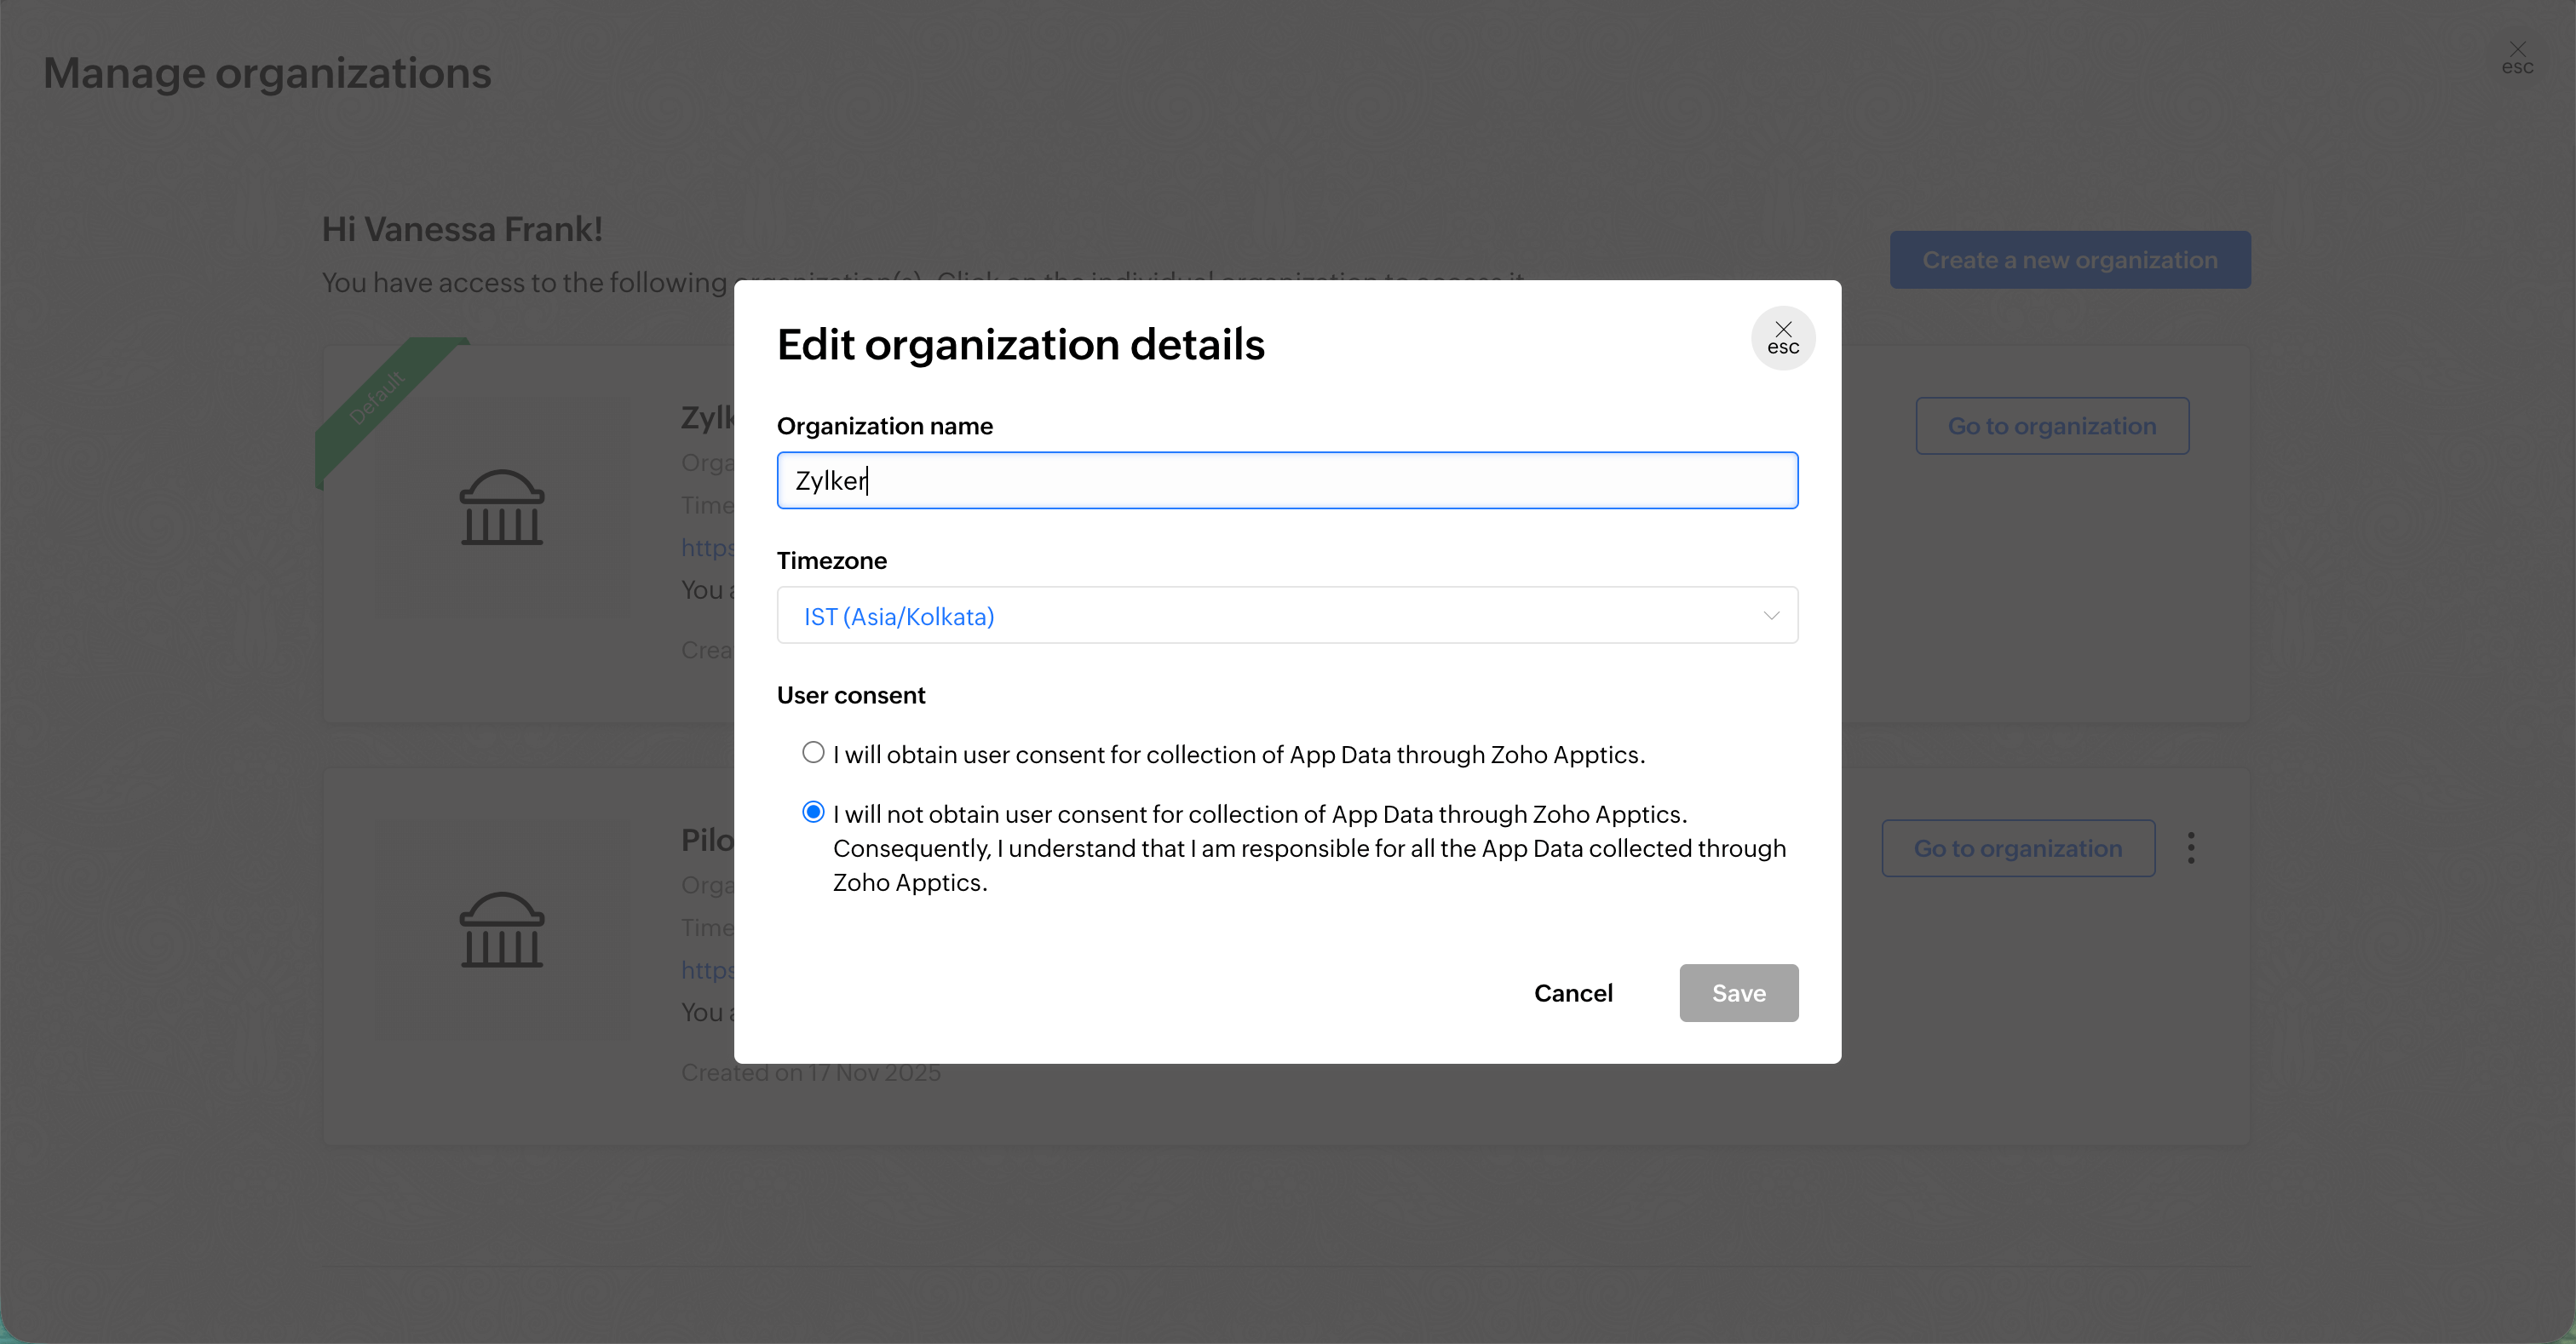
- Click on the drop-down under timezone and select your preferred timezone.
- Once the required changes are done, click Save.
There will be a slight difference in the data available in your Apptics console after the timezone has been edited.
| Timezone change | Data change in console |
|---|---|
| Timezone falls on the same date | No change in data |
| New timezone is ahead of old timezone | The calendar in the console will change to today. Data change based on the current timezone will reflect in the console within 15 mins |
| New timezone is behind the old timezone | Today in the calendar will be changed. Data change based on the current timezone will reflect in the console within 15 mins |
Roles and privileges
Super Admin: Super admin is the org owner. A super admin can add/remove org members, edit the org details, assign other users as organization admins, update their roles and privileges within the organization in Apptics. The super admin's account will be associated for any billing and payments.
Organization Admin: While inviting an org member, you can choose the user type, i.e., Admin or Member. If the user type is selected as admin, they will become an organization admin. They can assign roles and privileges to other members in the organization. They can manage and make changes in the organization, but cannot edit or delete an organization unlike the super admin.
Project Manager: The project manager is an individual who creates the project in Apptics. A project manager can add project members in various roles, configure group email notifications, edit the project name, and delete the project. The project ownership can be transferred to someone else from the organization settings, provided they should be an existing org member.
Super admin, organization admin, and project manager are the default roles.
There are other configurable roles in Apptics. Only an admin can configure, enable, or disable these roles in an organization.
- Development Lead and Developers
- Design Lead and Designers
- Marketing Lead and Marketers
- Testing Lead and Testers
- Followers
- Clients
Note: The roles of developers, development leads, designers, and designer leads are based on the app brand, i.e. Apple, Google, and Microsoft.
Organization admin privileges
An organization admin can perform all the actions apart from editing organization details or deleting it.
Project Manager
Module | Configure/Add | View | Edit | Delete |
|---|---|---|---|---|
| Organization members | ✗ | ✔ | ✗ | ✗ |
| Organization settings (Roles & privileges) | ✔ | ✔ | ✔ | ✔ |
| Managing project | ✔ | ✔ | ✔ | ✔ |
| Managing organizations | ✗ | ✔ | ✗ | ✗ |
| Add an application | ✔ | ✔ | ✔ | ✔ |
| Add application from Quickstart | ✔ | ✔ | ✔ | ✔ |
| Project Info | ✔ | ✔ | ✔ | ✔ |
| All other actions from Quickstart | ✔ | ✔ | ✔ | ✔ |
| Group email notifications | ✔ | ✔ | ✔ | ✔ |
| Integrations | ✔ | ✔ | ✔ | ✔ |
| Application IDs | ✔ | ✔ | ✔ | ✔ |
| Crash and non-fatal | ✔ | ✔ | ✔ | ✔ |
| DSYM and Proguard Mapping files | ✔ | ✔ | ✔ | ✔ |
| API tracking | ✔ | ✔ | ✔ | ✔ |
| Event tracking | ✔ | ✔ | ✔ | ✔ |
| In-app feedback | ✔ | ✔ | ✔ | ✔ |
| In-app updates | ✔ | ✔ | ✔ | ✔ |
| In-app ratings | ✔ | ✔ | ✔ | ✔ |
| Funnels | ✔ | ✔ | ✔ | ✔ |
| Retention | ✔ | ✔ | ✔ | ✔ |
| Remote configuration | ✔ | ✔ | ✔ | ✔ |
| Cross promotion | ✔ | ✔ | ✔ | ✔ |
| Store reviews | ✔ | ✔ | ✔ | ✔ |
| Push notifications | ✔ | ✔ | ✔ | ✔ |
| Users and user properties | ✔ | ✔ | ✔ | ✔ |
| Manage user group tracking | ✔ | ✔ | ✔ | ✔ |
| Segments | ✔ | ✔ | ✔ | ✔ |
Development lead and developers
(*The privileges access are listed here in general. It will vary for each organization/project according to the roles and privileges assigned by the organization admin.)
Module | Create/Add/Configure | View | Edit | Delete |
|---|---|---|---|---|
| Organization members | ✗ | ✔ | ✗ | ✗ |
| Organization settings (Roles & privileges) | ✗ | ✗ | ✗ | ✗ |
| Managing project | ✗ | ✔ | ✗ | ✗ |
| Managing organizations | ✗ | ✔ | ✗ | ✗ |
| Add an application | ✔ | ✔ | ✔ | ✔ |
| Add application from Quickstart | ✔ | ✔ | ✔ | ✔ |
| Project Info | ✗ | ✔ | ✗ | ✗ |
| Group Email Notifications | ✗ | ✗ | ✗ | ✗ |
| Integrations | ✔ | ✔ | ✔ | ✔ |
| Application IDs | ✔ | ✔ | ✔ | ✔ |
| Crash and non-fatal* | ✔ | ✔ | ✔ | ✔ |
| DSYM and Proguard* Mapping files | ✔ | ✔ | ✔ | ✔ |
| API tracking* | ✔ | ✔ | ✔ | ✔ |
| Event tracking* | ✔ | ✔ | ✔ | ✔ |
| In-app feedback* | ✔ | ✔ | ✔ | ✔ |
| In-app updates* | ✔ | ✔ | ✔ | ✔ |
| In-app ratings* | ✔ | ✔ | ✔ | ✔ |
| Funnels* | ✔ | ✔ | ✔ | ✔ |
| Retention* | ✗ | ✔ | ✗ | ✗ |
| Remote configuration* | ✔ | ✔ | ✔ | ✔ |
| Cross promotion* | ✔ | ✔ | ✔ | ✔ |
| Store reviews* | ✔ | ✔ | ✔ | ✔ |
| Push notifications* | ✔ | ✔ | ✔ | ✔ |
| Users and user properties* | ✗ | ✔ | ✗ | ✗ |
| User groups* | ✔ | ✔ | ✔ | ✔ |
| Segments* | ✔ | ✔ | ✔ | ✔ |
Marketing lead and marketers
(*The privileges access are listed here in general. It will vary for each organization/project according to the roles and privileges assigned by the organization admin.)
Module | Create/Add/Configure | View | Edit | Delete |
|---|---|---|---|---|
| Organization members | ✗ | ✔ | ✗ | ✗ |
| Organization settings (Roles & privileges) | ✗ | ✗ | ✗ | ✗ |
| Managing project | ✗ | ✔ | ✗ | ✗ |
| Managing organizations | ✗ | ✔ | ✗ | ✗ |
| Add an application | ✔ | ✔ | ✔ | ✔ |
| Add application from Quickstart | ✗ | ✔ | ✗ | ✗ |
| Project info | ✗ | ✔ | ✗ | ✗ |
| Group email notifications | ✗ | ✗ | ✗ | ✗ |
| Integrations | ✗ | ✔ | ✗ | ✗ |
| Application IDs | ✗ | ✔ | ✗ | ✗ |
| Crash and non-fatal* | ✗ | ✔ | ✗ | ✗ |
| DSYM and Proguard* Mapping files | ✗ | ✔ | ✗ | ✗ |
| API tracking* | ✗ | ✔ | ✗ | ✗ |
| Event tracking* | ✗ | ✔ | ✗ | ✗ |
| In-app feedback* | ✗ | ✔ | ✗ | ✗ |
| In-app updates* | ✗ | ✔ | ✗ | ✗ |
| In-app ratings* | ✗ | ✔ | ✗ | ✗ |
| Funnels* | ✔ | ✔ | ✔ | ✔ |
| Retention* | ✗ | ✔ | ✗ | ✗ |
| Remote configuration* | ✗ | ✔ | ✗ | ✗ |
| Cross promotion* | ✗ | ✔ | ✗ | ✗ |
| Store reviews* | ✔ | ✔ | ✔ | ✔ |
| Push notifications* | ✔ | ✔ | ✔ | ✔ |
| Users and user properties* | ✗ | ✔ | ✗ | ✗ |
| User groups* | ✔ | ✔ | ✔ | ✔ |
| Segments* | ✔ | ✔ | ✔ | ✔ |
Testers, clients, and followers
The privileges for the Tester, Client, and Follower roles will vary for each organization/project. These will be defined according to the roles and privileges assigned by the organization admin.
Organization settings
The doorway into the Apptics console is to be a part of an organization. In order to access the Apptics console, you need to create an organization and invite users to the organization. Once you create an organization and add an app, a project will be automatically created and you now invite users to the organization and assign roles and privileges in Organization settings. After creating an organization, it is always recommended to configure your organization settings first, to manage it efficiently.
Organization settings allows you to organize roles and privileges, configure role-based access for the organization, add the other family apps to cross-promote within your app, and manage the use of AI features within the Apptics console for your organization.
Updating roles and privileges
- Navigate to the right menu and click on the profile.
- Click on Organization settings and the below screen will appear.
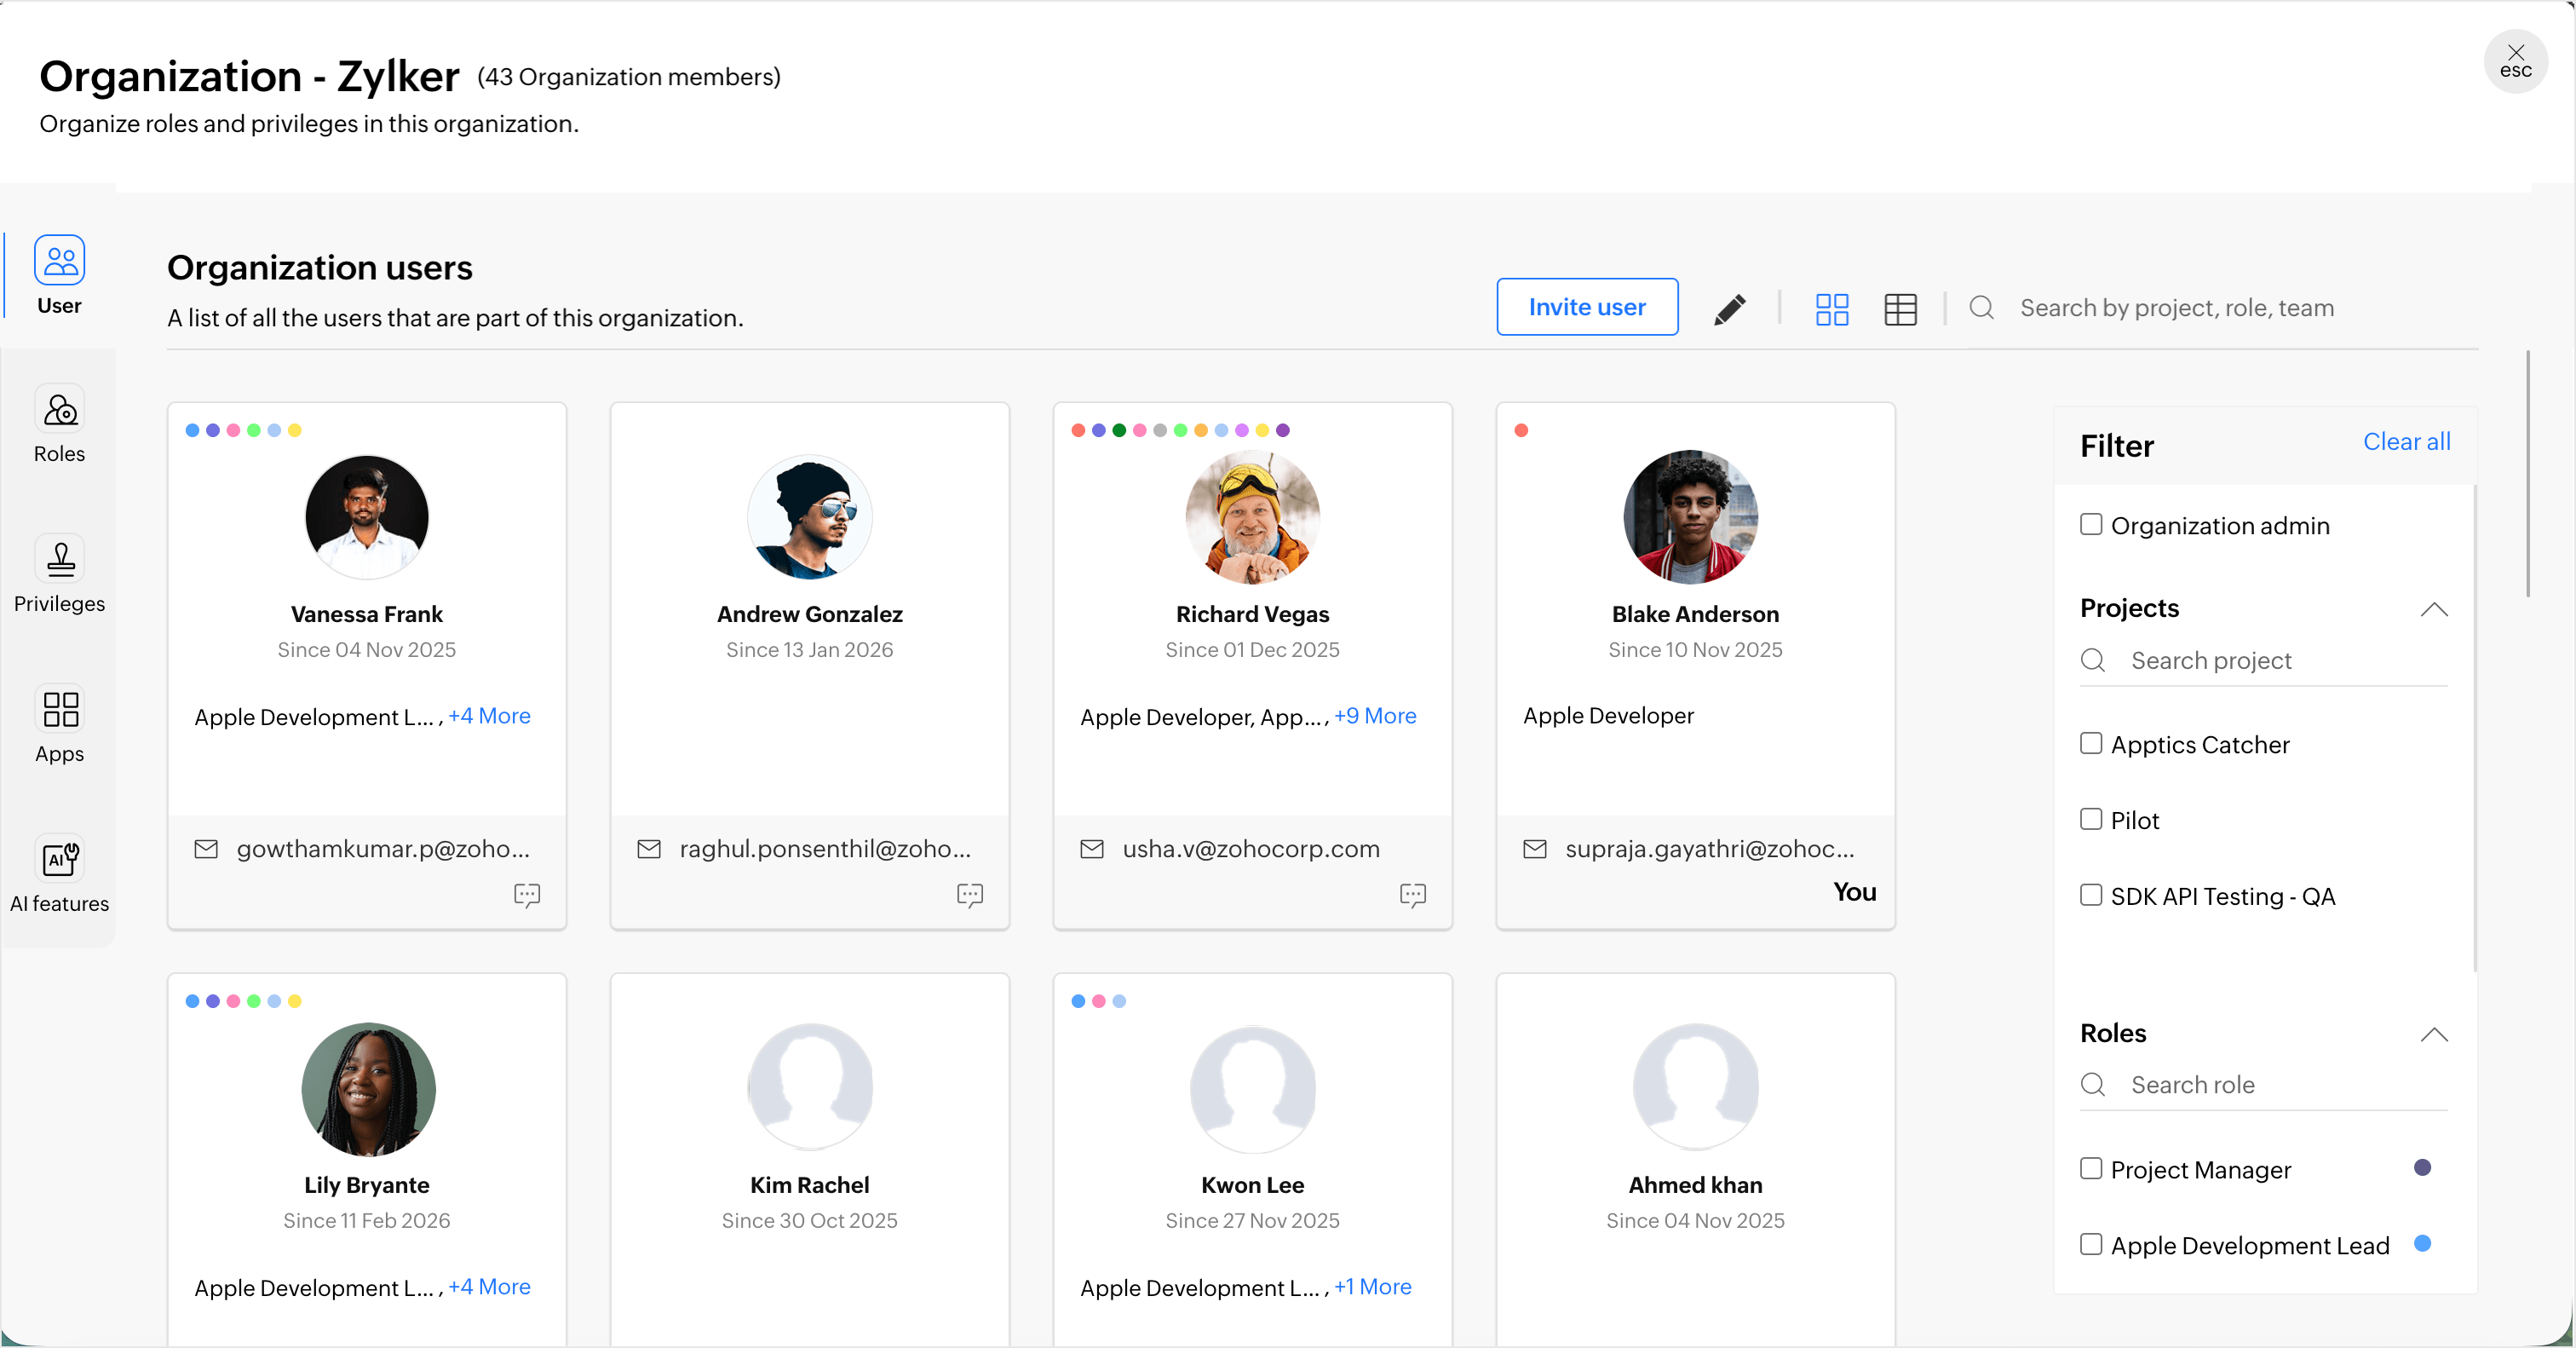
Manage organization users
You can invite new users, edit their roles, or remove users from the organization.
Update user roles
Click on Roles to select the roles you want to include in the organization apart from the default roles (Super admin, Organization admin, and Project manager), and click Update to save the configured roles. 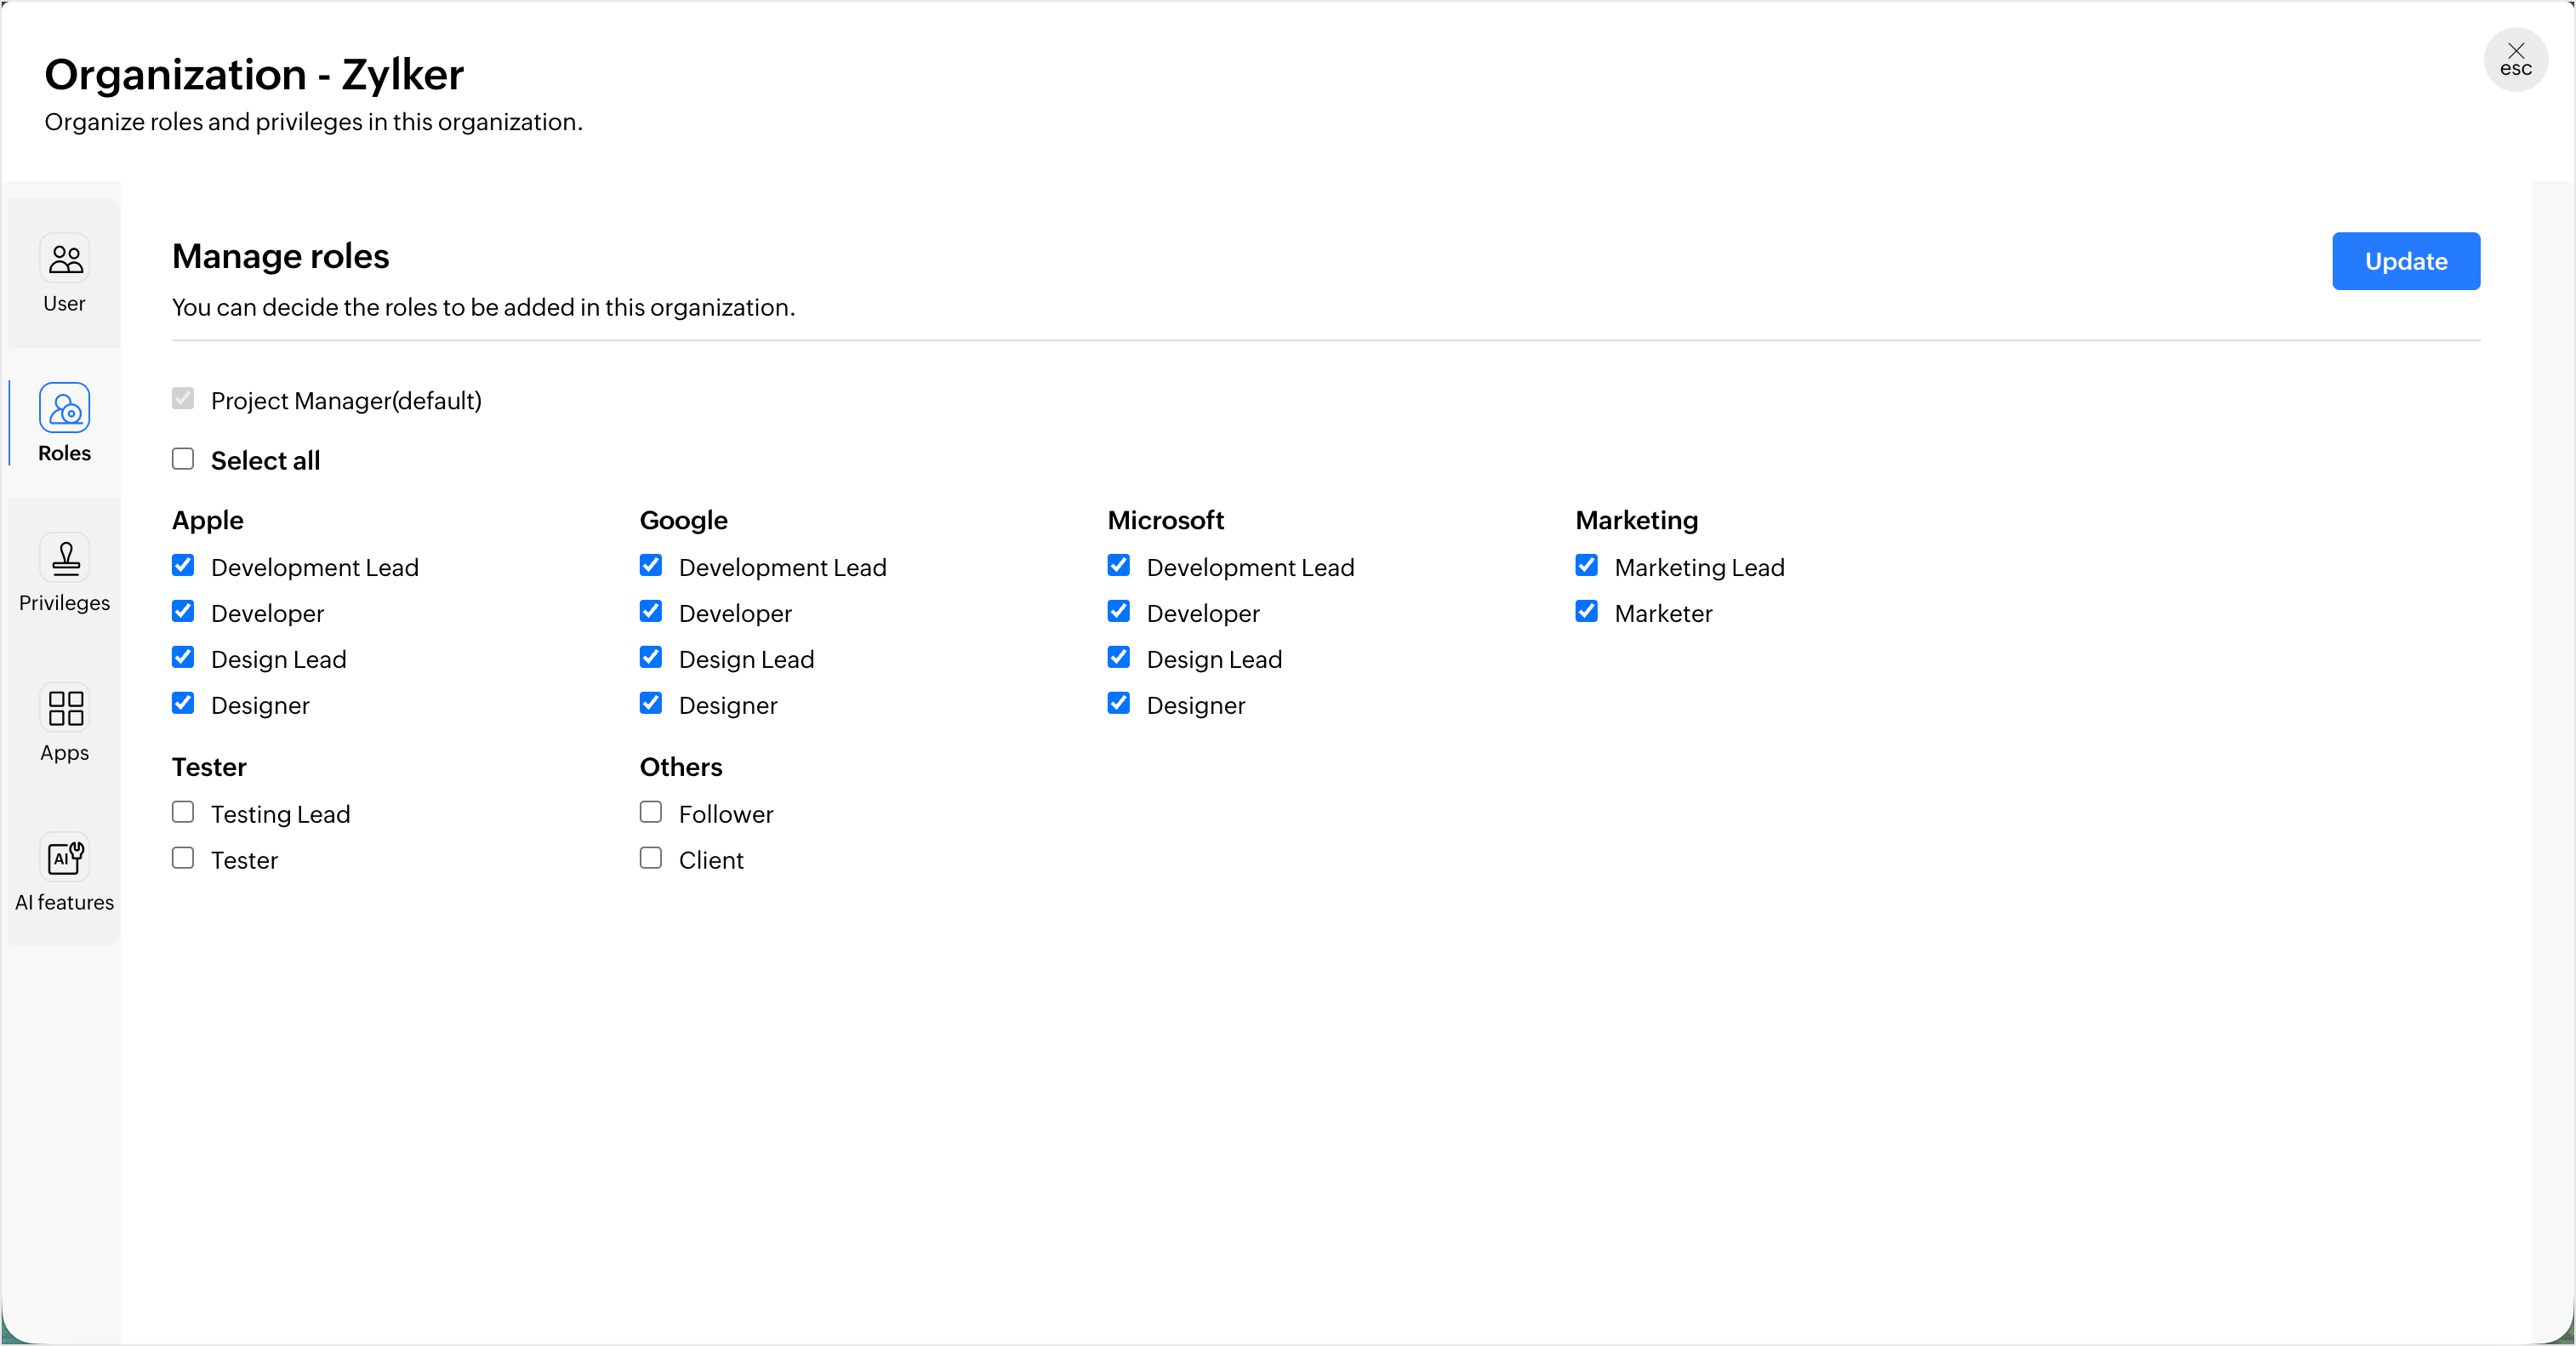
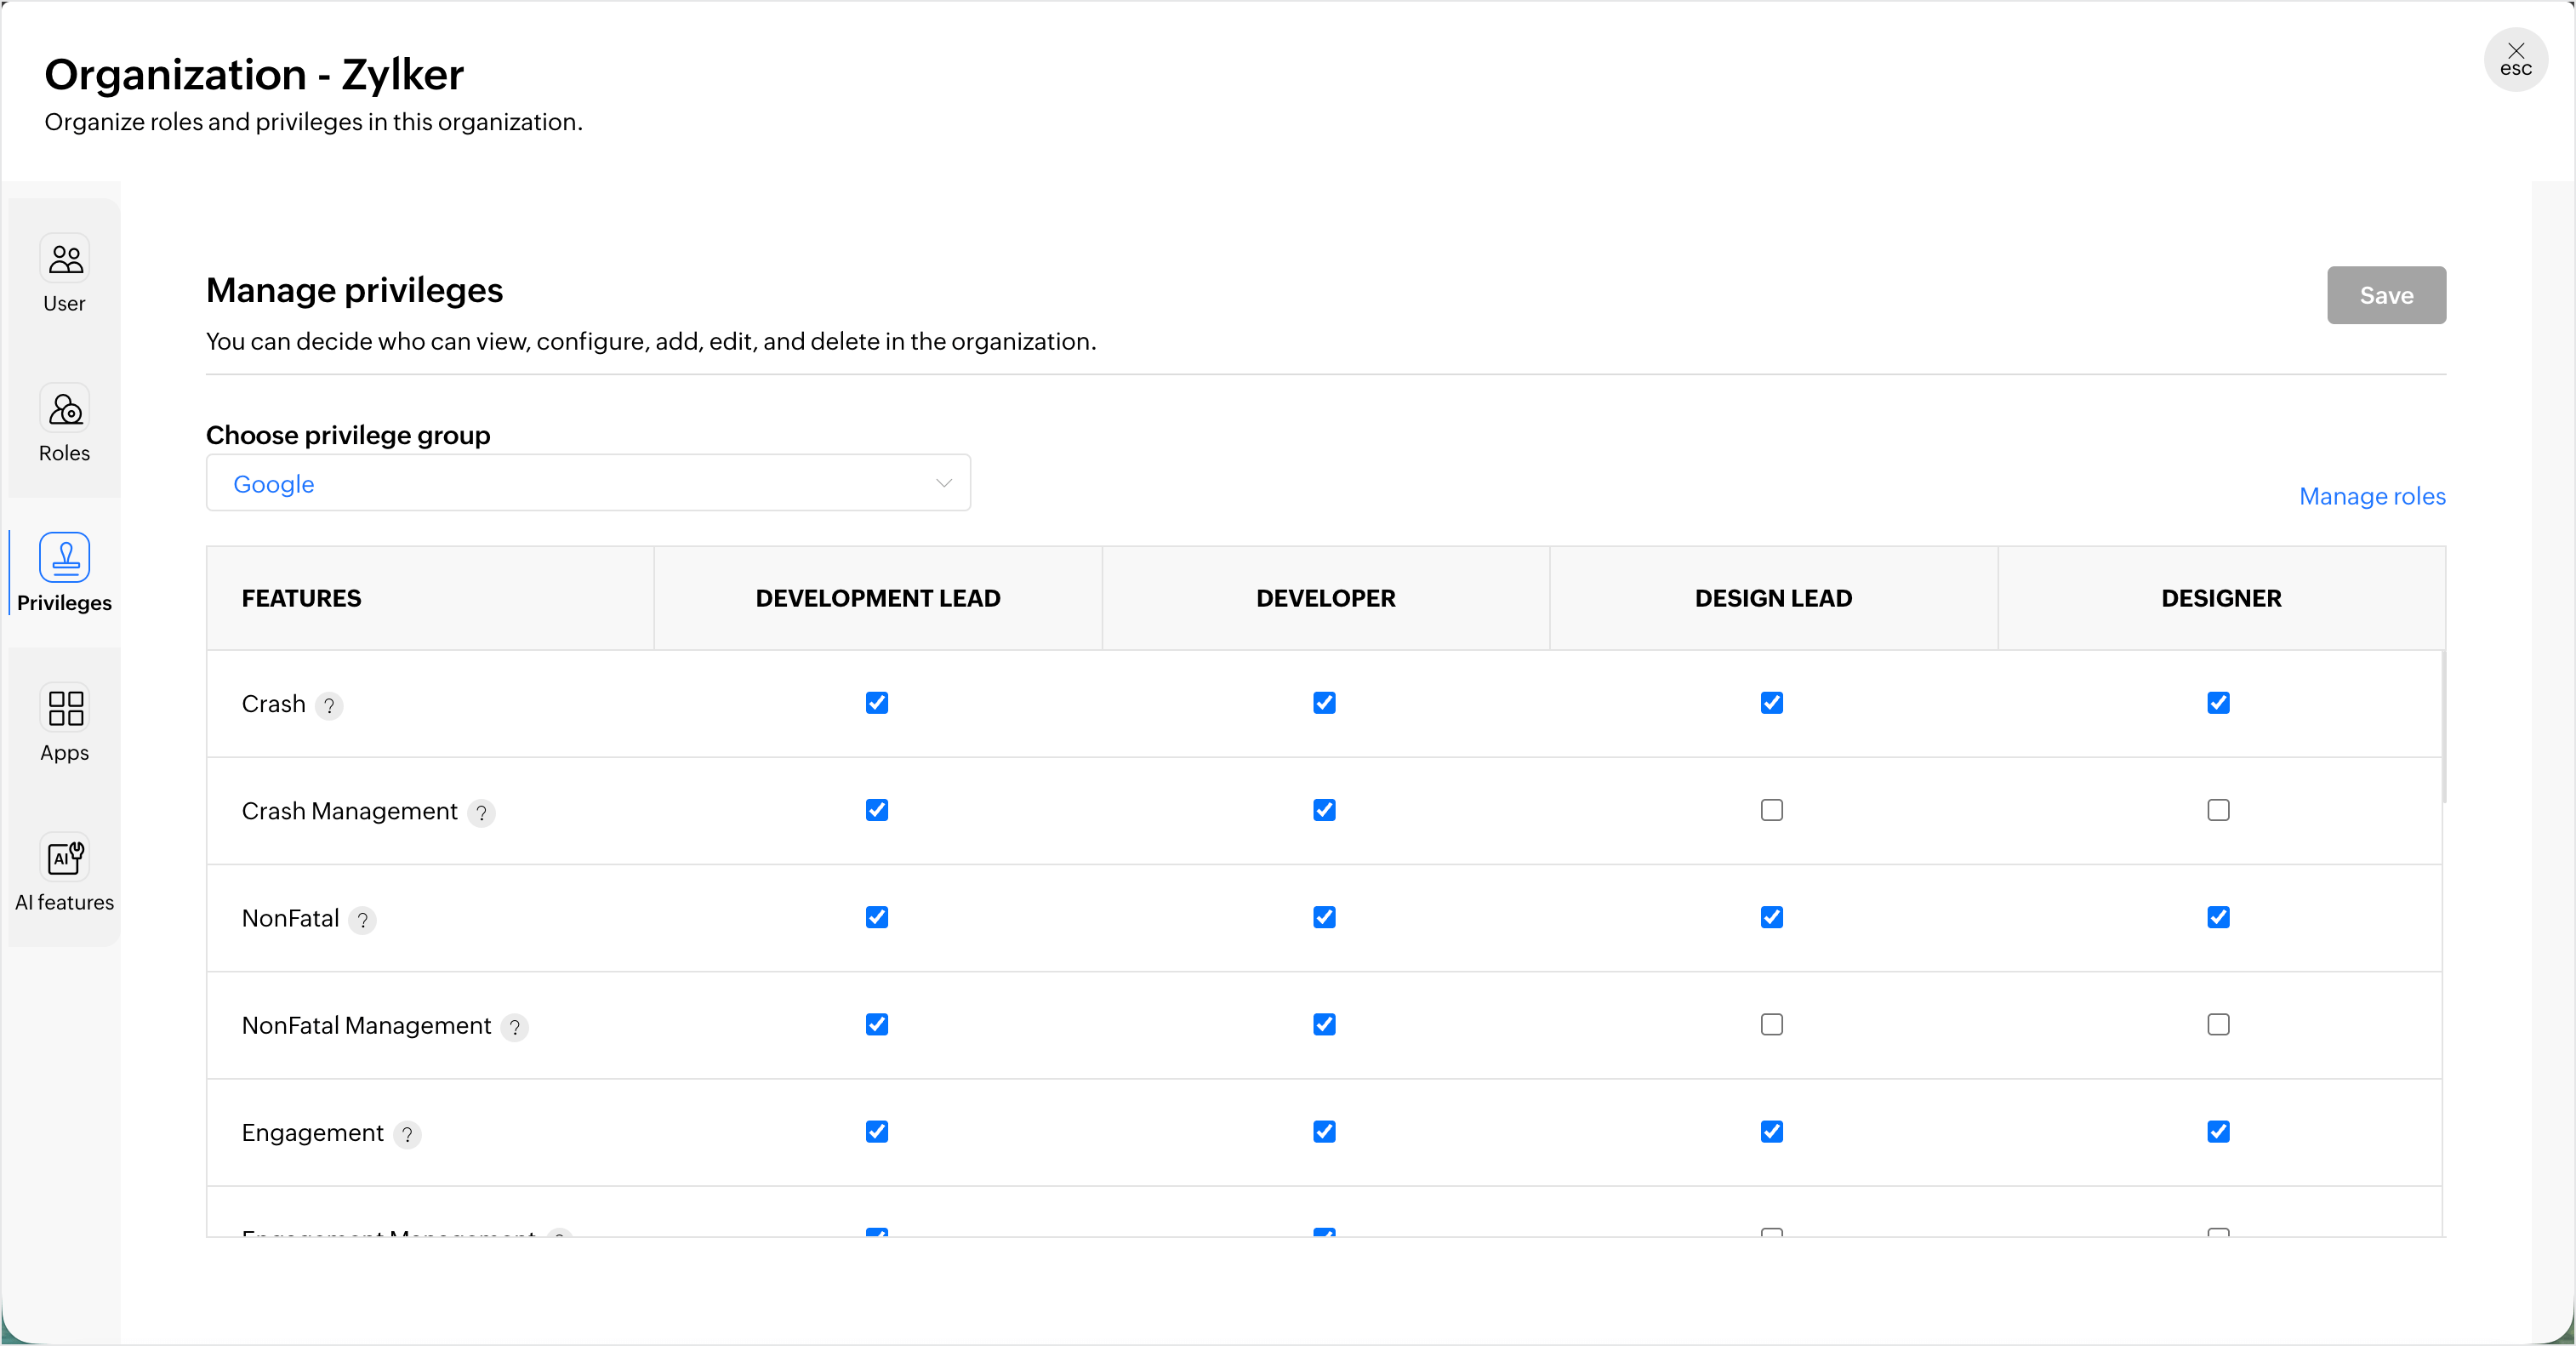
Manage module privileges
The Privileges section allows you to determine who can perform view, configure, add, edit, and delete actions for each feature module in the organization.
- Choose the privilege group for which you want to set permissions for each feature module. For example, let us say you choose Google for the privilege group, you can set permissions only for the roles you have assigned under the Google ecosystem.
- Click on Manage roles to add or remove roles from the privilege group you have selected and update the changes. (Only the roles that you have most recently updated will be visible for the chosen privilege group.)
- Click Save to update the set permissions for each feature module.
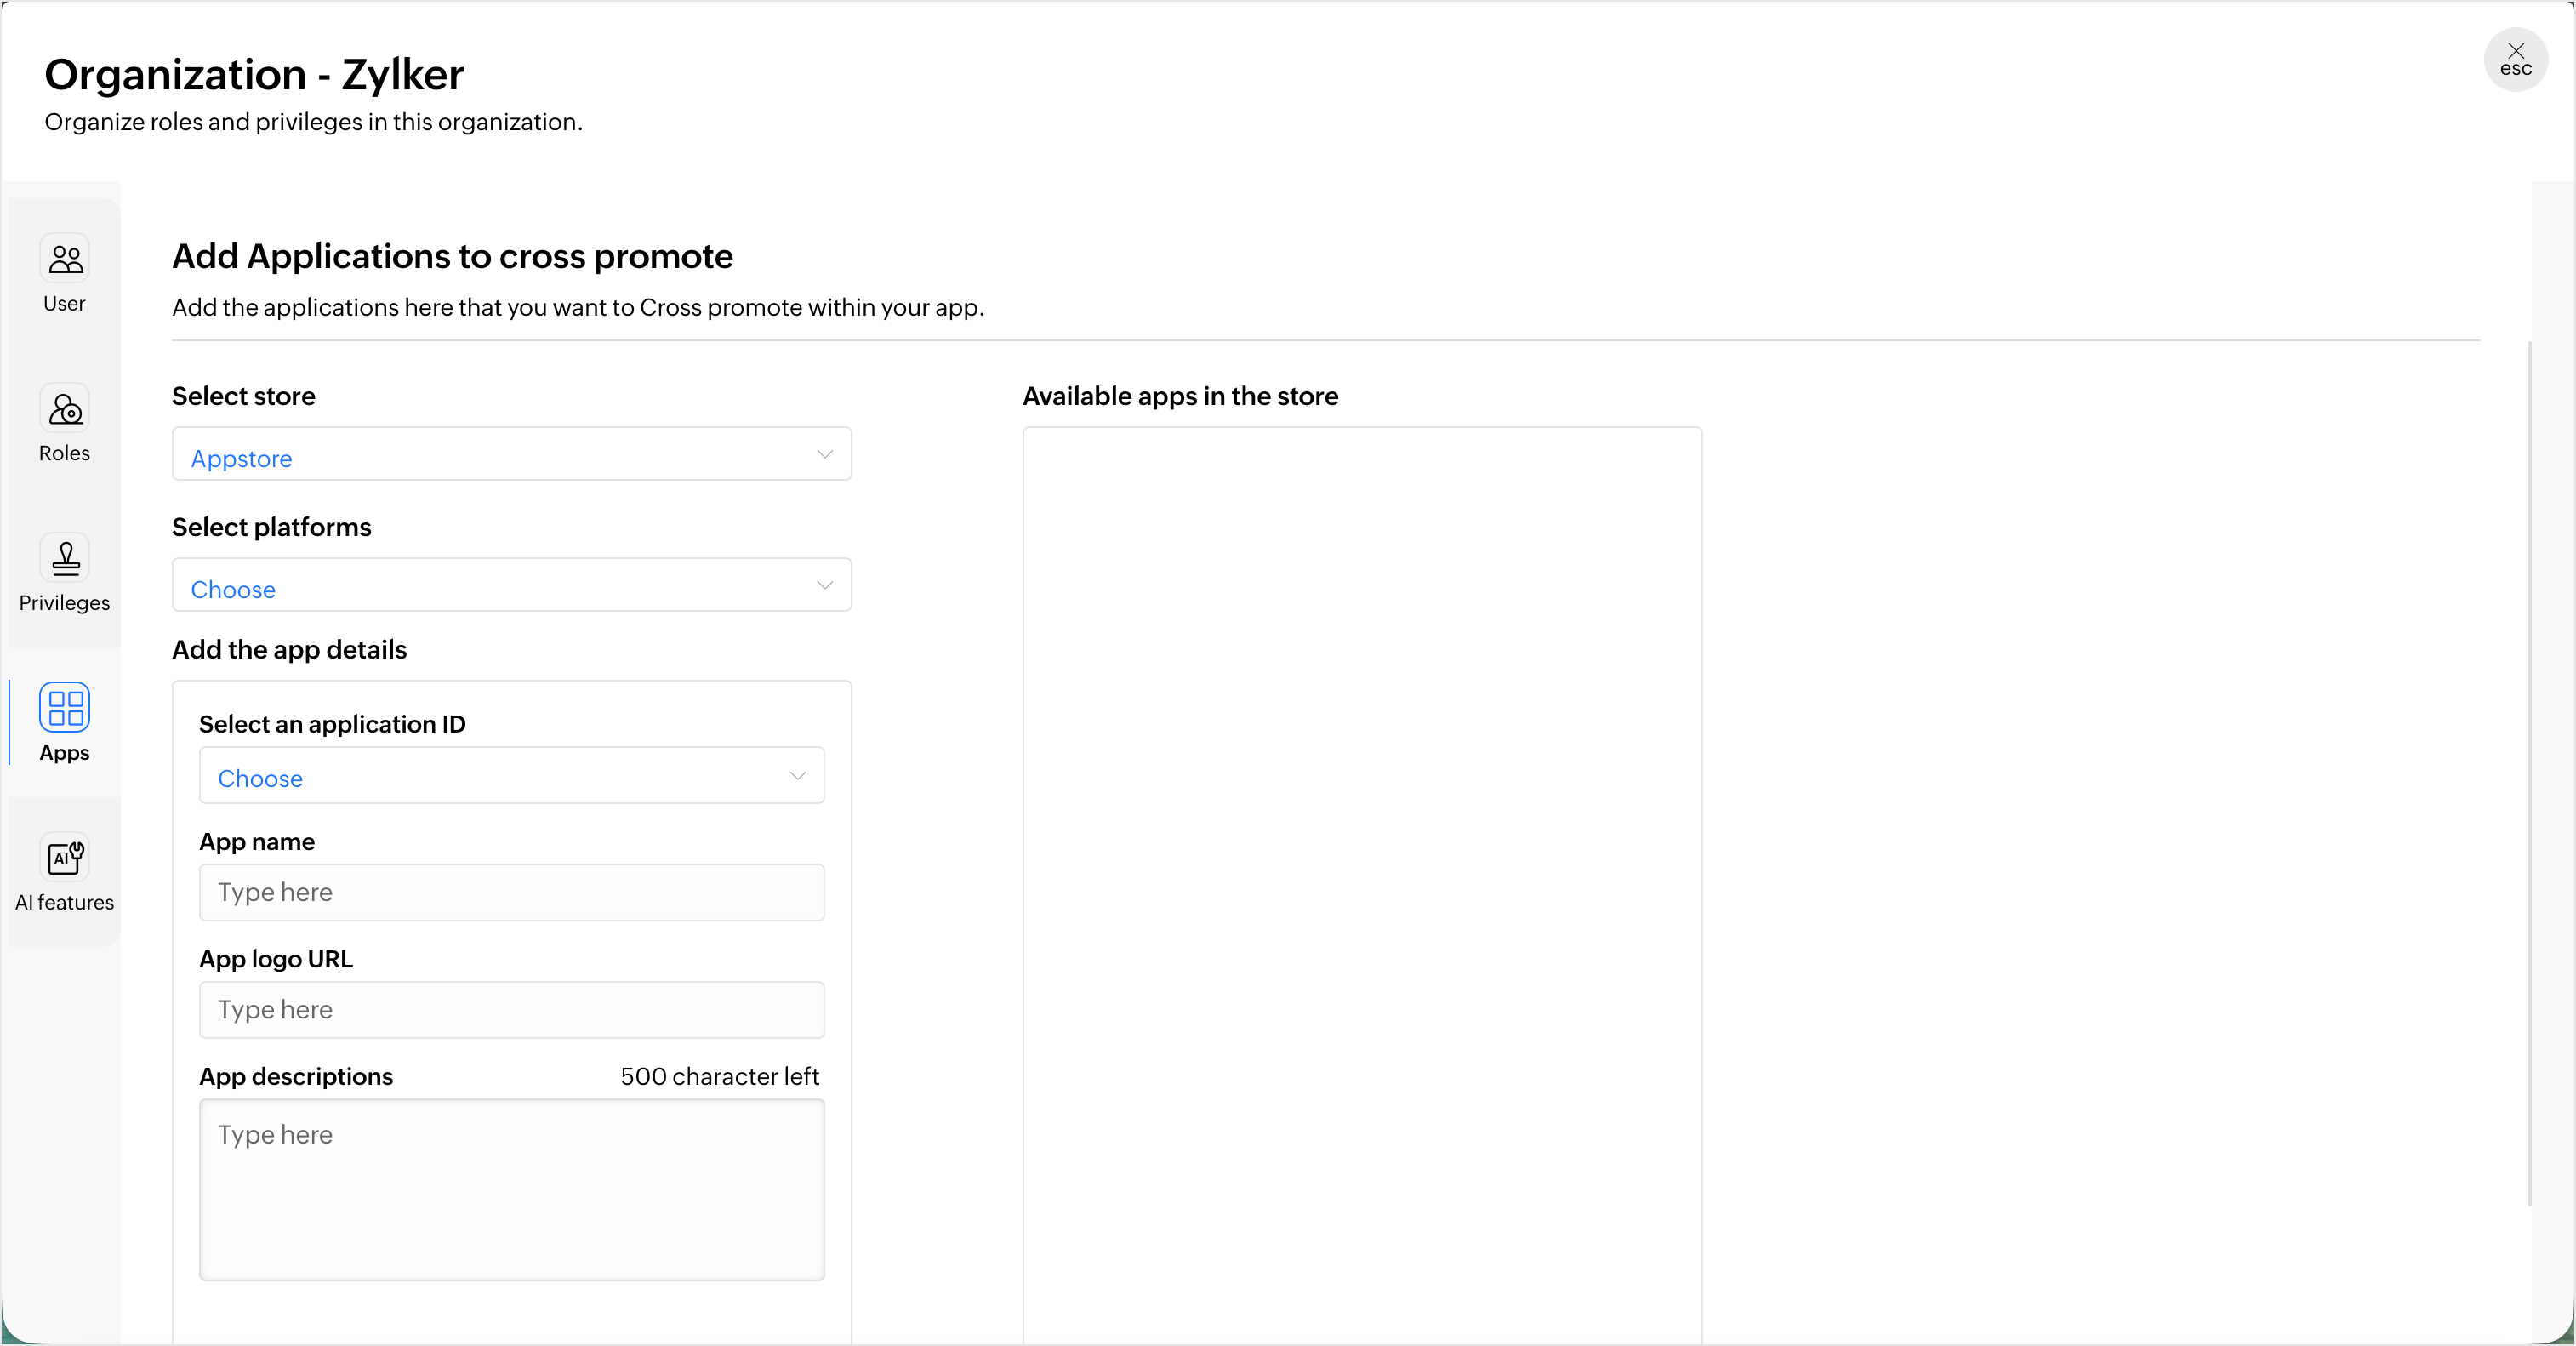
Add apps for cross-promotion
From the Apps section, you can add the other applications that you want to cross-promote within your app. This means that these apps will be listed under the 'Apps that you may like' and 'More apps from us' sections in your app's UI.
- Select the store and platform in which the app will be available.
- Provide further details such as the application ID, the app name, the URL for the app's logo, and a short app description.
- Click on Add and the app will be available in a list of apps that you want to cross-promote.
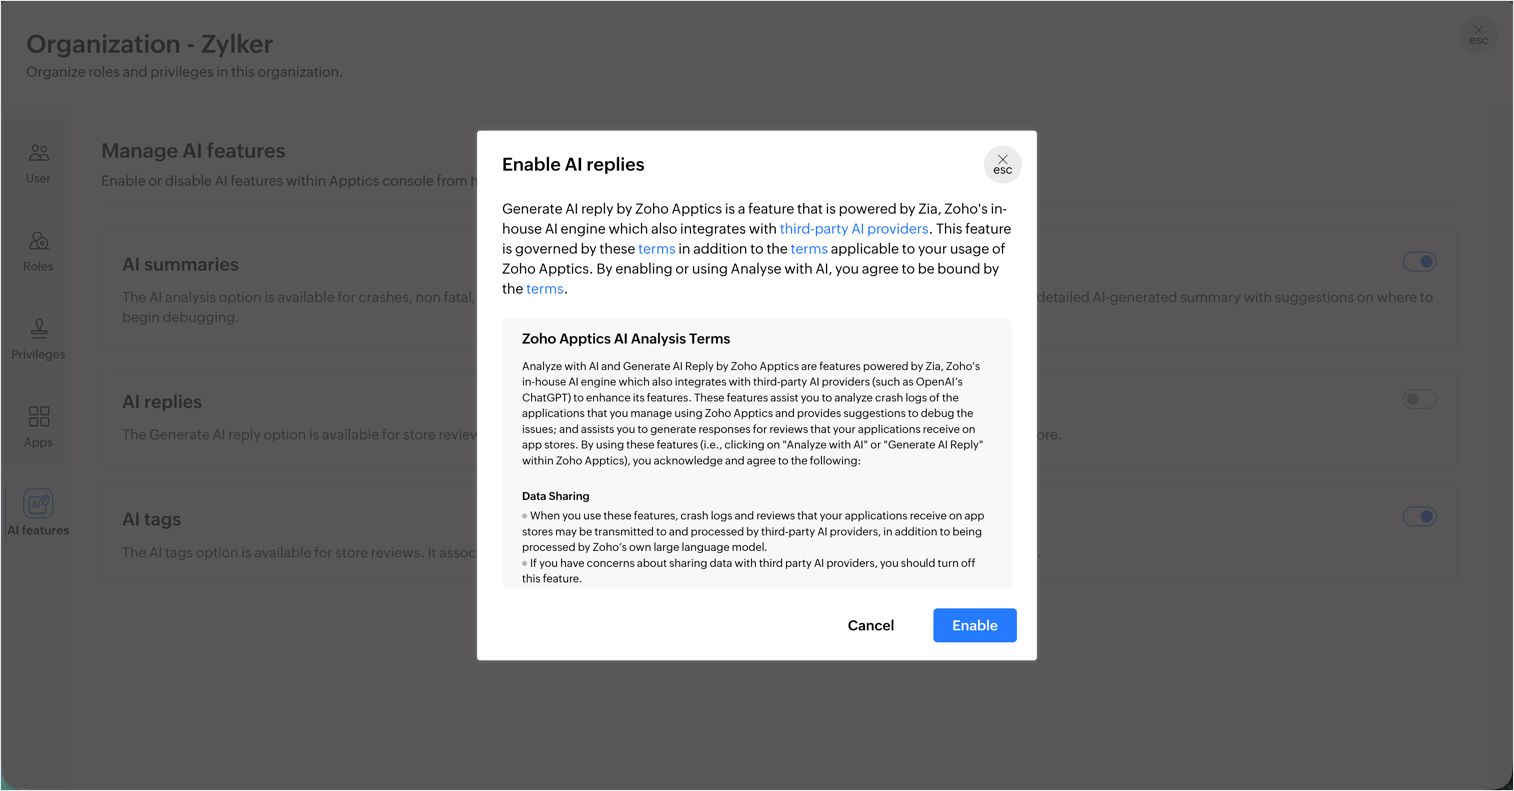
Manage AI features
- From AI features section, you can enable or disable AI features available within Apptics console for the organization.
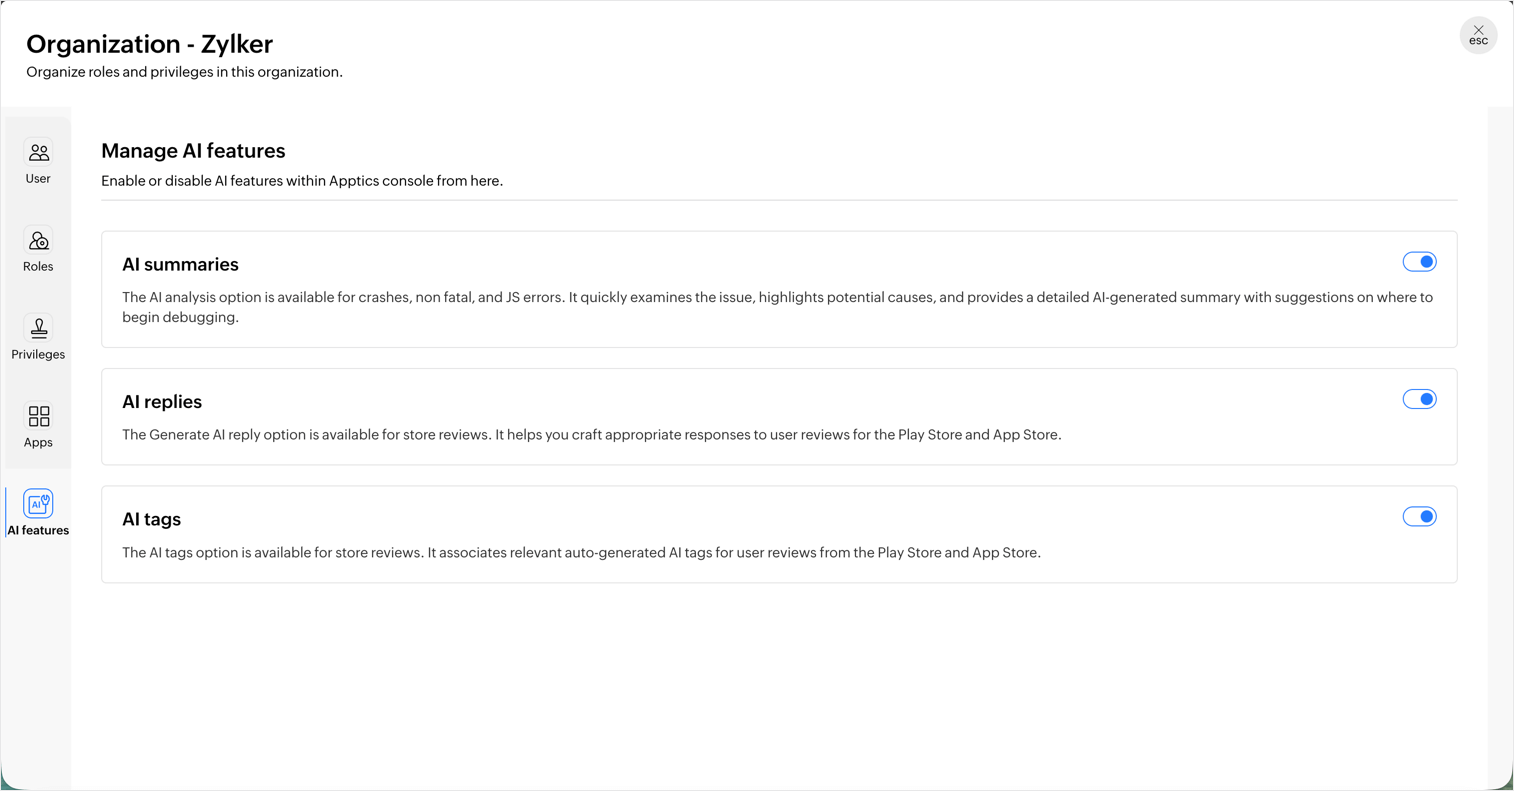
- While enabling or disabling AI features, make sure you a pop up will appear to confirm if you would want to proceed further.
Deletion
Deleting an organization or the associated projects is a role-based action. Once an organization or a project is deleted, data collection is stopped immediately and all the associated data is permanently removed as per our terms of use. This is followed by an email to all the members notifying them about the organization or project deletion.
Delete an organization
Only the Super admin (the one who created the organization) can delete the organization by following the below steps.
- Navigate to Profile > Manage organizations.
- Click on the menu button near the organization that you want to delete.
- A list of options will appear, click Delete and you will see a confirmation pop-up.
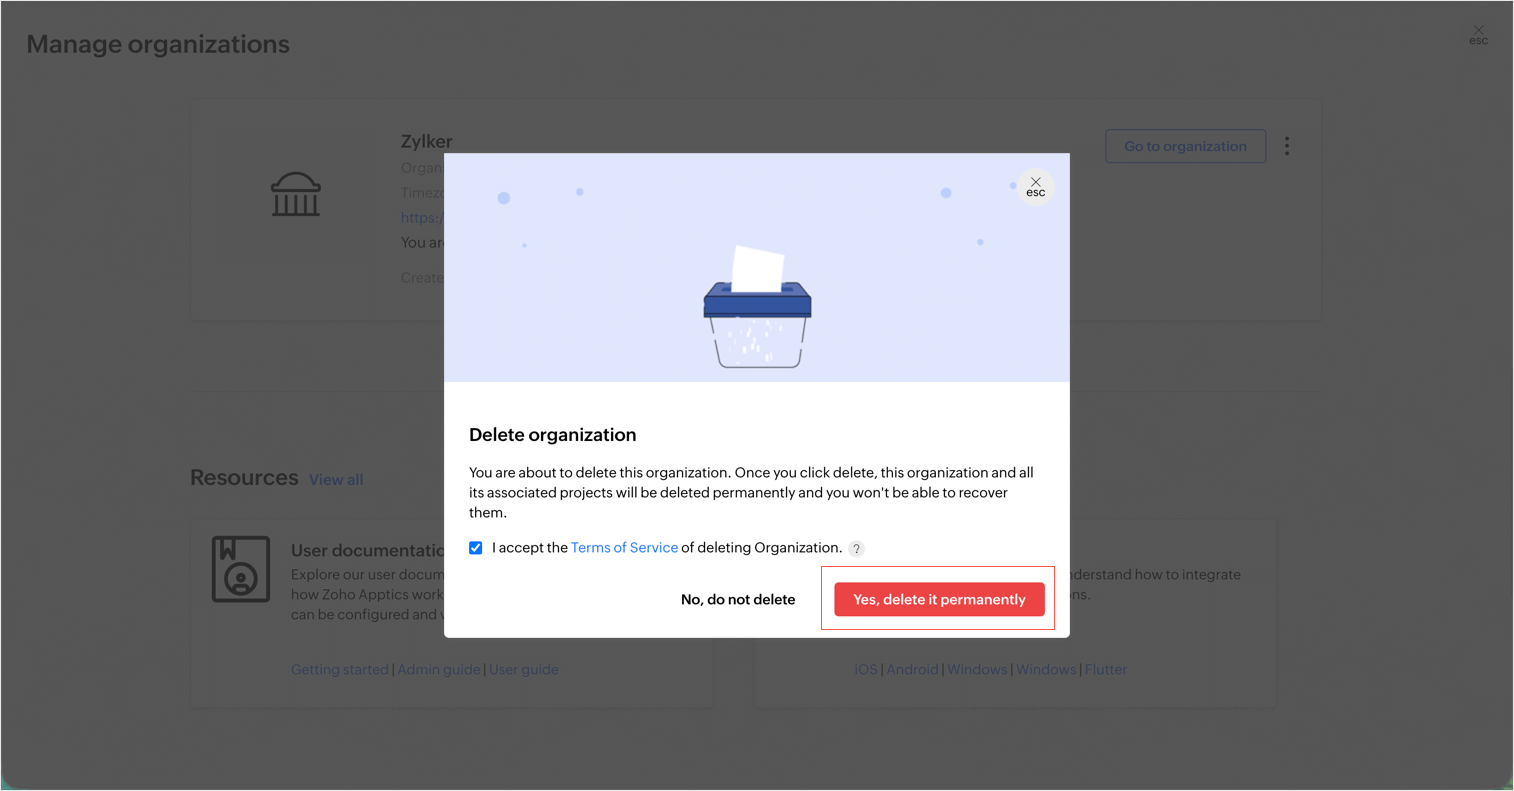
- Click Yes, delete and the organization will be deleted permanently.
Delete a Project
Only the super admin, organization admins, or the project manager can delete a project following the below steps:
- Navigate to Project settings > Project Info.
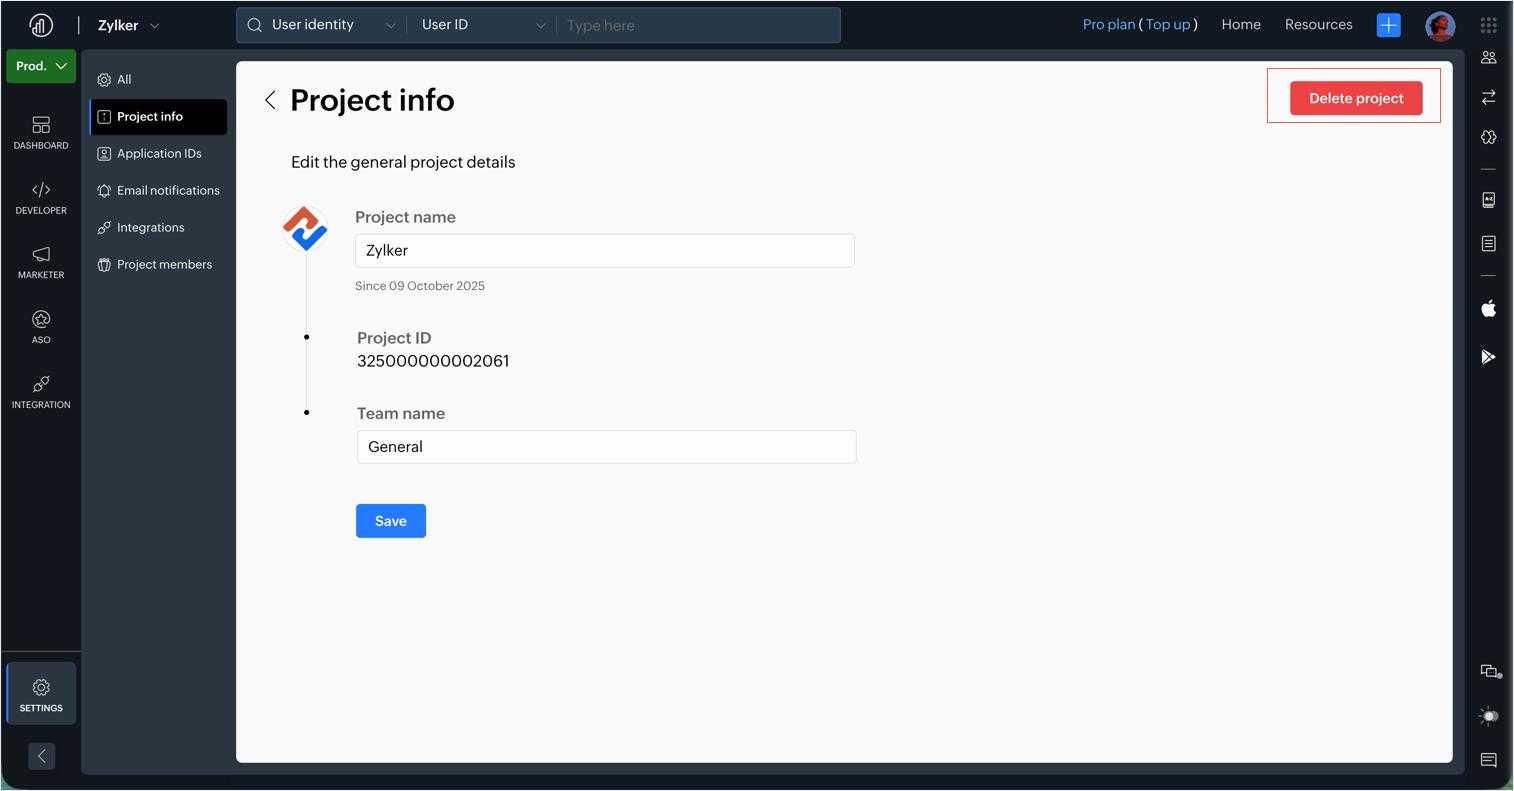
- Click on Delete project and a confirmation pop-up will appear.
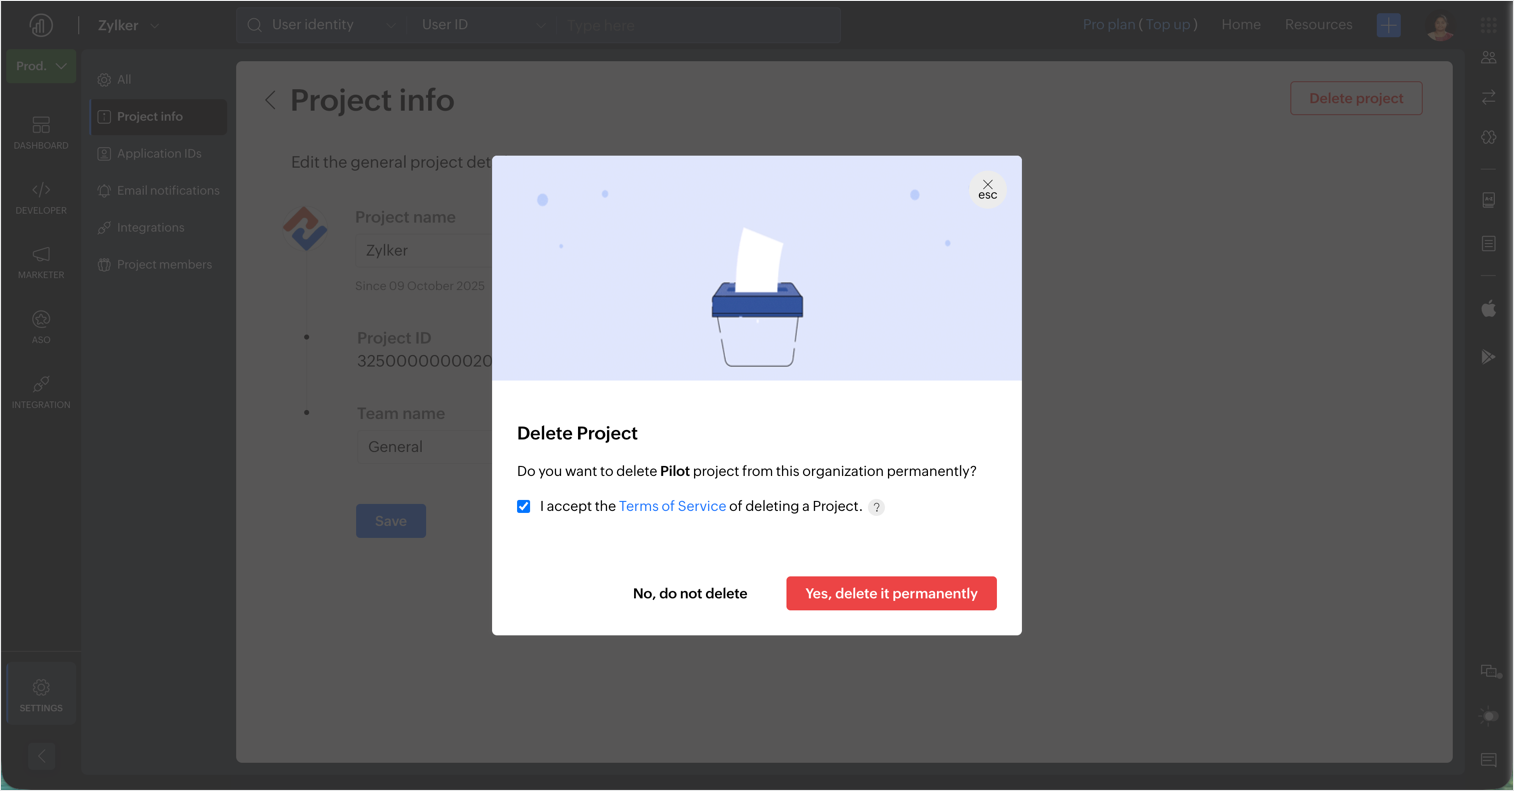
- Accept the terms and conditions of deleting a Project, click Yes, delete it permanently and the project will be deleted permanently.
- If a project is deleted by mistake, you can contact support@zohoapptics.com to restore the deleted project within 180 days, as long as the associated organization is still active.
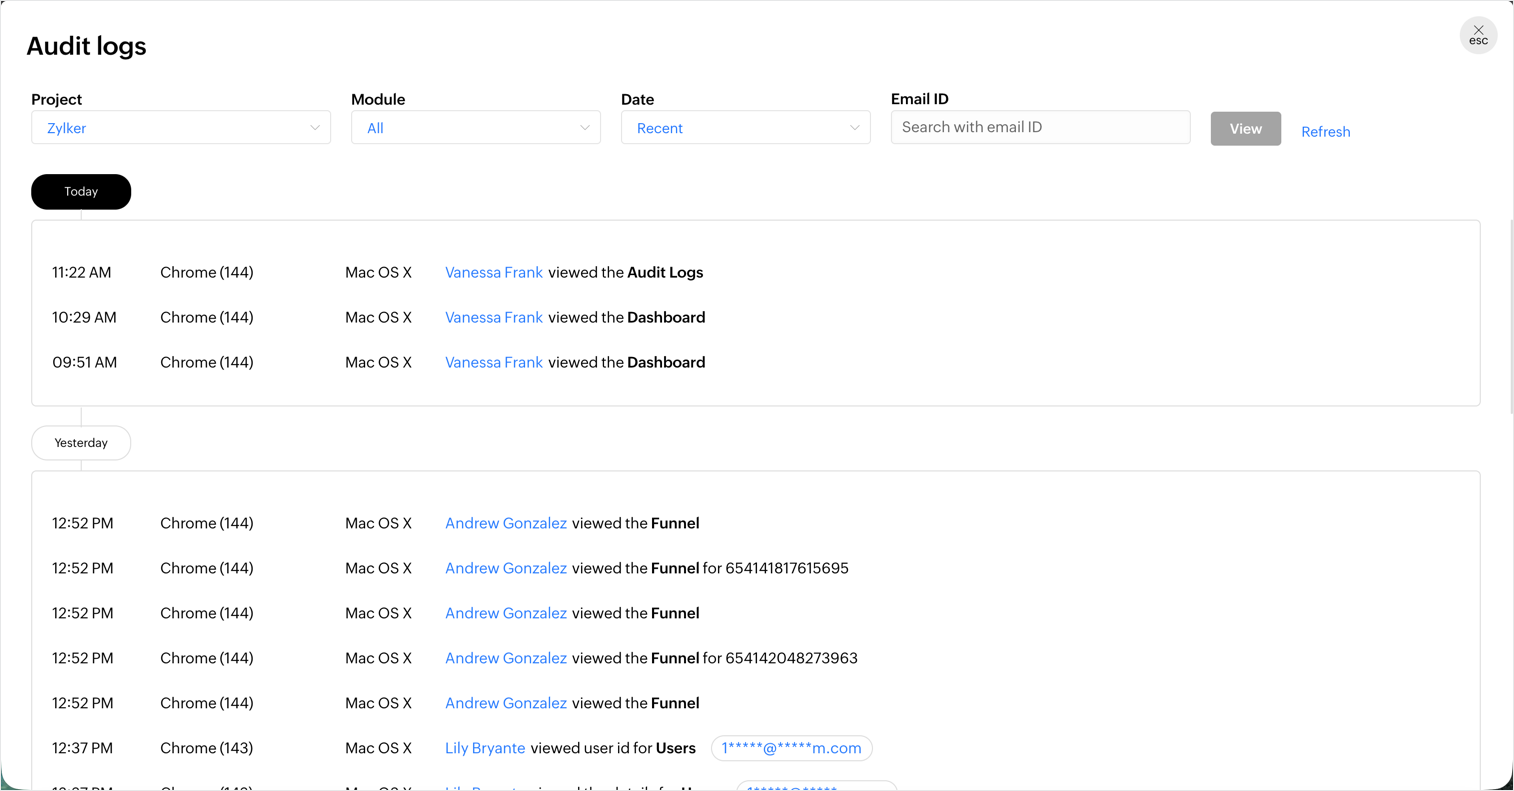
Audit logs
All user activity that happens for each project within the Apptics console are logged as audit logs in Zoho Apptics. The audit log entries can be accessed only by the organization admin, project manager, development lead, and developers by default and no one can edit/change/delete anything from the audit logs.
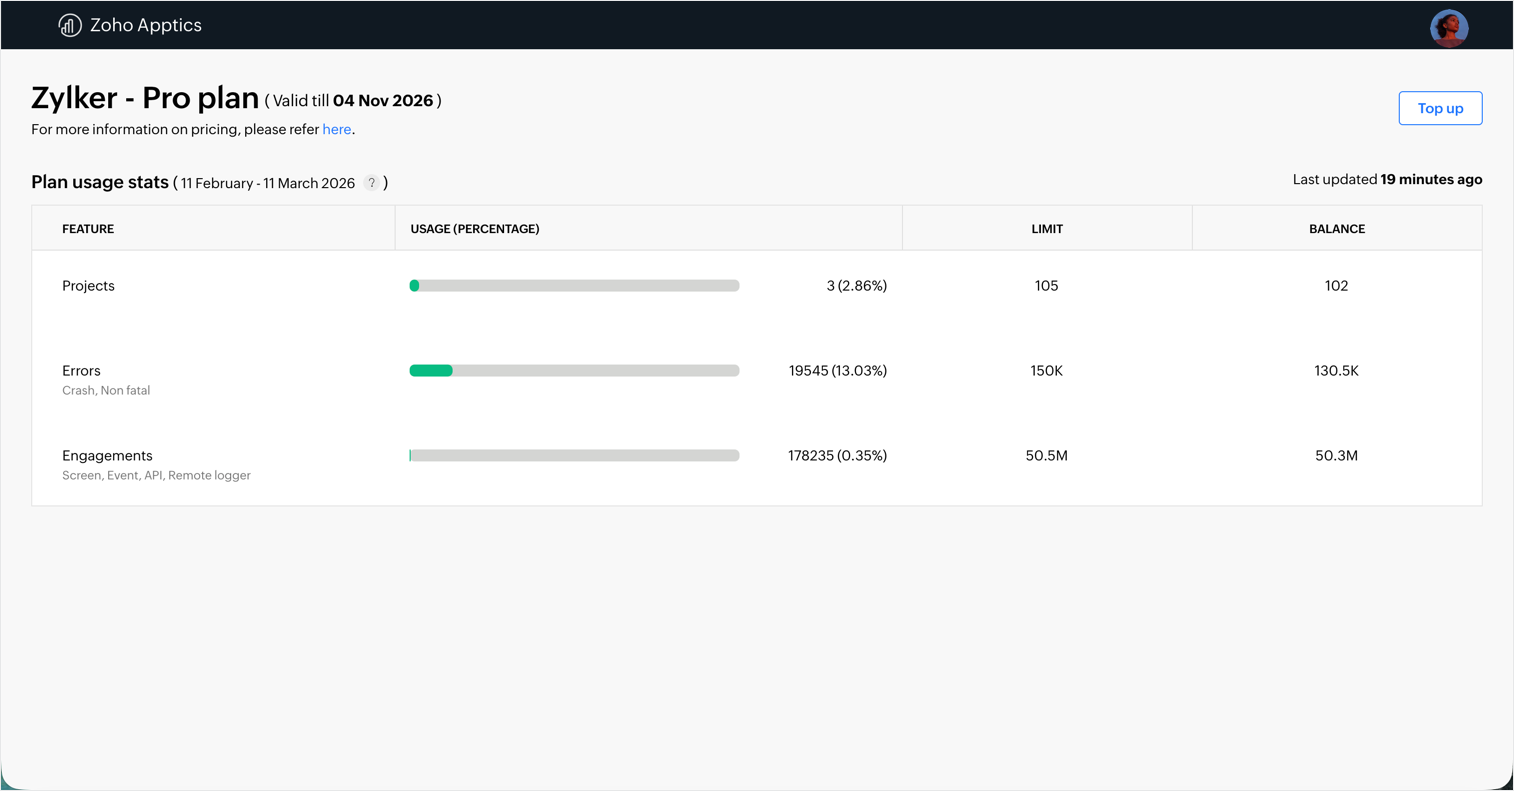
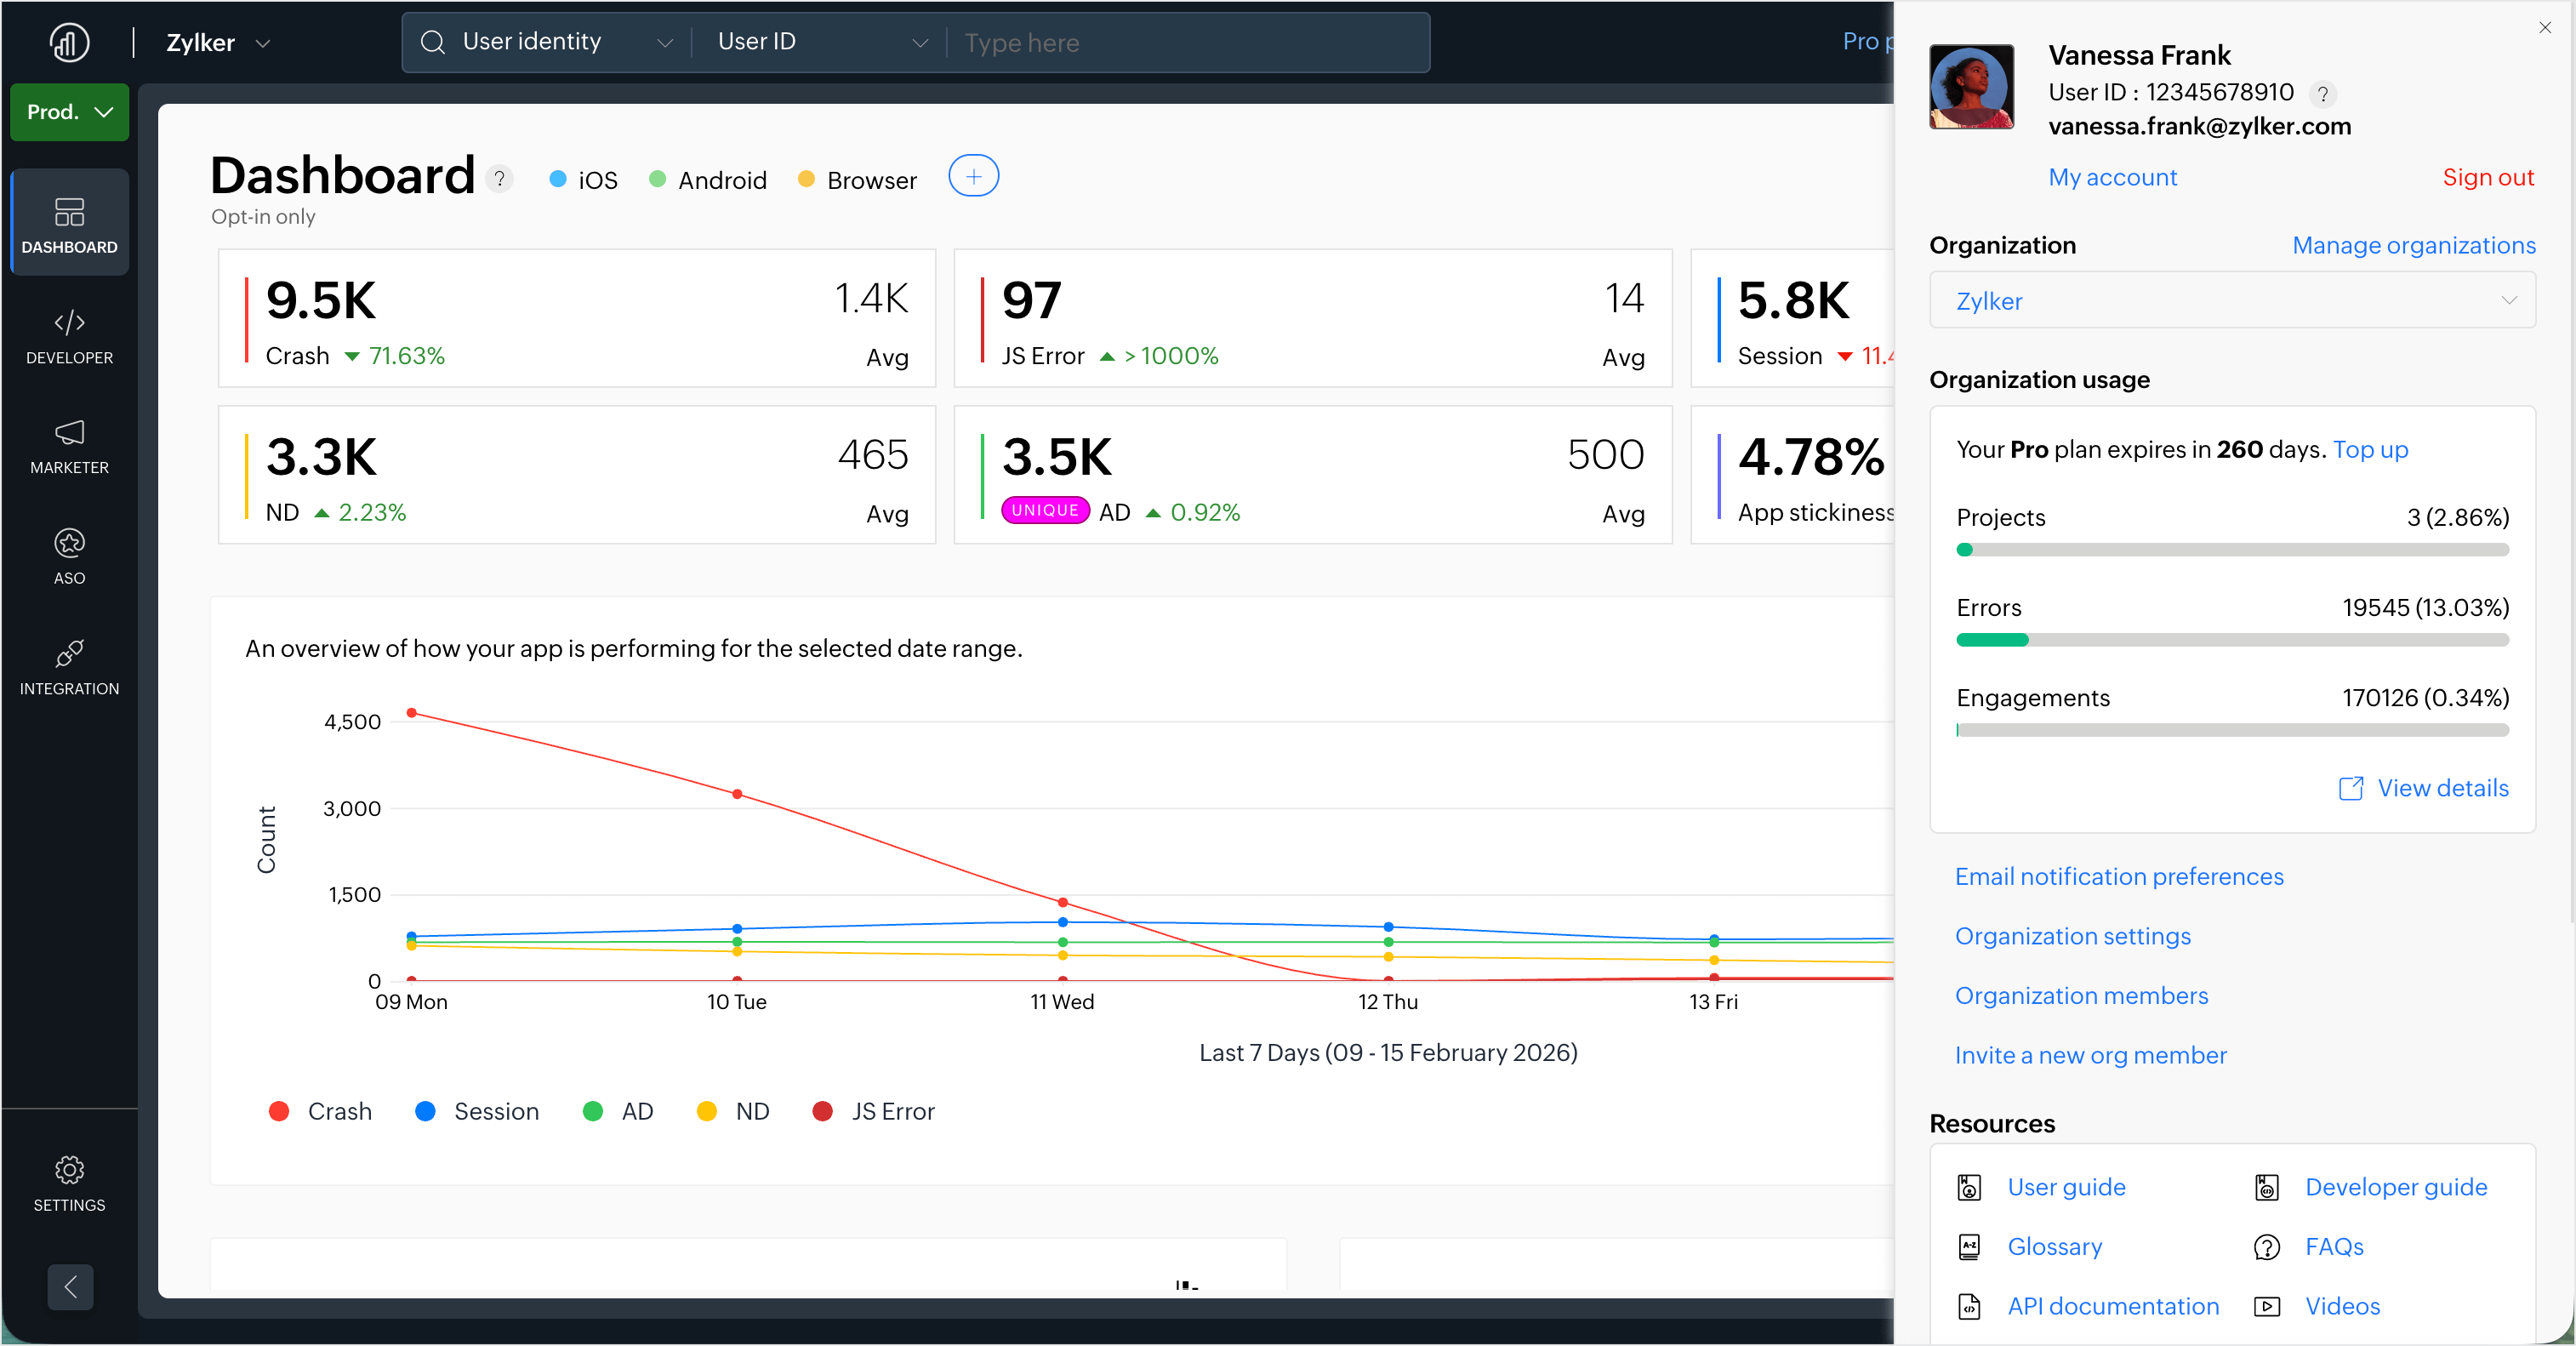
Organization usage
- You can check organization usage stats from the right menu > Organization usage. They include the project, errors, and engagement token limits based on your subscription plan.
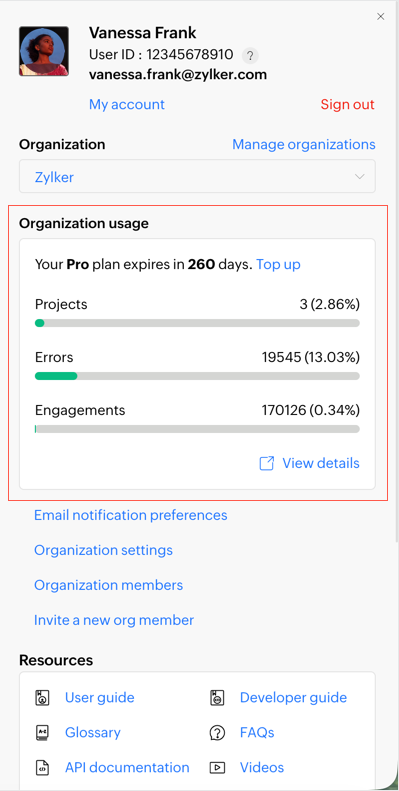
- Click on on View details to see the plan usage limits and balance available. You can also upgrade the plan in case of Free forever plan, or top up in case of Pro plan.