Connections in Cliq
"Ever wondered how you can link your favourite third-party services with Cliq?"
In this page, you'll learn about...
What are Connections?
Connections in Cliq are powerful bridges that facilitate smooth interactions with various services. They allow you to access and manage data effortlessly and significantly enhance your workflow, enabling seamless interactions across different platforms.
Once a connection is created and connected, you can use it in Deluge integration tasks and invoke URL scripts to access data from the required service.
For example, to access your OneDrive account using OneDrive's REST APIs from your Zoho Cliq, you can create a OneDrive connection, connect to it, and use the connection link name in invoke URL Deluge task. The invoke URL task will perform the specified API call to your connected OneDrive account.
How to navigate to the connections page?
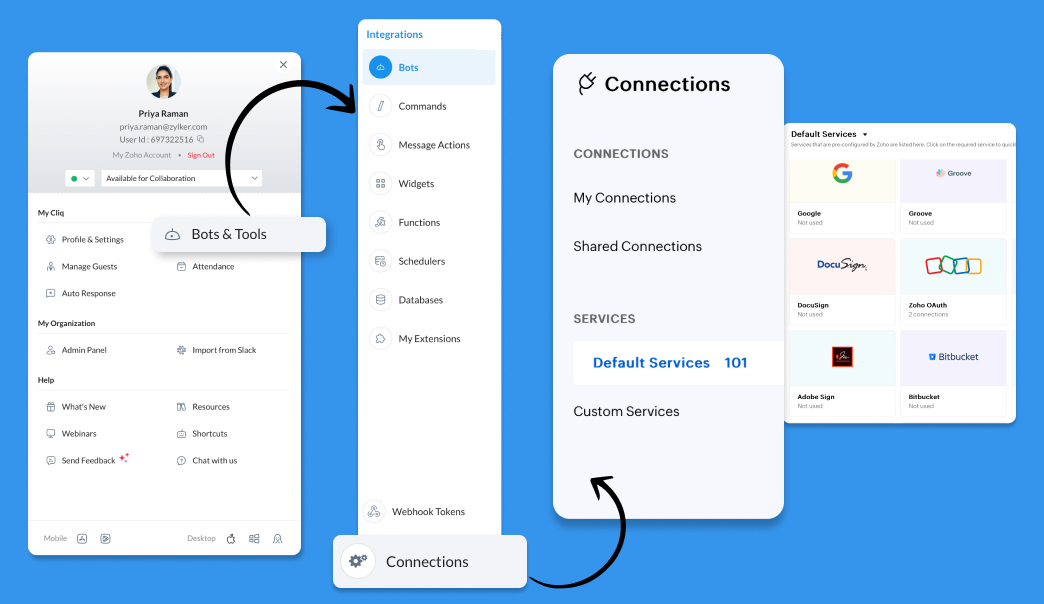
Click on your display picture and select Bots and Tools.
Click the Connections option at the bottom left to land on the All Connections page.
On the connections page, you'll find two categories :
My Connections
Shared Connection
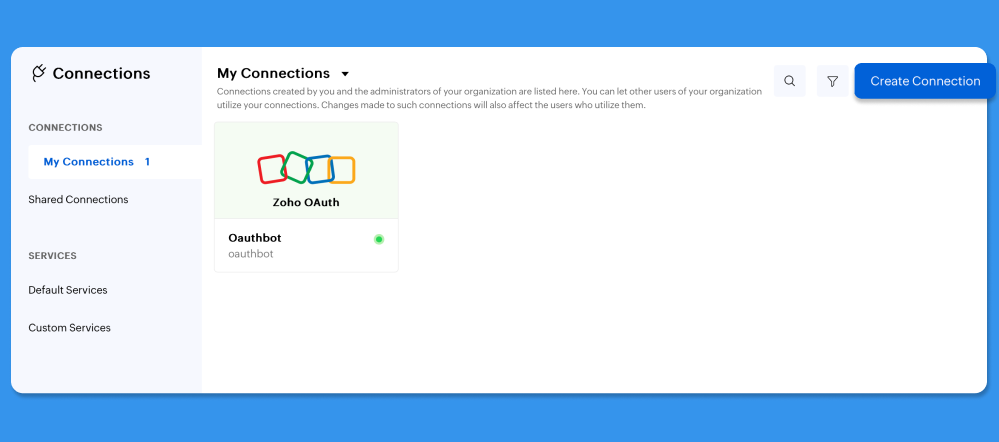
My Connections
The connections you create will be listed under the "My Connections" section.
Types of Connections
Default connection: You can choose from the services listed in the Pick Your Service category, provide your credentials, and establish a connection.
- Custom connection: You can configure and connect if the desired service is unavailable in the Pick Your Service Category.
Note:
You can create multiple connections for the same default or custom service.
Default Connection
Perform the following actions to create a connection with a default service:
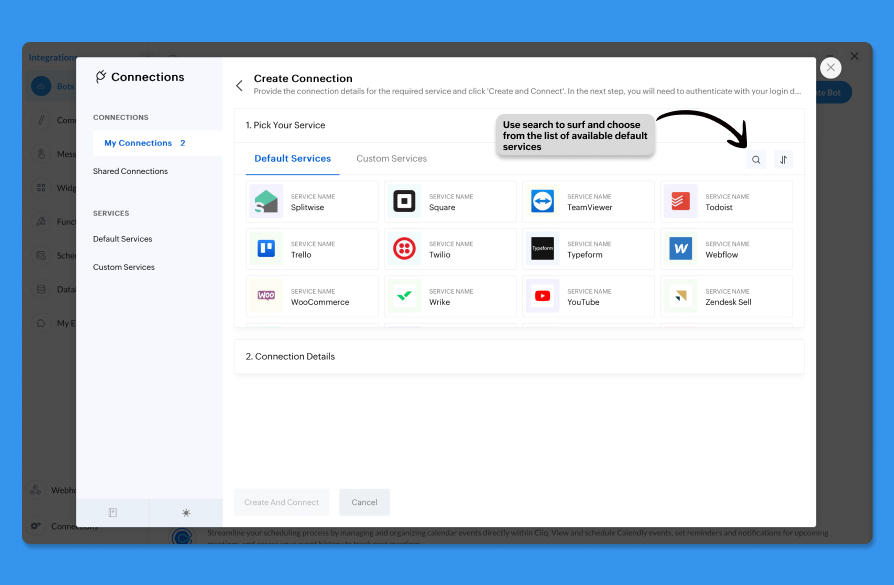
1. After going to the connections page, click the Create Connection option in the top right corner of the My Connections page.
2.The Pick Your Service option contains a list of third-party services pre-registered with Cliq. These connections will have the prefix Zoho DRE in the third-party services when used.
3.When the service you want to integrate is available in the Pick your service section, you can use it by selecting it.
Example : Let's try to create a default connection with the service - Trello!
4.In the Connection Details window, perform the following actions:
Provide the connection name, which is the display name for your connection. Display names can contain up to 50 characters.
Provide connection link name. Link names must be unique and can be used in Deluge integration tasks to invoke URL scripts to establish authentication.
Note:
The link name that you provide must satisfy the following conditions:
- It must begin with a lowercase letter.
- It can contain lowercase letters, numbers, and underscores (_).
- It can contain up to 50 characters.
The scopes and their availability vary depending on your service. You can find the applicable scopes in the desired service's API documentation.
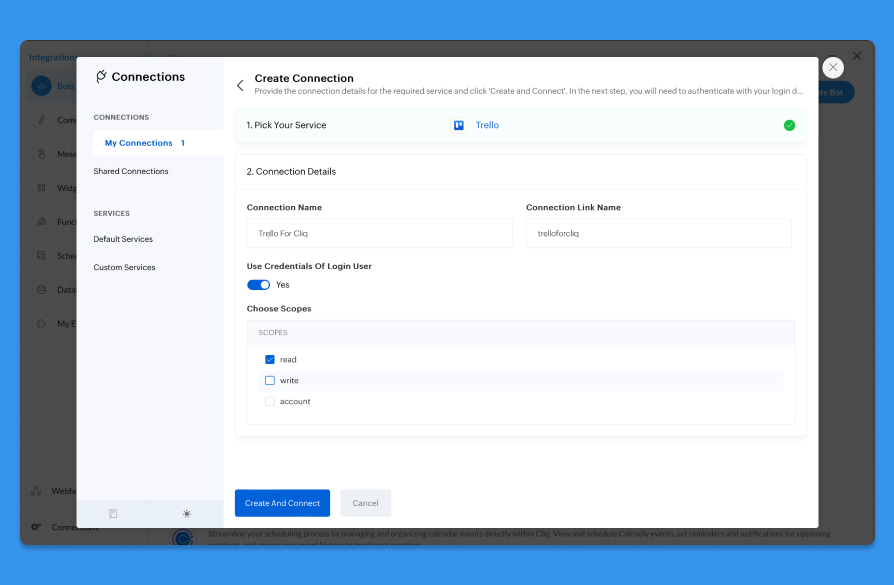
5. Click on Create and Connect.
Understanding the "Use Credentials of Login User" Toggle button in Zoho Cliq Connections
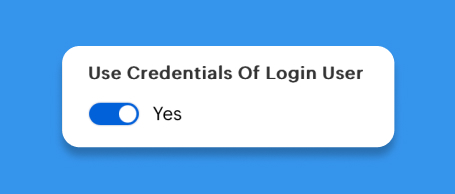
The "Use credentials of login user" option determines how users interact with the connections you've set up in Cliq.
When the "Use credentials of login user" toggle is enabled, every user who tries to utilize the connection will be prompted with a pop-up dialogue box asking for permission to access the third-party service. This allows users to authenticate connections using their credentials.
- Shared Connections :
The connections that you do not create but are only authenticated using your credentials will be listed under "shared connections". These connections will be listed under "my connections" for the user who created the connection and under "shared connection" for other users who authenticated it using their credentials.
Example:
- Let's assume you want to create and publish a Zoho Cliq bot for everyone in the organization. The bot will upload and forward the files to the user's Google Drive account. To achieve this, you need to create a connection to Google Drive and use it in an invoke URL Deluge task.
- When creating the connection, you must enable the "Use credentials of login user" button. This ensures that each user can authenticate the connection with their own credentials so that files will be uploaded to their individual Google Drive accounts. If you do not enable this toggle, the connection will run using the credentials of the connection owner, and all files sent by users will be uploaded to the owner's Google Drive account.
- In this scenario, enabling the "Use credentials of login user" toggle button is essential. All bot users will authenticate the Google Drive connection with their credentials, and a copy of the connection will appear under "Shared Connections" on their connections pages. For the connection creator, it will be listed under "My Connections."
Example:
- Imagine you want to create and publish a Zoho Cliq slash command for everyone in the team that will fetch the team's task list from Zoho Projects. Unlike the previous example, you need not enable the "use credentials of login user" toggle button while creating the connection because every user wants to access the same data. So, rather than encouraging every user to authenticate your connection to access your team's common data, you can allow them to use your connection to communicate with Zoho Projects.
- In this example, the users will not authenticate your connection using their credentials.Instead, they will use your connection as such. So, this connection will not be listed on the user's connections page.
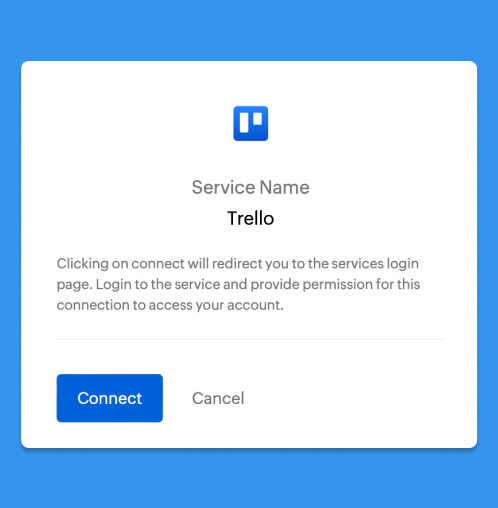
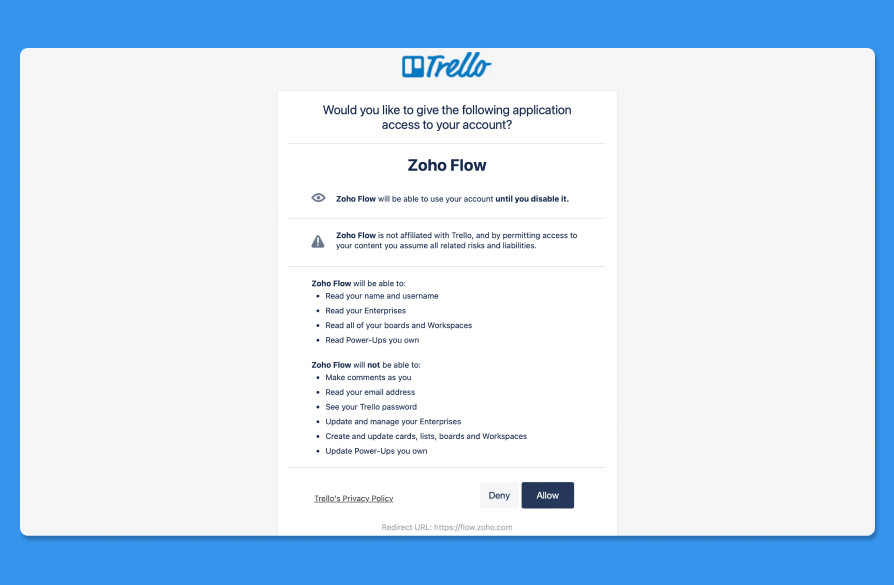
6. A User Permissions dialog will pop up, provide your login credentials, and proceed. Or, click on Allow if you are already logged into the service.
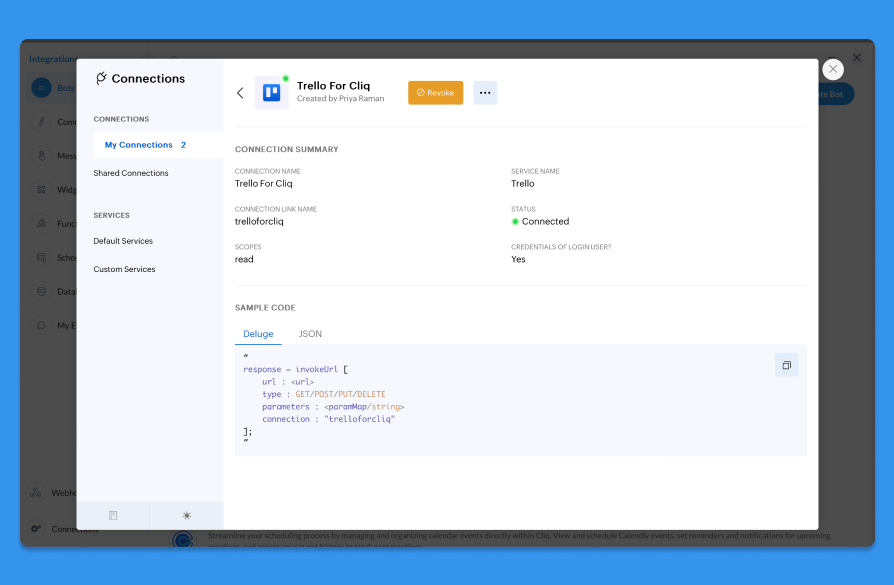
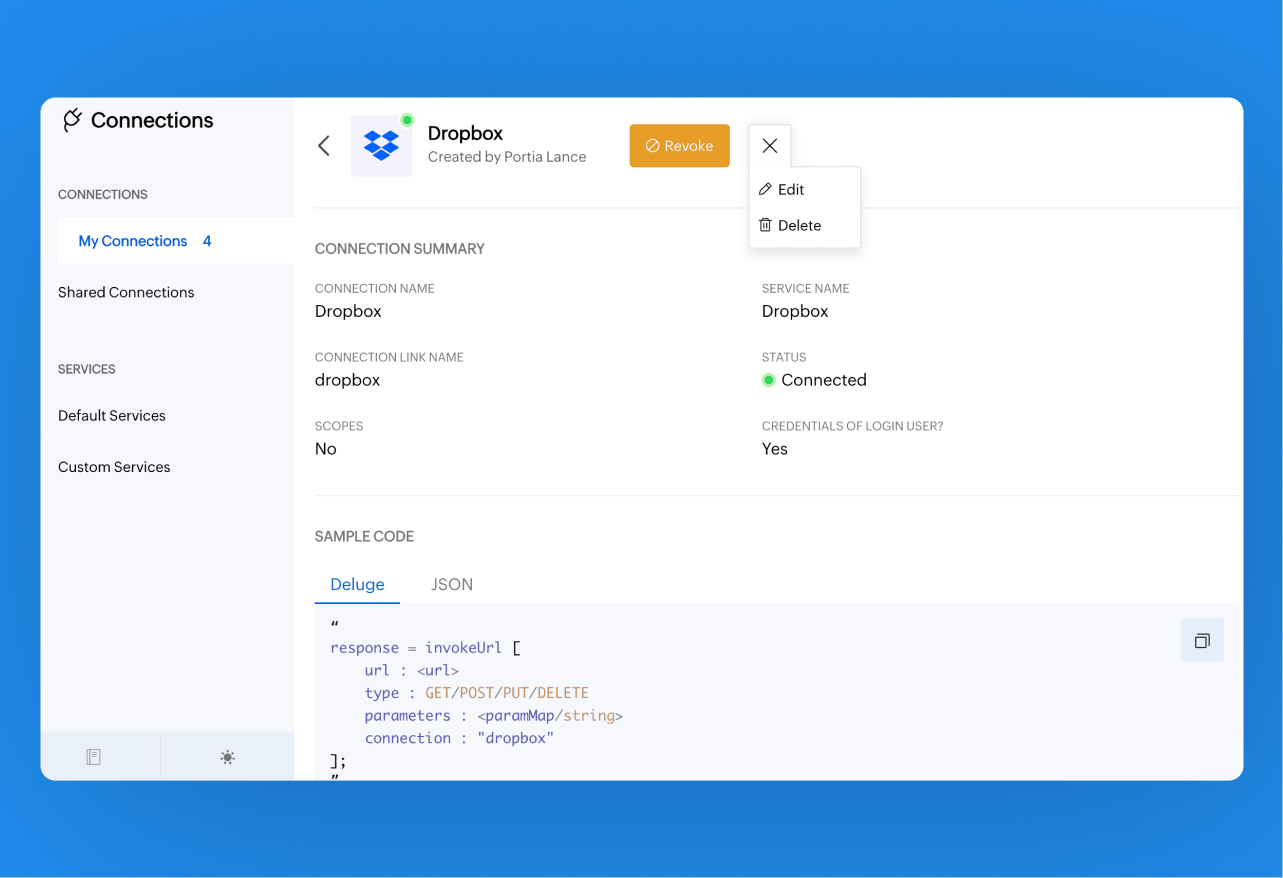
7. Post successful authentication of the created connection, a connection summary page will be displayed with the details of the connection and sample code of the Deluge invoke URL task. The Connection will be on your connections page under My Connections. Hover the cursor over the connection if you need to edit, revoke, or delete the Connection.
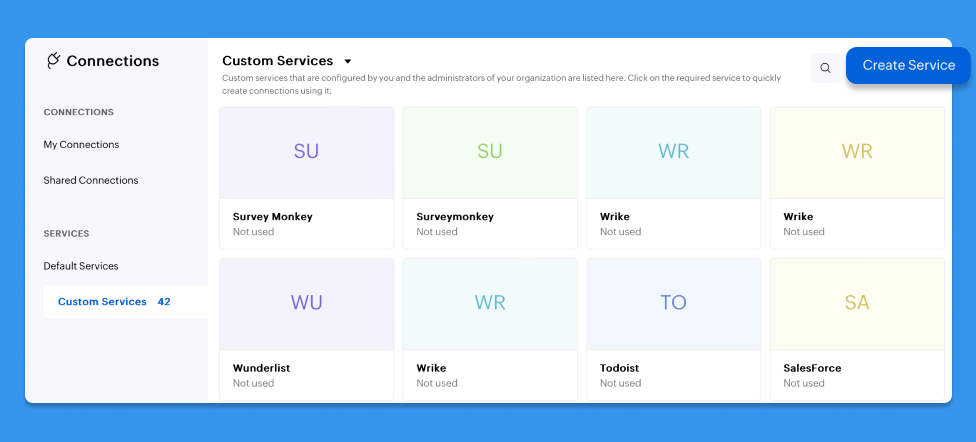
Custom Connection
If the service you are looking for is not available in the pre-registered services list, you will have to create a custom connection. This would require you to create and configure settings in Cliq and the third-party service.
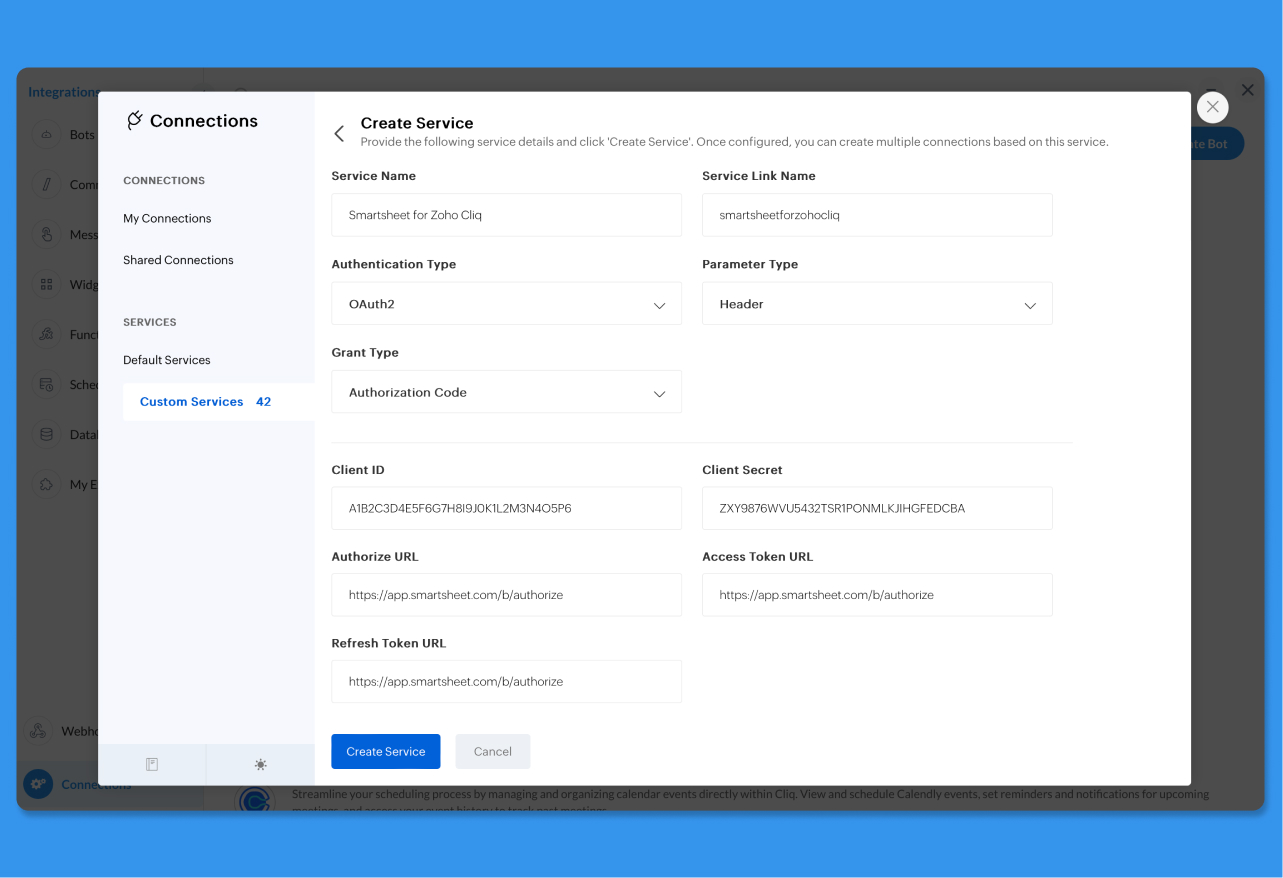
1. After going to the connections page, navigate to the Custom Services section and click the Create Service option in the top right corner to create a custom connection.
2. Under service details, provide the following information:
Service Name: This is the display name of the service that you want to create. Display name can contain up to 50 characters.
Service LinkName: Link name of the service to help you to uniquely identify your custom service.
Note:
The link name that you provide must satisfy the following conditions:
- It must begin with a lowercase letter.
- It can contain lowercase letters, numbers, and underscores (_).
- It can contain up to 50 characters.
Authentication Type: Choose from the following authentication types based on the desired service's API documentation
Type | Description | Fields |
| API Key | This auth type requires you to specify the params for establishing a connection with the desired service. In the next step, you will have to supply values for these params to perform the integration. For example, if you specify authtoken as param, the next step would be to provide your account's auth token to establish a successful connection. |
|
| Basic | This auth type requires you to specify the username and password in the next step. The provided username and password will be automatically encrypted with base64 algorithm and passed as header in the format: basic <encrypted_username>:<encrypted_password>. | N/A |
| OAuth 1 | This auth type requires you to specify the required parameters to perform an OAuth 1 authentication. |
|
| OAuth 2 | This auth type requires you to specify the required parameters to perform an OAuth 2 authentication. |
|
| AWS Signature Version 4 | This auth type requires you to specify the required parameters to perform AWS Signature Version 4 Authentication. | On choosing AWS Signature as authentication type, you need to provide values to the following fields AWS Service (Editable) : The name of the service you want to connect to. ex : sqs, s3, dynamodb AWS Region (Editable) The name of the region receiving the request. ex : us-east-1, eu-west-1 This auth type requires to specify the access key and secret key provided by AWS in next step. |
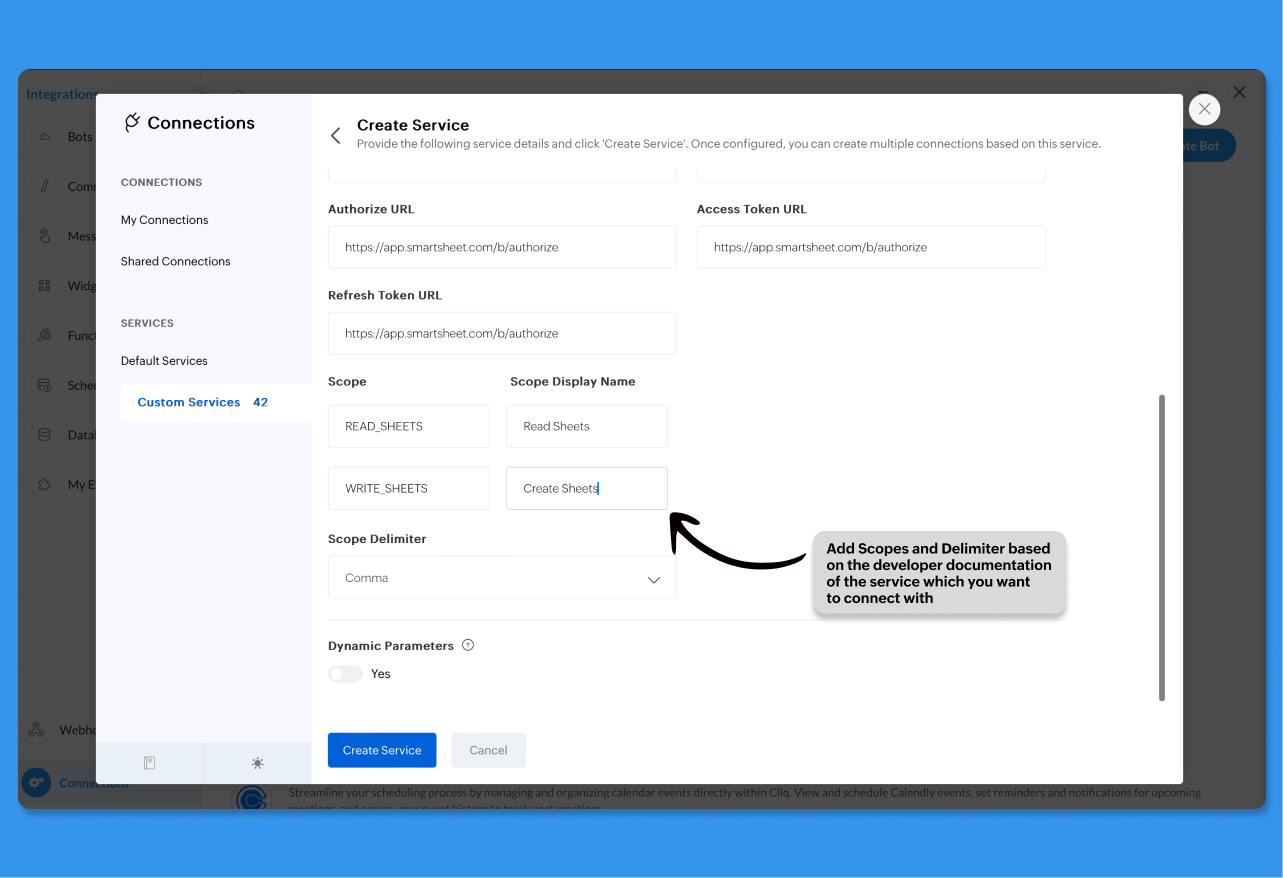
Dynamic Parameters : These are variables for which you can get values from the users while they create connections using this service. Use these parameters as placeholders using the format {Parameter Key} in the Deluge invokeUrl task, Authorize URL, Access Token URL, and Refresh Token URL. During execution, the dynamic parameter placeholders will be replaced with the values supplied by the user.
Let's say, we have created a dynamic parameter domain and the user has supplied zylker as the value to the parameter while creating the connection. During the execution of the following Deluge script, the dynamic parameter {domain} in the URL will be replaced with zylker.response = invokeurl [ url:"https://{domain}.my.salesforce.com/services/data/v56.0/sobjects/Merchandise__c/updated/v2/read" type:GET connection:"salesforce_connection" ];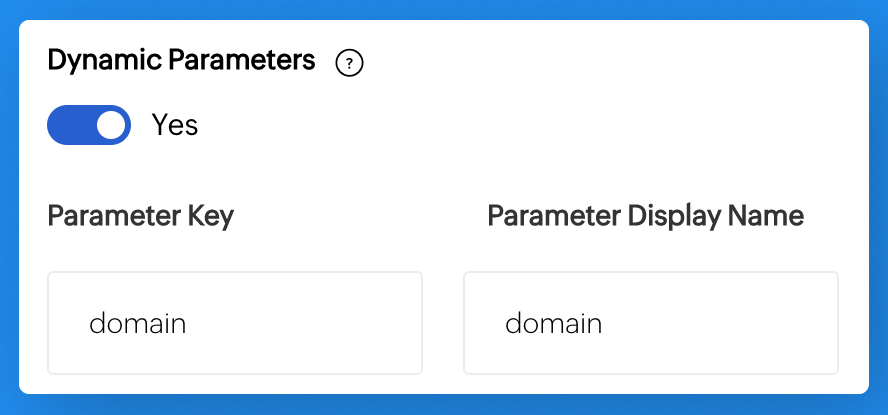
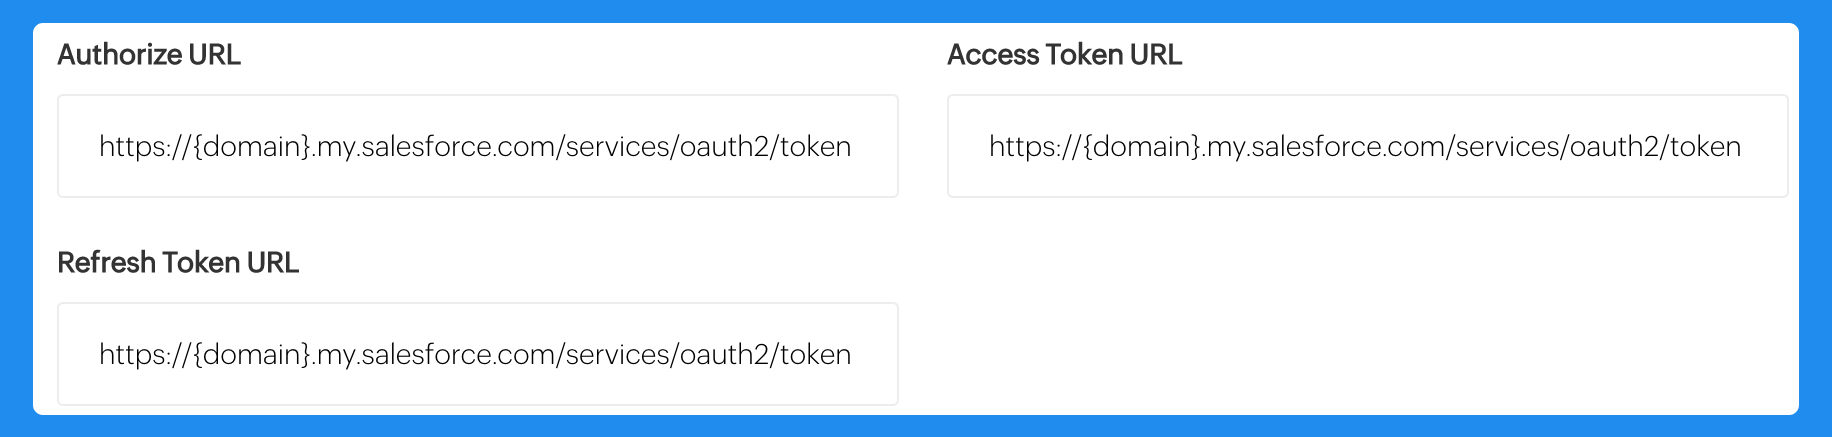
Similarly, the {domain} mentioned in the Authorize URL, Access Token URL, and Refresh Token URL while creating a custom service will be replaced with the value specified by the user during execution.
3. Under connection details, provide the following information:
Connection Name: Display name of your connection
Connection LinkName: Link names must be unique and can be used in Deluge integration tasks and invoke URL scripts to establish authentication.
Note: The link name that you provide must satisfy the following conditions:
It must begin with a lower case letter.
It can contain lower case letters, numbers, and underscores (_).
It can contain up to 50 characters.
Scope (applicable only to OAuth 2 auth type): Scopes required to perform integration as specified in the desired service's API documentation.
Scope Delimiter (applicable only to OAuth 2 auth type): Delimiter with which the desired service API expects the scopes to be separated.
Note:
You can select from the supported delimiters: comma, space, and plus. If not specified, comma is assumed as default delimiter.
You can choose delimiters only if you provide more than one scope.
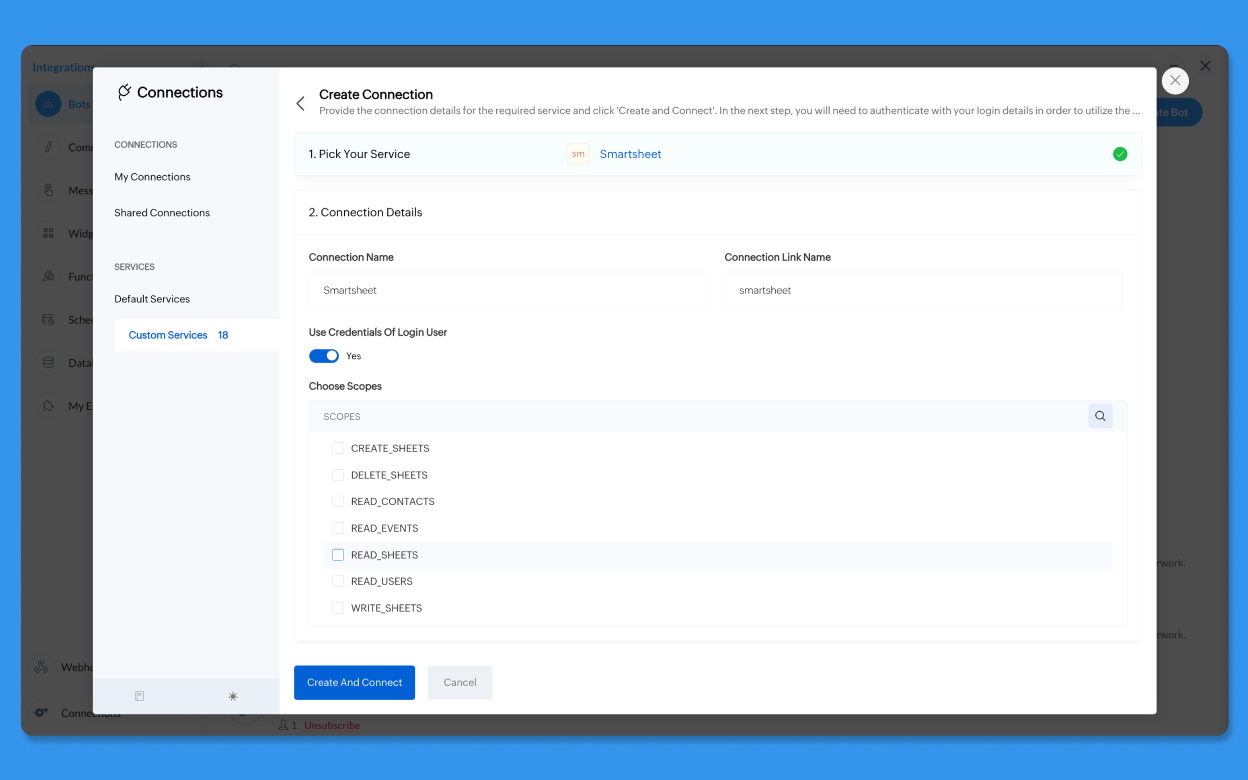
When prompted, provide your authentication credentials in the User Permissions dialogue box. A connection summary will then be displayed. Upon successful authorization, the connection will be created and listed on your connections page under My Connections. The configured service will be listed under Custom Service.
Note: Once a custom service is configured, it will be available for everyone in the organization. So, other users need not configure the custom service.Instead, they can simply create connections using the service..
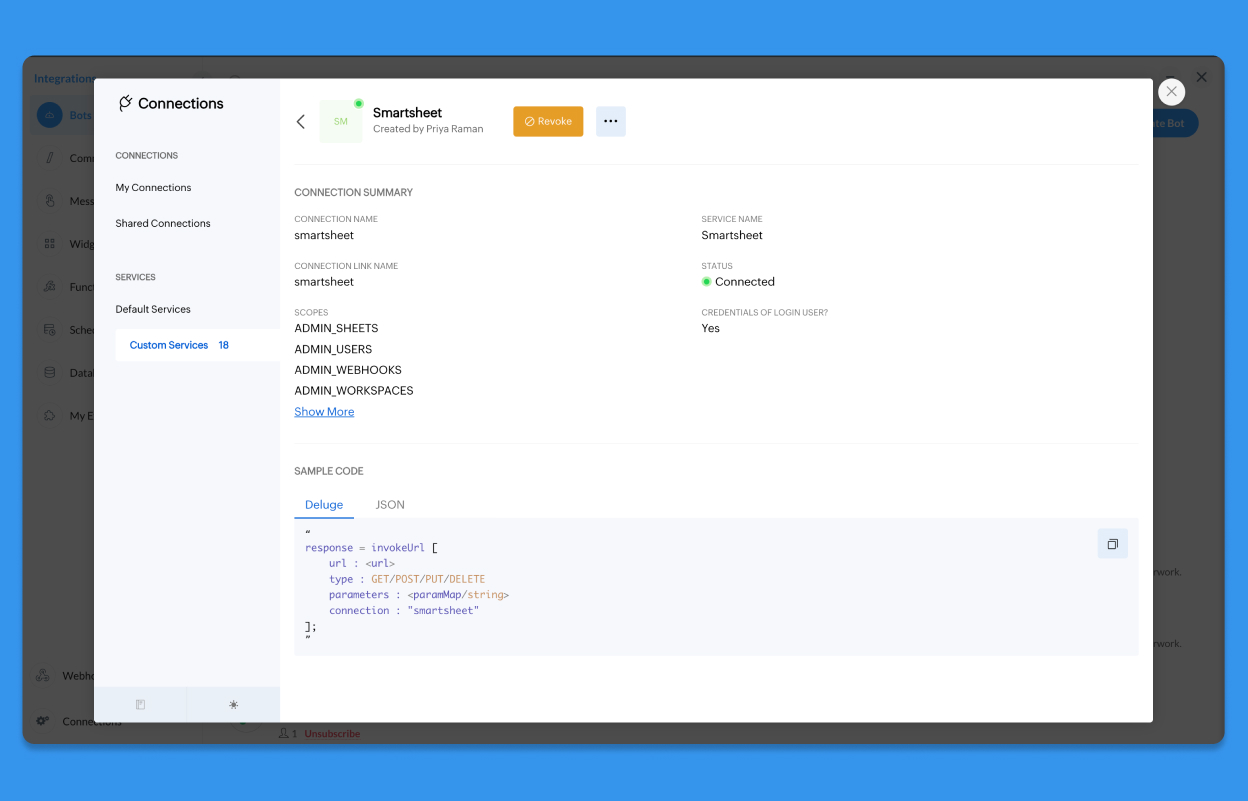
The connection will be on your connections page under My Connections. Hover over the connection if you need to edit, revoke, or delete the connection.
Edit,delete,and revoke connection
- Navigate to the My Connections section under Bots & Tools.
Hover over the connection you wish to manage. You will see options to edit, revoke, or delete the connection.
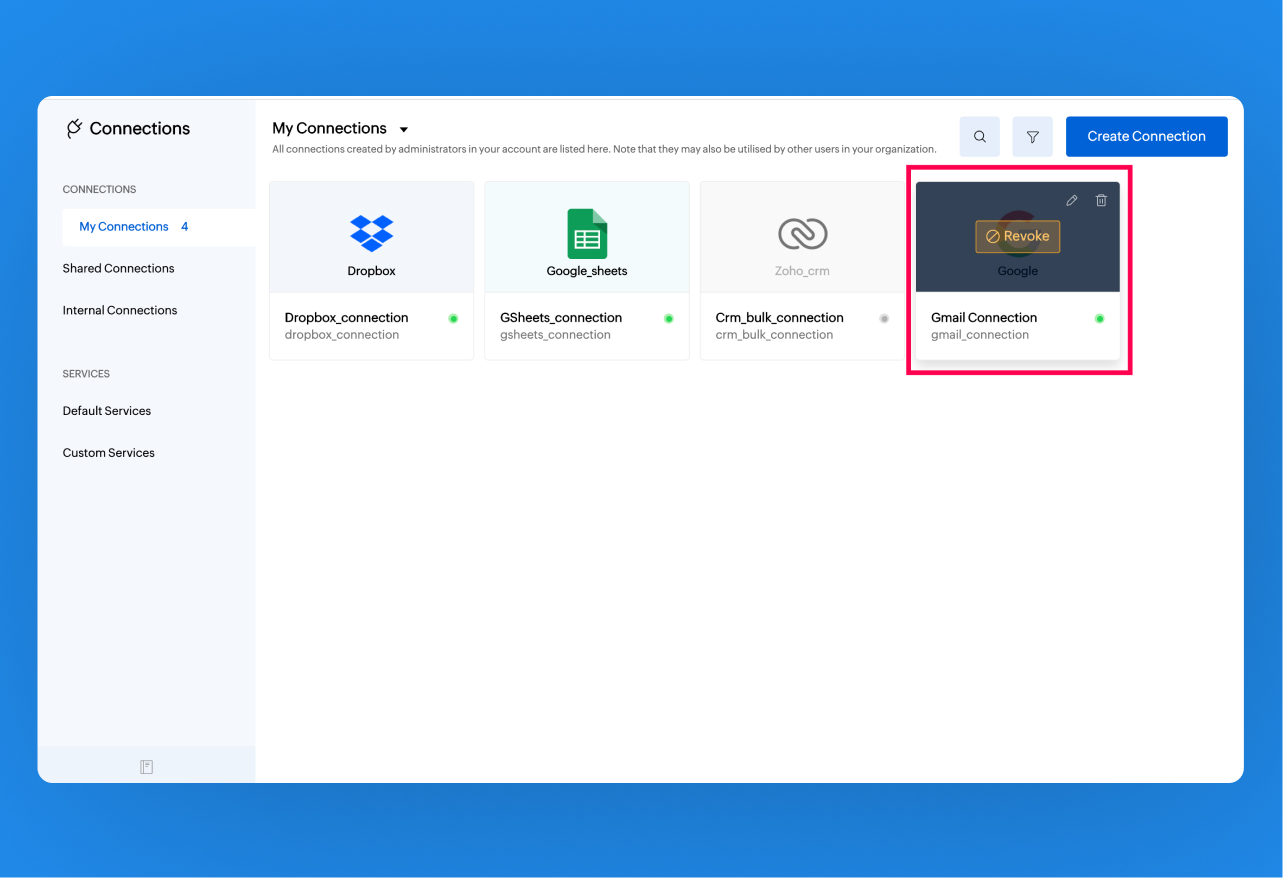
Alternatively, click on the connection to open its details and locate the three horizontal dots icon to access options to edit or delete the connection.
Note:
- You can edit, revoke, or delete any connection created by you (the connections that are listed under "My Connections").
- You can revoke your shared connections, internal connections, and connections from extensions, but cannot edit or delete them.
- If you choose Revoke access granted to all connected apps option while resetting the Zoho account password, you will need to reconnect the connections when you execute them for the first time after the password updation.
Invoke URL
The invoke URL task is a deluge function allowing access to Cliq's third-party services via Connections. To implement a connection created, you can use the Invoke URL deluge code displayed after creating and successfully authenticating the connection. Further details are provided on the Invoke URL page.