Queries
On this page:
Introduction
In today’s fast-paced business environment, immediate access to relevant data is essential for informed decision-making.
Queries is a powerful feature that allows you to dynamically retrieve data from CRM as well as third-party services directly within our platform. With Queries, you can streamline your workflow, gain deeper insights, and make data-driven decisions without leaving the product.
Whether you fetch records from CRM or data from any other third-party services, the Queries feature gives you the power to present that data the way you want. For example, displaying only closed deals of a contact on a canvas or displaying the details of a ticket from Zoho Desk on a screen(Kiosk) in Zoho CRM.
All you have to do is write a query that solves your business need and associate that query with the relevant CRM feature like Canvas, Kiosk etc. This helps you leverage the power of data retrieval using REST API and COQL, along with schema management, serialization of responses, and other functionalities in data handling.
For example, consider that Deals is a related list in the Contacts module. A contact can have multiple associated deals, but you want to display only those that are won on your canvas. To achieve this, you can use the Queries feature and write a Module type or COQL type query to fetch data from the Deals module , and associate that query with Canvas' Detail View.
If your data resides on a third-party service, you can use the REST API type query to fetch data from that external service.
So, Queries acts a hub to fetch data with advanced configurations and display data from within CRM and third-party applications, and use them at various places.
Query Workbench
The Query Workbench provides a unified interface for constructing and executing queries in Zoho CRM. It brings together all the essential components of query building in a single window for convenience and clarity.
This smart interface makes developer experience of building Queries in Zoho CRM faster, simpler, and more intuitive.
Features of the Workbench
The Workbench’s modern design and a cleaner layout groups related options intuitively and guides you through the process, making it easier for new users to get started and faster for advanced users to refine complex queries.
- Unified workspace - Build queries without switching between multiple screens. Choose or modify the query source, configure the query, handle serialization, set variables, manage schema, see the response, all without leaving the window.
- Variables Panel – Manage and substitute variables for dynamic query execution.
- Schema View – Explore the available fields in the query's response and their data types through an integrated schema panel ensuring precise queries.
- Output Panel – Execute the query, fine-tune your criteria, and view the results instantly within the same workspace.
Components of Queries
Sources
A source is the data provider. Zoho CRM provides pre-configured sources like Module and COQL in Queries. Apart from this, you can also create your own source to fetch data from third-party as well as other Zoho services.
The Queries feature supports the sources depicted in the following image.
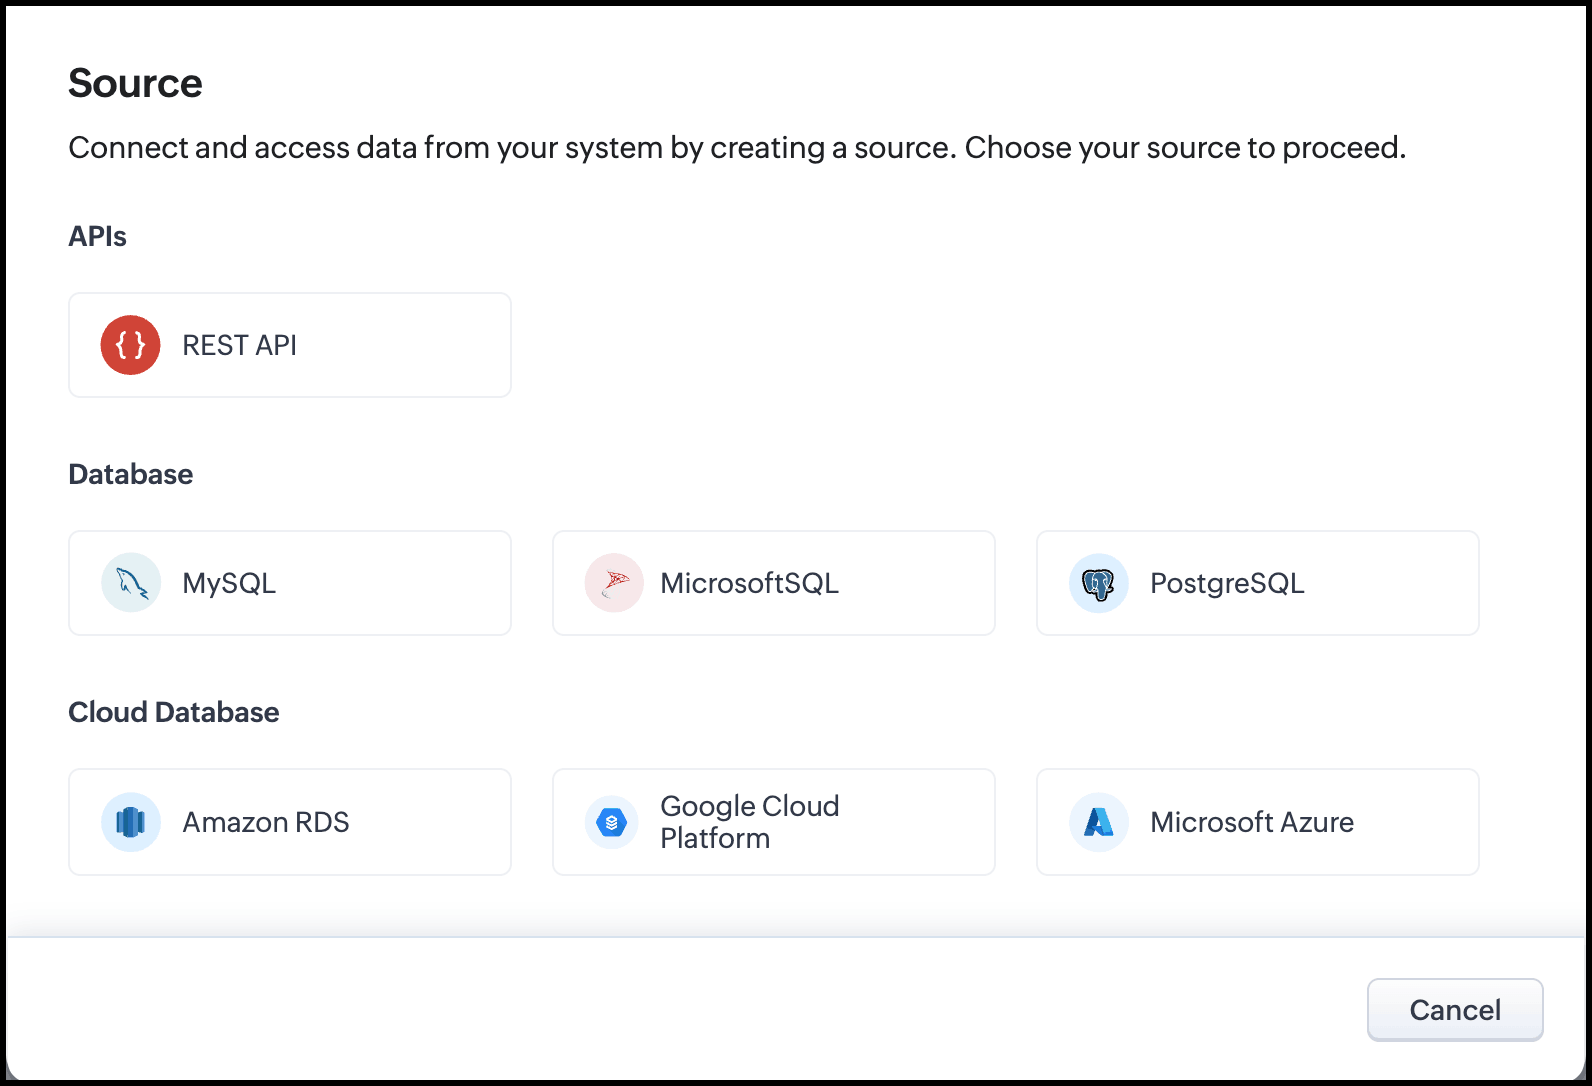
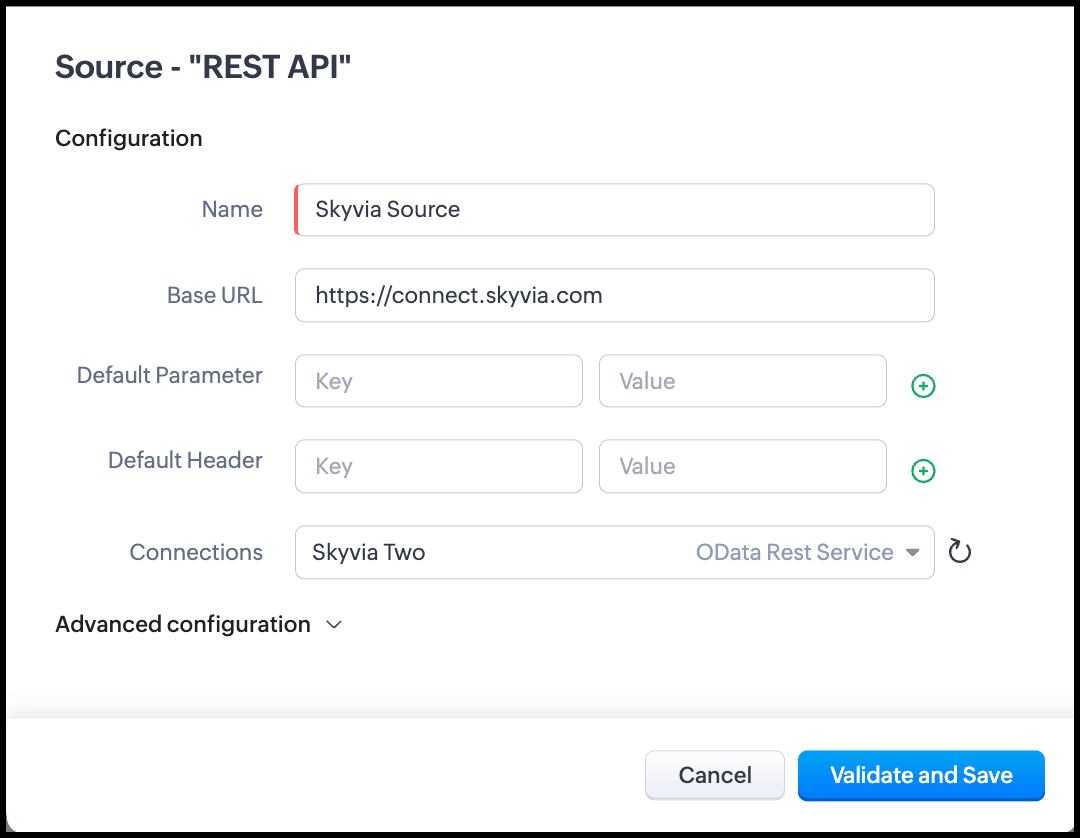
REST API - Use this when you want your query to hit an external API. Here, you can specify the name, base URL, default parameters and headers, connections as shown in the following image.
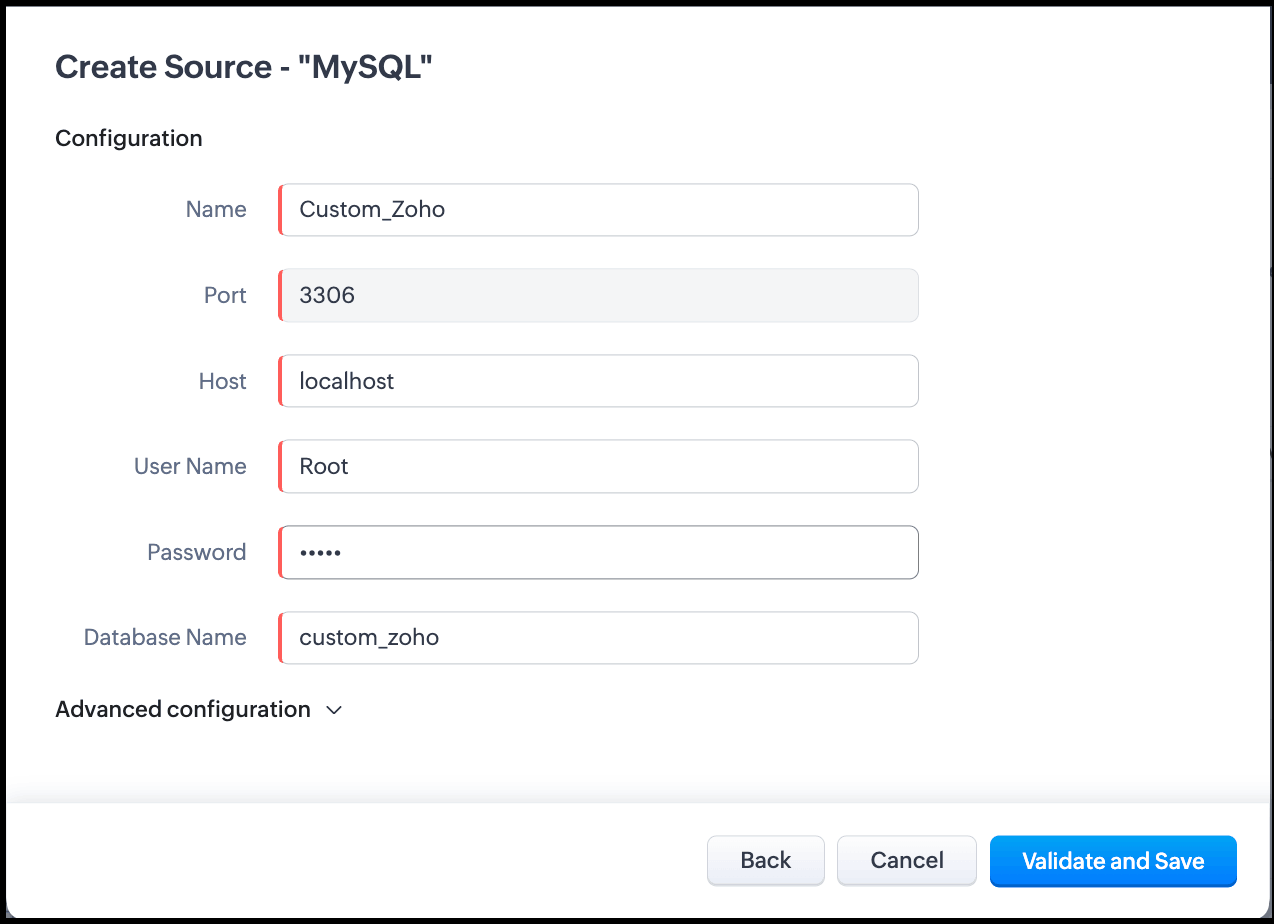
Database - You can add databases like MySQL, MicrosoftSQL, and PostgreSQL as sources of your queries. Specify information such as name, database name, port, host, user name, password, etc, to connect your database with Zoho CRM Queries. Under Advanced Configuration, you can choose the time zone, add connection timeout in seconds, enable SSL, and make the Source read-only. The following image is an example of a MySQL source.
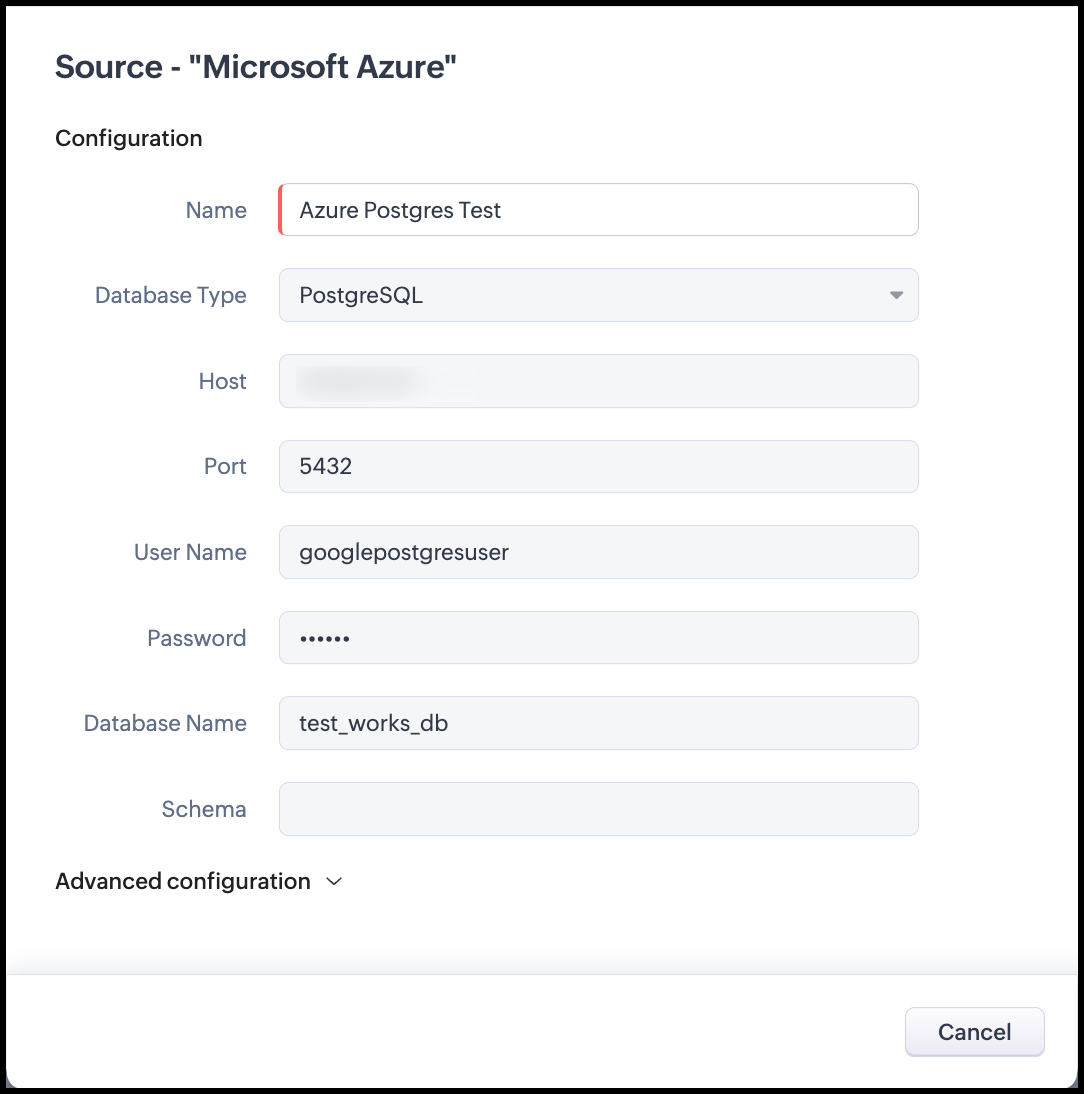
Cloud Database - You can add cloud databases like Amazon RDS, Google Cloud Platform, and Microsoft Azure as sources of your queries. Similar to Database, specify information such as name, database name, database type, port, host, user name, password, schema, etc, to connect your database with Zoho CRM Queries. Under Advanced Configuration, you can choose the time zone, add connection timeout in seconds, enable SSL, and make the Source read-only.The following image is an example of a Microsoft Azure source with a PostgreSQL database type.
Note
- Users with Developer permissions in Zoho CRM can access all configured sources, including SQL (database and cloud) sources within the organization.
If you configure a source using credentials with elevated privileges (for example, a superuser account) or connect to a sensitive database, Developer users may be able to access restricted data through queries or other features that use these sources.
To prevent unintended data exposure, use credentials with the minimum required permissions and restrict access to sensitive data at the database level. - Refer to the Limits page for more information on the SQL query Sources limits, query limitations, and sample query structures for different operations.
- Add the host to Trusted Domains if the host is not in the IP address format.
- Whitelist Zoho CRM IPs in the relay server to allow CRM to access your database.
Follow the steps to add a source.
- Go to Setup -> Developer Hub -> Queries. The Queries window opens.
- Click the Sources tab.
- Click Add Source.
- Choose the required source and enter the required information.
- Click Validate and Save to validate your source and save it. You can now use this source while creating a query of the REST API type.
Queries
Queries allow you to fetch data from various sources and use them as necessary at various places. Query configuration depends on the type of source. For example, if you choose the Source as Module, your query can fetch data from that module. If your Source type is COQL, you must write a query using COQL(CRM Object Query Language) to fetch data, and for the REST API Source type, you can use endpoints, headers, and other parameters to fetch data from a third-party service.
You can also sort the response based on a field.
For more information on different types of queries, go to the Query Types page.
Variables
Queries supports variables at various places like the criteria, COQL statement, values, endpoints, etc. While associating the Queries query in components like Canvas, the variables should be mapped to the required fields.
These variables allow you to pass dynamic values to the query during execution(runtime).
You must declare a variable in curly braces in the format {{VARIABLE_NAME}}.
Refer to our Kaizen posts on Handling Query Variables in Zoho CRM and Optimizing the Use of Record ID Variables in Zoho CRM Queries for added insights.
Schema
For every query, the schema will be generated and will be available in the result path.
Schema contains the path of each field, its CRM field type, and the label. You can traverse through this result to get to each field in the query. You can edit the field type and the label to suit your needs in the response of your query.
You can change the schema while creating or updating a query, or later. Hover over a query in the Queries tab. Click the three-dot icon and click Manage Schema.
We have discussed Serialization and Schema Management in Queries in one of our Kaizen posts.
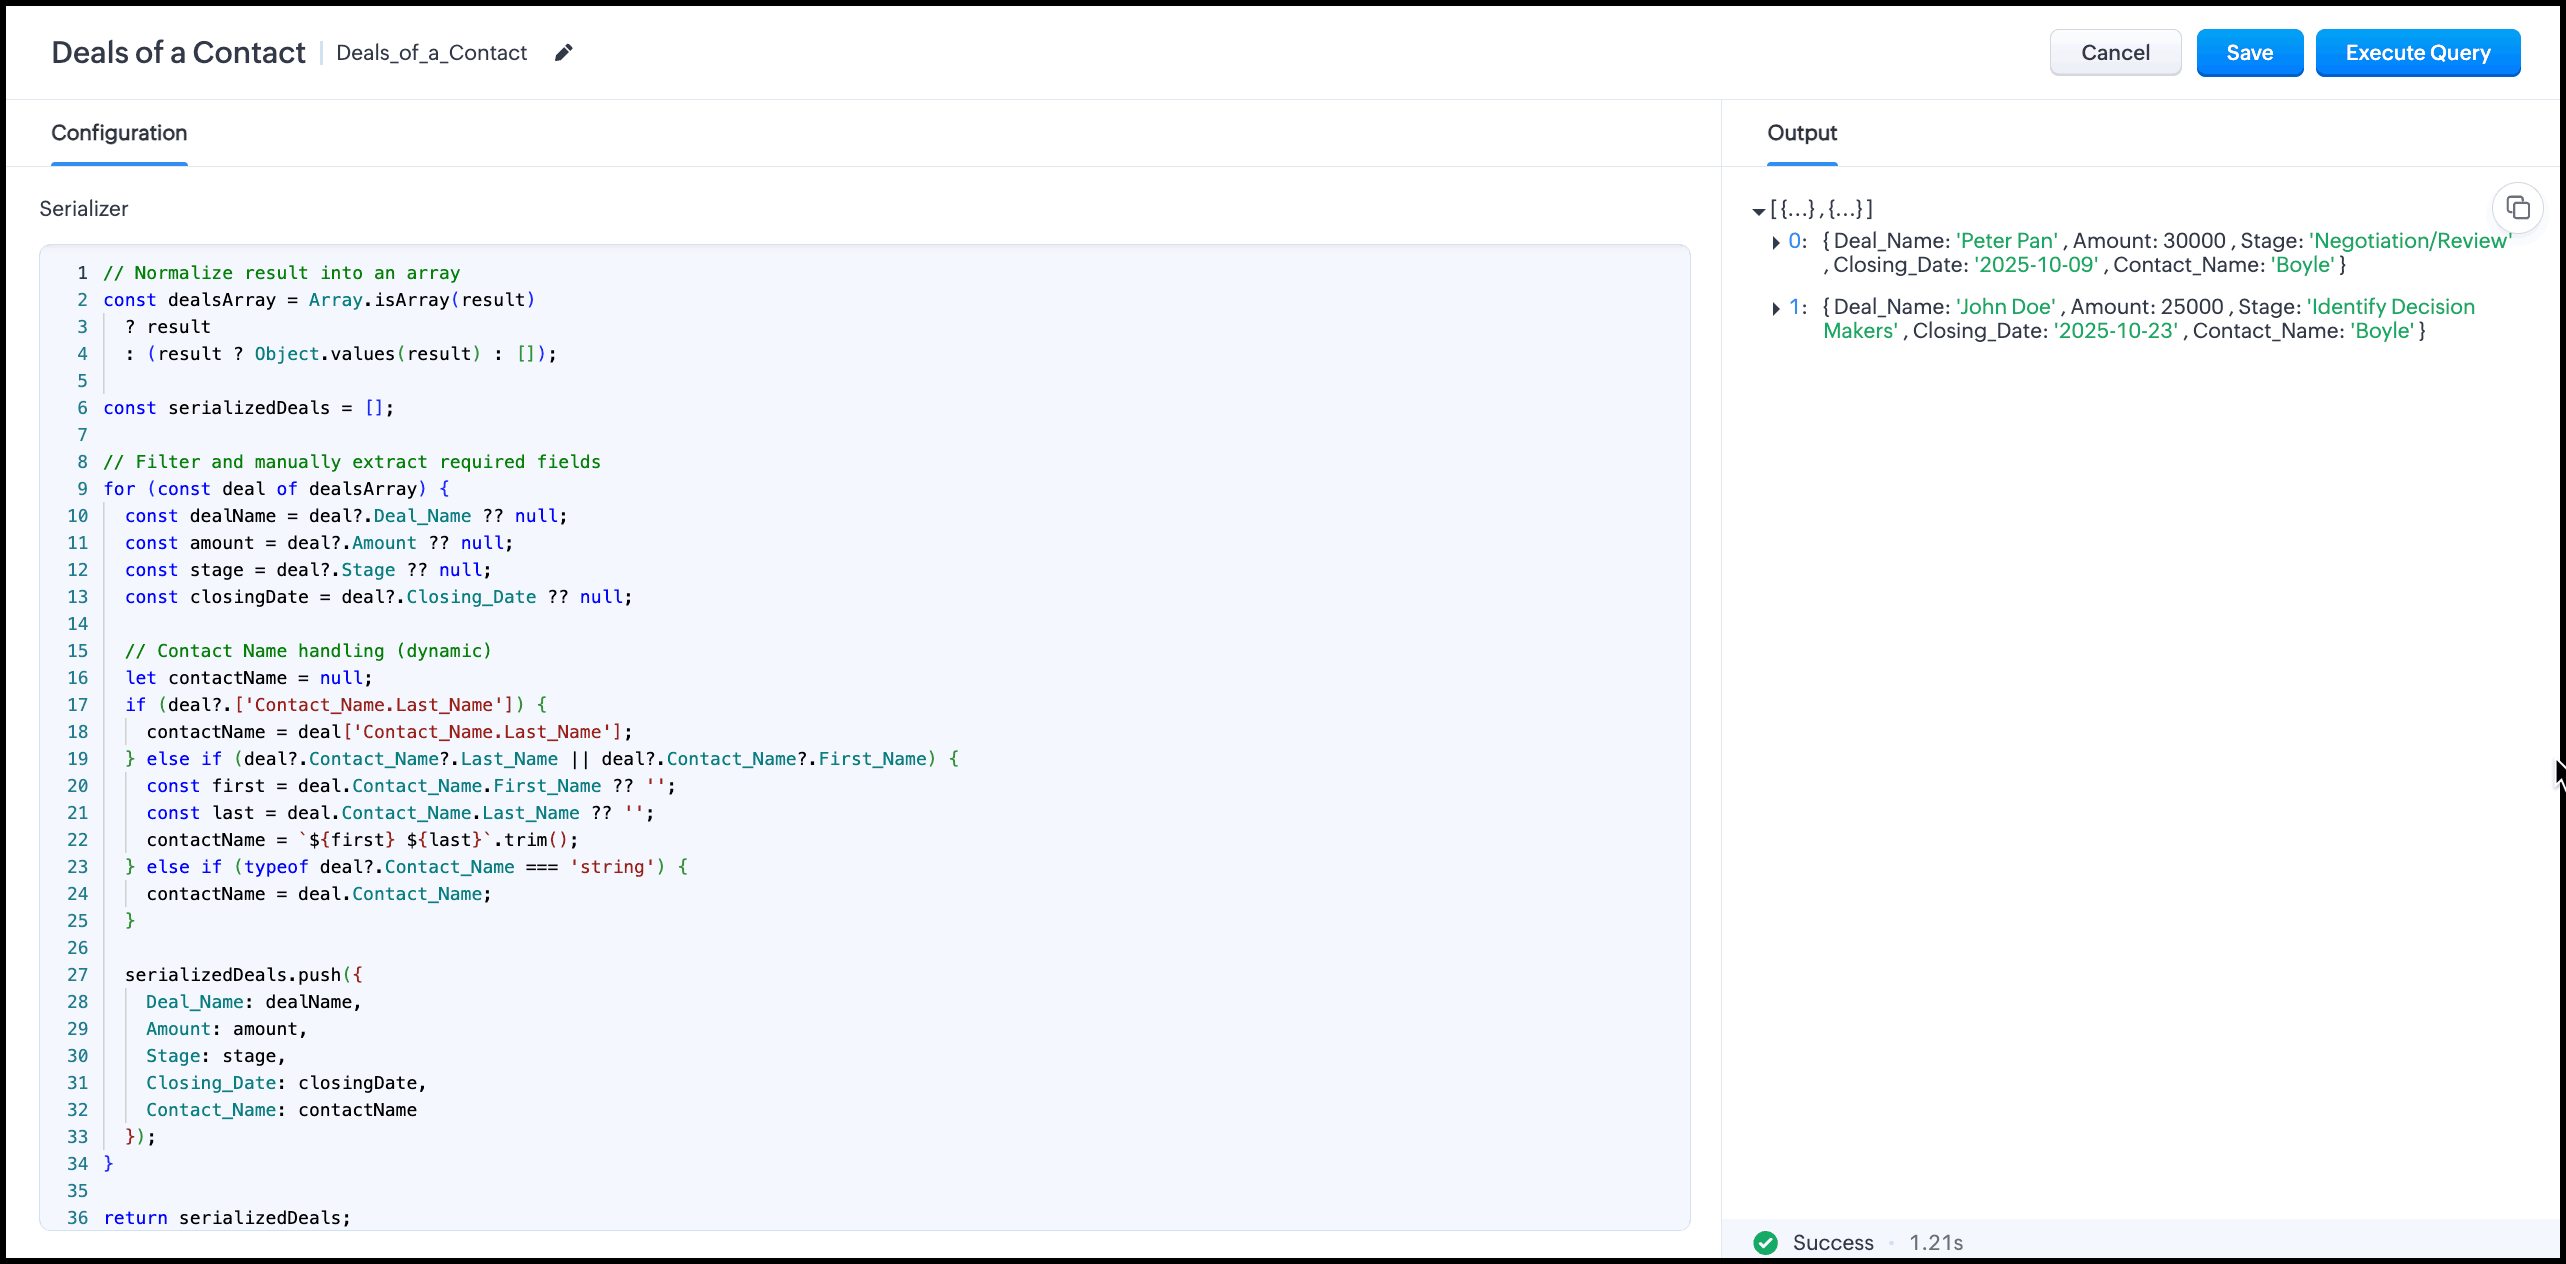
Serializer
Serializer allows you to manipulate the response of a query using JavaScript, and alter it to suit your needs or use it for further processing.
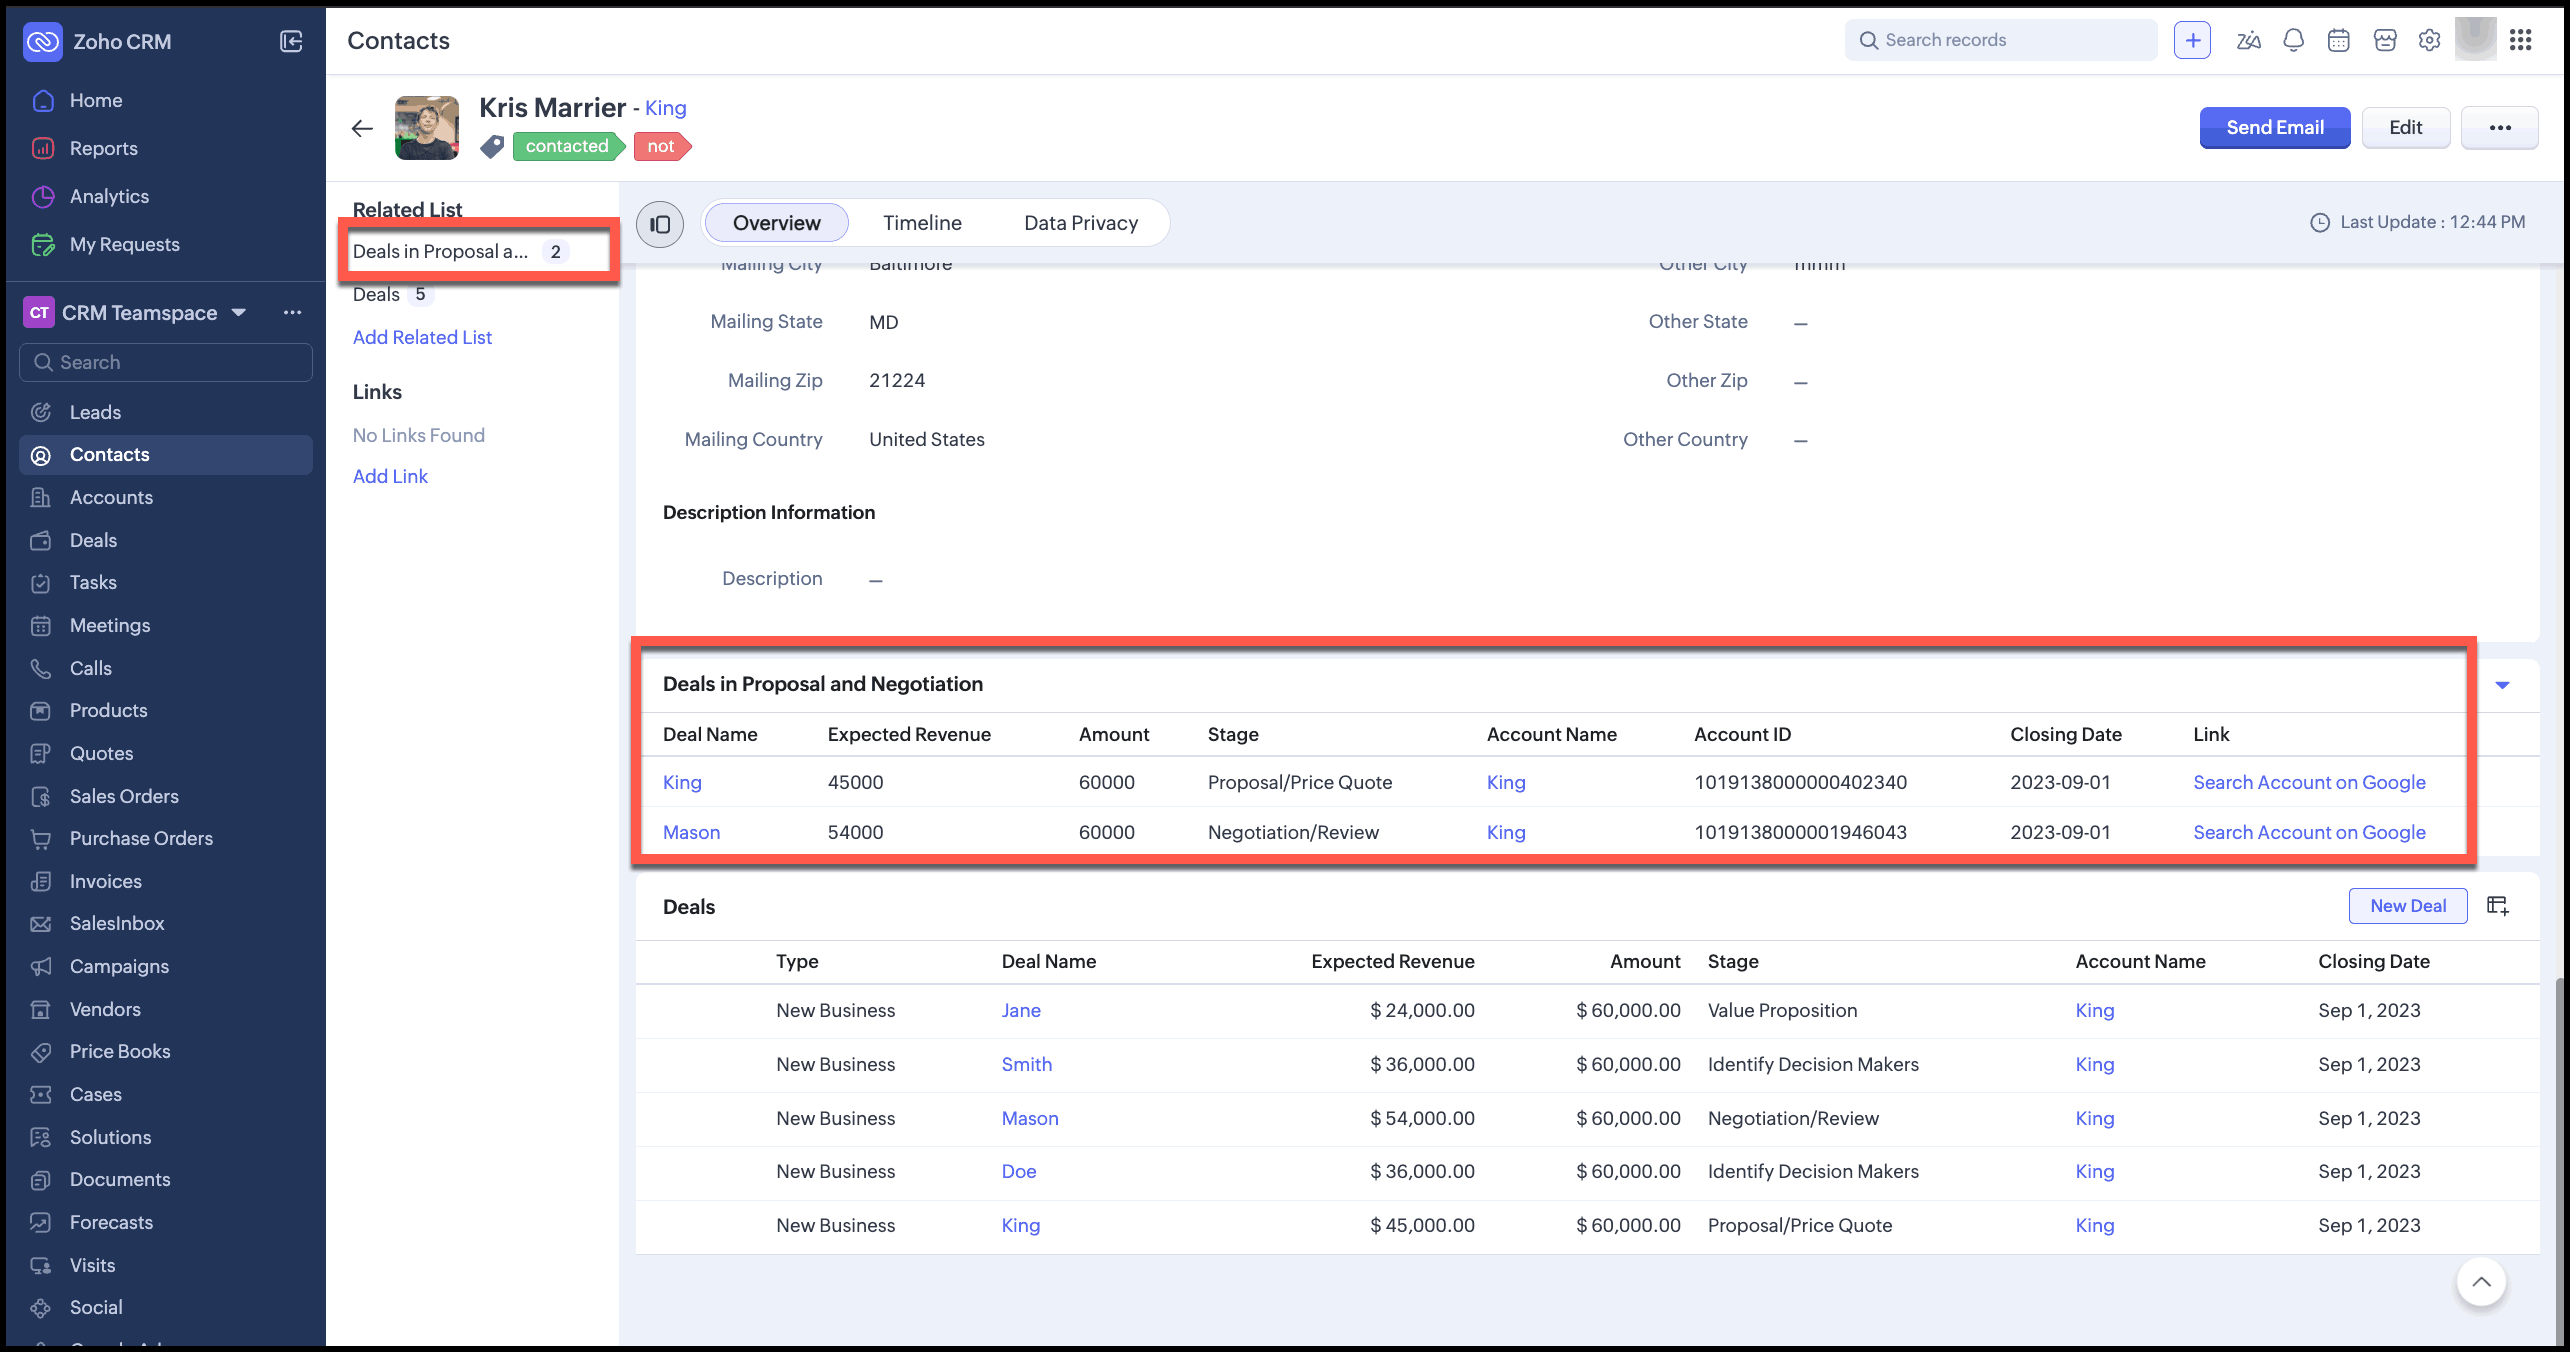
Serializers also support enhanced handling of lookup fields and URLs in query responses when you associate a query with a custom related list. With this, lookup fields can return clickable, structured related-record information(such as record ID and display name) instead of just the raw lookup ID. Additionally, URL enhancement allows serializers to include direct CRM record URLs or related resource links in the output, making query results easier to consume in UI components and integrations.
These enhancements help reduce additional API calls and make query responses more actionable and navigable. Refer to the following sample with "lookup" and "href" elements in the serializer.
return result.map(record => ({
 ...record,
Deal_Name: {
 id: record.id,
 name: record.Deal_Name,
 module: "Deals"
  },
 "Account_Name.Account_Name": {
 id: record.id,
 name: record["Account_Name.Account_Name"],
 module: "Accounts"
 },
Link: {
 label: "Search Account on Google",
 href: "https://google.com/search?q="+record["Account_Name.Account_Name"]
 }
}));
Here is the custom related list with this serialized response.
Create a Query
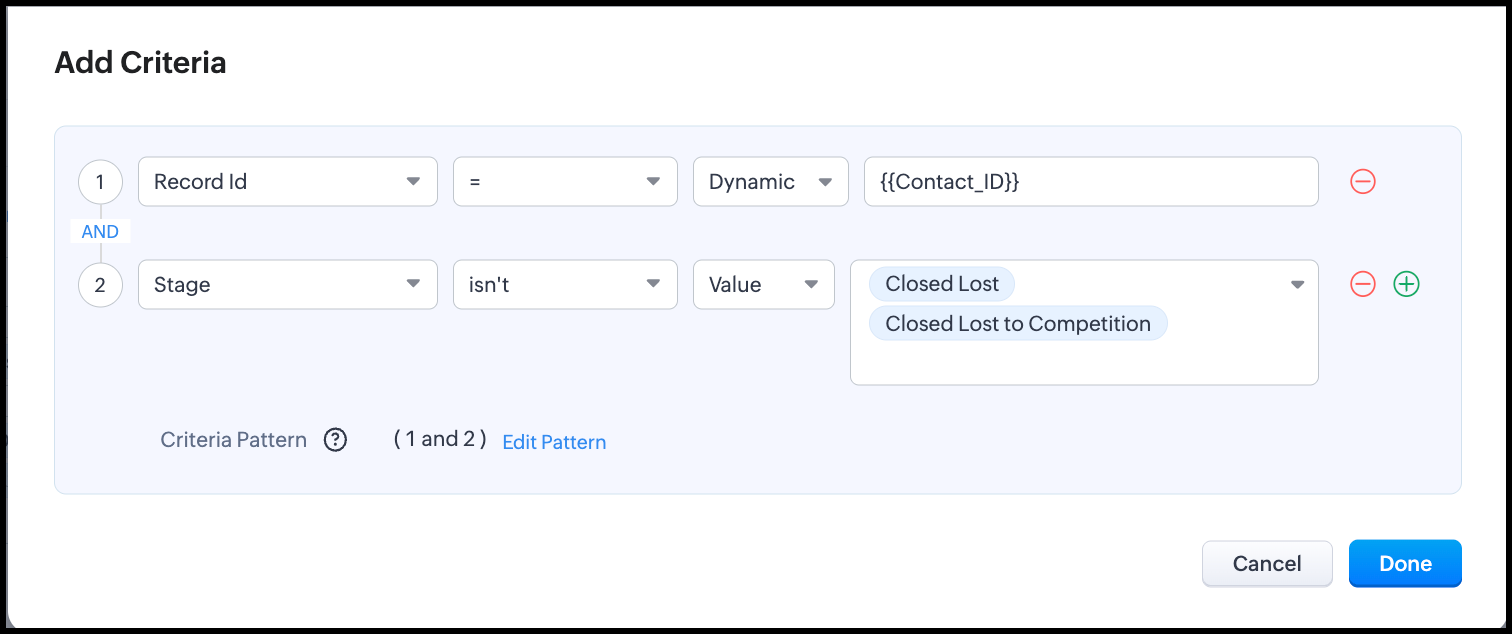
Let us see how to create a query for the Source type CRM - Module. The criteria for the query is to fetch all deals of a contact, whose "Stage" is not "Closed Lost" or "Closed Lost to Competition".
- Go to Setup -> Developer Hub -> Queries. The Queries window opens.
- Click Add Query.
- In the "Create Query" pop up, enter the following details:
- Enter Query Name and API Name. Click Next.
- Under Configuration, the default query type will be Zoho CRM Module. To change the type, click Change.
- Choose the module in CRM for which you want to create the query. You can also create queries for Subforms.
- If your module has lookup fields, you can also include them in your query. Choose the required lookups in the Related Module drop down. Note that you can choose a maximum of two fields in this drop down.
Select the required fields for your query from the Fields drop down. Note that you can choose a maximum of 50 fields here.

- Under Criteria, you can choose to get all records, or filter the response by the record ID or apply criteria.
- None - This option does not apply any criteria.
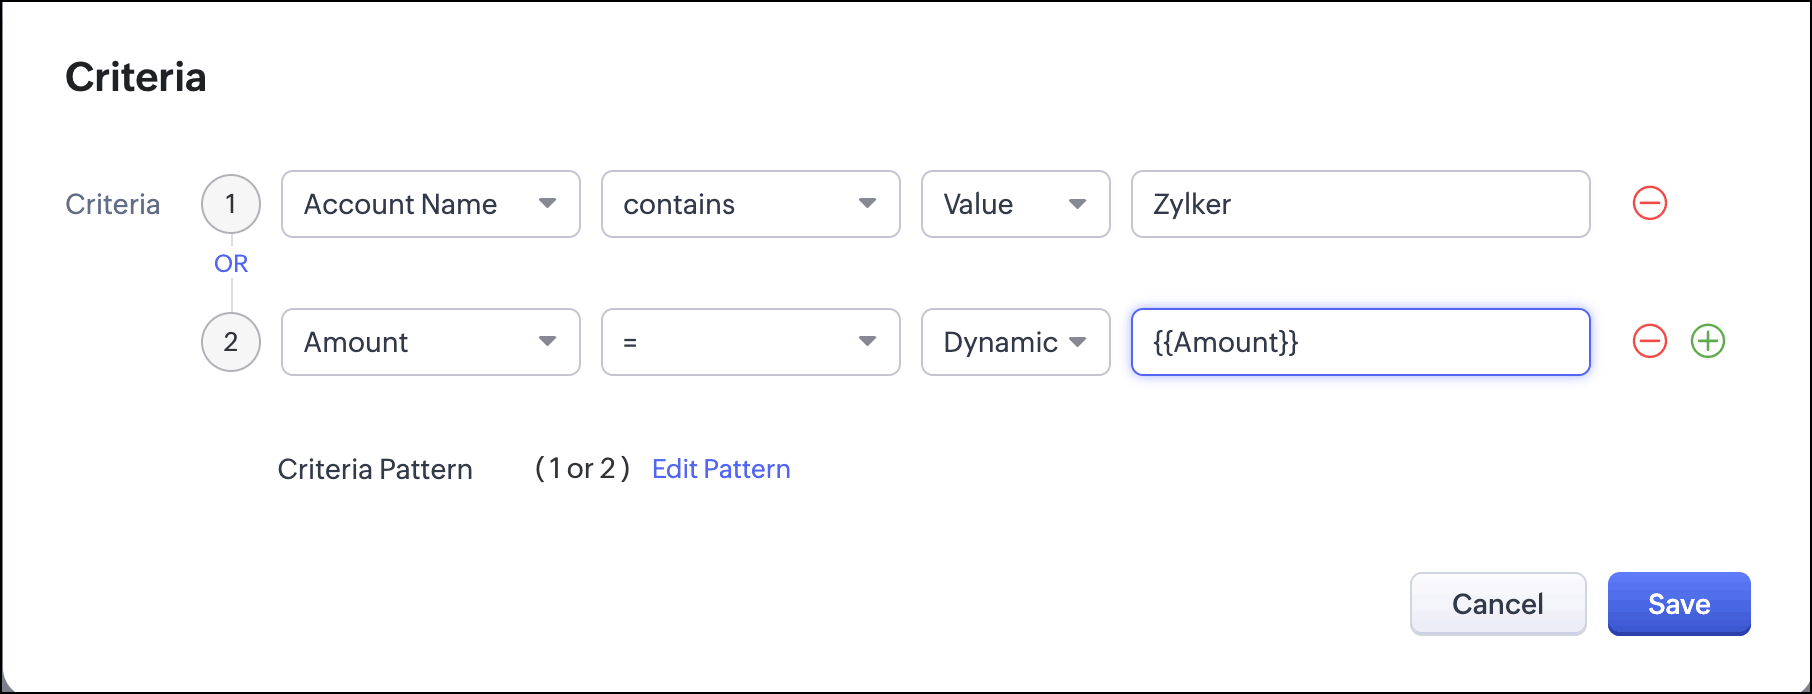
Criteria - You can apply criteria over different fields for which you are creating the query. Criteria supports various comparators and you can also group the conditions using AND or OR operators. You can also choose to give the value for the criterion or choose a dynamic value. Dynamic value means that the value will be taken for this field when the query is used at some place. In this example, we are assigning a variable to get the ID of the contact record that is associated with the deal that meets the criteria.
- Record ID - Choose this option if you want to apply the query to a specific record. You can assign a variable to this field and pass the record ID during execution.
Under Serializer, click Add Serializer to modify the response through JavaScript. You can then use this modified response for further processing. The following image shows an example of a serialized response. Click Save.
- You can also sort the response based on a field either in the ascending or descending order. Under Advanced, choose the field to be sorted on in the Order by drop down and the order in which it has to be sorted.
- Click Execute Query. If your query has a dynamic value in criteria, you will get a pop up asking for its value. Specify the value and click Next. You will see the response of the query you created.
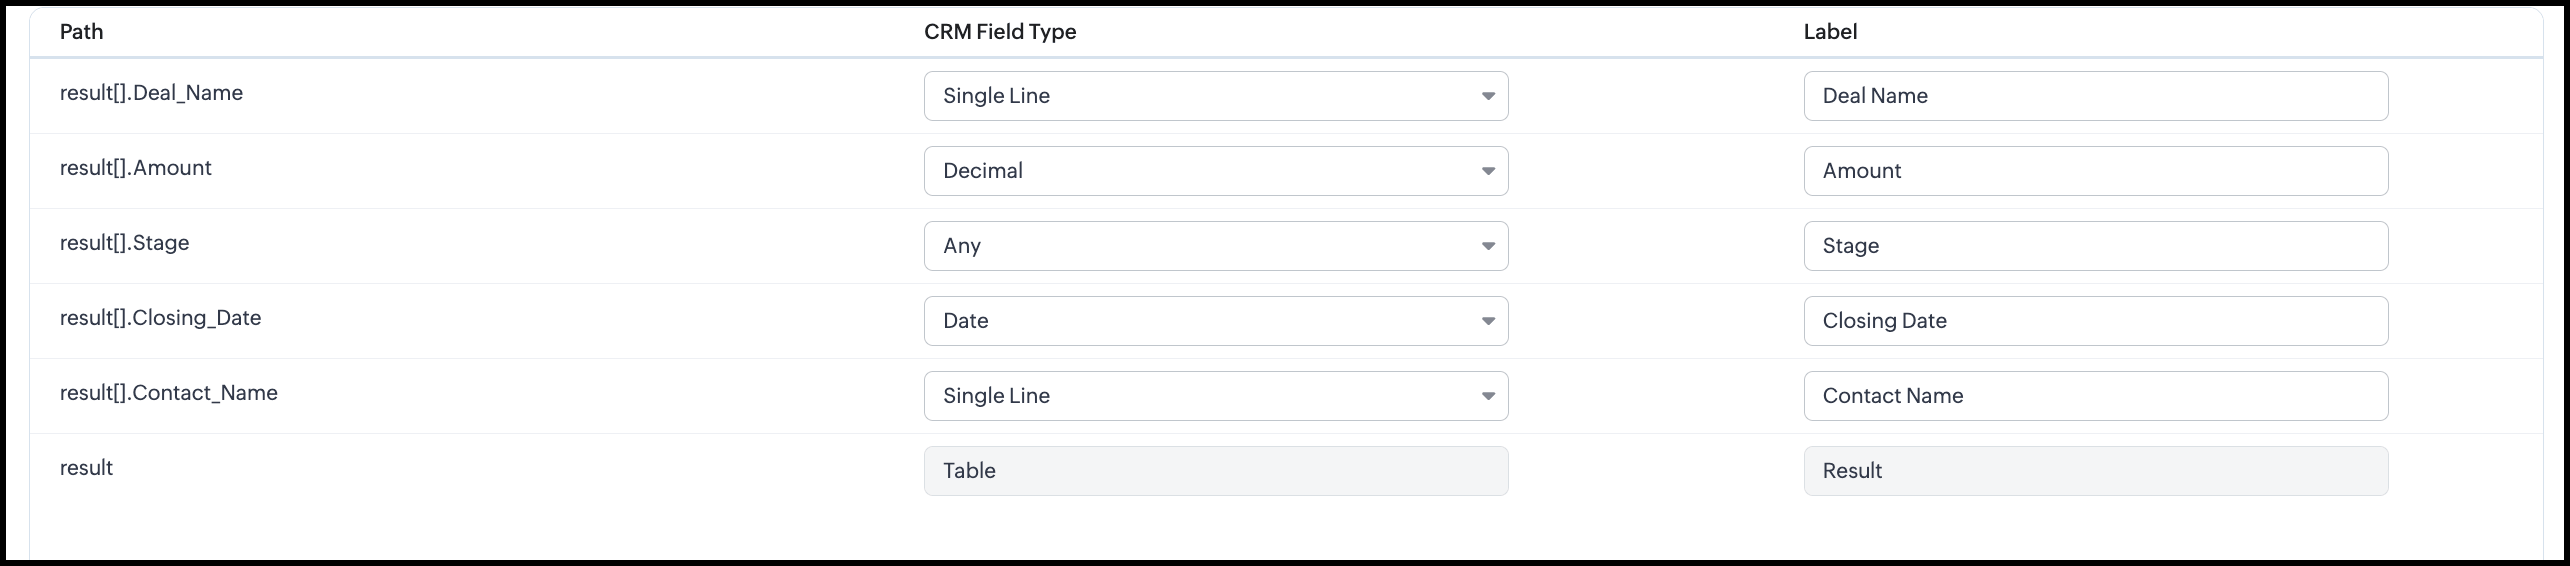
After the query executes, you can see the Schema at the bottom of the screen. Path indicates the JSON path in the response that the field is available in, CRM Field Type indicates it's field type in CRM such as long int, int, and the Label indicates the label/name of the field. You can edit these values based on what you need in the query's response.
- Click Save to save your query.
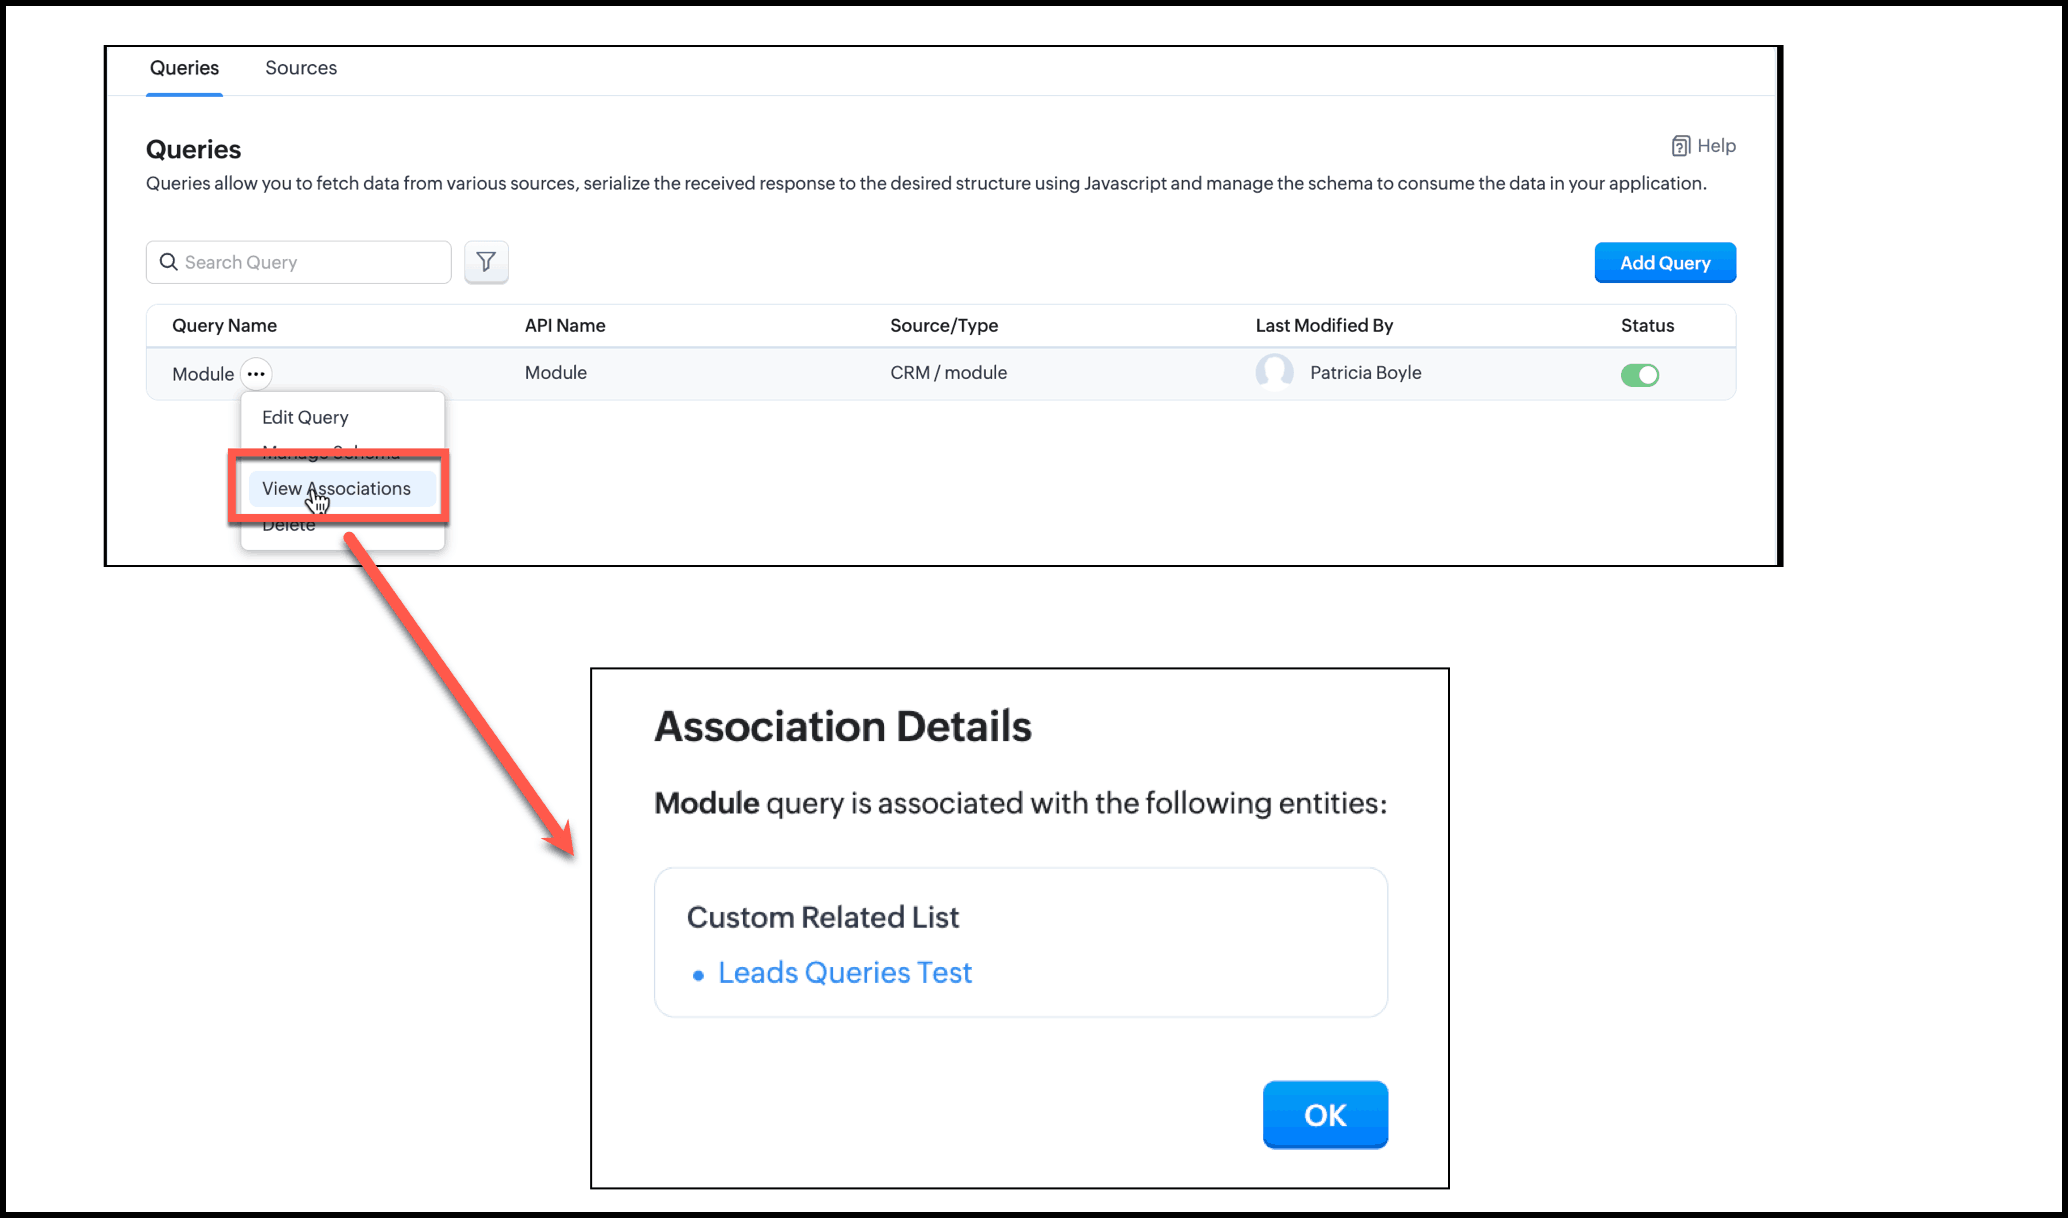
View Associations of a Query
You can associate a query with Canvas - Record Detail and List views, Kiosk - Screen and Decision components, and custom related list.
The View Associations option allows you to easily see the places or components the query is associated at.
To view the associations of a query, click the three-dot icon near the query and click View Associations. The pop up displays where the query is associated.