Kiosk Studio - An Overview
Kiosk Studio is a no-code customization tool in Zoho CRM. It allows admins to simplify work for their users, customers, and vendors by creating and embedding custom functionalities (called kiosks) across the CRM.
- Introduction
- Elements
Introduction
Kiosks are not only convenient for your CRM users, they are also easy to build using the no-code Kiosk Studio in Zoho CRM. Before you start building a kiosk in Zoho CRM, it helps if you have a clear idea of the capability you want to provide.
The problem
A brand new CRM comes with a set of standard modules and configurations. This default setup serves as a great starting point for most organizations. However, every organization has its own way of modeling customer relationships and doing customer-related work. To get the maximum value from Zoho CRM, admins can make changes to the standard setup by configuring custom modules, custom fields, multiple pipelines, canvas pages, wizards, translations, and more. Customizing the CRM in this way is something most admins are familiar with.
When it comes to customizing the CRM by adding capabilities to it, the story is different. In these cases, admins have to invest a lot of development effort and time to meet their needs. This acts as a barrier to admins and slows down the process of boosting the power of the CRM to their users, customers, vendors, and other stakeholders. It also slows down the process of making changes to the added capabilities.
Our solution
Admins can quickly create custom capabilities (called kiosks) and make them available for all CRM users. They can do this by using Kiosk Studio, a no-code interface that allows users to build capabilities by using some basic building elements.
The ease of building a kiosk does not mean there is a trade-off in power. In fact, a kiosk can bring in data from all modules in the CRM, have custom screens with fields not available in the CRM, perform actions for records across the CRM, fire webhooks, and execute custom functions. Once built, kiosks can be hosted in multiple places across the CRM. This gives admins a lot of options when it comes to sharing these capabilities with anyone related to an organization.
Before you visit the scenarios, it is essential that you understand the elements of Kiosk.
Elements
You can build kiosks to cover multiple use cases, but in the end, they are all made up of these basic elements that are added, configured, and connected in multiple ways.
Screen
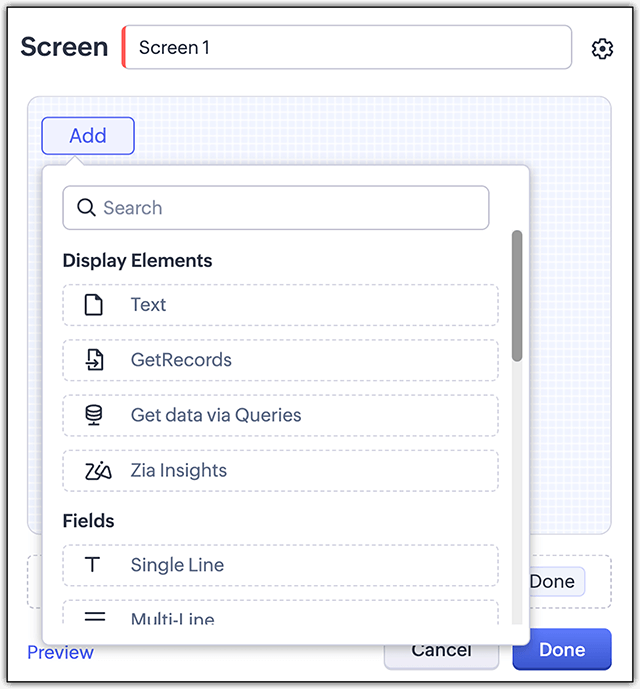
A screen presents the user with display text, fields, data from the CRM, data collected from previous screens, and buttons to pick the next step. Each button represents a branch in the kiosk's flow. The data entered in the fields of a screen and the data pulled in from the CRM will be available for use in subsequent screens. This is how a screen will look to CRM users:

GetRecords

The GetRecords component lets you pull in a record or multiple records from the CRM and display them to the user. You can pick a parent module, or select a parent record and pick its child module. Then, you can set the criteria for the records to be fetched, decide how these records should be sorted, and so on. You can learn more about GetRecords in the Data in kiosks section of this document.
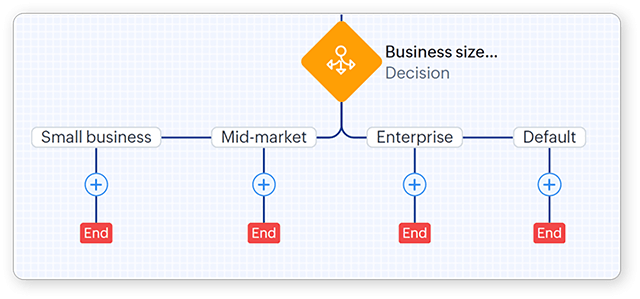
Decision

A decision component is used to create branches in the kiosk's flow based on existing CRM data or the data in the previous screen fields. It is a counterpart to the buttons on screens. Both dictate the branch of the flow that is to be executed, but decision components do this automatically based on data. Criteria are specified to decide the branch that the flow should take. There will always be a default path in case the criteria for the other paths are not satisfied.
Action
Actions are crucial, as they link the data in the screens with the rest of the CRM. Actions added in a branch of the kiosk will be automatically executed if the user's actions lead down that branch. When you create an action, you can make use of the data gathered in the previous screens. For example, the details entered by the user in previous screens can be used as values for a function's arguments.
The different actions include Field Update, Assign Owner, Assigning Tags, Removing Tags, Email Notifications, Add Note, Add Task, Schedule a Call, Add Meeting, Create records, Convert, Webhooks, Functions, Open Record, and Open Link.