ZOHO MARKETPLACE - AN INTRODUCTION
At Zoho Desk, we believe in delivering good user experiences and making the good ones better. In that vein, stepping into Zoho Marketplace is an effort towards achieving the latter goal.
Zoho Marketplace is an online store where you can find extensions that deliver business value by enhancing the core functionality of the Zoho products they use. It is similar to Google's Play Store, where one finds apps for installation and use according to their needs. Earlier, one could create extensions only for Zoho CRM, Creator, Connect, Cliq, Recruit, SalesIQ, Mail, and Reports. But now, they can create extensions for Zoho Desk too and make a positive impact in the customer service space.
As a developer, you can create extensions that combine Zoho Desk's functionalities with those of third-party tools to make your work easier and more effective. You do not require extensive expertise or experience in programming to create extensions. Functional knowledge of HTML, CSS, and JavaScript can help you to a great extent.
Once you create and submit your extension for review, we test its functionalities and provide you with feedback for improving its effectiveness, if required. When the extension is ready for use, we host it on the Marketplace for end-users to discover and use.
To keep yourself updated about changes to Zoho Desk Extension development capabilities, such as APIs and SDKs, follow the Zoho Desk Extension Developers forum.
Quick Start
Installing the Node
$ node -v
      v10.x
      or
      Above
As the first step in creating an extension, install the node.js runtime environment and download node.js from here (versions above 10.X are supported). After installing node.js, verify its version using the following command:
Installing the ZET CLI
Next, you must install the Zoho Extension Toolkit (ZET) Command Line Interface (CLI) tool, which enables you to build, test, and package extensions for Zoho products.
sudo npm install -g zoho-extension-toolkit
If you use a Mac/Unix system for development, run the following command to install ZET:
npm install -g zoho-extension-toolkit
If you use a Microsoft Windows system, run the following command:
The -g command option ensures that the installation is global. With a global installation, you can call commands and work on your extensions and CLI from anywhere within your machine.
zet -v
      0.23.6
      or
      Above
After ZET is installed, help information regarding the zet command would appear. You can then verify the version of the tool, using the following command:
D: \zet\projects\demoproject>zet -help

      Usage: index [options] [command]


      Options:

      -v, —version Show the version number
      -h, —help output usage information


      Commands:
      Init,     Creates a new project template directory
      run   Starts a local server with current directory as context
      Validate  Validates the current app with validation rules
      Pack    Packs the project to upload into marketplace
Running ZET will display all the commands supported, as shown in the right panel.
init
zet init
This command creates a new project for the extension.
D:\zet\projects>zet init
      ? Select the Zoho service for your widget and hit enter key (Use arrow keys)
      > Zoho Desk
      Zoho CRM
      ZES
Executing this command displays the list of Zoho Services available. Choose Zoho Desk and press the Enter key.
D:\zet\projects>zet init
      ? Select the Zoho service for your widget and hit enter key Zoho Desk
      ? Project Name demoproject
After choosing Zoho Desk, provide a name for the new project.
D:\zet\projects>D:\zet\projects>zet init
      ? Select the Zoho service for your widget and hit enter key Zoho Desk
      ? Project Name demoproject
      Initializing project at: D:\zet\projects\demoprojects
      Installing NPM dependencies…
      Project Initialized D:\zet\projects\demoprojects
      Run the following commands:
      Cd demoproject
      Zet run

      D:\zet\projects>
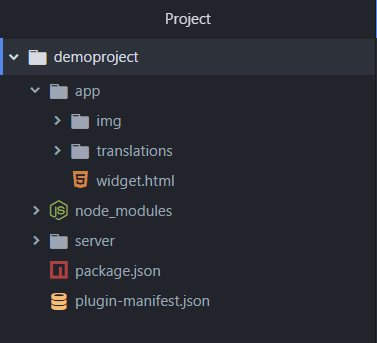
After you enter the name, a project template directory with all the necessary folders, dependency node packages, and files is created.
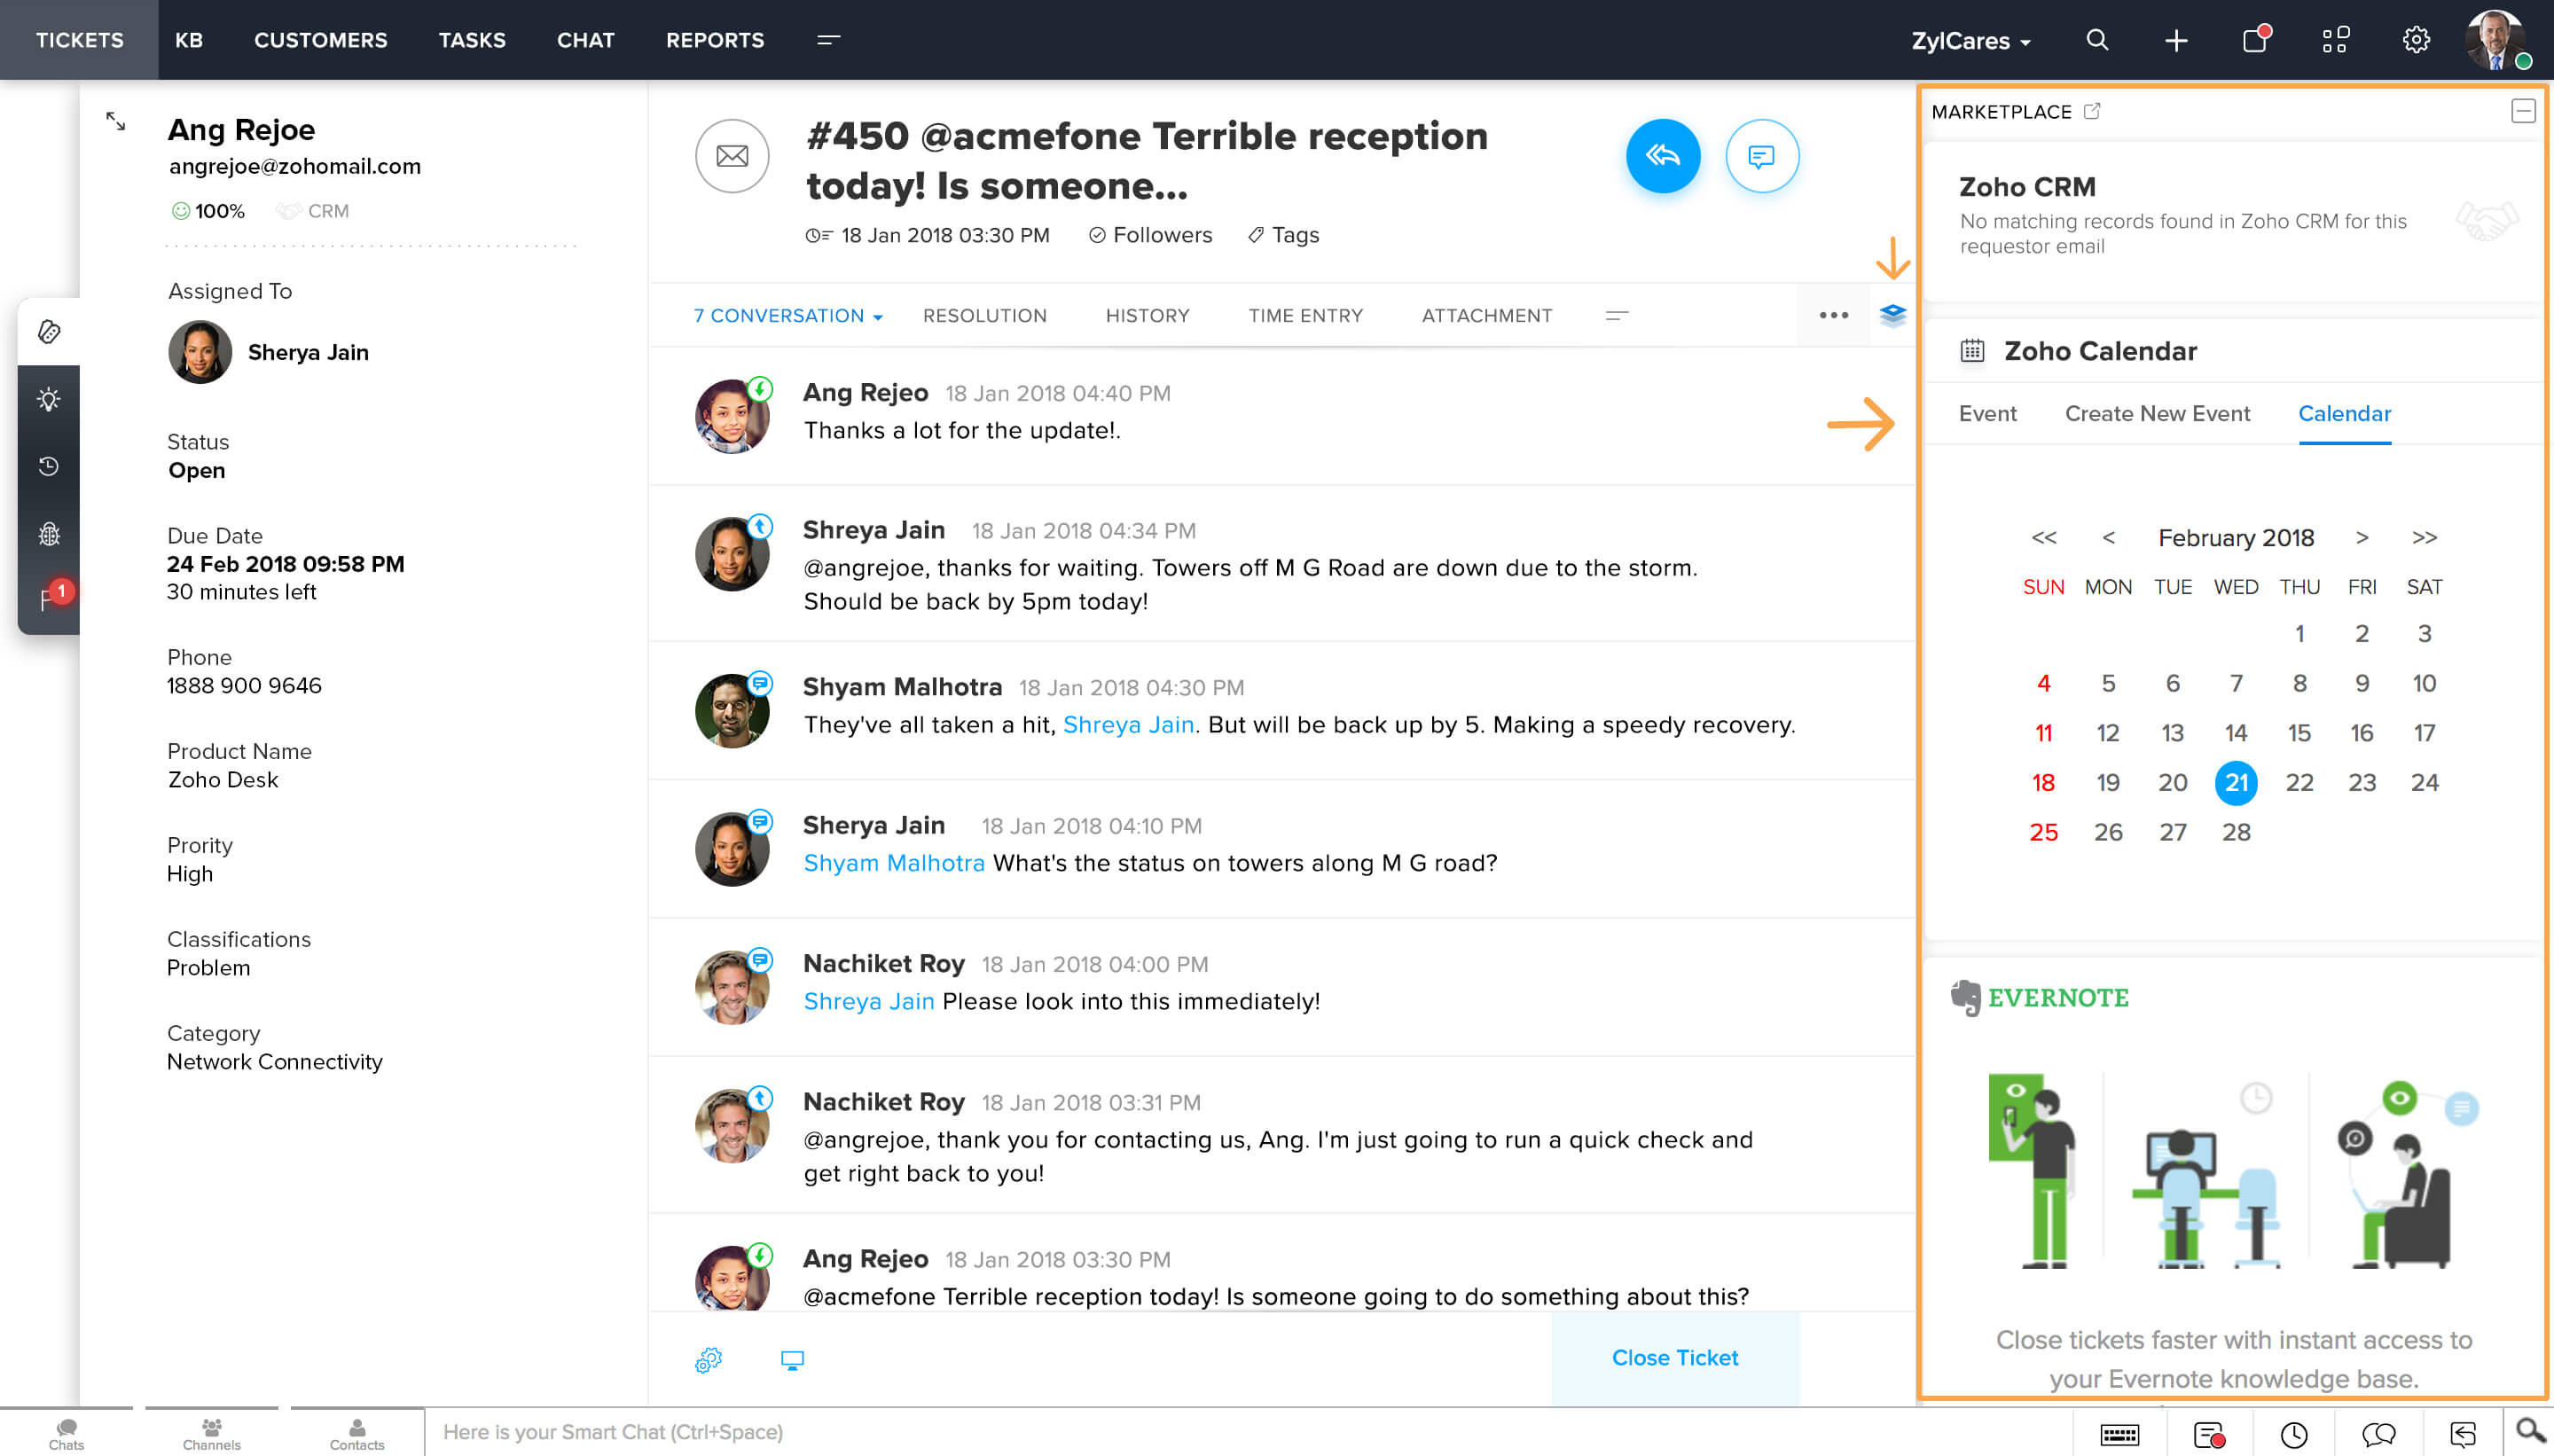
The image below shows the default folder structure of an extension project.
run
This command runs the http server hosting the extension.
D:\zet\projects>D:\zet\projects>zet run
1. To start the server and test the extension, run the following command:
This command makes the http server accessible through the 5000 port of your local machine. Make sure that the 5000 port is not occupied, before you start the server.
2. To verify if the server started successfully, open the following URL in your browser: http://localhost:5000/plugin-manifest.json
validate
D:\zet\projects>zet validate
This command validates the extension by checking if it follows the guidelines defined in this section. To perform this validation, run the following command:
After you execute this command, the result of the validation appears. Check the result and make any changes, if required. After this step, you can proceed to package the extension files for upload.
Guidelines
During validation, the details in the plugin-manifest.json file are checked to verify if the following conditions are met:
- Icon and logo URLs must be relative paths. Absolute paths are notallowed.
- All keys included by default while creating the extension must be present in the plugin-manifest file. None of the keys must be removed.
pack
zet pack
The project directory contains the source code and other node modules necessary for locally testing the extension. However, the final zip file you upload to Marketplace must contain only the files and folders essential for running the extension. ZET makes this packaging process easy through the following command:
After you execute this command, ZET creates a zip file containing all files in the app folder and the plugin-manifest.json file of your extension. This zip file is stored in the dist folder of the project.
Building Your First Extension
Let’s get started by creating an extension. First, open the terminal/command prompt window, and navigate to the directory under which you want to create your extension.
Then, perform the following steps:
- Run the init command.
- Under the list of services, choose Zoho Desk.
- Enter a name for the extension project.
- Press the Enter key.
The extension project is created with the necessary directories and files.
Testing the Extension
To test your extension, perform the following steps:
- Depending on the computer you use, open Terminal or Command Prompt and navigate to your project folder.
- Execute the zet run command.
- If you use Mozilla Firefox, open https://127.0.0.1:5000/plugin-manifest.json in a new tab, and click Advanced ---> Accept the Risk and Continue.
- If you use Google Chrome, open https://127.0.0.1:5000/plugin-manifest.json in a new tab and click Advanced ---> Proceed to Unsafe. If the Proceed to Unsafe option does not appear, enable the chrome://flags/#allow-insecure-localhost Chrome flag and restart the browser.
- Next, login to your Zoho Desk account. If you do not have a Zoho Desk account, sign up here.
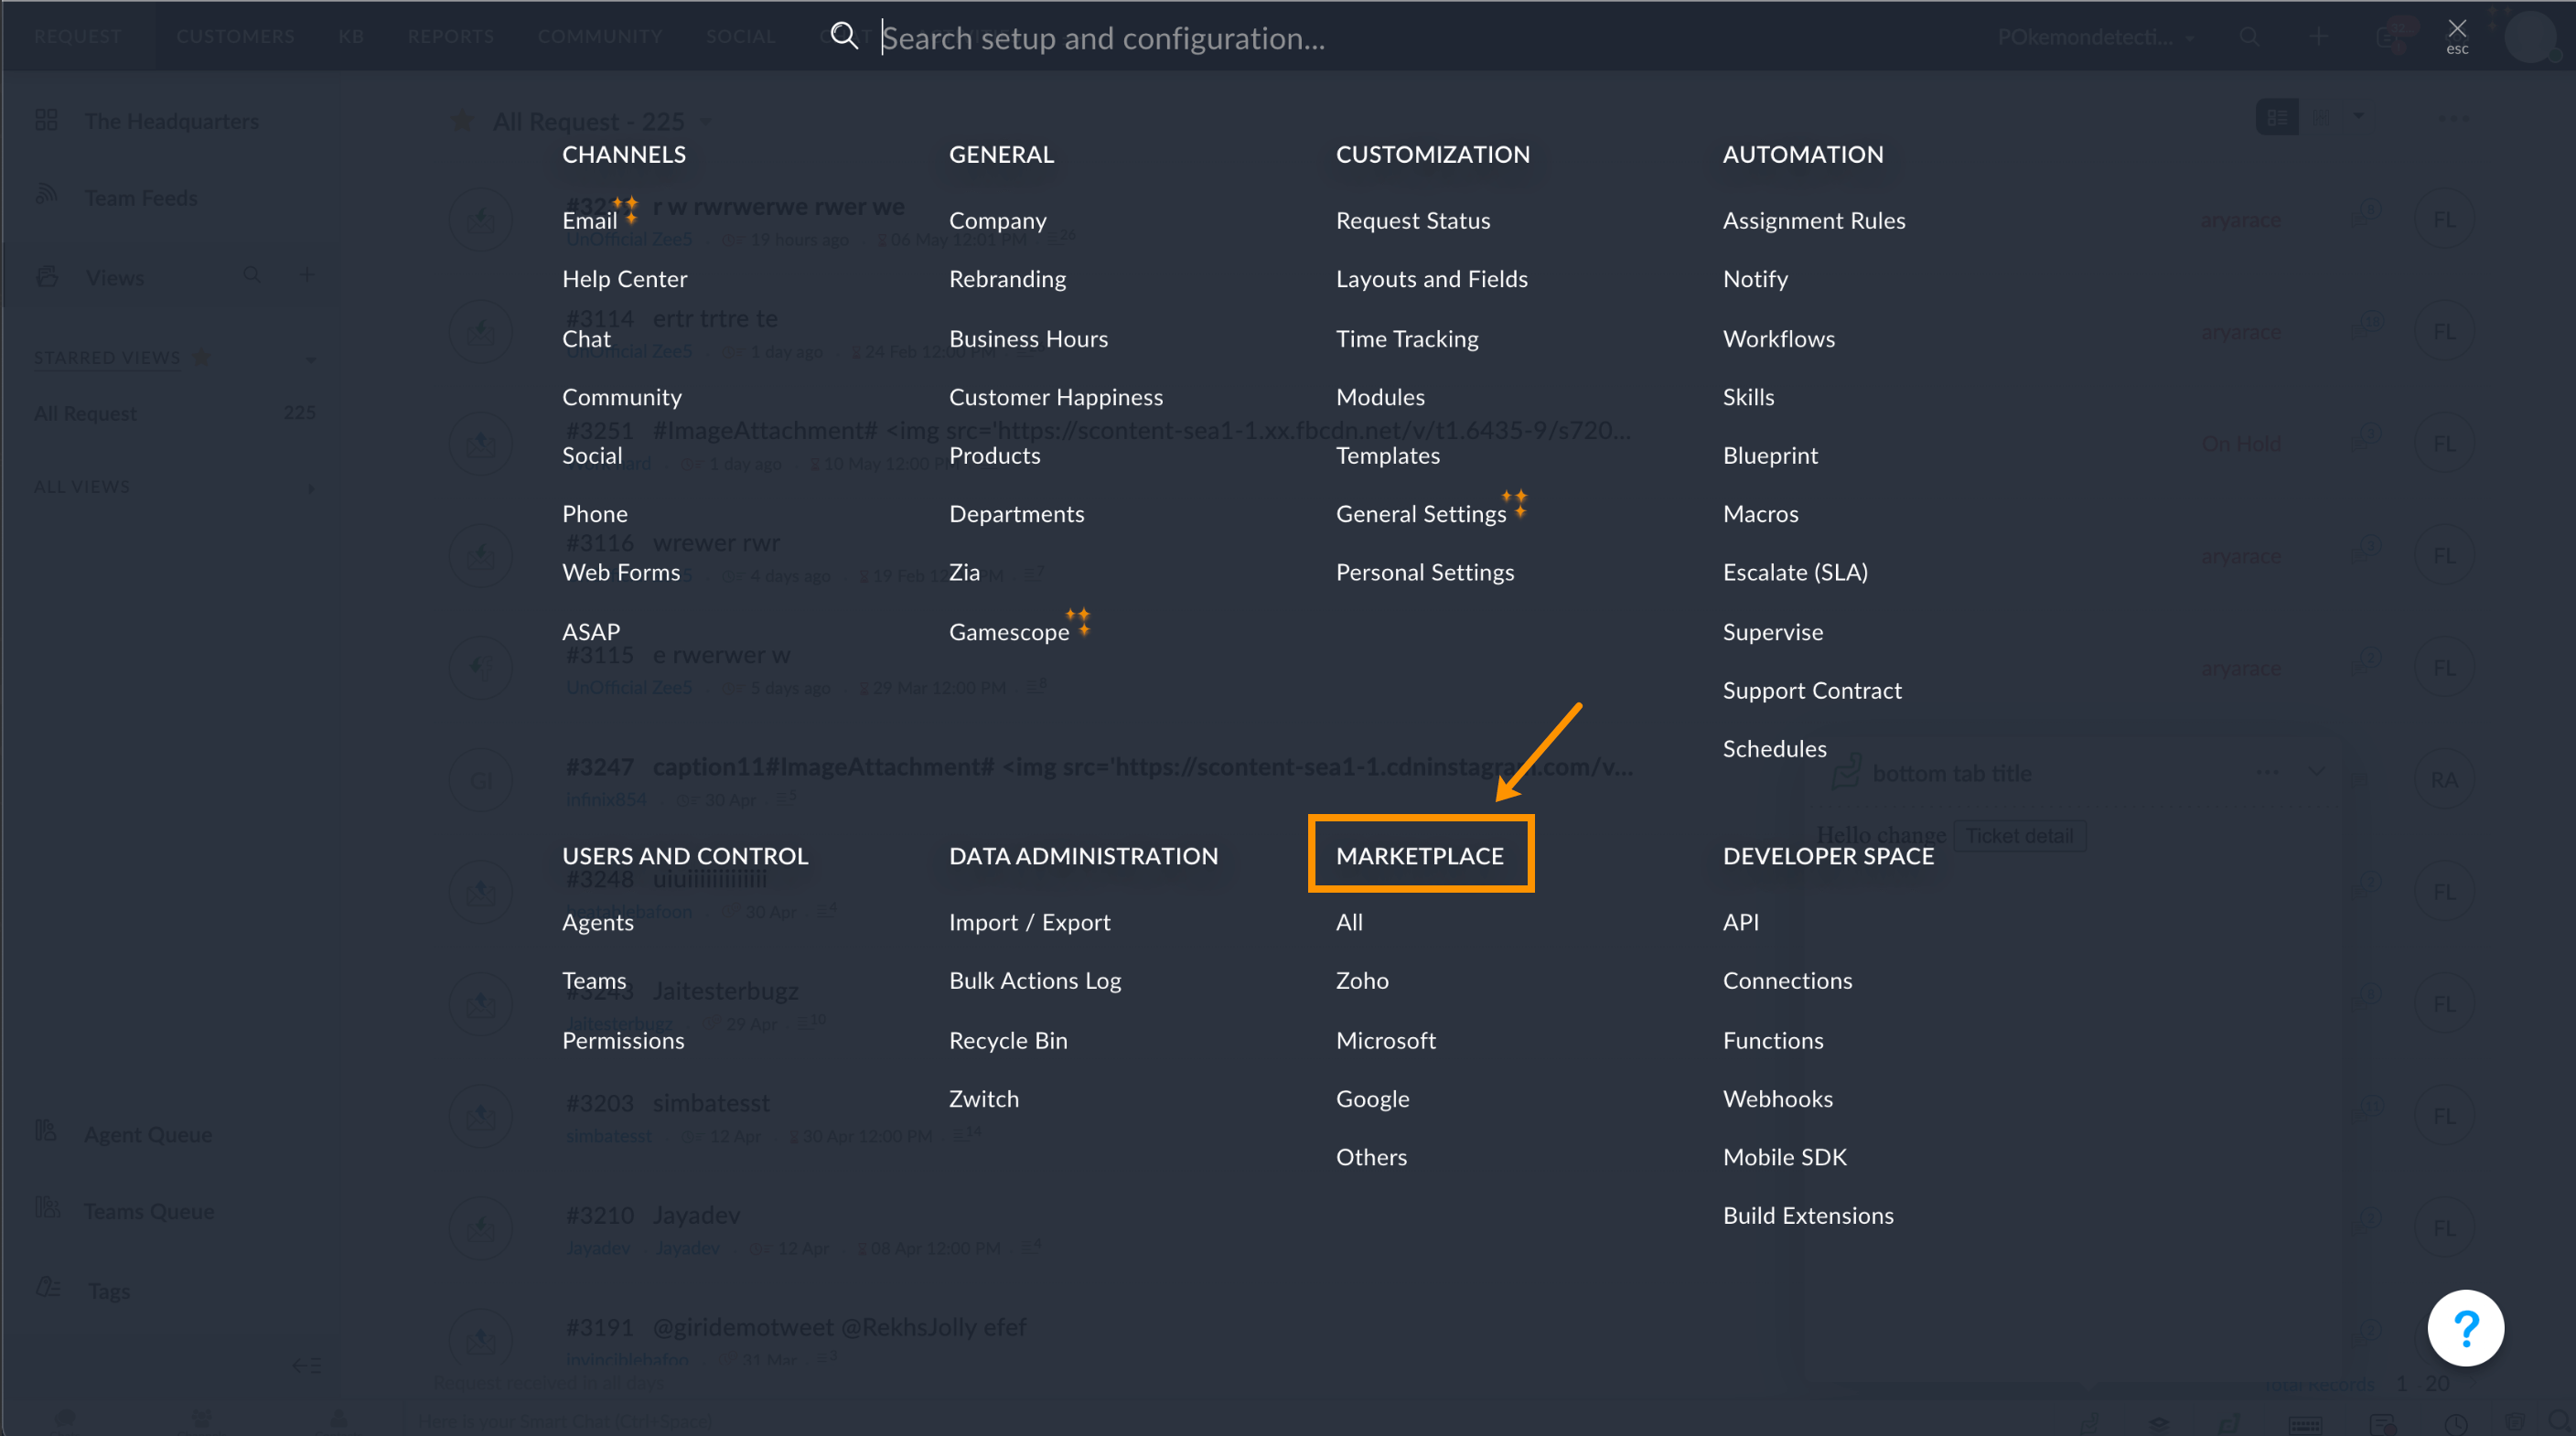
- On the upper-right side of the Zoho Desk screen, click the Setup icon.
The Setup page appears. - On this page, under the Developer Space section, click Build Extensions.
- On the Build Extensions page, click Enable Developer Mode.
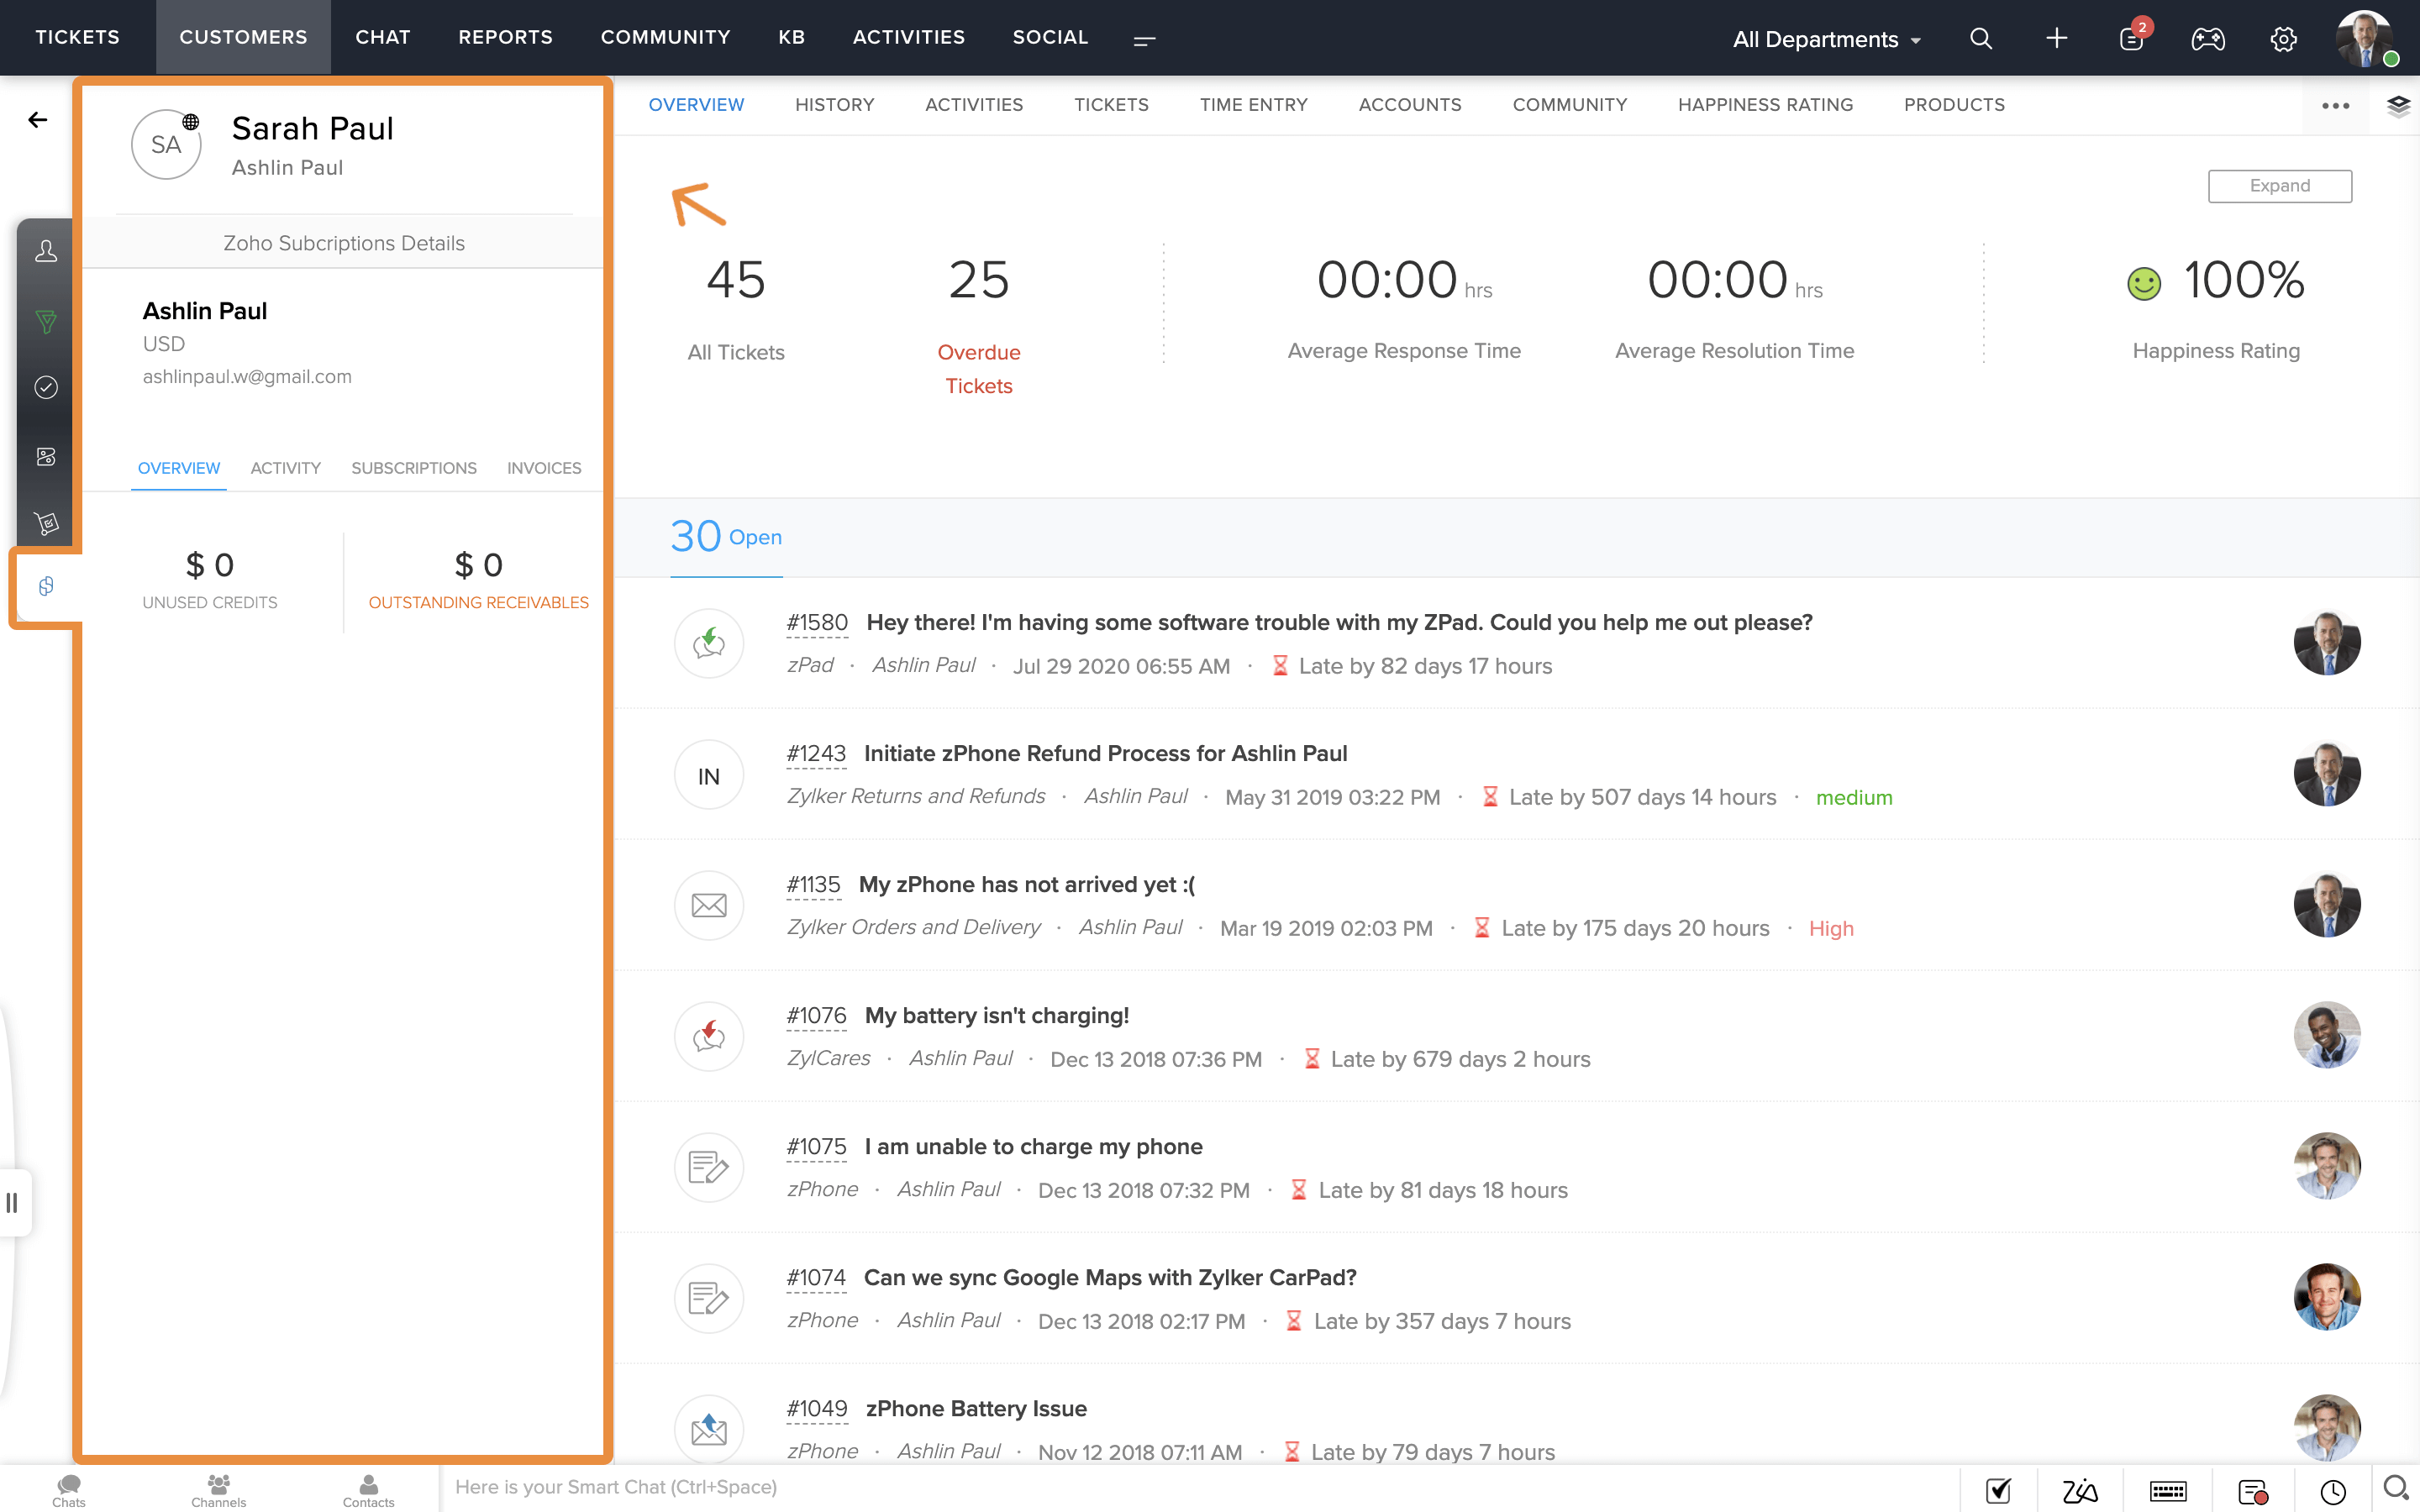
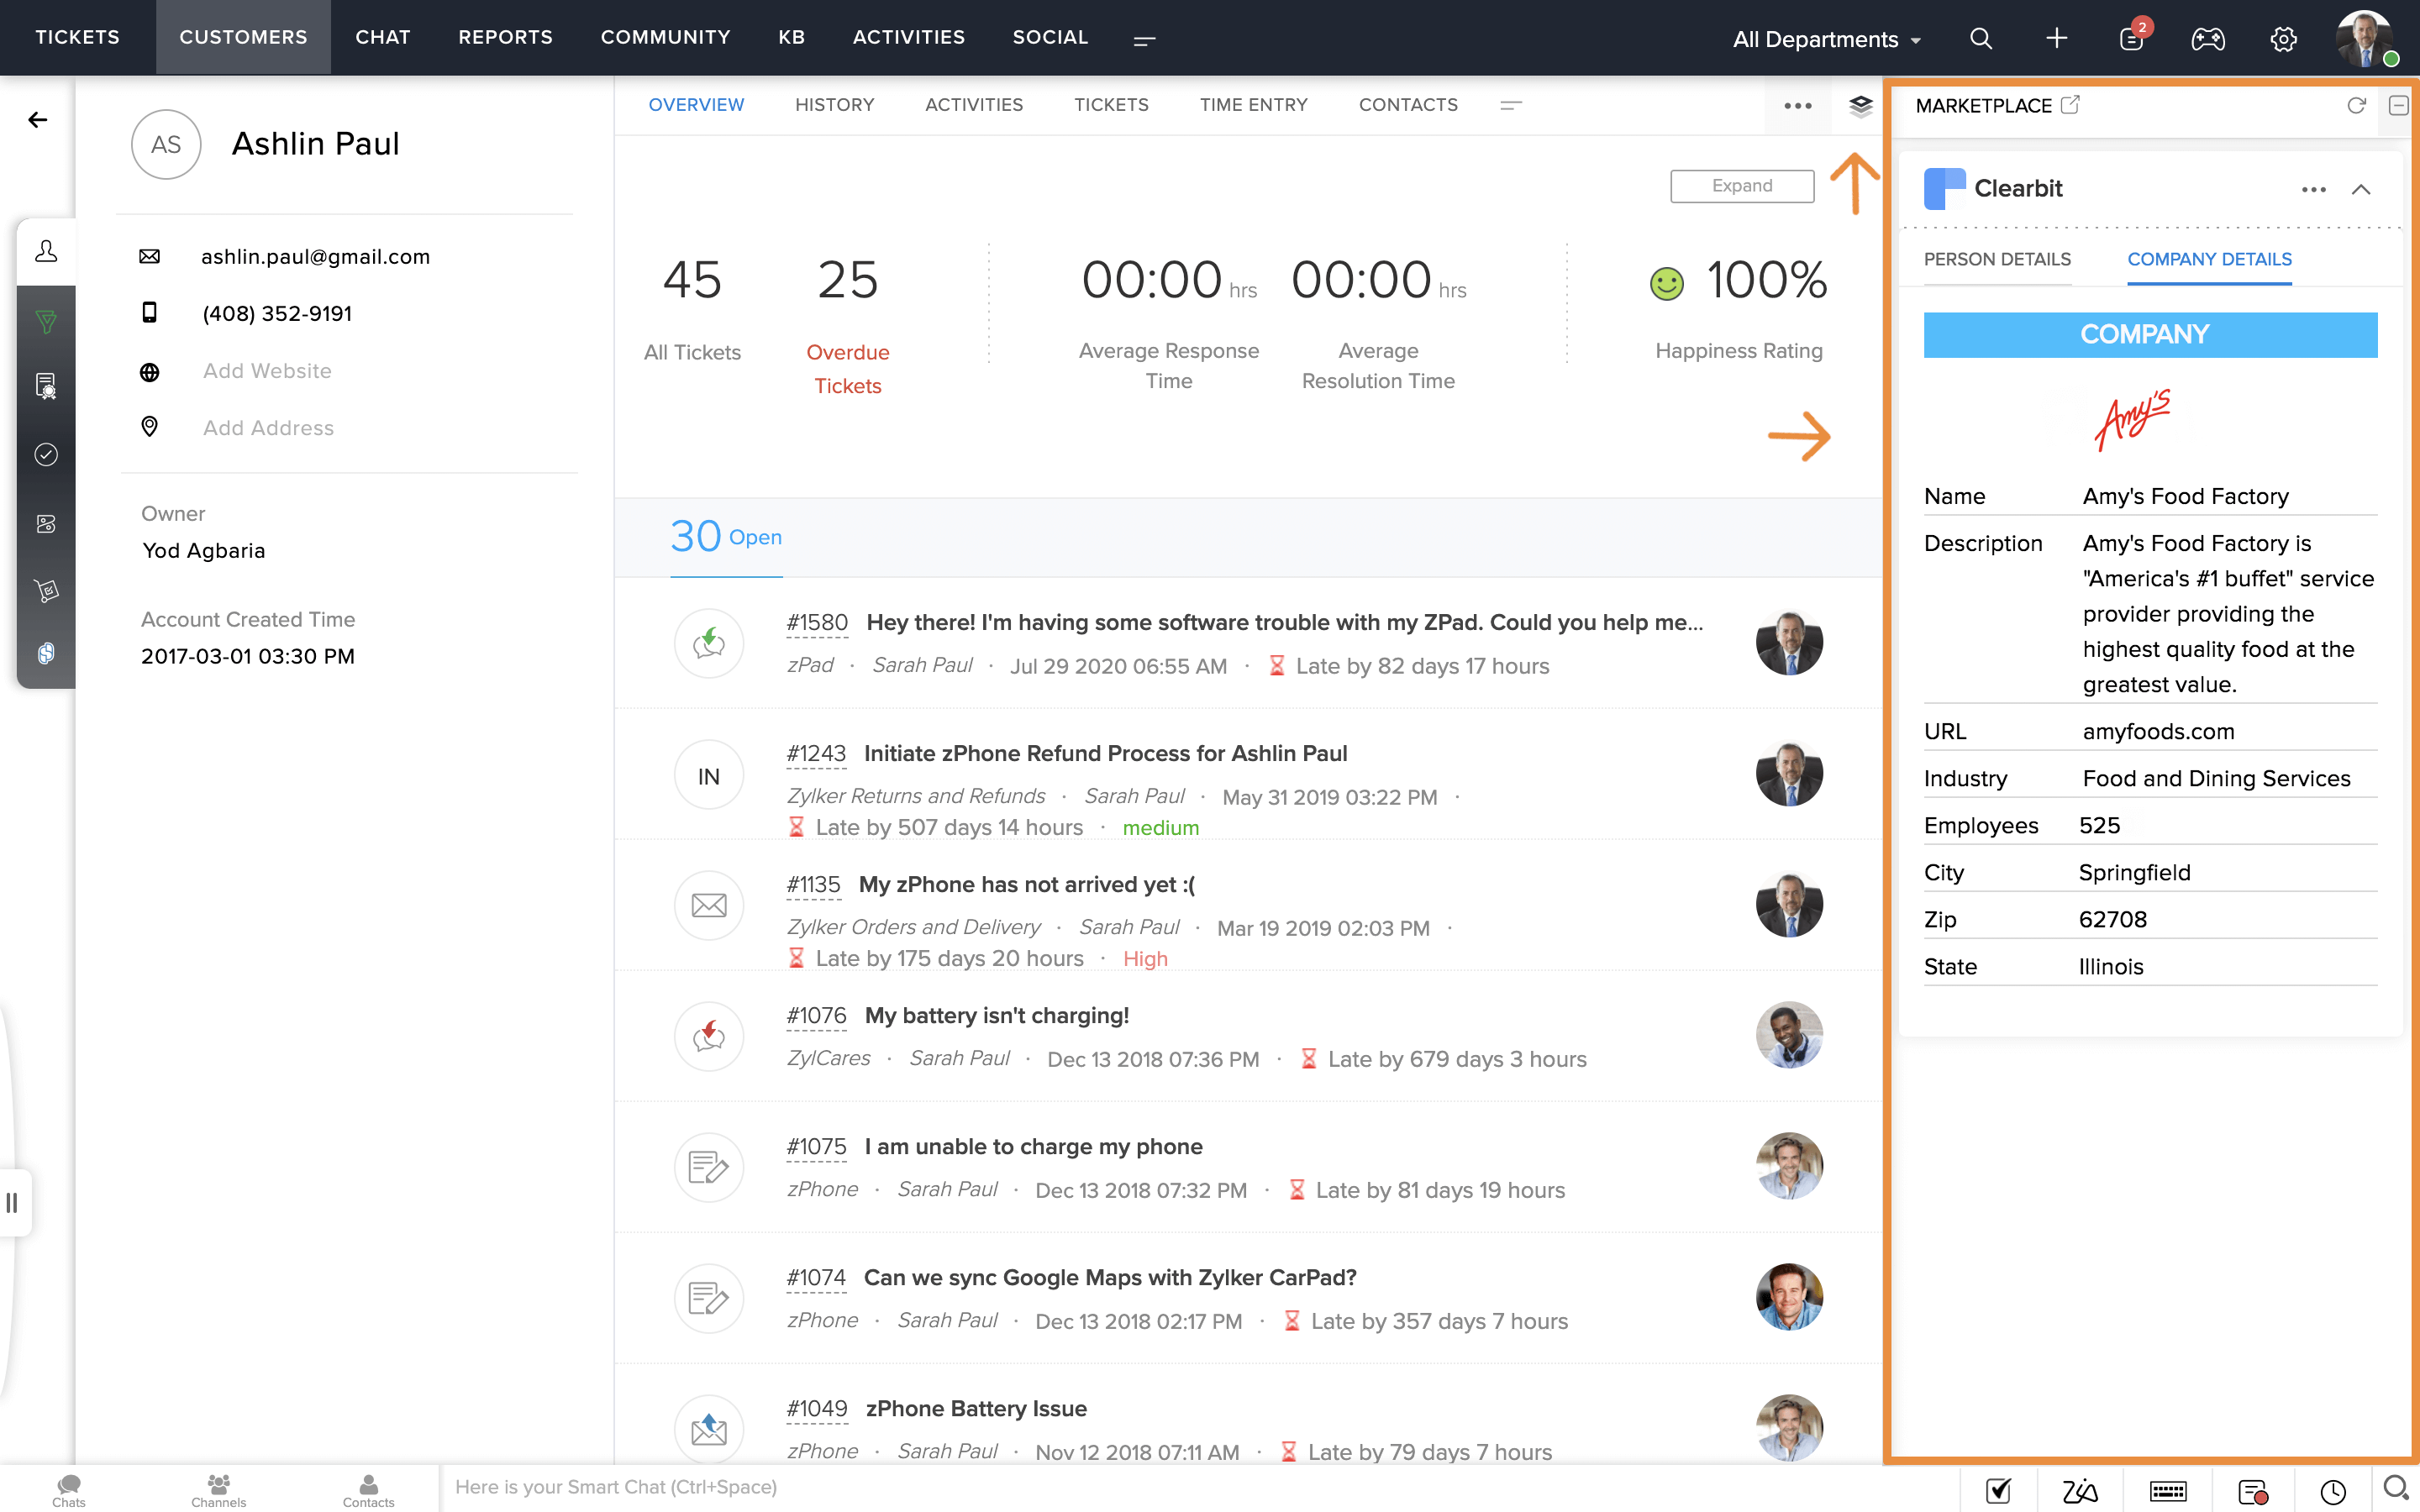
This action refreshes the page and activates the Developer Mode. - Now the extension is installed in your Zoho Desk portal. For example, if one of the locations of the extension is Ticket Right Panel (desk.ticket.detail.rightpanel), then the widget will load in this location.
You can now test your extension to verify if it behaves the way you intended. - After testing the extension, you can disable the Developer Mode by clicking the Disable Developer Mode button on the Build Extensions page.

Note: Only users with the Support Administrator user profile can build extensions.
Validating the Extension
To validate your extension and verify if it follows the guidelines mentioned earlier, perform the following steps:
- Open the terminal/command prompt and navigate to your project folder.
- Execute the zet validate command.
The results of the validation process appear. Make changes, if required.
Packaging the Extension
To package your extension as a zip file that contains only the relevant files, perform the following steps:
- Open the terminal/command prompt and navigate to your project folder.
- Execute the zet pack command.
The zip file of your extension is created in the dist folder of your project.
Uploading the Extension
Uploading the Extension to the Marketplace
After packaging your extension, perform the following steps to upload the zip file of your extension for review:
- Go to the Sigma website.
- Click the New Extension button.

The upload process flow begins.
Based on the visibility option you choose, your extension can be of two types:
- Private
- Public
Private:
If you want to use the extension only within your organization or help desk portal, choose Private in the upload form. After you complete the upload process, you will be provided with an installation URL, using which you can install the extension in your portal.
Public:
If you want to let other end-users of Zoho Desk find your extension in Marketplace and install it in their portal, choose Public in the upload form.
In public extension, you can make it available for free or for a price. In Zoho Desk, payment for extensions is charged either per installation or per user. End-users can opt for a trial of the extension to explore its functionalities. If they are satisfied with the extension and decide to purchase it, they can choose the payment type that suits them.
The form through which you submit more details of your extension appears. Follow the wizard through and upload your extension.
- In the General information form, provide the following details:
- Release Audience: Visibility option for the extension: Public or Private
- Developer Name/Org: Name of the organization or individual developer who created the extension
- Contact Number: Phone number to contact the extension developer
- Developer Website: Website of the extension developer
- Help URL: Link to the extension's help documentation
After entering these details, click the Next Step button. The App information form appears.
- In the App information form, enter the following details:
- App Title: Name of the extension
- Tagline: Short, catchy phrase that describes the function of the extension
- Category: Business function/operation related to the extension
- App Description: Brief description of the extension
- App Summary: Development summary of the extension and other important notes
- Logo: Logo of the extension/product/developer
- Banner: Banner image that should appear on the extension detail page
- Screenshots: Screenshots of the extension
After entering these details, click the Next Step button. The Uploads form appears.
- In the Uploads form, configure the following settings:
- Zoho Service: Zoho product related to the extension
- Upload Zip File: Final, packaged zip file of the extension
After performing these steps, click the Next Step button. The Validation page appears.
- On the Validation page, verify the details you entered, and perform one of these two steps::
- If all the information is accurate, click the Save button. The extension will be submitted for review.
- If any inaccurate information is present, click the Back button and perform the required corrections in the relevant form. After making the necessary correction(s), click the Save button in the Validation page.
After you upload your extension on the Sigma site, the Zoho Desk team reviews it for functionality and usability, and provides you with feedback if any enhancements are required. The extension is made available on Marketplace after it passes the review and functions as intended.
For more details, refer to the Application Submission process section.
Updating the Extension
Updating the Extension to the Zoho Desk
If you come up with new features, enhancements to existing features, or bug fixes, you can update your extension to improve its functionality and performance. Each update increments the version of the extension.
To upload the updated version of your extension, perform the following steps:
- Go to the Sigma website and click your extension.
- On the upper-right corner of the extension detail page, click the Edit button. The extension information form with previously filled data appears. Edit the details, if required, and click Next.
- In the final form, upload the zip file of the updated extension and submit it for review.
The review process of the updated extension begins.
After the review is completed, one of these two events happens:
- If the extension is public, the updated version is published in Marketplace.
- If the extension is private, the updated version is approved and the installation URL is displayed on the extension detail page.
When you release a new version of your extension, the Update option for it will be visible in the user's Zoho Desk portals after a period of 24 hours. If the extension must be updated immediately after the new version is released, users can find the Update option on the detail page of the extension.
Installing the Extension
Installing the Extension in Zoho Desk
End-users of Zoho Desk can view and install the public extensions you create, from two locations:
- Marketplace option in the SETUP section inside Zoho Desk.
- Zoho Marketplace website

If the Zoho Desk administrator installs an extension from the Setup page, the extension is made available to users in the current portal. On the other hand, if the administrator tries to install the extension from the Marketplace site, a list of all the available portals appears, letting the admin choose the one in which the extension must be installed.
Renaming Extensions and their locations
Renaming Extensions and their locations
Configuration
Below are the different configurations you can set for your extension.
Plugin Manifest
MultiDC Support for Widgets
Configuring Connectors for Third-Party Services
To configure a connector for a third-party service, perform the following steps:
- Create a third-party connection by performing the steps under the Connect with a custom service section in this help article.
- On the Connection Summary page that appears after you create the connection, click the JSON tab. Copy the code snippet under the tab.
- Open the plugin-manifest.json file of your extension and paste the code snippet under the connectors key.
Your extension is now connected to the third-party service you want.
Note: To configure your extension to fetch data from the third-party service, include the connectionLinkName key in the request API.
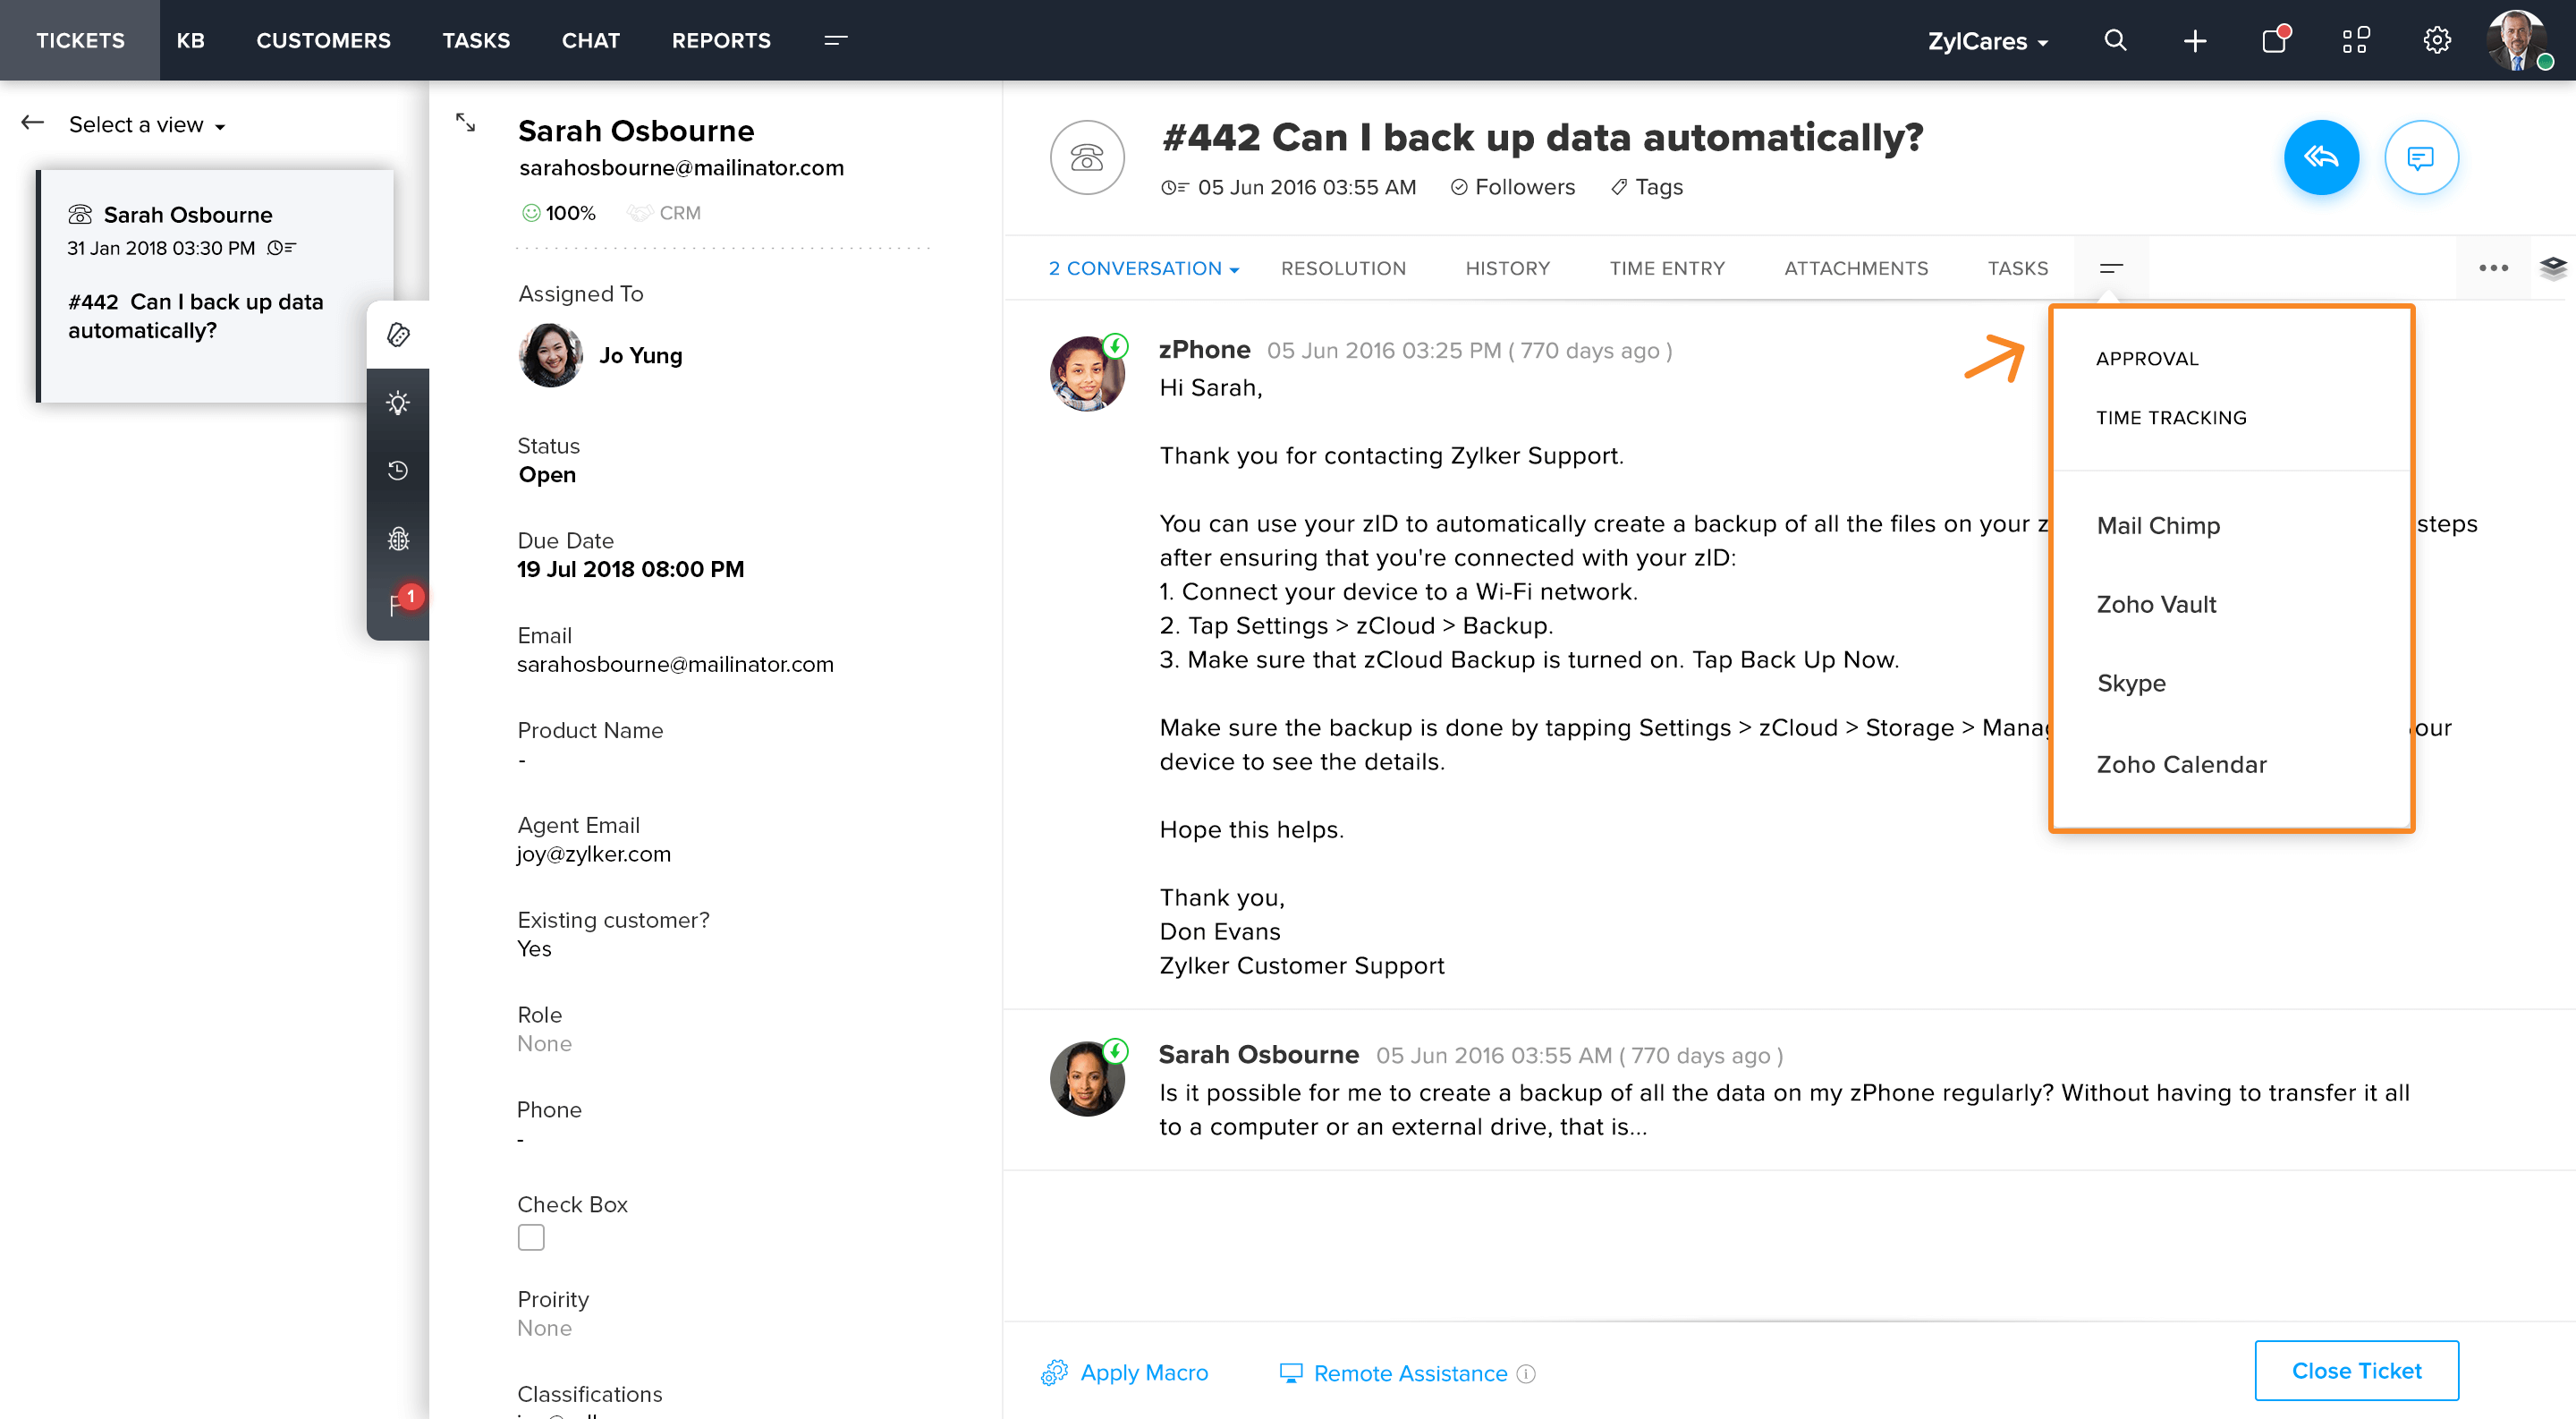
Locations
This key, which must be configured in the plugin-manifest file, defines the location(s) for your extension's widgets. Keep in mind that a single extension can be rendered in multiple locations.
| Location Name | |
|---|---|
| Top Band (Modules section) | desk.topband |
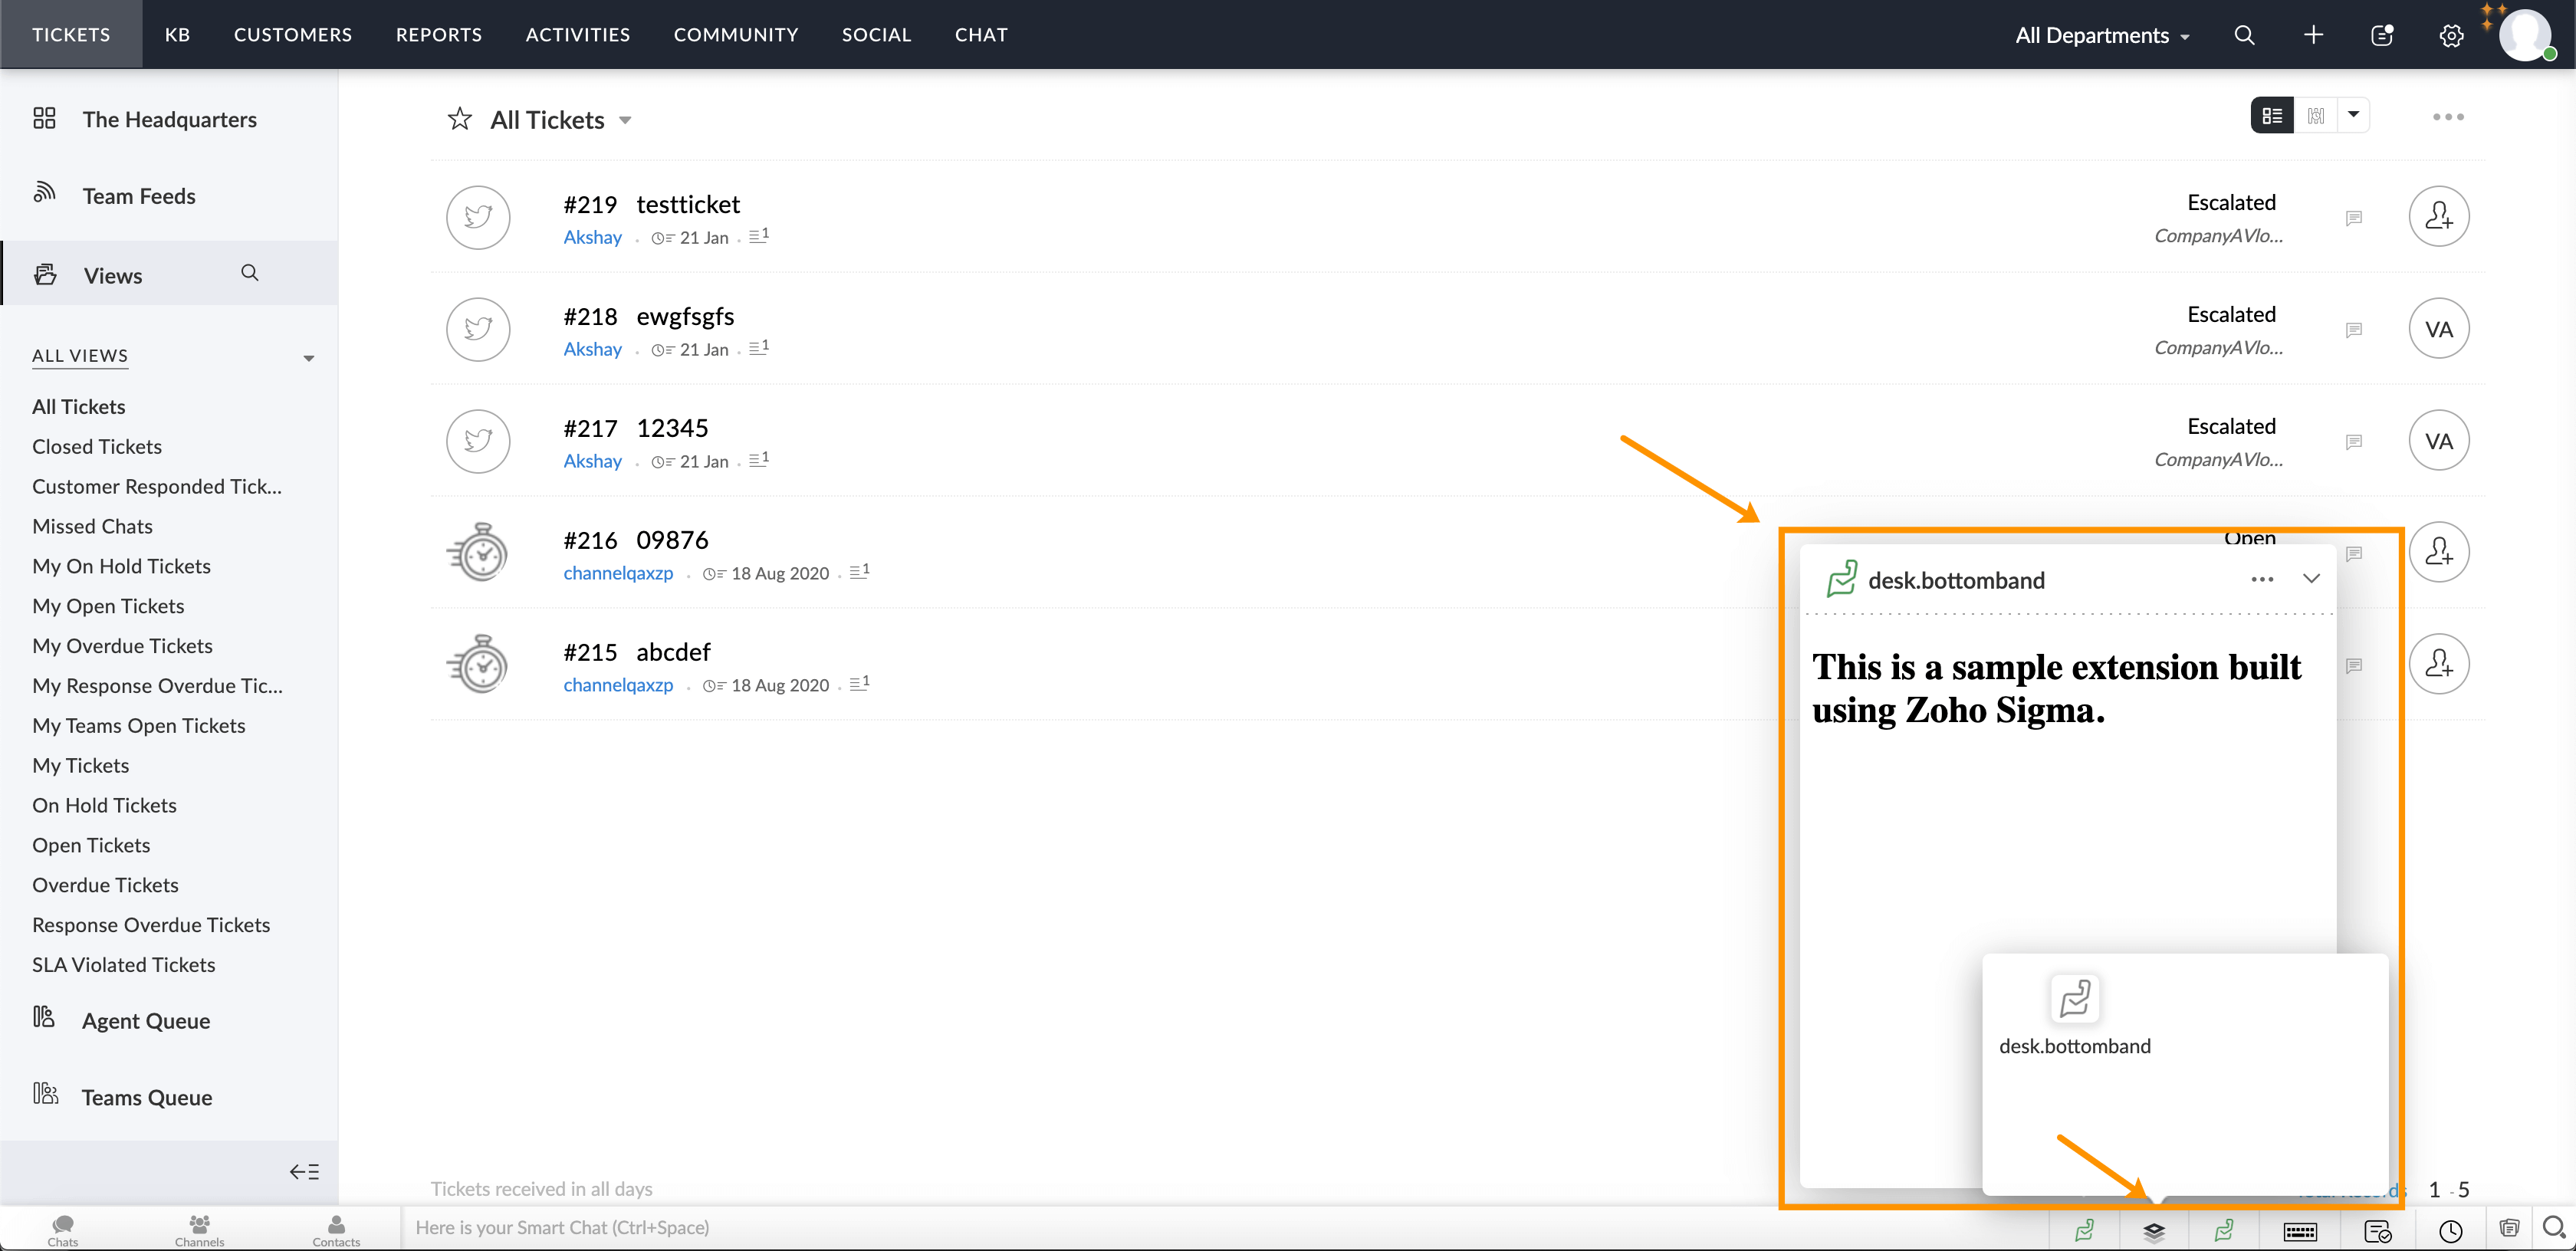
| Bottom Band | desk.bottomband |
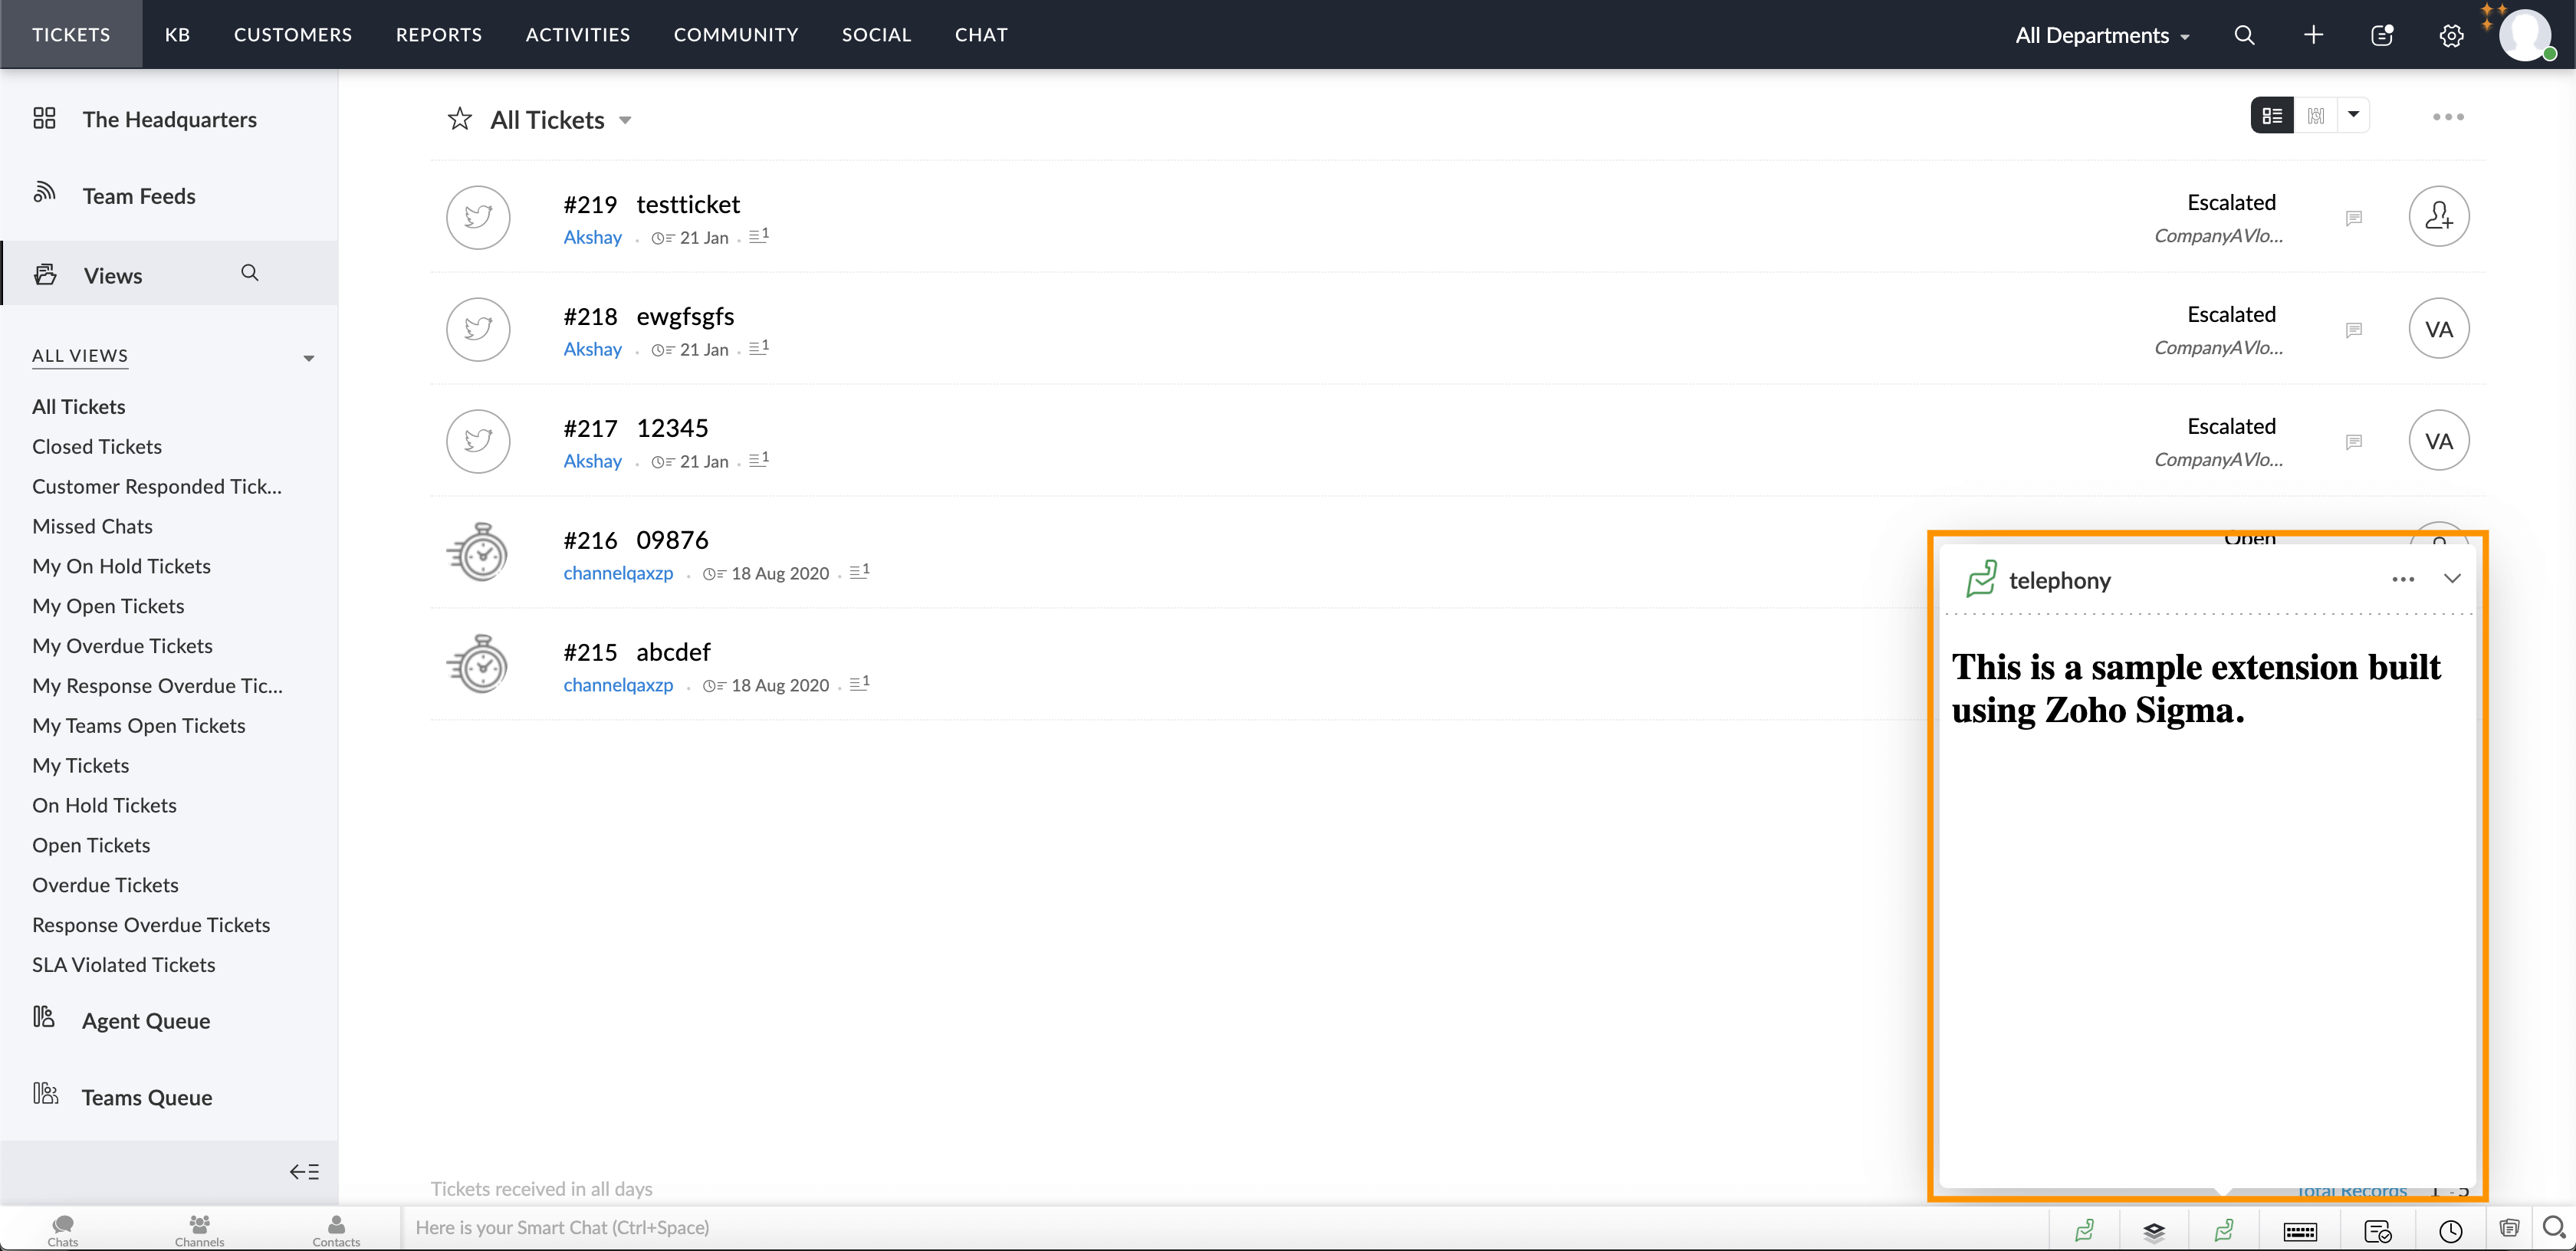
| Desk Telephony Extension | desk.extension.telephony |
| Background | desk.background |
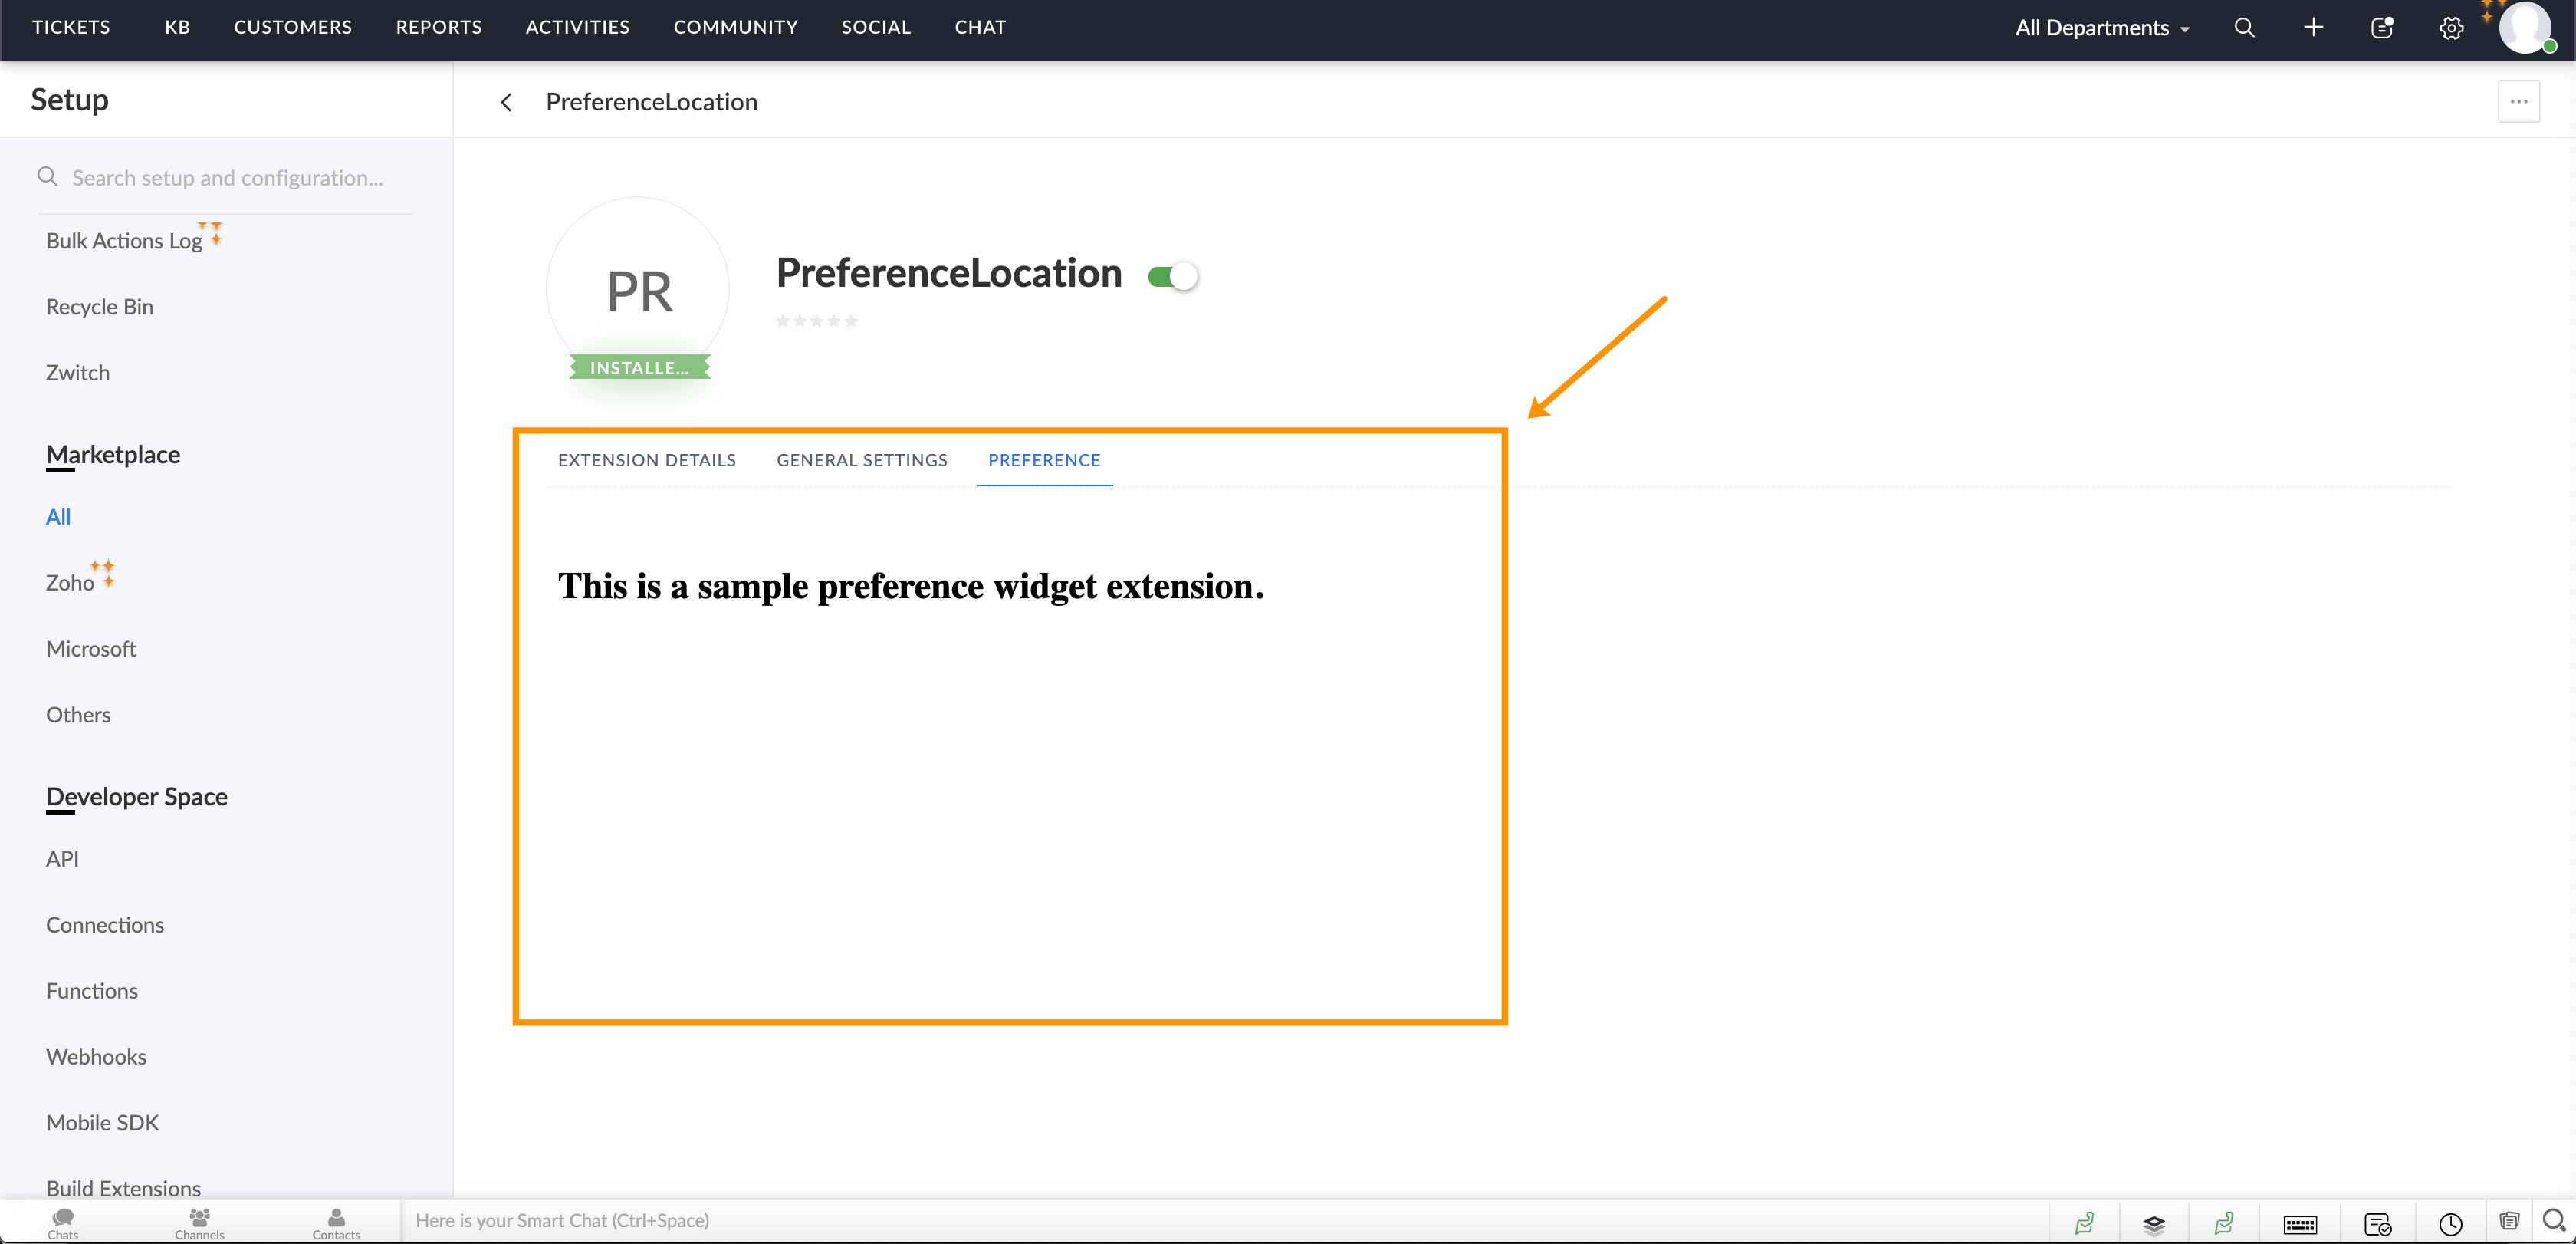
| Desk Extension Preference | desk.extension.preference |
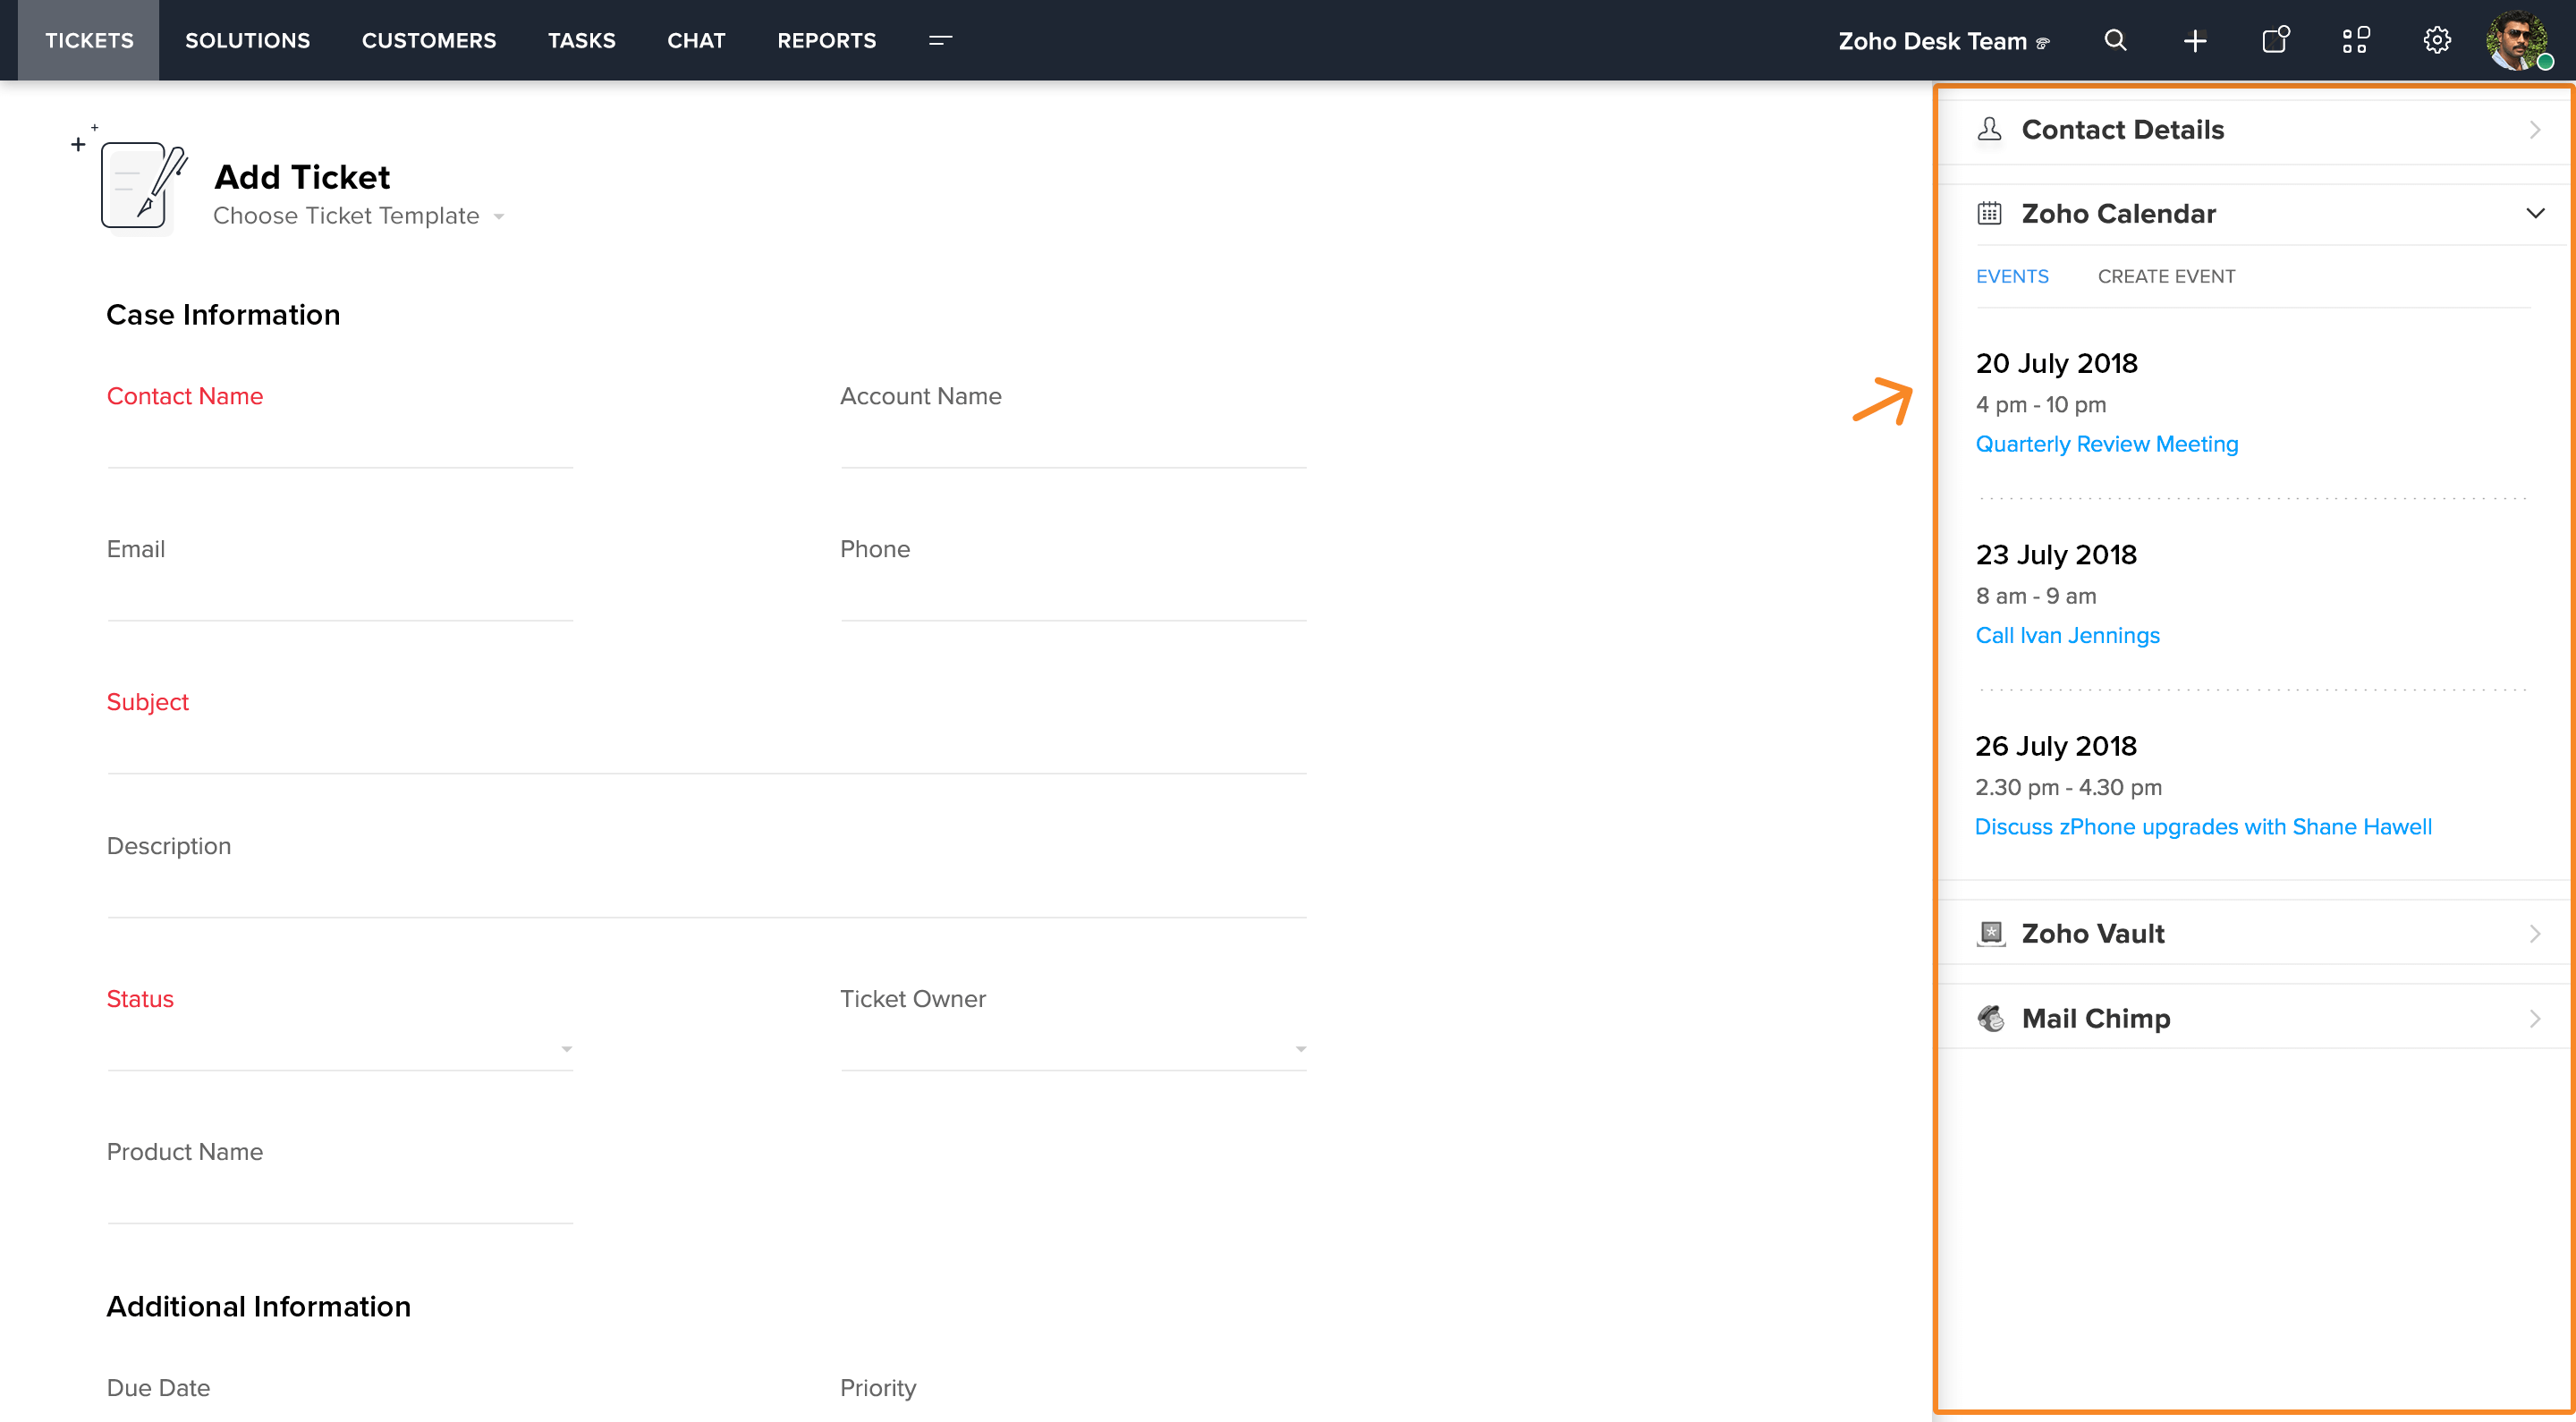
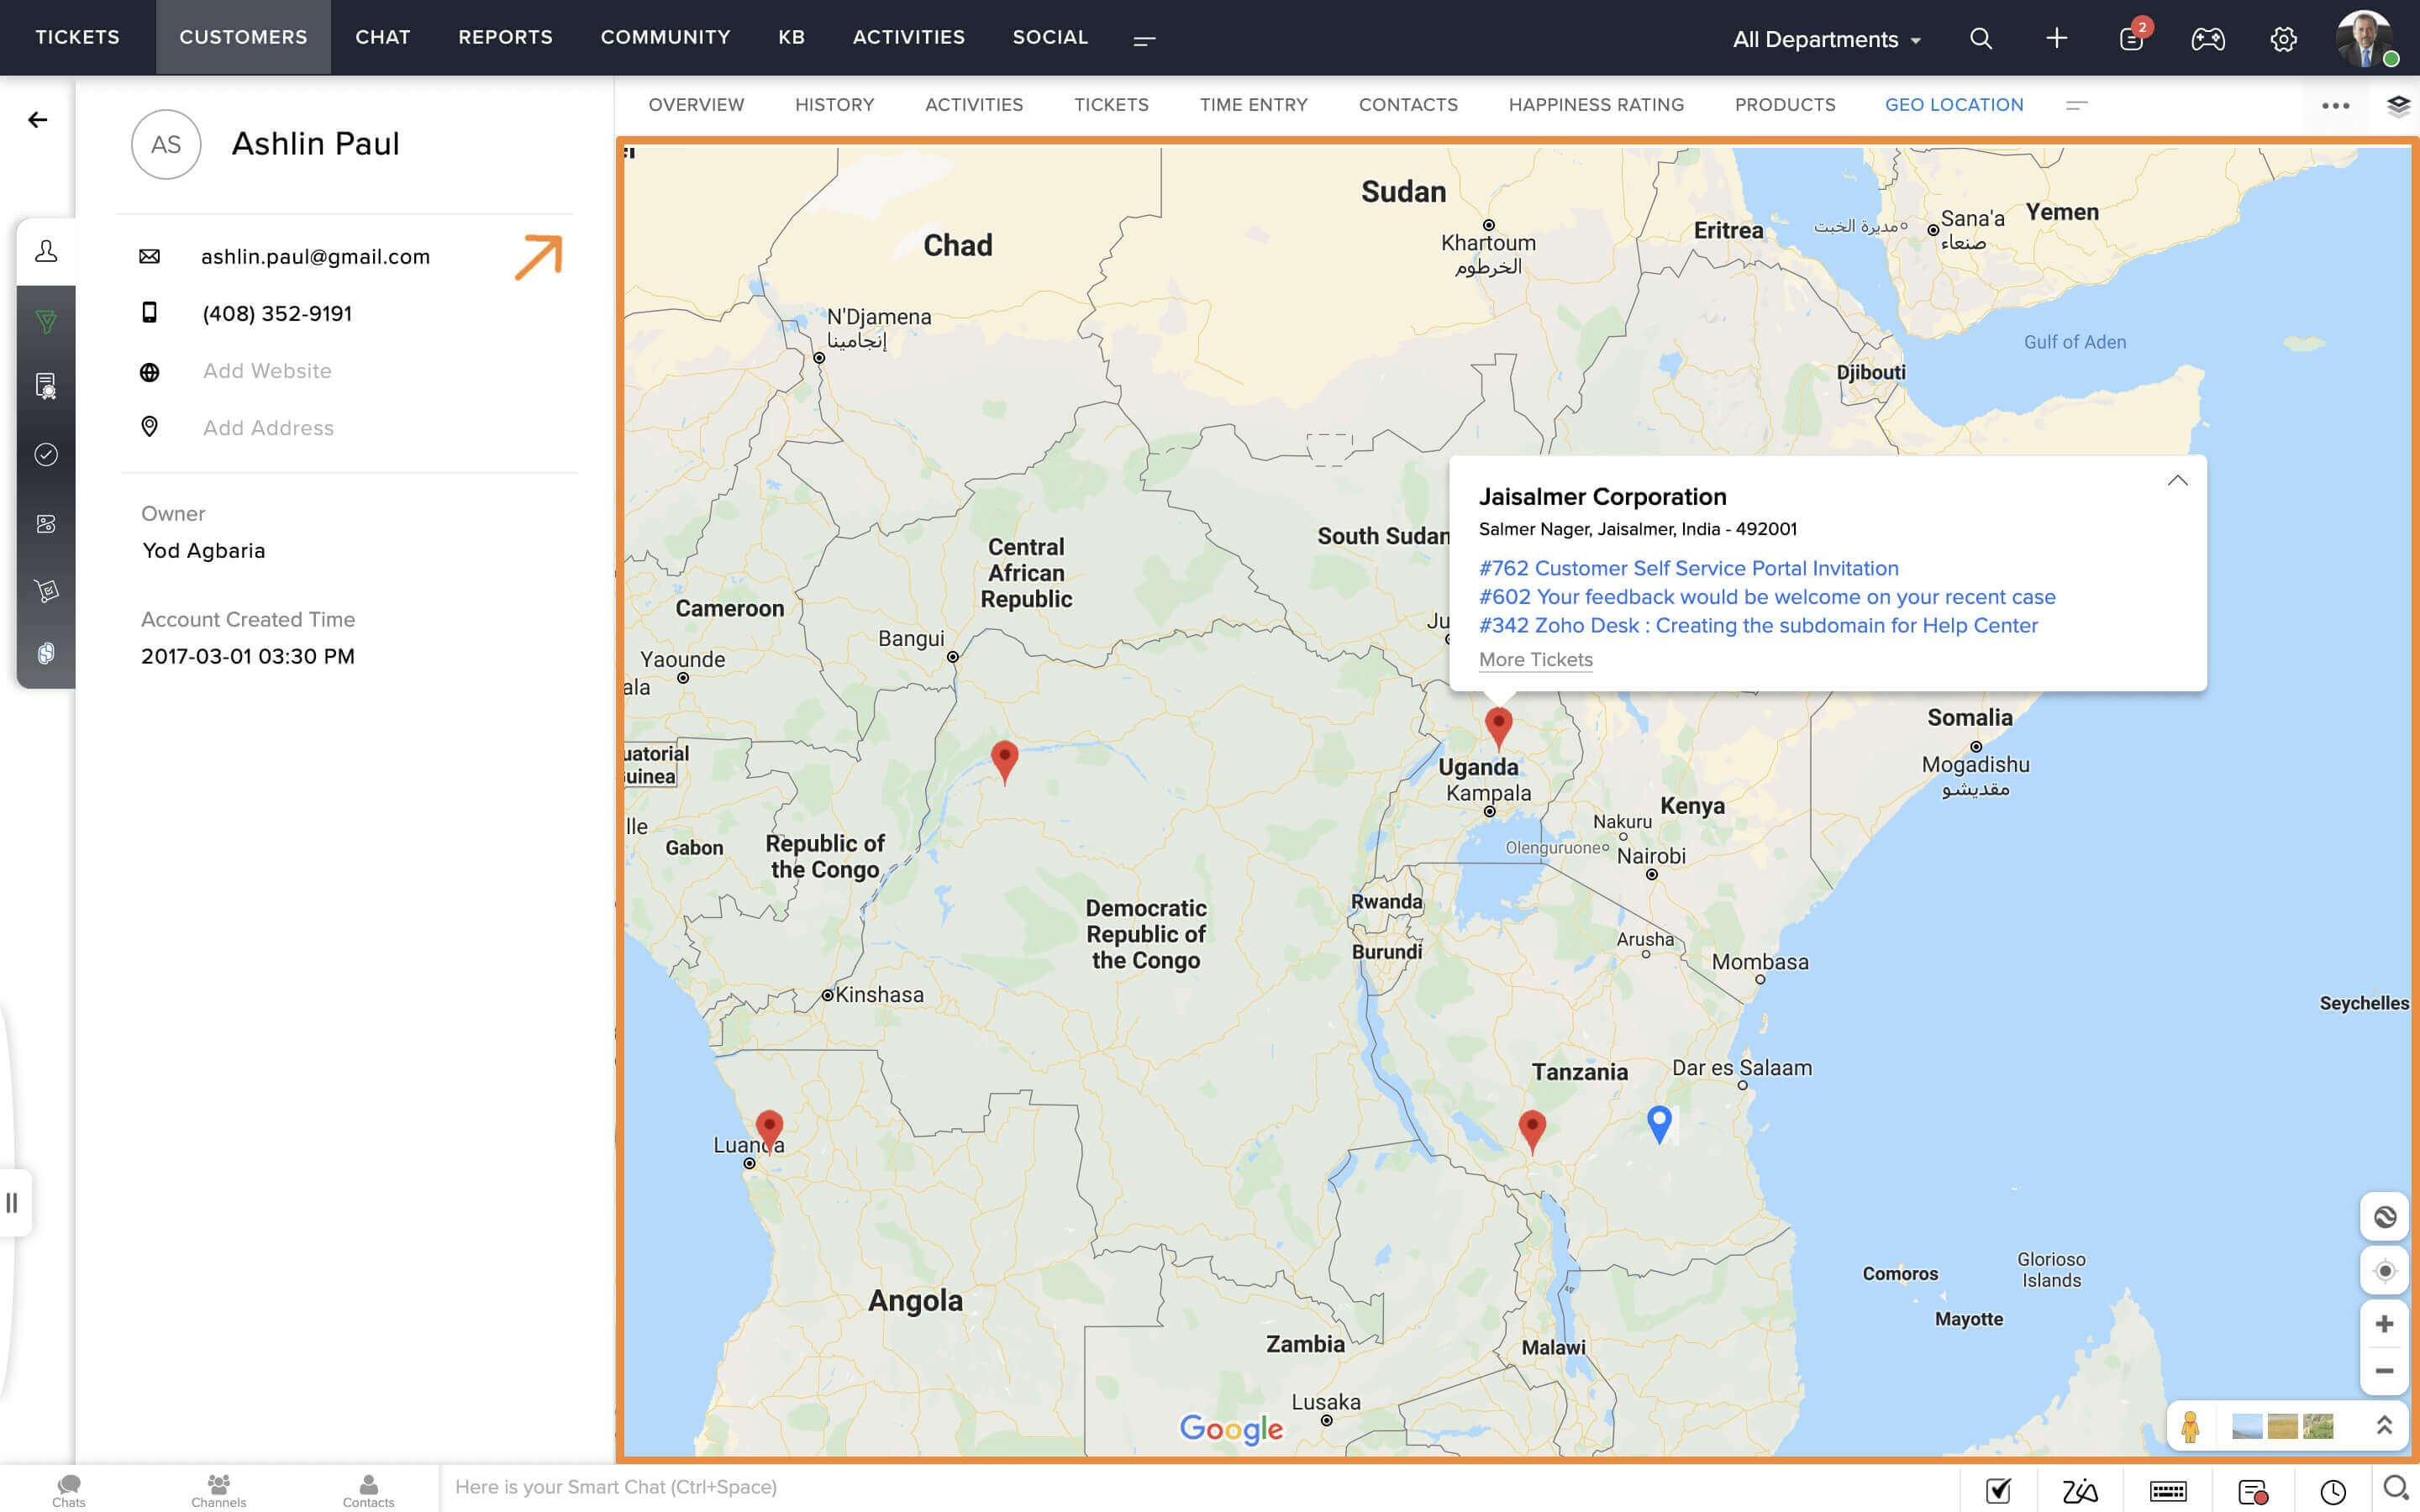
| Ticket Detail Right Panel | desk.ticket.detail.rightpanel |
| Ticket Detail Sub-tab | desk.ticket.detail.subtab |
| Ticket Detail Left tab | desk.ticket.detail.lefttab |
| Ticket Detail More Actions | desk.ticket.detail.moreaction |
| Ticket Detail Thread More Actions | desk.ticket.thread.moreaction |
| Ticket Form Right Panel | desk.ticket.form.rightpanel |
| Contact Detail Right Panel | desk.contact.detail.rightpanel |
| Contact Detail Sub-tab | desk.contact.detail.subtab |
| Contact Detail Left tab | desk.contact.detail.lefttab |
| Contact Form Right Panel | desk.contact.form.rightpanel |
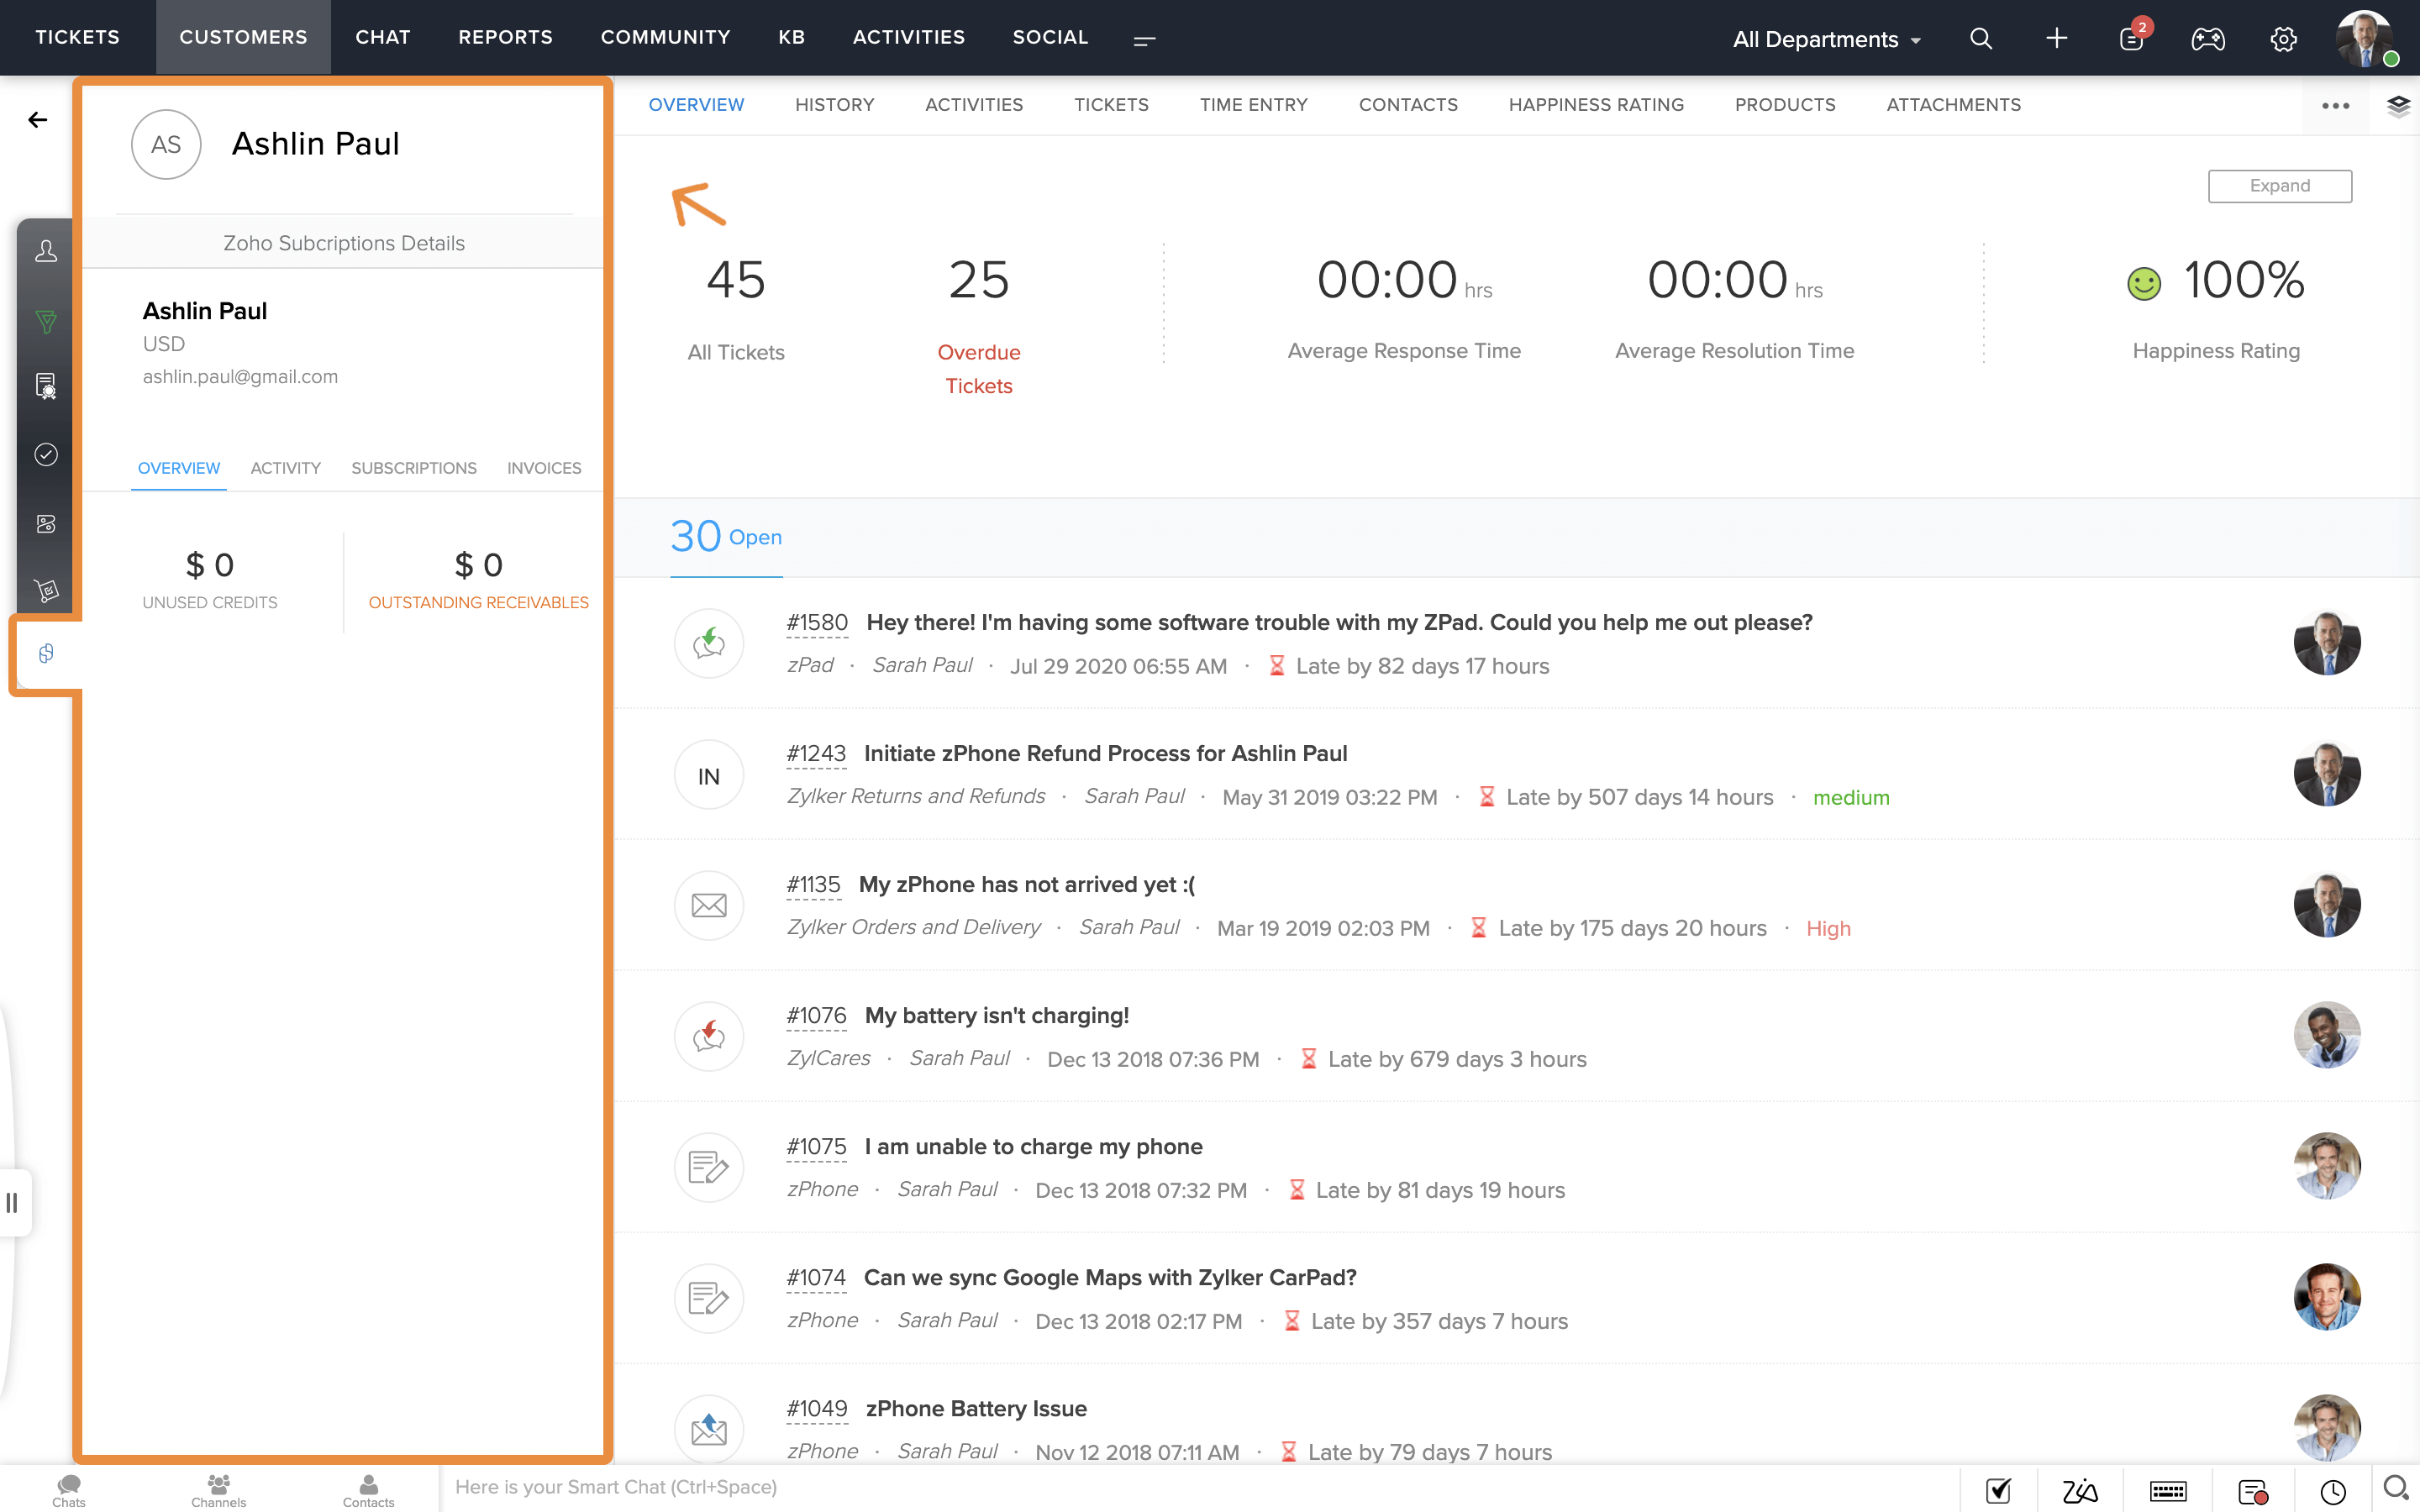
| Account Detail Right Panel | desk.account.detail.rightpanel |
| Account Detail Sub-tab | desk.account.detail.subtab |
| Account Detail Left tab | desk.account.detail.lefttab |
| Account Form Right Panel | desk.account.form.rightpanel |
Product Level
Top Band - desk.topband
This location refers to the top band from which users navigate between Zoho Desk modules. The extensions you installed in this location will be shown up under the more icon. When user picks an extension from the more icon, it will utilise the entire screen.
Bottom Band - desk.bottomband
This location refers to the space next to the Keyboard Shortcuts icon on the bottom-right side of the Zoho Desk page. When a user clicks the Marketplace icon on this location, the extensions configured here are listed. Clicking an extension on this list opens the corresponding widget on the left of the Marketplace icon.
Desk Telephony Extension - desk.extension.telephony
This location refers to another space next to the Keyboard Shortcuts icon on the bottom-right side of the Zoho Desk page. This location is meant exclusively for telephony-based extensions. Please note that there can be only one active telephony extension in a Zoho Desk portal.
Background - desk.background
This location is neither visible to end-users nor does it appear in the DOM elements. Extensions installed here will not appear anywhere, but the HTML code for them can be defined as required. The main purpose of this location is to aid inter-widget communication, which refers to the communication between two widgets when they are active. In some cases, one of the widgets might not be active. In such a scenario, data can be pushed from one widget to another using the widget configured in this location.
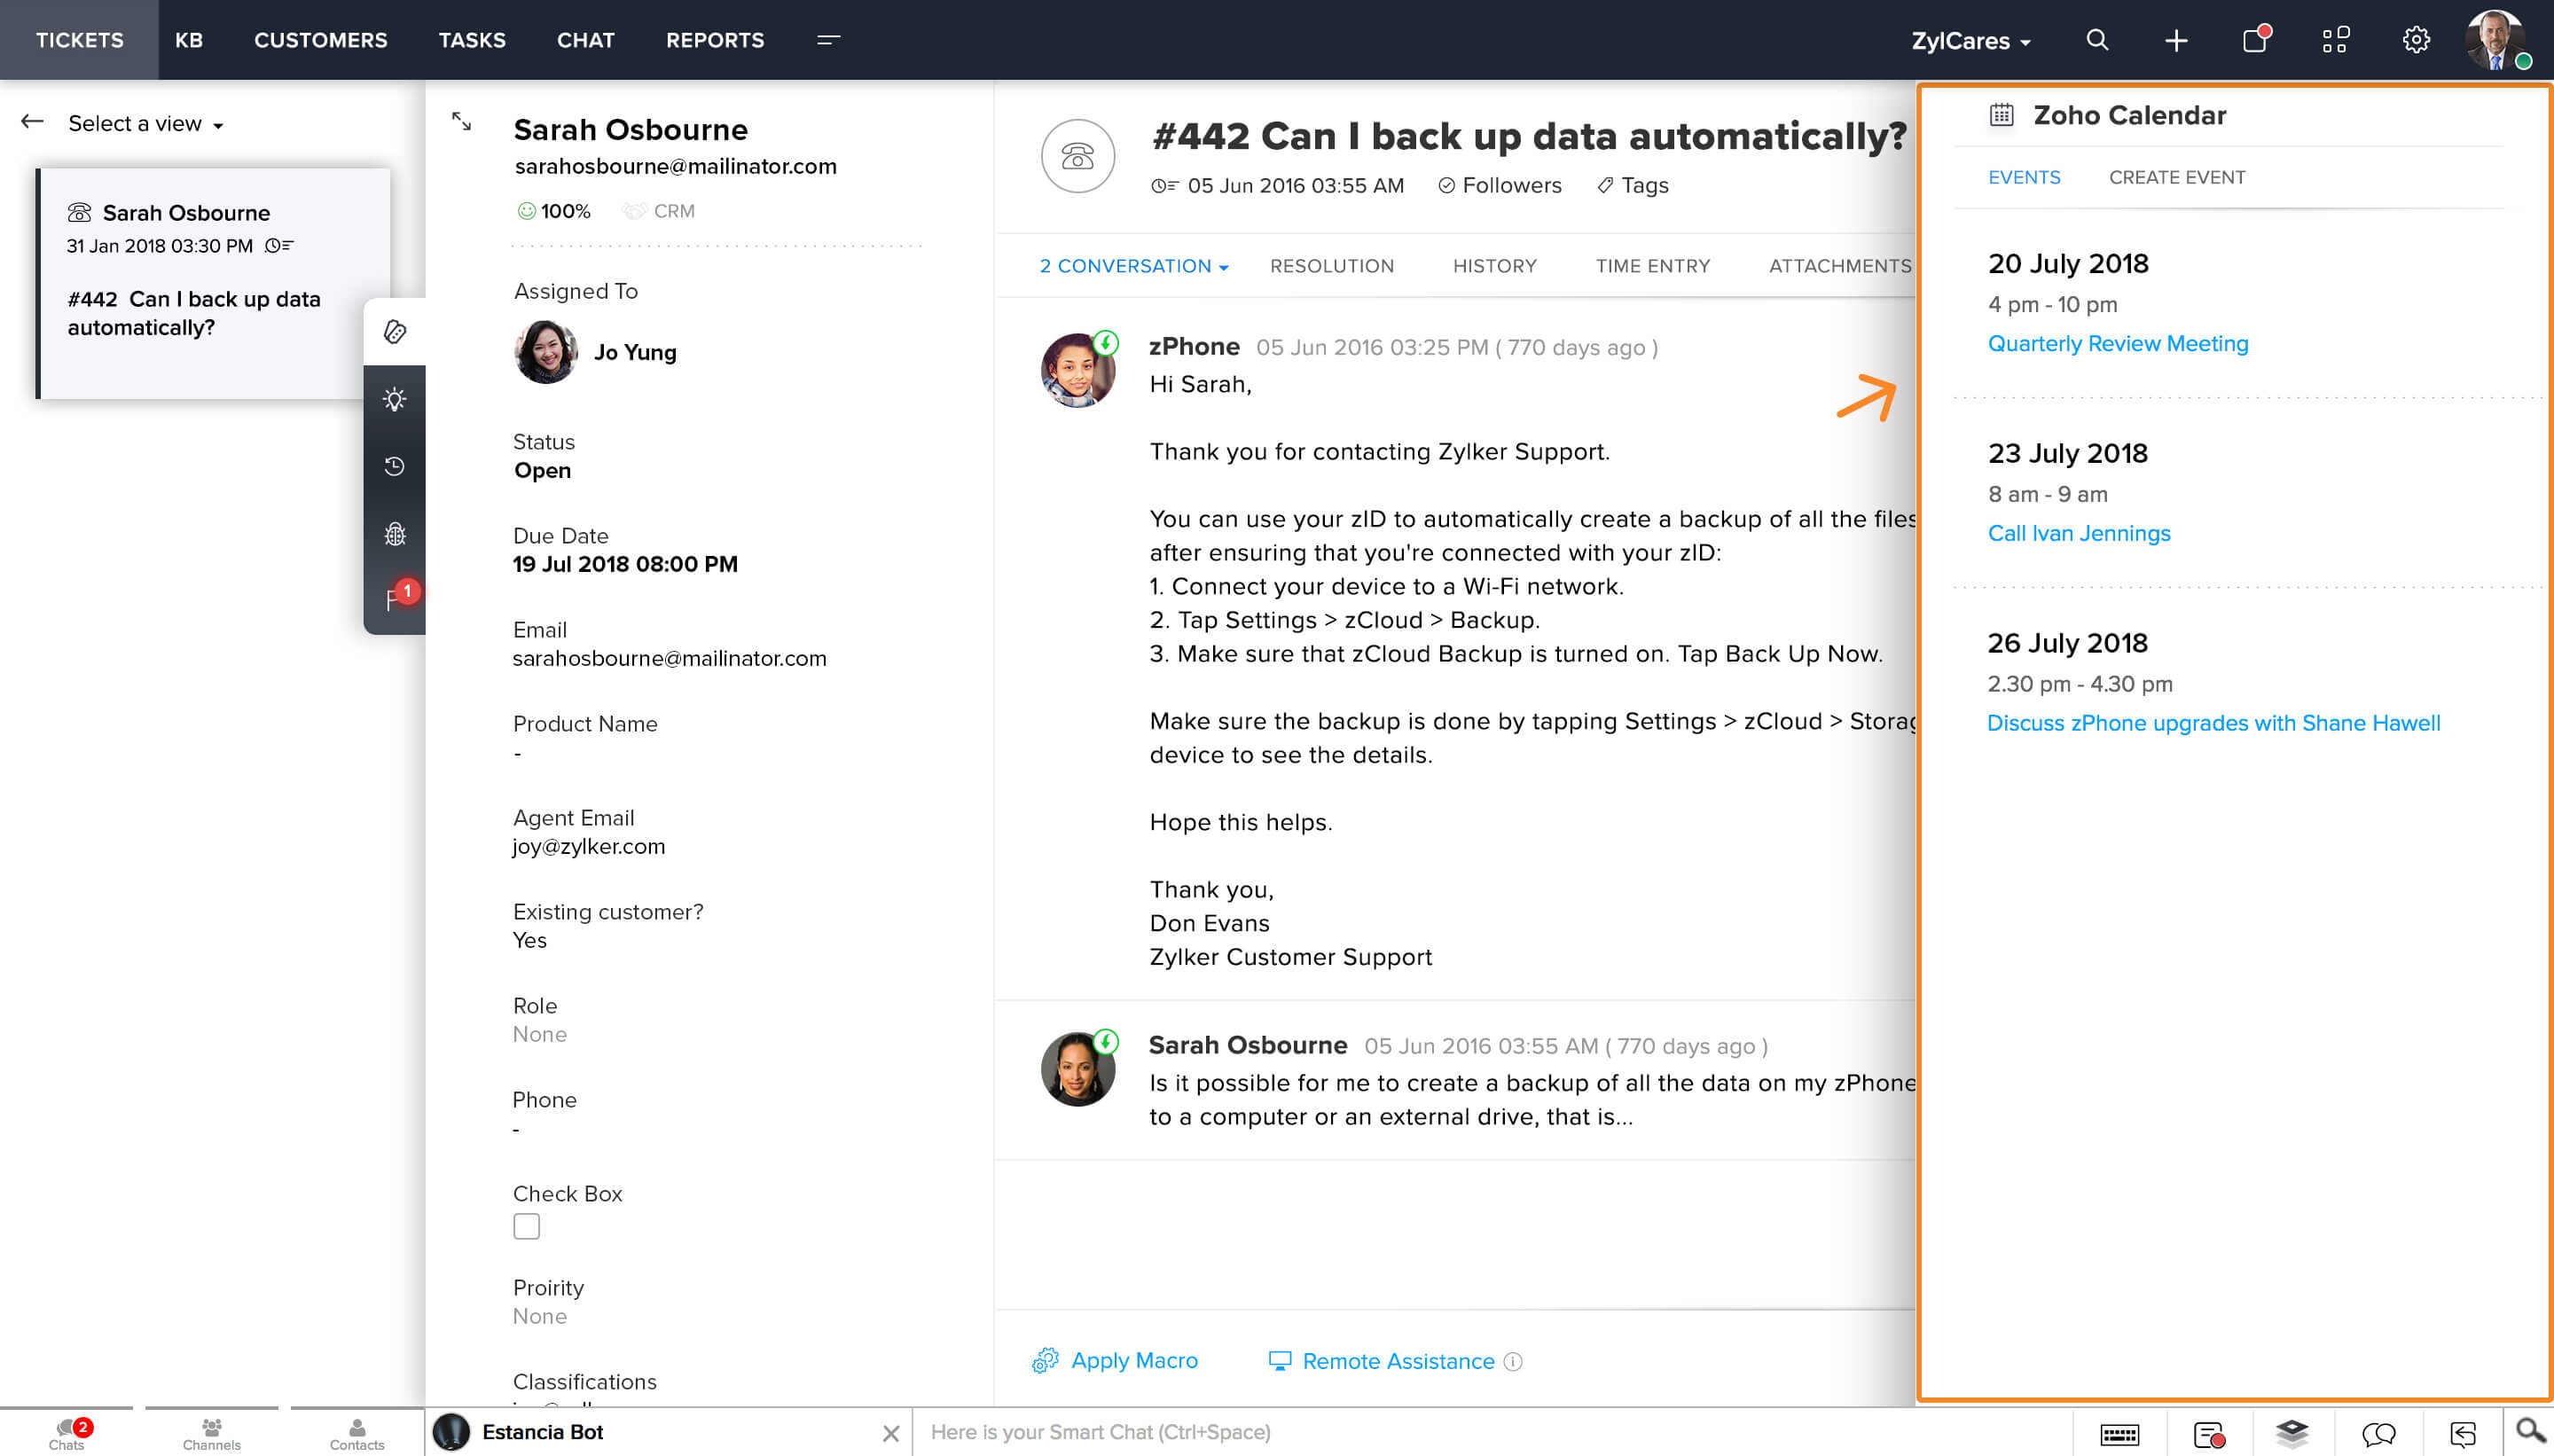
Desk Extension Preference - desk.extension.preference
This location refers to the Configuration tab that resides next to the General Settings tab on the extension detail page. The main purpose of this location is to get the configuration from the end-user. Extensions configured in this location are visible to users with the Support Administrator profile even if the extension visibility setting is not exclusively enabled for the profile. This location is enabled only if all other configuration is completed.
Ticket Detail page
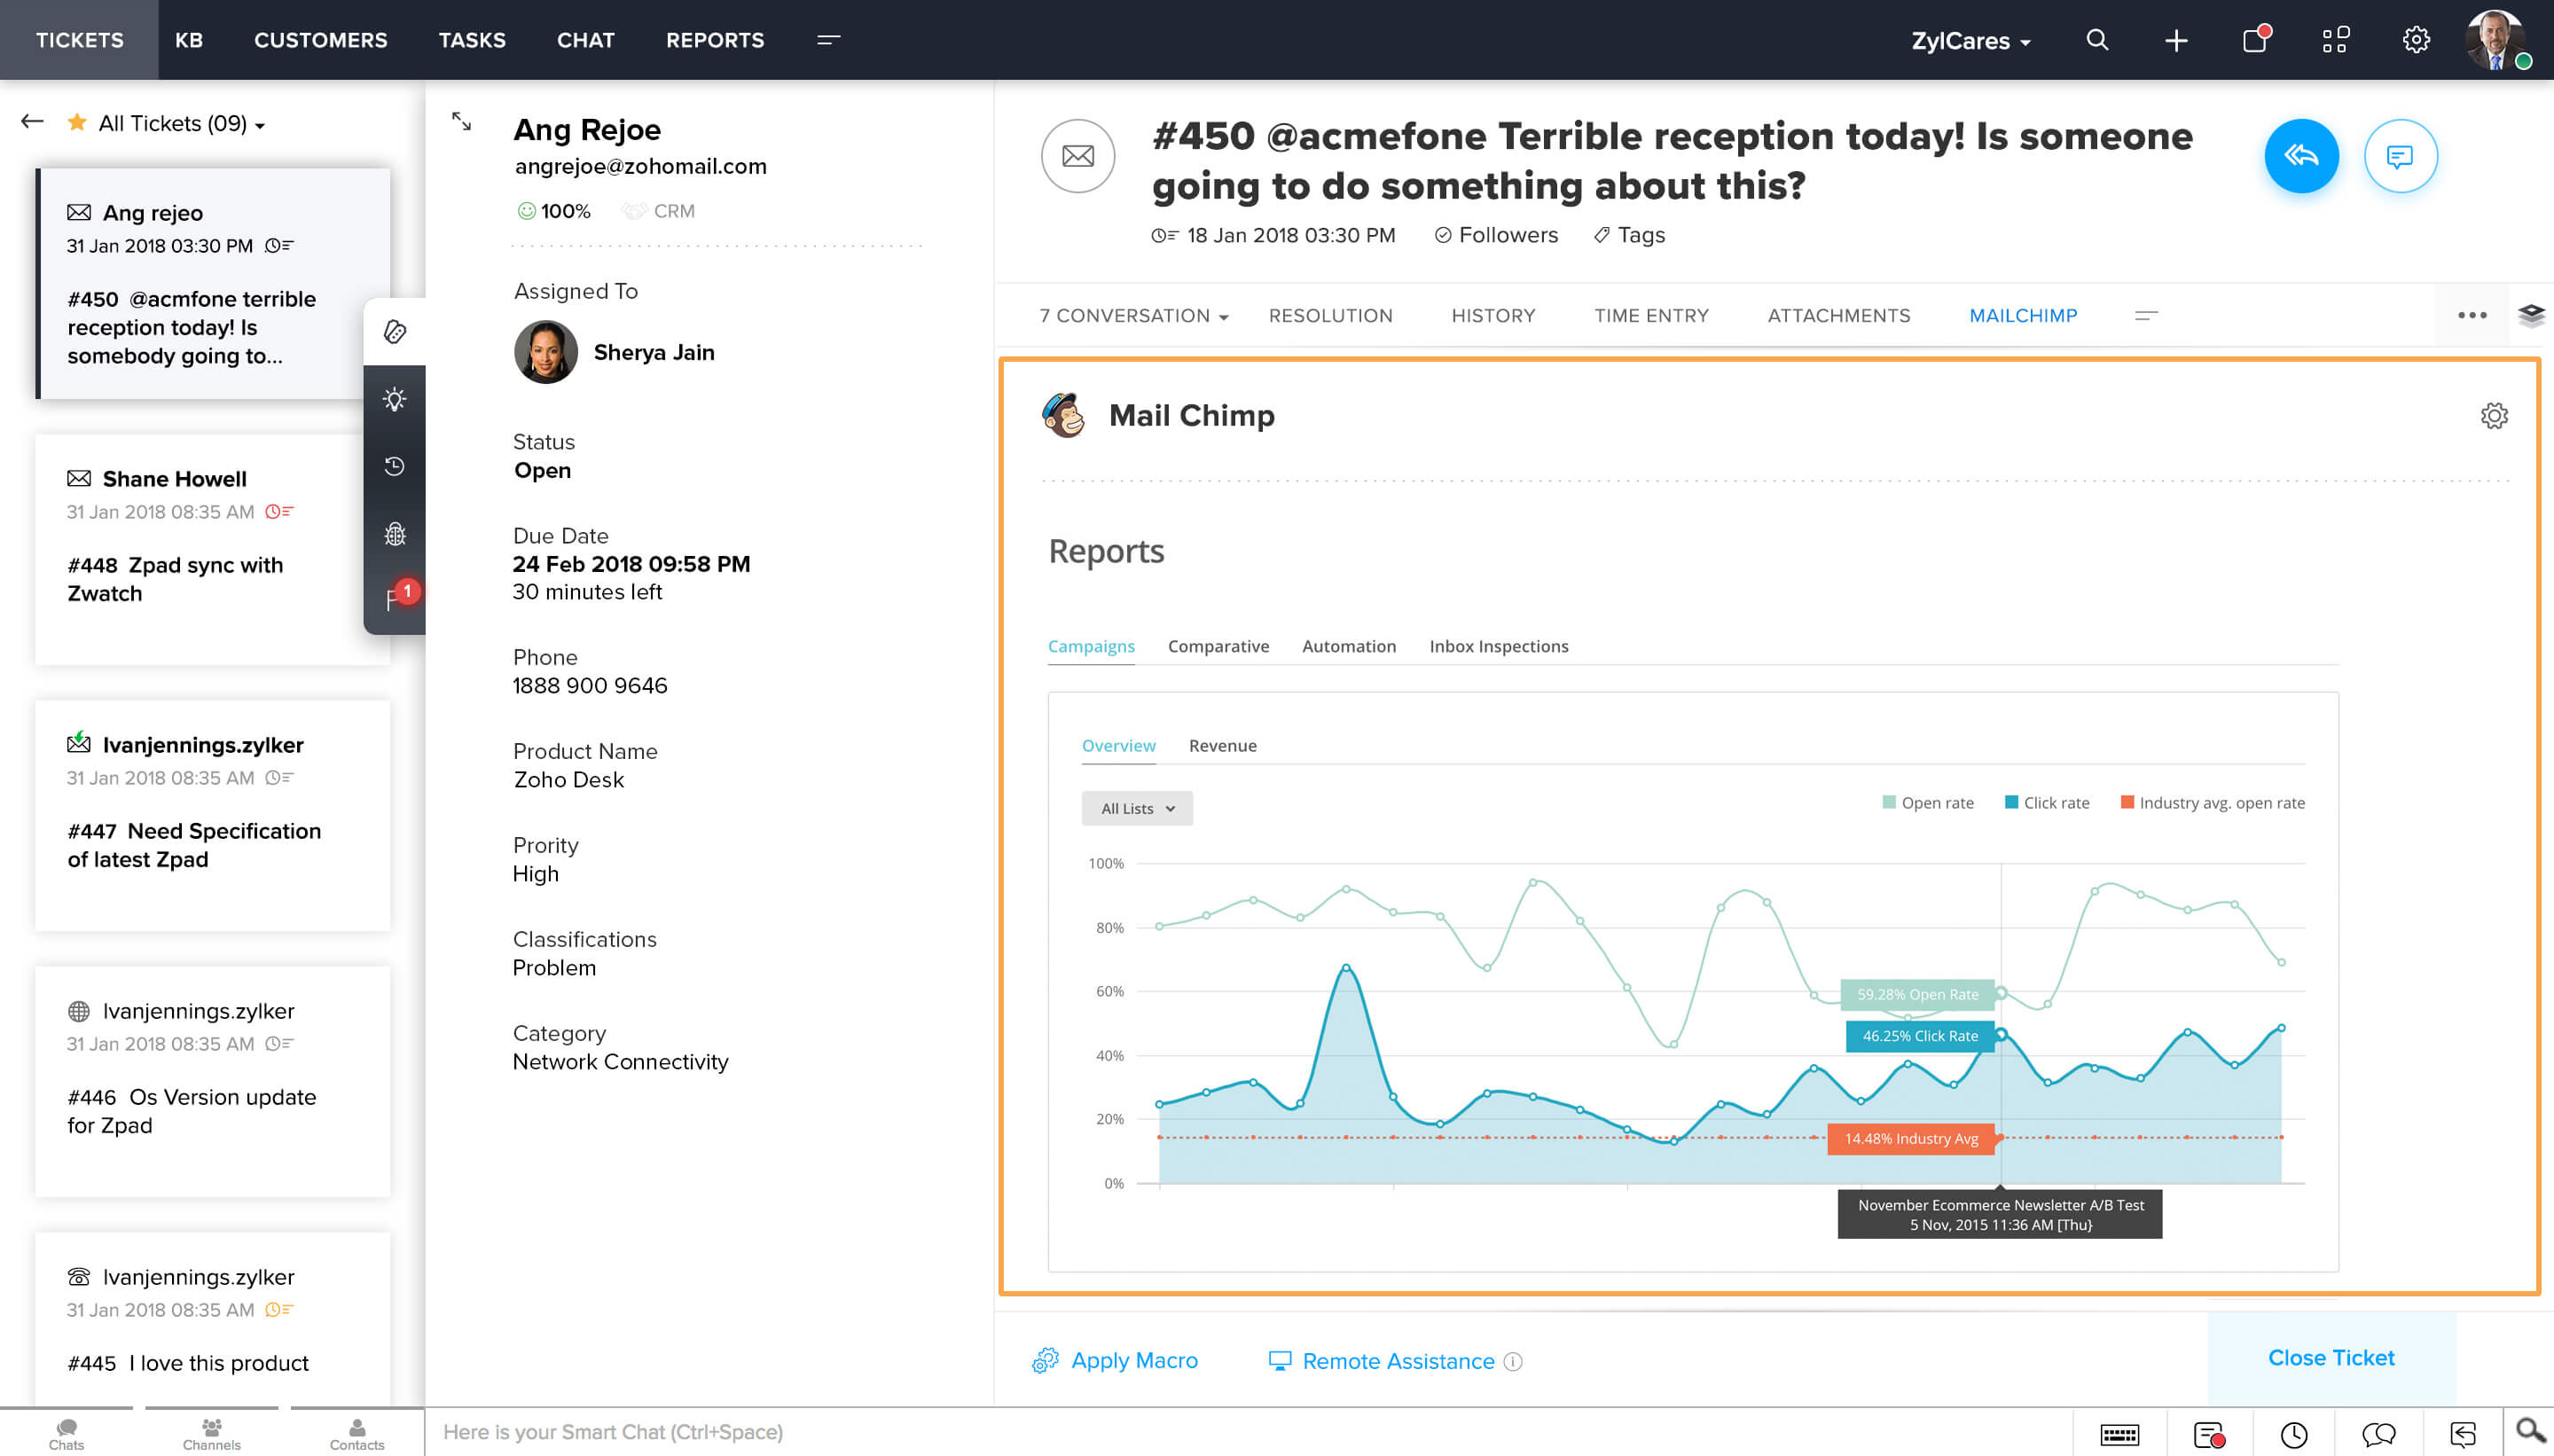
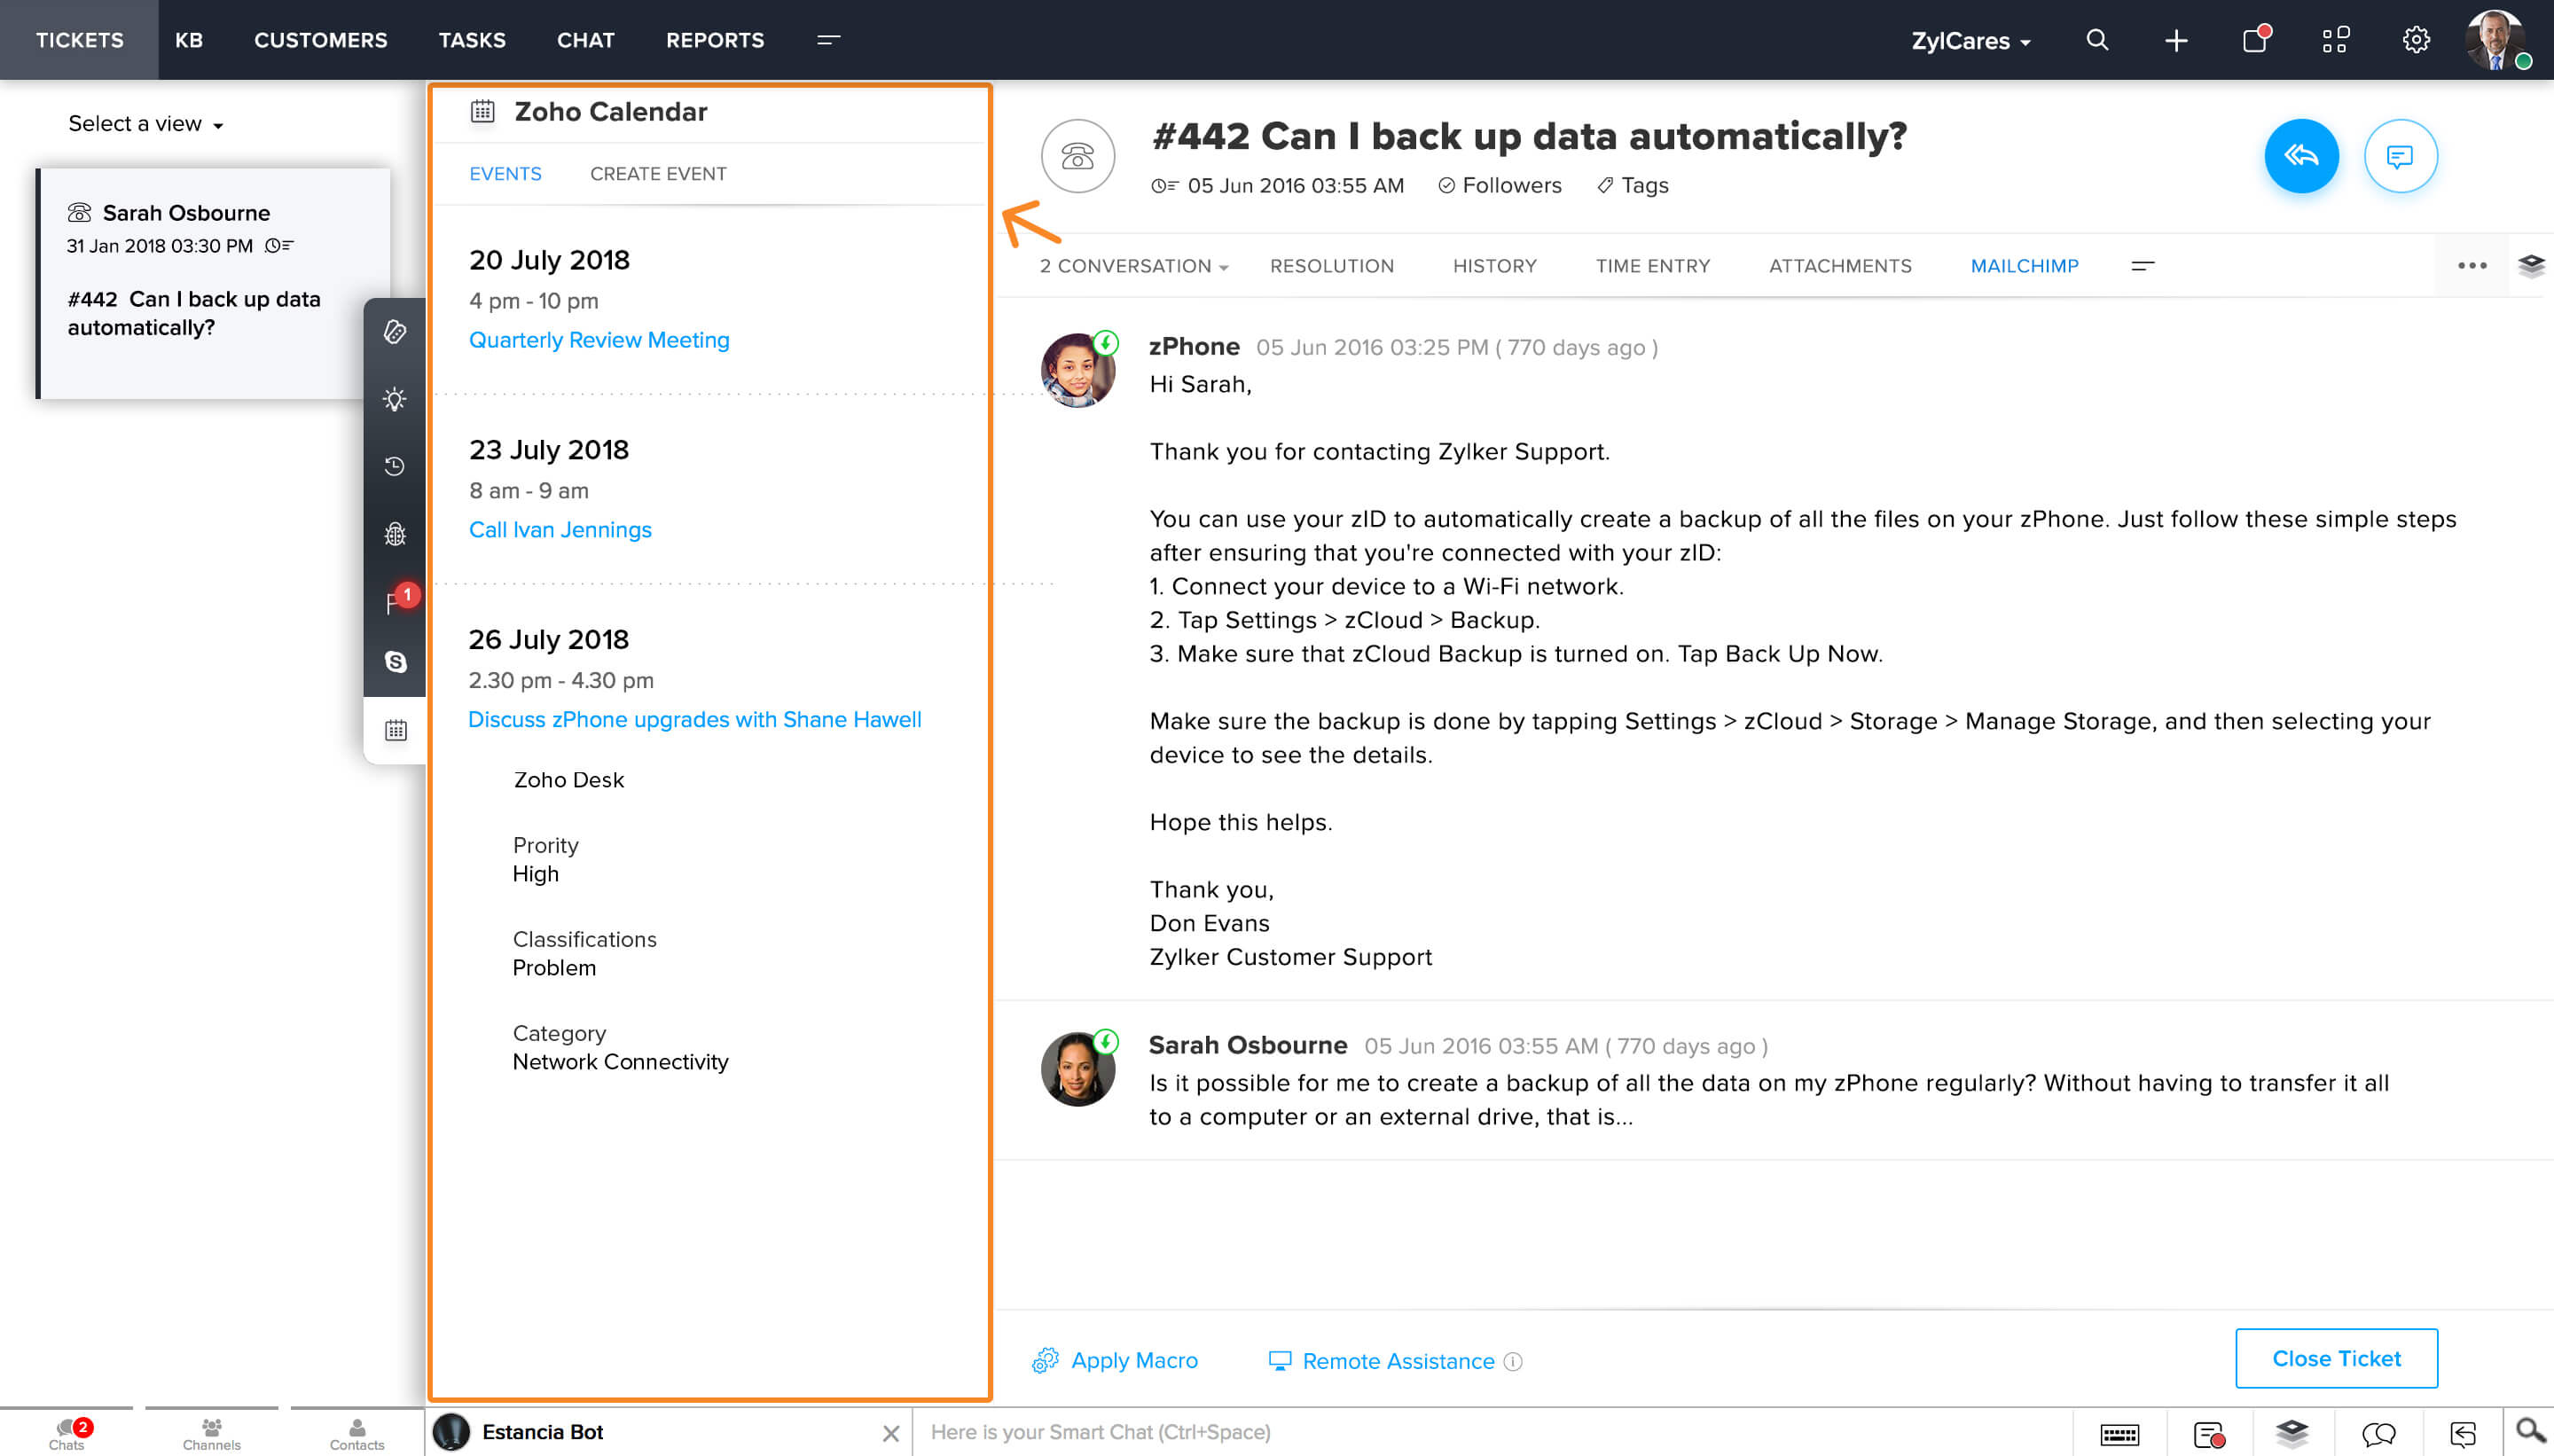
Right Panel - desk.ticket.detail.rightpanel
This location refers to a collapsible panel on the right side of the ticket detail page. The extension widget loads on this panel when the user clicks the Marketplace icon.
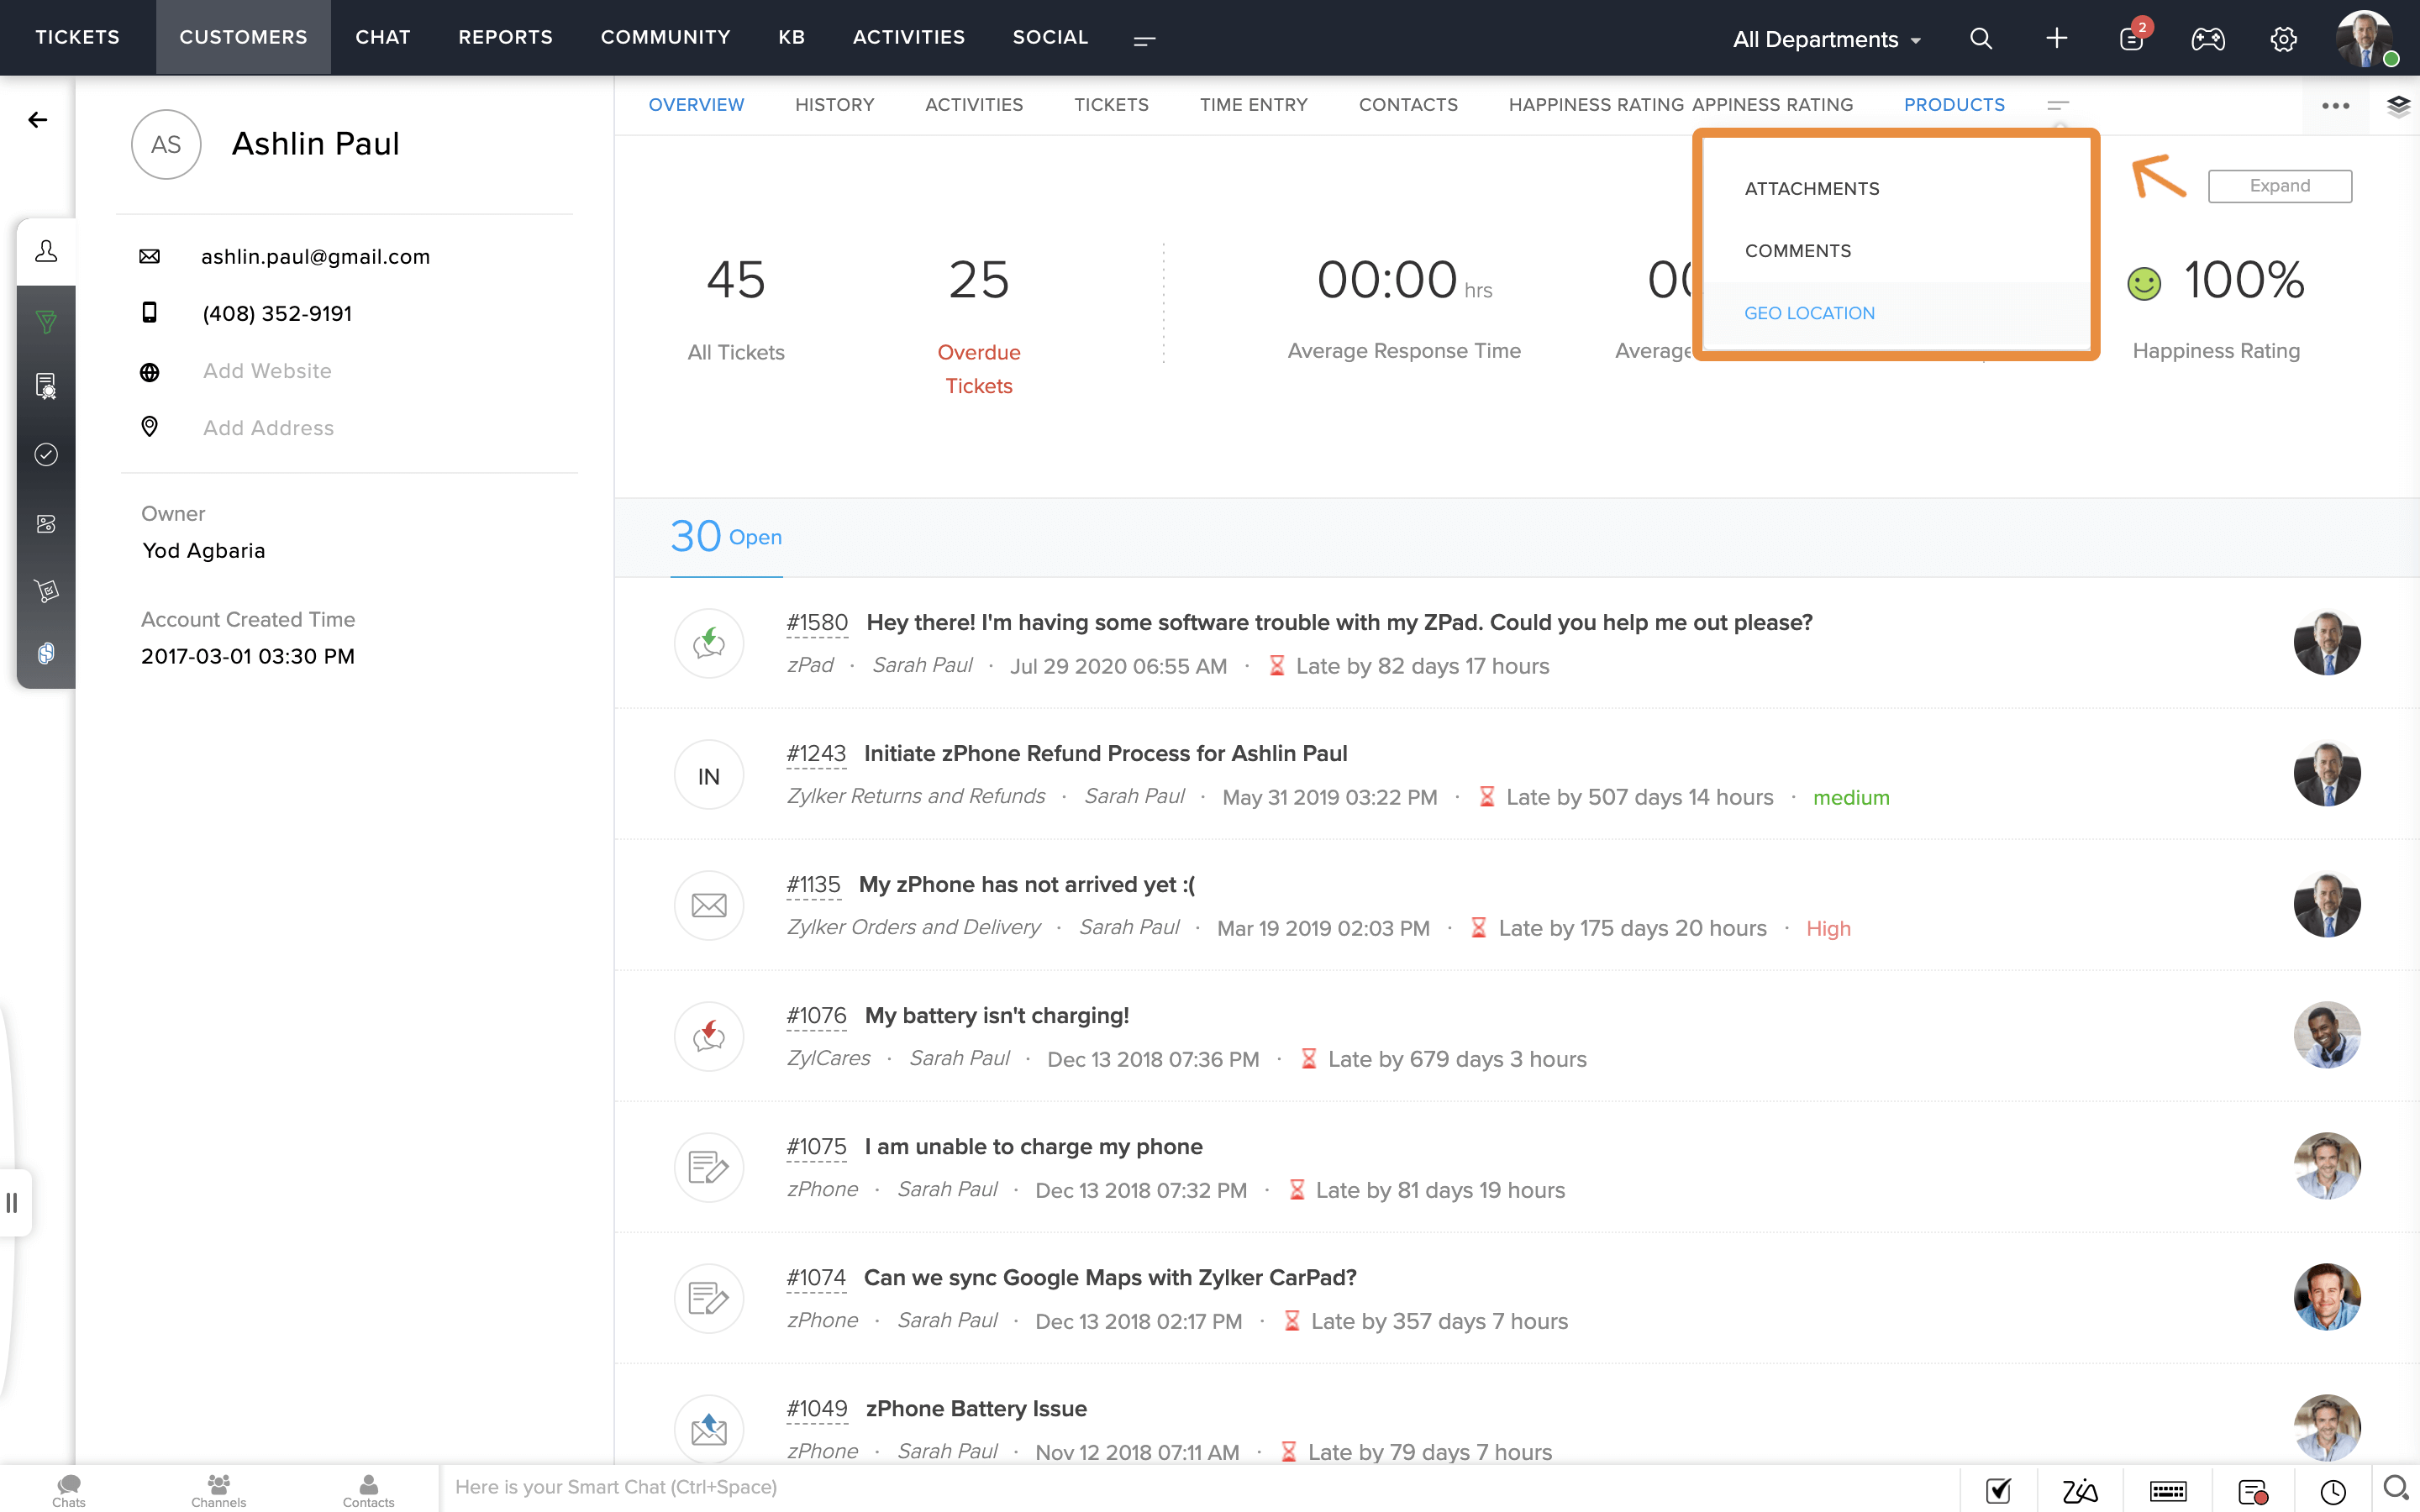
Sub-Tab - desk.ticket.detail.subtab
This location refers to the sub-tab (More icon) in the ticket detail page. Clicking the icon lists the extensions installed in this location. When a user clicks an extension from this list, the extension loads in the entire sub-tab section.
Left Tab - desk.ticket.detail.lefttab
This location refers to the black, vertical strip on the left side of the ticket detail page. The Marketplace logo appears here. Clicking the logo lists the extensions installed in this location.
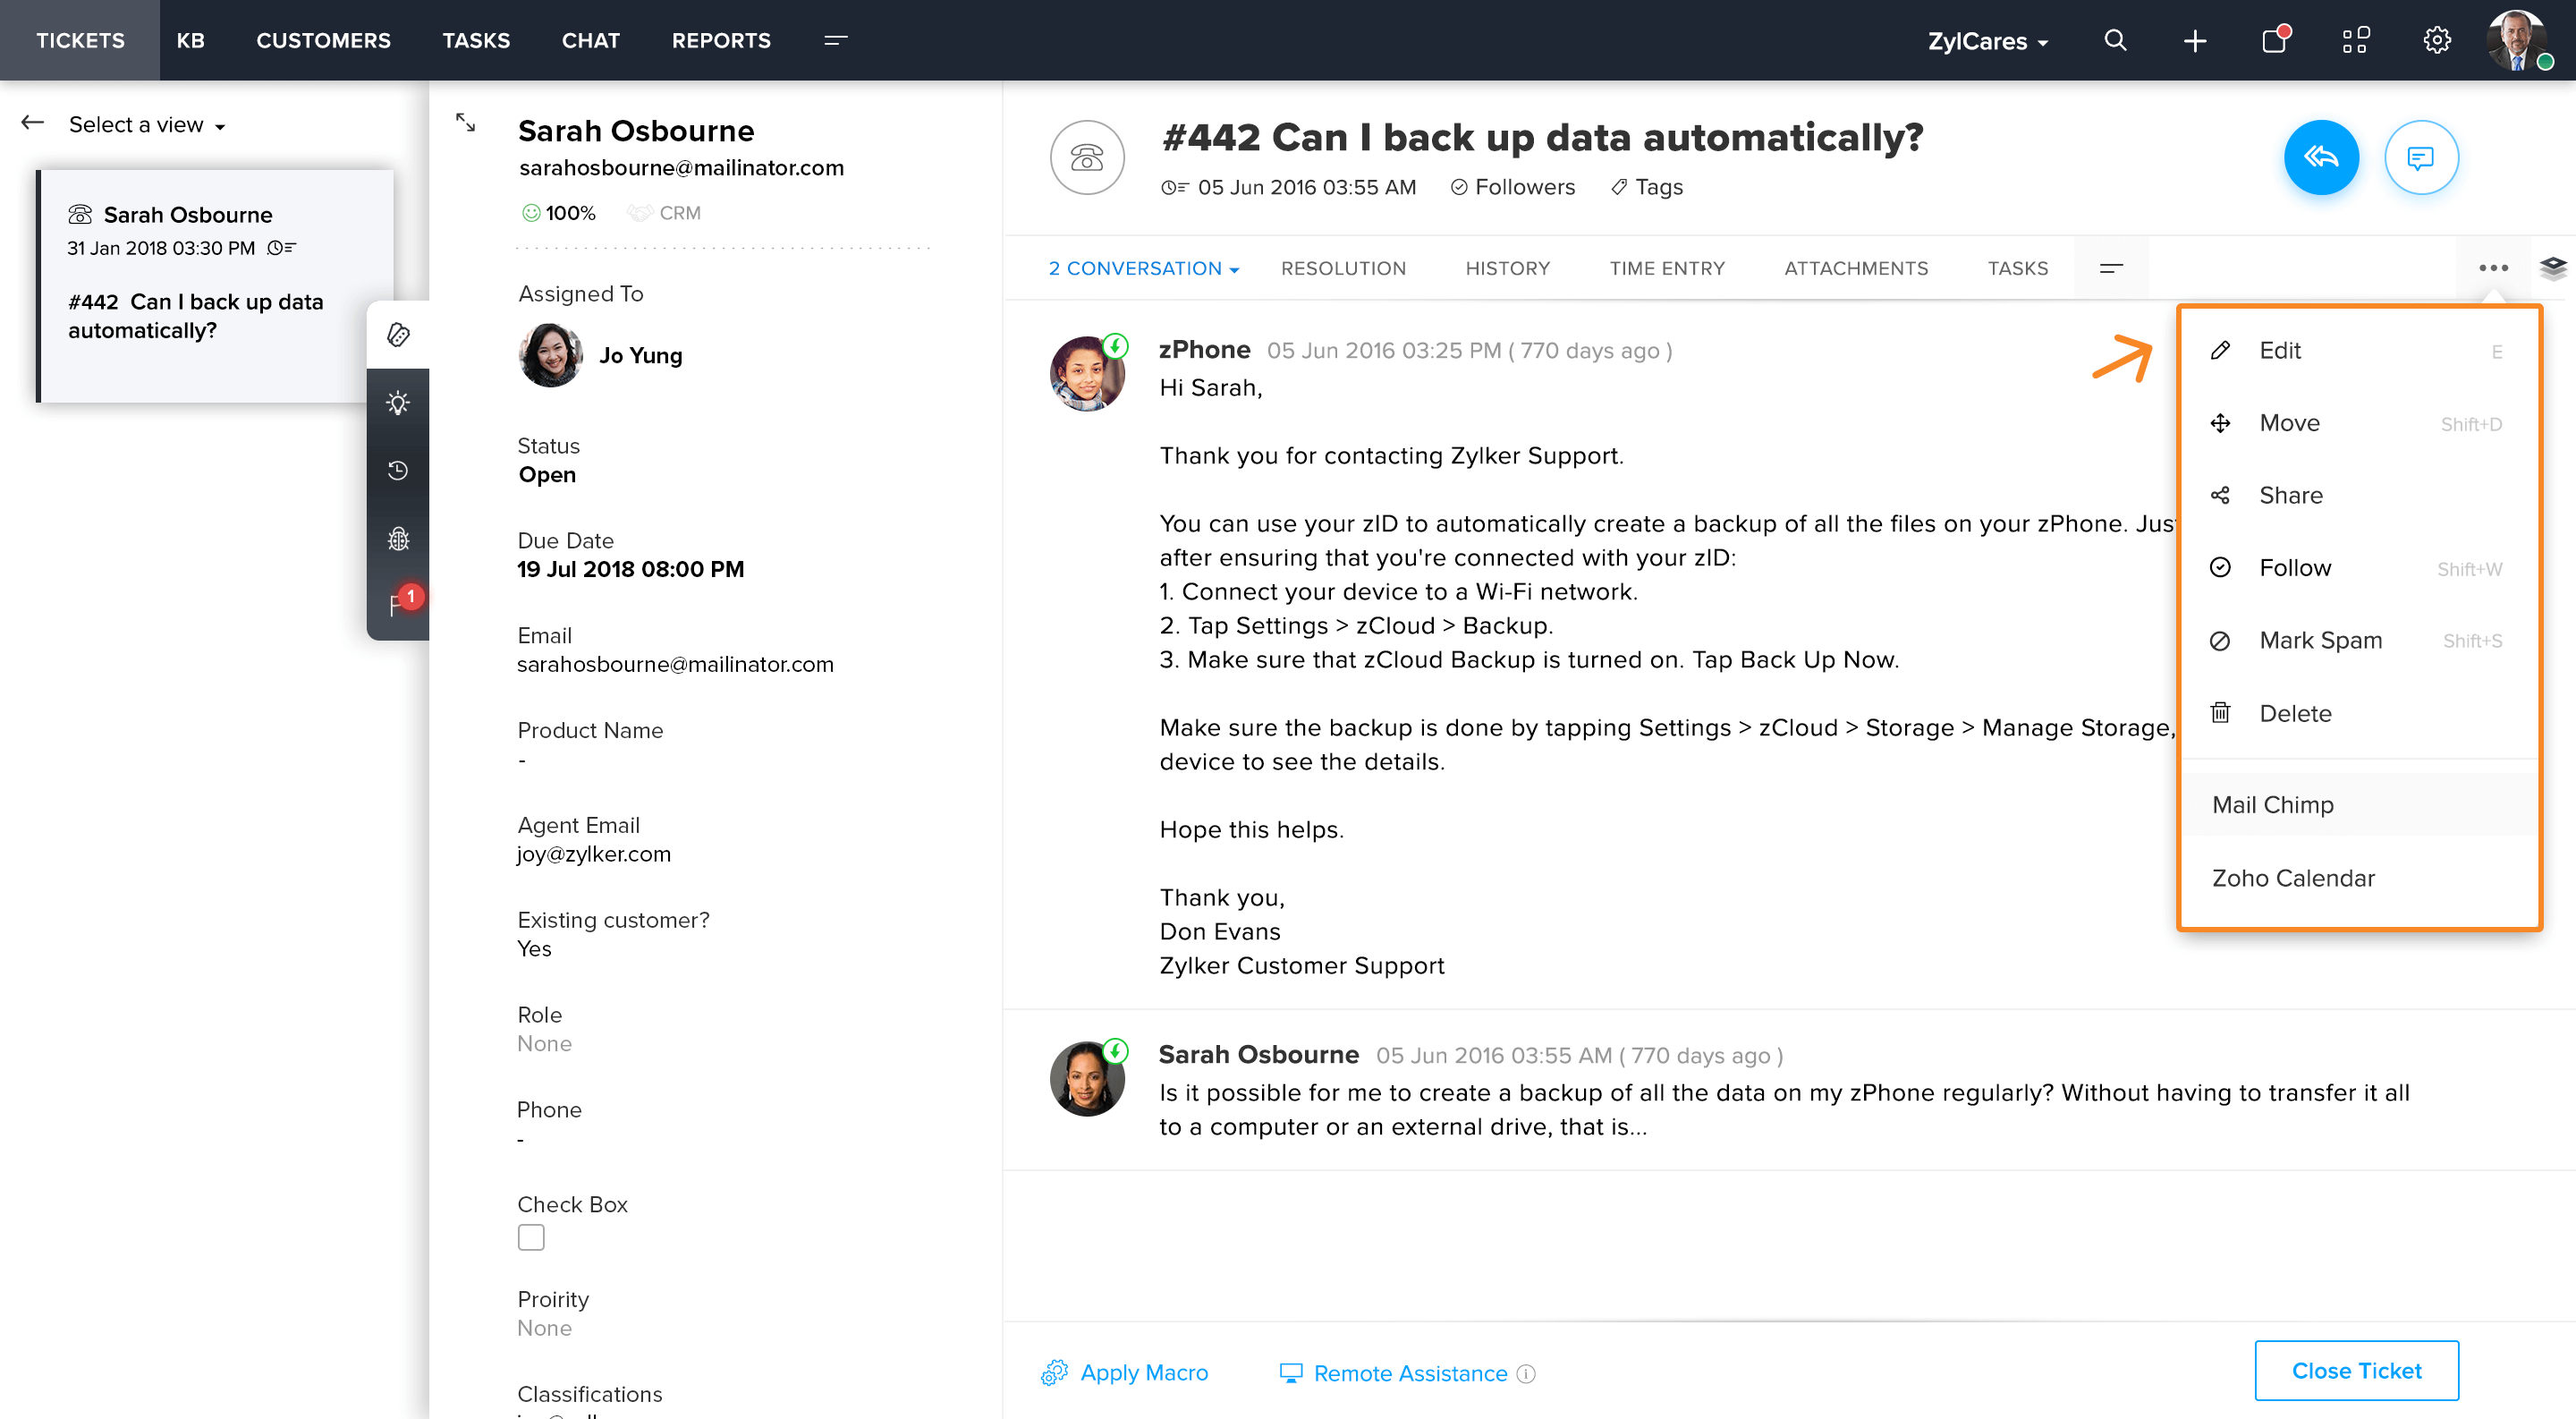
More Actions - desk.ticket.detail.moreaction
This location refers to the more actions icon at the top-right side of the ticket detail page. Clicking this icon displays a menu in which the extensions are listed below the other standard ticket-related actions, such as Edit, Share, Follow, Delete, and so on.
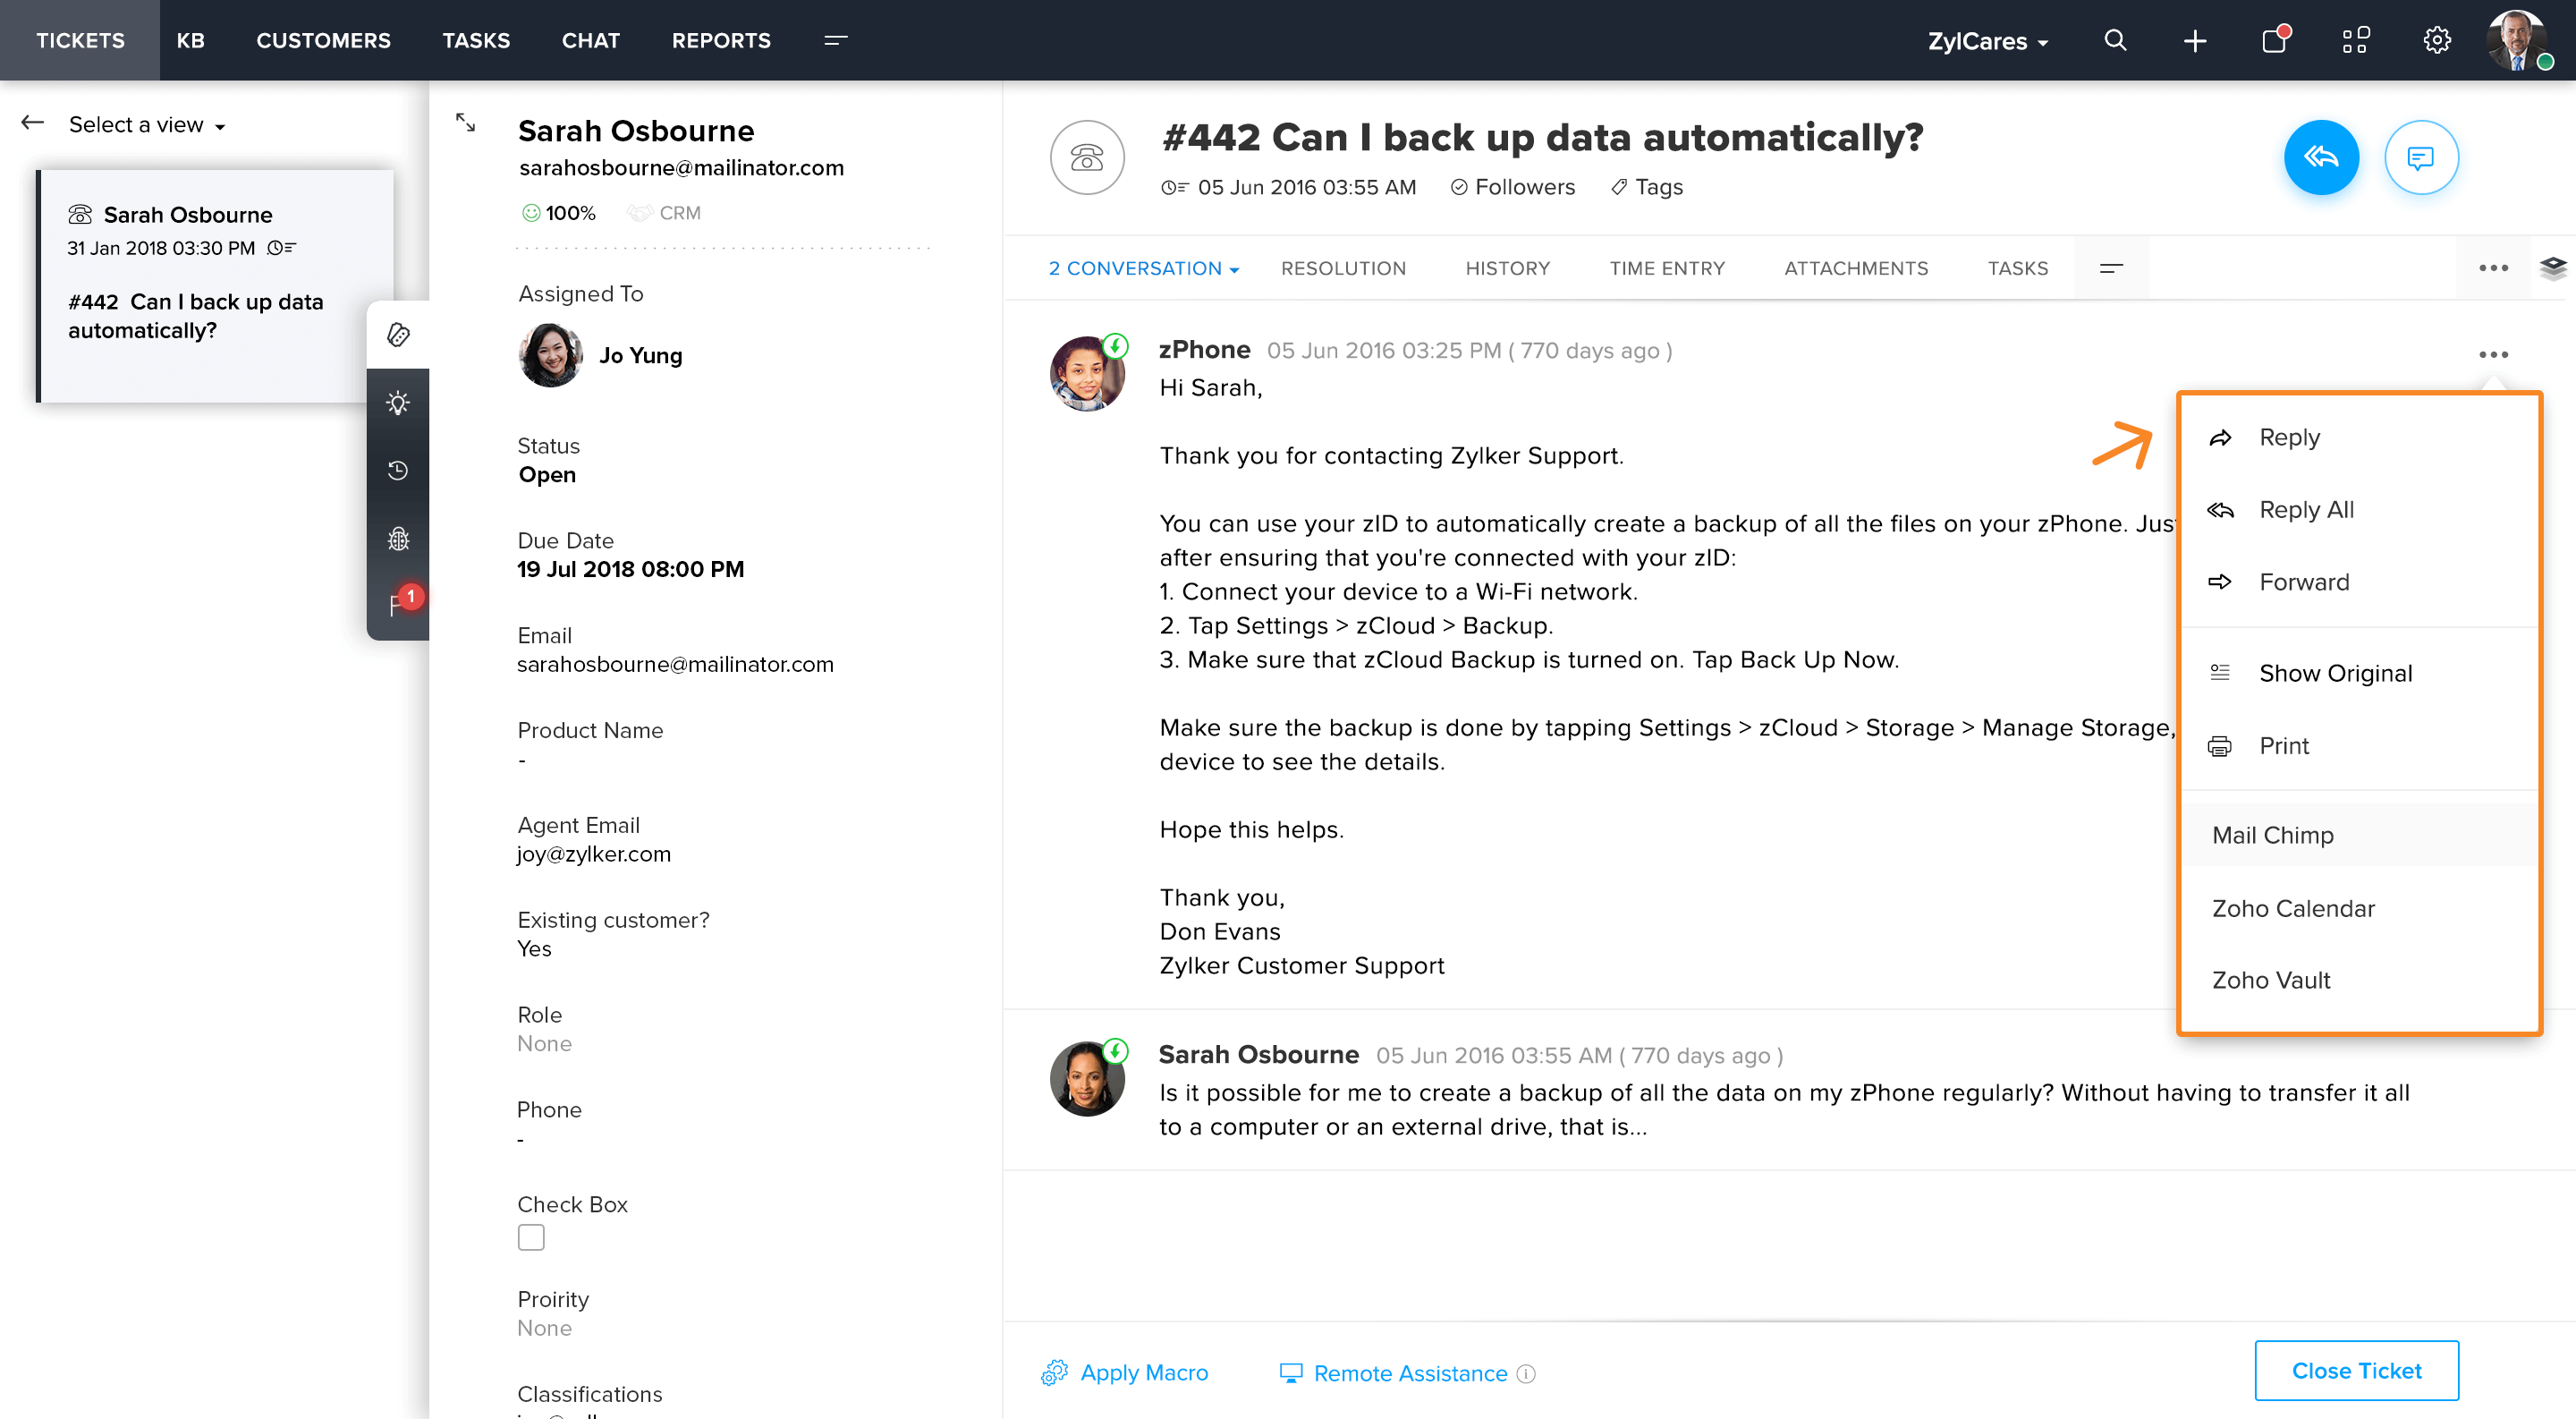
Thread More Actions - desk.ticket.thread.moreaction
This location refers to the more actions icon at the top-right side of an individual thread. Clicking this icon displays a menu in which the extensions are listed below the other standard thread-related actions, such as Reply, Forward, Print, and so on.

Ticket Form Page
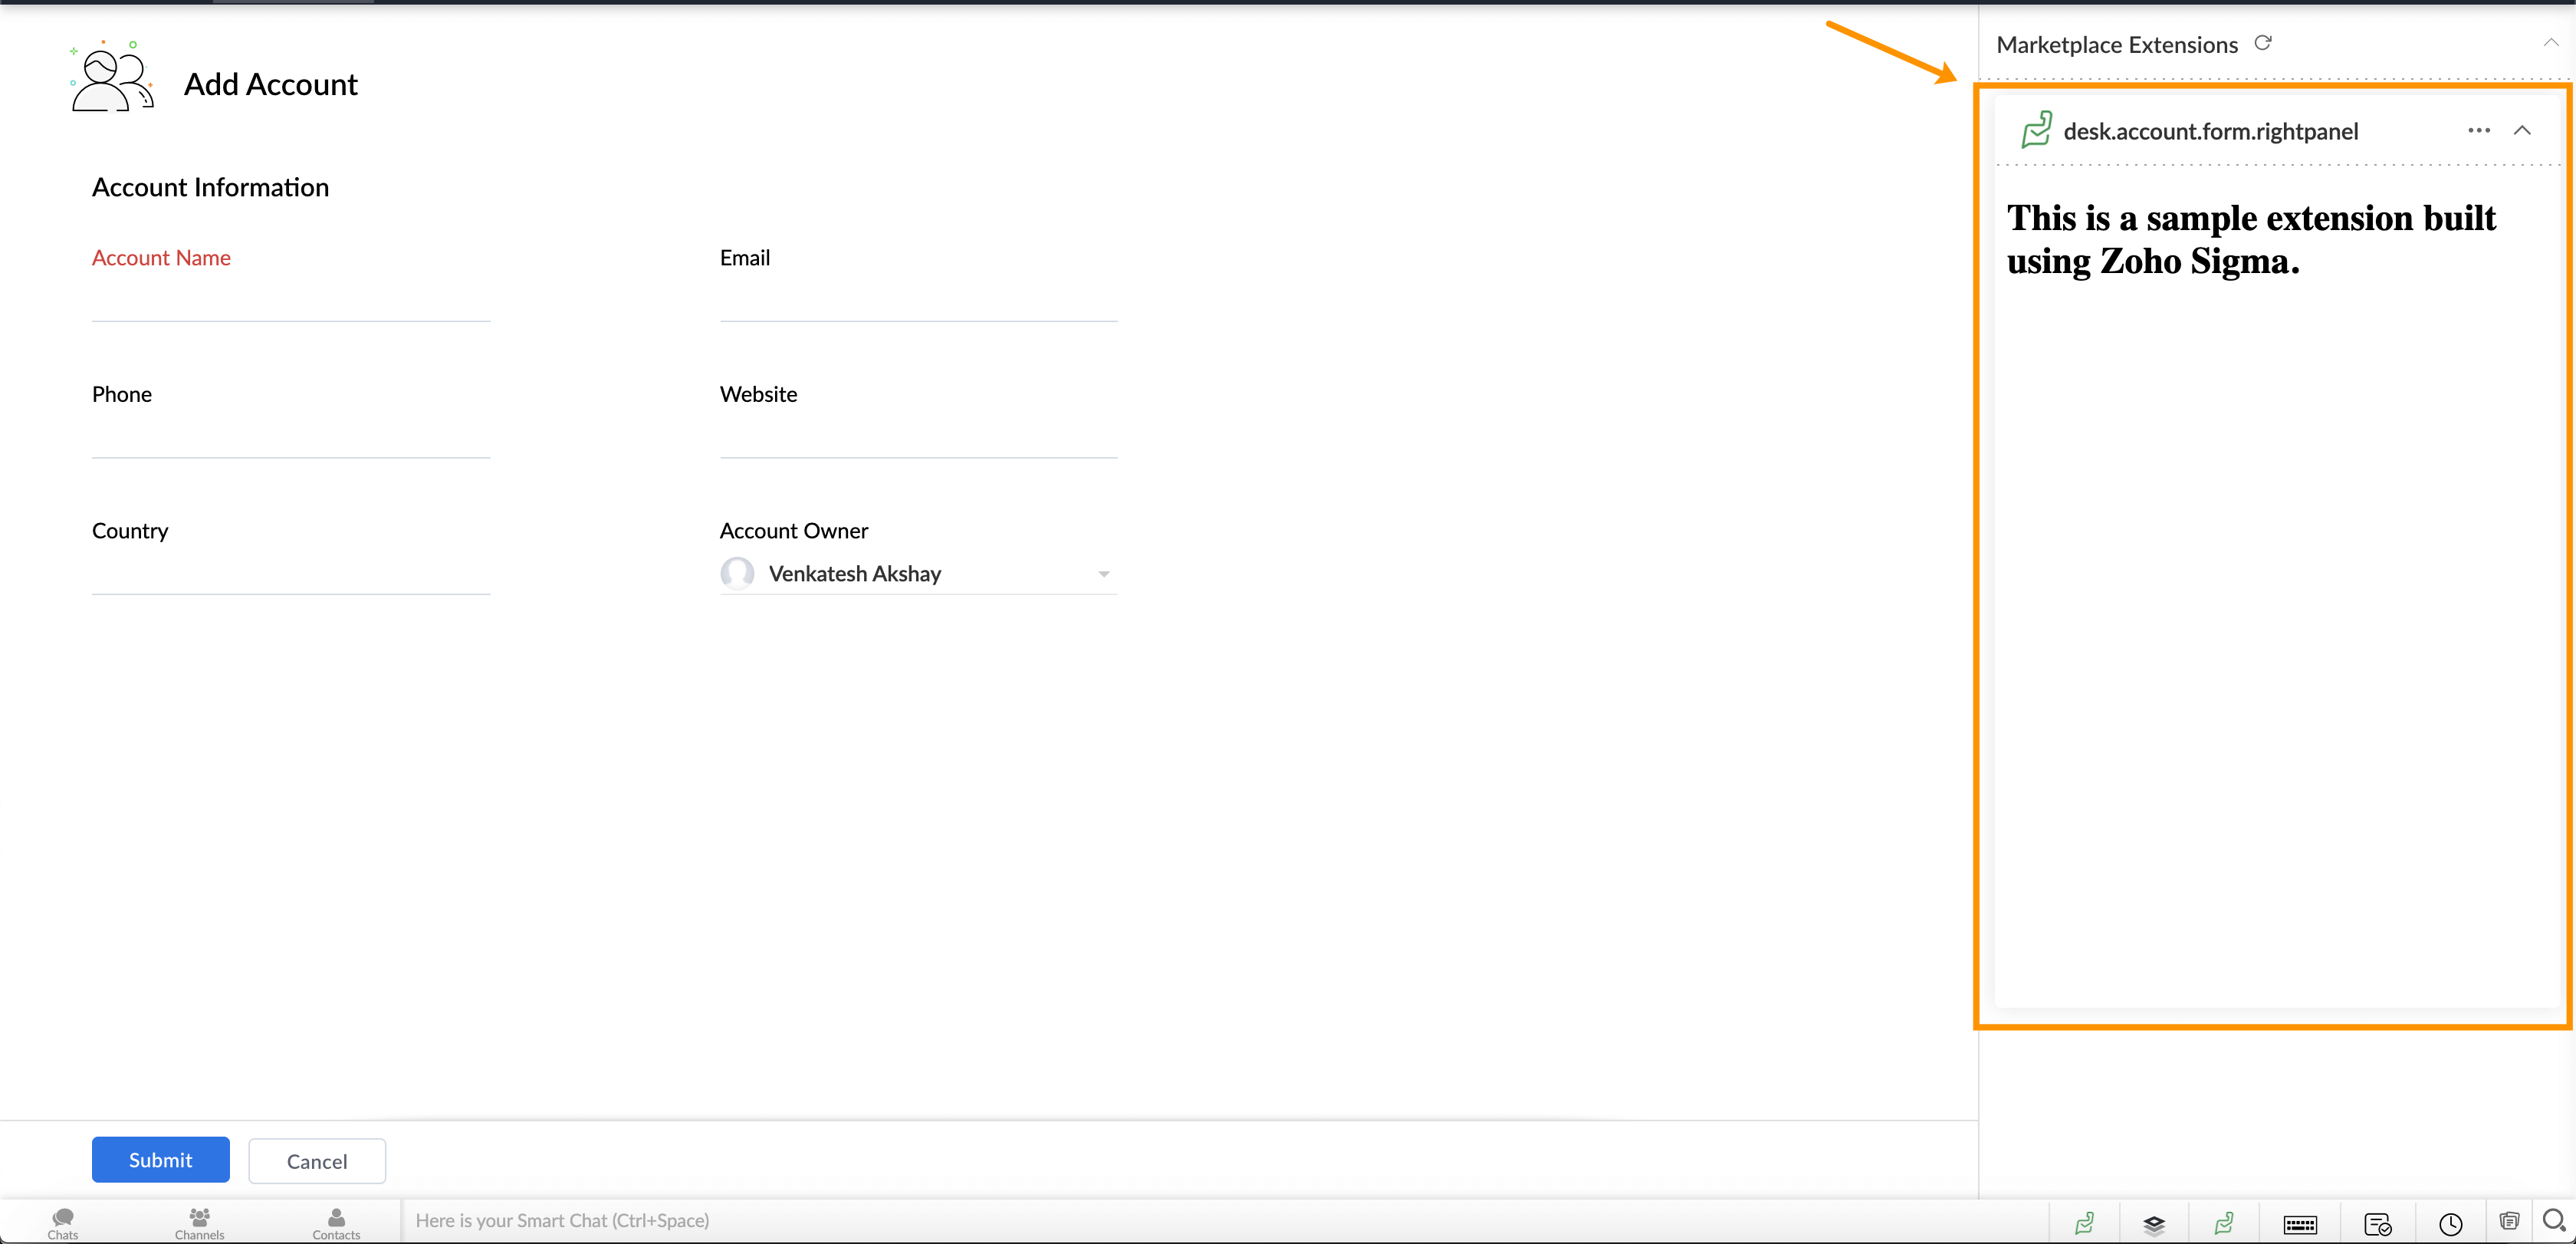
desk.ticket.form.rightpanel
This location refers to the Marketplace icon at the top-right side of the Add Ticket form. Clicking this icon displays a collapsible panel that lists all the extensions configured in this location.
Contact Detail page
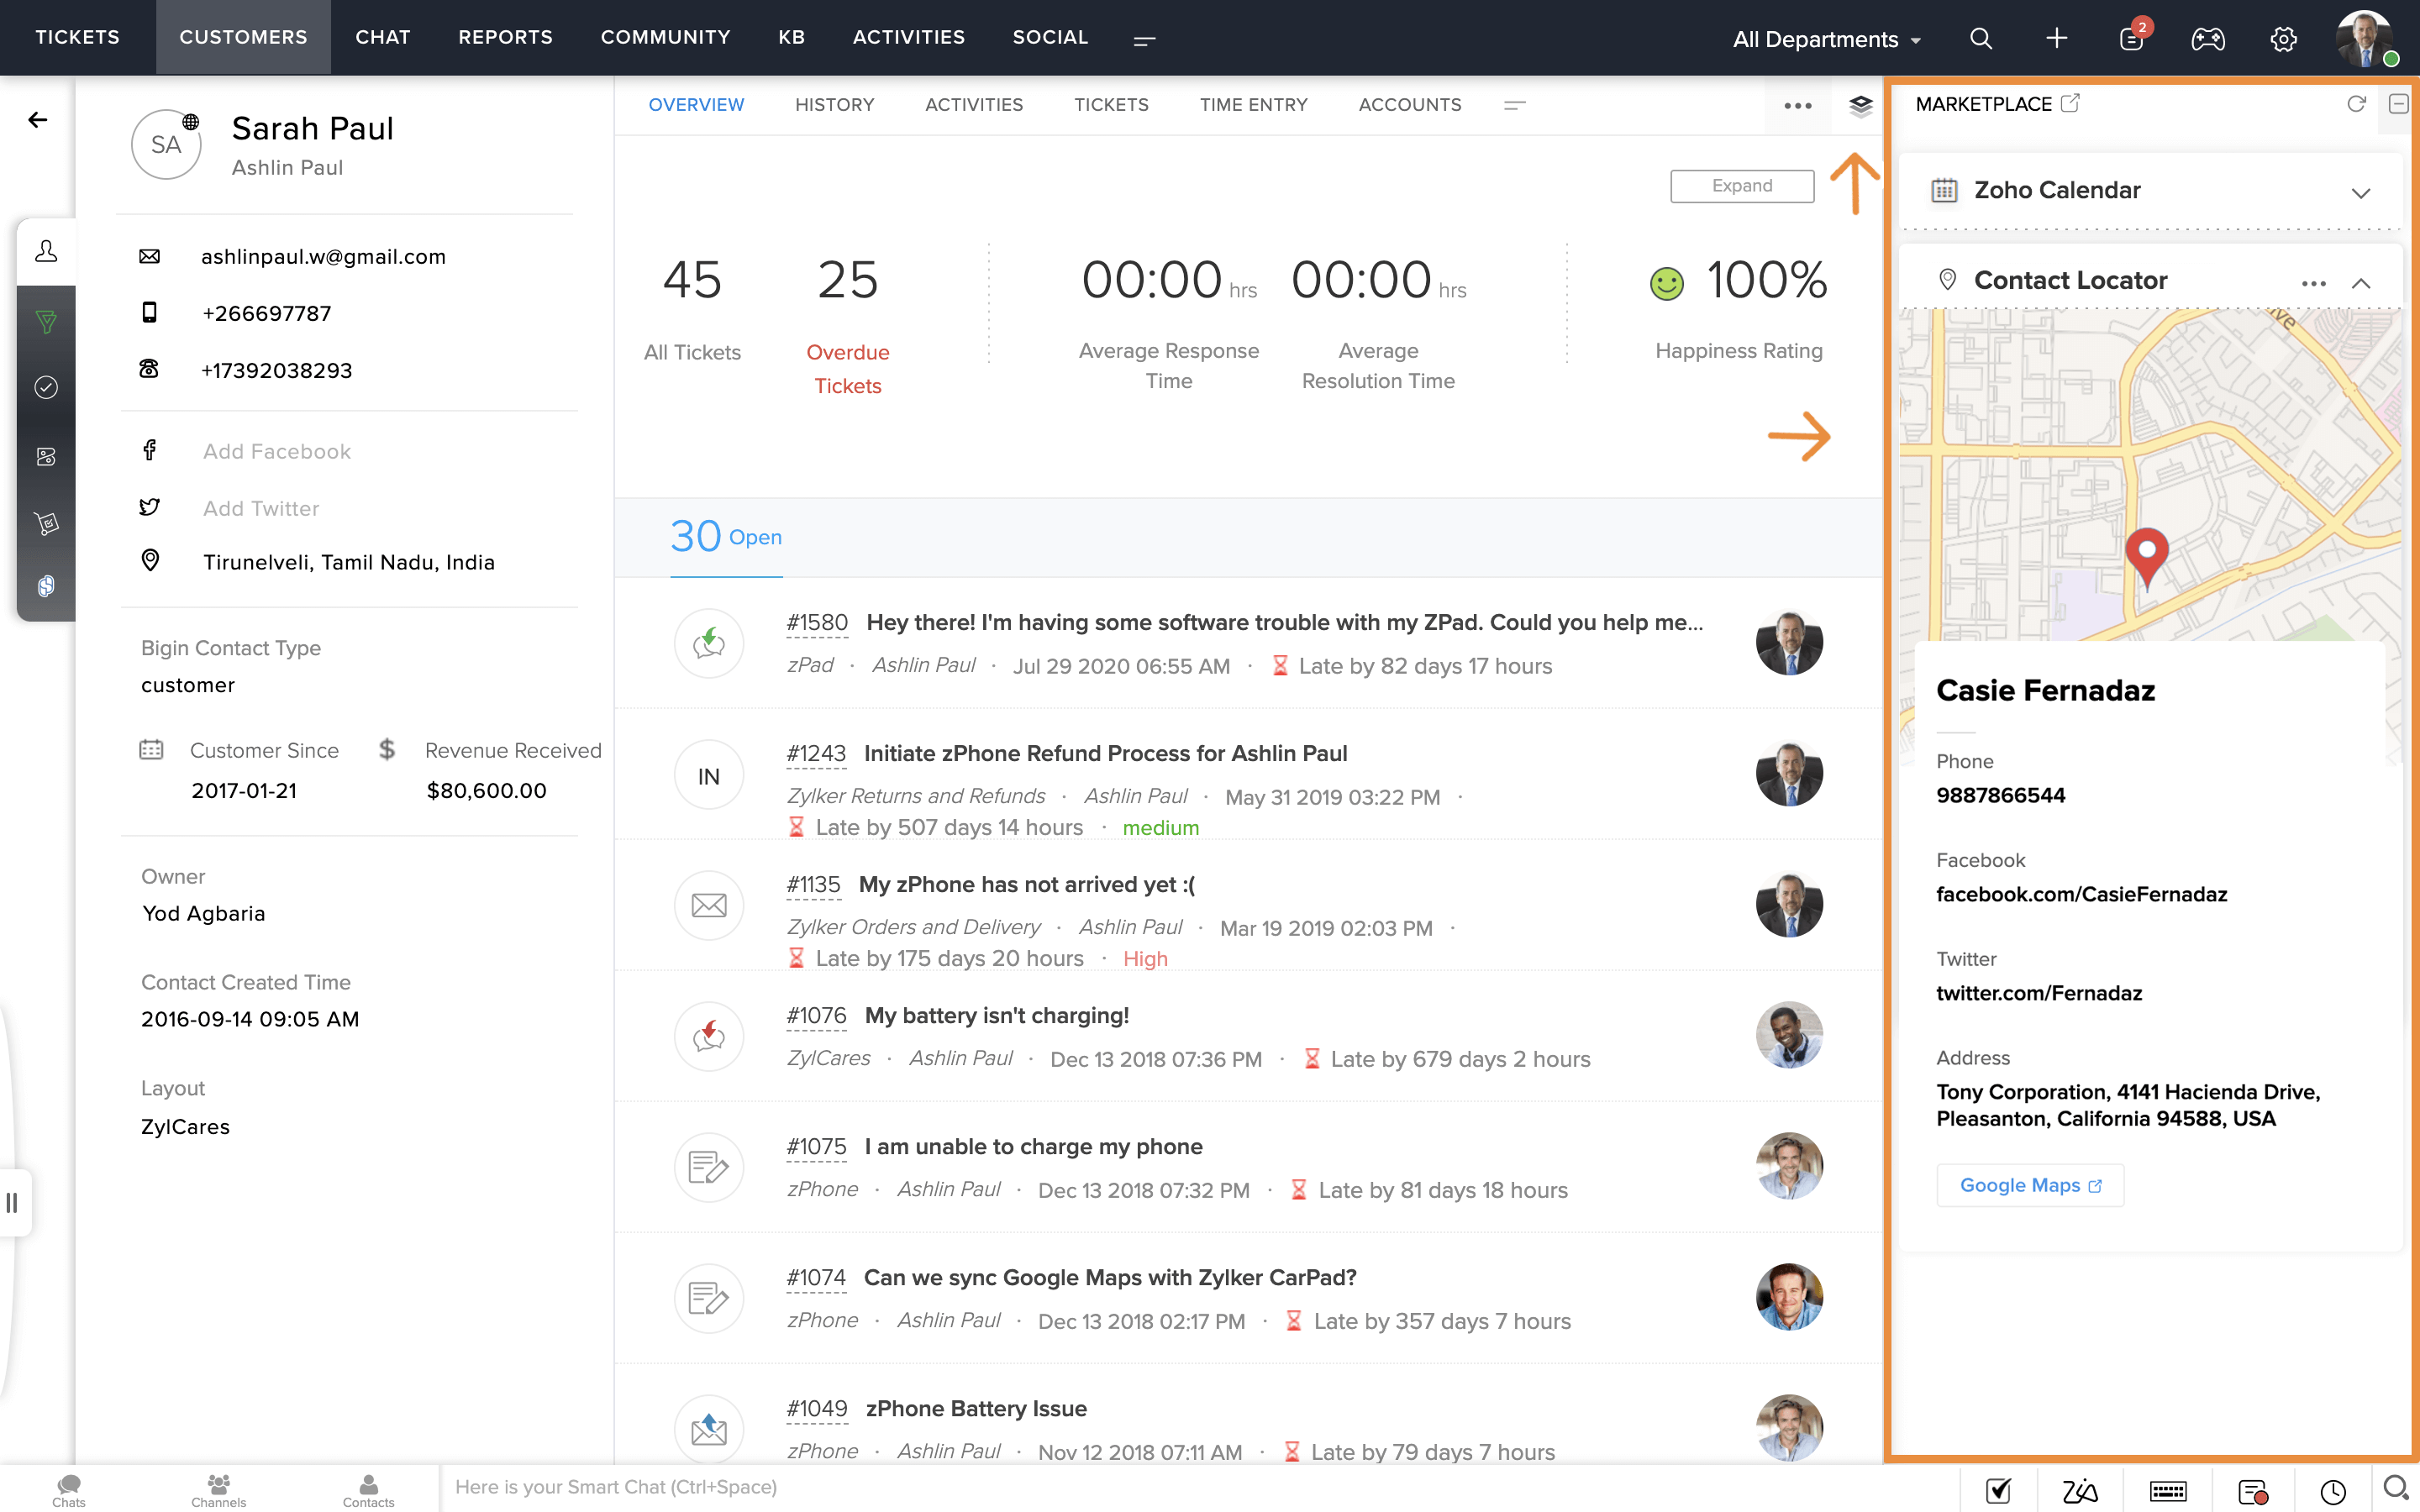
Right Panel - desk.contact.detail.rightpanel
This location refers to a collapsible panel on the right side of the contact detail page. The extension widget loads on this panel when the user clicks the Marketplace icon.
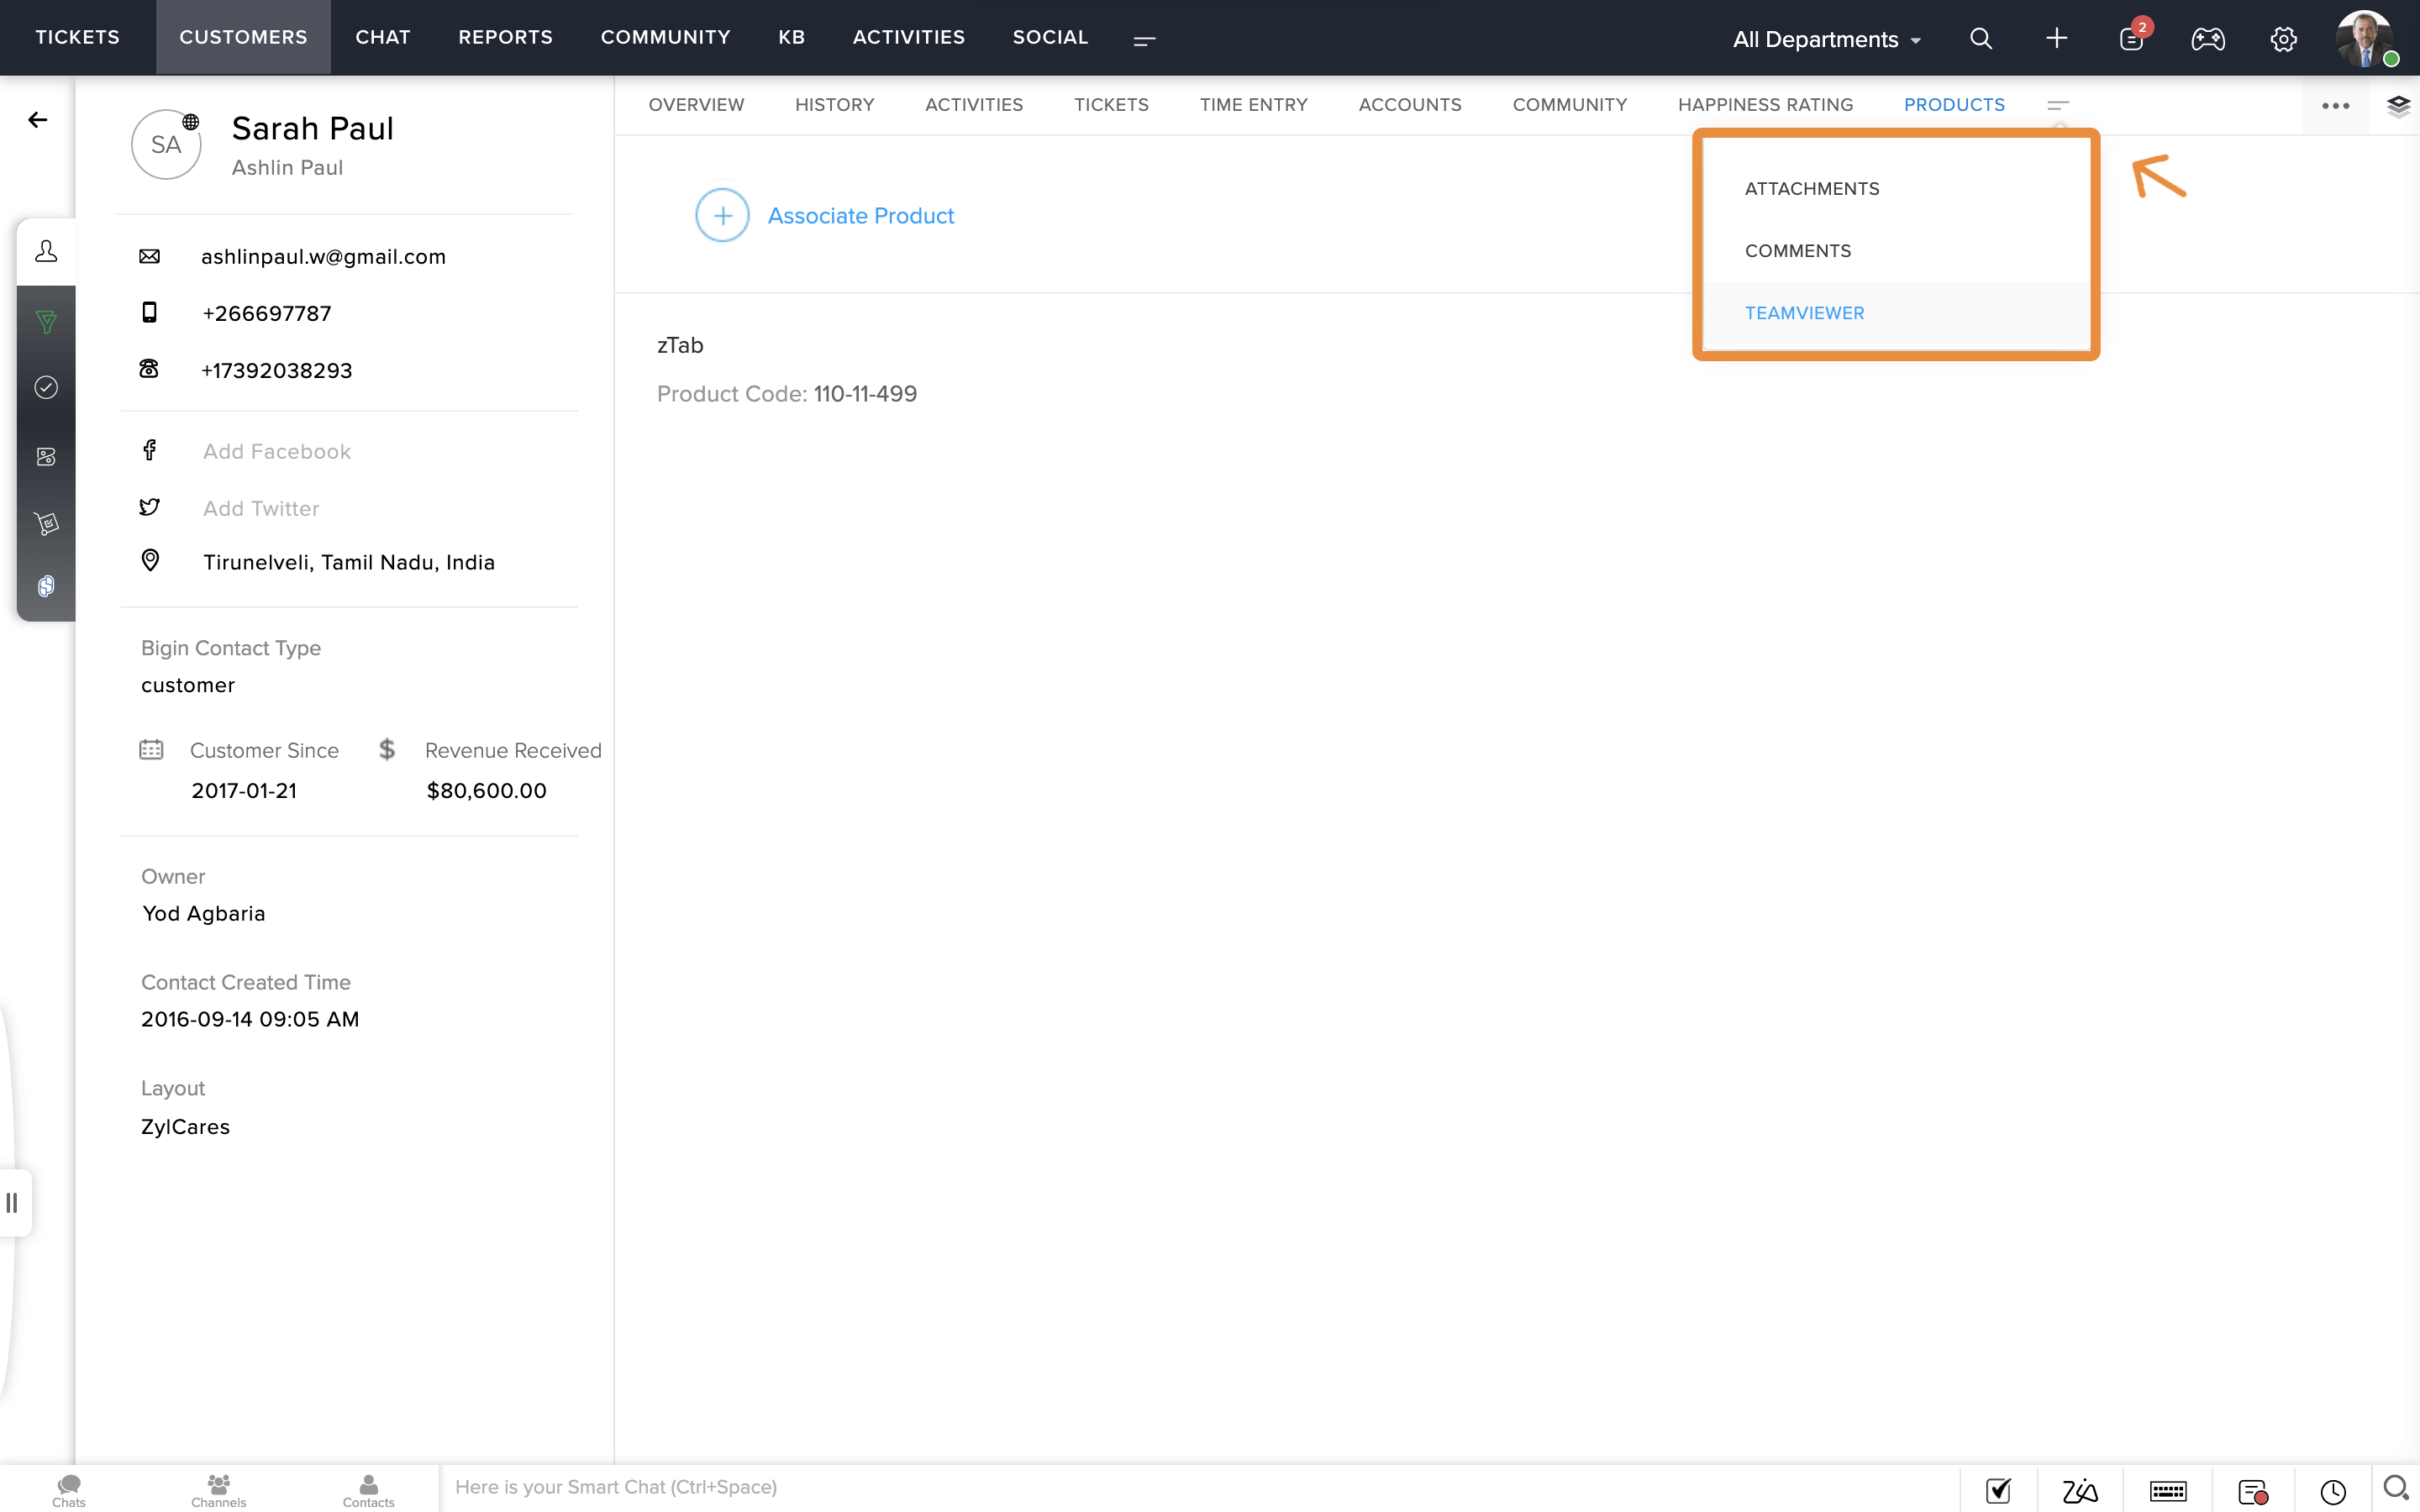
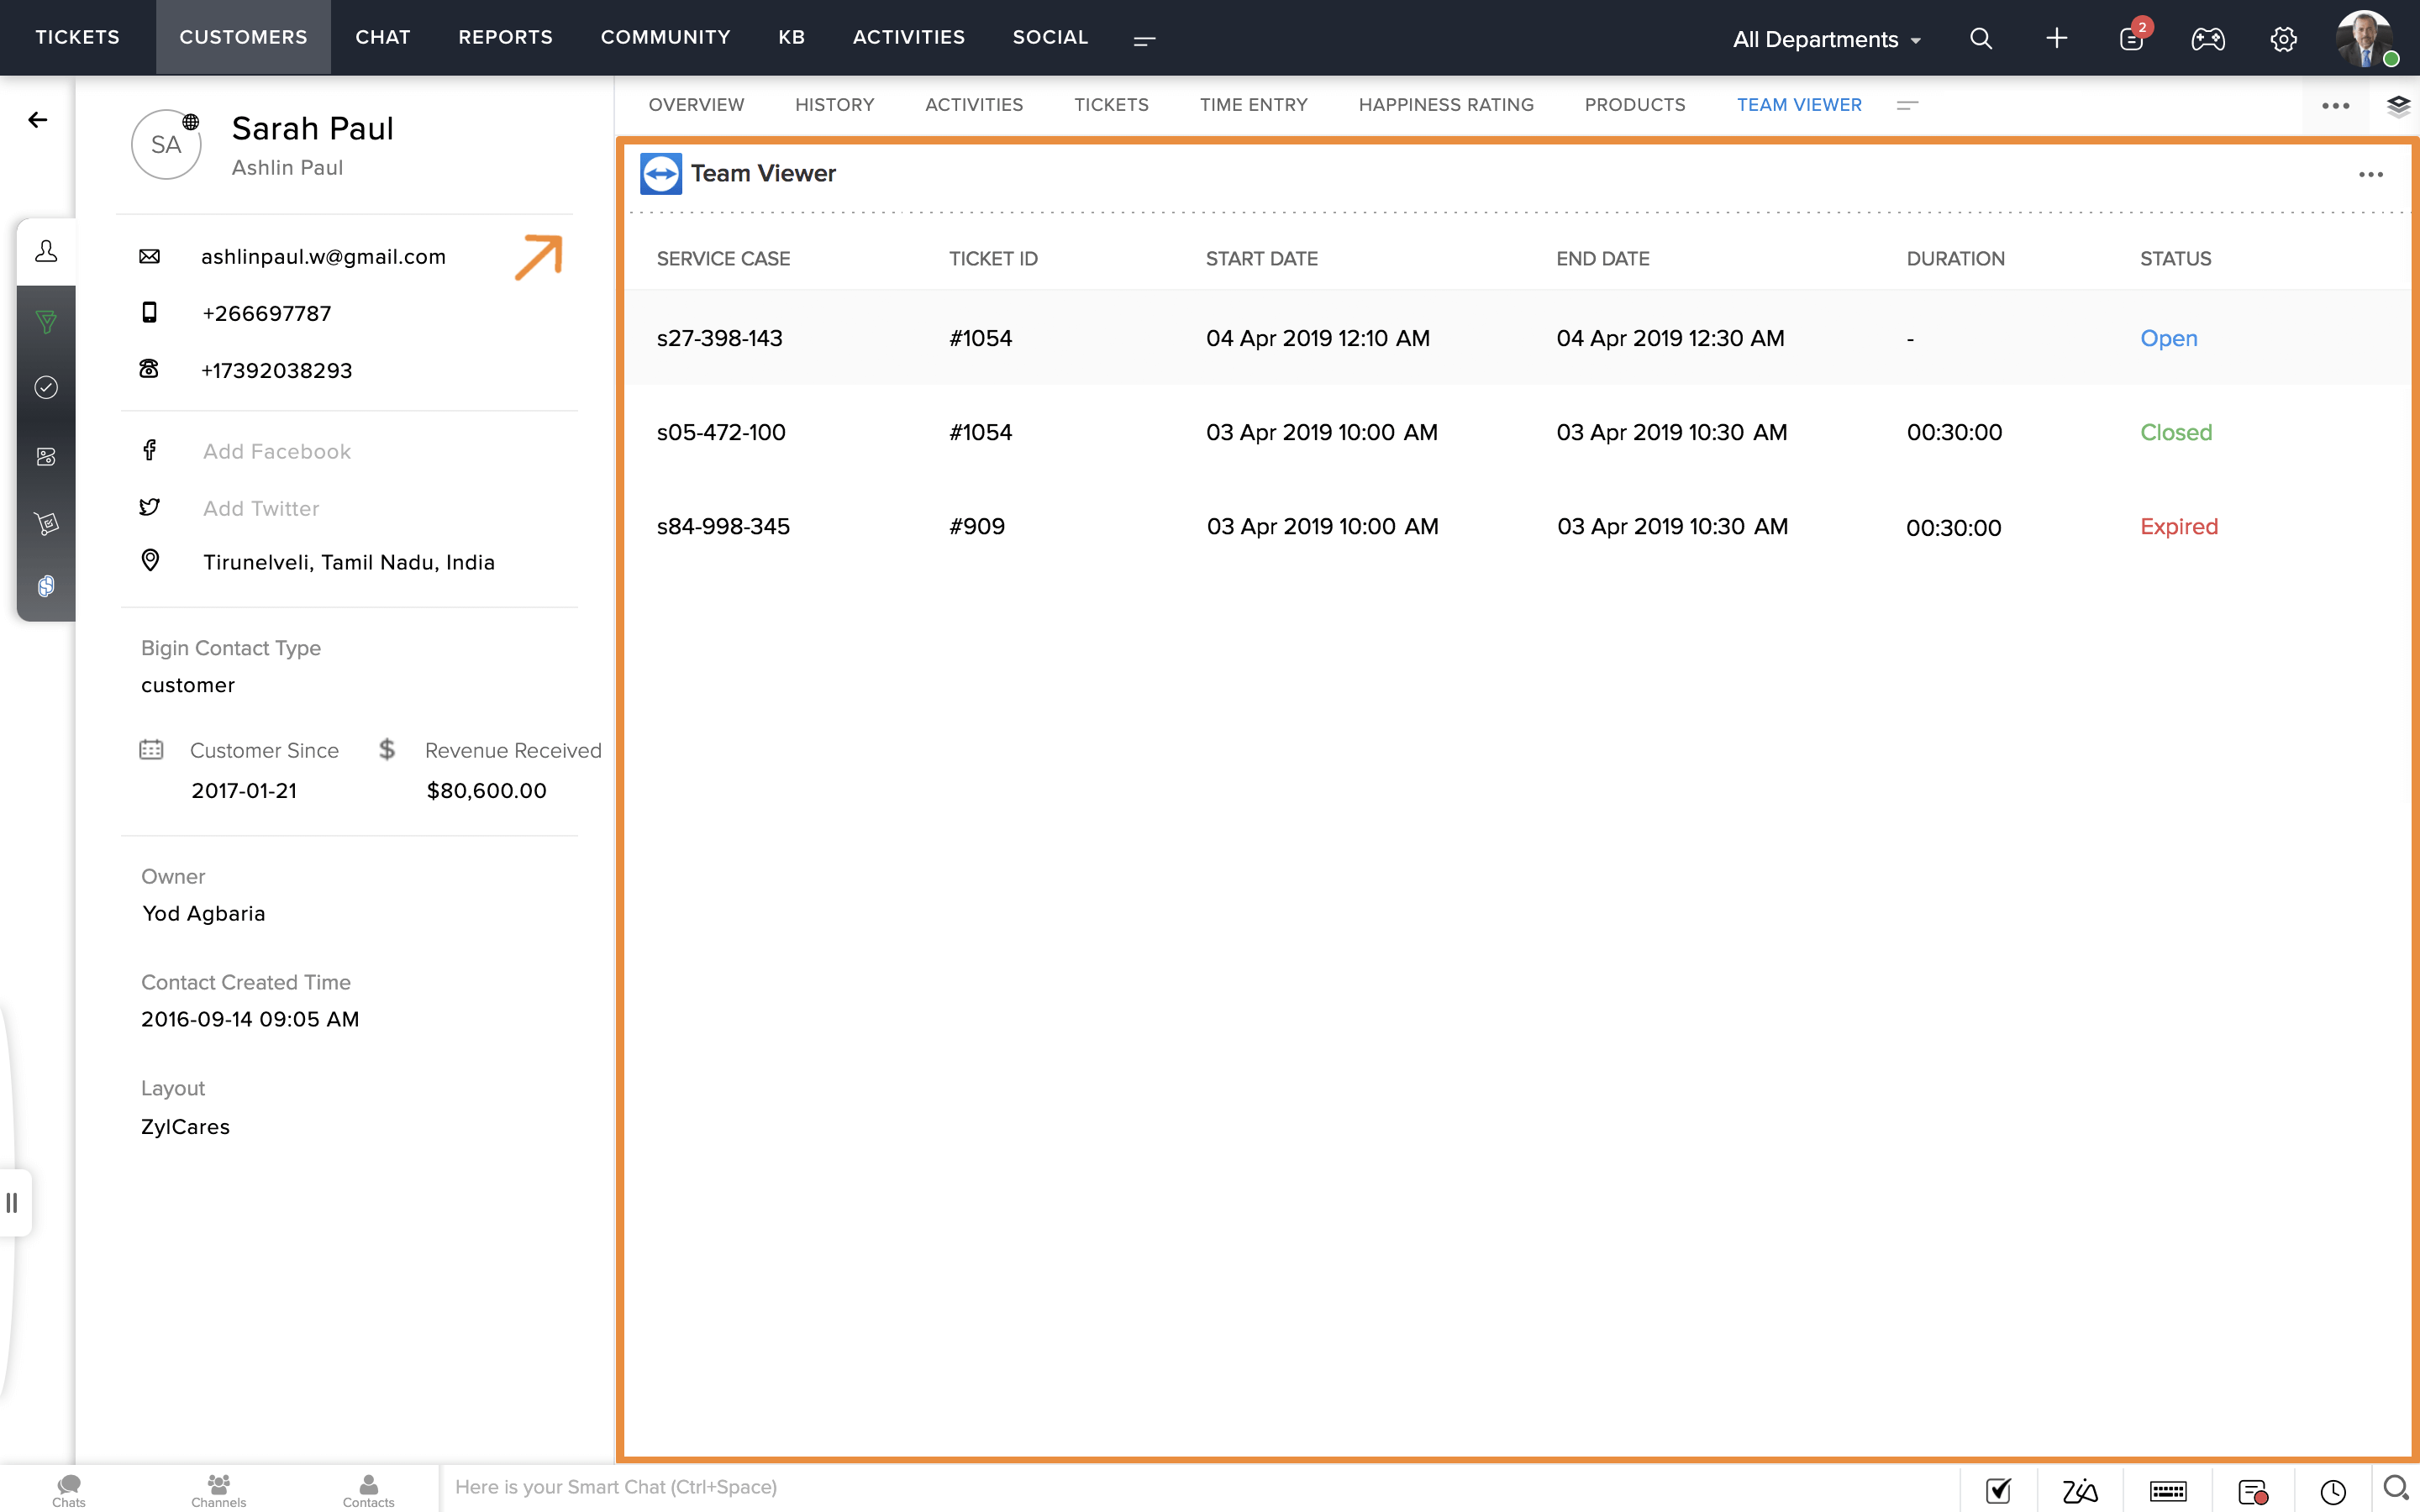
Sub-Tab - desk.contact.detail.subtab
This location refers to the sub-tab (More icon) in the contact detail page. Clicking the icon lists the extensions installed in this location. When a user clicks an extension from this list, the extension loads in the entire sub-tab section.
Left Tab - desk.contact.detail.lefttab
This location refers to the black, vertical strip on the left side of the contact detail page. The Marketplace logo appears here. Clicking the logo lists the extensions installed in this location.
Contact Form Page
Contact Form Right Panel - desk.contact.form.rightpanel
This location refers to the Marketplace icon at the top-right side of the Add Contact form. Clicking the icon displays a collapsible panel that lists all the extensions configured in this location.
Account Detail page
Right Panel - desk.account.detail.rightpanel
This location refers to a collapsible panel on the right side of the account detail page. The extension widget loads on this panel when the user clicks the Marketplace icon.
Sub-Tab - desk.account.detail.subtab
This location refers to the sub-tab (More icon) in the account detail page. Clicking the icon lists the extensions installed in this location. When a user clicks an extension from this list, the extension loads in the entire sub-tab section.
Left Tab - desk.account.detail.lefttab
This location refers to the black, vertical strip on the left side of the account detail page. The Marketplace logo appears here. Clicking the logo lists the extensions installed in this location.
Account Form Page
Account Form Right Panel - desk.account.form.rightpanel
This location refers to the Marketplace icon at the top-right side of the Add Account form. Clicking the icon displays a collapsible panel that lists all the extensions configured in this location.
Client APIs
Introduction
Get APIs
Set APIs
Data Storage APIs
Extension APIs
These APIs fetch or set information related to the extension.
Get extension config variable: Fetch the installation parameters of the extension. In production mode, only those parameters that have the value of the secure key set to false are returned. In development mode, all parameters are returned, irrespective of the value of the secure key.
ZOHODESK.get("extension.config").then(function(response){
      // response returns the installation parameters of the extension
      }).catch(function(err){
      // error handling
      })
Request:
{
      "extension.config": [
      {
      "name": "apikey",
      "mandatory": true,
      "type": "text",
      "value": "apikey",
      "userdefined": true,
      "secure": true,
      "default": "TestData"
      }
      ],
      "status": "success"
      }
Response:
Set value for extension config variable: Dynamically sets the value for a config variable defined in the plugin manifest file. New config variables cannot be defined using this API.
ZOHODESK.set('extension.config', {name : 'test', value : "value"}).then(function(res){
      //response returns the value saved
      }).catch(function(err){
      })
Request:
{
      extension.config: {
      "data": [
      {
      "userDefined": false,
      "name": "test",
      "options": "[]",
      "secure": false,
      "mandatory": false,
      "value": "value",
      "varId": "12345678901234567"
      }
      ]
      },
      status: "success"
      }
Response:
Get extension configured departments: This API fetches the departments configured for the extension on installation.
ZOHODESK.get("extension.departments").then(function(response){
      // response returns the department configured of the extension
      }).catch(function(err){
      // error handling
      })
Request:
 {
      "extension.departments": [{
      "name": "departmentName",
      "id": "1234567"
      }],
      "status": "success"
      }
Response:
Get extension configured profiles: This API fetches the profiles configured for the extension on installation.
ZOHODESK.get("extension.profiles").then(function(response){
      // response returns the profiles configured of the extension
      }).catch(function(err){
      // error handling
      })
Request:
 {
      "extension.profiles": [
      {
      "name": "Support Manager",
      "id": "1234567890"
      },
      {
      "name": "Newbie Agent",
      "id": "1234567890"
      },
      {
      "name": "Administrator",
      "id": "1234567890"
      },
      {
      "name": "Standard",
      "id": "1234567890"
      }
      ],
      "status": "success"
      }
Response:
Get extension configured users: This API fetches the users configured for the extension on installation.
ZOHODESK.get("extension.users").then(function(response){
      // response returns the users configured of the extension
      }).catch(function(err){
      // error handling
      })
Request:
 {
      "extension.users": [
      "1234567890",
      "0987654321"
      ],
      "status": "success"
      }
Response:
Request API
Resource API
This API gets the resource details of the extension. Make sure the resourceName key is given in resources.json file.
Refer resourceName for more details.
Note : Response will be given against the resourceName given in the extension.
 ZOHODESK.get("extension.resource", {resourceName: "field1", resourceType: "fields"}).then(function(response){
      //response returns the value saved
      }).catch(function(err){
      // error handling
      })
Request:
 {
      "status": "success",
      "extension.resource": {
      "resourceName": "field1",
      "id": "4000000020060",
      "resourceType": "fields",
      "apiName": "cf_counter"
      }
      }
Response:
My Custom Permission API
This API gets the permission details of logged in user.
Note : Response will be given if the permissions are configured in the extension.
 ZOHODESK.get("extension.permissions").then(function(response){
      //response returns the value saved
      }).catch(function(err){
      // error handling
      })
Request:
 {
      "status": "success",
      "extension.permissions": [
      {
      "apiName": "createResolution",
      "isEnabled": true
      },
      {
      "apiName": "editResolution",
      "isEnabled": false
      },
      {
      "apiName": "deleteResolution",
      "isEnabled": false
      }]
      }
Response:
Invoke API
Event APIs
Hook APIs
Multi-Widget Support
....
      "widgets": [
      {
      "location": "desk.ticket.detail.rightpanel",
      "name": "Client SDK",
      "url": "/app/app-iframe-view.html",
      "logo" : "./app/img/1.png",
      "icon" : "./app/img/2.png"
      },
      {
      "location": "desk.ticket.detail.subtab",
      "name": "Client SDK",
      "url": "/app/app-iframe-view.html",
      "logo" : "./app/img/1.png",
      "icon" : "./app/img/1.png"
      }
      ]
      },
      ....
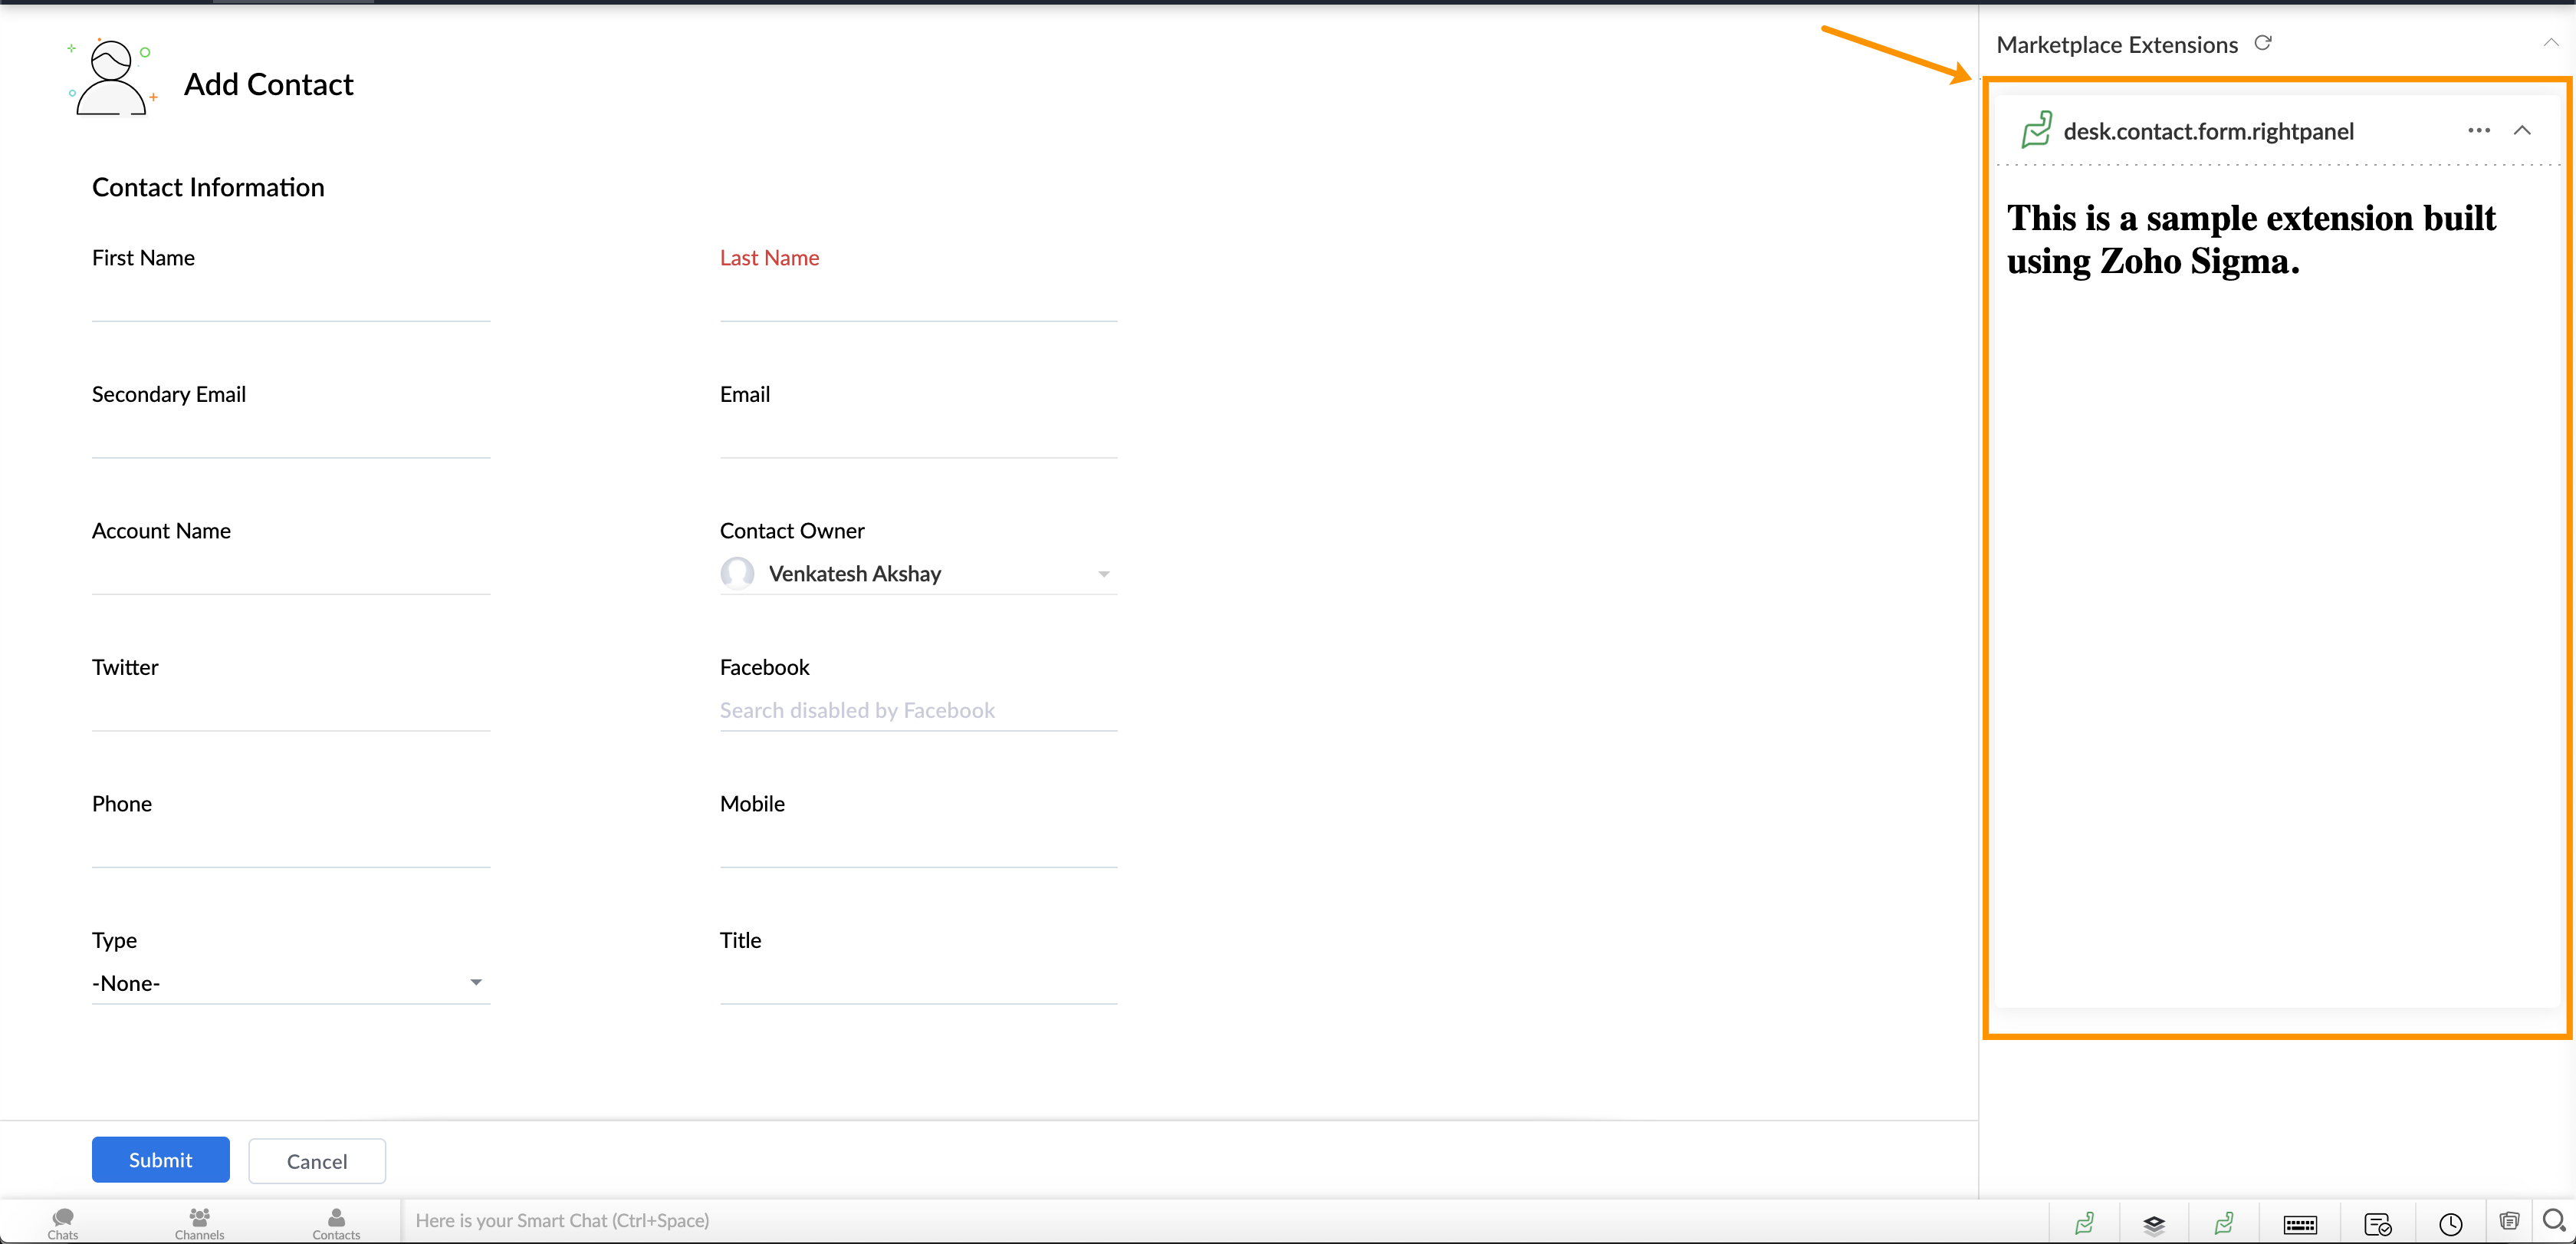
As mentioned earlier, users can access an extension through more than one widget on the Zoho Desk UI. Adding multiple widgets for your extension is a simple task. All that you need to do is include the properties of each widget, separated by comma, as shown in the right panel.
Inter-Widget Communication
In some cases where an extension has multiple widgets, communication between each widget becomes crucial. This is made possible through inter-widget communication.
App.instance.getWidgets().then(function(widgets)
      {
      siblingwidgetId = widgets[0].widgetID
      var siblingWidget = App.instance.getWidgetInstance(siblingwidgetId);
      siblingWidget.emit('event', { from: Math.random() });
      });
For instance, let us say an extension has two widgets: one at desk.ticket.detail.rightpanel and the other at desk.ticket.datil.subtab. Data from the widget on the right panel needs to be sent to the widget on the subtab. This requirement is achieved through the following code snippet:
Code Explanation
App.instance.getWidgets() returns the array of sibling widgets of the extension.
siblingwidgetId = widgets[0].widgetID gets the widgetID of the widget on the subtab. Here, widgets will have only one element. Therefore, iteration is not required.
var siblingWidget = App.instance.getWidgetInstance(siblingwidgetId) returns the whole instance of the widget on the subtab.
siblingWidget.emit('event', {from : Math.random()}) sends the event response with data to the widget on the subtab.
App.instance.on('event', function(data){
      // data({from : "randomnumber"}) sent from other widget
      });
To enable the widget on the subtab to receive the event sent from the widget on the right panel, use the following code snippet:
Interface APIs
Notifications
Alerts/Confirmations
Modal Boxes
Besides the main widgets, you can also display information or fetch user input through modal boxes. Modal boxes are UI elements in which users must perform a particular action as part of the overall process. As a result, users will be able to continue using the app on the main window only after performing the said action on the modal box.
To configure a modal box in your extension, write the necessary code in the modal.html file in the project folder, and reference this file where required in your extension.
App.instance.modal({
      url: '/app/modal.html',
      title: "Modal box"
      }).then(function(modalInfo) {
      var modalInstance = App.instance.getWidgetInstance(modalInfo.widgetID);
      modalInstance.on('modal.opened', function(data) {
      console.log('modal opened ++++++++++++++++++')
      });
      }).catch(function(err) {


      console.log(err, "Modal error");
      })
Below is a sample code for a widget that invokes a modal box.
You can configure a modal box to appear in a smaller size when invoked first and then expand to display more information. You can make this possible through the resize command.
ZOHODESK.invoke('RESIZE');
To include this resizing option in the modal box, use the following command in the modal.html file:
Functions
Introduction
Create Function
Edit Function
Associate Function
Function Execution
Authorizations
An extension user may need to authorize the Desk or Third party services for the developer to perform the authorized actions such as calling the APIs.
Available inbuilt authentication mode is
- Connections
Connections
                    Sample of Manifest with connections

                    {
                    ...,
                    "connectors":[
                    {
                    "connectionLinkName"    : "test216",
                    "connectionName"        : "test",
                    "serviceName"           : "jira",
                    "userAccess"            : true,
                    "isUserDefinedService"  : false
                    },
                    {
                    "connectionLinkName"    : "myconni",
                    "connectionName"        : "myconni",
                    "serviceName"           : "zlabs_integration",
                    "userAccess"            : true,
                    "isUserDefinedService"  : false,
                    "scope"                 : ["ZohoCliq.Channels.All"]
                    }
                    ]
                    ...
                    }
Connections can be used for the authentication of Zoho and External Services which provides the simplified solution where the authentication process (such as OAuth Client registration, redirection) is handled internally.
Developers can create a connection in the Sigma for the existing & request for new services.
Connection Configuration JSON
After successfully adding the connection in the external Sigma , obtain the Connection Configuration JSON details of the connection and speficy it in the manifest's connectors property. Value for the connectors property should be an array of obtained Connection Configuration JSONs.
Desk Invoke API
Desk's invoke API acts as a proxy between the extension and the External Services or Desk for calling the APIs.
With Desk Invoke API,
- Can access the Zoho Desk's APIs
- Can access the External Services's APIs
- Can access the Extension Data Specific APIs such as storage, configParam and log APIs
INVOKE API REQUEST FORMAT:

URL             :     api/v1/invoke
RequestMethod   :     POST
QueryParams     :     orgId
RequestHeaders  :     HASH
Content-Type    :     application/x-www-form-urlencoded
RequestBody     :     #INVOKE_API_REQUEST_PAYLOAD.


INVOKE API RESPONSE FORMAT:

ResponseCode    : 200
Content-Type    : application/json
Response        : #INVOKE_API_RESPONSE_OBJECT
Using Desk Invoke API
The query parameters such as orgId , securityContext and headerparam HASH are required for calling Invoke API . orgId & securityContext will be provided by desk during the Platform event callbacks. HASH should be generated using the SECRET and the Request URL inputs. Refer Generating Hash for Invoke API
#INVOKE_API_REQUEST_PAYLOAD
| Field | Required | Type | Description |
|---|---|---|---|
| securityContext | yes | string | An Extension specific encrypted token that is used for identifying & authenticating the extension while calling the invoke API. SecurityContext can be obtained during Platform event callbacks |
| requestURL | yes | string | URL to be invoked. |
| requestType | yes | string | HTTP method for invoking the requestURL For example,
|
| postBody | yes | string | Payload or body to be sent while invoking the requestURL. |
| headers | yes | string | Headers to be sent while invoking the requestURL. |
| queryParams | yes | string | QueryParams to be sent while invoking the requestURL. |
| connectionLinkName | yes | string | If the authorization needs to be applied from the connections while invoking the requestURL, specify the unique connection name provided by the DRE. |
Sample of Invoke API HASH Generation
If manifest.secret => "my_secret_key_238392"

For Sample Invoke API Inputs =>
requestURL          = https://api.google.com/test
requestType         = POST
queryParams         = {}
postBody            = {}
headers             = {"orgId":376723}
connectionLinkName  = myConnectionLinkName

(*ignore what you don't need)'

Hash generation would be =>
let stringToHash =
'requestURL=https://api.google.com/test&requestType=POST&queryParams={}&postBody={}&headers={"orgId":376723}&connectionLinkName=myConnectionLinkName'

then, generated HASH = hmac_sha256 ( stringToHash, "my_secret_key_238392" );

*Note: While generating HASH, only include the parameters which will be used in the
 invoke API.
Order of the fields while generating hash should be exactly
 1.requestURL, 2.requestType, 3.queryParams, 4.postBody,  5.headers, 6.connectionLinkName and you can ignore the fields which you don't send.
Generate Hash for Invoke API
To call invoke API, HASH is mandatory. Hash is used to verify the invoke API call was originally made by the extension developer. HASH is an HMAC sha256 encrypted string with the key as app's secret (manifest.secret) provided in the manifest and the input as invokeAPI's payload.
Desk also will generate the HASH with the shared app's secret with the provided payload in the invoke API and will match the provided HASH in the desk invoke API's header. If the HASH does not match with the desk generated HASH, then the invoke API will not be processed.
The same process of authentication can be used by the extension during the extension callback events to verify the callback was originally sent by the desk.
Specifying Placeholders in Invoke API
You can specify configParams, authentication details as placeholders while calling the desk invoke API. The placeholders will be replaced with the original values before sending the request to requestURL.
Supported placeholders
| Placeholder | Syntax | Location(s) | Description |
|---|---|---|---|
| InstallationId | {{PROPERTY}} | requestURL, queryParams, requestHeaders | eg: https://desk.zoho.com /api/v1/installations/ {{installationId}}/storage |
| Config Params | {{PROPERTY}} | requestURL, queryParams, requestHeaders | Name of Config Param eg : {{jiraAuthKey}} |
| resourceName | {{RESOURCETYPE.RESOURCENAME.ID}} | requestURL, queryParams, postBody, requestHeaders | Get Field eg : https://desk.zoho.com/api/v1/ organizationFields/{{fields.field1.id}} |
| resourceName | {{RESOURCETYPE.RESOURCENAME.APINAME}} | requestURL, queryParams, postBody, requestHeaders | Set Field eg : "cf": { "{{fields.field1.apiName}}": "Testing" } |
Sample of Specifying Connection in invokeAPI payload
...
requestURL         = https://api.google.com/test
connectionLinkName = googleConnection
...
Specifying Authentication Details in Invoke API
Invoke API applies the authentication details specified while calling the API, find the below table for specifying the authentication details while calling the invoke API.
| Auth Type | Where to specify ( Parameter Name ) | Description |
|---|---|---|
| connections | payload (connectionLinkName) | Name of the connectionLinkName has to be given in the query parameter connectionLinkName while calling the invoke API. |
Sample Response :
{
  "responseHeaders" : {
    "Cache-Control" : "private,no-cache,no-store,max-age=0,must-revalidate",
    "Set-Cookie" : "drecn=9e1f7200-bcdf-426d-9628-79ff4e9241c8; Path=/; Secure",
    "Vary" : "Accept-Encoding",
    "Expires" : "Thu, 01 Jan 1970 00:00:00 GMT",
    "X-XSS-Protection" : "1",
    "Content-Type" : "application/json;charset=utf-8"
  },
  "response" : "{\"data\":[{\"ticketNumber\":\"176\",\"customerResponseTime\":\"2014-03-22T05:05:08.471Z\",\"productId\":null,\"contactId\":\"1892000000045028\",\"subject\":\"from forum\",\"dueDate\":\"2016-06-01T14:04:07.000Z\",\"departmentId\":\"1892000000006907\",\"channel\":\"Forums\",\"threadCount\":\"72\",\"priority\":\"High\",\"assigneeId\":\"1892000000056007\",\"closedTime\":null,\"commentCount\":\"0\",\"phone\":null,\"contact\":{\"firstName\":\"\",\"lastName\":\"as\",\"phone\":null,\"id\":\"1892000000045028\",\"type\":null,\"email\":\"manojkumar.s+4444@zohocorp.com\",\"account\":{\"website\":\"qwe.com\",\"accountName\":\"Man_Account\",\"id\":\"1892000000980421\"}},\"createdTime\":\"2014-03-06T09:49:50.000Z\",\"id\":\"1892000000094004\",\"email\":\"example@example.com\",\"status\":\"Open\"}]}",
  "statusCode" : "200"
}
#INVOKE_API_RESPONSE_OBJECT
| Field | Type | Description |
|---|---|---|
| statusCode | integer | Status Code from the requestURL by the invoke API request. |
| response | string | Response from the requestURL by the invoke API request. |
| responseHeaders | string | Response headers sent by the requestURL. |
Extension Data Specific APIs
The following are the APIs available to the extension that can be accessed using Desk Invoke API. InstallationId wont be provided to the developers, instead he has to use installationId placeholder in Invoke API to call the apis.
- Storage API
- Configuration Param API
- Log API
- My Custom Permission API
Storage API
Extensions can make use of Storage API to access & modify data from the extension's DB storage. The available storage API 's are,
- Add data to storage
- Get data from storage
- Delete data from storage
#STORAGE_DATA_OBJECT
{
    "key"            : "color-red-data-id-278783",
    "queriableValue" : "color-red-datas",
    "value"          : {
        "myResult" : "Diluted solution for red color experiment 128ml "
    }

}
#STORAGE_DATA_OBJECT
Every storage object has the following properties.
| Field | Type | Description |
|---|---|---|
| key | string | Key for the value which can be used to lookup. |
| value | JSONObject | Specifies the value that needs to be stored for the given key. |
| queriableValue | string | Used to group the multiple storage data. Specifies a common lookup group of the given key-value pair which will be useful for lookup from the database. |
Add data to storage:

Request Format:

URL             :     https://desk.zoho.com/api/v1/installedExtensions/{{installationId}}/storage
OAuth Scope     :     Desk.extensions.CREATE
RequestMethod   :     POST
RequestHeaders  :     orgId, Authorization
Content-Type    :     application/json
RequestBody     :     #STORAGE_DATA_OBJECT.


Response Format:

ResponseCode    : 200
Content-Type    : application/json
Response        : #STORAGE_DATA_OBJECT
Add data to storage
Use this API to add data to the extension storage.
Get data from storage:

Request Format:

URL             :     https://desk.zoho.com/api/v1/installedExtensions/{{installationId}}/storage
OAuth Scope     :     Desk.extensions.READ
RequestMethod   :     GET
RequestHeaders  :     orgId, Authorization
QueryParams     :     key, queriableValue, from, limit


Response Format:

ResponseCode    : 200
Content-Type    : application/json
Response        : JSONObject with data property
                  containing the result as array of #STORAGE_DATA_OBJECT.
Get data from storage
Use this API to get data from the extension storage with the matching criteria.
Delete data from storage:

Request Format:

URL             :     https://desk.zoho.com/api/v1/installedExtensions/{{installationId}}/storage
OAuth Scope     :     Desk.extensions.DELETE
RequestMethod   :     DELETE
RequestHeaders  :     orgId, Authorization
QueryParams     :     key


Response Format:

ResponseCode    : 200
Delete data from storage
Use this API to delete data from the extension storage specifying the key.
Configuration Param API
Extensions can make use of Configuration Param API to access & modify the extension's config params. The available storage API's are,
- Add config params
- Get config param
#CONFIG_PARAM_API_REQUEST_OBJECT
{
  "variables" : [
    {
      "name"  : "configParam1",
      "value" : "value for the configparam 1"
    },
    {
      "name"   : "configParam3",
      "value"  : "value for the configparam 3"
    }
  ]
}

#CONFIG_PARAM_API_RESPONSE_OBJECT
{
  "data" : [
    {
      "defaultValue" : "default1",
      "userDefined" : true,
      "name" : "variable1",
      "options" : "[op1,  opt2]",
      "secure" : true,
      "type" : "text",
      "mandatory" : false,
      "value" : "testing",
      "varId" : "4000000011017"
    }
  ]
}
#CONFIG_PARAM_API_REQUEST_OBJECT
| Field | Type | Description |
|---|---|---|
| variables | JSONArray <#CONFIG_PARAM> | Array of config params to be saved in desk |
#CONFIG_PARAM
| Field | Type | Description |
|---|---|---|
| name | string | Name of the config param |
| value | string | Value of the config param |
Add config params:

Request Format:

URL             :     https://desk.zoho.com/api/v1/installedExtensions/{{installationId}}/configParams
OAuth Scope     :     Desk.extensions.CREATE
RequestMethod   :     POST
RequestHeaders  :     orgId, Authorization
Content-Type    :     application/json
RequestBody     :     #CONFIG_PARAM_API_REQUEST_OBJECT.


Response Format:

ResponseCode    : 200
Content-Type    : application/json
Response        : #CONFIG_PARAM_API_RESPONSE_OBJECT
Add or update config params
Use this API to add or update config params.
Get config params:

Request Format:

URL             :     https://desk.zoho.com/api/v1/installedExtensions/{{installationId}}/configParams
OAuth Scope     :     Desk.extensions.READ
RequestMethod   :     GET
RequestHeaders  :     orgId, Authorization


Response Format:

ResponseCode    : 200
Content-Type    : application/json
Response        : #CONFIG_PARAM_API_RESPONSE_OBJECT
Get config params
Use this API to get extension's config params.
Extension Log APIs
Extensions can make use of Log API to log the extension processes. Logs can be viewed on customer's support portal.
Logs will expire after 3days.
Path to Logs: 
Parent Logs List: 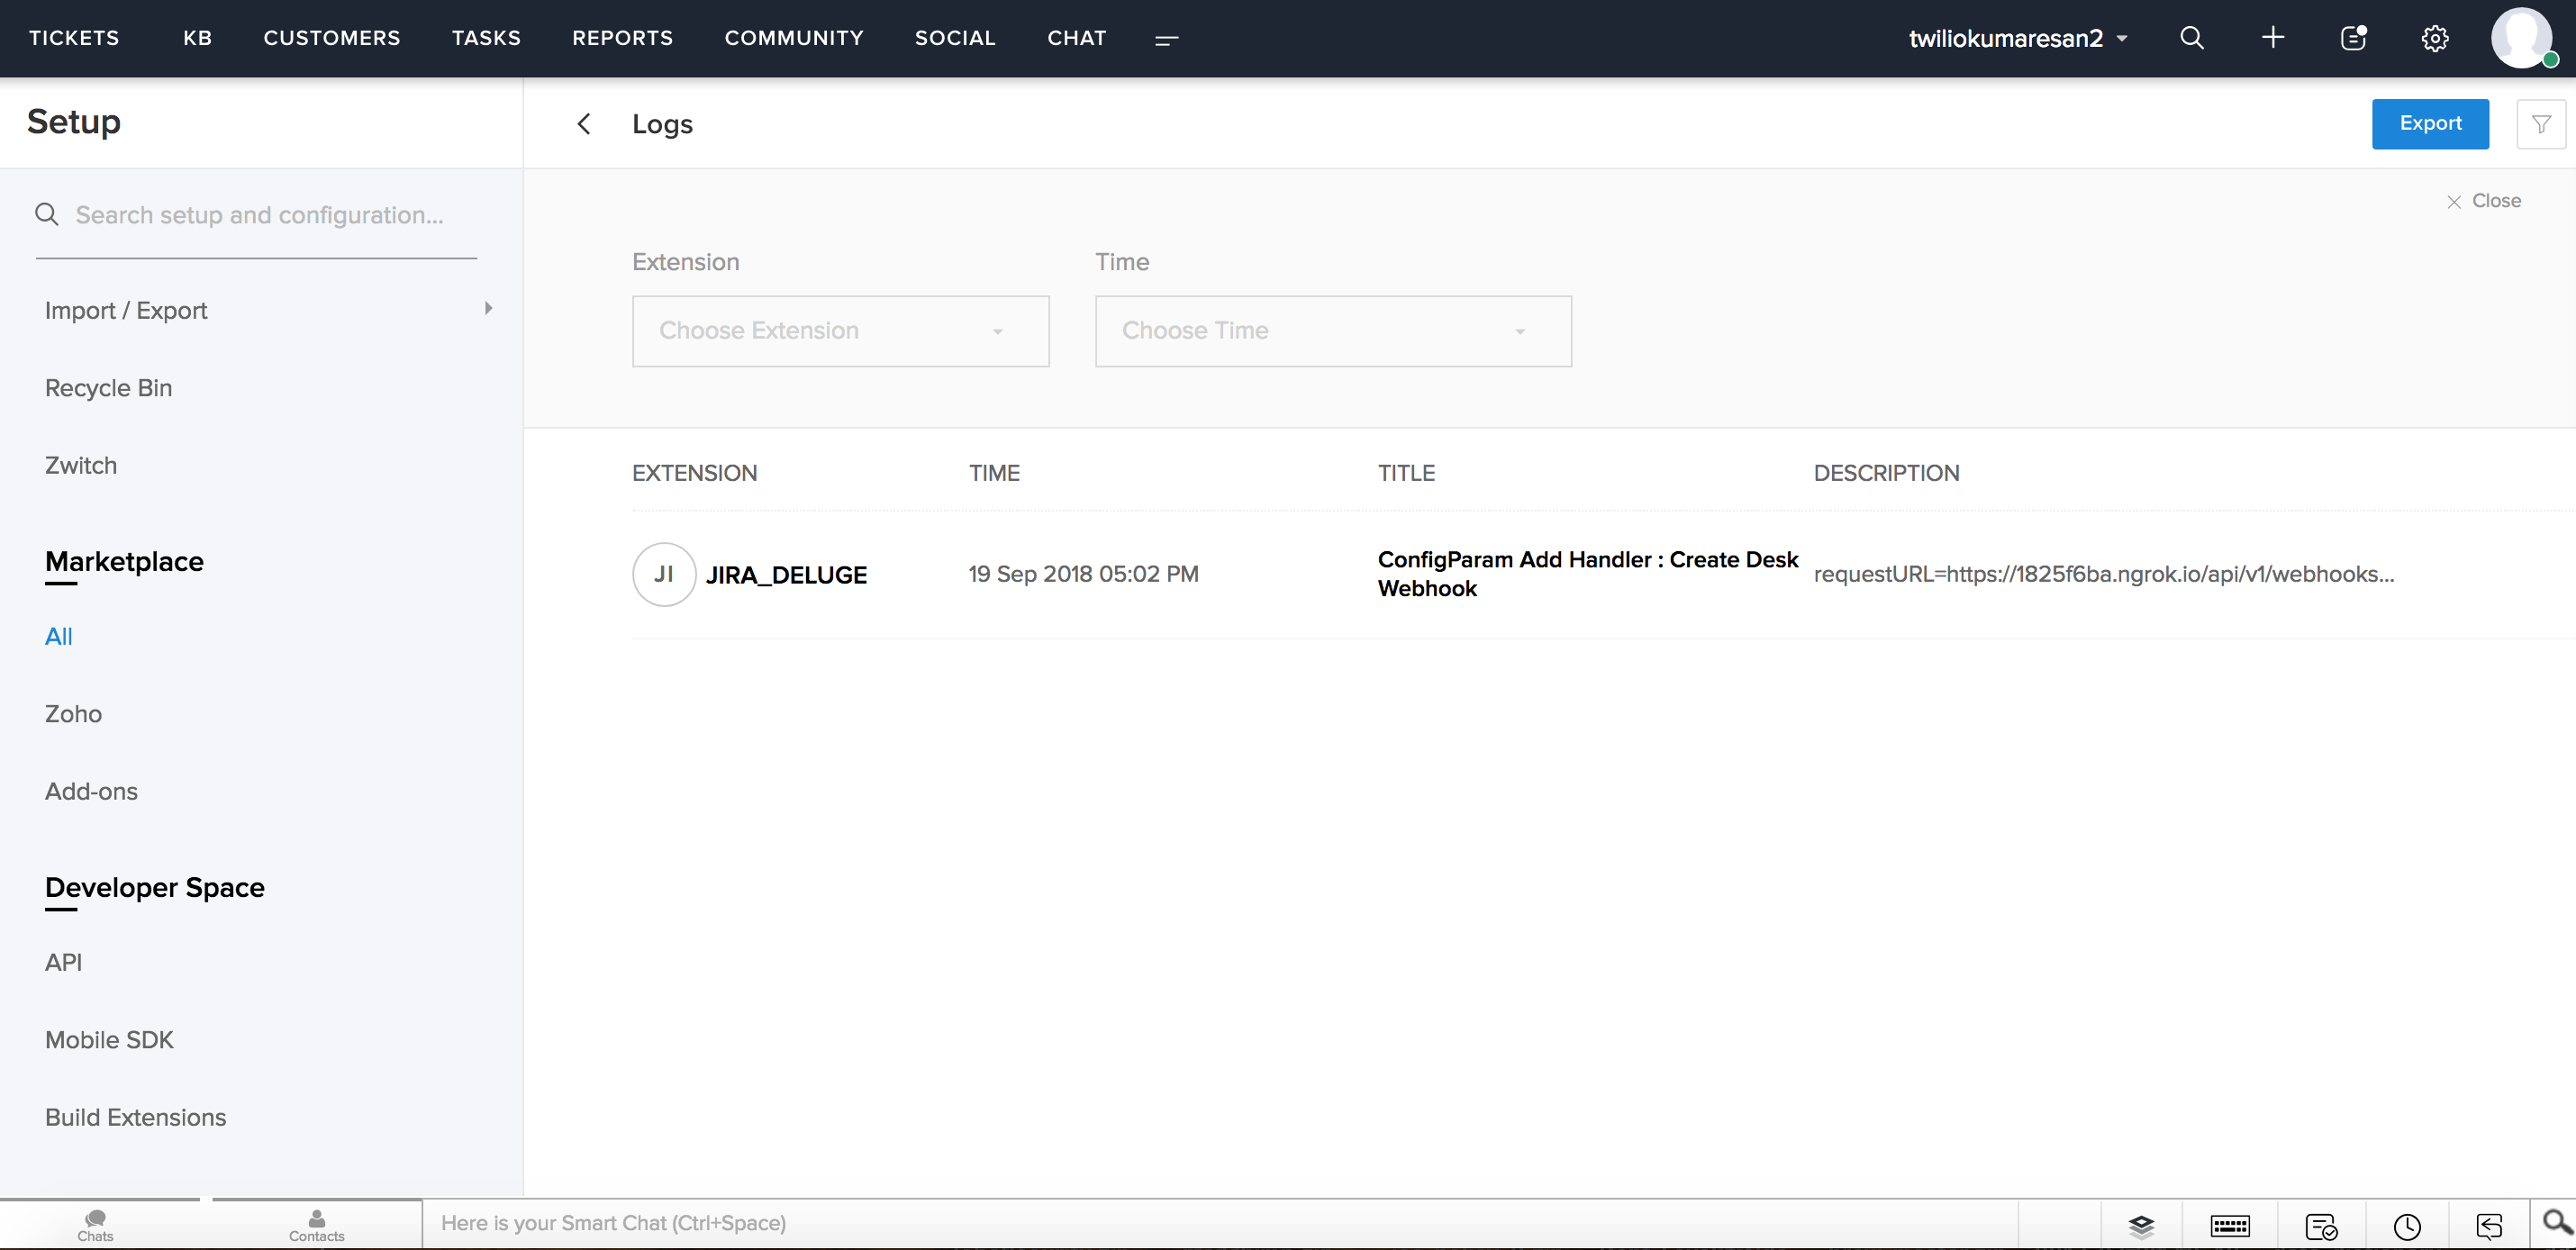
Sub Logs List: 
During development, logs are loaded in the developer's portal.
The param - reference is a random string that is used to group multiple logs. If multiple logs are grouped using reference, the first log will be the parent log and the rest will be sub logs. Developer can group a maximum of 10 logs using a reference. Means, a parent log can have 9 sub logs as maximum.
If the logs are created without reference, they are considered as parent logs.
The available APIs for Logs are,
- Add a Log
#EXTENSION_LOG_OBJECT
{
    "reference"      : "1d8bd6c8-5424-11e8-9c2d-fa7ae01bbebc",
    "description"    : "jira issue is created with id = 10223",
    "installationId" : "112343231355",
    "title"          : "created a jira issue"
}

#LOG_API_RESPONSE_OBJECT
{
    "parentLogId"     : "4000000022003",
    "extensionName"   : "Jira",
    "description"     : "jira issue is created with id = 10223",
    "logId"           : "4000000023001",
    "installationId"  : "112343231355",
    "title"           : "create jira issue",
    "logTime"         : "2018-05-10T07:33:13.000Z"
}
#EXTENSION_LOG_OBJECT
| Field | Type | Description |
|---|---|---|
| reference | string | a UUID string used to group multiple logs. Logs having the same reference key will be stored as a single log. |
| description | string | Log message. |
| installationId | long | The id of the installed extension |
| title | string | Title of the log |
Add a log:

Request Format:

URL             :     api/v1/extensionLogs
OAuth Scope     :     Desk.extensions.CREATE
RequestMethod   :     POST
RequestHeaders  :     orgId, Authorization
Content-Type    :     application/json
RequestBody     :     #EXTENSION_LOG_OBJECT.


Response Format:

ResponseCode    : 200
Content-Type    : application/json
Response        : #LOG_API_RESPONSE_OBJECT
Add a Log
Use this API to add extension logs.
My Custom Permission API
Use this API to retrive the permission details of logged in user.
    #MYPERMISSION_DATA_OBJECT
    {
        "apiName"            : "createResolution",
        "isEnabled"          : true

    }
#MYPERMISSION_DATA_OBJECT
Every permission object has the following properties.
| Field | Type | Description |
|---|---|---|
| apiName | string | apiName for the permission which can be used to lookup. |
| isEnabled | Boolean | Specifies whether permission is enabled or not. |
Get my custom permission:

Request Format:

URL             :     https://desk.zoho.com/api/v1/installedExtensions/{{installationId}}/myCustomPermissions
OAuth Scope     :     Desk.extensions.READ
RequestMethod   :     GET
RequestHeaders  :     orgId, Authorization


Response Format:

ResponseCode    : 200
Content-Type    : application/json
Response        : JSONObject with data property
                  containing the result as array of #MYPERMISSION_DATA_OBJECT.
Get permission data
Use this API to get permission details of logged in user.
Platform Event Callbacks
plugin-manifest.json
...
"callbackListener":{
        "onZohoAuthorise": "https://zohodeskapp.com/authorized.php",
        "onConfigParamAdd": "https://zohodeskapp.com/adjustfiler.php",
        "onUninstall": "https://zohodeskapp.com/revokeWebhook.php"
},
...
Marketplace supports callbacks for extension's events. Developer can subscribe to the supported events and when the extension event is triggered, callbacks are invoked.
Supported Platform Event Callback's are,
- onInstall
- onZohoAuthorise
- onTPAAuthorise
- onTPARevoke
- onUpdate
- onConfigParamAdd
- onConfigParamDelete
- onUninstall
Subscribing to the Events
Extension manifest's callbackListener property is used for declaring the callbacks for the extension's events. To subscribe to an event, specify the callback URL in the manifest for the callbackListener's respective event.
Event Callback Request

URL             :     manifest.callbackListener.{eventName}
RequestMethod   :     POST
RequestHeaders  :     HASH
Content-Type    :     application/json
RequestBody     :     JSONObject in #EVENT_CALLBACK_PAYLOAD_FORMAT format.


EVENT_CALLBACK_URL
https://zohodeskapp.com/authorized.php

EVENT_CALLBACK_HEADERS
{
    "HASH"            : "xxxxxxxxx"
}

EVENT_CALLBACK_PAYLOAD_FORMAT
{
    "event"            : "onZohoAuthorise",
    "orgId"            : 387238,
    "securityContext"  : "2398deio3qwnx3c9xwi3nc3njkh9jfico"
}
Event Callback Request
Whenever the extension event occurs, the callback URL is triggered with security parameters which can be used to call the authenticated APIs.
#EVENT_CALLBACK_PAYLOAD_FORMAT
| Field | Description |
|---|---|
| event | Name of the event triggered the callback. Possible values are,
|
| orgId | orgId of the user's organisation. |
| securityContext | securityContext which can be used for calling Desk's invoke API. |
Events
onInstall
onInstall will be triggered when the customer installs an extension. The developer can subscribe to the event with the URL and perform his logic.
Example usage
Creating a Third party resource once the customer installs the extension.
onZohoAuthorise
Once the end user installs the extension, he needs to authorize the desk & TPA (say jira). onZohoAuthorise will be triggered when the customer authorize the DESK. The developer can subscribe to the event with the URL and perform his logic.
Example usecase
Creating a Zoho Desk webhook once the desk authorization is completed.
onTPAAuthorise
The event will be triggered once the user authorize the Third party app.
Example usecase
Subscribing or creating a webhook in third party service.
onTPARevoke
The event will be triggered once the user revoke the Third party app authorization.
Example usecase
Revoking or deleting the added webhooks in the third party services.
onUpdate
The event will be triggered when the user upgrade the extension.
Example usecase
Adding or Updating config params.
onConfigParamAdd
The event will be triggered when the customer adds configuration params in the extension.
Example usecase
In jira extension, when customer adds configuration params such as domain, jiraAuthKey , developer shall create a jira webhook against the jira account.
onConfigParamDelete
The event will be triggered when the customer adds configuration params in the extension.
Example usecase
In jira extension, when customer deletes configuration params such as domain, jiraAuthKey , developer shall delete jira webhook in the jira account.
onUninstall
The event is triggered when customer uninstall the extension.
Example usecase
Operations to be performed during un-installation such as deleting webhooks.
Including Zoho Desk Resources
You can also include Zoho Desk resources, such as fields, webhooks, custom permissions, and channel integrations that can be used within the extension by defining in resources.json
For instance, if you want to create a field to be used in your extension, you have to use the organization fields API and manually associate the extension departments to the fields. This complicates the code logic of the extension and makes it difficult to manage it. You can avoid this complication by including Zoho Desk's resources in your extension's resources.json, thereby saving development time and effort substantially.
Among resources, fields are extension-specific, which means they are shared among multiple installation instances in the same portal. The other resources - webhooks, custom permissions, and channel integrations - are installation-specific, which means they are valid only in the particular installation instance.
resourceName
Each resource you create must have a unique identifier, which must be specified using the resourceName key. The resourceName(s) specified should be unique across the extension and this is validated before the extension is made available on the Marketplace.The resourceName you assign serves as the unique identifier across all organizations that install your extension.
To include a resource in your extension, you must mention its resourceName value in the resources.json file in the extension bundle.Currently, this key is supported only for fields and webhooks.
How it works?
When you define a resourceName in the resources.json file, the ID and apiName (if available) of the resource are also mapped to it automatically. After this, you can use the ID and/or apiName (if available) in APIs related to the resource, as required. For instance, if you are in need of apiName of a created field, you can use the resourceName value of the field to retrieve its apiName.
Retrieving the ID and apiName of a resource : Using the resourceName value, you can retrieve the ID and apiName of a resource in one of the following ways:
1. Through a merge field in the invoke API, or
2. Using the client SDK
1. Through a merge field in the invoke API
In this method, you must specify the resourceName value in the Desk's invoke API in the following format.
{{resourceType.resourceName.id}} or {{resourceType.resourceName.apiName}}.
Refer Specifying Placeholders in Invoke API.
Placeholders Details :
resourceType should be fields or webhook, based on your use case.
id returns the fieldId or webhookId, based on the value in resourceType.
apiName returns the apiName of the resource. it is applicable to fields.
2. Using the client SDK
In this method, you must use the Resource API for retrieving resource details.
Including Fields in Your Extension
                   resources.json
...
{
    "fields": [{
        "resourceName": "field1",
        "module": "tickets",
        "displayLabel": "Counter",
        "type": "Text"
        "maxLength": "100"
    }]
},
...
All fields that can be created using the Create field REST API are supported in extensions.
However, please keep in mind the following points:
1. resourceName key is mandatory in resources.json. Refer resourceName.
2. Make sure to not pass the layoutId key in the extension code because layoutId value is automatically chosen from the department associated with the extension. This means that the new field is mapped to the default layout configured for the department.
To include custom fields in your extension, add the code snippet to the resources.json file.
Any field you include in your extension will be added to the user's Zoho Desk portal on the very first installation of the extension. Subsequent installations map to the fields created already. The fields are deleted from the portal on the last uninstallation of the extension.
You can include a maximum of 10 custom fields in an extension.
Extension webhook
resources.json
...
"webhook":{
        "resourceName": "webhook1",
        "url": "https://demowebhook.com/callbackurl",
        "name": "Demo extension webhook",
        "description": "Demo extension webhook listen to ticket events",
        "subscriptions":{
          "Ticket_Add":null,
          "Ticket_Update":{
            "includePrevState":true
            },
          "Ticket_Thread_Add":null,
          "Ticket_Comment_Add":null,
          "Ticket_Comment_Update":null
       }
       "ignoreSourceId":"2df92c1a-973a-48f5-95b7-5792c68b9c36"
},
...


  Sample of Manifest entry with Zoho Authorization - using Connnections (Desk.events.ALL scope should be included in connection scope list)

  {
      ...,
      "zohoAuthorisation"  : {
          "type"                  : "connectors",
          "connectionLinkName"    : "test12345",
          "connectionName"        : "Webhook zoho desk",
          "serviceName"           : "Zoho Oauth",
          "userAccess"            : true,
          "scope"                 : ["Desk.events.ALL"],
          "isUserDefinedService"  : false
      },
      ...
  }
Marketplace supports Extension Webhook , which will allow a market place app to create extension specific desk webhooks. Extension webhook access is restricted to the extension app alone so that the normal user can't make any changes on these webhooks.
An extension developer can specify the webhook details in resources.json file. Extension webhooks will be created on authorising the extension and will be deleted on uninstalling the extension. We will apply department filtering on webhook events based on the departments choosed in the extesnion configuration.
On subscribing extension webhook we will append the orgId and securityContext to the webhook callback url. You can use this information to make API calls using Desk's invoke API.
Note:Extension webhook is allowed only for org based extensions
How to handle Authorisation
To use extension webhook you should include the webhook specific scope Desk.events.ALL in the authorisation scope list and the authorisation should be defined using the key zohoAuthorisationin plugin-manifest file.
#WEBHOOK_FIELDS
(Refer Webhook's Attribute section to know more about webhook fileds.We will apply department filtering on webhook events based on the departments choosed in the extesnion configuration. Kindly ignore the departmentIds key while giving the subscription details in resources.json file.)
| Field | Required | Type | Description |
|---|---|---|---|
| resourceName | yes | string | Unique indentifier for created webhook.Refer resourceName. |
| url | yes | string | Server endpoint to which event information must be sent. |
| name | yes | string | Name of the webhook. |
| description | no | string | Description of the webhook |
| ignoreSourceId | yes | string | Client ID exempted from triggering webhooks. The value of this attribute must always be a UUID. For information on how to use this attribute, refer to the Ignoring Webhook Events section. |
| subscriptions | yes | JSONObject | Events that you want to subscribe to. To know about the supported events and its payload refer Event Supported. |
Introduction
Channel Integration lets you to sync data such as tickets, threads and contacts between Zoho Desk and External Services. It also lets the agents to send replies to the queries on external platforms directly from the desk. Channel Integration can be achieved by ZohoDesk Marketplace app which must act as a bridge between External Service and the Zoho Desk.
Marketplace App with Channel Integration:
Marketplace App which supports the channel integration is responsible for
- Extracting data from external service and supply to the Desk.
- Two-way conversion - Converting the external data into desk compatible format & Converting desk reply into external service compatible format. Periodically supply updated data to the desk.
- Add or update new replies in the external service when a reply is pushed from the desk.
- Redirect to the external resource when requested by the desk.
Configuration
Requirements:
- Create a ZohoDesk Marketplace App with specifying channel properties as a resource in resources.json. resources.json should be created on app root folder.
- If your application has an authentication process, Register an OAuth Client in the External Service and get client_id and client_secret if needed.
- Create an endpoint to provide data from external service to desk during periodic requests produced by Desk.
- Create an endpoint which can receive new replies and send it to the External Service, when an agent reply is sent from the desk.
- Create an endpoint which can redirect the user to the respective External Service's entities such as tickets, threads and user profiles.
resources.json
...
"channel": {
    "resourceName"        :"youtube_app",
    "channelLogoPath"     : "/app/img/youtube_logo.png",
    "acceptAttachments"   : false,
    "updateRecords"       : true,
    "contentTypes"        : ["text/plain","text/html"],
    "redirectUrl"         : "https://zohodeskapp.example.com/youtube/handleRedirect",
    "includeQuotedMessage": false,
    "sync": {
        "push": "https://zohodeskapp.example.com/youtube/handlePull",
        "pull": "https://zohodeskapp.example.com/youtube/handlePush"
    }
}
...
resources.json
Channel configuration in the resources.json specifies the settings of the channel and the endpoints to pull or push the data for syncing. The params to be specified in the manifest are listed below.
#CHANNEL_INTEGRATION_CONFIGURATION
| Field | Required | Type | Description |
|---|---|---|---|
| sync | yes | JSONObject SYNC_OBJECT | Sync property of the channel defines the endpoints that are used for handling data sync. |
| channelLogoPath | yes | string (URL) | Relative Path of the channel's logo image in the app directory. Logo Specification: image-format : png, jpg max-size : 500kb |
| redirectUrl | string (URL) | URL which can redirect the user to the external resource of an entity. Refer Source Redirection | |
| updateRecords | boolean | Specifies whether the replies of this channel can be updated. Default : false | |
| acceptAttachments | boolean | Specifies whether attachments can be added to the replies of this channel. Default : false | |
| includeQuotedMessage | boolean | Specifies whether it is advisable to add the previous replies as quoted to the replies while replying for this channel. Default : false | |
| contentTypes | JSONArray <string> | Specifies the allowed/supported content types (MIME types) for the replies of this channel. Default : text/plain Allowed Values :
|
Sync Object
| Field | Required | Type | Description |
|---|---|---|---|
| push | yes | string (URL) | An endpoint to accept the replies from the desk by agent to process them and update in the external service. Refer Push Request from Desk |
| pull | string (URL) | An endpoint which supplies updated external data when desk periodically requests. Refer Pull Request from Desk |
Sync (Data Transfer)
Desk offers the below methods to perform two-way data syncing between Desk & External Service.
Overriding read-only fields
An important usage of the syncing via channel integration is, some of the read-only system-computed fields such as createdTime, modifiedTime and direction of the thread can be specified and overridden with the original value in the external service.
#SYNC_RESPONSE_OBJECT

{
    "channelState":"{\"my_pending_data\":\"298092,289782,2767\"}",
    "data":{
        "tickets": [
            #SYNC_TICKET_OBJECT,
            #SYNC_TICKET_OBJECT,
            #SYNC_TICKET_OBJECT,
            ... max 1000
        ],
        "threads": [
            #SYNC_THREAD_OBJECT,
            #SYNC_THREAD_OBJECT,
            #SYNC_THREAD_OBJECT,
            ... max 1000
        ]
    }
}
#SYNC_RESPONSE_OBJECT
Desk accepts data to be synced in the below format during pull-request from desk and push-data to desk operation.
| Field | Required | Type | Description |
|---|---|---|---|
| channelState | string | Value to be stored in the app's channelState configParam. Can be used to store the state of the channel sync progress. Refer Channel State | |
| data | yes | JSONObject <#SYNC_DATA_OBJECT> | Contains the data to be imported from the external service, converted to desk compatible format. Supported properties are,
|
#SYNC_DATA_OBJECT
Data format to be specified in the sync response's data property.
| Field | Required | Type | Description |
|---|---|---|---|
| tickets | JSONArray (1000) <SYNC_TICKET_OBJECT> | Array of ticket properties to be imported. | |
| threads | JSONArray (1000) <SYNC_THREAD_OBJECT> | Array of thread properties to be imported. |
Example of #SYNC_TICKET_OBJECT

{
  "data":{
    "tickets":[
      {
        "extId":"whatsapp:+919994411345",
        "subject":"How to reset the configuration?",
        "createdTime":"2018-09-10T13:34:26.000Z",
        "actor": #SYNC_ACTOR_OBJECT,
        "extra": #SYNC_EXTRA_OBJECT
      },
      ...
    ],
    "threads":[]
    }
}
Create or Update Tickets in Desk
Channel integration lets you create and update tickets for external resources. To import tickets to the desk, the details of the ticket has to be given in the #SYNC_TICKET_OBJECT format to the pull-request from desk & push-data to desk response's data.tickets property.
#SYNC_TICKET_OBJECT
| Field | Required | Type | Description |
|---|---|---|---|
| extId | yes | string | Unique ID of the ticket in the external service. Refer External ID |
| actor | yes | JSONObject #SYNC_ACTOR_OBJECT | Details about the author. |
| subject | yes | string (255) | Details about the author. |
| extra | yes | JSONObject #SYNC_EXTRA_OBJECT | Extra information about the ticket for the extension. |
| createdTime | Timestamp ISO Format | Created time of the ticket. | |
| string | EMail ID of the ticket. | ||
| phone | string | Phone number of the ticket. | |
| description | string | Description of the ticket. | |
| status | string | Status of the ticket. | |
| category | string | Ticket category. | |
| subCategory | string | Ticket sub category. | |
| resolution | string | Resolution of the ticket. | |
| dueDate | Timestamp ISO Format | Due date for resolving the ticket. | |
| priority | string | Priority of the ticket. | |
| classification | string | Classification of the ticket. | |
| customFields | JSONObject | Custom fields in the ticket. | |
| assigneeId | long | ID of the agent to whom the ticket is assigned. | |
| teamId | long | ID of the team assigned to resolve the ticket. | |
| productId | long | Product to which the ticket is mapped. |
External ID
ID of the resource on external service. External ID is the value which acts as a unique identifier of the resource on the external resource. The extId property plays a significant role in identifying the corresponding desk entity of the external resource during sync. If there is no entity found for the given extId of the channel in the desk, a new entity is created otherwise the existing entity which has the extId of the channel is updated. Allowed characters : A-Z a-z 0-9 @ $ & + : . { } ( ) # - _ +
For example
If we consider a Facebook post, every Facebook post has a unique ID (extId). When an external resource of Facebook service with extId "298393" is submitted to create a ticket in desk, if any existing ticket with Facebook channel and the same extId found then the ticket is updated with given data, otherwise a new ticket is created with facebook channel and given extId.
Adding External Attachments
If any external attachments need to be added to the tickets/threads, it has to be given as a JSON array of URLs which will be downloaded and attached to the tickets. The downloading of the attachments and adding to the tickets are asynchronous so that failure of attachments does not interrupt the process of adding/updating the tickets or threads.
For example
A facebook comment may contain images that you want to add as a thread.
Example of #SYNC_THREAD_OBJECT

{
  "data":{
    "threads":[
        {
            "extId":"SMa8974b1b935d957ffd9",
            "extParentId":"+123456789",
            "createdTime":"2018-09-10T11:54:03.000Z",
            "content":"What surprised",
            "direction":"in",
            "from":"+00032882",
            "to":["+00000273637"],
            "canReply":true,
            "extra": #SYNC_EXTRA_OBJECT,
            "actor": #SYNC_ACTOR_OBJECT
      },
      ...
    ],
    "tickets":[
      {
        "extId":"+123456789",
        "subject":"Knew he didnt know, i never knew a lot too!",
        "createdTime":"2018-09-07T14:02:27.000Z",
        "extra": #SYNC_EXTRA_OBJECT,
        "actor": #SYNC_ACTOR_OBJECT
      },
      ...
    ]
  }
}
Create or Update Threads in Desk
Channel integration lets you to add threads or replies from the external service. To import threads, provide the threads details in the #SYNC_THREAD_OBJECT format to the pull-request from desk & push-data to desk response's data.tickets property.
#SYNC_THREAD_OBJECT
| Field | Required | Type | Description |
|---|---|---|---|
| extId | yes | string | Unique ID of the thread in the external service. Refer External ID |
| extParentId | yes | string | Parent Entity's ID of the thread in the external service. Threads having the same parentId will be grouped under the same ticket which's extId is equal to the parentId. Refer External Parent ID |
| actor | yes | JSONObject #SYNC_ACTOR_OBJECT | Details about the author. |
| content | yes | string | Content of the thread. |
| direction | string | Specifies the direction of the thread. Supported Values are
| |
| extra | JSONObject #SYNC_EXTRA_OBJECT | Extra information about the thread for the extension. | |
| attachmentUrls | JSONArray <string> | Urls of the attachments to be added to the thread. Refer Adding External Attachments | |
| createdTime | Timestamp ISO Format | Created time of the thread. | |
| modifiedTime | Timestamp ISO Format | Modified time of the thread. | |
| canReply | boolean | Specifies whether replies can be added to this thread. | |
| contentType | string | Content-Type of the content of the thread. Supported Values are
| |
| from | string | From address of the thread. Default : Channel Name | |
| to | JSONArray <string> | Direct Recipients of the thread | |
| cc | JSONArray <string> | cc'ed Recipients of the thread | |
| bcc | JSONArray <string> | bcc'ed Recipients of the thread |
External Parent ID
This constraint is used for grouping multiple threads under a single ticket. extParentId contains the parent ID of the external resource in external service. For a thread external resource, extParentId is useful for identifying the correct ticket that the reply has to be added in the desk. Whenever an extParentId for a thread resource is given, a thread is added for the ticket that has the given extParentId as extId. If none of the ticket's extId matches the given extParentId then the thread will not be added.
For example
If we consider a facebook-post-comment, extParentId will be the ID of the facebook post. So that comments having the same externalaParentId will be grouped under the same ticket which has the extId.
SYNC ACTOR OBJECT Sample:

{
    "name"        :"John Snow",
    "displayName" :"John Snow @johnstark",
    "email"       :"john@gmail.com",
    "phone"       :"+918637436803",
    "extId"  :"39jdiwkndw3ninj",
    "photoURL"    :"https://example.com/profile/39jninj/photo.jpg"
}
#ACTOR_OBJECT
Actor object defines the properties of the author of the resource (i.e by whom this resource was made) on the external service.
| Field | Required | Type | Description |
|---|---|---|---|
| extId | yes | string | Unique ID of the person in the external service. Used for contacts profiles sync. |
| name | yes | string | Name of the person in the external service. |
| displayName | string | Name to display on contact's detail page. If not provided, defaults to name | |
| string | Email ID of the author on external service. If provided, this profile will be added under the contact who have the same Email Id. | ||
| phone | string | Phone number of the author on external service. If provided, this profile will be added under the contact who have the same Phone Number. | |
| photoURL | string <URL> | URL of the author's photo on external service. |
Providing app specific custom data for resources
Apps may need to store some extra details about a particular resource in addition to the desk supported standard fields of an entity.
Place holders can be given for any of the Extra-Object's properties which will be replaced with the original values of the respective entities. For supported placeholders refer Desk Resource Template Placeholders
Example
An app developer may need to store likes and share counts of a facebook post which needs to be added as a ticket or thread in the desk so that the app may show that information in the desk widgets or may need to show some actions prior to that information.
SYNC EXTRA OBJECT Sample:

{

    "key"            :"Post-{{ticket.id}}-Comment-{{thread.id}}-Details",
    "queriableValue" :"Post-{{ticket.id}}-Details"
    "value"          :{
                        "likes":3809,
                        "comments":453
                      }
}
#SYNC_EXTRA_OBJECT
| Field | Required | Type | Description |
|---|---|---|---|
| key | yes | string | Value for the key property can be a templated string with supported placeholders. Key for which the given value has to be stored in the DB storage. Refer extra.key |
| value | yes | JSONObject | Specifies the value that needs to be stored for the given template key. |
| queriableValue | yes | string | Specifies a common lookup group of the given key-value pair which will be useful for lookup from the database. |
Desk Resource Template Placeholders
Developer may not know the values of the resource but might want to make use of it to store some information in extension's DB storage. So developers can make use of place holders which are replaced with original values after updating the resource.
Format for the templated string with placeholder - {{PLACEHOLDER}}
Supported Placeholders are,
ticket.idthread.id
extra.key
Value for the key property is a string which can be a template key. Key for which the given value has to be stored in the DB storage.
For Example,
When a like count of a post has to be stored in the extension's db storage so that an app can re-access them, the external resource response's extra.key can be specified as
facebook_comment_{{thread.id}}_data.
When the external resource is processed and generated as a desk thread with threadId 2980928, the key will be replaced as facebook_comment_2980928_data and the value given in the extra.value will be stored for the key facebook_comment_2980928_data in that app's DB storage. Later the app can lookup the DB storage from the widget with the key facebook_comment_2980928_data to get the value of the likes count.
PULL REQUEST FORMAT:

URL             :     channel.sync.pull
RequestMethod   :     POST
QueryParams     :     securityContext, orgId
Content-Type    :     application/json
RequestBody     :     All the non-secure configParams (CONFIG_PARAMS_OBJECT).


CONFIG_PARAMS_OBJECT:
{
    "channelState" : "{\"my_last_fetch_time\":\"Jan 11\"}",
    "myConfigParam1" : "My value for configParam",
    "myConfigParam2" : "My value for configParam2",
    "myConfigParam3" : "My value for configParam3"
}


PULL REQUEST RESPONSE FORMAT:

ResponseCode    : 200
Content-Type    : application/json
Response        : Updated Data to be added in desk in the #SYNC_RESPONSE_OBJECT format.
Pull Request from Desk
Desk periodically invokes a request to the endpoint specified in the
extension manifest's channel.sync.pull property. Pull requests are made every 4 minutes from the desk. You can send the new/ updated data of tickets and threads that needs to be updated in desk in the specified #SYNC_RESPONSE_OBJECT format.
*Tip : You might need to call the external service's API to get new data which has to be sent to the desk. Call the external service's API through Desk Invoke API so that authentications are handled automatically (e.g Using connections) .
*Tip : You might want to keep track of the syncing status of the data you transferred (e.g number of tickets remaining to be sync). Make use of channelState property, to store the tracking data during pull, push & import requests.
PUSH REQUEST FORMAT:

URL             :     channel.sync.push
RequestMethod   :     POST
QueryParams     :     securityContext, orgId
Content-Type    :     application/json
RequestBody     :     JSONObject containing reply & configParams in #PUSH_REPLY_PAYLOAD_FORMAT format.


PUSH REQUEST RESPONSE FORMAT:

ResponseCode    : 200
Content-Type    : application/json
Response        : Data to be updated in desk in #PUSH_REPLY_RESPONSE_OBJECT format.
Push Reply from Desk
When an agent replies from the desk for a ticket or thread created by channel integration, the reply is pushed to the Resources.channel.sync.push endpoint of the app which needs to be delivered to the external service so that the reply will be processed further. The push endpoint given in the manifest is responsible for handling the desk reply, delivering it to the external service and submit the status & response of the processed reply to the desk back.
The Progress of an agent reply from the desk for a ticket or thread created via channel integration are,
- Agent reply is added in the desk with status PENDING.
- Reply is pushed to the push_endpoint of the app.
*Tip : To send the received agent reply to other service, you may need to call other service's APIs. Use Desk Invoke API to call the external service's API, so that authentications are handled automatically (e.g Using connections) .
Sample of #PUSH_REPLY_PAYLOAD_FORMAT:

    {
        "configParams" :{
            "channelState" : "{\"my_last_fetch_time\":\"Jan 11\"}",
            "myConfigParam1" : "My value for configParam",
            "myConfigParam2" : "My value for configParam2",
            "myConfigParam3" : "My value for configParam3"
        },
        "resource":{
            "extParentId"             : "1276576533",
            "replyToExtId"            : "3298dniuniu3",
            "id"                      : 287189379819,
            "content"                 : "Hi customer, thanks for writing to us",
            "summary"                 : "Hi customer, thanks for writing to us",
            "contentType"             : "text/plain",
            "hasAttach"               : false,
            "attachments"             : [],
            "author"                  : {
                "name"      : "John Snow",
                "email"     : "john.snow@example.com",
                "type"      : "AGENT",
                "photoURL"  : "https://desk.zoho.com/api/v1/agents/387829/photo?orgId=28732"
             }
        }
    }
#PUSH_REPLY_PAYLOAD_FORMAT
| Field | Type | Description |
|---|---|---|
| configParams | JSONObject CONFIG_PARAMS_OBJECT | All the non-secure config params belongs to the app. |
| resource | JSONObject DESK_REPLY_THREAD_OBJECT | Details of the Agent's reply to be sent to the external service. |
#DESK_REPLY_THREAD_OBJECT
| Field | Type | Description |
|---|---|---|
| extParentId | string | External Id of the thread's ticket. (i.e) Parent Entity's ID of the thread in the external service. |
| replyToExtId | string | Add the reply to this message in the External Service. External Id of the thread to which the reply has to be added. |
| id | long | ID of the thread. |
| author | JSONObject | Details about the author with the following properties.
|
| content | string | Content of the thread. |
| contentType | string | Content-Type of the content of the thread. Possible Values are
|
| summary | string | Summary of the thread. |
| hasAttach | boolean | Specifies whether thread has attachments. |
| attachments | JSONArray <JSONObject> | Attachments in the thread. Each attachment object contains properties:
|
| attachmentCount | integer | Count of the attachments |
| createdTime | Timestamp ISO Format | URL to get the full content of the thread. |
#PUSH_REPLY_RESPONSE_OBJECT
| Field | Required | Type | Description |
|---|---|---|---|
| extId | yes | string | Unique ID of the thread added in the external service. |
| extra | JSONObject #SYNC_EXTRA_OBJECT | Extra information about the thread for the extension. | |
| canReply | boolean | Specifies whether replies can be added to this thread. | |
| from | string | From address of the thread. Default : Channel Name | |
| to | JSONArray <string> | Direct Recipients of the thread |
Push-Data to Desk
PUSH REQUEST FORMAT:

API Endpoint    :     /api/v1/channels/{{installationId}}/import
RequestMethod   :     POST
Content-Type    :     application/json
RequestBody     :     JSONObject in the #SYNC_RESPONSE_OBJECT format.
Whenever you need to manually push tickets & threads to the desk, you can use the following API. This API expects the payload in the #SYNC_RESPONSE_OBJECT format.
To call desk's "channels/import" API, orgId and securityContext params are mandatory. You may obtain these details during any of the extension event callbacks & store them so that you can reuse them during the channels/import API call.
*Tip : Call the channels/import API through Desk Invoke API so that authentications are handled automatically (e.g Using connections) .
For Example:
You may have subscribed to the events such as onConfigParamAdd, onDeskAuthorize or onTPAAuthorise in the manifest's callBacks. Which will make request to the callback URL mentioned in the manifest with the securityContext & orgId during the respective events. During this event, you may subscribe to another service. The given orgId, securityContext can be stored or can be added in the subscription URL (e.g queryParams ) so that whenever the external service requests you with respect to the subscription, you can obtain the orgId and the securityContext from the URL and use it to call the desk "channels/import" API.
Channel State
About
Channel State represents the channelState non-secure configParam which is automatically added for the channel type of marketplace apps during installation. Channel State can be used as the current status of the channel's syncing process such as last fetched item, remaining API limit in the external service, pending or next set of entities to be fetched and so on.
The value of the channelState param can be any string which will be updated in the app's channelState configParam during the pull & push requests. If you don't want to update the channelState of the app in ZohoDesk, then exclude the channelState key while sending the sync request response.
Source Redirection:

URL             :     channel.redirectUrl
RequestMethod   :     GET
QueryParams     :     entity, id, parentId
Source Redirection
The redirectUrl endpoint specified in the Manifest's channel param is responsible for redirecting the user to the external resource of an entity when requested by the desk.
Source Redirection Query Params
| Field | Description |
|---|---|
| entity | Type of the entity to be redirected. Supported Values are
|
| id | External Id of the entity in the external service. |
| parentId | External Parent Id of the entity. In case of threads, parentId contains the extId of the ticket. |
For example:
When an agent views a ticket, a hyperlink to the external resource will be shown to the agent. On clicking the hyperlink, the agent is redirected the redirectUrl in the manifest with the extId of the resource and the type of the entity as queryParams of the Url. The redirect URL should parse the entity type and id of the resource and redirect the user to the external service which contains the resource.
Extension Custom Actions
Introduction
How to use Custom Actions
How to create Custom Action
Configurations
Custom Permissions
Introduction
resources.json
...
{
    "permissions": [{
        "apiName": "createResolution",
        "displayName": "create Resolution test",
        "description": "Able to create the task",
        "defaultState": true
    }]
},
...
Custom permissions are new profile permissions that you can provide in the extension you develop. These permissions will be displayed under the PERMISSIONS tab on the extension detail page. Only the admins of a Zoho Desk portal will be able to configure these permissions.
How to define the custom permissions for the extension?
An extension developer can specify the Permissions details in resources.json file.
How does it work?
Custom permissions will be added when an admin installs the extension and deleted when they uninstall the extension. The permissions are specific to each installation of an extension. Therefore, admins can configure different permissions for an extension by installing it multiple times.
Admin configuration Permission Tab: 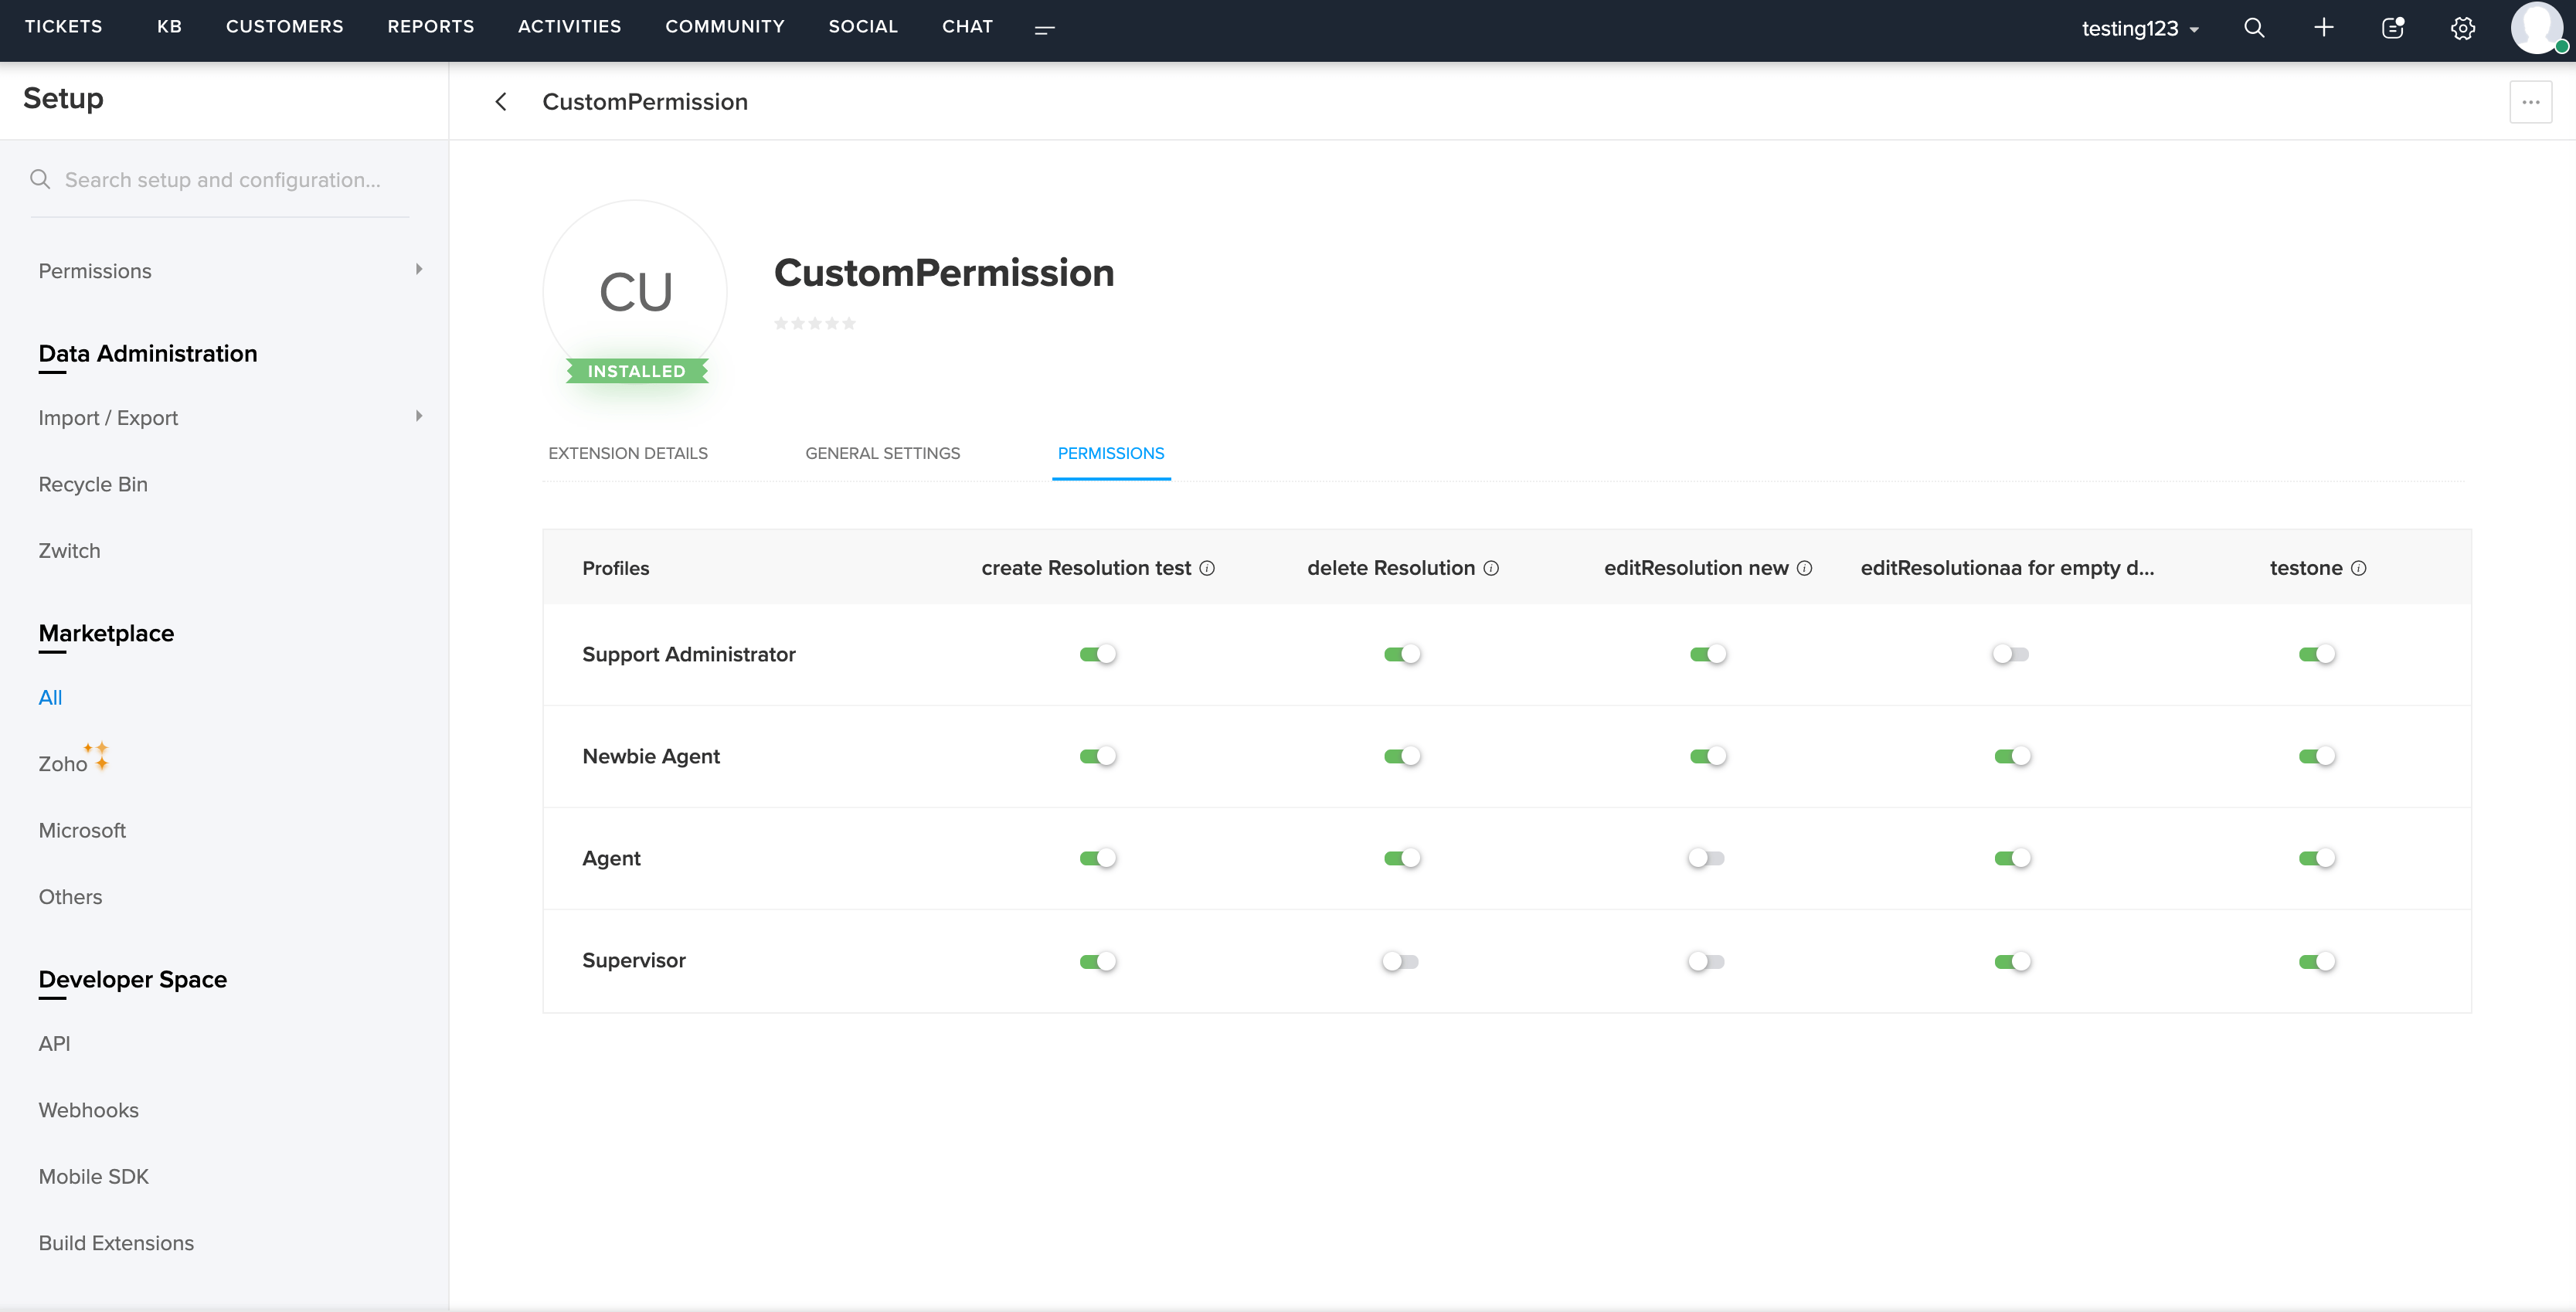
You can fetch the details of custom permissions in two ways:
1. Through the My Custom Permissions API within the extension, or
2. Through the My Custom Permissions REST API.
#CUSTOM_PERMISSION_FIELDS
| Field | Required | Type | Description |
|---|---|---|---|
| apiName | yes | string | apiName is the unique name given to each permission.apiName should be unique across each extension.apiName can have AlphaNumeric and underscore. |
| displayName | yes | string | Name of the custom permission.This name will be displayed in "PERMISSIONS" tab.AlphaNumeric Values are allowed here. |
| description | no | string | Description of the custom permission. |
| defaultState | yes | string | Default state of custom permission. It can have boolean value. Either true or false(Case sensitive). |