How to configure spam control lists in Zoho Mail Admin Console
Zoho Mail's Spam Control section in the Admin Console lets admins define organization-wide rules for managing incoming emails by maintaining Allowed, Blocked, Trusted, and Rejected lists. These anti-spam controls can be applied to specific email addresses, domains, IP addresses, and even top-level domains (TLDs), giving admins detailed control over what reaches users' inboxes. Admins can also filter emails based on language and country of origin using the Internationalized Spam settings.
Explore in detail about Zoho Mail's Data and threat protection mechanisms.
What is the Allowed List in Zoho Mail and how does it work?
As an administrator, if you do not want certain emails to be marked as spam, you can add the domain, specific email addresses or IP addresses to the Allowed List. However, in case there is an SPF failure, and there is no action set for SPF failure, the emails from allowed list domains or addresses will not be marked as 'Not Spam'. In the case of SPF failure, the email may be a possible spoofed email, and hence the email address/ IP address/ domain added to the allowed list will not be effective in that case.
Follow the below instructions to navigate to the Allowed List section:
- Login to the Zoho Mail Admin Console.
- Go to the Security & Compliance menu.
- Select Spam Control, and select Allowed List. Select the preferred tab to configure allowed lists:
Add email addresses to the Allowed List in Zoho Mail
You can add specific sender email addresses to the Allowed List to ensure their emails bypass spam checks and are delivered directly to users' inboxes. Multiple email addresses can be added at once using comma separation, or imported in bulk using a CSV file.
Follow these steps in the Emails tab to add email addresses:
- Navigate to the Emails tab and click on Add to enter the email addresses.
- You can add multiple email addresses by separating them with commas.
- Finally, click Add.
- Alternatively, you can also import email addresses by clicking on Import.
- Click Browse Files, and select the file containing the email addresses.
- The email addresses in the CSV file will get added to the allowed list.
Add domains to the Allowed List in Zoho Mail
Adding a domain to the Allowed List ensures that all emails originating from that domain skip spam processing and are delivered to users' inboxes. You can add multiple domains at once using comma separation or import them in bulk via CSV file.
Follow the steps to add domain to Allowed List:
- Navigate to the Domains tab and click on Add.
- You can add multiple domains by separating them with commas.
- Finally, click Add.
- Alternatively, you can also import domains by clicking on Import.
- Click Browse Files, and select the file containing the domain names.
- The domain names in the CSV file will get added to the allowed list.
Add IP Addresses to the Allowed List in Zoho Mail
The Allowed List in Zoho Mail lets admins add specific IP addresses or IP address ranges to ensure emails from those sources are not flagged as spam. When adding an IP range, you can use the IP mask (subnet) option to define how many addresses fall within the allowed range.
To allow emails from a certain IP address range, select the IP Addresses tab and follow these steps:
- Click on Add to enter the IP addresses.
- Enter the IP addresses and select the IP mask, depending on the IP range that you'd like to add.
- Finally, click Add.
- Alternatively, you can also import IP addresses by clicking on Import.
- Click Browse Files, and select the file containing the IP addresses.
- The IP addresses in the CSV file will get added to the allowed list.
What is the Blocked List in Zoho Mail and how does it work?
The Blocked List in Zoho Mail's Spam Control settings allows admins to block incoming emails from specific email addresses, domains, IP addresses, TLDs, or recipient addresses at the organization level. Unlike the Allowed List, the Blocked List also lets admins define what happens to blocked emails, they can be marked as spam, moved to quarantine, rejected with a bounce message, or rejected silently without notifying the sender.
- Mark as spam - The email is delivered to the recipient’s Spam folder.
- Move to quarantine - The email is quarantined and must be reviewed and processed by an admin.
- Reject email - The email is permanently rejected, and a bounce message is sent to the sender.
- Reject without bounce - The email is permanently rejected, with no bounce message sent to the sender.
Note:
"Reject without bounce" option is applicable only to the Blocked Emails and Blocked Domains.
Follow the below instructions to access the Blocked List for your organization:
- Log in to the Zoho Mail Admin Console and select Security & Compliance on the left menu.
- Navigate to Spam Control, and select Blocked List. Select the preferred tab to configure the blocked list:
Add email addresses to the Blocked List in Zoho Mail
You can block emails from specific senders by adding their email addresses to the Blocked List in Zoho Mail's Spam Control settings. When adding addresses, you also choose the delivery action, and add multiple addresses at once or import via CSV.
To add specific email addresses to the blocked list, follow these steps:
- Click Add in the Emails tab and add one or more email addresses by separating them with commas.
- Select the action to be taken on these emails, then click Add.
- Alternatively, you can also import email addresses by clicking on Import. Select the action to be taken on these emails.
- Click Browse Files, and select the file containing the email addresses. The email addresses in the CSV file will get added to the blocked list.
Block emails from specific domains in Zoho Mail
Adding a domain to the Blocked List ensures that all emails from that domain, including its subdomains, are processed according to the action set, even if the domain passes the SPF test. You can add multiple domains at once using comma separation or import them in bulk via CSV file.
To add one or more domains to the blocked list, select the Domains tab and follow these steps:
- Click Add to enter the domain names. You can add multiple domains by separating them with commas.
- Select the action to be taken on these emails, then click Add.
- Alternatively, you can also import domains by clicking on Import. Select the action to be taken on these emails.
- Click Browse Files, and select the file containing the domain names. The domain names in the CSV file will get added to the blocked list.
Block emails from specific IP Addresses in Zoho Mail
The Blocked List in Zoho Mail lets admins block emails from a specific IP address or a range of IP addresses using the IP mask (subnet) option. As with other blocked list entries, you must select a delivery action when adding IP addresses.
To block emails from a certain IP address range, select the IP Addresses tab and follow the below instructions:
- Click on Add to enter the IP addresses.
- Enter the IP addresses and select the IP mask, depending on the IP range that you'd like to add. Click here to know more about IP masks.
- Select the action to be taken on these emails, then click Add.
- Alternatively, you can also import IP addresses by clicking on Import. Select the action to be taken on these emails.
- Click Browse Files, and select the file containing the IP addresses.
- The IP addresses in the CSV file will get added to the blocked list.
What is a blocked TLD list in Zoho Mail and how do you configure it?
A Top-Level Domain (TLD) is the last segment of a domain name. For example, .com, .net, or .xyz. Zoho Mail lets admins block all emails originating from domains with a specific TLD, which is useful for filtering out spam from high-risk or irrelevant domain extensions at the organization level.
To block a TLD, select the TLDs tab and follow these steps:
- Click on Add to enter the TLD. You can add multiple TLDs by separating them with commas.
- Select the action to be taken on these emails, then click Add.
- Alternatively, you can also import TLDs by clicking on Import. Select the action to be taken on these emails.
- Click Browse Files, and select the file containing the TLDs. The TLDs in the CSV file will get added to the blocked list.
Block emails sent to specific recipients in Zoho Mail
The Blocked Recipient List in Zoho Mail lets admins block all incoming emails addressed to specific users within the organization, regardless of who the sender is. This is useful for deactivated accounts or role-based addresses that should no longer receive external email.
To block emails addressed to certain members of your organization, select the Recipient Emails tab and follow these steps:
- Click on Add to enter the email address.
- You can add multiple emails by separating them with commas.
- Select the action to be taken on these emails, then click Add.
- Alternatively, you can also import recipient email addresses by clicking on Import. Select the action to be taken on these emails.
- Click Browse Files, and select the file containing the email addresses. The email addresses in the CSV file will get added to the blocked list.
- If you are entering the entire IP address that denotes a specific machine, you will have to select the subnet as 32 from the dropdown list.
- If you mention just the network to denote all the computers that come under that network, enter the network part of the IP address and select the subnet depending on the number of bits that you have used in the IP address.
- For example, if you are entering 172.20.0.0 and select 30 from the dropdown list, it will refer to IP addresses in the range 172.20.0.0 - 172.20.0.3. This will denote a total of 4 IP addresses.
- This can be derived by calculating 2(32-n). In this case, the value of n will be 30, and by performing the calculation we derive at 22, which will be 4. Hence the 4 IP addresses will be added to the respective List.
- Similarly, you can add a consecutive range of IP addresses by selecting the relevant value from the dropdown list.
Note:
- You will not be allowed to include your domain's TLD in your organization's Blocked List.
- The IP Address options for the allowed list and the blocked list will not be available for organizations in the free plan.
- When you add a domain to the blocked list, any emails from its associated sub-domains will be blocked too.
What are Blocked Patterns in Zoho Mail and how do they work?
Blocked Patterns in Zoho Mail Admin Console allow admins to define plain text or regular expression (regex) patterns to automatically detect and filter spam emails based on the sender address, subject line, or email body content. Each pattern can be assigned an expiry date, after which it becomes inactive. Admins can then review and delete expired patterns to keep the blocked list updated. This is particularly useful for blocking recurring spam that shares a common pattern, such as a specific phrase, domain format, or sender structure, rather than a fixed email address or domain.
The patterns that can be added are:
Block emails based on Sender Patterns in Zoho Mail
The Sender Pattern feature lets admins add plain text or regular expression patterns that match against the sender's email address. Any email whose sender matches the pattern is automatically flagged as spam or moved to quarantine. You can also set an expiry date for each pattern, after which it will no longer be applied.
To configure a pattern click on Add and select either Plain text or Regular expression. You can set an expiry date for the pertaining pattern. Now, click Add to save the pattern.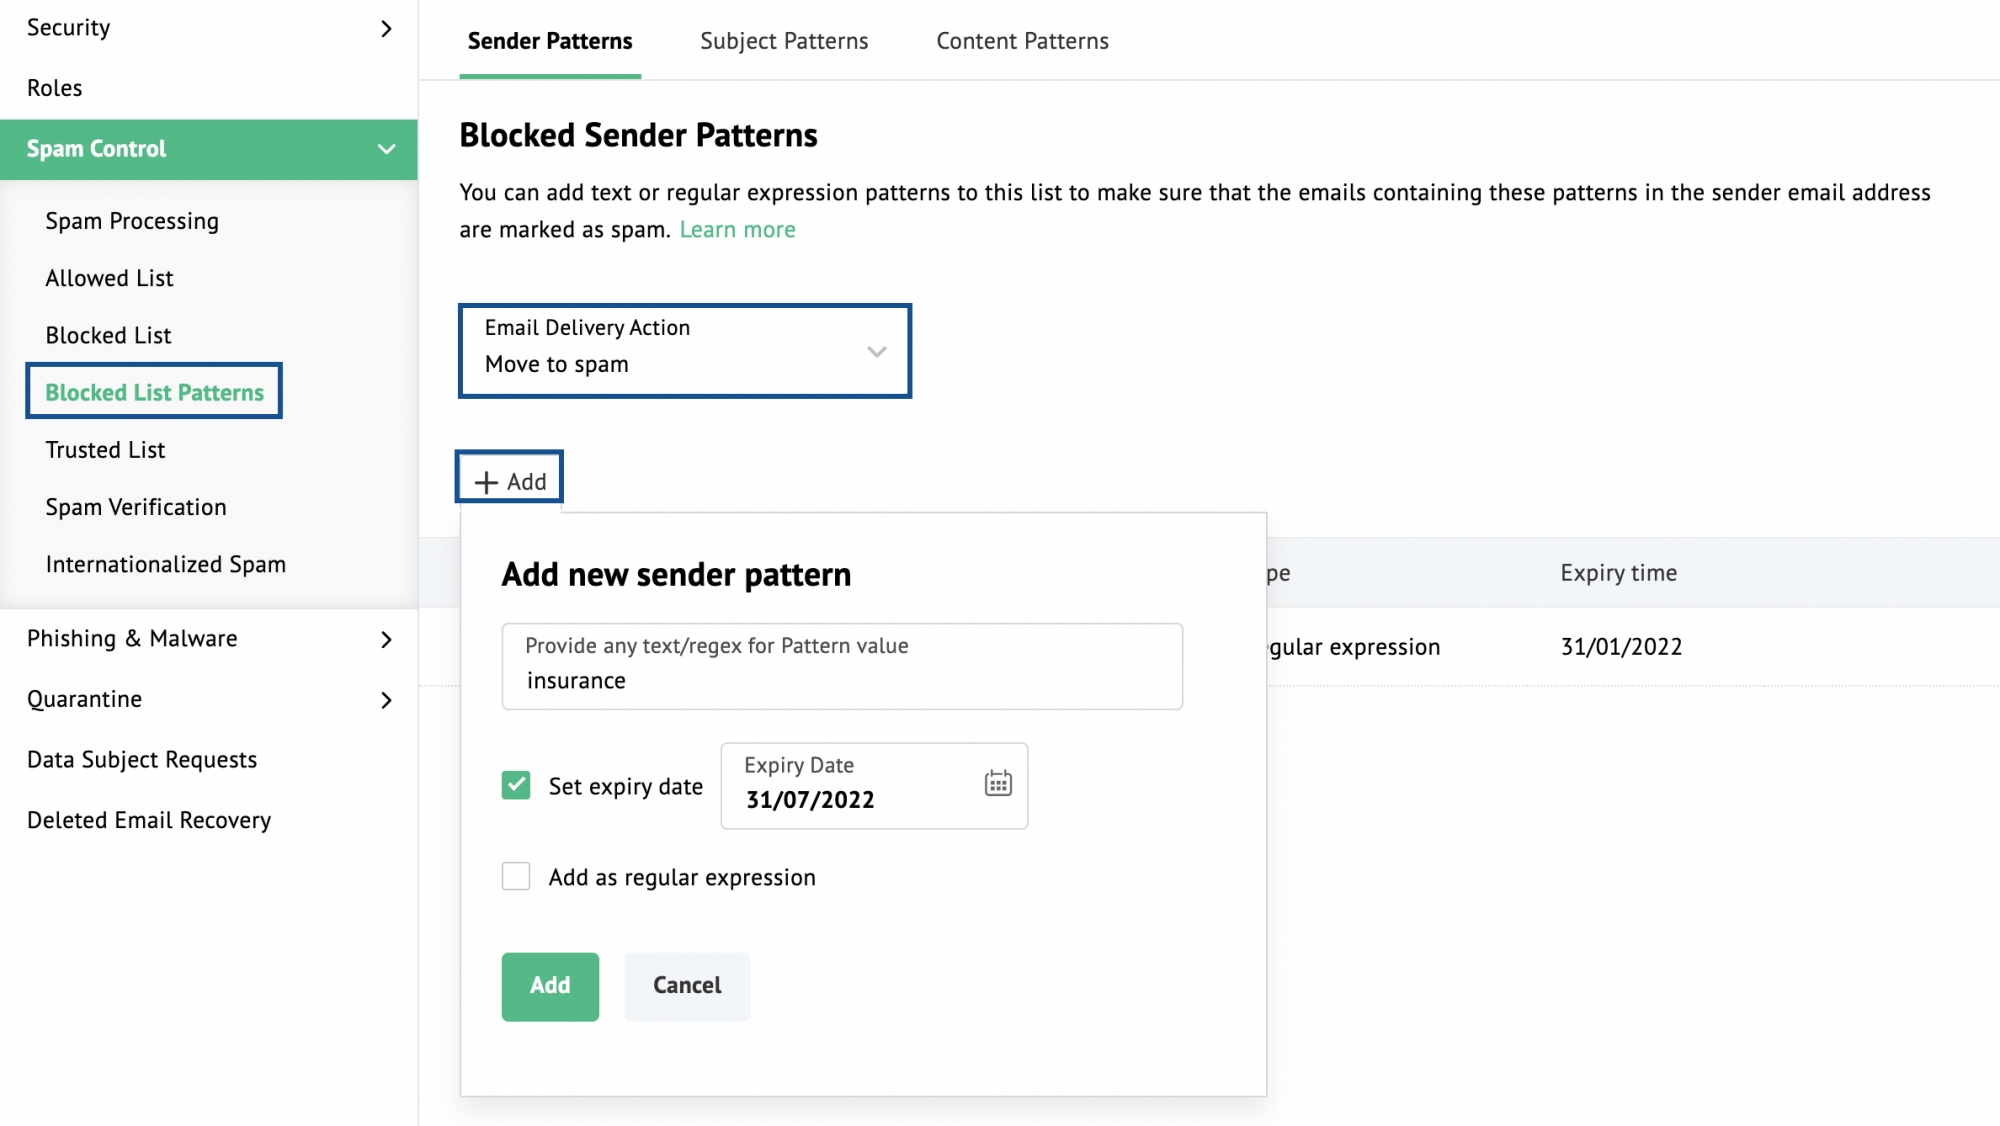
You can also Edit/ Delete a pattern using the icons provided over the saved patterns.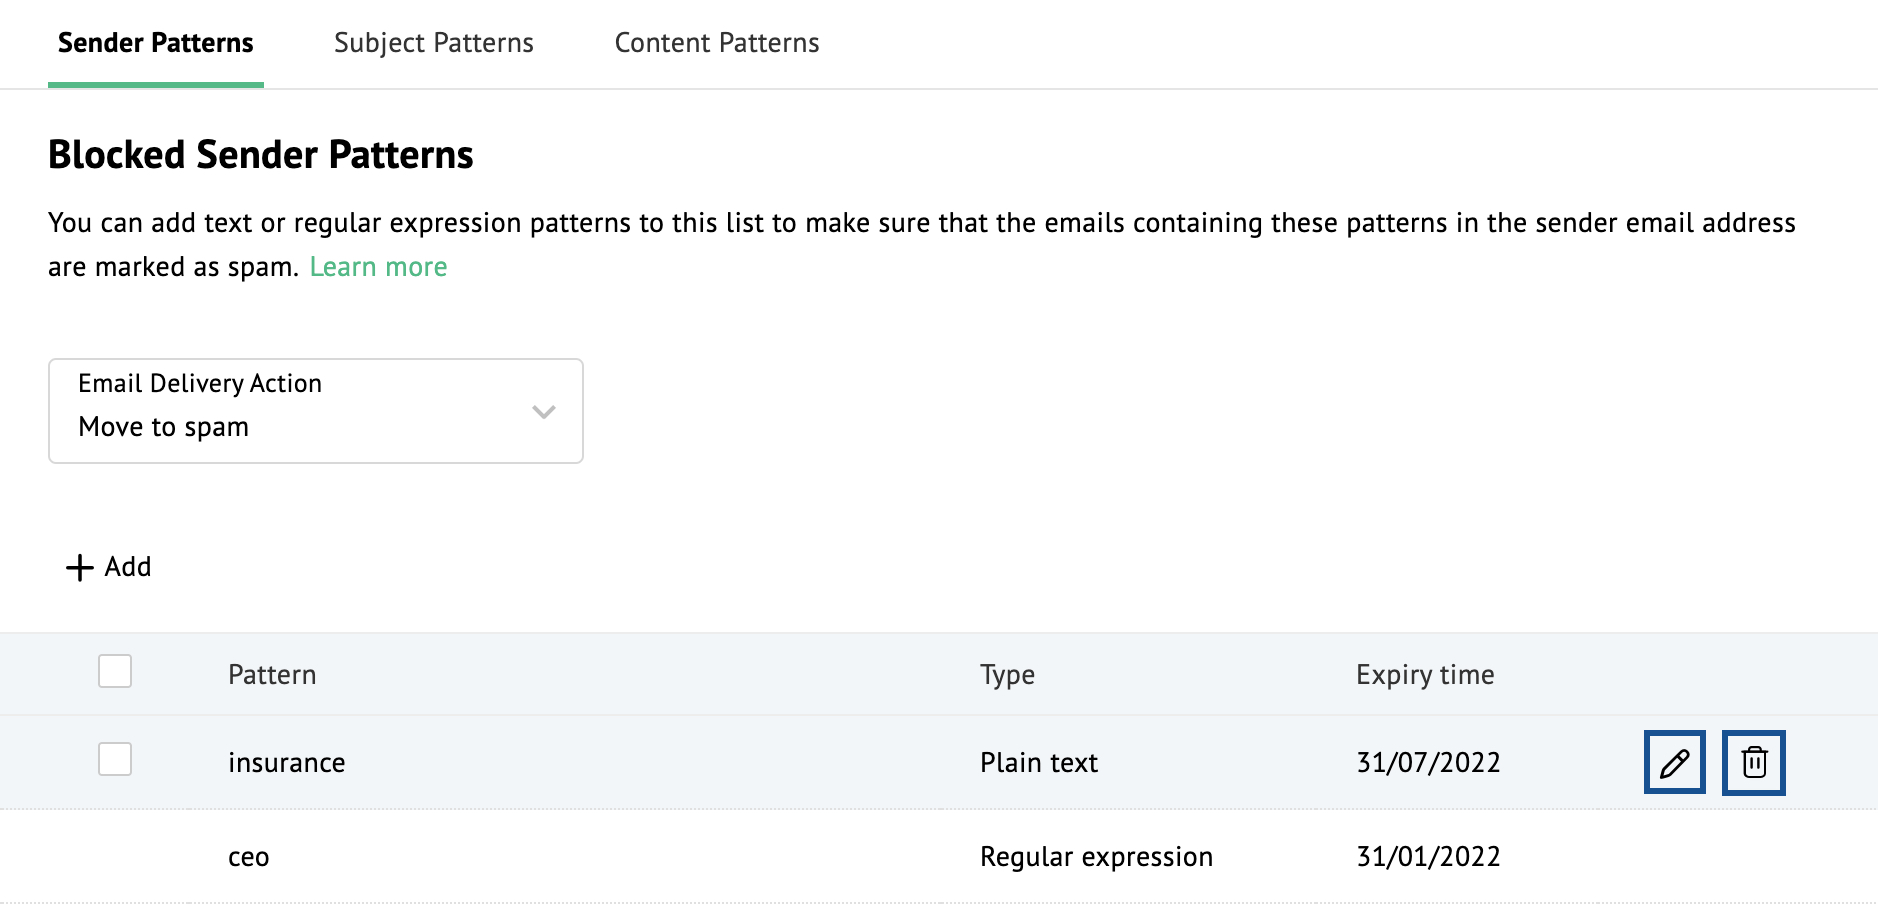
Block emails based on Subject Patterns in Zoho Mail
The Subject Pattern feature in Zoho Mail's Spam Control lets admins flag emails as spam based on keywords or regex patterns found in the email subject line. Admins can set Email delivery action to None, Move to spam or Move to quarantine.
To configure a pattern click on Add and select either Plain text or Regular expression. You can set an expiry date for the pertaining pattern. Now, click Add to save the pattern.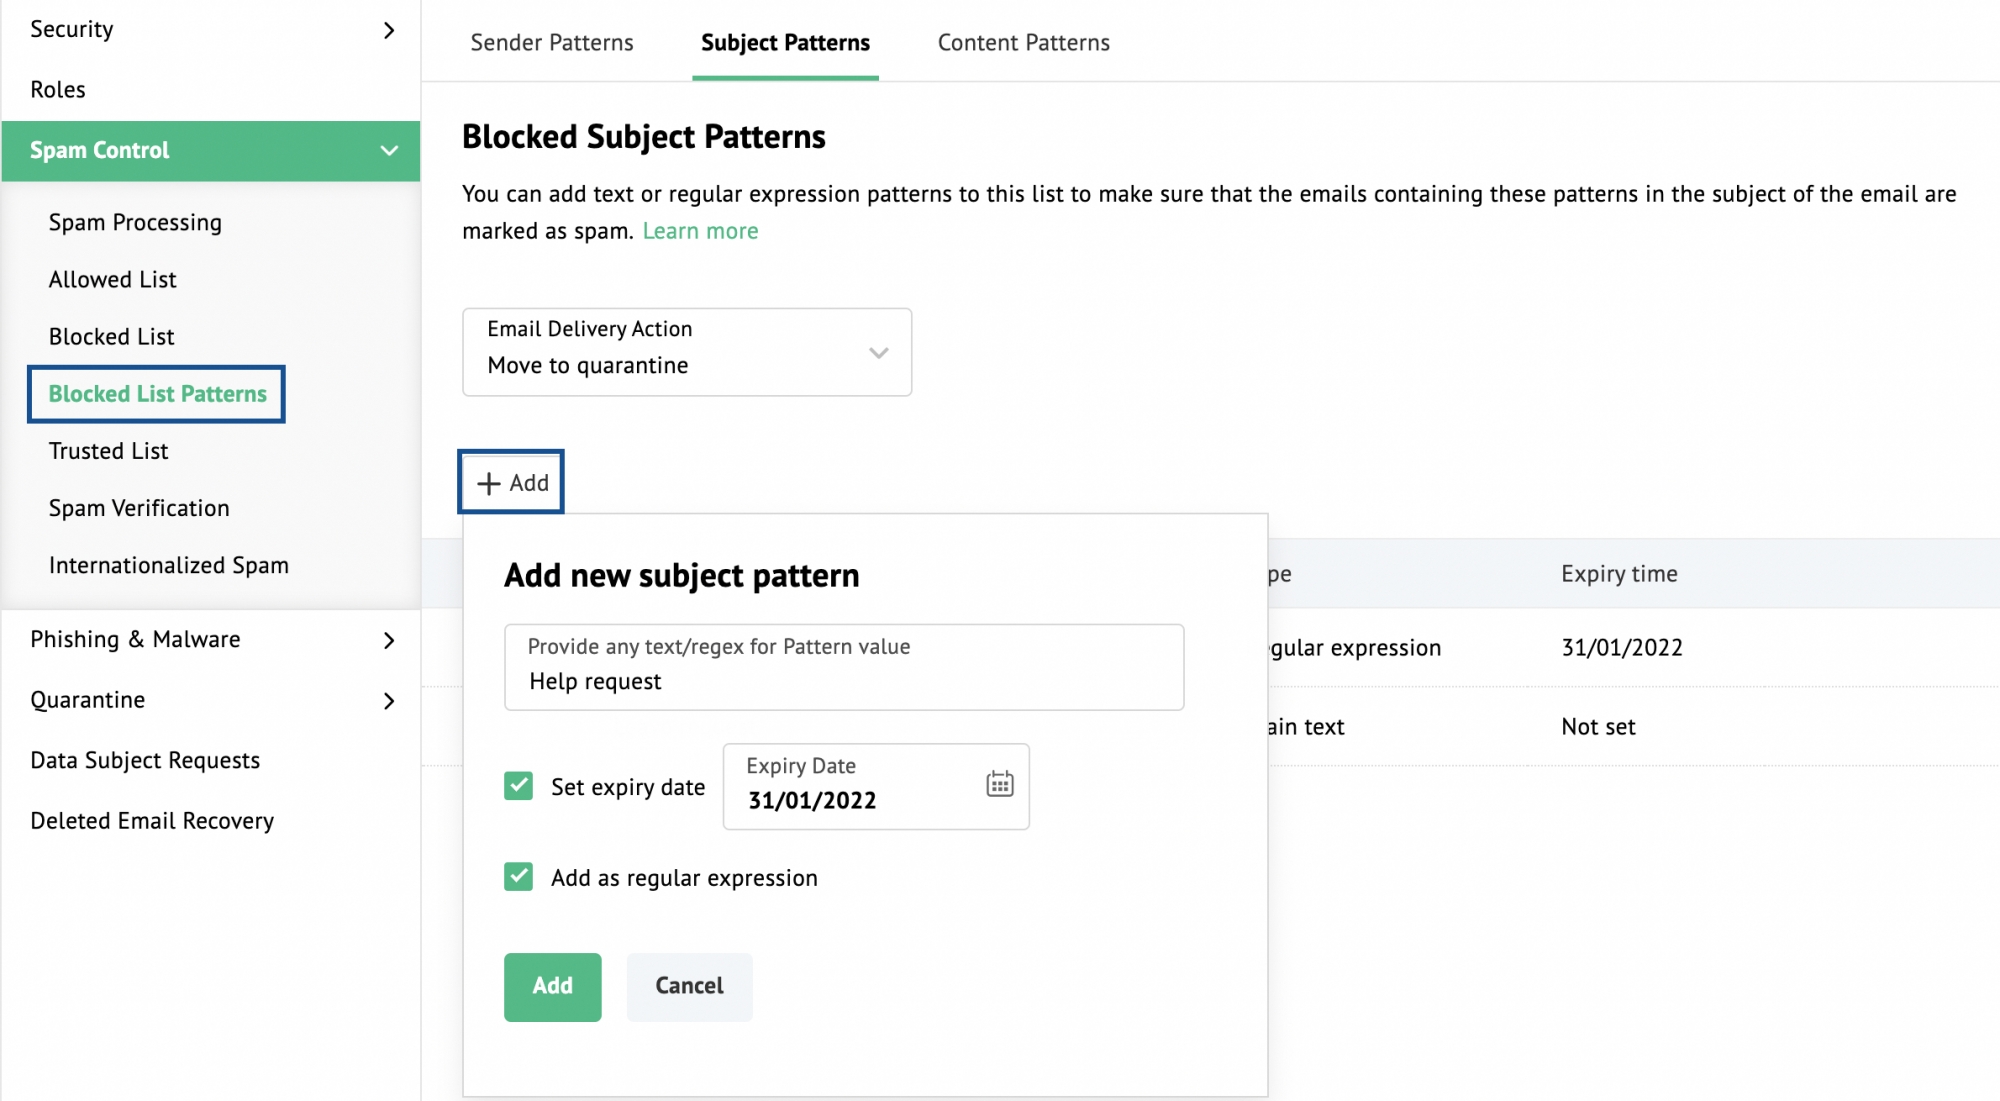
You can also Edit/ Delete a pattern using the icons provided over the saved patterns.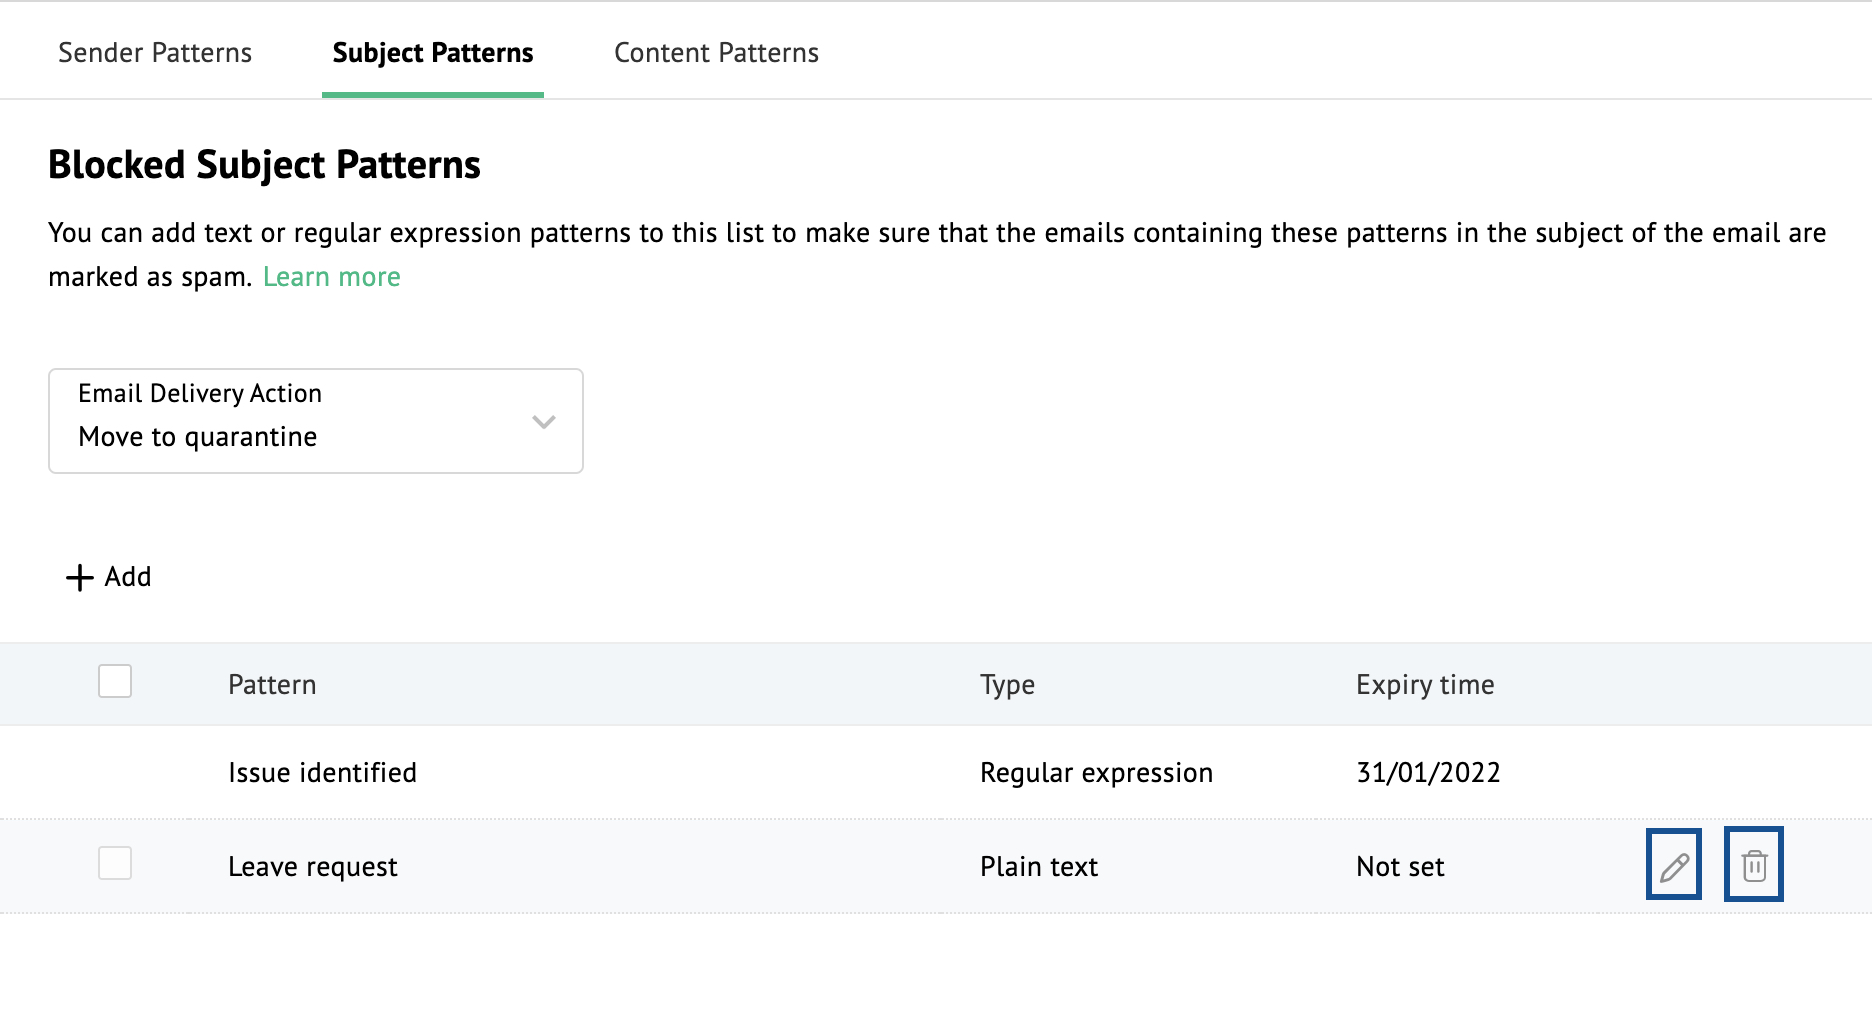
Block emails based on email Content Patterns in Zoho Mail
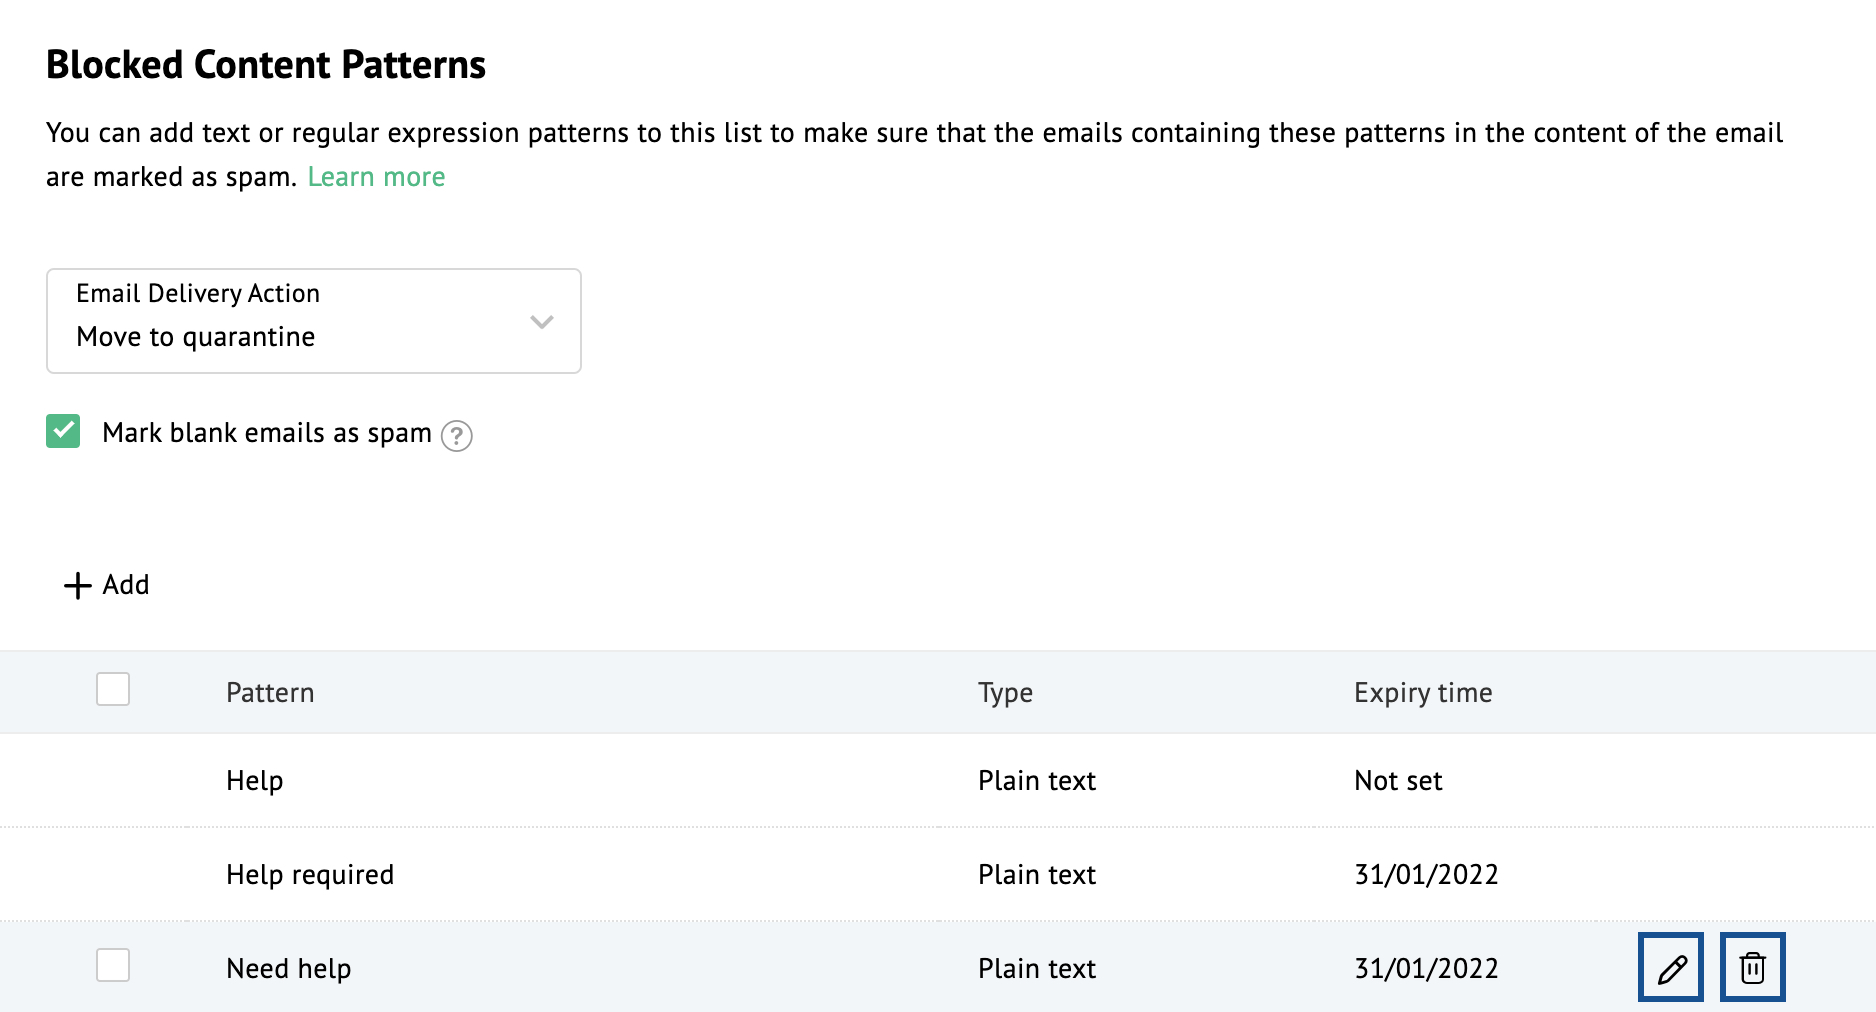
The Content Pattern feature allows admins to filter emails based on text or regex patterns found in the body of the email. The Email delivery action can be set to None, Move to spam or Move to quarantine. Admins can also enable the option to Mark blank emails as spam, which helps block empty-body phishing emails.
To configure a pattern click on Add and select either Plain text or Regular expression. You can set an expiry date for the pertaining pattern. Now, Click Add to save the pattern.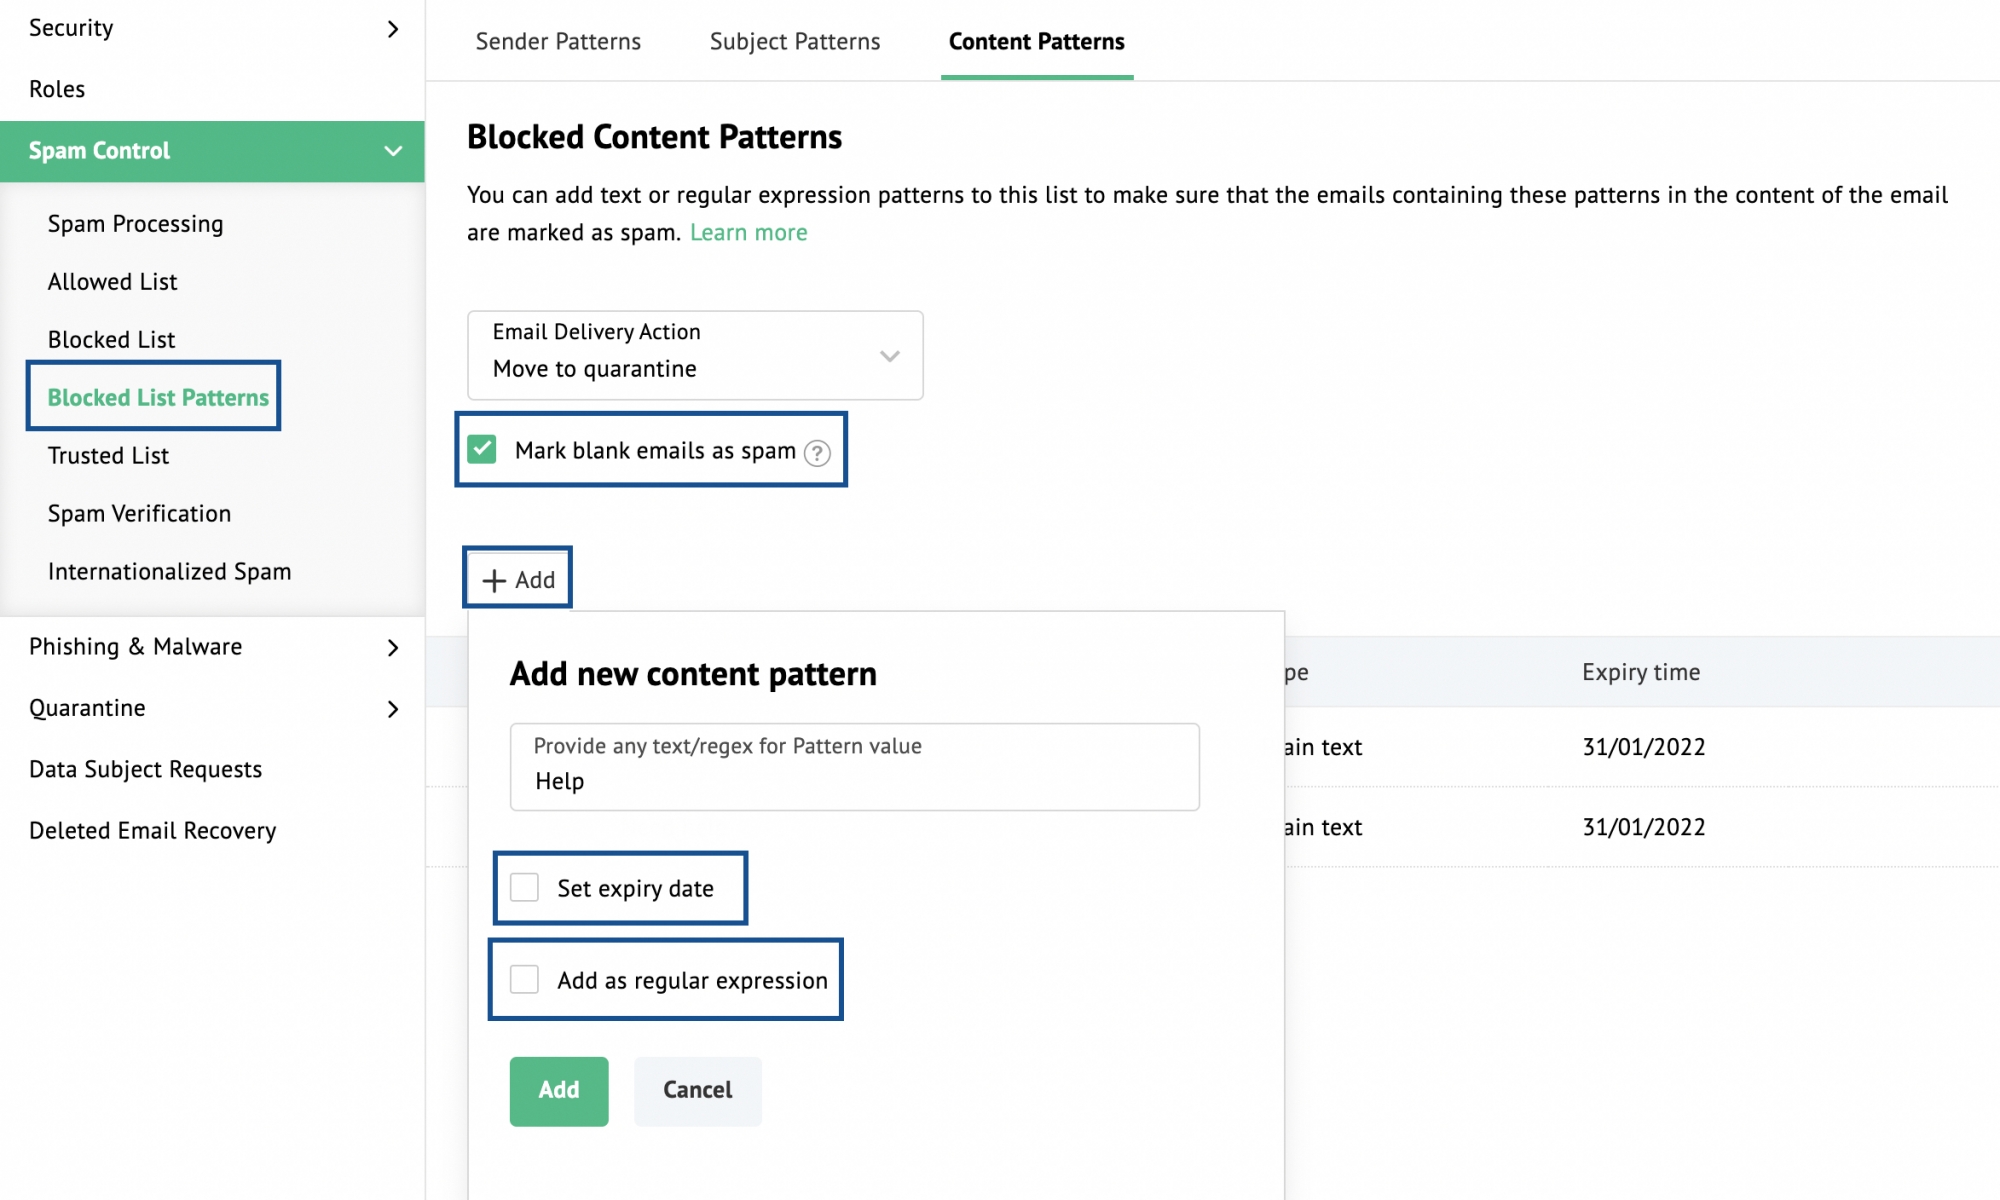
You can also Edit/ Delete a pattern using the icons provided over the saved patterns.
Learn more about Allowed List and Blocked List under user spam settings in Zoho Mail.
What is the Trusted List in Zoho Mail and when should you use it?
The Trusted List in Zoho Mail is a special anti-spam setting that completely bypasses all spam checks, including SPF, DKIM, and blocklist validations, for email addresses, domains, or IP addresses added to it. While adding values to the trusted list, be doubly cautious since the organization could be exposed to spam or phishing attacks, as there is no spam check.
Follow the below instructions to define the trusted list for your organization:
- Login to the Zoho Mail Admin Console
- Go to the Security & Compliance menu.
- Select Spam Control, and select Trusted List. You will land in the Emails tab.
- To add specific email addresses to the trusted list, do these steps:
- Click on Add to enter the email addresses.
- You can add multiple email addresses by separating them with commas.
- Finally, click Add.
- Alternatively, you can also import email addresses by clicking on Import.
- Click Browse Files, and select the file containing the email addresses.
- The email addresses in the CSV file will get added to the trusted list.
- To add one or more domains to the trusted list, click on the Domains tab and do these steps:
- Click on Add to enter the domain names.
- You can add multiple domains by separating them with commas and click Add.
- Alternatively, you can also import domains by clicking on Import.
- Click Browse Files, and select the file containing the domain names. Now, click Import to proceed.
- The domain names in the CSV file will get added to the trusted list.
Note
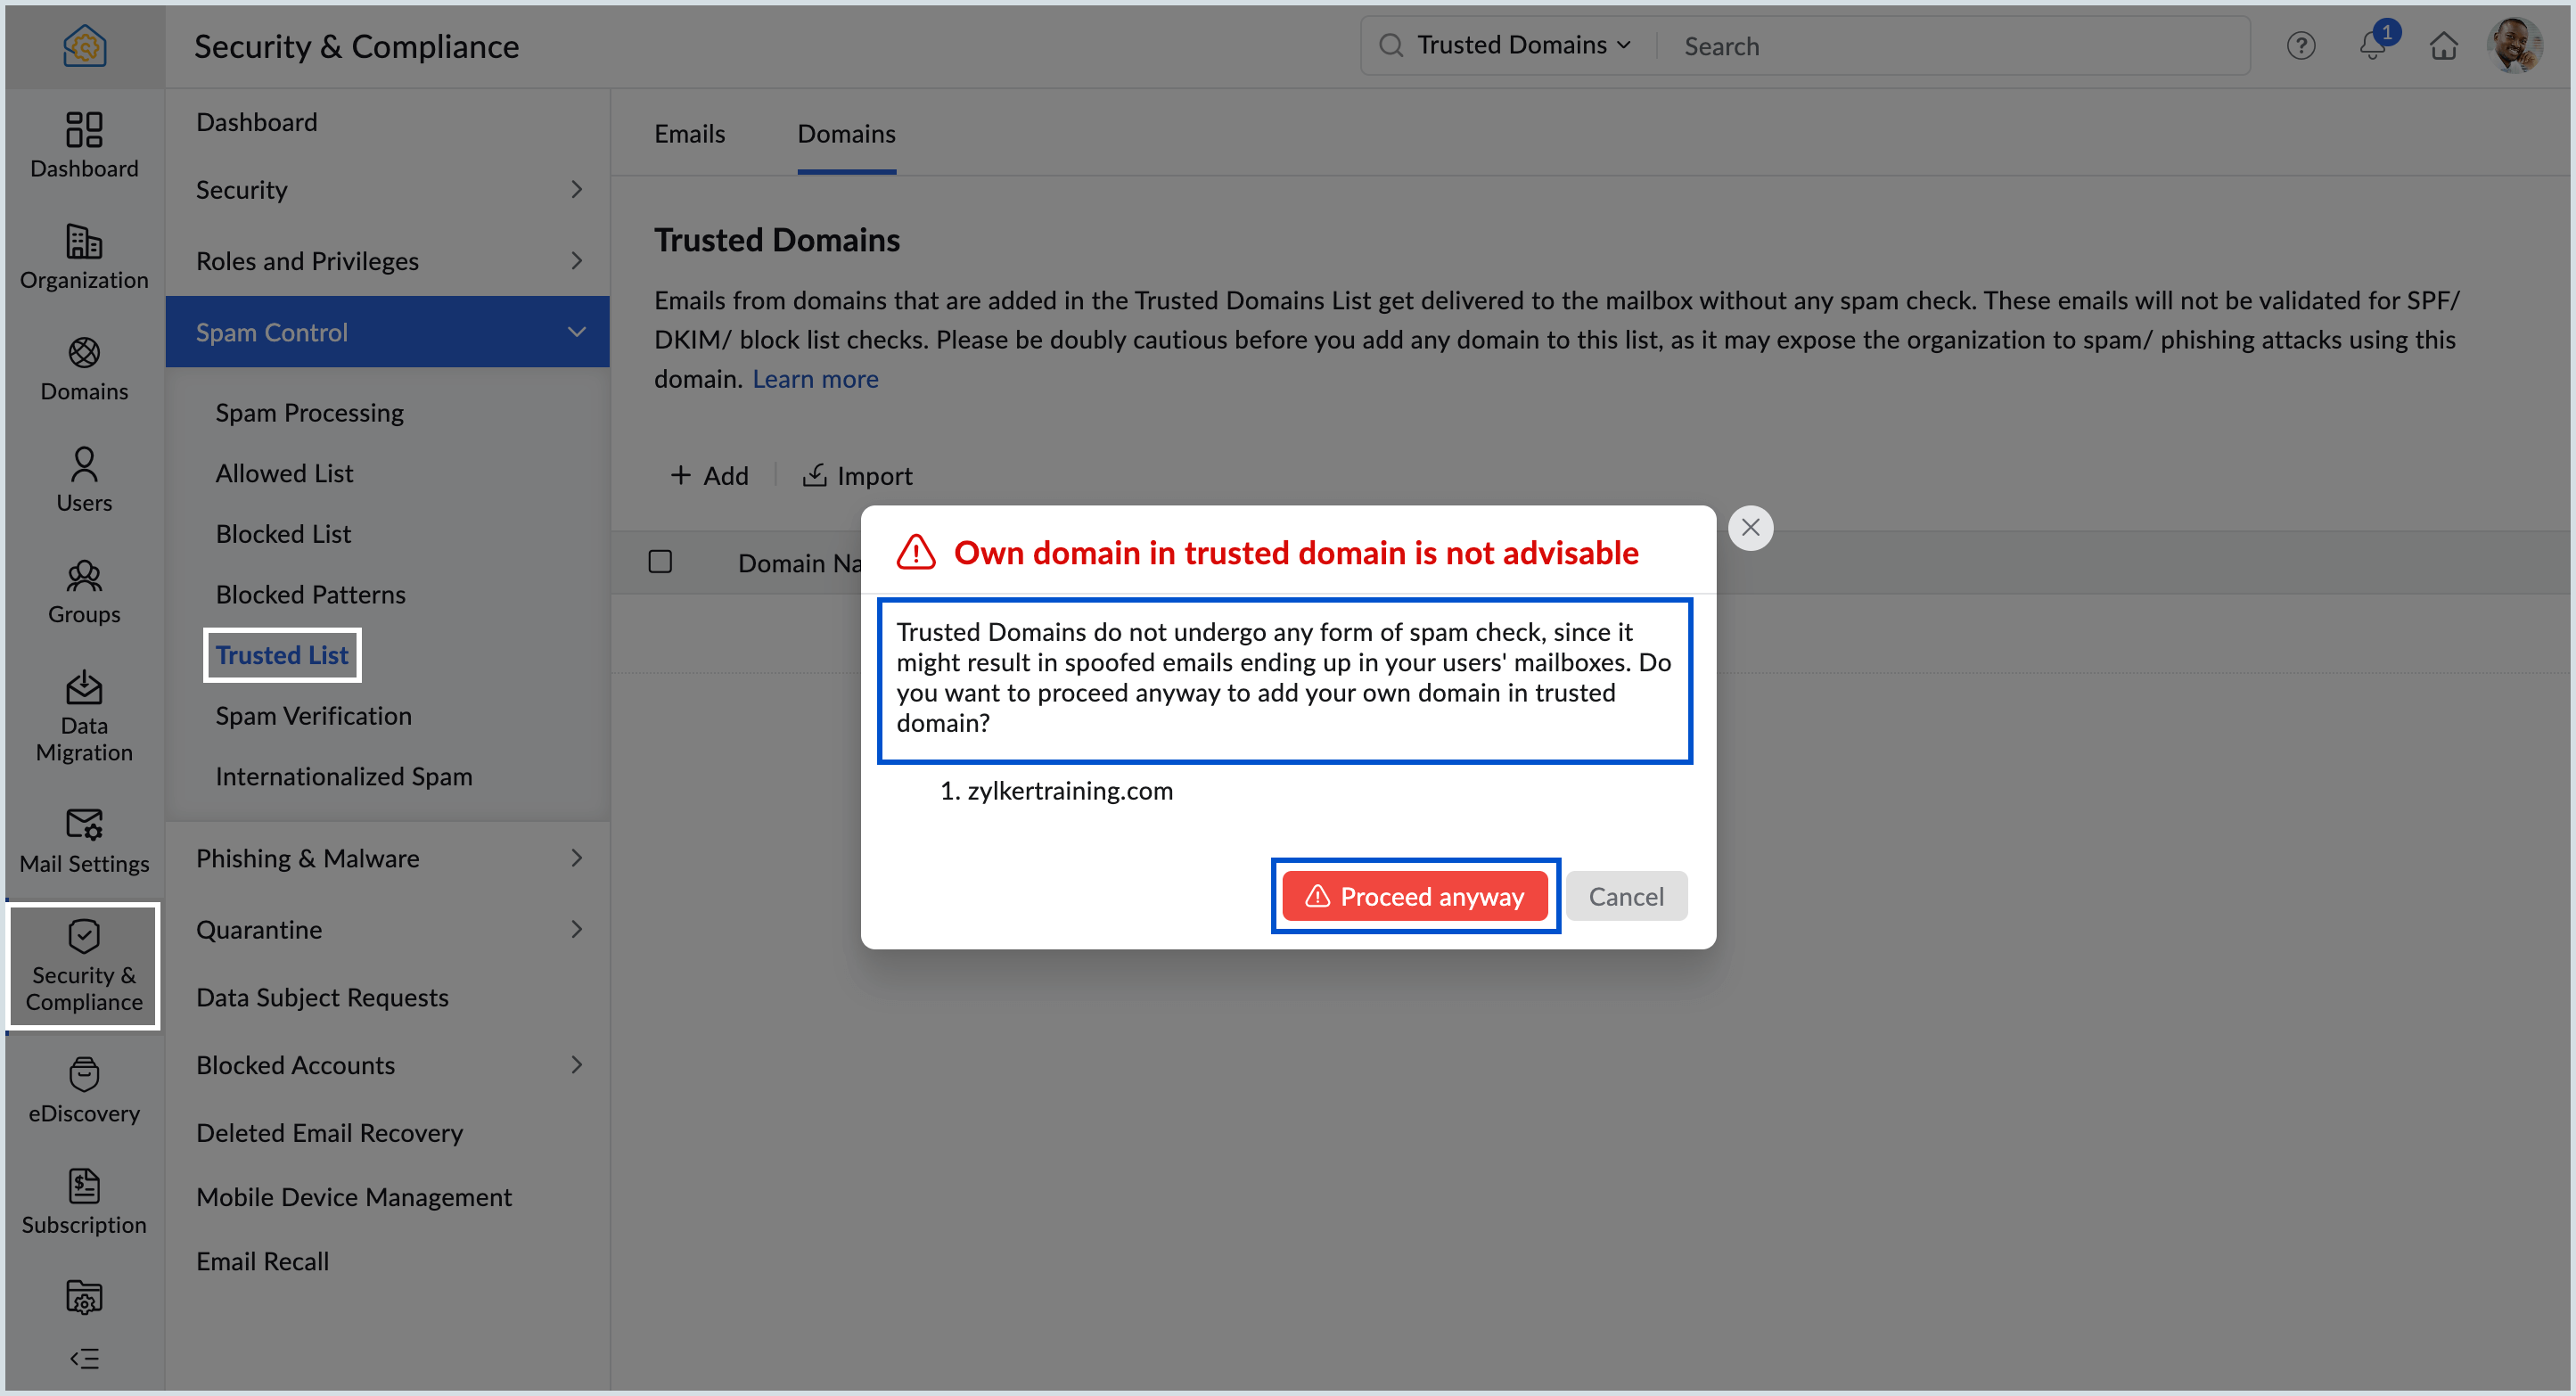
- It is generally not recommended to add your own domain to the trusted domain list, as this may result in spoofed emails being delivered to your users' mailboxes. However, if you choose to proceed, a warning pop-up will appear for you to confirm your action. Review the warning message carefully, and click Proceed Anyway to confirm.
- Learn more about Trusted List and Rejected List under user spam settings in Zoho Mail.
What is Internationalized Spam control in Zoho Mail?
Zoho Mail's Internationalized Spam Control feature lets admins filter incoming emails based on the language they are written in or the country they originate from. Admins can block or allow emails in specific languages and apply actions such as marking as spam, quarantining, or rejecting emails from specific countries.
How to block or allow emails based on Language in Zoho Mail
The Language-based spam control in Zoho Mail lets admins either allow or block emails written in specific languages, helping filter out spam that targets users in languages not relevant to the organization. You can add multiple languages at once and set a single action, Allow or Block, that applies to all selected languages.
Follow the below steps to add languages:
- Login to the Zoho Mail Admin Console
- Go to the Security & Compliance menu.
- Select Spam Control, go to Internationalized Spam. You will land in the Language tab.
- Select the action that you'd like to take that is listed in the Spam Processing Action field. You can either Allow or Block the chosen languages.
- Click Add and select the languages.
- Once done, click Add.
Based on the preferences set, emails in the languages that you've entered will either be blocked or allowed.
Learn in detail about user spam filter based on language in Zoho Mail.
Block or filter emails based on Country of origin in Zoho Mail
Zoho Mail's Country-based spam control allows admins to filter emails based on the geographic origin of the sender, with options to mark them as spam, move them to quarantine, or reject them. This is useful for organizations that receive a high volume of spam or unwanted emails from specific regions and want to apply automatic filtering at the organization level.
Follow the below steps to add locations:
- Login to the Zoho Mail Admin Console
- Go to the Security & Compliance menu.
- Select Spam Control, go to Internationalized Spam, and select the Country tab.
- Click Add, select the countries, and choose the desired action to apply to emails originating from them.
- You can either mark the emails as spam, move it to quarantine or reject it.
Emails from the respective countries will be processed according to the preferences that you have set.
Note:
The language and country-based spam control features will only be available for organizations that are using one of our paid plans.
Frequently Asked Questions (FAQs)
What is the difference between the Allowed List, Blocked List, Trusted List, and Rejected List in Zoho Mail?
- Allowed List: Emails from added addresses, domains, or IPs are not marked as spam, but standard spam checks still apply.
- Blocked List: Emails from added addresses, domains, IPs, or TLDs are blocked, with admin-defined actions such as mark as spam, quarantine, or reject.
- Trusted List: Emails from added addresses, domains, or IPs completely bypass all spam checks including SPF, DKIM, and blocklist validations.
- Rejected List: Blocks all incoming emails addressed to specific users in the organization, regardless of who the sender is or where the email originates from.
Will blocking a domain in Zoho Mail also block emails from its subdomains?
Yes. When you add a domain to the Blocked List in Zoho Mail, all emails from that domain's associated subdomains are automatically blocked as well. The same delivery action selected for the parent domain applies to emails from its subdomains.
What happens to emails that match a Blocked Pattern in Zoho Mail, are they deleted?
No, emails that match a Blocked Pattern are not automatically deleted. Admins can choose one of three delivery actions, None, Move to Spam, or Move to Quarantine, when configuring each pattern. Emails moved to quarantine must be reviewed and processed by an admin before any further action is taken.
Can admins block emails based on the country they are sent from in Zoho Mail?
Yes, Zoho Mail's Internationalized Spam Control feature lets admins filter emails based on the geographic origin of the sender, with options to mark them as spam, move them to quarantine, or reject them outright. This feature is available exclusively on paid Zoho Mail plans.
Is it safe to add your own domain to the Trusted List in Zoho Mail?
Adding your own domain to the Trusted List is not recommended, as it bypasses all spam checks, including SPF, DKIM, and blocklist validations. This exposes your organization to spoofed emails being delivered directly to users' mailboxes. If you choose to proceed, Zoho Mail will display a warning pop-up asking you to confirm the action before it takes effect.
Related Pages
Spam Control Settings | Phishing and Malware | Spam Quarantine