OAuth 2.0 User Guide
Table of Contents
OAuth 2.0 overview
Zoho Mail REST API uses OAuth 2.0 for secure authentication and authorization. OAuth 2.0 enables third-party applications to access resources without requiring the end user to repeatedly authenticate. By obtaining user consent, OAuth 2.0 allows applications to perform predefined API calls securely, ensuring data protection while enhancing user convenience.
If you're developing a custom application or customizing Zoho Mail features for specific business needs, OAuth 2.0 ensures secure access to Zoho Mail data through API integration.
Note
In the context of this page, the client application refers to the third-party application that the user tries to access through the Zoho account and the End user refers to the user utilizing the client application.
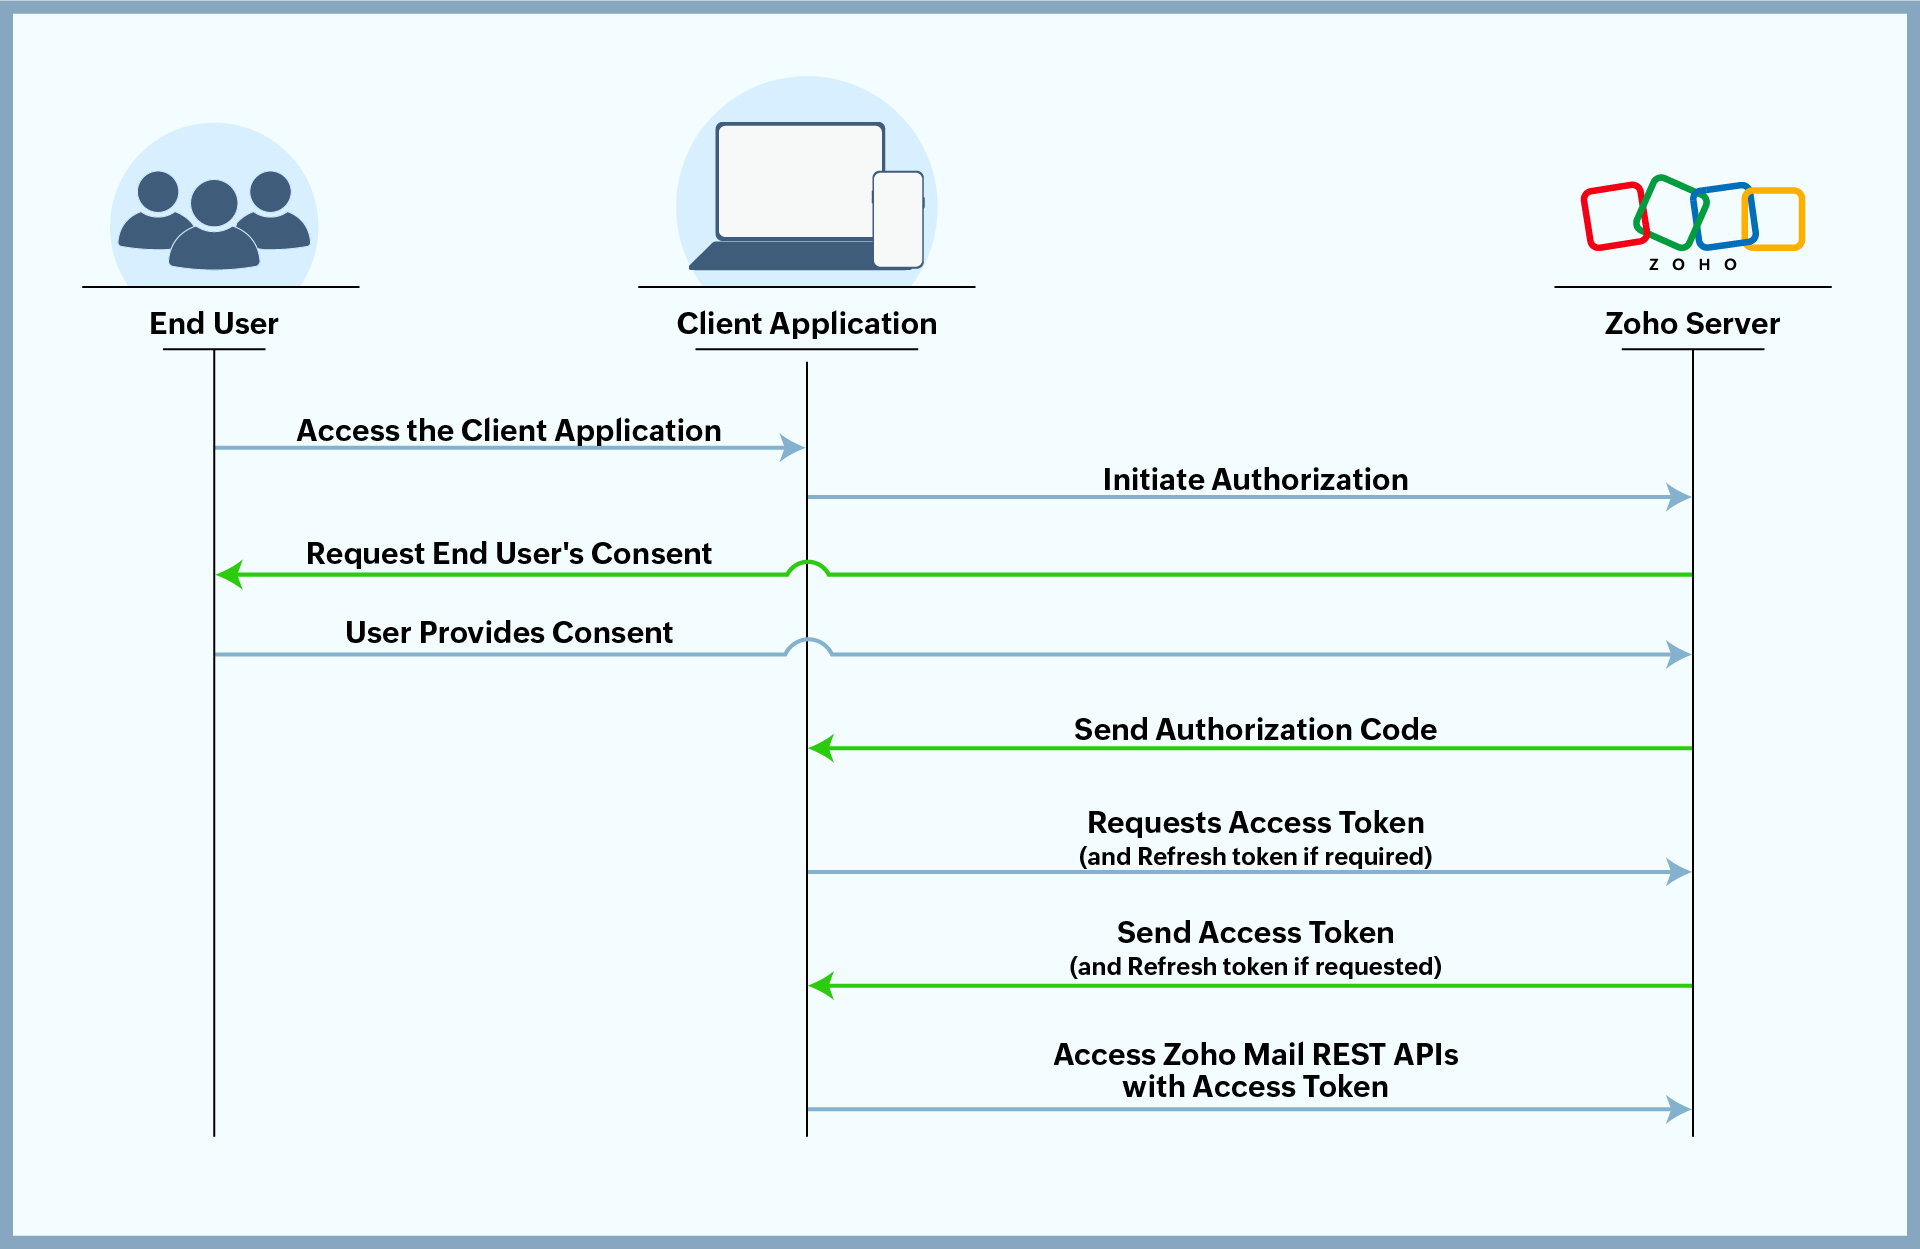
How does OAuth 2.0 work?
The following steps will help you understand the OAuth 2.0 authentication process:
- The end user accesses the client application.
- The client application initiates authorization by sending a request for authorization code, mentioning the required scopes.
- The Zoho server prompts the end user to authorise the client application to access the end user's data within the mentioned scopes.
- The end user authorizes the client application.
- The Zoho server sends the authorization code to the client application.
- The client application requests the Zoho server for an access token, for the mentioned scopes, in exchange for the authorization code.
- The Zoho server sends an access token ( and a refresh token, if requested).
- The client application uses the access token to access resources on behalf of the end user from the Zoho server. If the access token expires, the refresh token is used to obtain a new access token, allowing the client application to continue accessing resources seamlessly. This process repeats every time the access token expires, ensuring that the refresh token is consistently used to obtain a new access token. This cycle continues until access is explicitly revoked.
Step-by-step guide to obtaining a Zoho-oauthtoken
The following steps outline the OAuth 2.0 authentication flow for accessing Zoho Mail REST APIs:
Step 1: Register Your App and Get OAuth Credentials
Before making any API calls, register your application in the Zoho API Console. This one-time setup provides the credentials your app uses to identify itself to the Zoho Authorization Server.
How to register?
- Go to the Zoho API Console.
- Click GET STARTED. If you have already added an application, click ADD CLIENT in the top-right corner.
- Choose your client type and click CREATE NOW.

Choosing a client type
The client type determines the authorization flow your application uses to obtain tokens. Choose based on where your application runs and whether it can securely store a client secret.
- Client-based applications: Choose this if your application runs entirely in the browser using JavaScript, with no backend server. Since client-side code is visible to users, a client secret cannot be stored safely. Authorization Code flow with PKCE is recommended for new integrations.
- Server-based applications: Choose this if your application has a front end and a back-end server. The server can securely store credentials, so the client secret is never exposed to the browser. This client type uses the Authorization Code flow.
- Mobile-based applications: Choose this for native iOS or Android apps. PKCE is used instead of a client secret because secrets cannot be stored safely on user devices. The app must provide an app scheme so the redirect can be handled by the mobile application.
- Non-browser applications: Choose this for devices without a browser, such as smart TVs, printers, or CLI tools. This client type uses the Device Authorization Grant flow, where the device displays a URL and verification code for the user to authorize from another device.
- Self client: Choose this if your application accesses your own Zoho Mail account without end-user interaction, such as a personal script, backend automation job, or app-to-app communication. No user consent screen is required; tokens are generated directly from the Zoho API Console.
Client type and authorization flow
The table below summarizes the authorization flow for each client type. Select the link for your client type above for the complete setup steps.
| Client type | Recommended use case | Authorization flow |
|---|---|---|
| Client-based Application | Single-page browser application | Implicit/Authorization Code flow with PKCE |
| Server-based Application | Web application with a dedicated backend | Authorization Code flow |
| Mobile-based Application | Native iOS or Android application | Authorization Code flow with PKCE |
| Non-browser Based Application | Device, CLI, or application without browser access | Device Authorization Grant flow |
| Self Client | Personal scripts or backend automation for your own account | Pre-generated Authorization Code |
- Enter the below mentioned details based on the choice of client type, then click CREATE. The details required during registration depend on your client type. Use the table below to confirm which fields apply to your application:
| Client Type | Common Required Details |
|---|---|
| Client-based Application | Client Name, Homepage URL, Authorized redirect URIs |
| Server-based Application | Client Name, Homepage URL, Authorized Redirect URIs, JavaScript Domain |
| Mobile-based Application | Client Name, Homepage URL, Authorized redirect URIs |
| Non-browser Based Application | Client Name, Homepage URL |
| Self Client | - |
Field descriptions
| Parameter | Description |
|---|---|
| Homepage URL | Full URL of your application's home page. |
| Authorized Redirect URI | URI to which Zoho Accounts sends the authorization response after the user grants consent. The response contains the authorization code or, for client-based applications, the access token. The URI must begin with https:// or https://. Multiple redirect URIs can be added using the + icon. Example: https://www.zylker.com/oauthredirect |
| JavaScript Domain | Domain of your client-based JavaScript application. The domain must begin with https:// or https://. Multiple domains can be added using the + icon. |
Credentials issued
After registration, Zoho issues the following credentials for your application:
- Client ID: A public identifier for your application.
- Client Secret: A private key used to authenticate your app’s token requests. Keep this confidential and never expose it in client-side code.
Note
Your Client ID and Client Secret are permanent for the registered application. Store them securely and rotate the Client Secret immediately if it is ever compromised.
Note
The steps below cover the Authorization Code flow for Server-based Applications only. If you are using a different client type, refer to the link for your client type in the section above.
Step 2 : Requesting authorization code
You (the end-user) or your client application should initiate the authorization process by requesting an authorization code through a GET request to the Zoho authentication server via a web browser. The request must include the required scopes, client_id, response_type, and redirect_uri.
Method:
GET
Sample request format of the URL to be called via a web browser:
https://accounts.zoho.com/oauth/v2/auth?client_id={client_id}&response_type=code&redirect_uri={redirect_uri}&scope={scope}&access_type={offline or online}
Example request:
https://accounts.zoho.com/oauth/v2/auth?client_id=1000.*****5&response_type=code&redirect_uri=https://zylker.com/redirect&scope=ZohoMail.accounts.READ&access_type=offline
Query Parameters Details :
| Parameter | Type | Value | Description |
| *client_id | Unique Identifier | - | The ID that was assigned to the client application when registered. |
| *response_type | string | "code" | The type of response expected. In this case, "code" indicates an authorization code will be returned. |
| *redirect_uri | URI | - | The callback URI that was mentioned during the client application's registration. |
| *scope | string | Syntax: Servicename.scopename.Operation Example: ZohoMail.accounts.READ,ZohoMail.folders.UPDATE | Specifies the scope allowed for the client application. Has to be separated by commas. For detailed information on Scopes, click here. |
| access_type | string | "offline/online" (Default : "online") | Specifies whether a refresh token is required. "online" provides an access token only; "offline" provides both an access token and a refresh token. |
| prompt | string | "consent" | Add this parameter to reauthorize the user at each login, showing the consent screen every time. Use this parameter only when necessary. |
| state | string | - | A generated value that correlates the callback with its associated authorization request. |
* denotes mandatory parameter.
Step 3 : User authorization prompt
In response, the Zoho authentication server will prompt you (the end-user) to authorize the client application to access their data based on the specified scopes.

Step 4 : Granting authorization
If you (the end-user) click "Accept" in the prompt window, you authorize the client application to access your Zoho account's resources within the specified scope. Upon acceptance, the Zoho authentication server redirects you to the specified redirect_uri, including the requested authorization code "code" embedded in the URL.
Sample response format of the URL in which authorization code is received:
https://{redirect_uri}?code={authorization_code}&location={domain}&accounts-server={accounts_url}
Example response URL in which authorization code is received:
https://zylker.com/redirect?code=1000.*******77&location=us&accounts-server=https%3A%2F%2Faccounts.zoho.com
The client application retrieves the authorization code from the above URL. The authorization code is valid for 2 minutes.
- If the end user clicks Deny, the server will return an error.
Step 5: Exchanging authorization code for access token
The client application should request an access token from the Zoho authentication server by sending a POST request in any API platform like Postman, embedding the authorization code received in the previous step in the URL, along with other necessary details.
Method:
POST
Sample request format in any API platform:
https://accounts.zoho.com/oauth/v2/token?code={authorization_code}&grant_type=authorization_code&client_id={client_id}&client_secret={client_secret}&redirect_uri={redirect_uri}&scope={Servicename.Scopename.Operation}
Example request:
https://accounts.zoho.com/oauth/v2/token?code=1000.****160&grant_type=authorization_code&client_id=1000.R2Z0W****Q5EN&client_secret=39c***921b&redirect_uri=https://zylker.com/redirect &scope=ZohoMail.accounts.READ
Query Parameter Details :
| Parameter | Type | Value | Description |
| *code | string | - | The authorization code was obtained from the previous step. |
| *grant_type | string | "authorization_code" | Defines the type of grant being used. In this case, it's the authorization code grant type. |
| *client_id | Unique Identifier | - | The ID that was assigned to the client application when registered. |
| *client_secret | string | - | The client application's secret, which was assigned when it was registered. |
| *redirect_uri | URI | - | The callback URI that was mentioned during the client application's registration. |
| *scope | string | Syntax: Servicename.scopename.Operation Example: ZohoMail.accounts.READ | Specifies the scope allowed for the registered client application. Has to be separated by commas. For detailed information on Scopes, click here. |
| state | string | - | It has to be maintained the same during the entire process of authorization. |
- denotes mandatory parameter.
Step 6 : Zoho server response
The Zoho server responds with an access token (and a refresh token if requested).
Sample Response Format:
{
"access_token": "{access_token}",
"refresh_token": "{refresh_token}",
"api_domain": "https://www.zohoapis.com",
"token_type": "Bearer",
"expires_in": 3600
}
Example Response:
{
"access_token": "1000.24a566***********6d276b472.86a1******883491c79a042af",
"refresh_token": "1000.f113ece**********82d02fb25e9.cc0**********8c57693baea39f",
"scope": "ZohoMail.accounts.READ",
"api_domain": "https://www.zohoapis.com",
"token_type": "Bearer",
"expires_in": 3600
}
You can store this data so that there is no need for authorization each time the end user accesses the registered client application. This completes the authentication.
Step 7 : Accessing Zoho Mail resources
Once your client application obtains the access token, it can access Zoho's protected resources through Zoho Mail's APIs. When the access token is provided to the Zoho's resource server, your client application will be granted access based on the scopes specified in the request. Zoho's OAuth implementation uses the Bearer authentication scheme. Therefore, the access token must be included in the Authorization header, prefixed with Zoho-oauthtoken, in every API request.
Note:
The OAuth token response includes token_type as Bearer, in compliance with the OAuth 2.0 specification. However, Zoho Mail APIs require Zoho-oauthtoken as the authorization header prefix, not Bearer. Use the following format when making API requests:
Authorization: Zoho-oauthtoken {access_token}
Renew Access Token
Access tokens have a limited validity period and, in most cases, expire after one hour (3,600 seconds). Once an access token expires, the client application must use the refresh token to request a new access token for continued access. This process repeats each time the access token expires, ensuring that the refresh token is consistently used to obtain new access tokens. The cycle continues until access is explicitly revoked. Refresh tokens typically have a longer lifespan—ranging from days to months or even years—depending on the authorization server’s policy.
The client application requests a new access token from the Zoho authentication server by sending a POST request, embedding the refresh token from step 6 in the URL, along with other required details.
Method:
POST
Sample Request format of URL:
https://accounts.zoho.com/oauth/v2/token?refresh_token={refresh_token}&grant_type=refresh_token&client_id={client_id}&client_secret={client_secret}
Example URL :
https://accounts.zoho.com/oauth/v2/token?refresh_token=1000.4069dacb56*****36&grant_type=refresh_token&client_id=1000.R2Z0W***Q5EN&client_secret=39c****921b
Query Parameter Details:
| Parameter | Type | Value | Description |
| *refresh_token | string | - | The refresh token received from step 6 embedded in the URL. |
| *grant_type | string | "refresh_token" | Defines the type of grant being used. In this case, it's the refresh token grant type. |
| *client_id | Unique Identifier | - | The ID that was assigned to the client application when registered. |
| *client_secret | string | - | The client application's secret, which was assigned when it was registered. |
| scope | string | Syntax: Servicename.scopename.Operation Example: ZohoMail.accounts.READ, ZohoMail.folders.UPDATE | Specifies the scope allowed for the registered client application. Has to be separated by commas. For detailed information on Scopes, click here. |
| state | string | - | It has to be maintained the same during the entire process of authorization. |
- denotes mandatory parameter.
If the request is successful, you will receive the following response:
Sample response format:
{
"access_token": "{new_access_token}",
"expires_in": 3600,
"api_domain": "https://www.zohoapis.com",
"token_type": "Bearer"
}
In response, you have received a new Access Token. This new Access Token will also have an hour(3600 seconds) of time validity.
Revoke Refresh Token
Access tokens are revoked on logout, expiration, security updates, suspicious activity, or account changes to maintain security.
The client application requests that the Zoho authentication server revoke the refresh token by sending a POST request to the API platform, embedding the refresh token received in step 6 in the URL, along with other necessary details.
Method:
POST
Sample Request format of URL:
https://accounts.zoho.com/oauth/v2/token/revoke?token={refresh_token}
Example URL:
https://accounts.zoho.com/oauth/v2/token/revoke?token=1000.4069dacb56*****3677
Note:
- Some APIs require Admin authentication for execution, while others can be executed with user authentication. Certain APIs are designed to be executed by both Admins and Users. However, the request URLs will differ based on the user's role.