Webhook
Webhooks allow you to integrate Zoho Mail with other external applications. A webhook is used to trigger an action in one application using real-time events from an external application. Webhooks are of two types - Incoming webhooks and Outgoing webhooks. Incoming webhooks are used to trigger an action inside Zoho Mail using real-time events from other Zoho or third-party applications. With outgoing webhooks, your incoming emails/ new tasks created/ new messages posted on Streams can be configured to trigger actions in external applications.
How does it work?
In order to set up an integration between Zoho Mail and any other Zoho or third-party application, you will have to configure an incoming webhook in one application and an outgoing webhook in the other application. For example, if you wish to post events from any other application to your Streams group, the following steps should be carried out:
- Configure an incoming webhook in Zoho Mail.
- Obtain the Webhook URL generated while creating the incoming webhook.
- Configure an outgoing webhook in the other Zoho or third-party application using the webhook URL obtained.
If you wish to trigger an event in the external application when you receive emails, you need to configure the outgoing webhook in Zoho Mail and the incoming webhook in the other Zoho or third-party application.
Incoming webhooks
An incoming webhook lets you post to the URL of your choice when a specified event occurs in a Zoho or third-party application. You can configure the incoming webhook to send emails and create posts, notes, or tasks in your Streams group using the information received from the external application.
Configuring Incoming webhook
- Login to Zoho Mail
- Navigate to Settings > Integrations > Developer Space
- Select Incoming Webhooks under Configure section in the left menu.
- Click on Add new configuration

- Select the post format

- Mail - Webhook update will be sent to your inbox as an email.
- Post/ Notes/ Task - Webhook update will be posted in the preferred Streams group as a post/ note/ task.
- If you have chosen Mail in the previous step, skip this step. If you have chosen Post/ Notes/ Task, provide the following details on the configuration page:

- Custom Username - This name will be used to post in Streams
- Group - The group where the updates will be posted
Then, click on Write Function under Custom Function if you wish to modify the data in the post request to suit the webhook format as per your needs. Once you create the custom function, click on Select custom function to select the function.
 Note:
Note:
You can establish connections between any Zoho or third-party application of your choice using DRE Connectors.- Click Generate URL and copy the URL created.

The URL that has been generated is used while configuring an outgoing webhook in the other Zoho or third-party application of your choice.
Note:
Incoming webhook can be configured for a Streams group only by the moderators or owner of the group.
Points to remember
- If you wish the Streams post to include an @mention, include the following in the message body:
- To @mention a group member, include @emailID in the message. Example: To @mention Rebecca, @rebecca@zylker.com
- To @mention a group, include @group in the message. The group configured for the webhook will automatically be tagged.
- The webhook URL should not be disclosed to unauthorized persons. If exposed, they will be able to post updates to your Streams group.
- If you re-generate the webhook URL, you will need to replace the old URL with the new URL in all the places it has been used.
Note:
The Domain name of the Incoming Webhook URL is being changed for security reasons. Hence, you need to regenerate and update your Incoming Webhook configuration in Zoho Mail before 22nd of September, 2024 to avoid any interruption in functionality. Using the old Incoming Webhook URL after the mentioned date will result in configuration failure.
Regenerate Incoming Webhook URLs
To regenerate your Incoming Webhook URLs, follow the steps below:
- Log into your Zoho Mail account.
- Navigate to Settings > Integrations > Developer Space .
- Select Webhooks under Configure.
- Click on the already existing Incoming Webhook URL.
Click on the 'Regenerate' option to regenerate the webhook URL.

- A confirmation pop-up will appear, click ok to proceed.
- Once the URL is regenerated, it will appear on the screen. Copy the URL, as you won't be able to view it again later due to security reasons. If you forget the URL, you will need to generate a new URL.
Outgoing webhooks
An outgoing webhook allows you to configure your emails/ tasks to trigger events in other Zoho or third-party applications. You can post the details of the emails/ tasks/ Streams posts to external applications. The conditions/ filters options in the configuration allow you to select which emails/ tasks/ posts you want to act as triggers for the event.
Configuring Outgoing webhook
- Login to Zoho Mail
- Navigate to Settings > Integrations > Developer Space
- Select Outgoing Webhooks under the Configure section in the left menu.
- Click on Add new configuration

- After filling in the Custom Username and Webhook URL, you have to select an entity, i.e Mail or Tasks or Streams Post, that you want to configure.
- Custom Username - The name given to the webhook configuration
- Webhook URL - URL obtained from the incoming webhook configuration in the other Zoho or third-party app. Updates triggered from either the Mail or Tasks or Streams Post will be posted to this URL.

- If you select Mail, then you can skip the next 2 steps (for Task and Streams Post). You should choose a mail condition type and the conditions for which you need the webhook to be triggered.

- Condition type - Choose how you want to run the filter actions. To learn more about the filters, click here.
- Conditions - After selecting the Mail condition type, provide the desired condition. For example, the condition can be From contains rebecca@zylker.com. To learn more about the Mail conditions, click here.
- Tagged emails - If you select tagged emails, you have to choose the tags from the Select tag(s) drop-down. You can choose a maximum of 3 tags only.
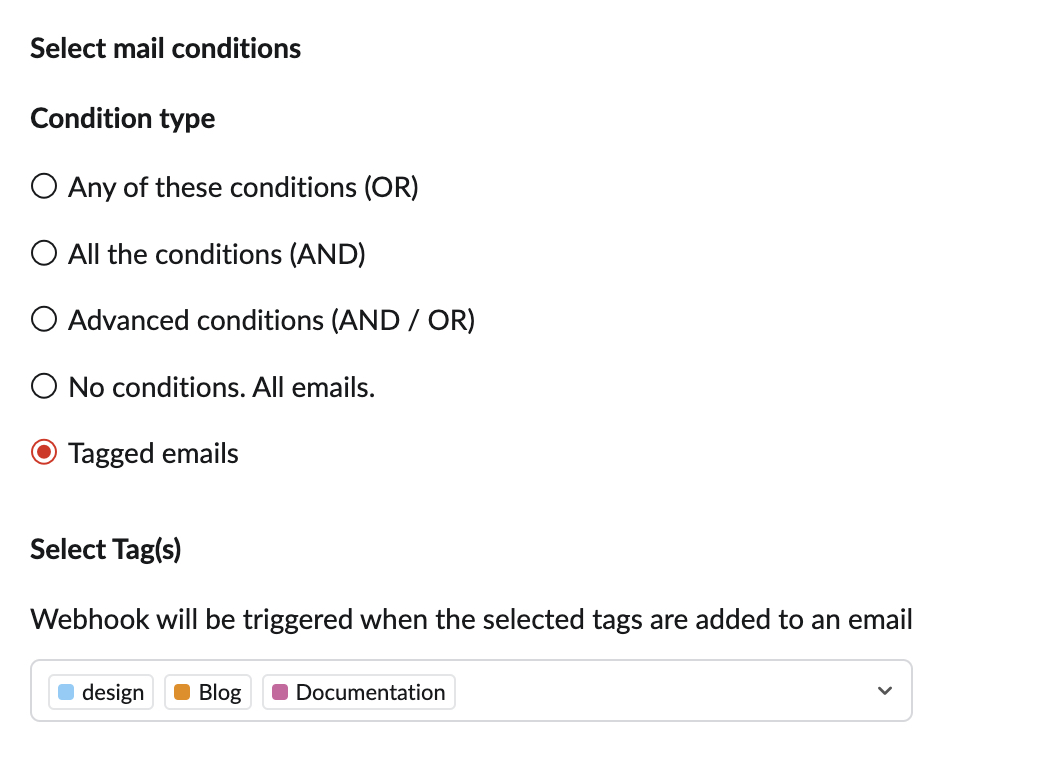
- The Tagged emails condition hand-picks only those emails under specific tags (Newsletter, Marketing, etc.). Choose this option if you want emails marked with specific tags to trigger the webhook. After you've selected the tags, whenever an incoming email is marked with any of the selected tags or when you mark an email later with one or more of those selected tags, the webhook will be triggered. However, you can't specify additional Conditions if you choose Tagged emails.
- Limited Data List - If you check this option, only the Subject, From, To, and time details of the email will be posted in the other Zoho or third-party application.
- If you select Task, you should choose the groups and task activity(ies) for which you need the webhook to be triggered. Before choosing the group and task activities you can either:
- Choose to Enable notification for task related activities in groups that you're a owner/ moderator irrespective of the task is assigned to you or not/ followed by you.
- Select Group(s) - You have to choose the group(s) in which you're a owner or a moderator. You can choose a maximum of 3 groups only.
- Choose task activities - You can choose the task activities for which the webhook should be triggered.
- Choose to trigger the webhook when the task activities are performed on the tasks assigned to you or that you follow.
- Select Group(s) - You have to choose the group(s) from which the task activities should trigger the webhook. You can choose a maximum of 3 groups only.
- Choose task activities - Whenever the selected activity occurs in a task assigned to you or in the one that you watch, the webhook will be triggered.

Limited Data List - If you check this option, only a limited data of the task details will be posted in the other Zoho or third-party application. The difference between Full Data and Limited data list of the Task details is given in the table below.
Difference between Full Data and Limited Data list Full Data Limited data list Description assignee assignee User Id (Zuid) of the assignee assigneeName assigneeName Nickname of the assignee displayName displayName Full name of the assignee title title Title of the task summary Description of the task entityId entityId Id of the task entityType entityType Represents the entity. For example, 3 denotes it's a task entity. categoryId Id of the category categoryName Name of the category dueDate dueDate Due date value in numeric values. priority Priority of the task mentioned in the number parentTaskId Task Id of the parent (if the triggered task is a sub-task) nameSpaceId nameSpaceId id of the group groupName groupName name of the group triggerZuid triggerZuid User Id of the account that triggered the action status status Status mentioned in number statusName Status name of the task action action Name of the task action which is triggered
- Choose to Enable notification for task related activities in groups that you're a owner/ moderator irrespective of the task is assigned to you or not/ followed by you.
- If you select Streams Post, you have to choose the group and activity for which you want the webhook to be triggered.
- Select Group(s) - You have to choose the group(s) from which the Streams Post activities should trigger the webhook. You can choose a maximum of 3 groups only.
- Choose streams activity - Whenever the selected activity occurs in a post that you are mentioned or you follow, the webhook will be triggered.
- Limited Data List - If you check this option, only the data such as post ID, group ID, etc. of the post will be posted in the other Zoho or third-party application.

- Click on Write Function under Custom Function if you wish to modify the data in the post request to suit the webhook format as per your needs. Once you create the custom function, click on Select custom function to select the function.

- Click Save.
- If the webhook URL used in the configuration is unresponsive for an extended period, the outgoing webhook will automatically be disabled.
- When you save an outgoing webhook configuration for the first time, a POST request is initiated. The configuration will be saved only if a 200 response is received for the POST request.
WEBHOOK RESPONSE SAMPLE:
{
"summary": "Hi Rebecca, I have shared the slide deck for our product pitch meeting on Friday. Please take a look and do let me know if you have any suggestions. Regards, Paula",
"sentDateInGMT": 1560866021000,
"subject": "Marketing - Product pitch",
"messageId": 1560840837125110000,
"toAddress": "\"Rebecca A\"<rebecca@zylker.com>",
"folderId": 3881227000000013000,
"zuid": 647772765,
"ccAddress": "",
"size": 55503,
"sender": "Paula",
"receivedTime": 1560840837126,
"fromAddress": "paula@zylker.com",
"html": "<meta /><div><div style=\"font-family:"Trebuchet ms", Arial, Helvetica, sans-serif;font-size:12pt;\"><div>Hi Rebecca,<br /></div><div><br /></div><div>I have shared the slide deck for our product pitch meeting on Friday. Please take a look and do let me know if you have any suggestions.<br /></div><div id=\"\"><div><img src=\"/zm/ImageDisplay?f=1.png&mode=inline&cid=0.28869215260.3894179596053002321.16b695cdb49__inline__img__src&\" width=\"145\" height=\"145\" style=\"float:left;\" /><br /></div><div><br /></div><div><br /></div><div>Regards,<br /></div><div>Paula<br /><br /></div></div><br /><br /><div style=\"clear:both;\"></div></div><br /></div>",
"IntegIdList": "34000000580271,"
}
Securing Webhooks
Securing your webhooks is recommended as it helps you determine if the requests have actually originated from Zoho Mail. To enable you to verify the webhooks, Zoho Mail adds a signature to all its webhook requests. This adds an extra layer of security to your webhooks.
Validating Webhook requests
Each webhook request contains a signature for verification purposes. The key that is used to sign the message is the x-hook-secret. This secret is obtained only from the header of the very first request of the webhook. The x-hook-signature is found in the HTTP header of all requests. The header is a base 64 digest of an HMAC SHA256 hash. The hashed content should be the binary representation of the full request body.
In order to verify the signature, you will be required to generate a signature of your own using the x-hook-secret. You can then compare the generated signature with the signature in the request header to check the authenticity of the request.
The sample code for checking the validity of a request is given below:
JAVA:
import javax.crypto.Mac;
import javax.crypto.spec.SecretKeySpec;
import javax.servlet.http.HttpServletRequest;
//method to validate webhook request
boolean verifyWebhookRequest(String secret, String payload, HttpServletRequest request) throws Exception
{
Mac mac = Mac.getInstance("HmacSHA2256");
SecretKeySpec secretKey = new SecretKeySpec(secret.getBytes(), "HmacSHA256");
mac.init(secretKey);
String signature = Base64.encodeBase64String(mac.doFinal(payload.getBytes()));
return signature.equals(request.getHeader("X-Hook-Signature"));
}
JAVA SCRIPT:
Method to verify the payload by hashing:
function verifyWebhookRequest(secret, payload, xHookSignature) {
const crypto = require('crypto');
const hmac = crypto.createHmac('sha256', secret);
const signature = hmac.update(payload).digest('base64');
return signature === xHookSignature;
}
Creating server to listen the Webhook request and to get the request body:
const server = http.createServer((request, response) => {
if (request.method === 'POST') {
let body = '';
request.on('data', chunk => {
body += chunk.toString();
});
request.on('end', () => {
// secret is x-hook-secret while registering webhook to URL
let isRequestValid = verifyWebhookRequest(secret, body, request.headers["x-hook-signature"]);
response.end('OK');
});
}
});