Zoho Calendar Integration
Zoho Calendar in the Mail-suite applications helps you to better schedule your days without having to close your mailbox. You can view your events, events that you're a part of, be reminded of events, and so on with the Calendar application. The Zoho Calendar integration, in addition to the app, allows you to contextually create events from the emails you receive. The RHS widget can also be used to get a quick view of the day's events and the month's agenda. You can also quickly create and edit events using the widget.
Calendar application
You can meet all your scheduling needs using Zoho Calendar application from the left pane.
Available features:
- Create and manage events
- Organize repeat events
- Add conferencing
- Create and manage team calendars
- Sync Zoho App Calendars
- Sync Google Calendar
- Sync calendars using CalDAV sync
- Subscribe to calendars
The complete user guide for Zoho Calendar can be found here.
Calendar widget
You can click on the Calendar icon on the right pane and access the calendar widget. You can use the widget to view the events for the day, Week and the for an entire month. The events will be displayed in Day view by default.
Click on the Calendar icon on top of the widget and enable/ disable the calendars to show/ hide the events from your calendar. To open Zoho Calendar in a separate browser tab, click on the Open in new tab icon on top of the widget.

Steps to create an event using the widget
- Click on the Calendar widget icon in the right pane.
- Click on + New event button.

- In the New event creation section provide the details of the event (Event title, participants, time and date, etc.,)
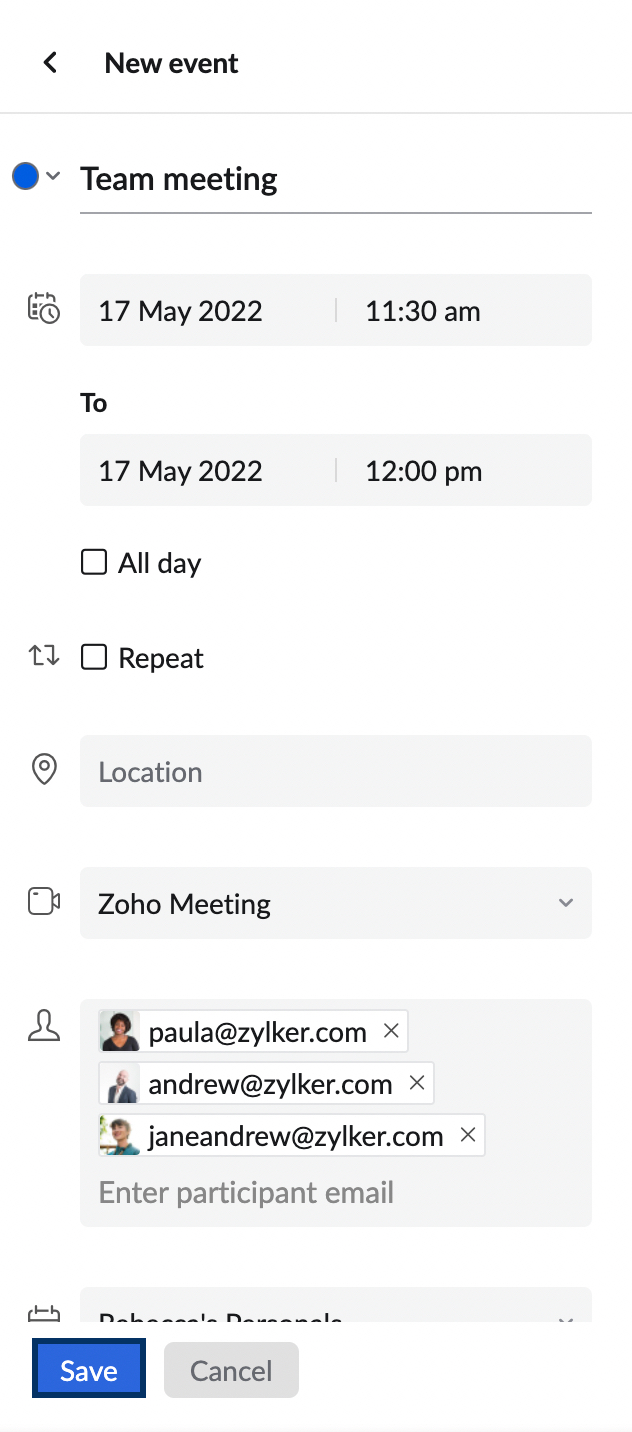
- Click Save.
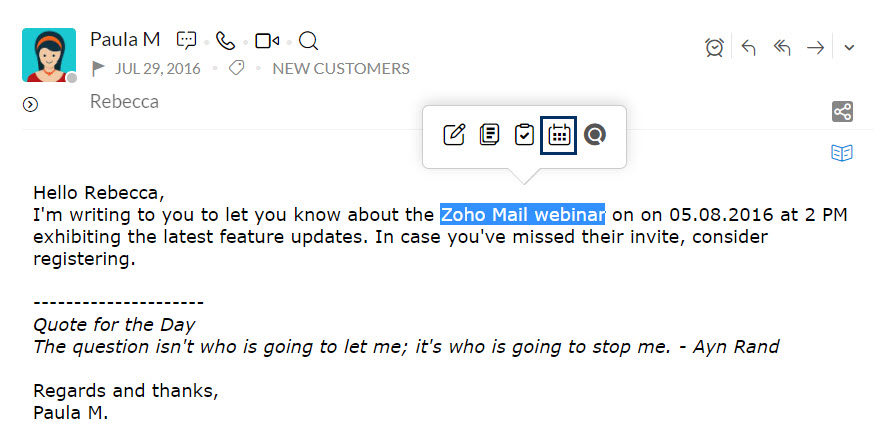
Steps to create an event using the email content
You can also convert email content into a calendar event to help keep track of important dates and meetings. This allows you to quickly automate details like the event title, date, and participations details from an email into your calendar event, making it easier to stay organized.
- Log into your Zoho Mail account.
- Navigate to the email containing the details you want to use to create an event.
- In the email preview pane, click the Add Task dropdown located at the top, and select Calendar.
- The Calendar widget will be displayed in your right pane.
- The event title (taken from the email subject), date, and calendar will automatically populate in the widget.

- You can modify the pre-filled information or add any additional required details, such as time, location, or attendees.
- For further customization, click More Options to include additional features like event descriptions, reminders, and other settings.
- Once satisfied with the entered event details, click Save to finalize and add the event to your calendar.
Note:
When you create a new calendar event via Mail using Email Content, any email attachments included in the email will automatically be added in the Calendar widget. If you prefer not to include these attachments in the event, you can easily remove them by hovering over each attachment and clicking the X icon.
Steps to edit an event using the widget
- Click on the Calendar widget icon in the right pane.
- Navigate to the event you want to edit from the Day, Week or Month view and click on the event.

- Click on the Edit icon in the View event section.
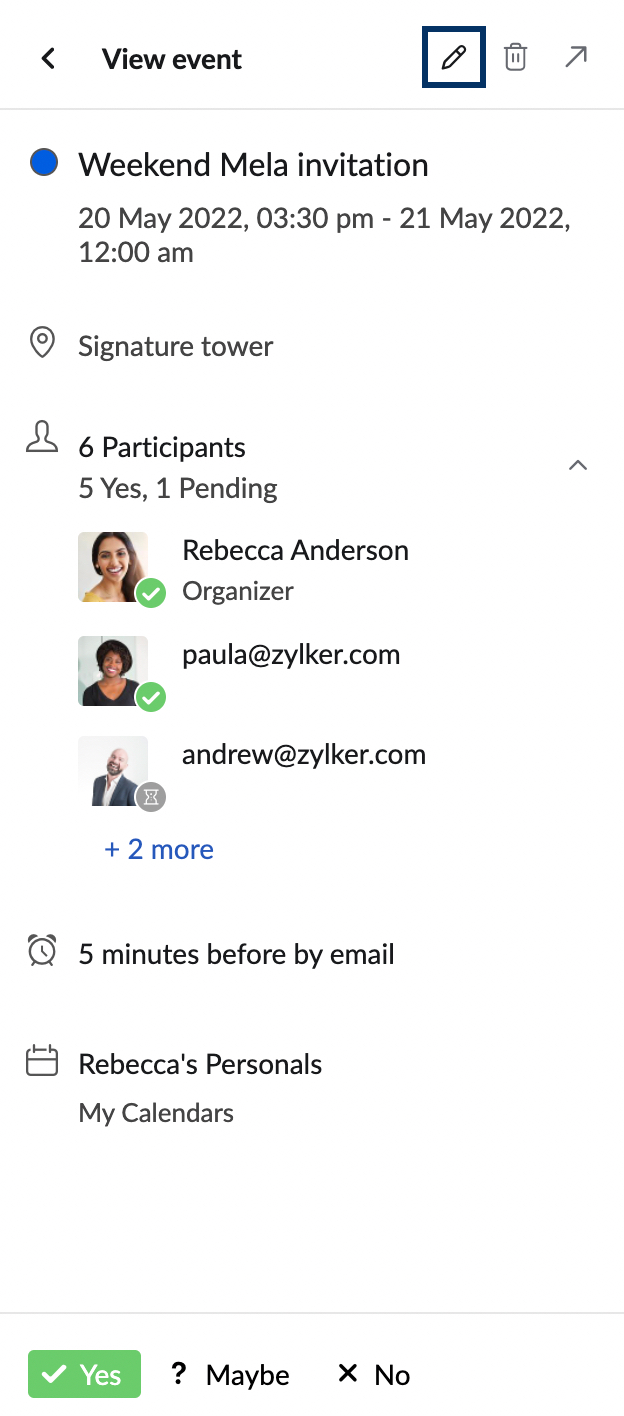
- In the Edit event section, make the necessary changes and click Save.
You can also Delete or RSVP to an event from the Calendar widget.
Smart Add
Using Smart Add feature in the Calendar eWidget in Zoho Mail you can simplify and speed up the process of creating calendar events. Instead of manually entering all event details, Smart Add lets you type a quick phrase (e.g “Product Meeting with Team tomorrow at 3 PM”) and automatically extracts relevant information to create a calendar event. Follow the steps mentioned below to add event via Smart Add:
- Log into your Zoho Mail account.
- Navigate to the email containing the details you want to use to create an event.
- Click on the Calendar widget icon in the right pane.
- Click on the "+" icon on the top right side of the calendar eWidget.

- Enter the required details from the email and click on Add once done.
Note:
- The date entered in Smart Add should be of the format "mm/dd/yyyy".
- Use the information icon in the Smart Add window to know about the syntaxes supported in Smart Add. Refer here to know more about Supported Syntaxes.
Contextual integration
You can create an event using the contextual integration menu available in Zoho Mail. To create an event using the text in email content, click and select the text you want to add as the event title. Select the Calendar icon from the contextual menu pop-up. Provide other details to create an event and click Save.
Note
You will not be able to view Calendar features in Zoho Mail if your admin has disabled your access to the Calendar application.