Zoho SalesIQ Mobilisten Flutter Installation
Overview
Mobilisten, the Zoho SalesIQ Flutter SDK, brings live chat and in-app calling directly into your mobile app, helping you connect with customers at every stage of their journey. With Mobilisten, users can reach you from any screen, get instant support, and make faster, more confident purchase decisions, all without leaving your app.
- In-app Chat: Let customers start conversations, get their questions answered in real-time, and stay engaged right inside your app.
- [New] In-app Calls: Go beyond chat with voice calls, making it easy to resolve complex issues faster and provide a more personal support experience.
- Deep Customization: Mobilisten is highly flexible, from UI customization to behavior control, you can shape the experience to match your app’s design and workflow.
- Knowledge Base & Tracking: Give customers quick access to your knowledge base, track user activity for better insights, and send timely notifications to drive engagement.
- Comprehensive APIs: Every feature, chat, calls, tracking, notifications, KB, and more is available through well-documented APIs under the API Reference.
Download the sample app below to explore how Mobilisten works in action.
Note: Zoho SalesIQ is GDPR Compliant. The configurations for the website and Mobile SDK remain the same. So, if you have already configured on your site, it will be automatically reflected in the Mobile SDK. If not, then learn how to configure now.
Installation steps:
- Requirements
- Installing Zoho SalesIQ Mobilisten for Flutter
- Dependencies installation
- Platform configuration (mandatory)
- Generate App and Access keys
- Initialize Mobilisten SDK
- Platform configuration (optional)
Please follow the steps mentioned below to install the Mobilisten plugin in your Flutter mobile application.
Requirements
Android:
- Minimum Android Version: Android 6.0 (Marshmallow) (API Level 23)
- Compile SDK Version: 35 (Android 15)
Note: Click here to view the required permissions for the Mobilisten SDK.
iOS:
- Minimum iOS Version: iOS 13 and above
- Xcode: 16.0+ (latest recommended)
Installing Zoho SalesIQ Mobilisten for Flutter
Dependencies installation
iOS
- Add dependencies to pubspec.yaml. Add the Mobilisten package for chat/support. If you also need voice calling, add the optional Calls add-on alongside the base package.
Copied
dependencies:
  flutter:
    sdk: flutter
 salesiq_mobilisten: ^6.5.1
 salesiq_mobilisten_calls: ^0.0.2 # Optional — add only if you need calling features
- Install the declared Flutter packages into your project.
Copied
flutter pub get - Install CocoaPods dependencies, navigate to the ios directory, and install pods (only of iOS)
Copied
pod install- Upon any pod resolution issues, try the following command.
Copied
pod repo update && pod install
Android
Open the android directory in Android Studio or any IDE used for Android development. Open the project build.gradle file and add the following maven repository.
- Add the following maven repository in the project root settings.gradle(project/android/settings.gradle) or build.gradle file(project/android/build.gradle).
For Gradle version 6.7 and below
Copied// Add the following to your project's root build.gradle file.

allprojects {
   repositories {
      google()
      mavenCentral()
      // ...
      maven { url 'https://maven.zohodl.com' }
   }
}
For Gradle version 6.8 and above
Copied// Add the following to your settings.gradle file.

dependencyResolutionManagement {
    repositoriesMode.set(RepositoriesMode.FAIL_ON_PROJECT_REPOS)
    repositories {
        google()
        mavenCentral()
        // Add the Zoho Maven URL here
        maven { url = uri("https://maven.zohodl.com") }
    }
}Copied// Add the following to your settings.gradle file.
dependencyResolutionManagement {
repositoriesMode.set(RepositoriesMode.FAIL_ON_PROJECT_REPOS)
repositories {
google()
mavenCentral()
// Add the Zoho Maven URL here
maven { url 'https://maven.zohodl.com' }
}
}Platform configuration (mandatory)
iOS
1. Update your Info.plist
Add the required keys and descriptions for your application in the Info.plist file. These are necessary for the SDK to work correctly and comply with iOS requirements.
- Open Xcode workspace
Copied
open ios/Runner.xcworkspace - In Xcode’s Project navigator, expand Runner and locate Info.plist under the Runner folder.
- Add only the usage description keys you need, then save and rebuild the app.

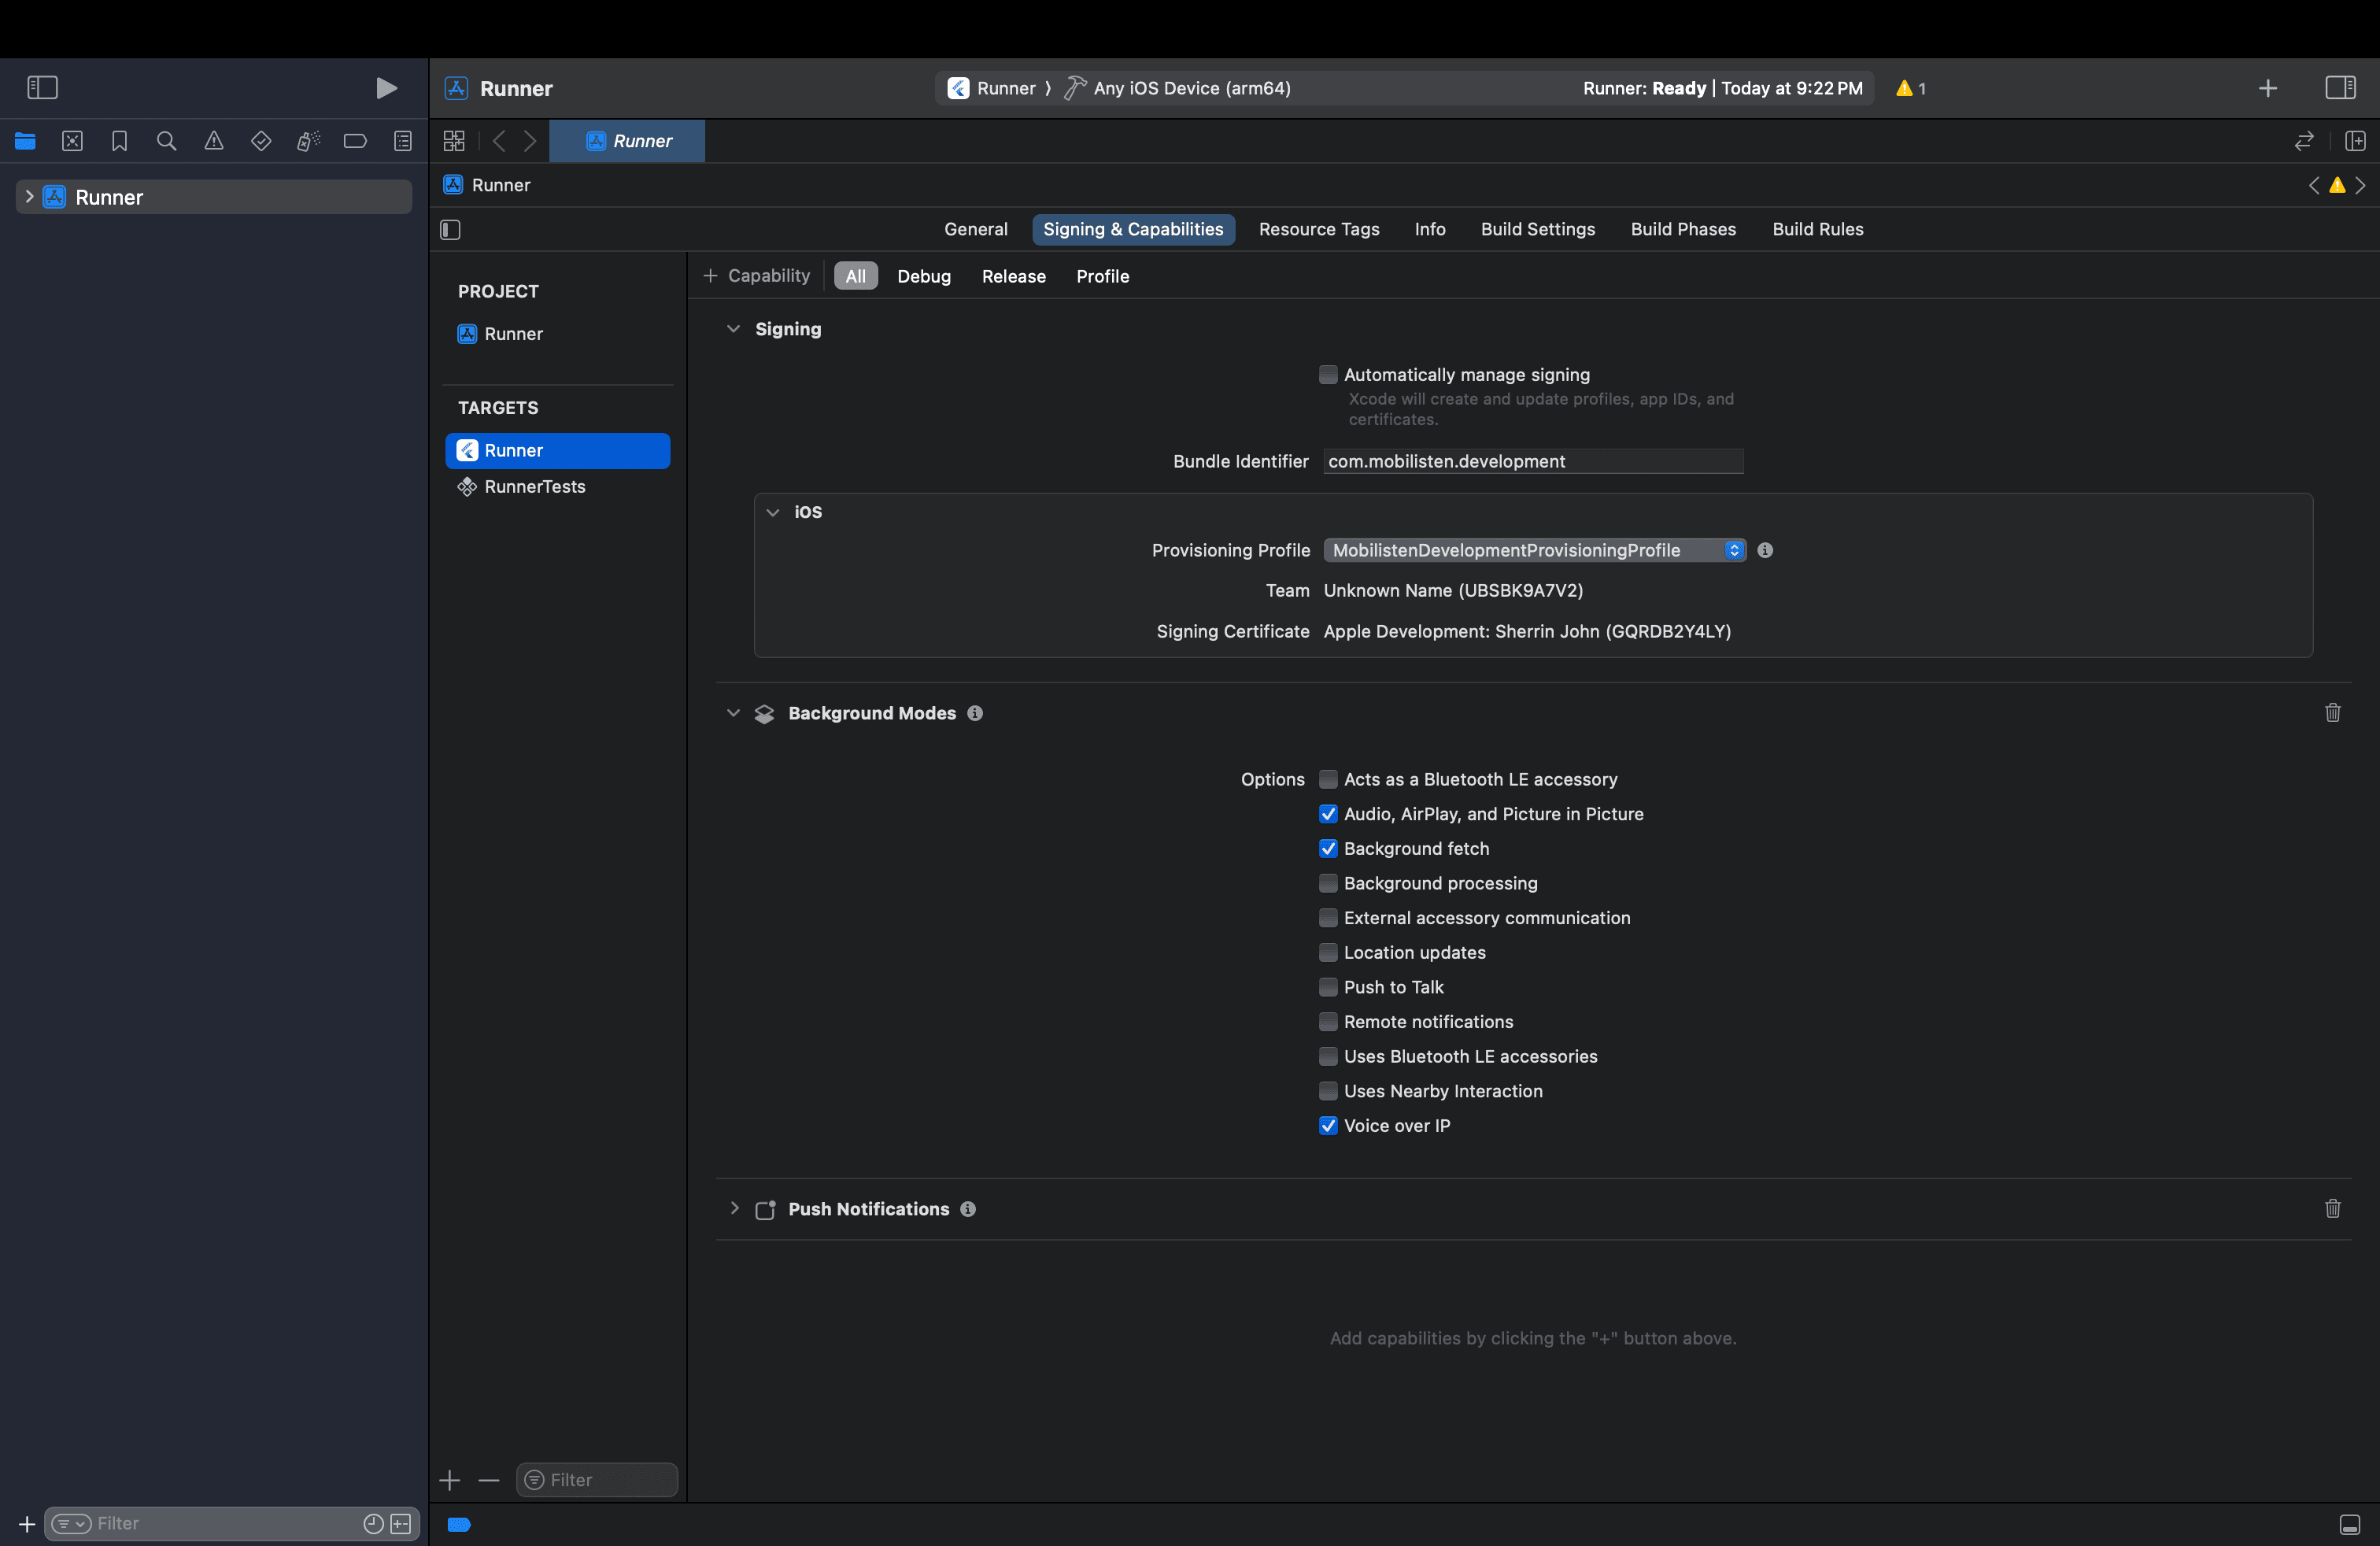
2. Configure background mode capability for CallKit
When integrating salesiq_mobilisten_calls, enable the appropriate Background Modes in Xcode so CallKit can properly show incoming and ongoing calls, even when your app runs in the background.
This setup ensures your app can display CallKit’s call UI and handle calls seamlessly in the background.
Enable background modes for CallKit
- Open Xcode and select your app target.
- Navigate to the Signing & Capabilities tab.
- Click + Capability and add Background Modes.
- Under Background Modes options, check:
- Background fetch
- Audio, AirPlay, and Picture in Picture
Android
1. Lifecycle Callback
Copied
<application
    android:label="@string/app_name"
    android:icon="@drawable/ic_launcher"
android:name="<package_name>.MyFlutterApplication"> Copiedimport io.flutter.app.FlutterApplication;
import com.zoho.salesiq.mobilisten.calls.plugin.MobilistenCallsPlugin;
import com.zohosalesiq.plugin.MobilistenPlugin;
public class MyFlutterApplication extends FlutterApplication {
//...
@Override
public void onCreate() {
MobilistenPlugin.registerCallbacks(this);
MobilistenCallsPlugin.registerCallbacks(this);
super.onCreate();
}
}This is essential as it enables Mobilisten to track activity's lifecycles and other listener callbacks on the app's startup to show the launcher and other important user behaviors.
Note: If you already have a custom Application class, ensure to "import com.zohosalesiq.plugin.MobilistenPlugin;" and call "MobilistenPlugin.registerCallbacks(this);" before invoking "super.onCreate()".
2. Permissions
Mobilisten
| Permission | Description |
|---|---|
| android.permission.INTERNET | Required for all network-related operations, including chat, calls, and data synchronization. (Mandatory) |
| android.permission.SCHEDULE_EXACT_ALARM | Required to schedule proactive chatbot triggers after a specified duration. Add SCHEDULE_EXACT_ALARM permission in your AndroidManifest.xml. Ensures bot messages are delivered at the exact time, even if the app is inactive. Mandatory for Android 12 and above when using bot triggers. |
Mobilisten Calls
| Permission | Description |
| android.permission.POST_NOTIFICATIONS | Allows the SDK to display notifications for messages, calls, and bot triggers. |
| android.permission.FOREGROUND_SERVICE_SPECIAL_USE | Permits running specialized foreground services required for call-related features. |
| android.permission.FOREGROUND_SERVICE_PHONE_CALL | Enables foreground service support specifically for handling phone call functionality. |
| android.permission.FOREGROUND_SERVICE_MICROPHONE | Allows microphone access while running foreground services during calls. |
| android.permission.MANAGE_OWN_CALLS | Enables the app to manage its own call sessions within the system. |
| android.hardware.sensor.proximity | Uses the device’s proximity sensor to manage screen behavior during calls (e.g., turning off screen near the ear). |
| android.permission.BLUETOOTH_CONNECT | Allows connection to Bluetooth audio devices during calls. |
| android.permission.USE_FULL_SCREEN_INTENT | Enables full-screen notifications for incoming calls. |
| android.permission.MODIFY_AUDIO_SETTINGS | Allows the SDK to control audio routing and volume during calls. |
| android.permission.SYSTEM_ALERT_WINDOW | Permits displaying overlay elements when required (e.g., call UI). |
| android.permission.RECORD_AUDIO | Required to capture microphone input during voice or video calls. |
Generate App and Access keys
Once the SDK is integrated and the necessary permissions are configured, generate the App Key and Access Key for the required platform(s) to initialise Mobilisten.
Note: A separate app and access key are required for iOS and Android.
iOS
- In the Zoho SalesIQ console, navigate to Settings > Brands > choose the brand > Installation, and choose iOS.
- Enter your application's bundle ID, which must match Xcode > Runner target > Bundle Identifier.
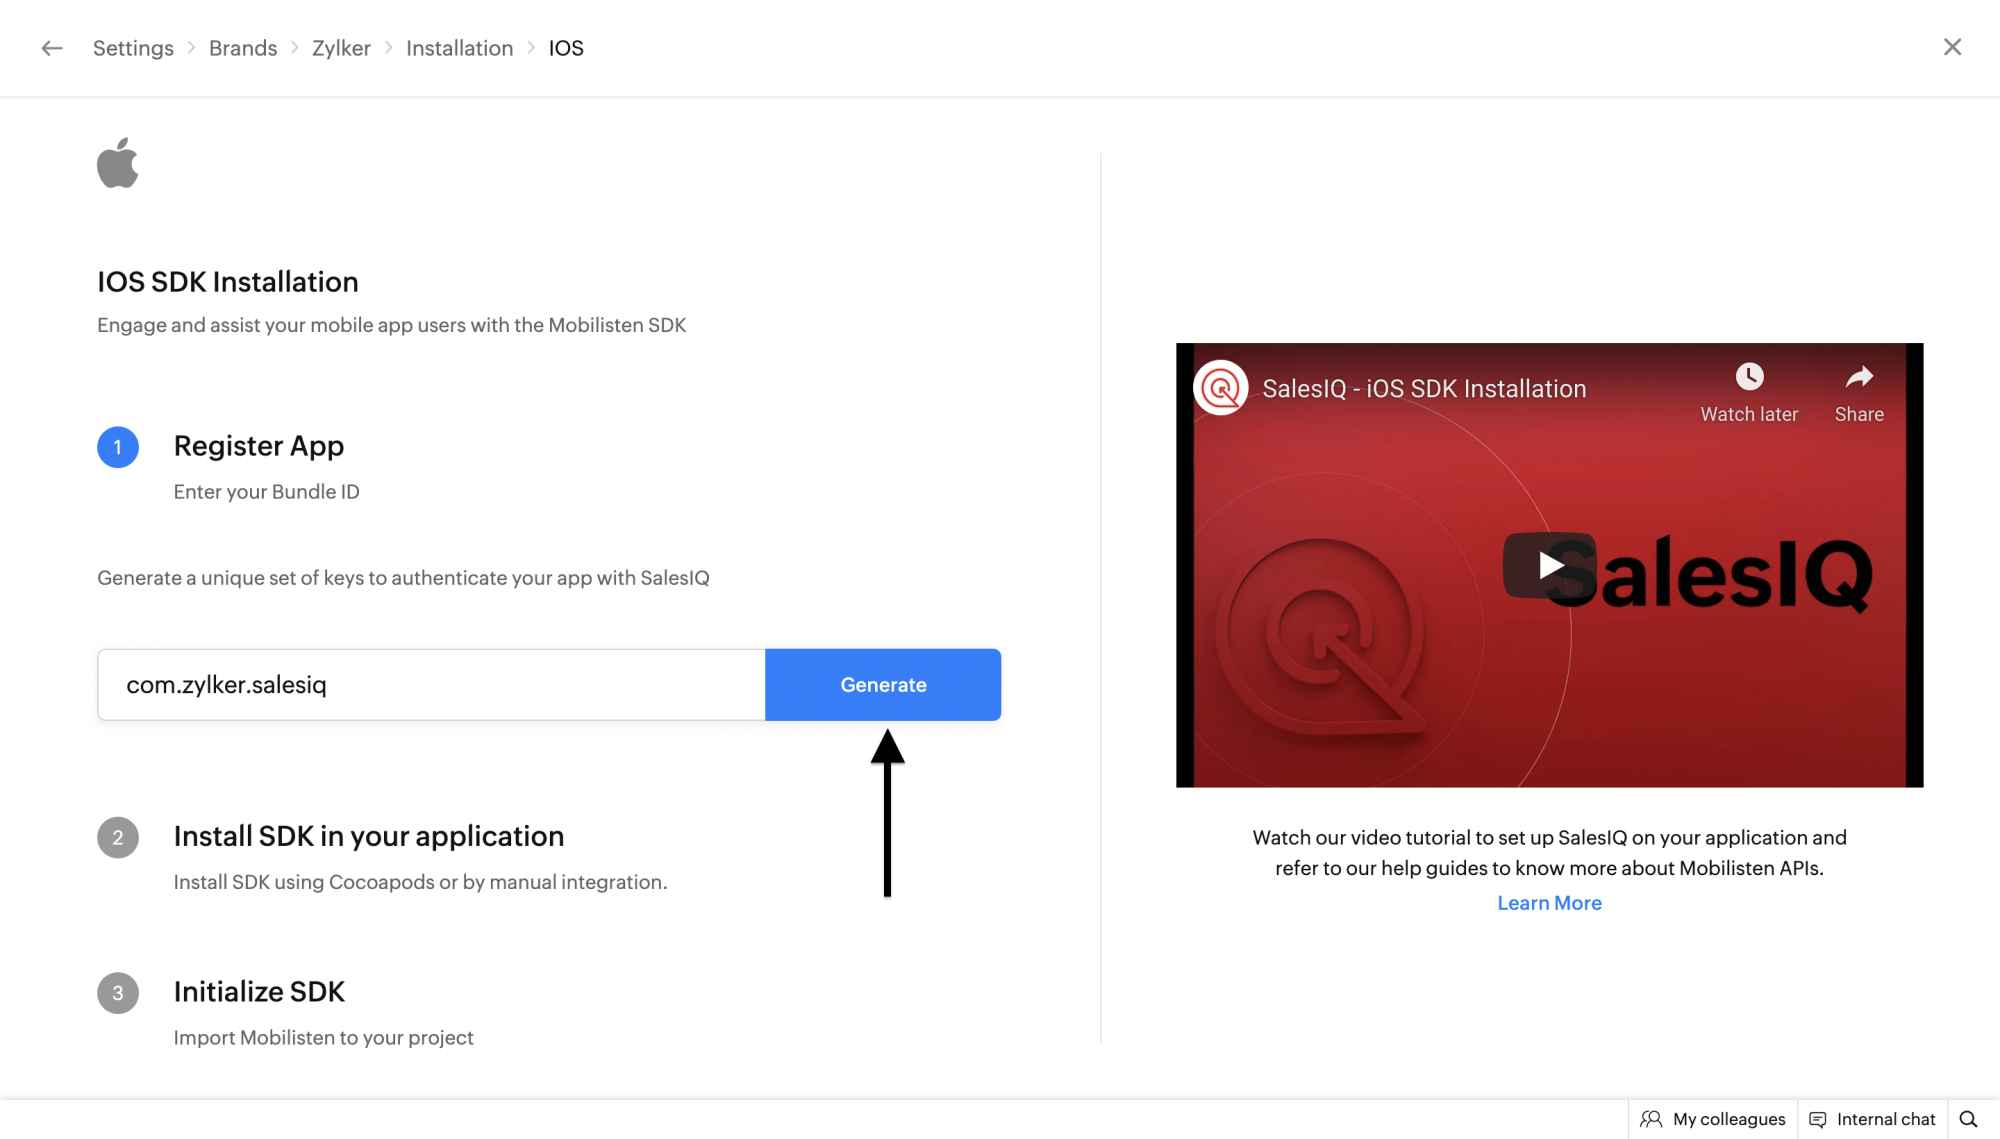
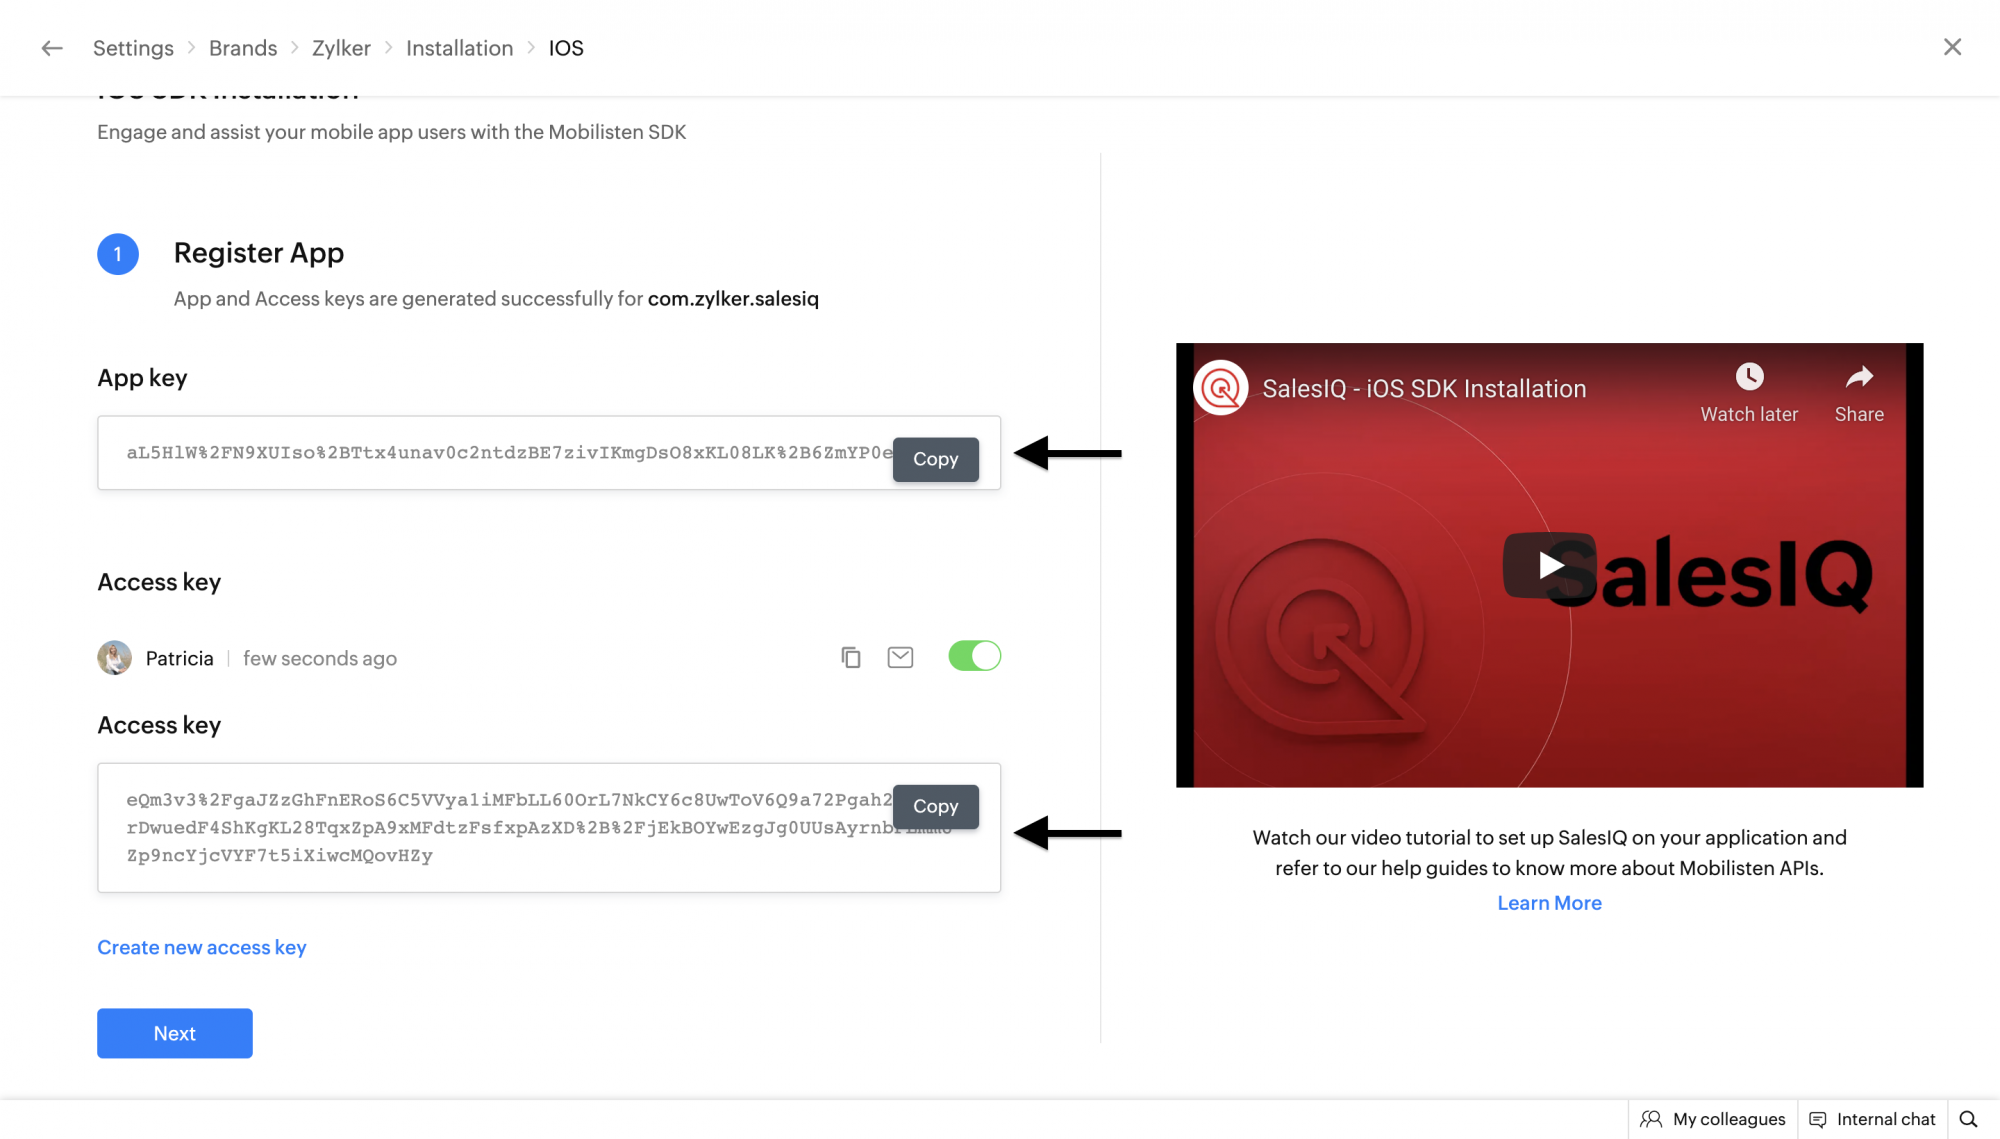
- Click on Generate Token. Copy the App key and Access key. You can also generate the new keys by clicking on the Generate button again.
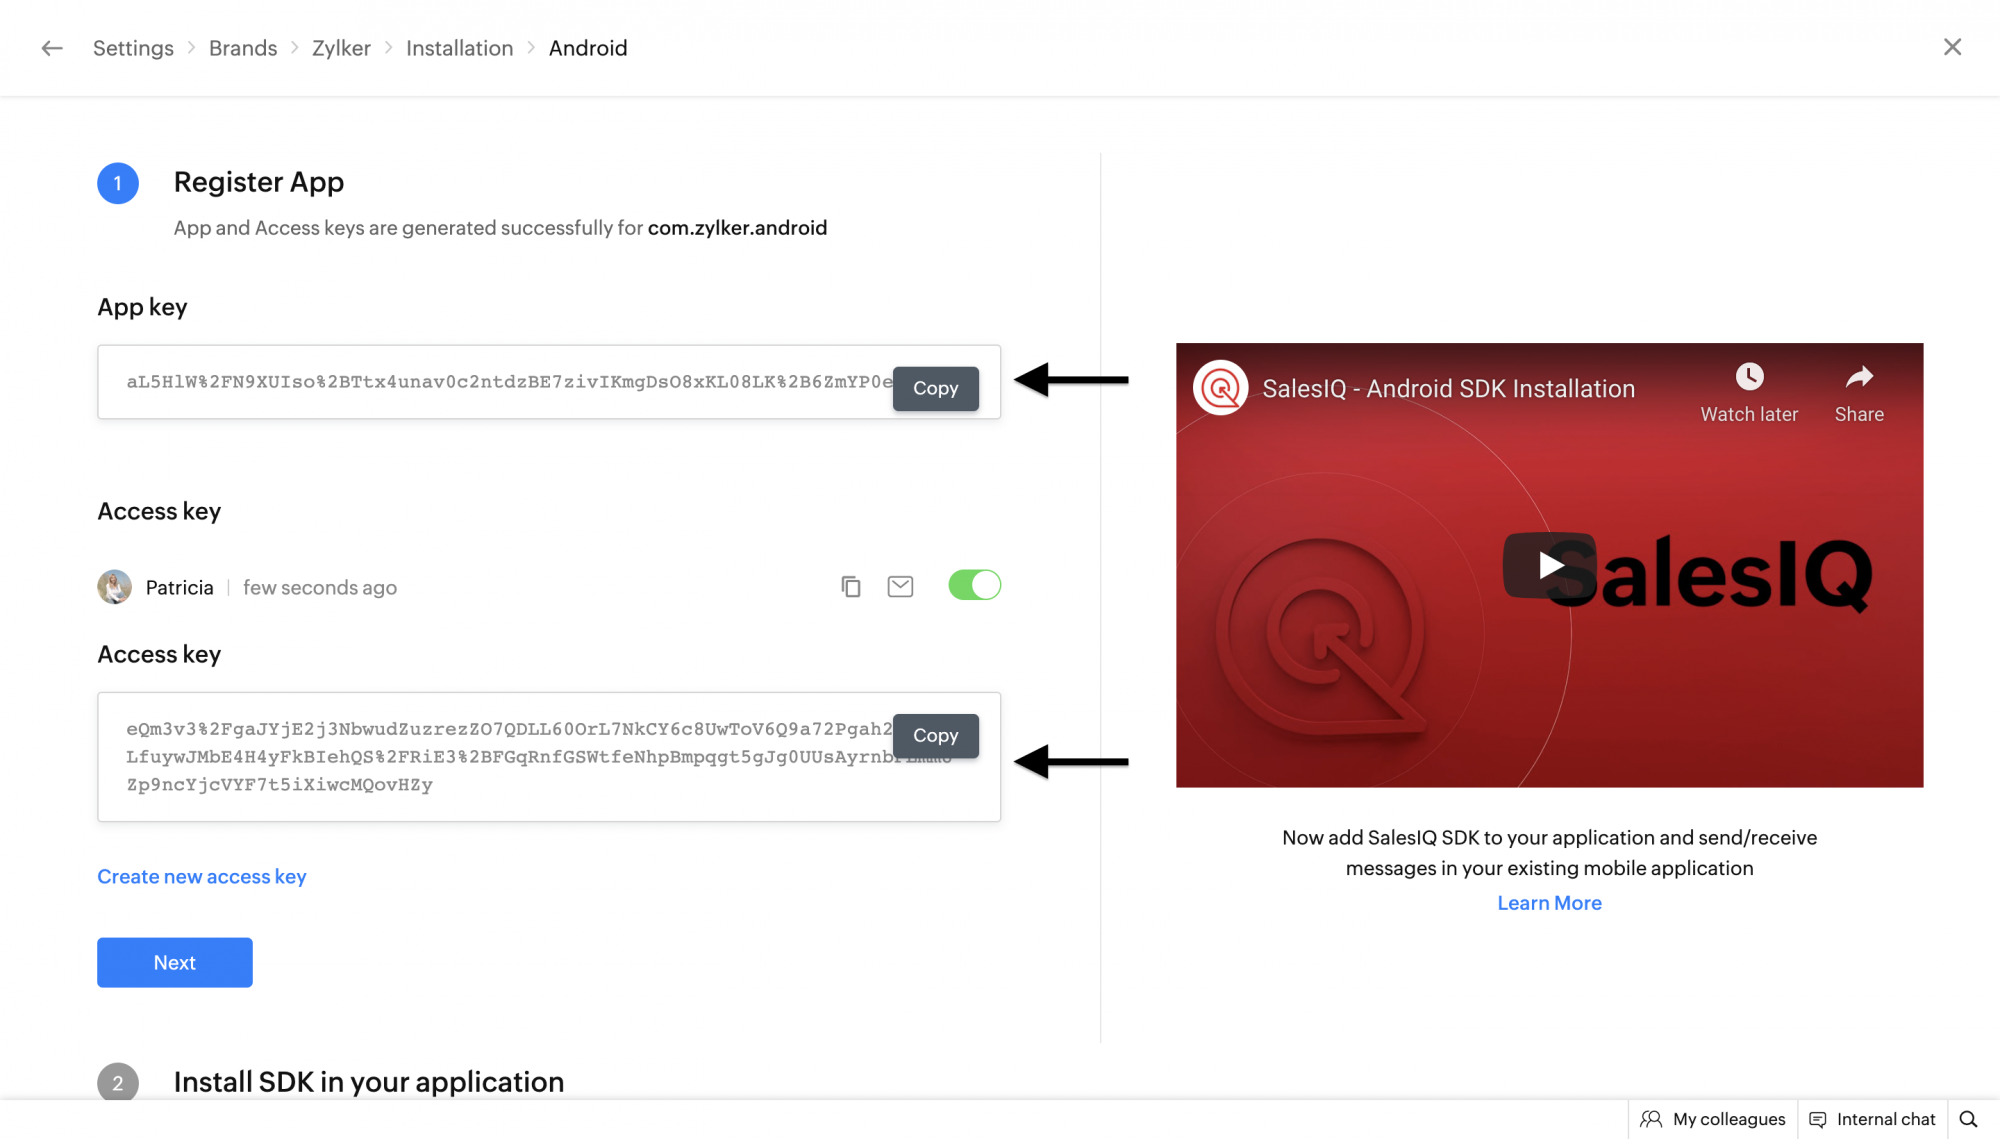
Android
- In the Zoho SalesIQ console, go to Settings > Brands > Installation, and choose Android.
- Enter your application's bundle ID (applicationId in android/app/build.gradle).
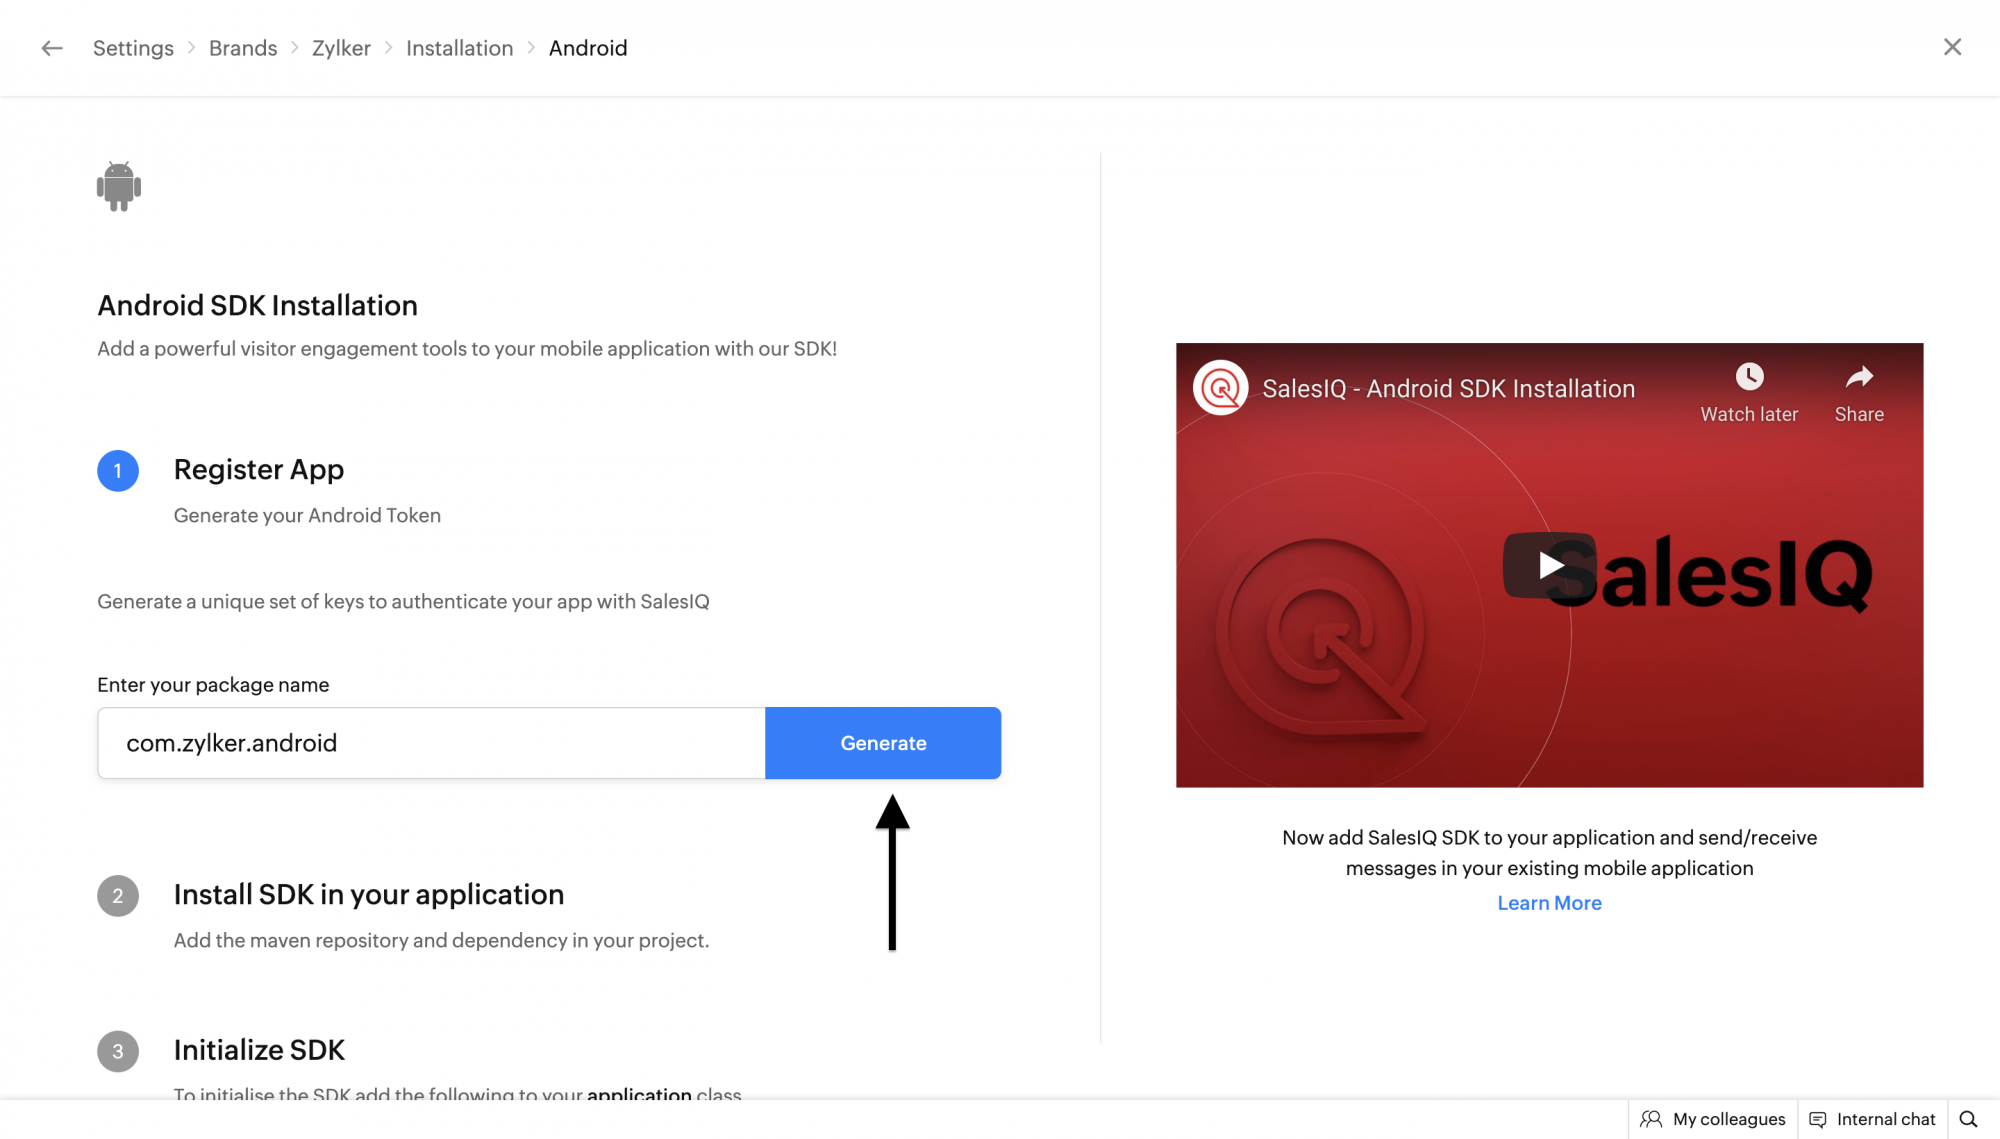
- Click on Generate. Copy the App key and Access key. You can also generate the new keys by clicking on the Generate button again.
Initialize Mobilisten SDK
After completing all the above steps, initialize the SDK by adding the following snippet with your app key and access key.
Copiedimport 'dart:io' show Platform;
import 'package:salesiq_mobilisten/salesiq_mobilisten.dart';
// If you use the Calls add-on, keep the import below; otherwise remove it.
import 'package:salesiq_mobilisten_calls/salesiq_mobilisten_calls.dart';
/// Initialize Mobilisten SDK.
/// Call this once at app startup (application wakeup place), e.g., before runApp().
Future<void> initMobilisten() async {
  // Hardcoded here only as placeholders:
  const iosAppKey        = 'YOUR_IOS_APP_KEY';
  const iosAccessKey     = 'YOUR_IOS_ACCESS_KEY';
  const androidAppKey    = 'YOUR_ANDROID_APP_KEY';
  const androidAccessKey = 'YOUR_ANDROID_ACCESS_KEY';

  // Platform check: pick the correct keys per platform
  final appKey    = Platform.isIOS ? iosAppKey : androidAppKey;
  final accessKey = Platform.isIOS ? iosAccessKey : androidAccessKey;

  ZohoSalesIQ.init(appKey, accessKey).then((_) {
 // Mobilisten instelized successfully
}).catchError((error){
   // Mobilisten not instelized successfully
});
}
Note: To display the chat launcher (floating button) by default in your app UI, use the following snippet
Copied
import 'package:salesiq_mobilisten/launcher.dart';
ZohoSalesIQ.launcher.show(VisibilityMode.always);
Platform configuration (optional)
Proguard Configuration (Minifying App)
In some versions of the Android Gradle plugin, the R8 compiler exhibits aggressive behavior that removes some essential classes necessary for the SDK to function as expected. To handle this, we have added specific pro-guard rules within our Mobilisten SDK to preserve these crucial classes during the build process. If you have enabled ProGuard(minifyEnabled) R8, then please add the following rules in your proguard-rules.pro file in your project/android folder.
Copied
-dontwarn kotlinx.parcelize.Parcelize
Backup Codes
If your app has enabled backup and you have your own backup rules or some of your other dependencies have them, then all these steps below are mandatory for App data backup to Google. Since Android doesn’t support manifest merging, all backup rules must be combined into a single file, which you’ll need to reference in your app’s AndroidManifest.xml.
To complete this setup,
- Create XML files called merged_backup_rules.xml and merged_data_extraction_rules.xml in the res/xml/ directory. Example: android/app/src/main/res/xml.
- Add your rules with our Mobilisten rules to your app and verify that everything is functioning as expected.
Copied<?xml version="1.0" encoding="utf-8"?>
<full-backup-content>
    <!-- Your own/other library's rules -->
    <exclude domain="sharedpref" path="sample-data"/>
    <exclude domain="database" path="sample.db"/>

    <!-- Mobilisten rules -->
    <exclude
        domain="sharedpref"
        path="siq_encrypted_shared_preference_entries.xml" />
    <exclude
        domain="sharedpref"
        path="siq_session.xml" />
    <exclude
        domain="sharedpref"
        path="siq_permission.xml" />
    <exclude
        domain="database"
        path="siq_mobilisten.db" />
     <exclude
        domain="database"
        path="mobilisten_zoho_salesiq.db" />
</full-backup-content>
merged_data_extraction_rules.xml
Copied<?xml version="1.0" encoding="utf-8"?>
<data-extraction-rules>

    <cloud-backup>
        <!-- Your own/other library's rules -->
        <exclude domain="sharedpref" path="sample-data"/>
        <exclude domain="database" path="sample.db"/>

        <!-- Mobilisten rules -->
        <exclude
            domain="sharedpref"
            path="siq_encrypted_shared_preference_entries.xml" />
        <exclude
            domain="sharedpref"
            path="siq_session.xml" />
        <exclude
            domain="sharedpref"
            path="siq_permission.xml" />
        <exclude
            domain="database"
            path="siq_mobilisten.db" />
        <exclude
            domain="database"
            path="mobilisten_zoho_salesiq.db" />
    </cloud-backup>

    <device-transfer>
        <!-- Your own/other library's rules -->
        <exclude domain="sharedpref" path="sample-data"/>
        <exclude domain="database" path="sample.db"/>
    </device-transfer>
</data-extraction-rules>
Also, ensure to map it in your AndroidManifest.xml.
Copied
android:dataExtractionRules="@xml/merged_data_extraction_rules"
android:fullBackupContent="@xml/merged_backup_rules"'
tools:replace="android:fullBackupContent,android:dataExtractionRules,android:allowBackup"