Queries
Businesses often need to fetch data from multiple services, manage, and convert that data to the required format as needed. This is typically achieved using Functions, Client Script, or Widgets to load and display data within a CRM system. These processes involve writing and executing code.
The Queries feature facilitates the retrieval of data from Zoho CRM and external sources via various standards such as COQL(for Zoho CRM) and REST API. In addition to data retrieval, it provides schema management, serialization of responses and other functionalities in data handling.
For example, consider that Deals is a related list in the Contacts module. A contact can have multiple associated deals, but you want to display only those that are won in your canvas.
To achieve this, you can create one of the following queries and associate that query in the Canvas' Detail View.
Modules
Create a query for the Deals module and use criteria to filter the deals by "Stage" and give the contact ID as a variable. This means that you want to filter only the deals associated with that contact and by their stage.
COQL
Create a COQL query for the Deals module. The COQL statement is as follows.
{
                        SELECT Deal_Name, Closing_Date, Stage, Related_Contact from Deals WHERE Stage = "Closed_Won" and Related_Contact = {{contact_id}}
                    }
Here {{contact_id}} is the variable to pass the contact ID dynamically to the query during execution. To know more about variables in your queries, go to the Variables section on this page.
So, Queries is a hub to fetch data with advanced configurations and display data from within CRM and third-party applications, and use them at various places.
Components of Queries
Sources
A source is the data provider. Zoho CRM provides pre-configured sources like Module and COQL in Queries. Apart from this, you can also create your own source to fetch data from third-party as well as other Zoho services.
Currently, Queries supports REST API standard while creating a source.
Follow the steps to add a source.
- Go to Setup -> Developer Hub -> Queries. The Queries window opens.
- Click the Sources tab.
- Click Add Source.
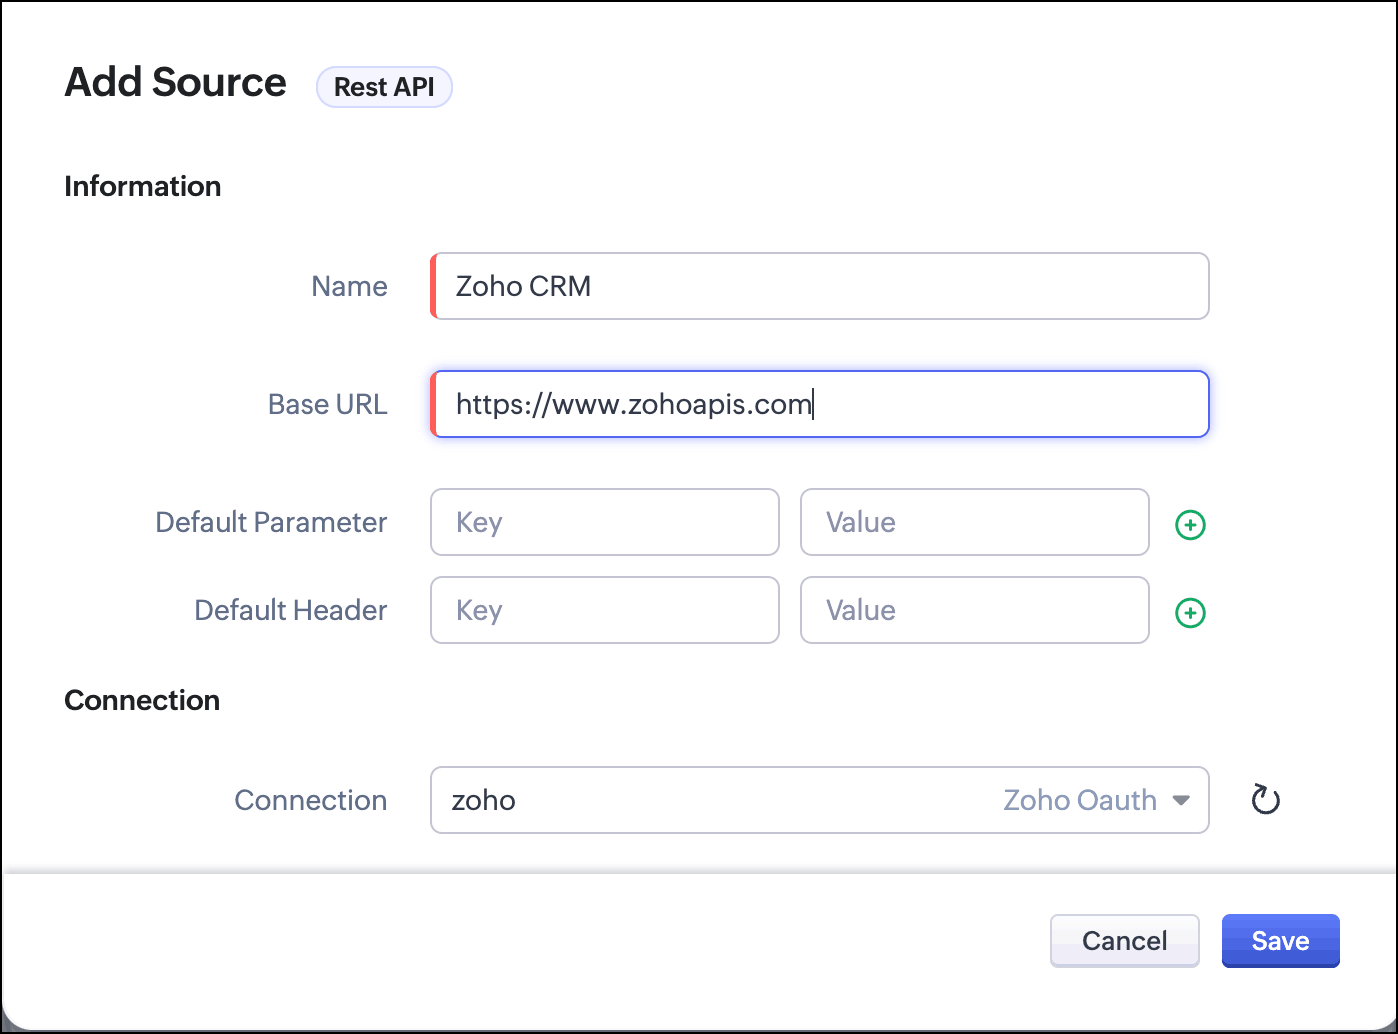
- Under Information, enter the following:
- The name of the resource.
The Base URL of the resource. This will be the URL of the other Zoho service or third-party, which Queries will make API calls to fetch data from.
Note: This URL must be available in the Trusted Domain.
- The default parameters and headers of the request.
- Under Connection, you can choose the connection of the data provider. You can also create a connection from here. For more details on creating connections, refer to this page.
Click Save.
Queries
Queries allow you to fetch data from various sources and use them as necessary at various places. Query configuration depends on the type of source. For example, if you choose the Source as "Module", your query can fetch data from that module. If your Source type is "COQL", you must write a query using COQL(CRM Object Query Language) to fetch data, and for the "REST API" Source type, you can use endpoints, headers, and other parameters to fetch data from a third-party service.
You can also perform sorting the response based on a field.
For more information on different types of queries, go to the Query Types page.
Variables
Queries supports variables at various places like the criteria, COQL statement, values, endpoints, etc. While associating the Queries query in components like Canvas, the variables should be mapped to the required fields.
These variables allow you to pass dynamic values to the query during execution(runtime).
You must declare a variable in curly braces in the format {{VARIABLE_NAME}}.
Schema
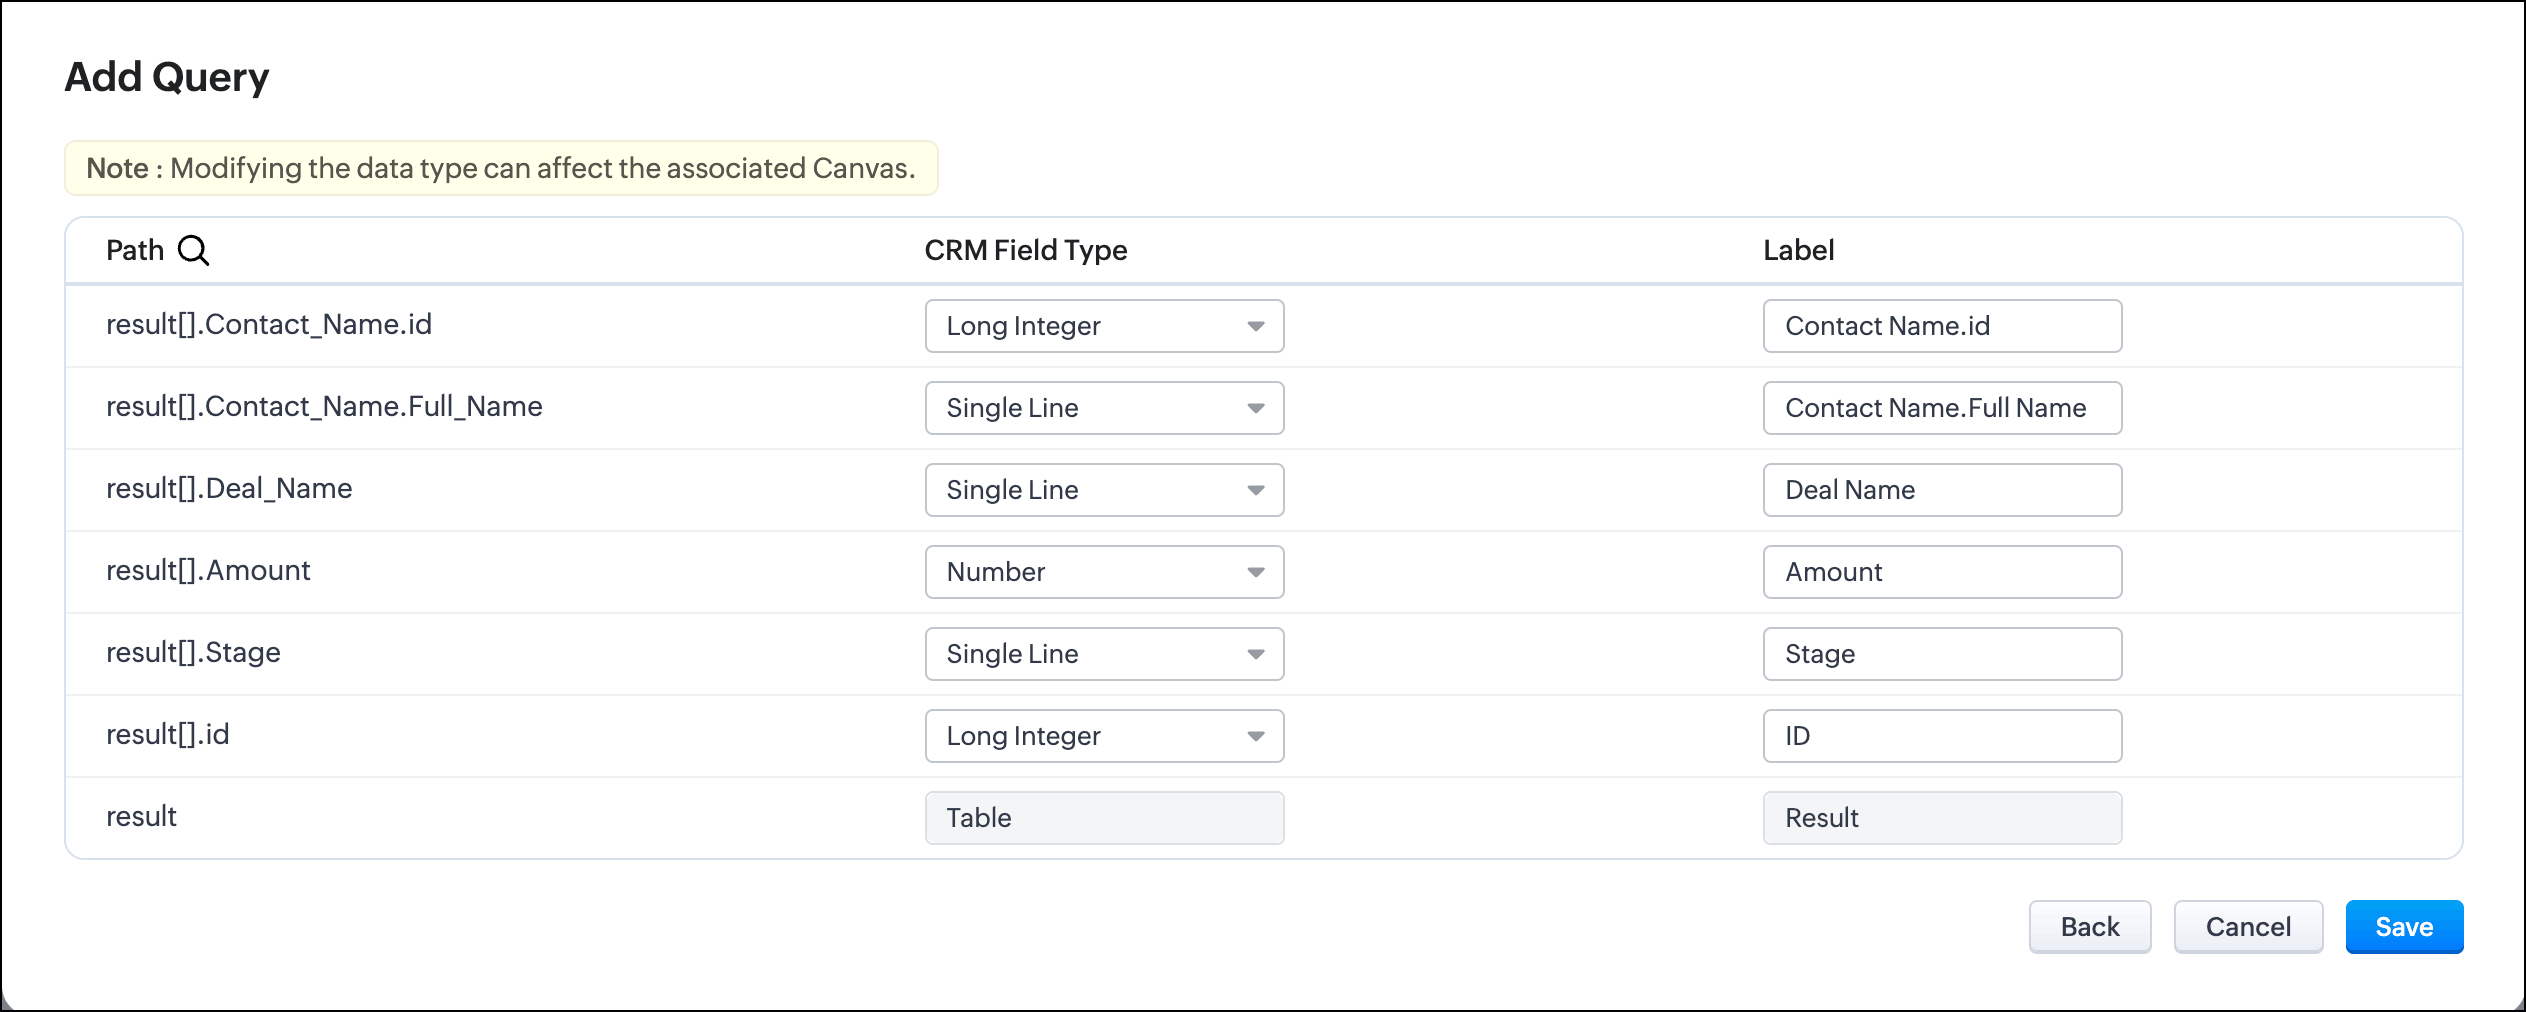
For every query, the schema will be generated and will be available in the result path.
Schema contains the path of each field, its CRM field type, and the label. You can traverse through this result to get to each field in the query. You can edit the field type and the label to suit your needs in the response of your query.
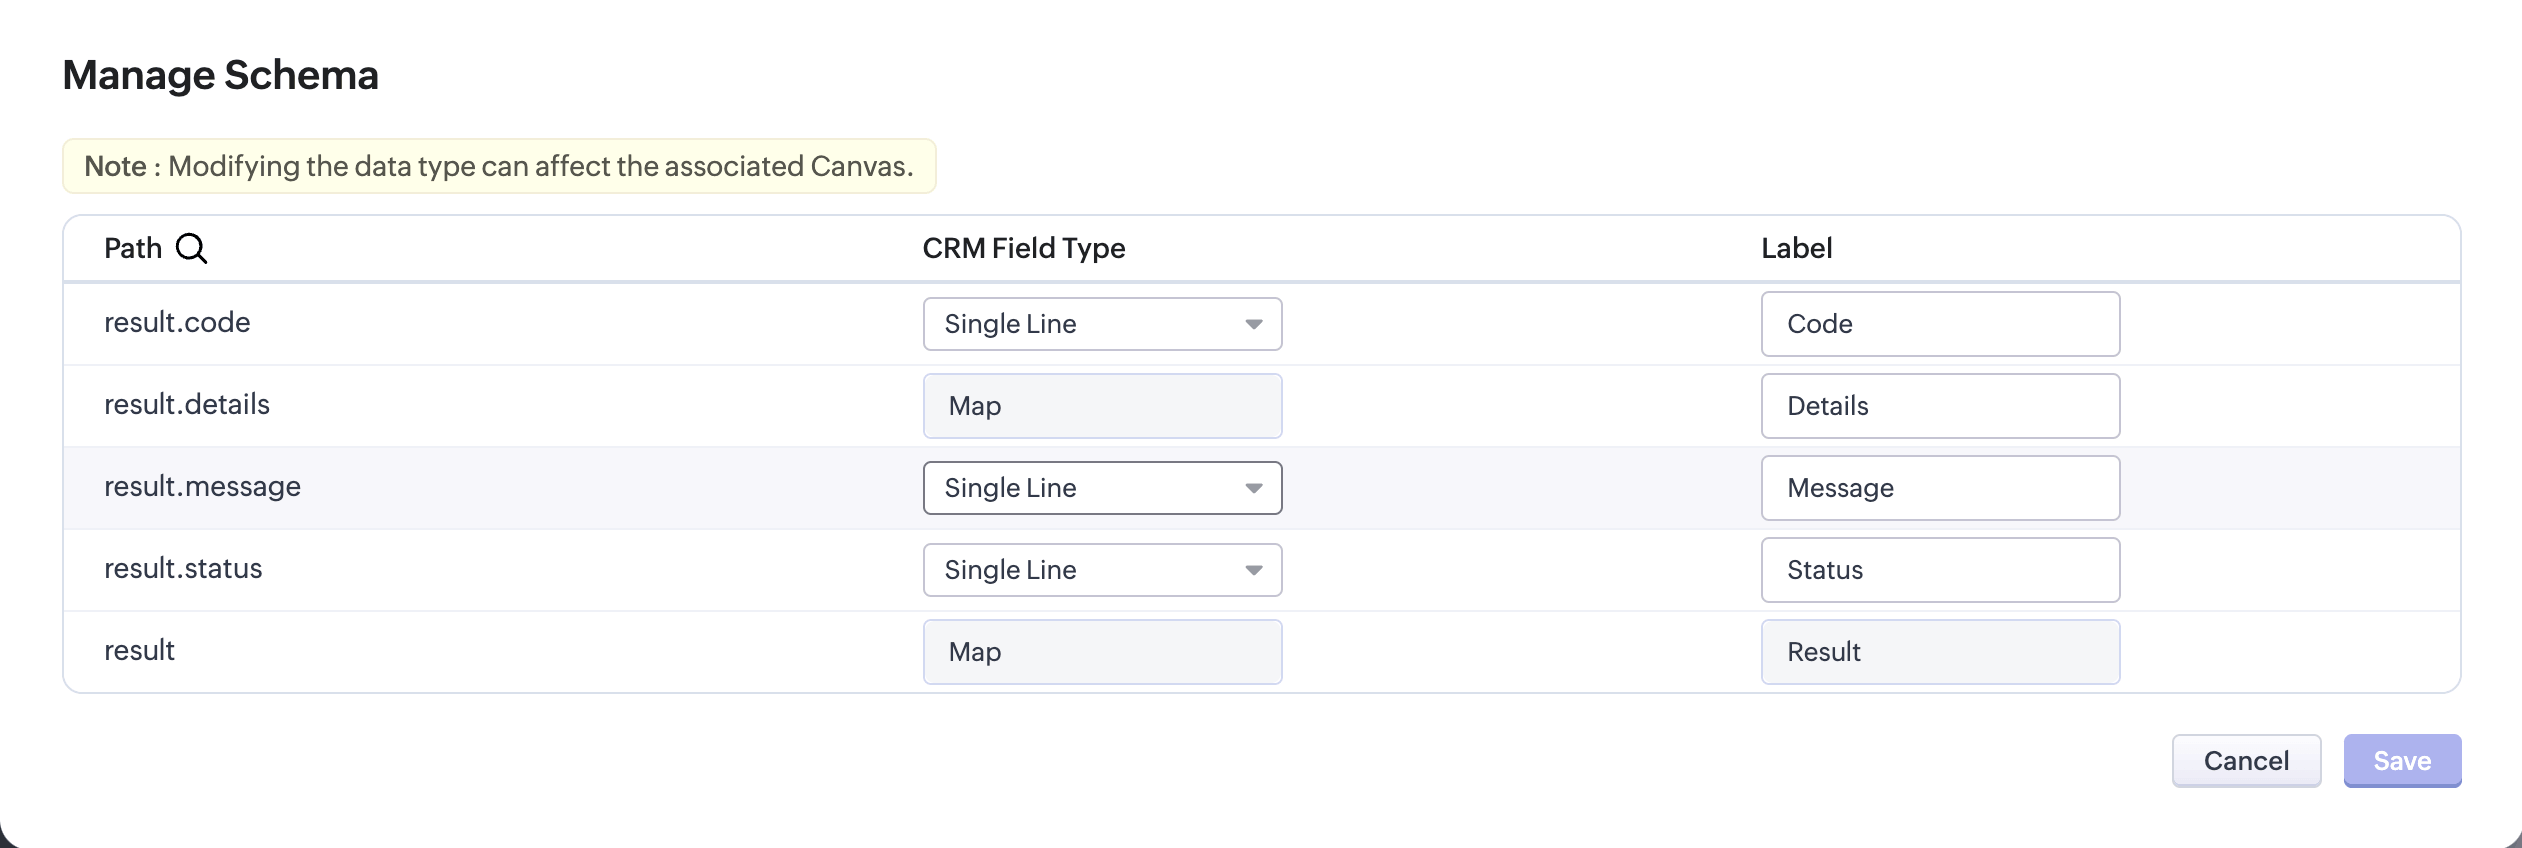
You can change the schema while creating or updating a query, or later. Hover over a query in the Queries tab. Click the three-dot icon and click Manage Schema.
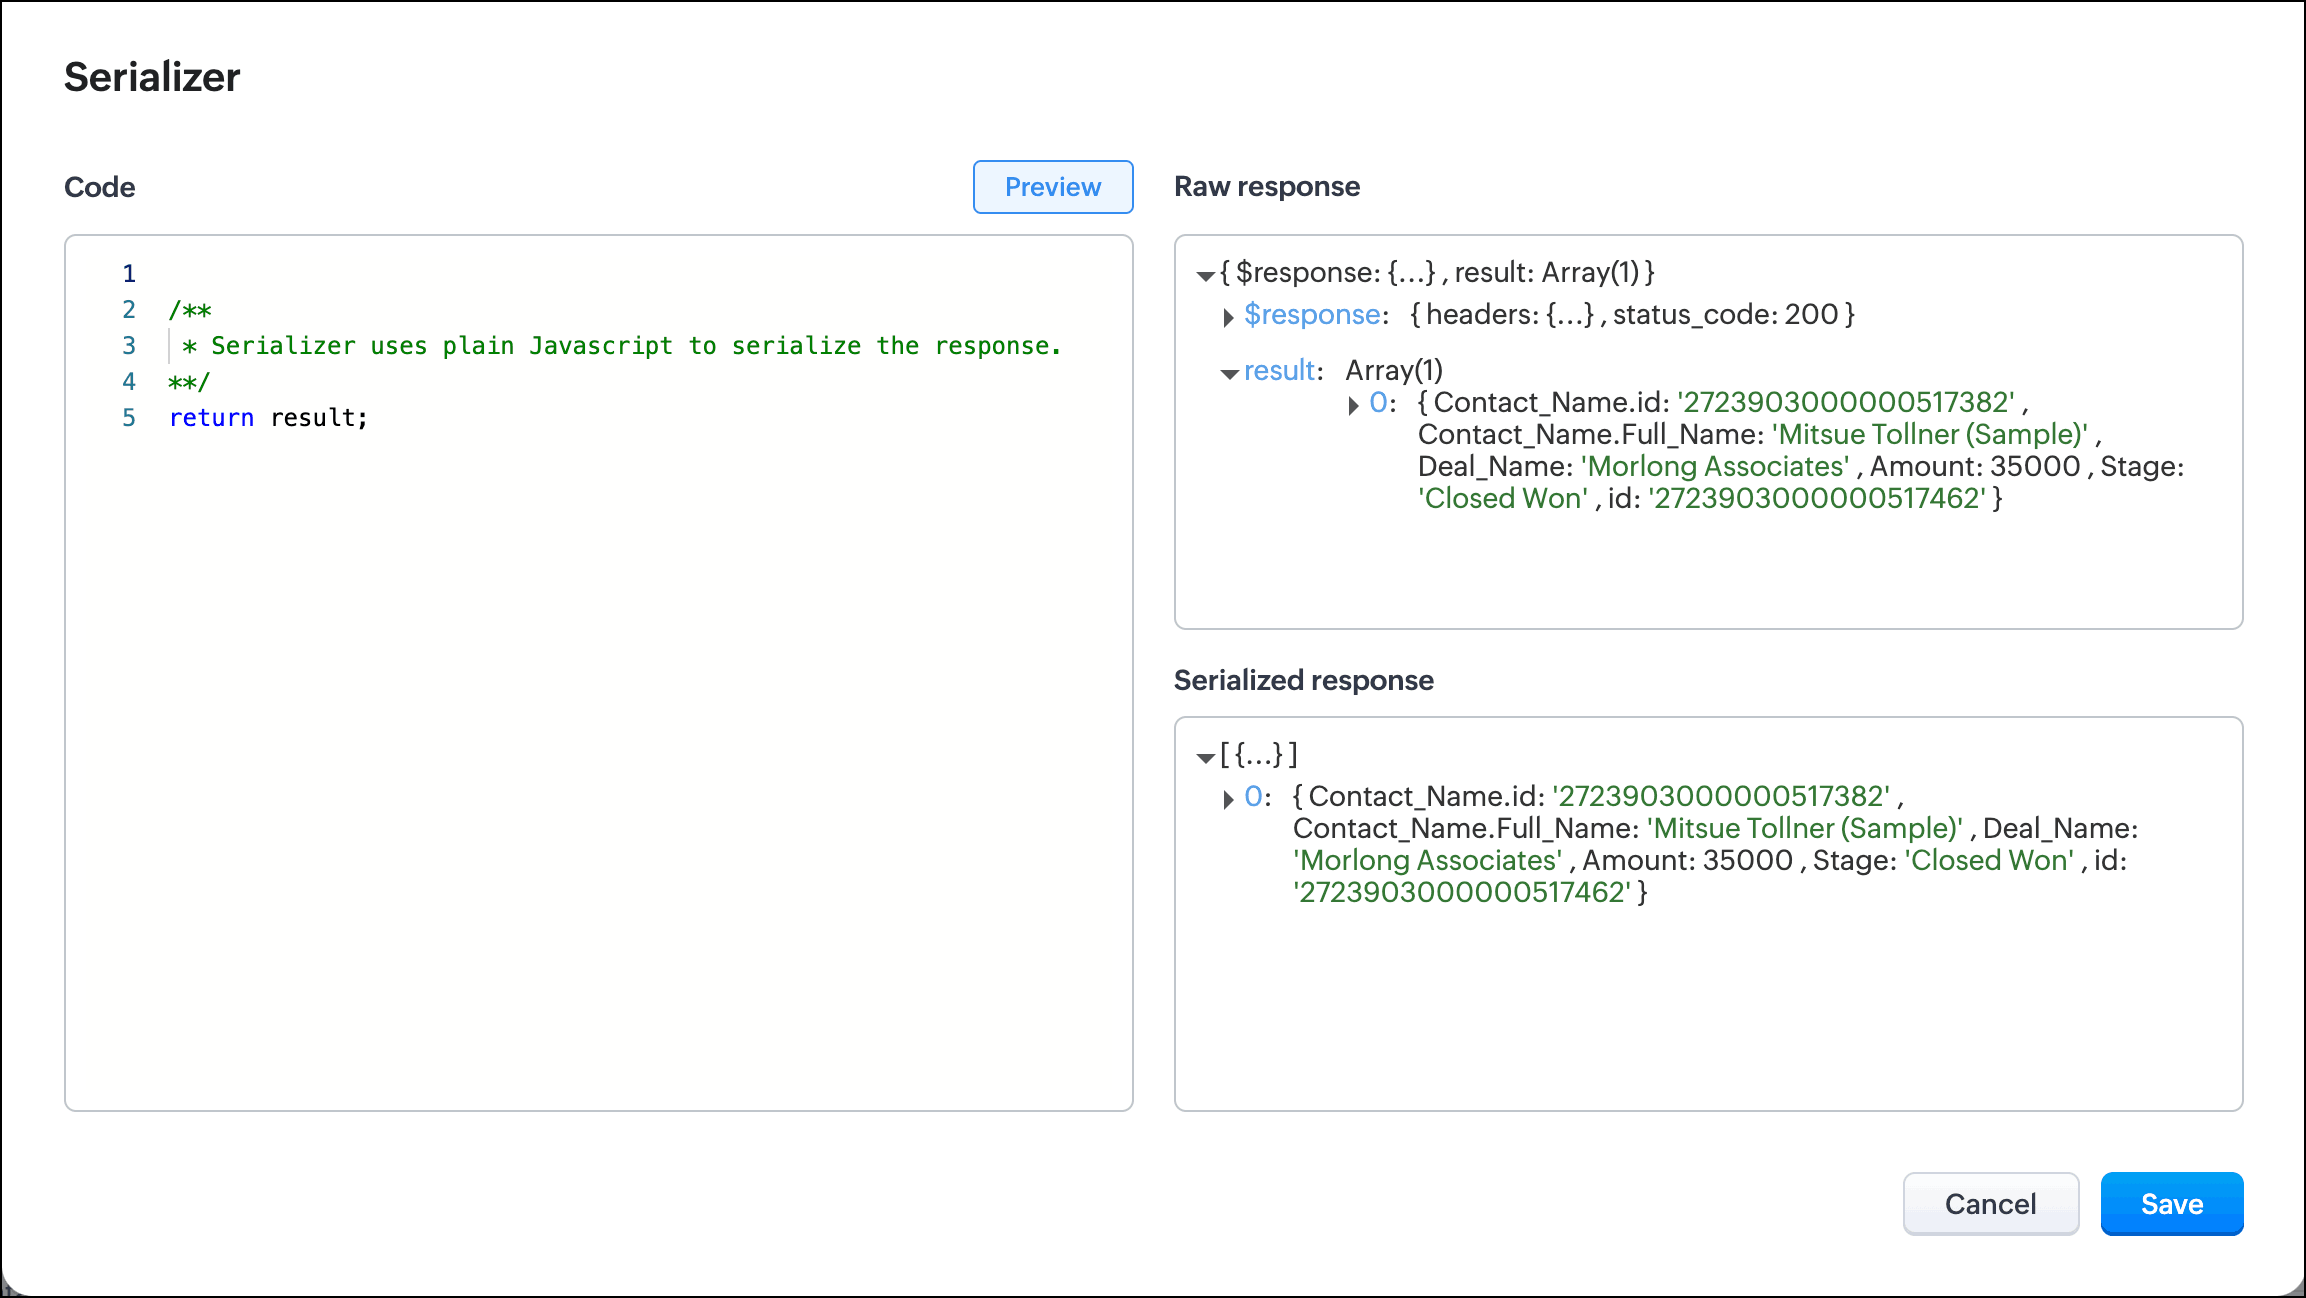
Serializer
Serializer allows you to manipulate the response of a query using JavaScript, and alter it to suit your needs or use it for further processing.

Create a Query
Let us see how to create a query for the Source type CRM - Module. The criteria for the query is to fetch all deals of a contact, whose "Stage" is "Closed Won".
- Go to Setup -> Developer Hub -> Queries. The Queries window opens.
- Click Add Query.
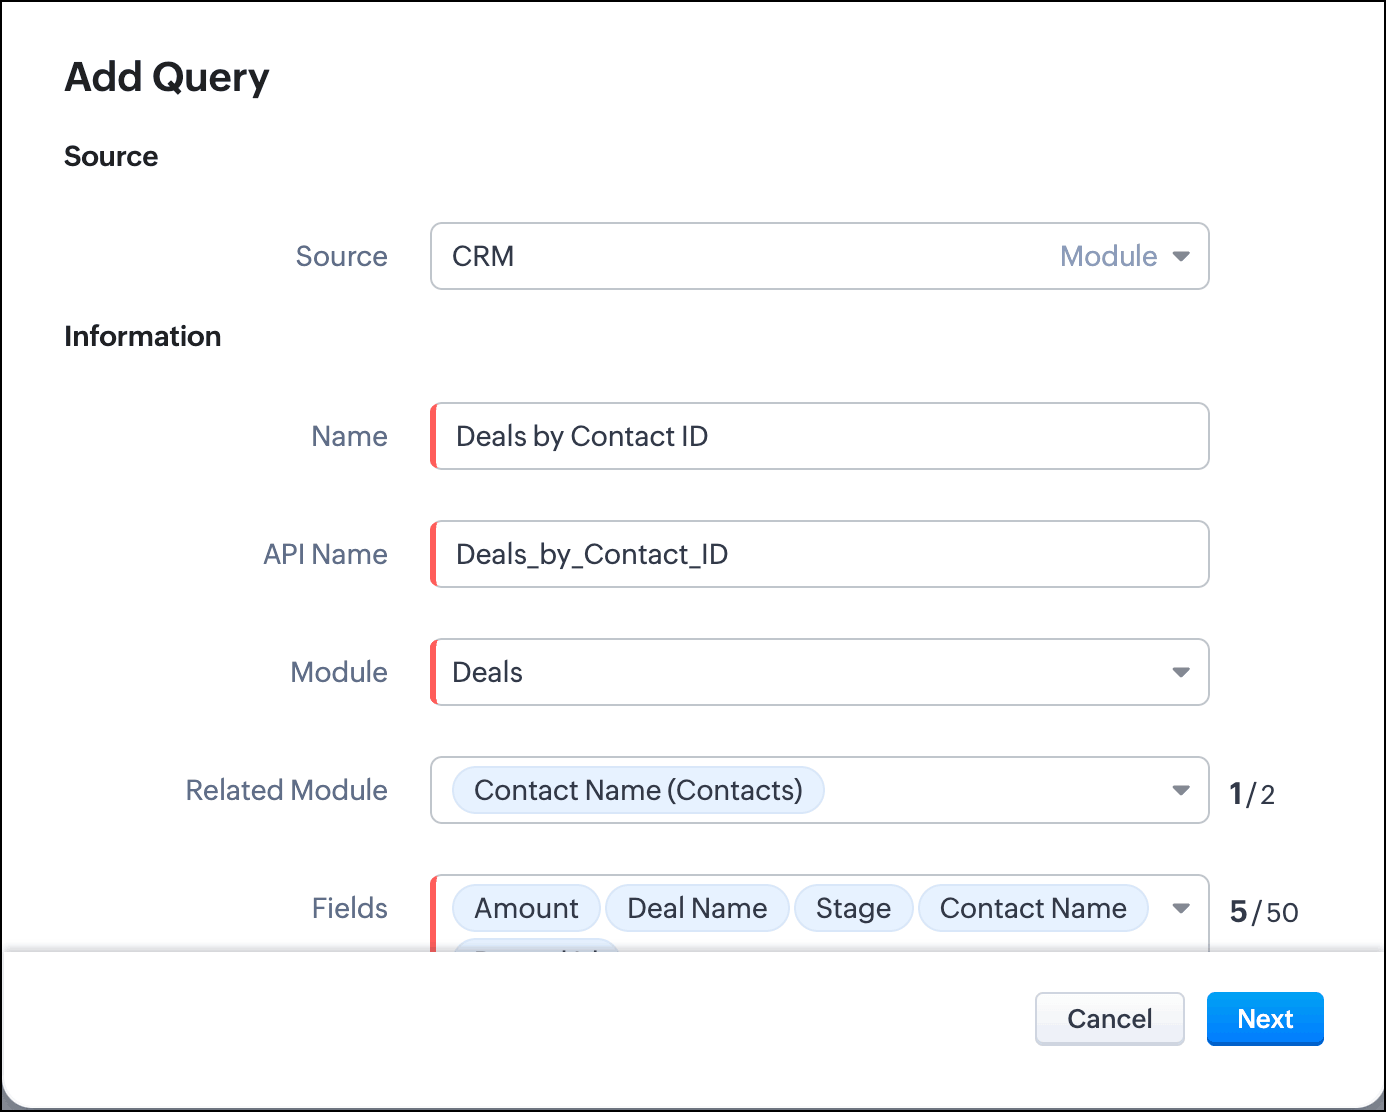
- In the "Add Query" pop up, enter the following details:
- Under Source, choose the source of the query as CRM Module.
- Under Information, enter the name and API name. This API name will be referenced at places where the query is used.
- Choose the module in CRM for which you want to create the query. You can also create queries for Subforms.
- If your module has lookup fields, you can also include them in your query. Choose the required lookups in the Related Module drop down. Note that you can choose a maximum of two fields in this drop down.
Select the required fields for your query from the Fields drop down. Note that you can choose a maximum of 50 fields here.
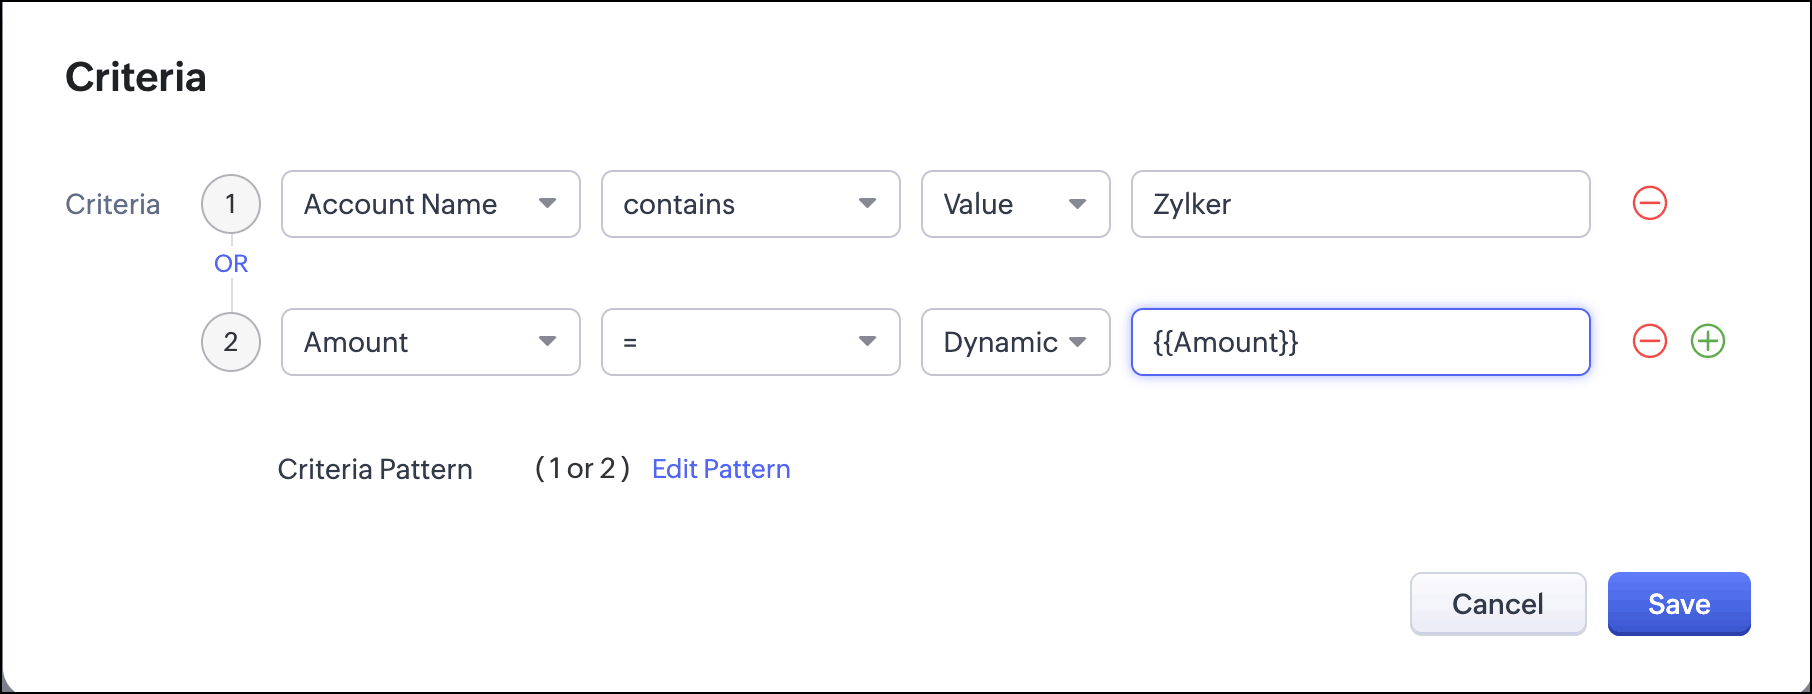
- Under Criteria, you can choose to get all records, or filter the response by the record ID or apply criteria.
- None - This option does not apply any criteria.
Criteria - You can apply criteria over different fields for which you are creating the query. Criteria supports various comparators and you can also group the conditions using AND or OR operators. You can also choose to give the value for the criterion or choose a dynamic value. Dynamic value means that the value will be taken for this field when the query is used at some place. In this example, we are assigning a variable to get the ID of the contact record that is associated with the deal that meets the criteria.
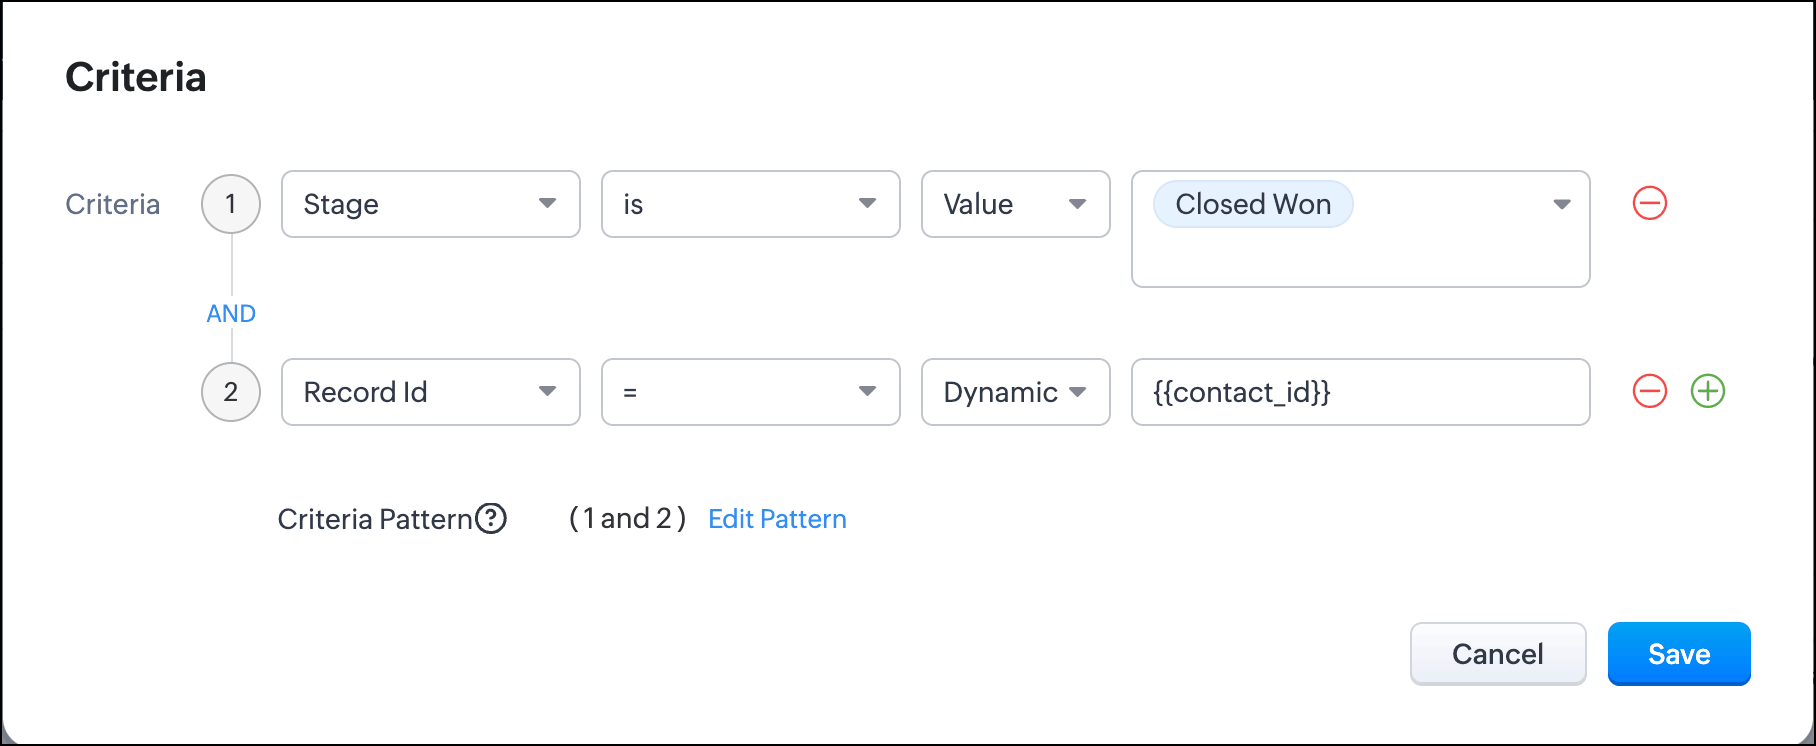
- Record ID - Choose this option if you want to apply the query to a specific record. You can assign a variable to this field and pass the record ID during execution.
Under Serializer, click Add Serializer to modify the response through JavaScript. You can then use this modified response for further processing. The following image shows an example of a serialized response. Click Save.
- You can also sort the response based on a field either in the ascending or descending order. Under Advanced, choose the field to be sorted on in the Order by drop down and the order in which it has to be sorted.
- Click Next. If your query has a dynamic value in criteria, you will get a pop up asking for its value. Specify the value and click Save. You will see the response of the query you created. Click Next.
In the next pop up, you can see the Path, CRM Field Type, and the Label. Path indicates the JSON path in the response that the field is available in, CRM field type indicates it's field type in CRM such as long int, int, and the label indicates the label/name of the field. You can edit these values based on what you need in the query's response.
- Click Save to save your query.