Email Group settings
You can access the group settings of any of your groups by clicking on the group from the listing. Manage the members of the group, spam settings, email moderation, and much more from the Group settings. The following settings will be available for all your groups:
General settings
Click on the General option in Group settings to access General settings. You can edit the following group details from the General settings:
- Group Name
- Group Description
- Group photo
Once you've edited the details, click on the tick icon to save the changes.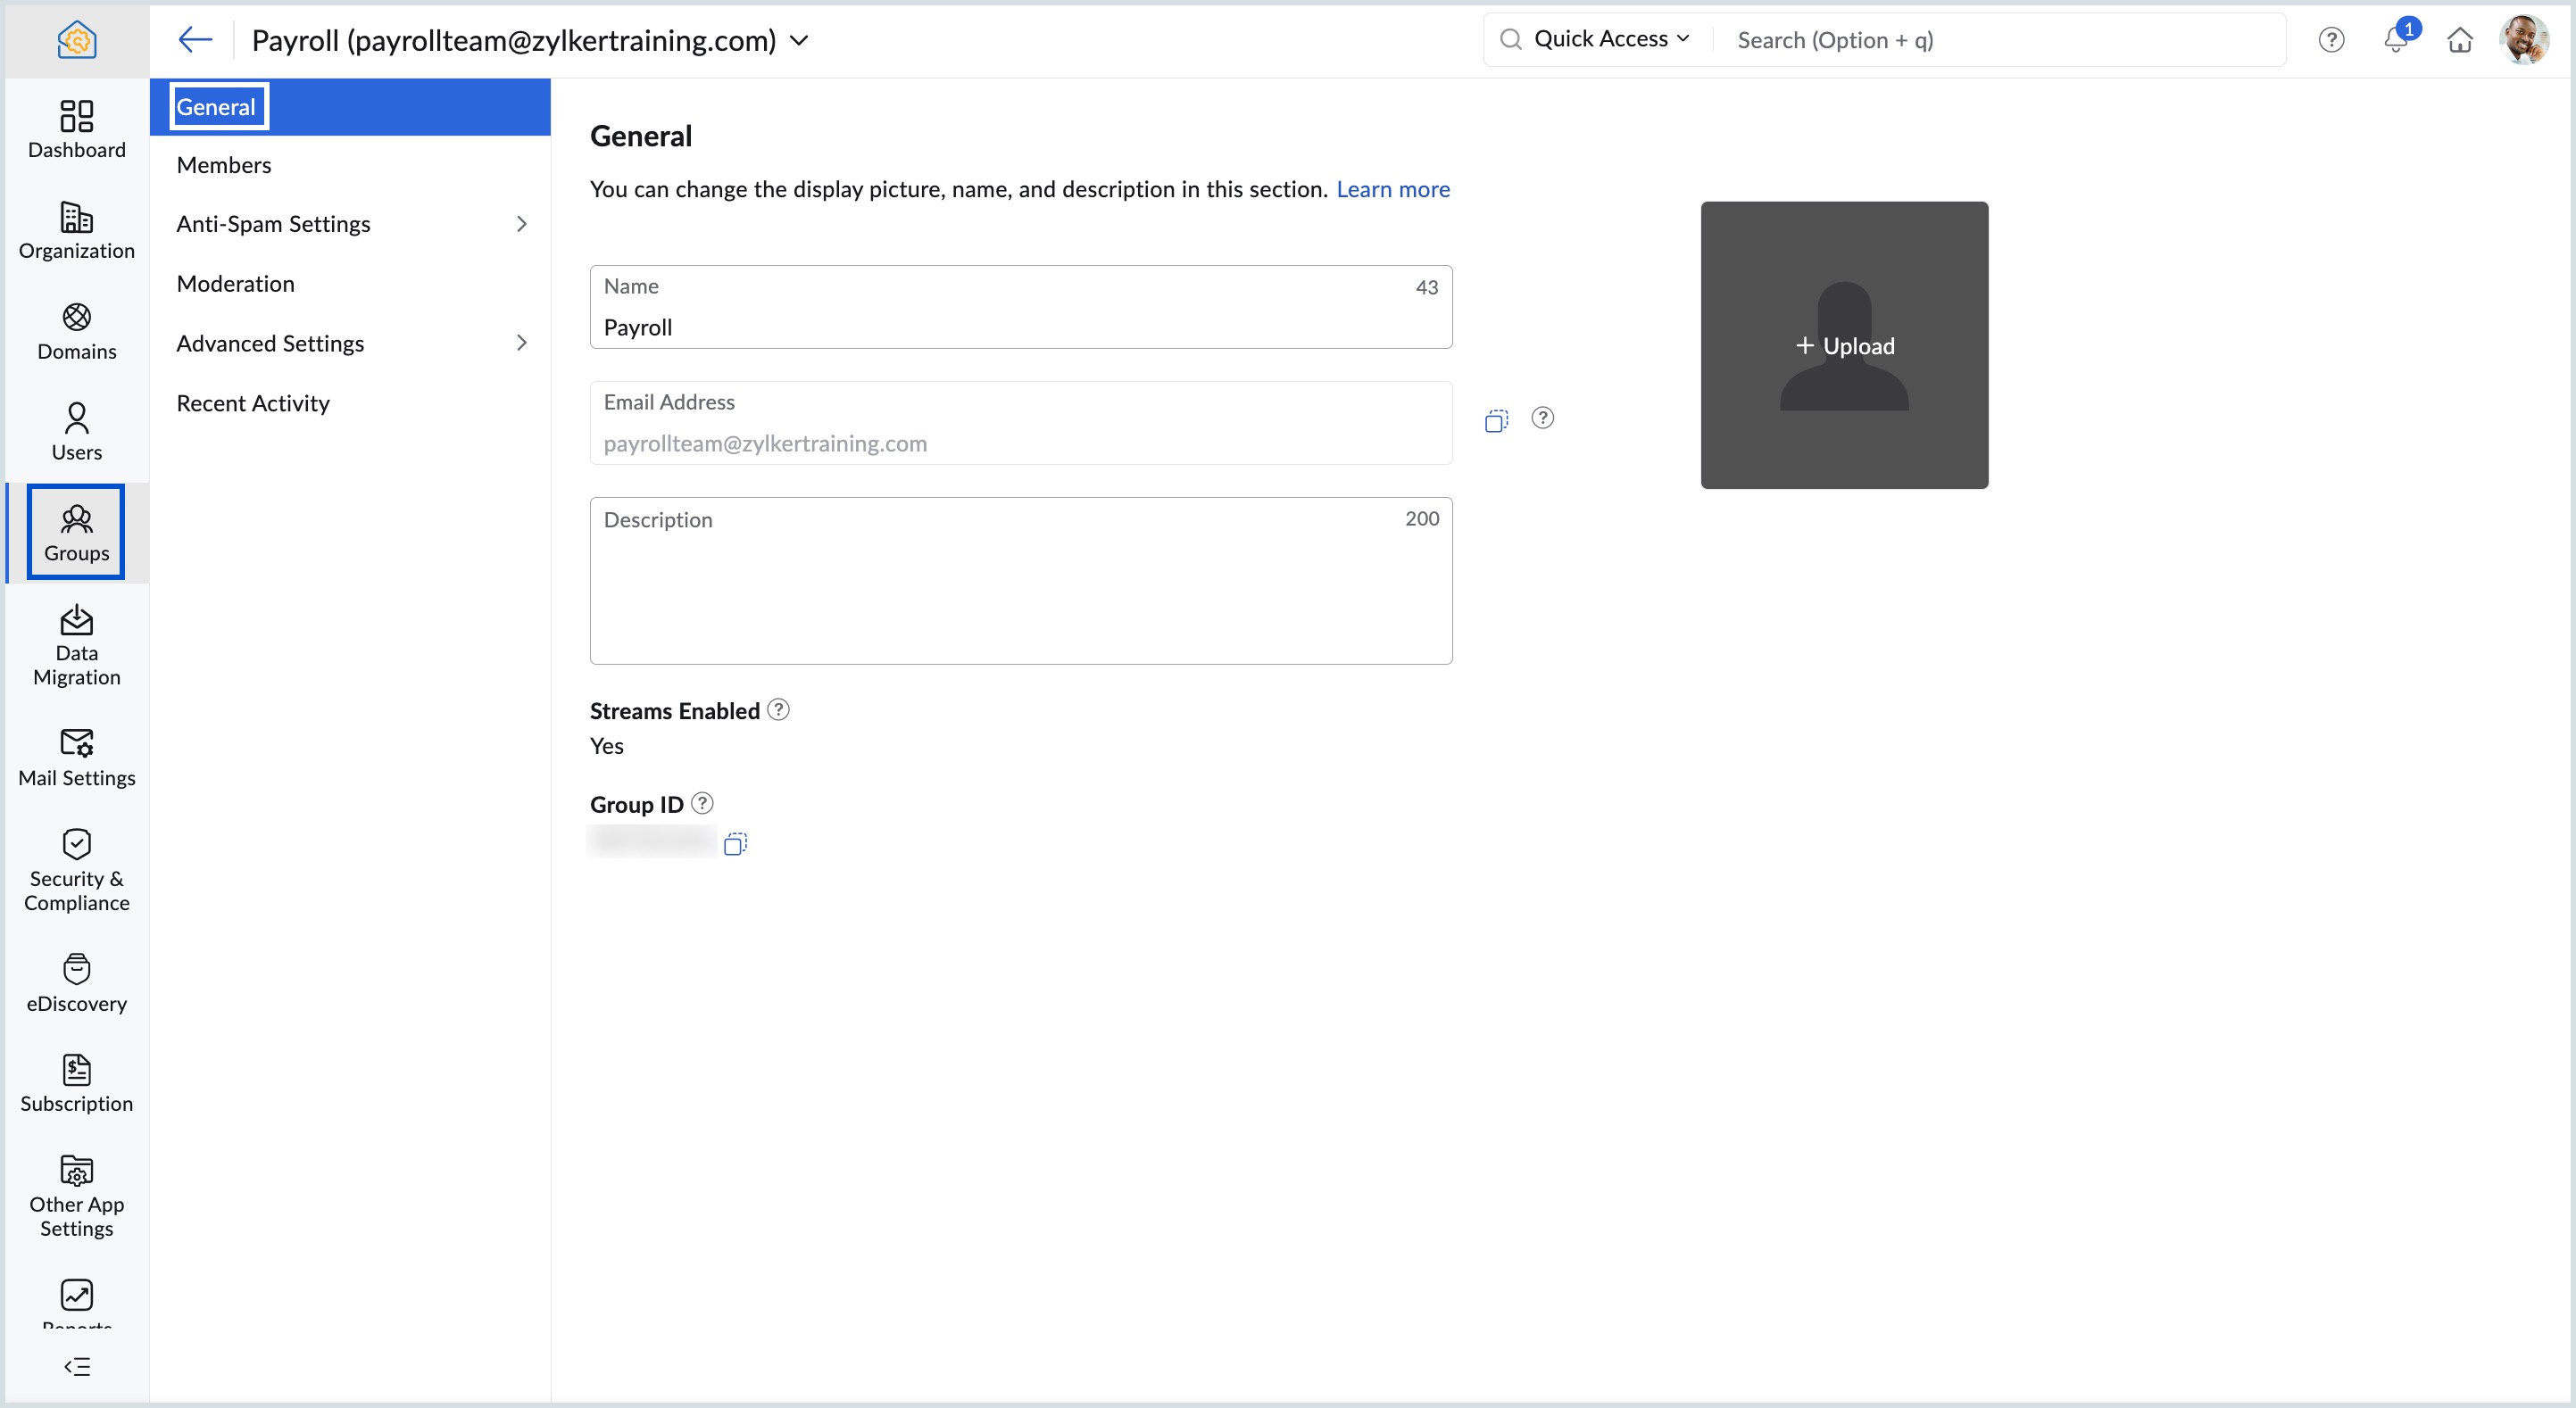
Note:
Once you have enabled Streams, you cannot disable them.
Member settings
Clicking on the Members section from the Group settings page will open the Member settings page. All the users in this group will be displayed in the Members tab and you can add, import/ export, or delete users from here. You can also edit user information from this page.
Add members
- Navigate to the Member settings page of the relevant group.
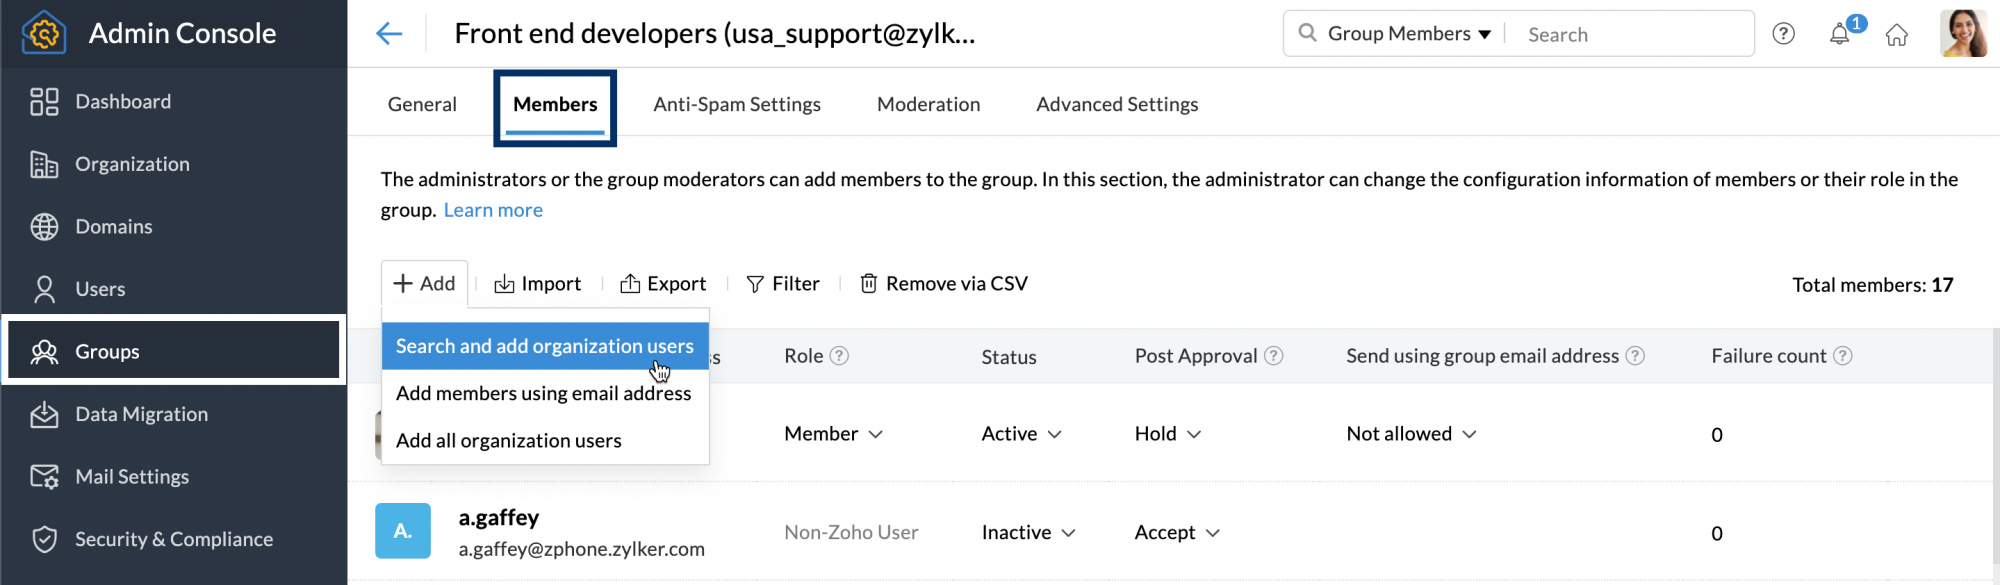
- Click on the Add option from the top menu.
- You can choose one of the following options to add members to the group -
- Search and add organization users
Choose this option from the dropdown and select the users you wish to add by clicking on the icon next to the users. Once all users are selected, click on the Add button on the right-bottom corner. The selected members will be added to the group. - Add all organization users
Choose this option from the dropdown and click the Add button in the pop-up to add all organization users to the group. Here, irrespective of the organization size, all the users will be added. No limit is applied. Add members using email address
Choose this option from the dropdown to add users who are not a part of your organization. Enter the email address in the pop-up that appears and click Add. An invite email will be sent to the external members' email addresses. Once, they accept the invite they'll start receiving emails sent to the group.Note:
- You can add a maximum of 100 users individually. For larger groups, you can use import via CSV file.
- If a group member is added to an organization group in a Zoho Application, the member will automatically be added to the same organization group in Zoho Mail as well.
- The option to add external members to organization groups will be available only for organizations that are using one of our paid plans.
- Search and add organization users
- Once the users are added, they will be listed in the Members section.
Import member
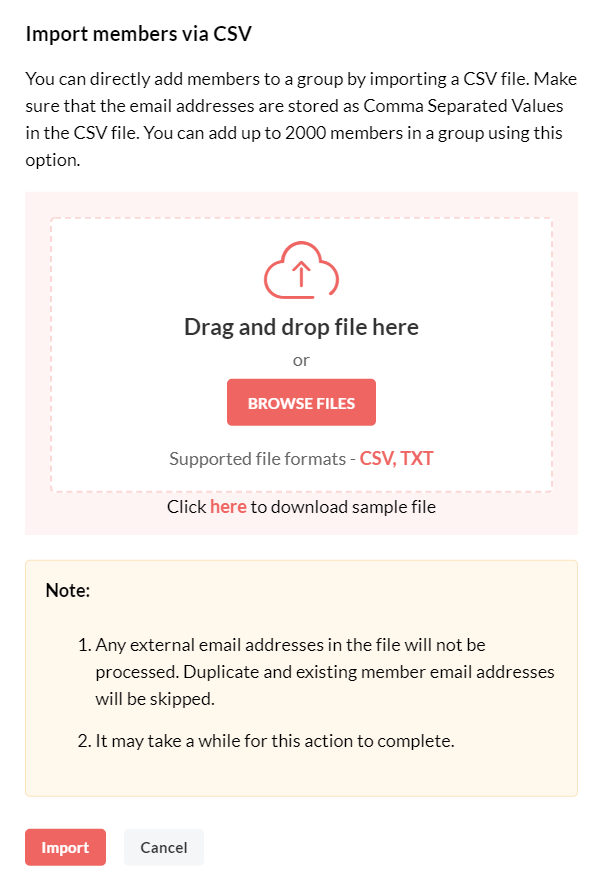
You can import members to the group via CSV file. Click on the Import option from the top menu to import users. Click on the Browse Files button to upload the relevant CSV file with the user information. Once the file is uploaded, click Import. The organization members in the CSV file will be added to the group.
Note:
The CSV import option supports a maximum of 2000 users per file.
Export members
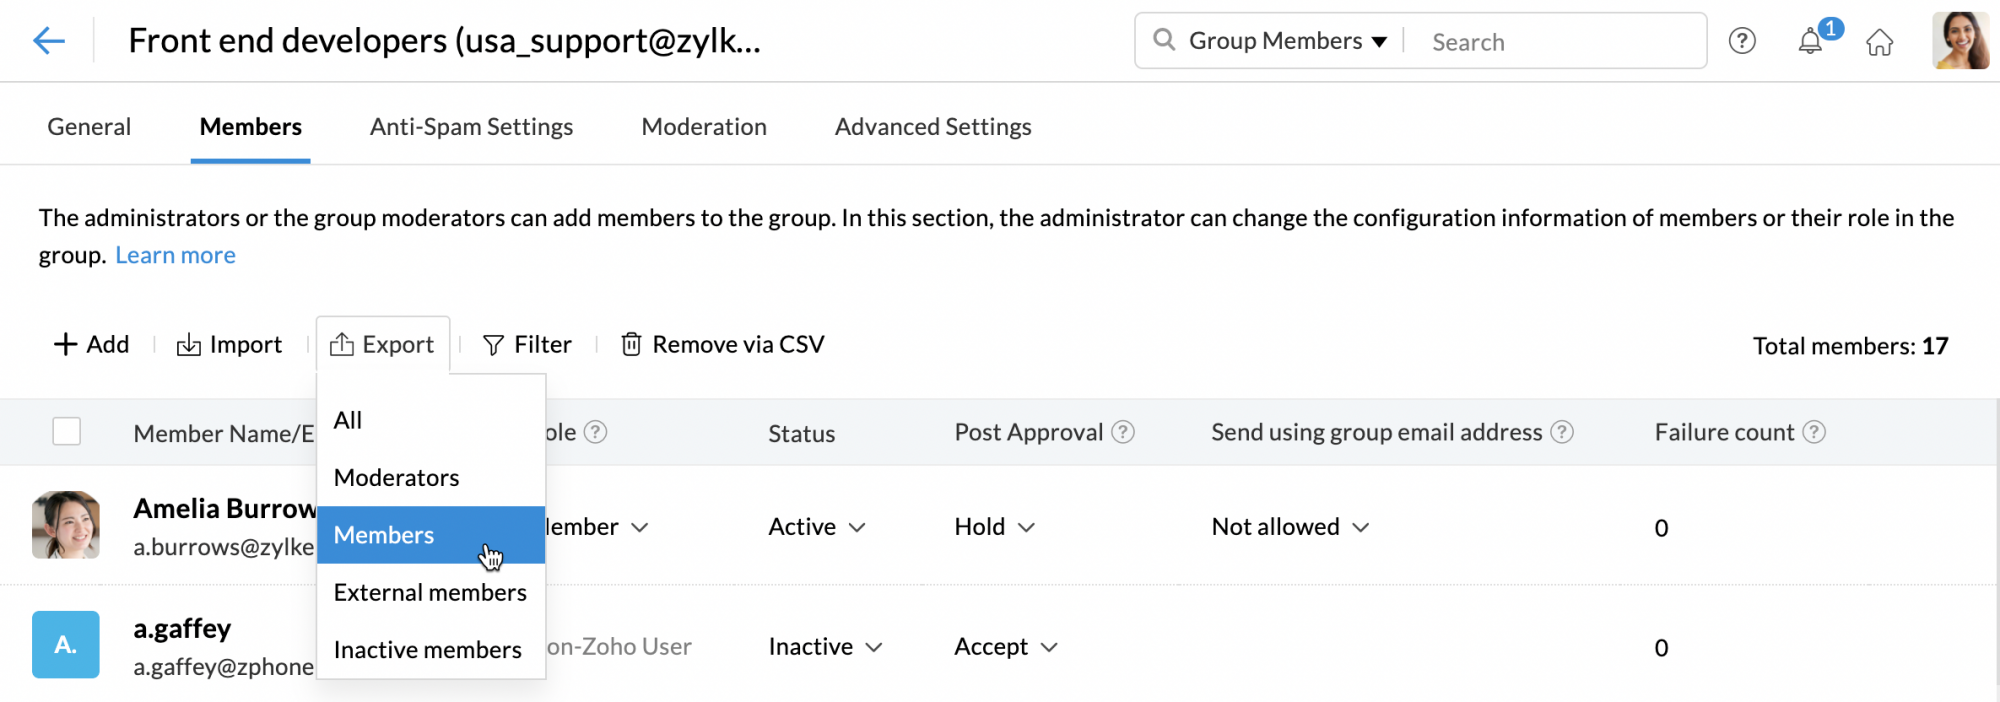
Click on the Export option from the top menu bar in the Members tab to export user details from the group. You can narrow down based on their role and if they are part of your organization. Choose one of the following options from the export dropdown to pick the members you wish to export:
- All - Exports all the members of the group
- Moderators - Exports only the moderators of the group
- Members - Exports the users with Member role
- External members - Exports members who are not your organization users.
- Inactive members - Exports all inactive members of the group
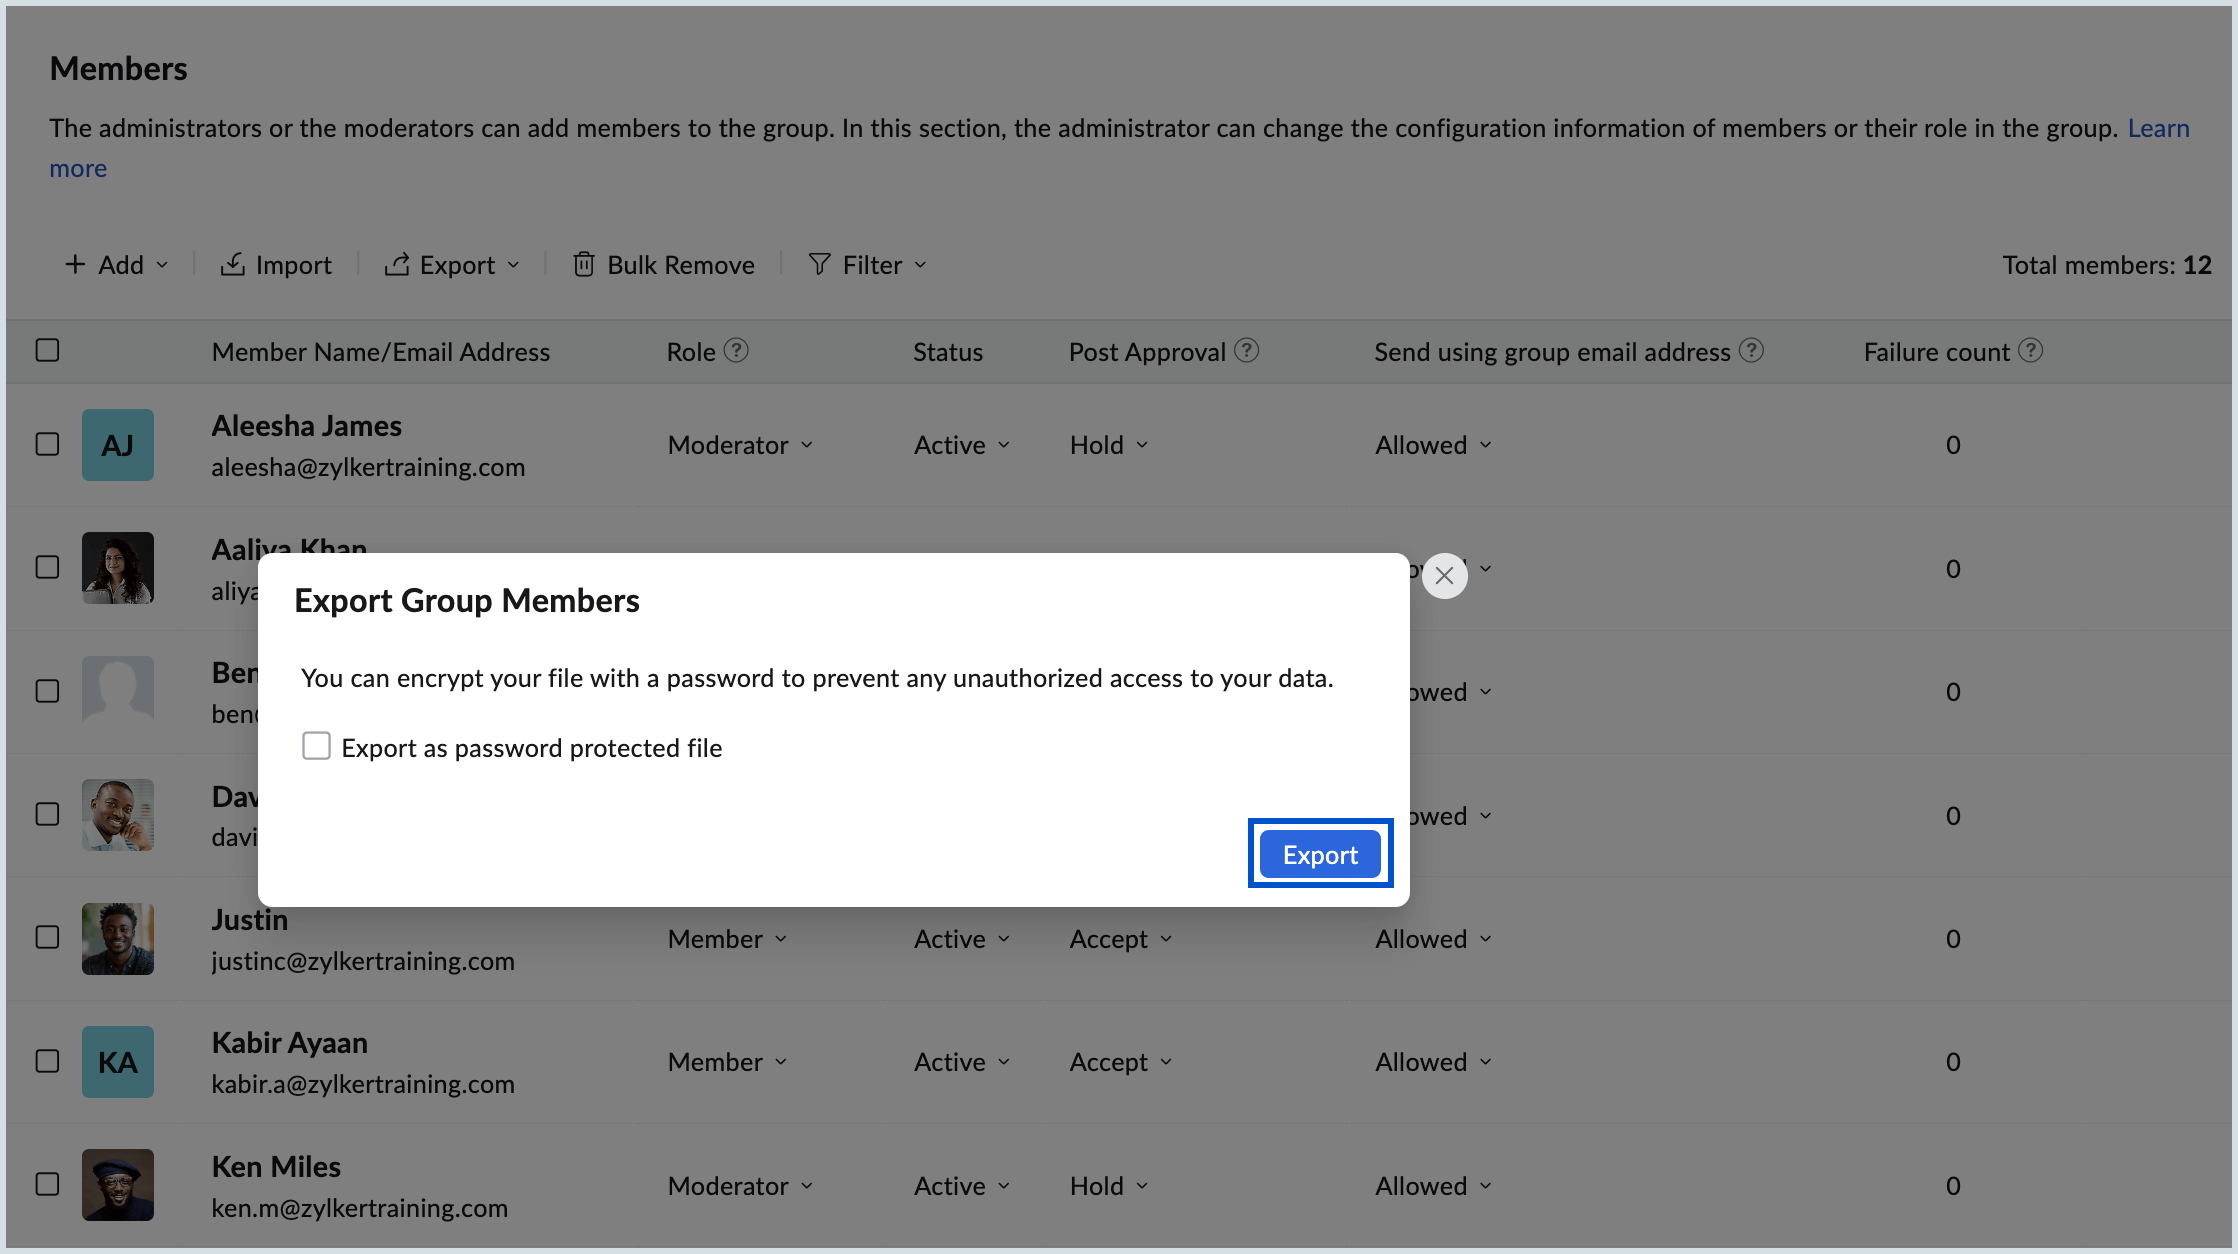
Once you select the type of members, you can choose to export the details by selecting any or all of the available options:
- Export with additional fields - Allows you to export the details along with additional fields like Role, Status, Post approval, Send using group email address, and Failure count.
- Export as password protected file - Allows you to protect the exported details with a password to prevent any unauthorized access.
Delete members
You can delete members from the group in one of two ways.
- Remove selected
Select those members from the listing that you wish to delete and click Remove to remove them from the group.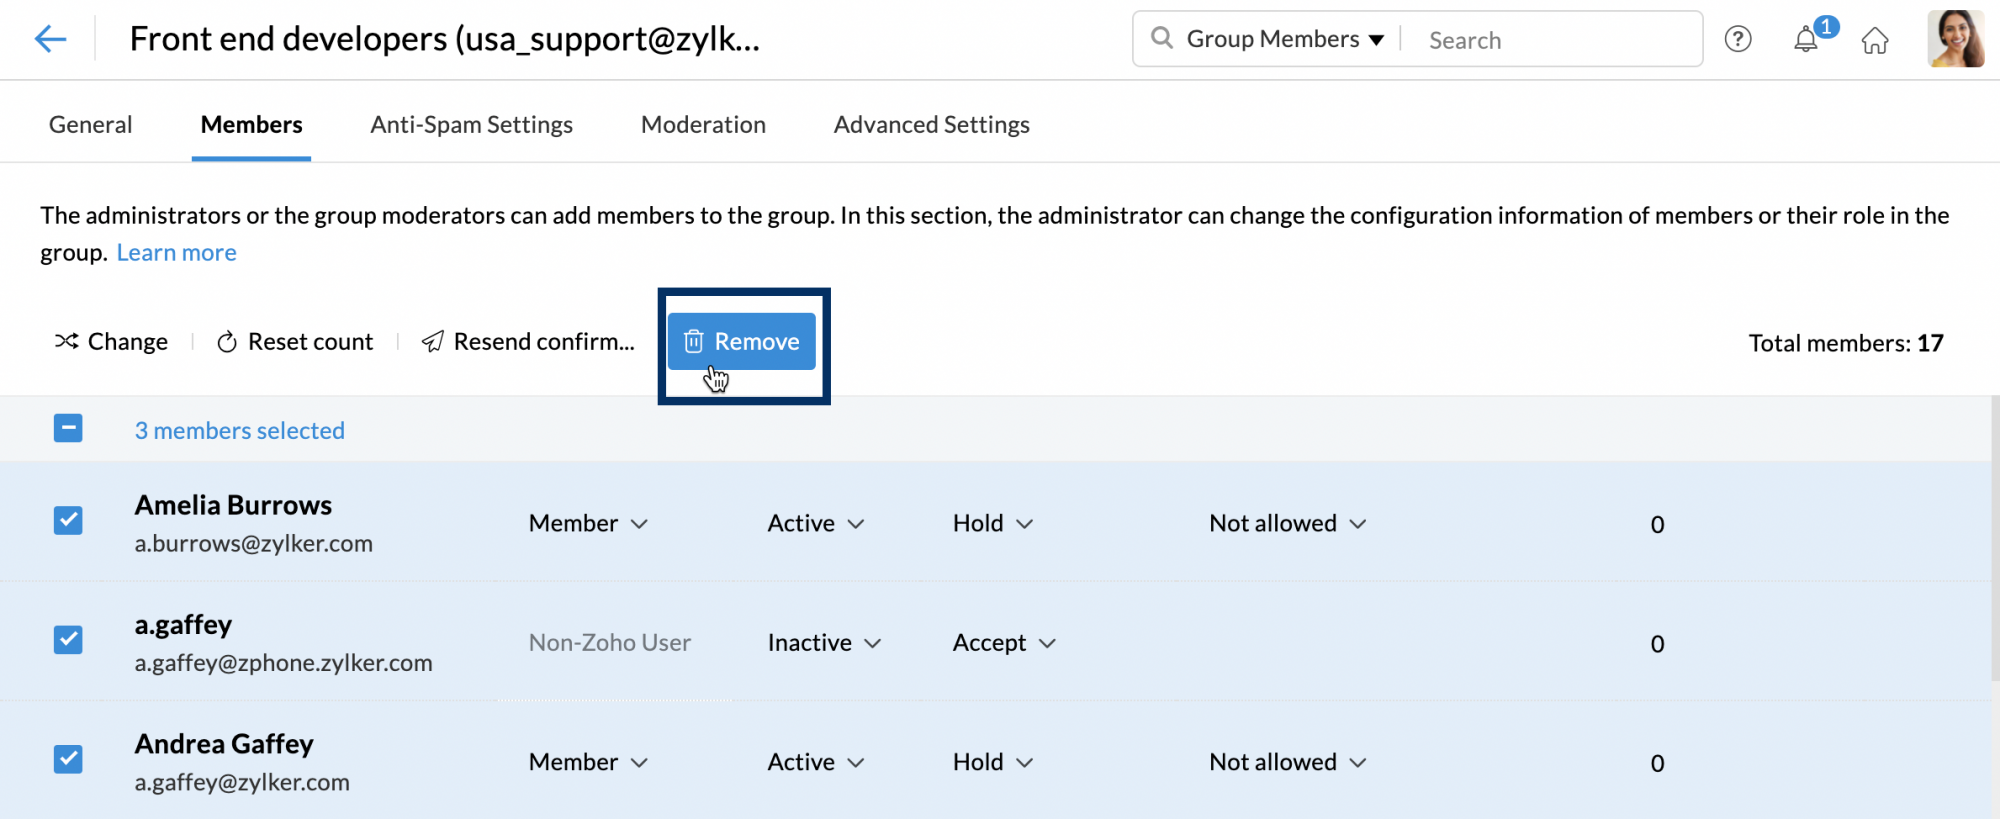
- Remove via CSV
Click BulkRemove to delete the members using a CSV file. Click on the Browse Files button to upload the relevant CSV file with the user information. Once the file is uploaded, click Remove.
Note:
If a member is deleted from an organization group in a Zoho application, the member will be automatically removed from the corresponding group in Zoho Mail as well.
Member details
The Member settings page will display the name, role, status, post approval, email sending permissions, and failure count of the members of the group. Hover over these details displayed next to the user lets you edit the information from drop-downs. You can choose from the following options from each of the details:
- Role - Moderator/ Member
- Status - Active/ Inactive
- Post approval - Accept/ Reject/ Hold/ Hold and acknowledge
- Send using group email address - Allowed/ Not allowed
Clicking on any member from the listing will also display the personal, contact, and account information of the particular contact.
Manage incoming email settings in Zoho Mail
The Incoming Email Settings section lets you manage group-level anti-spam controls in Zoho Mail by adding email addresses or domains to four lists; Allowed, Blocked, Trusted, and Rejected. These anti-spam settings work alongside the organization-level spam control policies.
These settings include:
- Allowed List: To prevent legitimate emails from being marked as spam, administrators can add the relevant domains, or email addresses to the Allowed List. This ensures that the emails are delivered directly to the user's inbox. Being on the Allowed List does not guarantee inbox delivery — emails that fail spam checks may still land in the Spam folder.
- Blocked List: The Blocked List contains email addresses or domains that you specifically designate as spam. Once added, all incoming messages from these sources are automatically directed to the user's Spam folder, preventing unwanted or potentially harmful emails from reaching the inbox. Even if the domain passes the SPF test, emails from a blocked domain will still be marked as spam.
- Trusted List: The Trusted List allows you to add email addresses that should be excluded from spam processing. Emails received from entities on the Trusted List will not be subjected to any of the usual spam checks, including SPF, DKIM, or block list validations.
- Rejected List: To block unwanted senders, administrators can add their email addresses to the Rejected List. Emails from these senders are bounced without any checks, preventing them from reaching the user's inbox.
Note:
The organization's Allowed/Blocked list and Trusted/Rejected list takes precedence over the user's/group's Allowed/Blocked list and Trusted/Rejected list.
Adding email addresses
- Log in to Zoho Mail Admin Console.
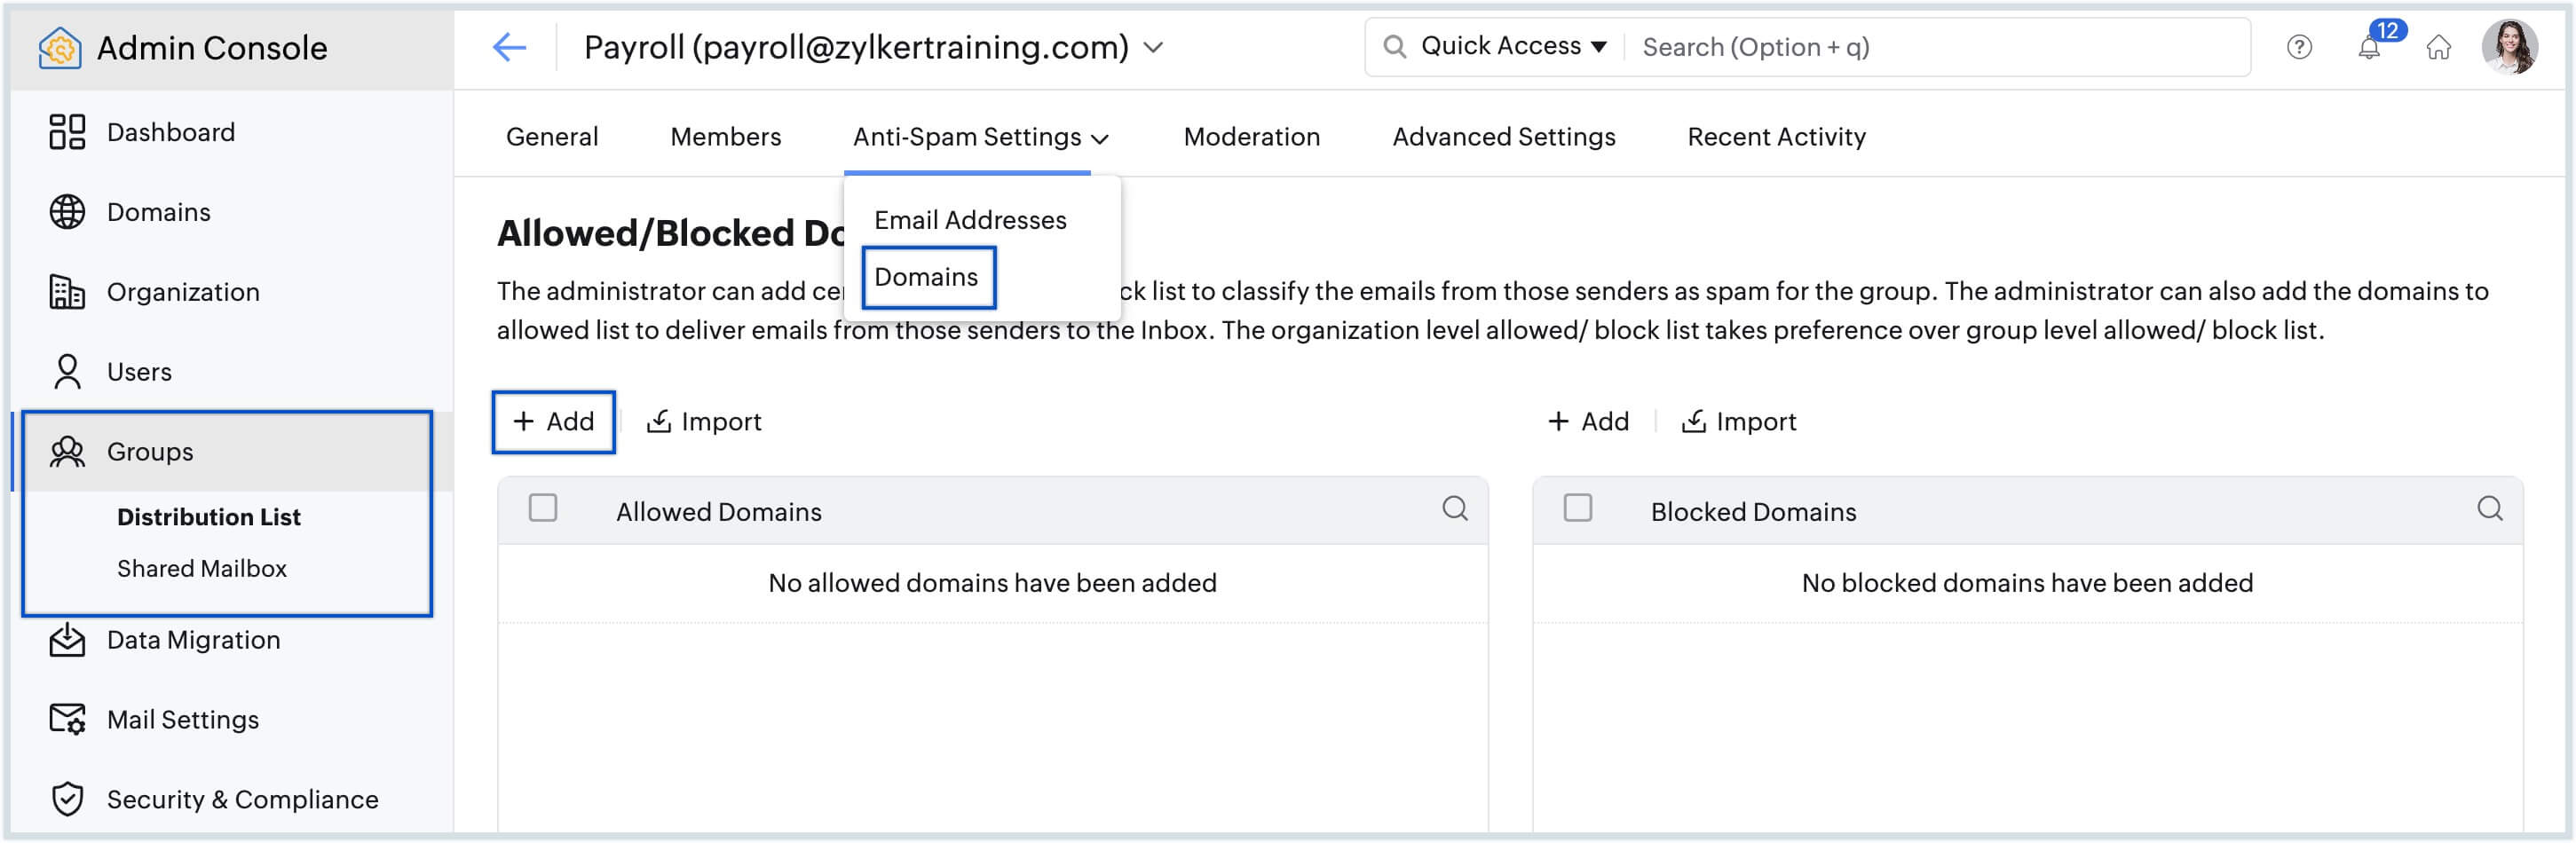
- Select Shared Mailbox or Distribution List under Groups in the left pane based on your preferences.
- Select the group for which you want to create the allowed and blocked lists from the group listing.
- Click on the Incoming Email Settings option, then select Email Address from the drop down menu.
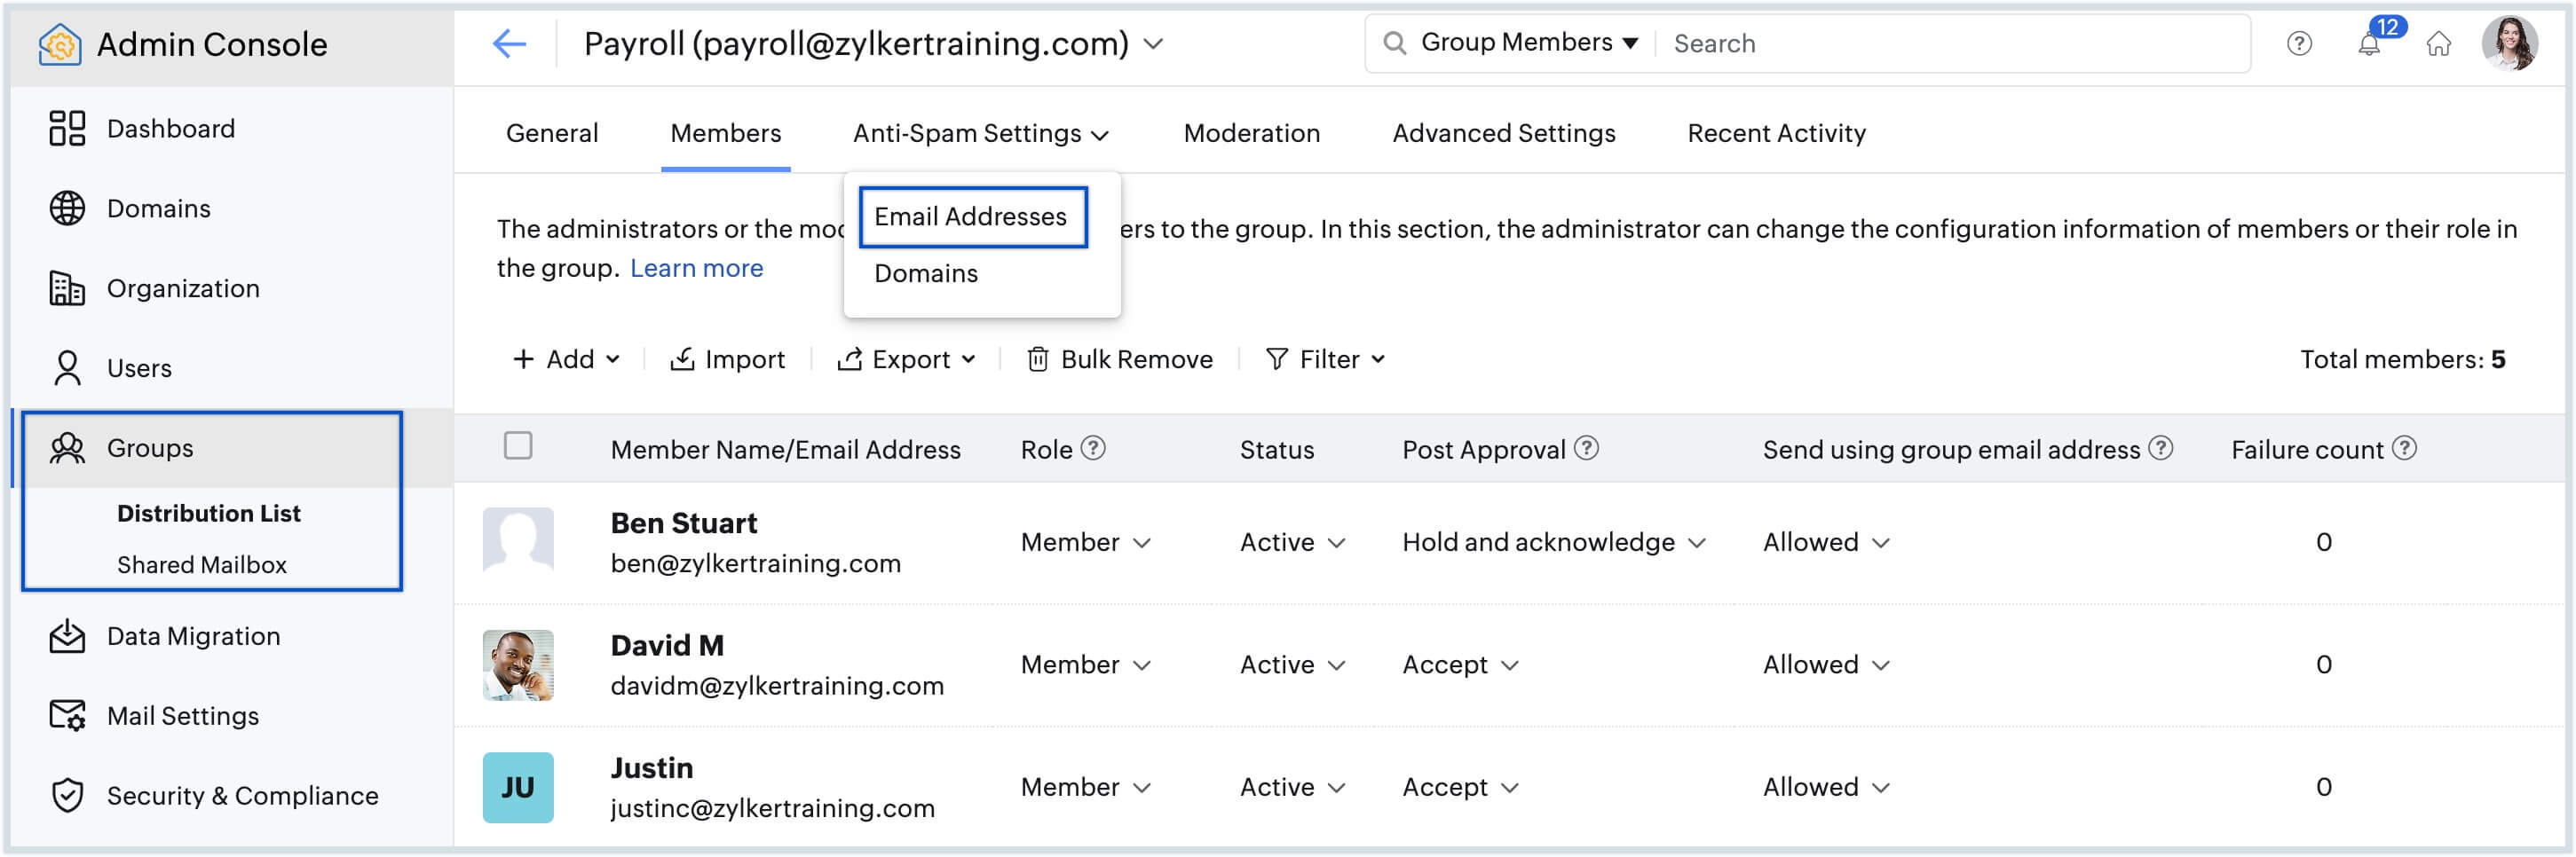
- Click Add under Allowed/Blocked Email Addresses on the top menu within your chosen section, based on whether you're adding the email address to the allowed list or the blocked list.
- Enter one or more email addresses separated by a comma to add to the list, and click Add.
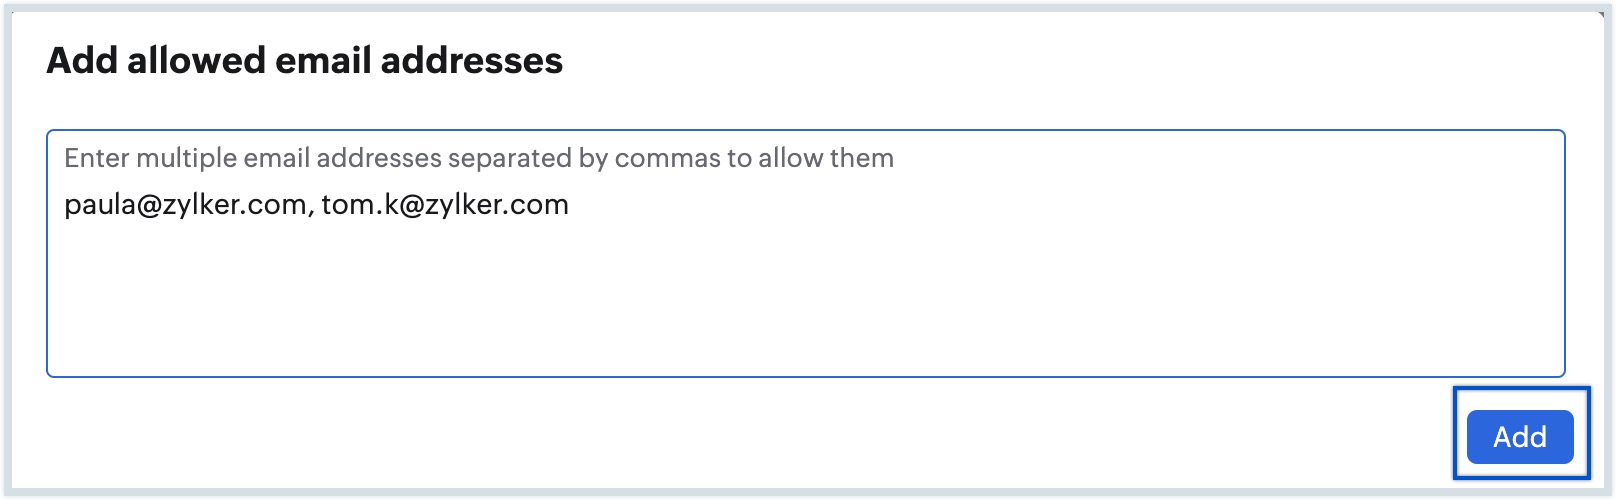
- Navigate to Trusted List / Rejected List section on the top menu and add users based on whether you're adding the email address to the Trusted or Rejected list.
- Enter one or more email addresses separated by a comma to add to the list, and click Add in the corresponding list.
Allow or block entire domains for a specific group in Zoho Mail
- Log in to Zoho Mail Admin Console.
- Select Shared Mailboxes or Distribution lists under Groups in the left pane based on your preferences.
- Select the group for which you want to create the allowed and blocked lists from the group listing.
- Click on the Incoming Email Settings option, then select Domains from the drop down menu.
- Click Add on the top menu within your chosen section, based on whether you're adding the domain to the allowed list or the blocked list.
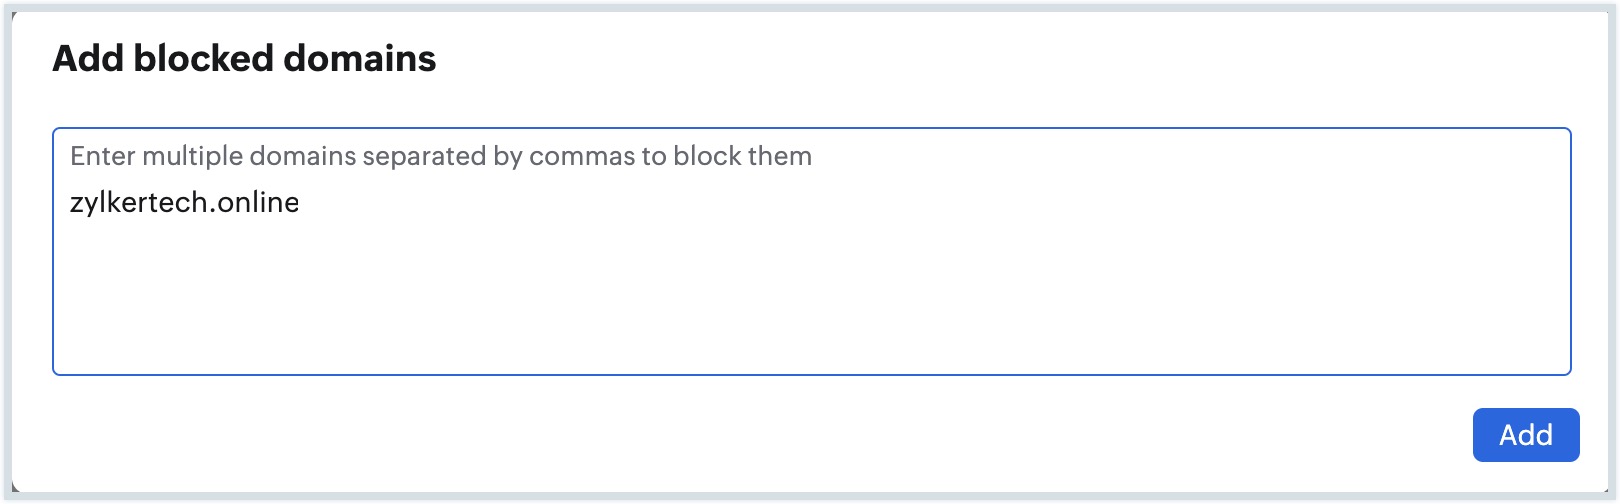
- Enter one or more domains separated by a comma to add to the list, and click Add.
To delete an email address or domain from the list, hover over the email address or domain and click the Delete icon.
In case you want to move an email address or domain from allowed list to blocked list and vice versa, you can use the checkbox to select them from the list and then click Move to Allowed List / Move to Blocked List in the top menu based on your preference.
You can also add to these lists by clicking on the Import option from the top menu. Choose the desired list from the dropdown and upload the relevant CSV file. Information in the file will be added to the selected list. You can download any list of your choice by clicking on the Export option.
Note:
Adding email addresses or domains to the Allowed List/Blocked List does not 100% guarantee email delivery/rejection to the group. The emails will be processed as per the Delivery Action specified in the organizational Spam Control settings.
Moderation settings
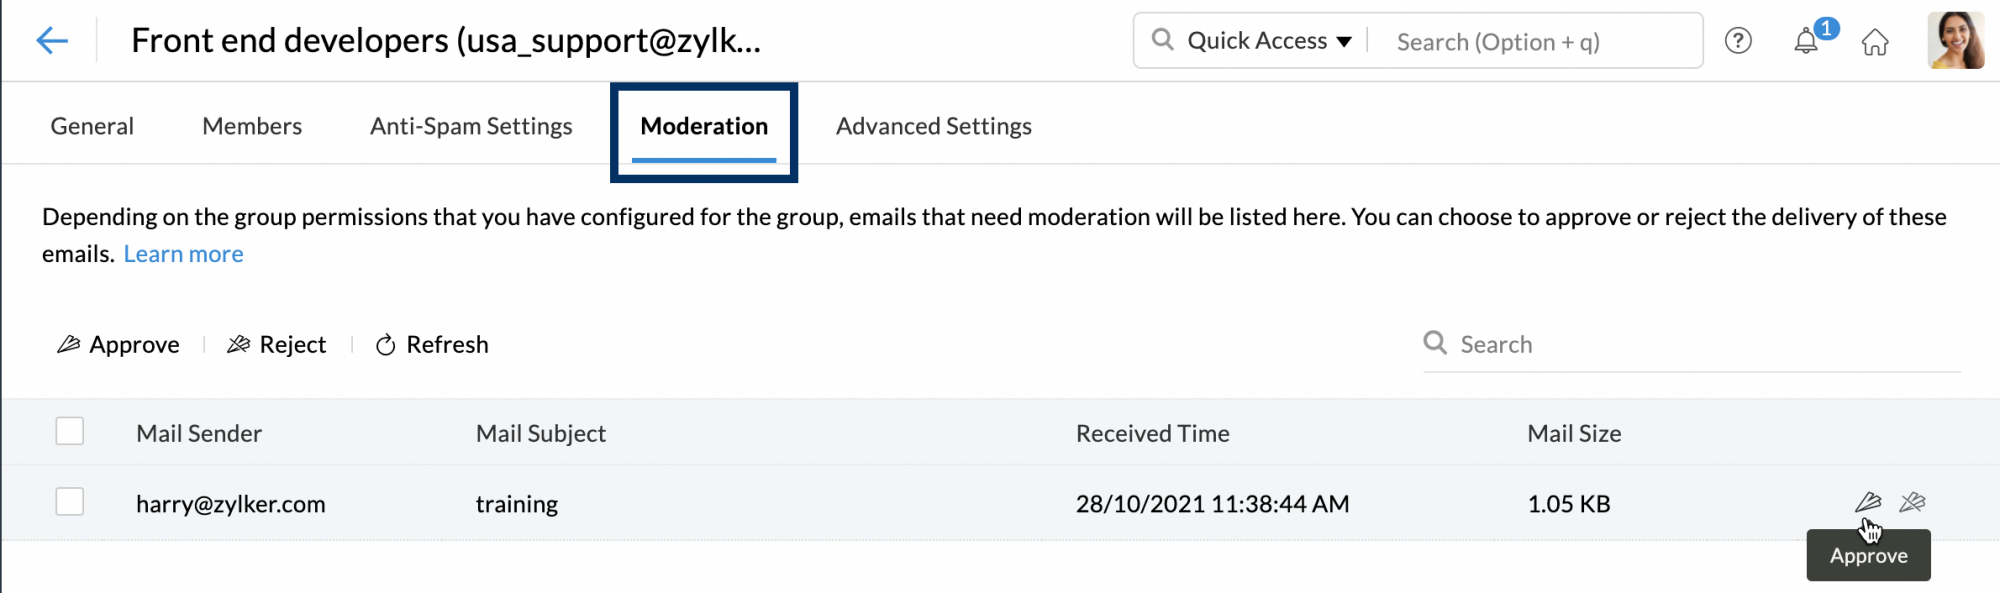
Depending on whether your group is a public, organization, private, or moderated group, only emails from certain users will be delivered directly to the group members. Emails from users without the permissions will be sent for moderation. These emails are listed under the Moderation section within the Group Settings.
Group moderators can then choose to approve or reject the email. Approved emails will be delivered to the group members while the rejected emails will be bounced back. Select the emails you wish to perform an action on and click on Approve or Reject option from the top menu. You can also moderate each email by hovering on the email from the listing and clicking on the Approve or Reject icon from the right corner.
Group moderators
When an admin creates a group, only they will have the control to add new members, moderate emails, and access the groups' settings. But, they can delegate that responsibility to any member of the group by assigning them as moderators. Group moderators can add members to the group, moderate emails, and have access to the group's notifications and advanced settings. A group can have multiple moderators.
When a moderator-only group is created, only the group moderators can send emails to the group. Emails sent by any other person will be sent to the Moderation tab from where the moderators can approve or reject them.
In the case of other groups, such as a private group, or an organization-only group, etc., emails breaching the permissions set for the group will be set to the Moderation tab. The Group moderators can approve or reject them after reviewing the emails.
To change the permission of a user from a member to a moderator,
- Login to Zoho Mail Admin Console.
- Navigate to Groups in the left pane. All the groups you have created under your Organization in Zoho Mail will be listed.
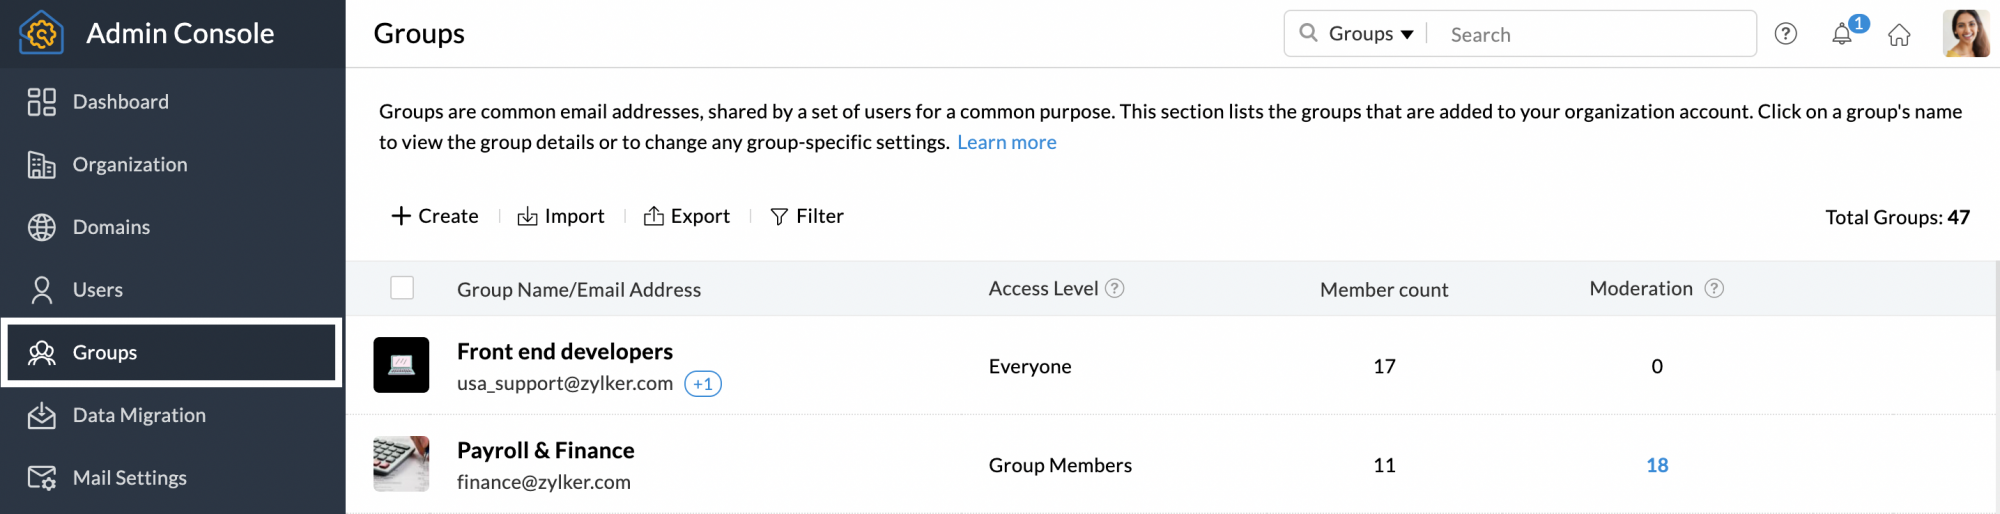
- Click on the group in which you'd like to add moderators.
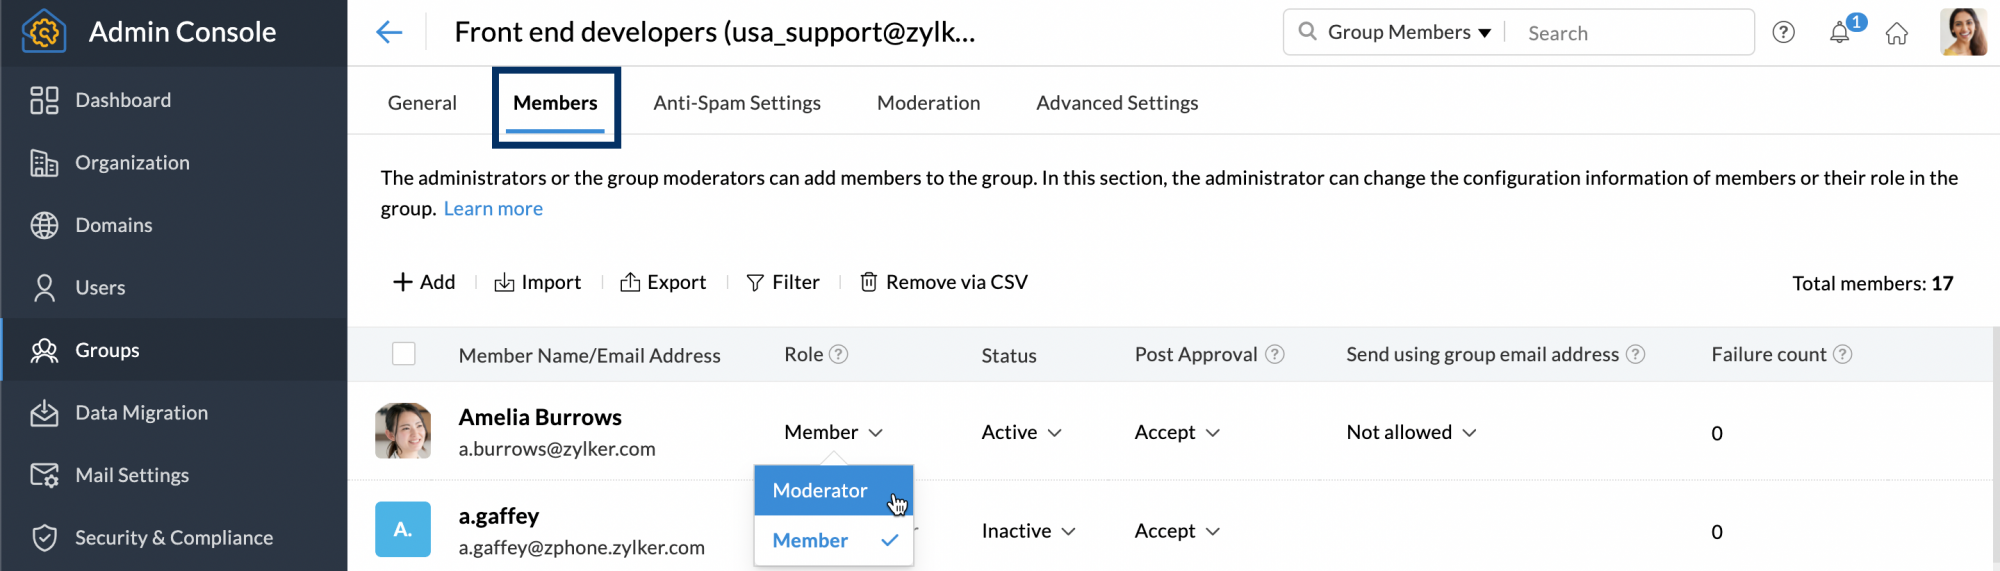
- Navigate to the Members section and locate the user whom you want as a group moderator.
- In the Role column, click the drop-down next to Member.
- Select Moderator and now the user will be a group moderator and he/she can add new members.
Advanced settings
Clicking on the Advanced Settings tab will display the following email group settings:
- Email Policy
- Group Alias
- Email Delivery
- Notifications
- Permissions
- Email Restrictions
- Domain Restrictions
- Auto Response
- Failure Threshold
- Calendar
Refer to the Advanced Settings help page for detailed instructions.
Recent activity
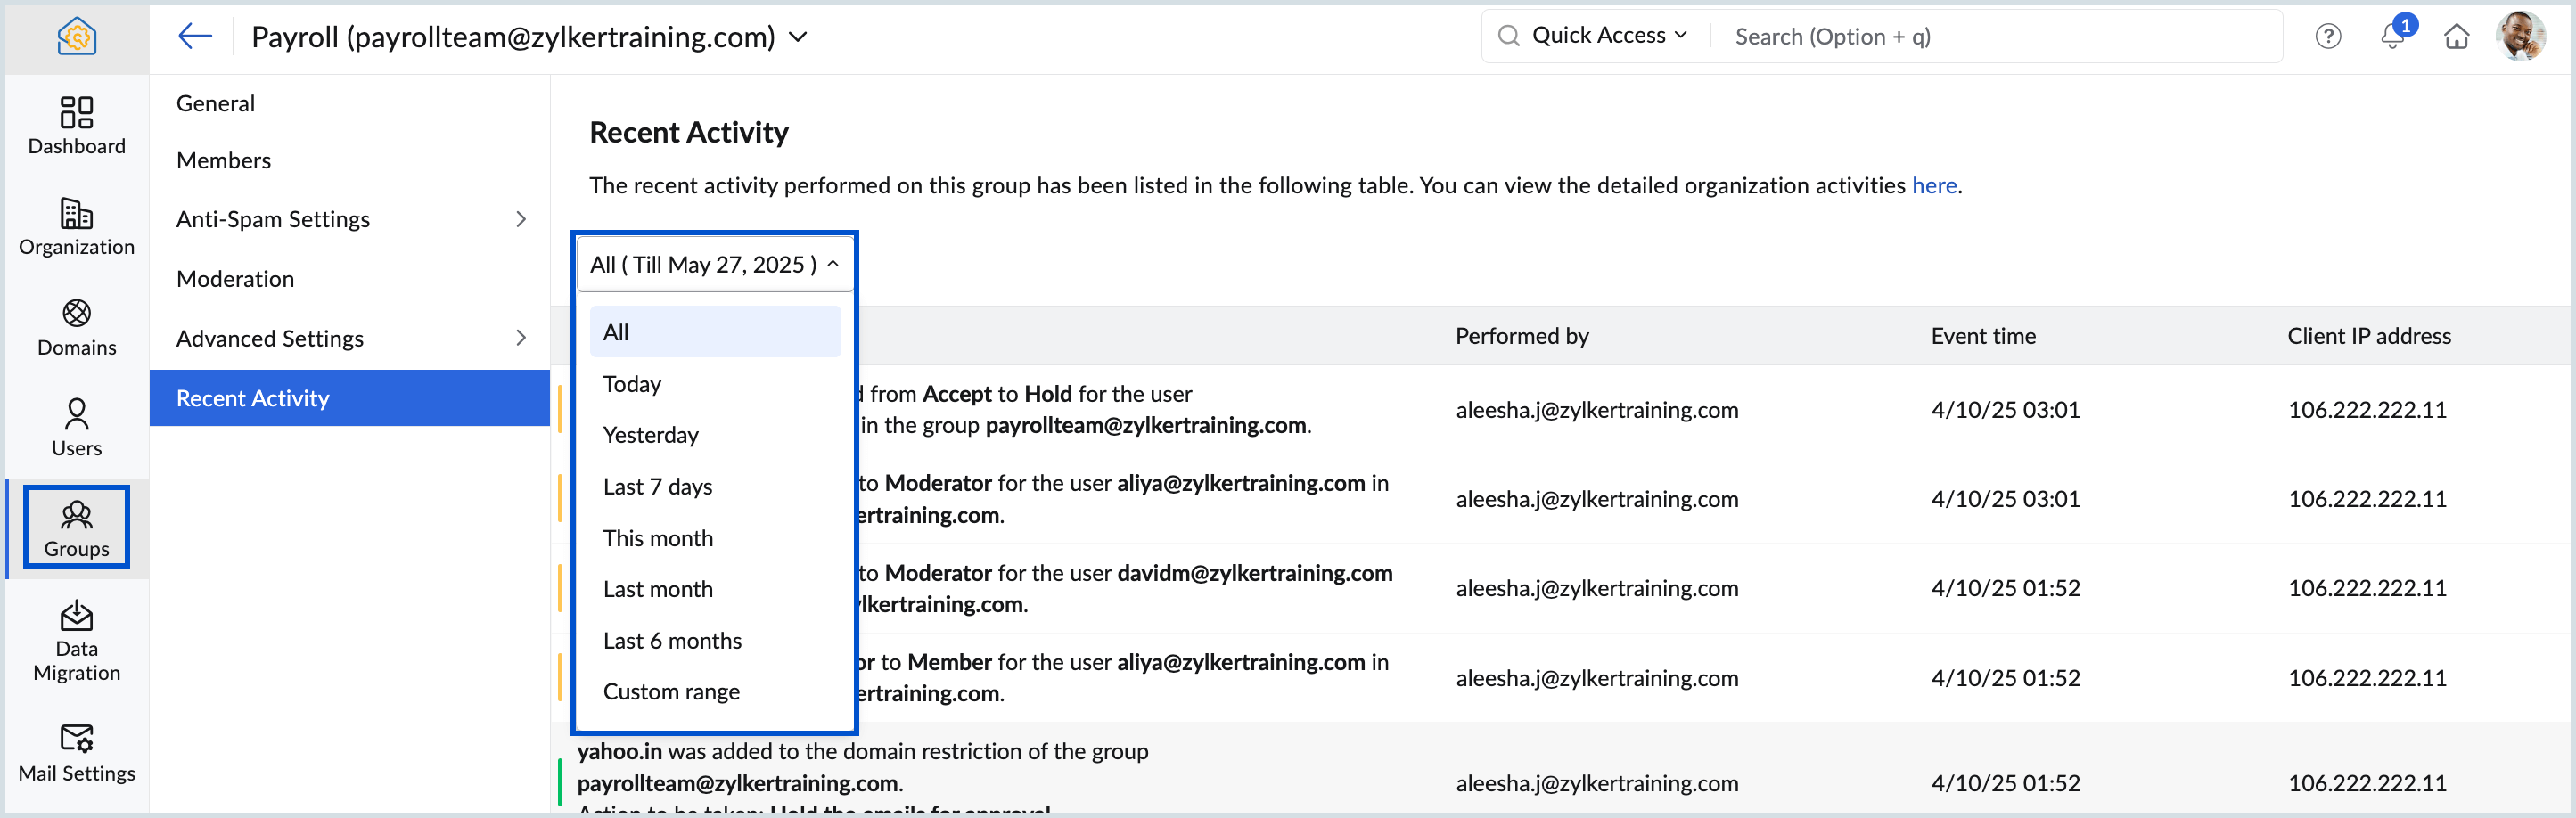
The Recent Activity section lists the recent events made on this group by the group admins and the moderators. For example, events such as adding new users, removing exisiting users, changing the role of a user are listed under the Recent Activity tab. In addition, when you add an email address/domain into the Allowed/Blocked list, those actions are also recorded under this tab.
The members who performed those events along with the time will be displayed next to the event. Click here in the Recent Activity section to access the Audit Logs, which provide detailed records of organizational activities.
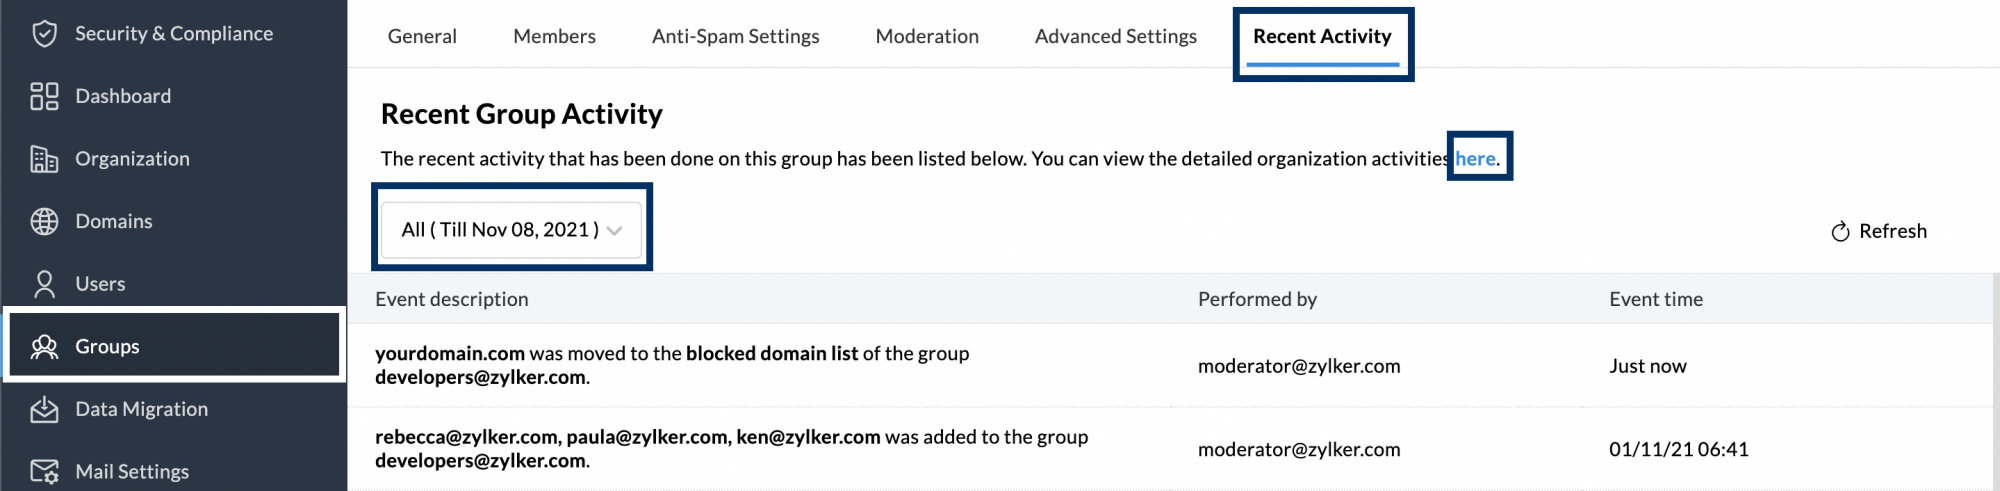
You also have the option to specify a particular day/week/month, or a custom timeline and the recent activities for that day/timeline will be displayed.