Managing your Zoho Mail / Zoho Workplace Subscriptions
Managing your organization's Zoho Mail / Zoho Workplace subscription is a simple task. The Subscription section in the Zoho Mail Admin Console is a centralized location for managing your organization's subscription related activities. From upgrading your plan and purchasing additional licenses or storage units to configuring payment settings and accessing storage usage reports, this section allows you to efficiently handle all subscription requirements.
Manage subscription
To access your organization's subscription details:
- Log in to Zoho Mail Admin Console.
- Navigate to the Subscription section from the left pane.The Subscription section includes the following subsections:
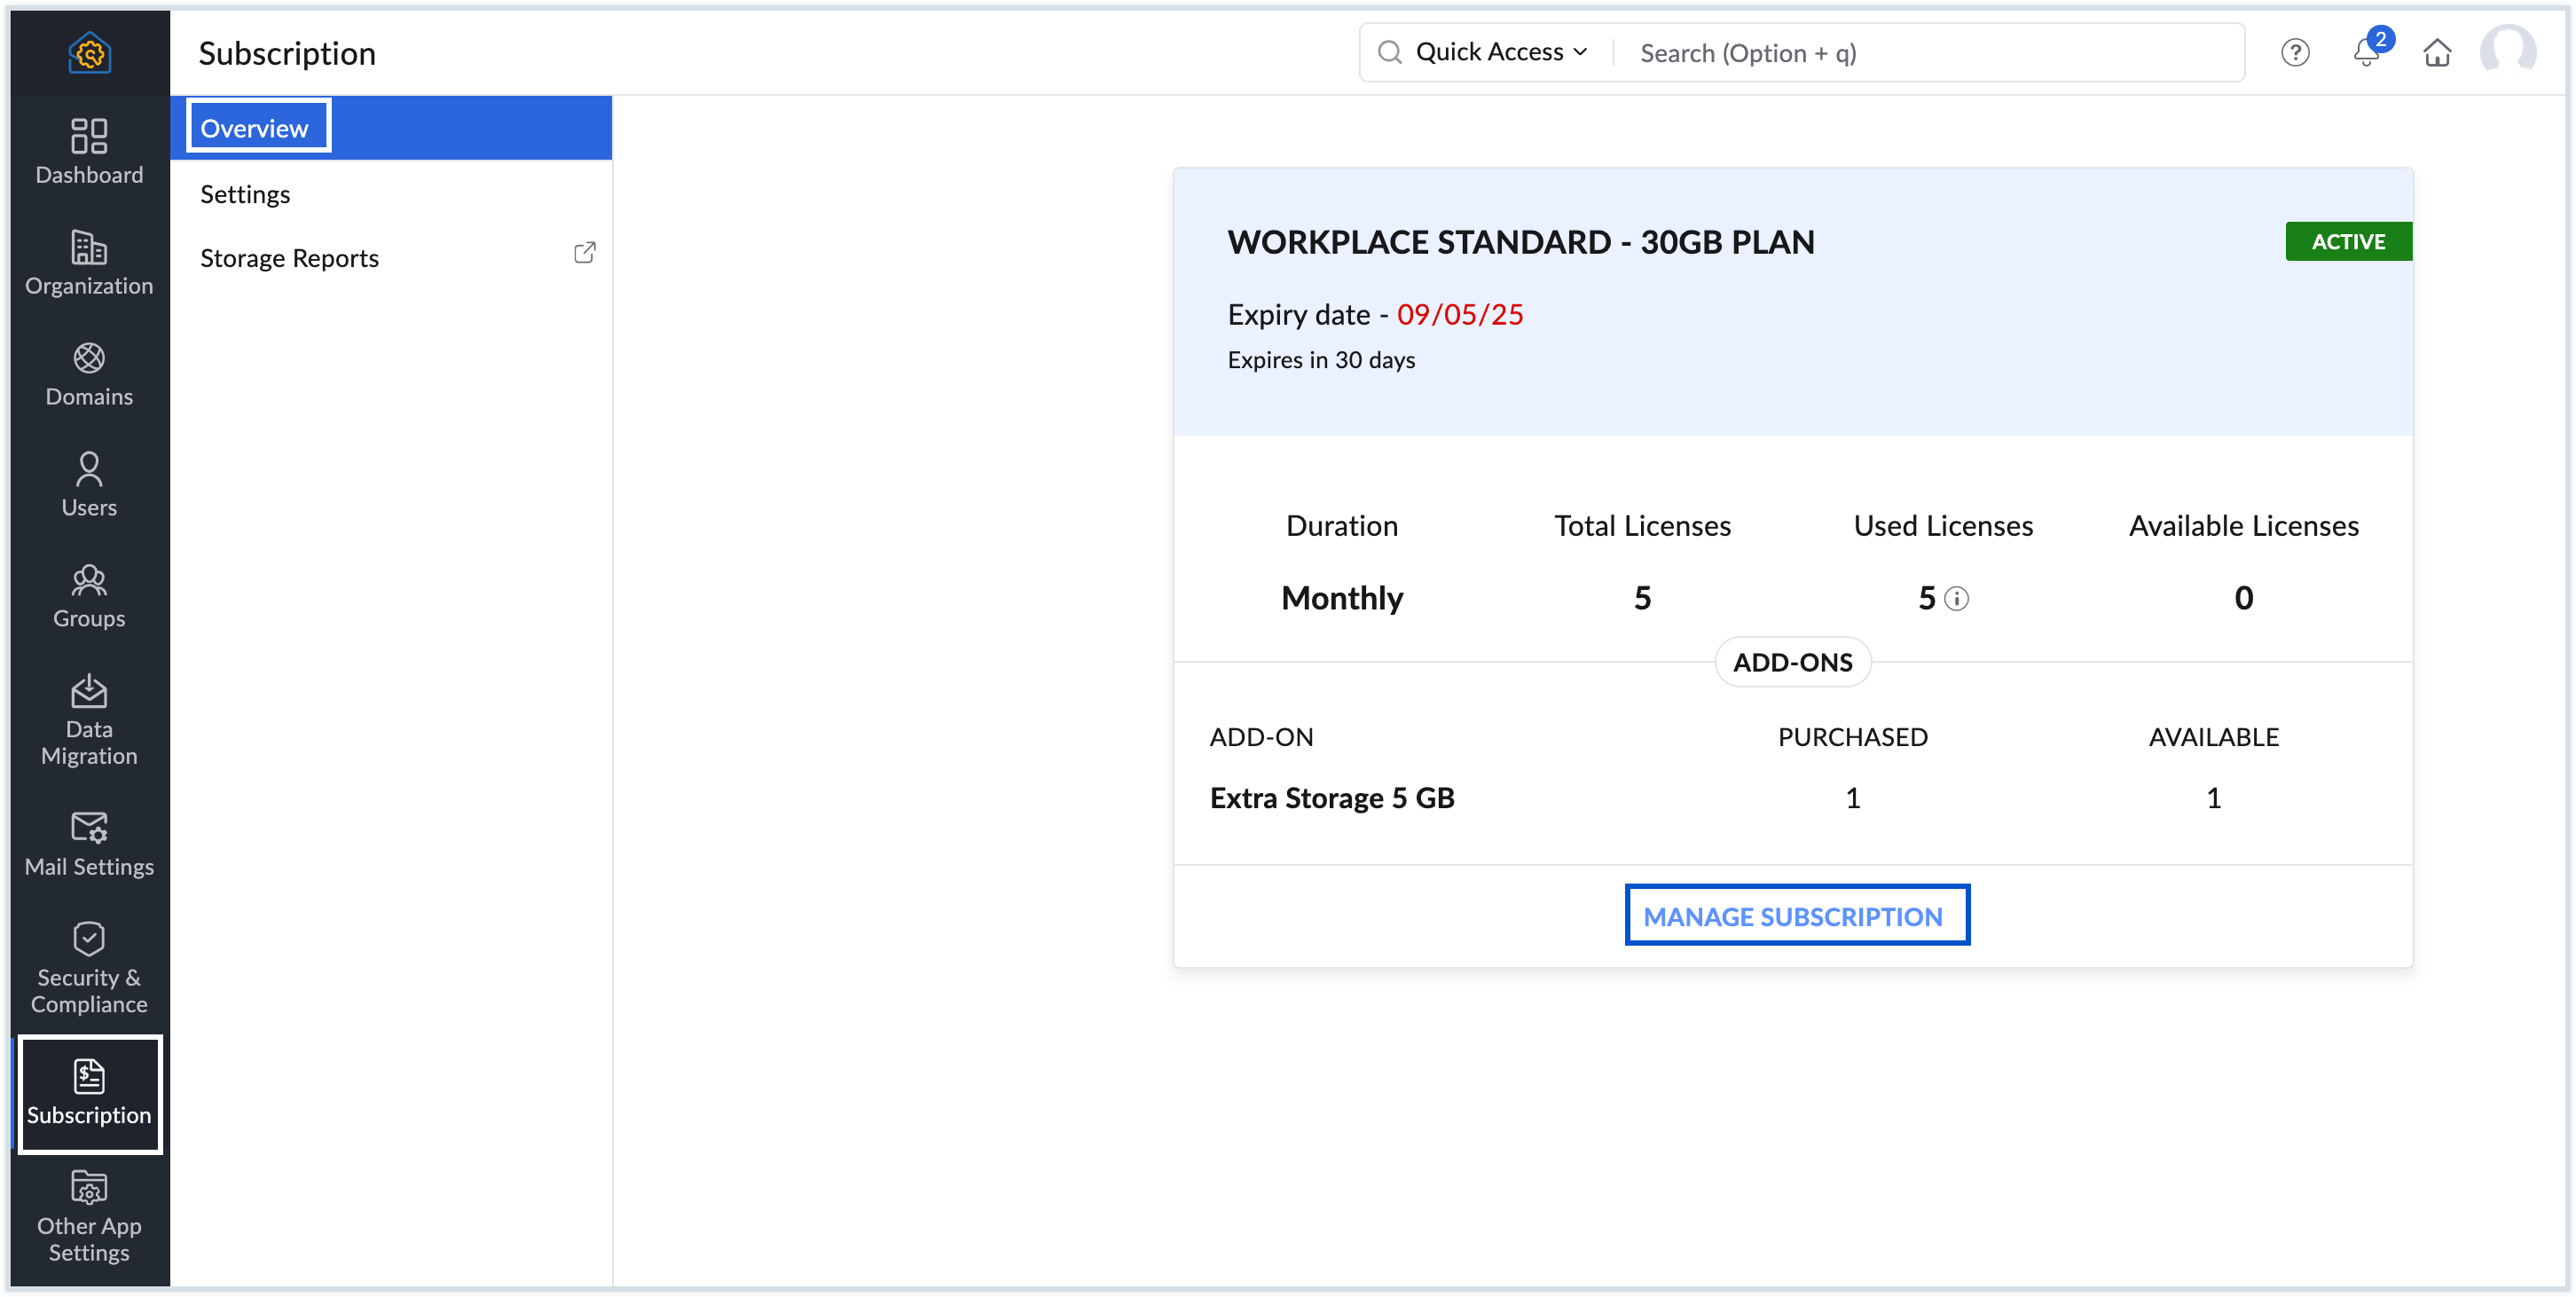
- Overview – View your current subscription details, including the active plan, number of licenses, and any associated add-ons. Click Manage Subscription to make changes to your subscription.
- Settings – Enable or disable Auto-allocation of purchased additional storage units to users in your organization. You can also control whether other administrators are allowed to manage the organization's subscription.
- Click the Reports section in the left pane to access the Storage Reports in Admin Reports. This section provides in-depth insights into user storage usage, protocol access, ActiveSync activity, and more.
Personal Account
Zoho Mail is specifically designed for business purposes, offering tailored solutions for professional needs. However, for those users who prefer to use Zoho Mail without a custom domain or for individuals who simply want a reliable and efficient email service for personal use, there is the option to create personal accounts in Zoho Mail. For instructions on how to sign up for a personal account, click here.
Buy additional storage
If you have signed up with Zoho Mail for personal usage and your mailbox is full, follow these steps to buy additional storage units:
- Log in to your Zoho Mail account.
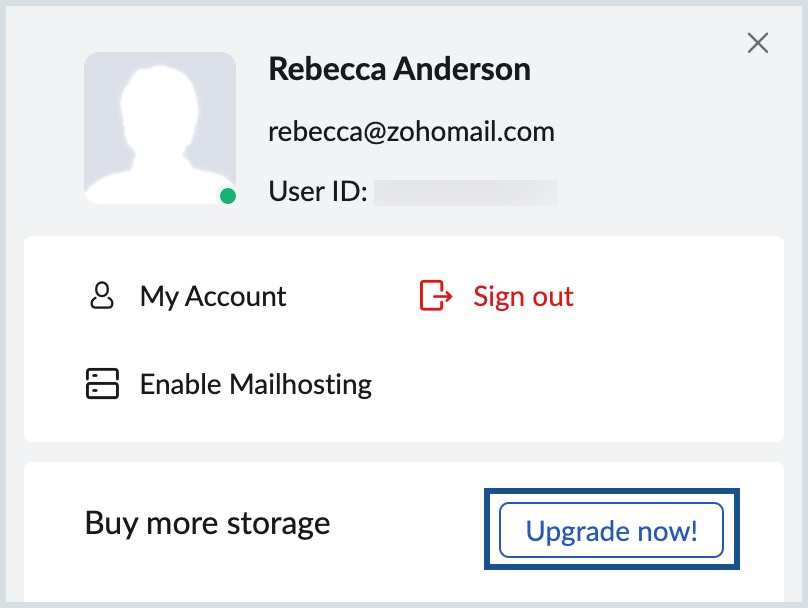
- Select the Profile icon on the top right corner, and click Upgrade Now.
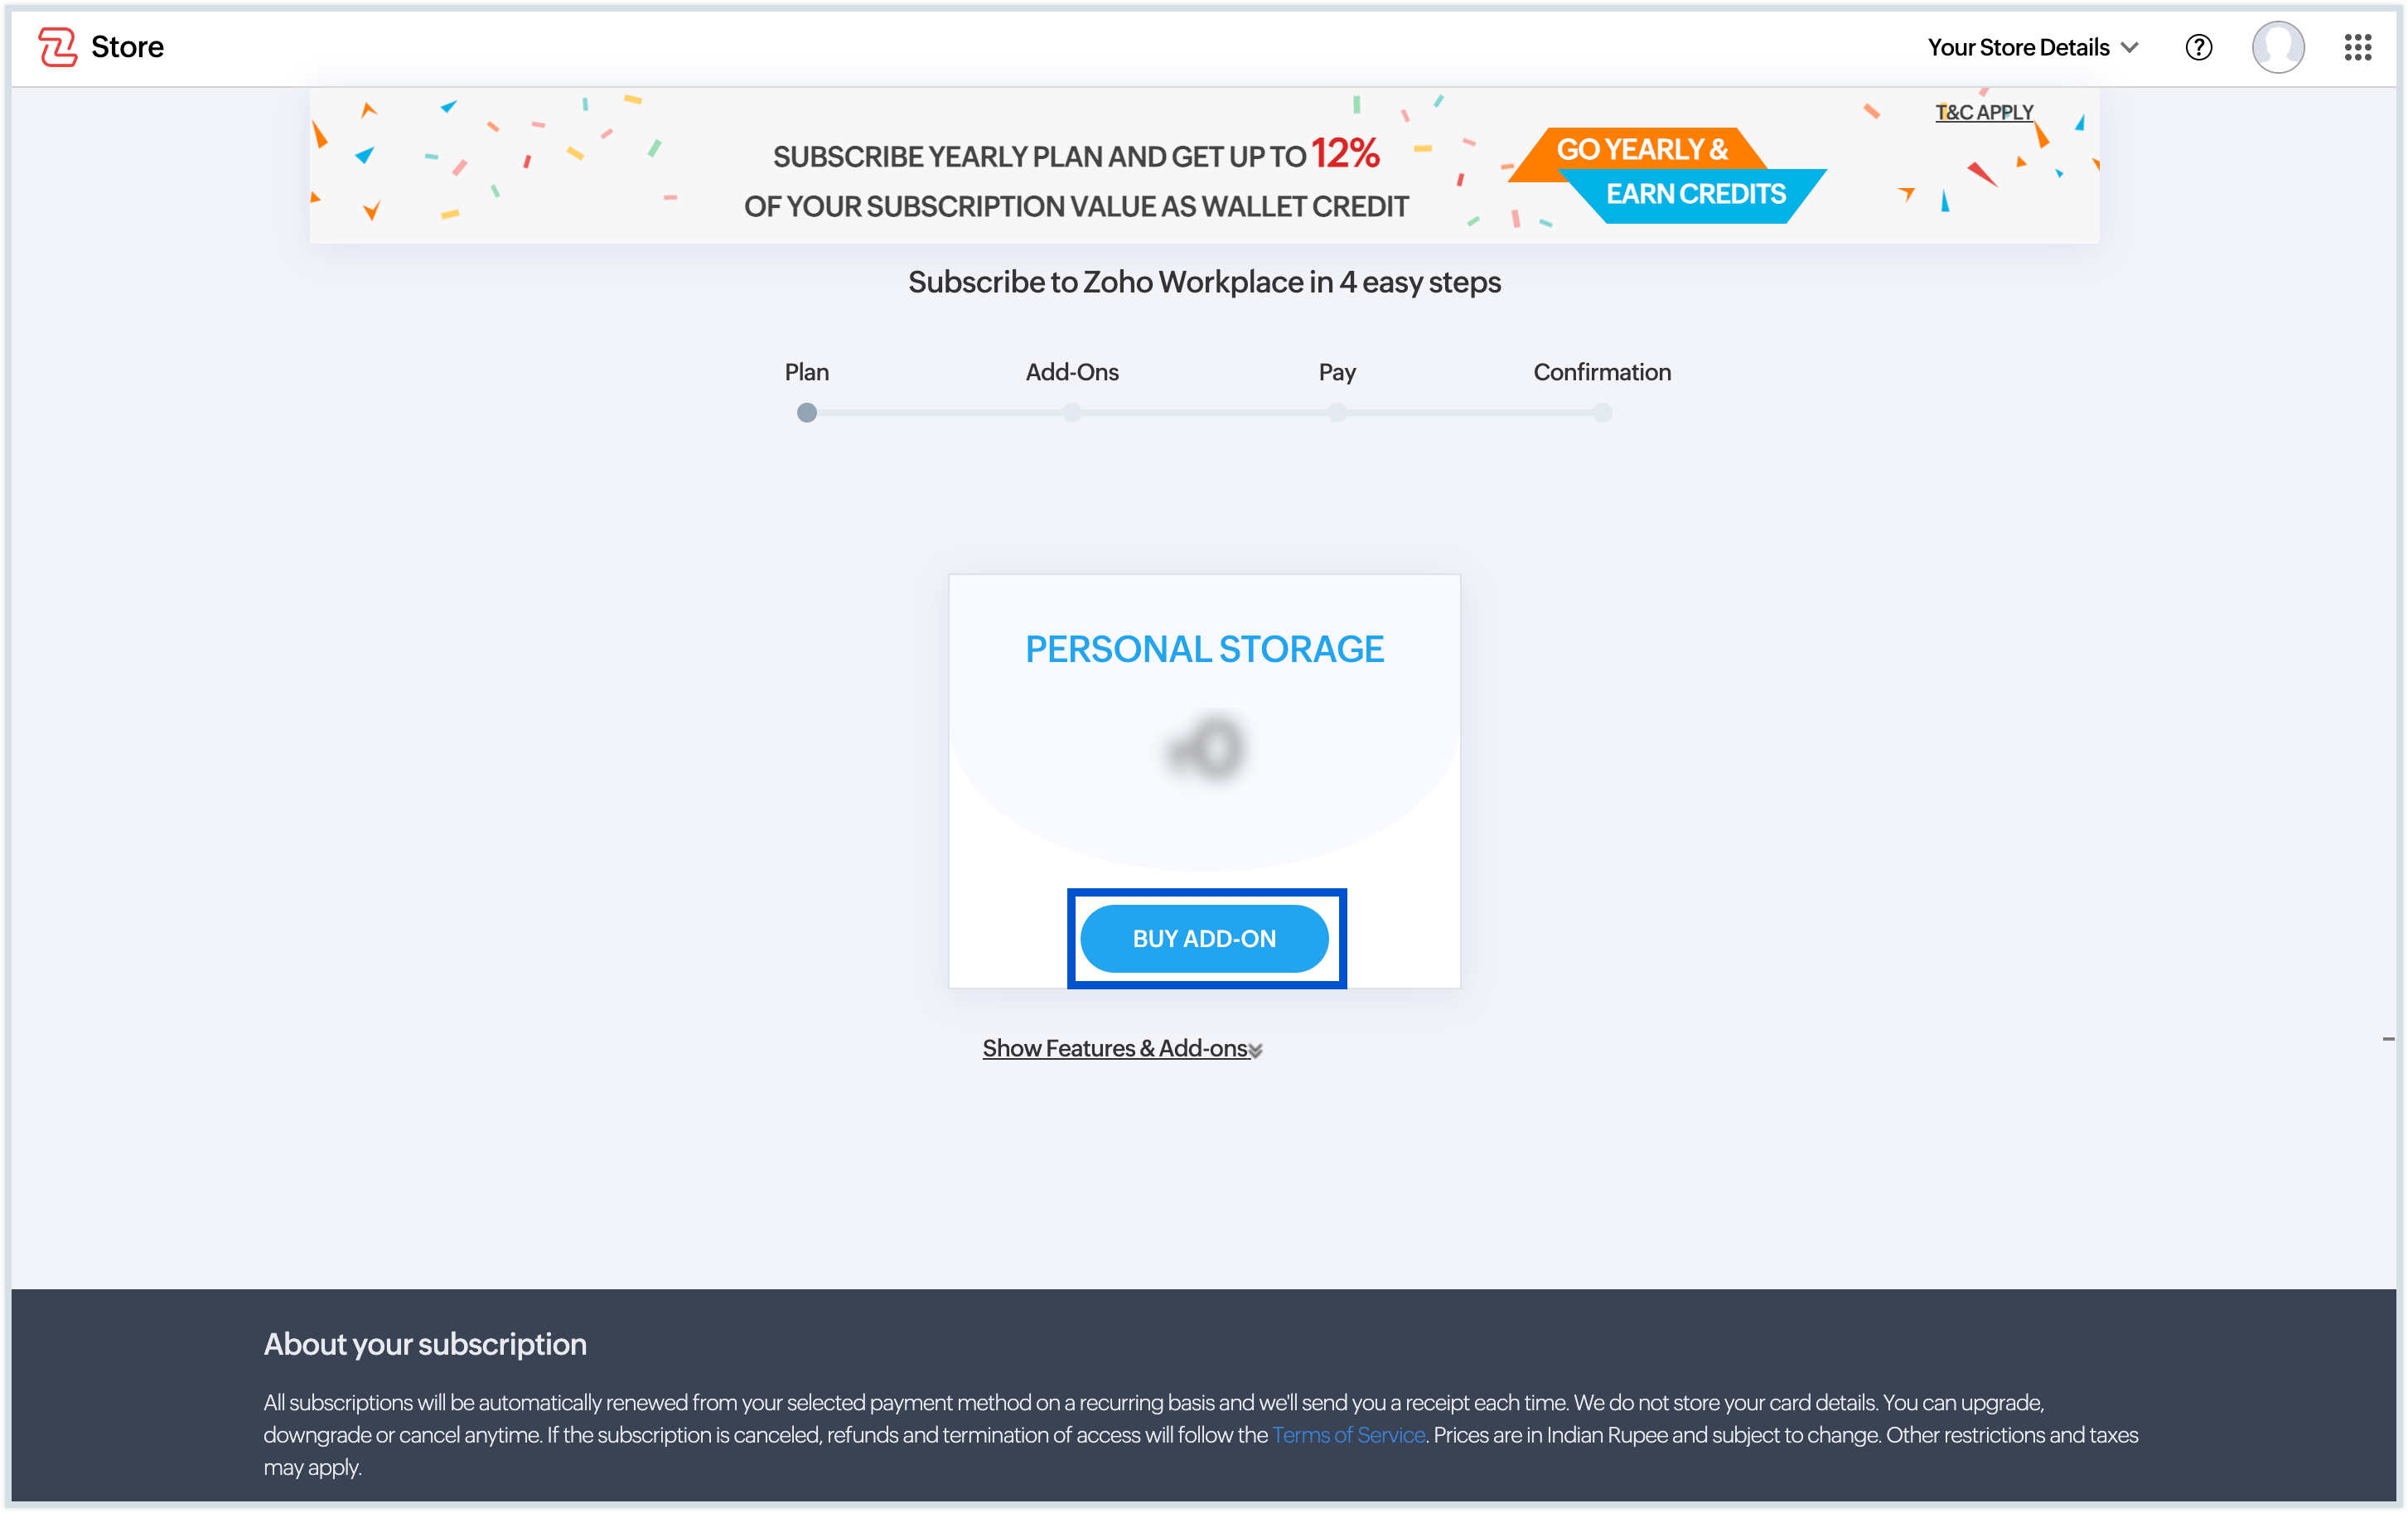
- Click BUY ADD-ON and choose the required storage size.
- Select the desired storage and click PROCEED.
- Review your order summary and proceed to the billing address section.
- Add your contact and payment details.
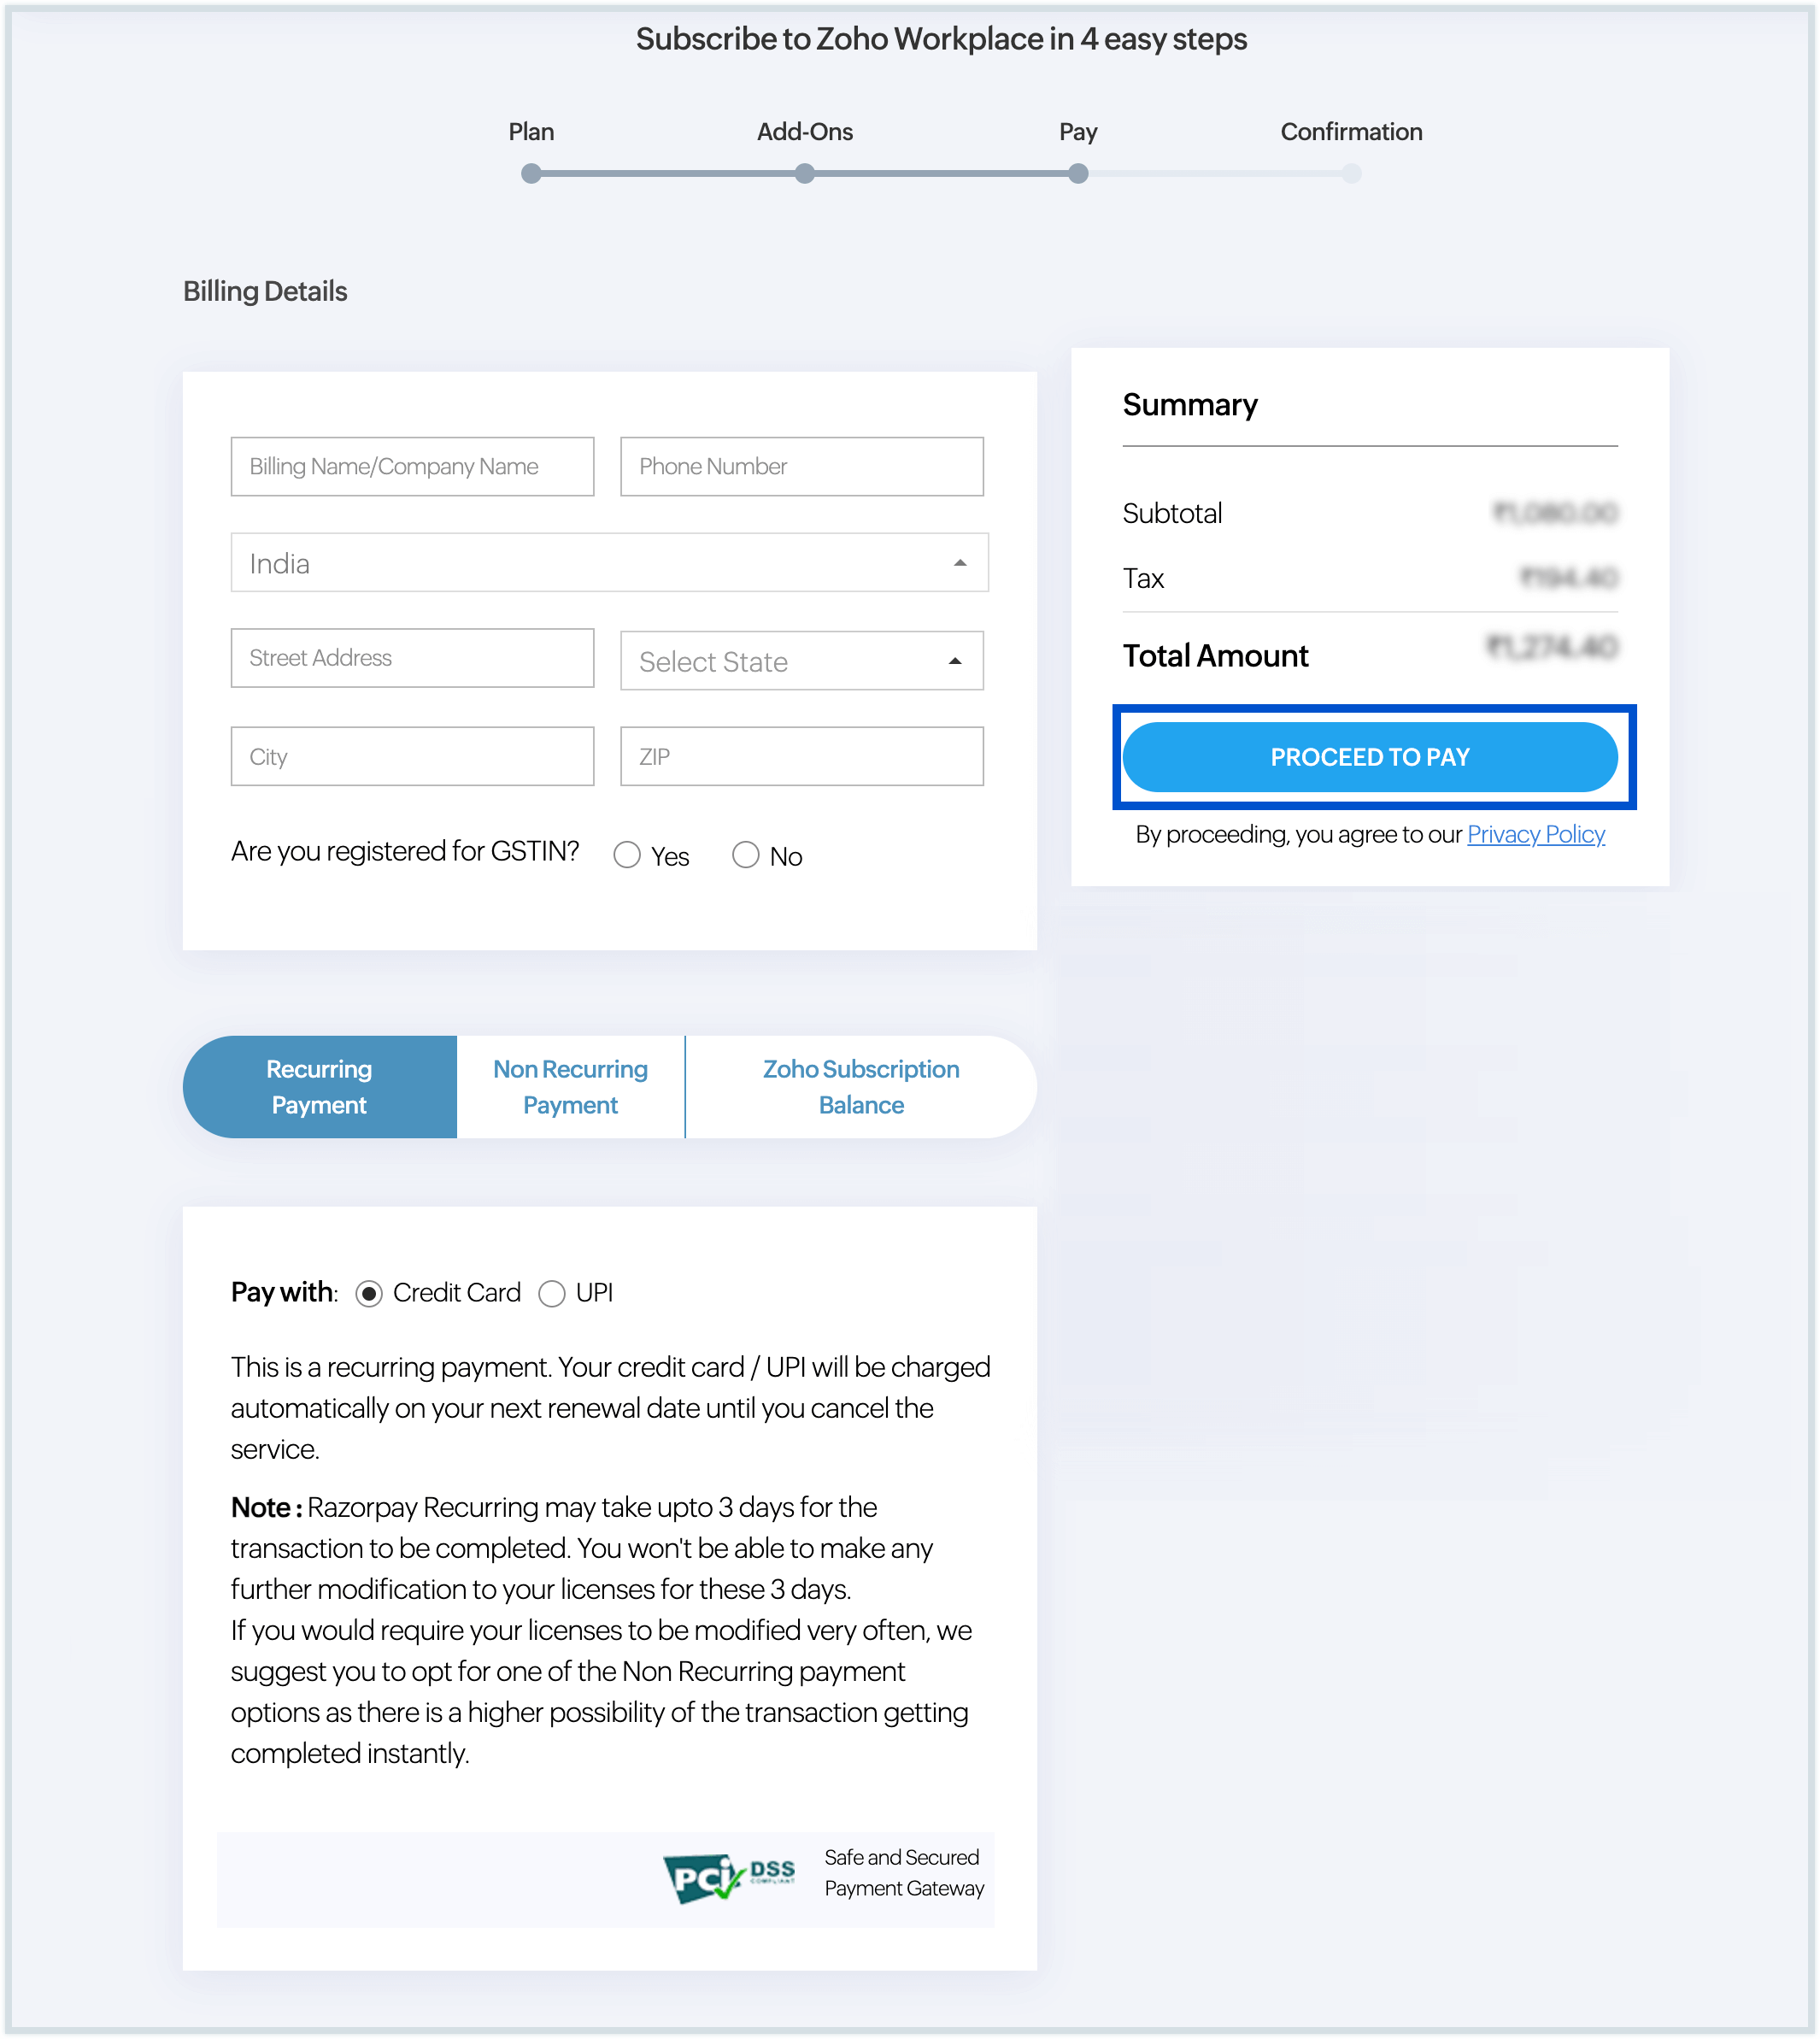
- Click PROCEED TO PAY and make the payment.
Once your transaction is successful, you can view the additional storage in your Zoho Mail account by selecting the Profile icon.
Upgrade your Personal account to Business account
If you are currently using Zoho Mail for personal purposes and now want to use it for your business purposes, you can upgrade your personal account to a business account in Zoho Mail. Upgrading your personal account to a business account is a seamless process that offers you a whole new set of features and functionalities tailored to meet your professional needs. Follow the steps below to upgrade your personal account:
- Log in to your Zoho Mail personal account.
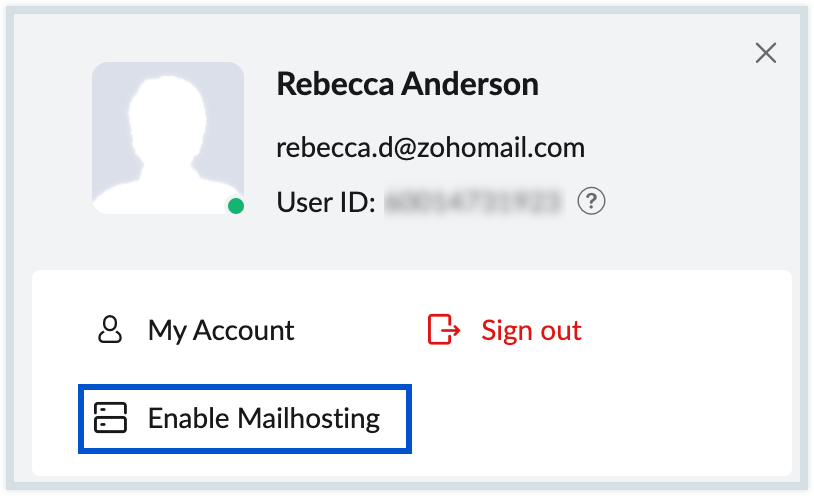
- Click the Profile icon and select Enable Mailhosting.
- Choose the plan of your choice and click the Buy Now button.
- You will be redirected to our organization setup page, where you can proceed with setting up your organization.
Once the process is complete, your personal account will be upgraded to a business account. For detailed instructions on setting up your organization in Zoho Mail, please refer to our help document.
Managing Business Accounts
Zoho Mail Business Account is a paid version of Zoho Mail that caters to needs of businesses of all sizes. The Business account provides a professional email hosting service, which includes custom domain-based email addresses (e.g., example@yourbusiness.com), enhanced security features like encryption and spam filtering, access to various other collaboration tools. Zoho Mail Business account also provides ample storage capacity depending on the plan, with options to choose between 30GB, 100GB, and unlimited storage. It is a comprehensive email solution that aims to improve productivity and communication within an organization.
Upgrade to a paid plan
An admin can upgrade their organization's subscription—from a free or trial plan to a paid plan or from the Lite or Standard plans to Premium or Professional—in case the requirement arises. To upgrade, follow these instructions:
- Log in to Zoho Mail Admin Console.
- Navigate to Subscription and select Overview from the left pane.
- If you are upgrading from one of our paid plans, you can view your plan details along with the list of licenses and add-ons you own on the Subscription page. Here, click Manage Subscription.
- Above your subscription details, select Change Plan.

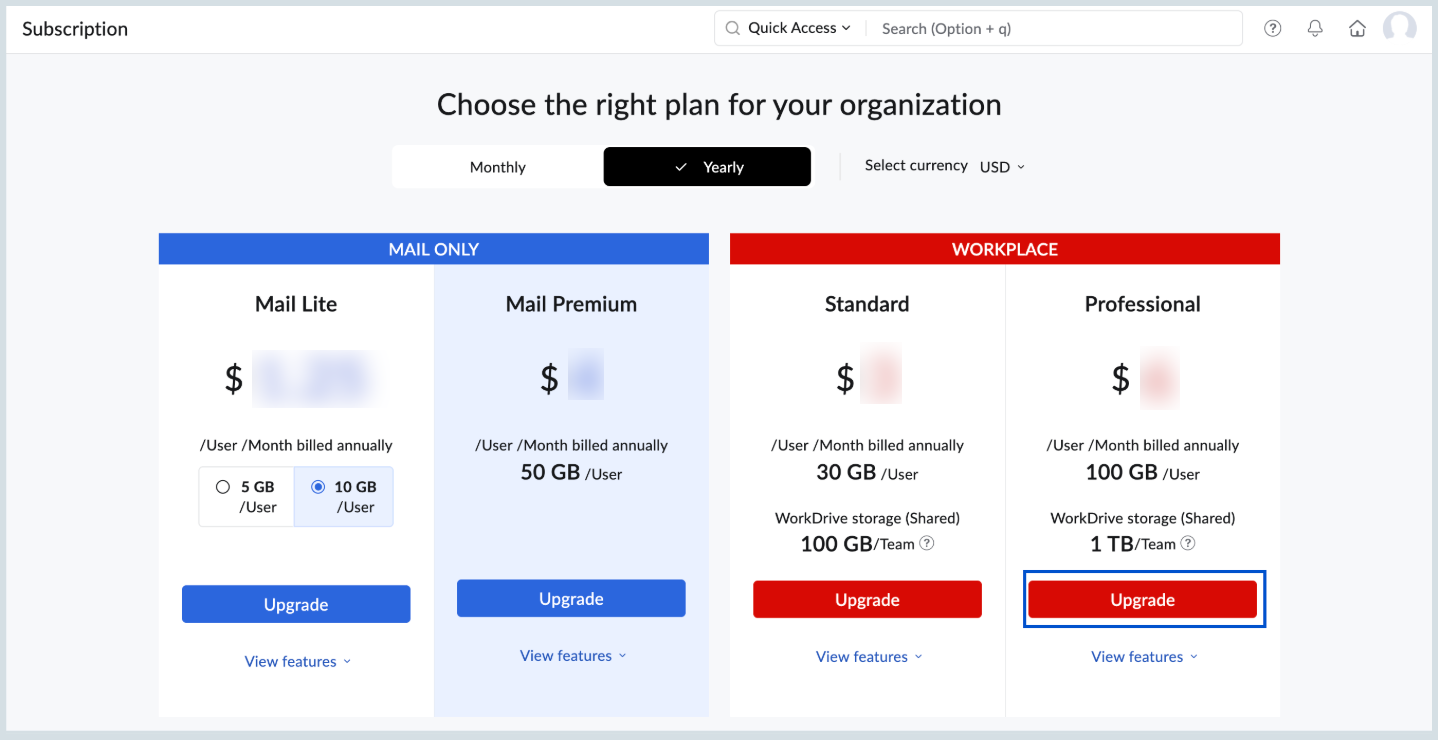
- To upgrade, click the Upgrade button on your preferred plan.

If you are upgrading from a Free plan or Trial plan, details of all the plans available under Zoho Mail and Zoho Workplace will be displayed on the subscription page itself. Choose the plan of your choice and click the Upgrade button.
Note:
- Please note that the pricing displayed in the above screenshots is subject to change. For the most current and accurate information regarding our plans and pricing options, we recommend referring to our Pricing page.
- If you have any questions or need further clarification about our pricing structure, please drop an email to sales@zohocorp.com.
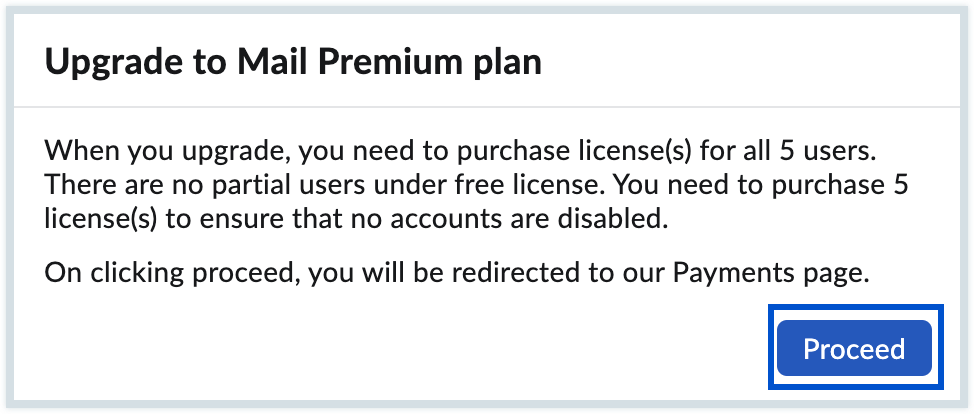
- When you upgrade from a Free plan / Trial plan, you will have to purchase licenses for all users present under your organization. Click Proceed.
- Review the details of your selected plan before confirming the order. Once you've verified everything, click Proceed to Pay to continue.
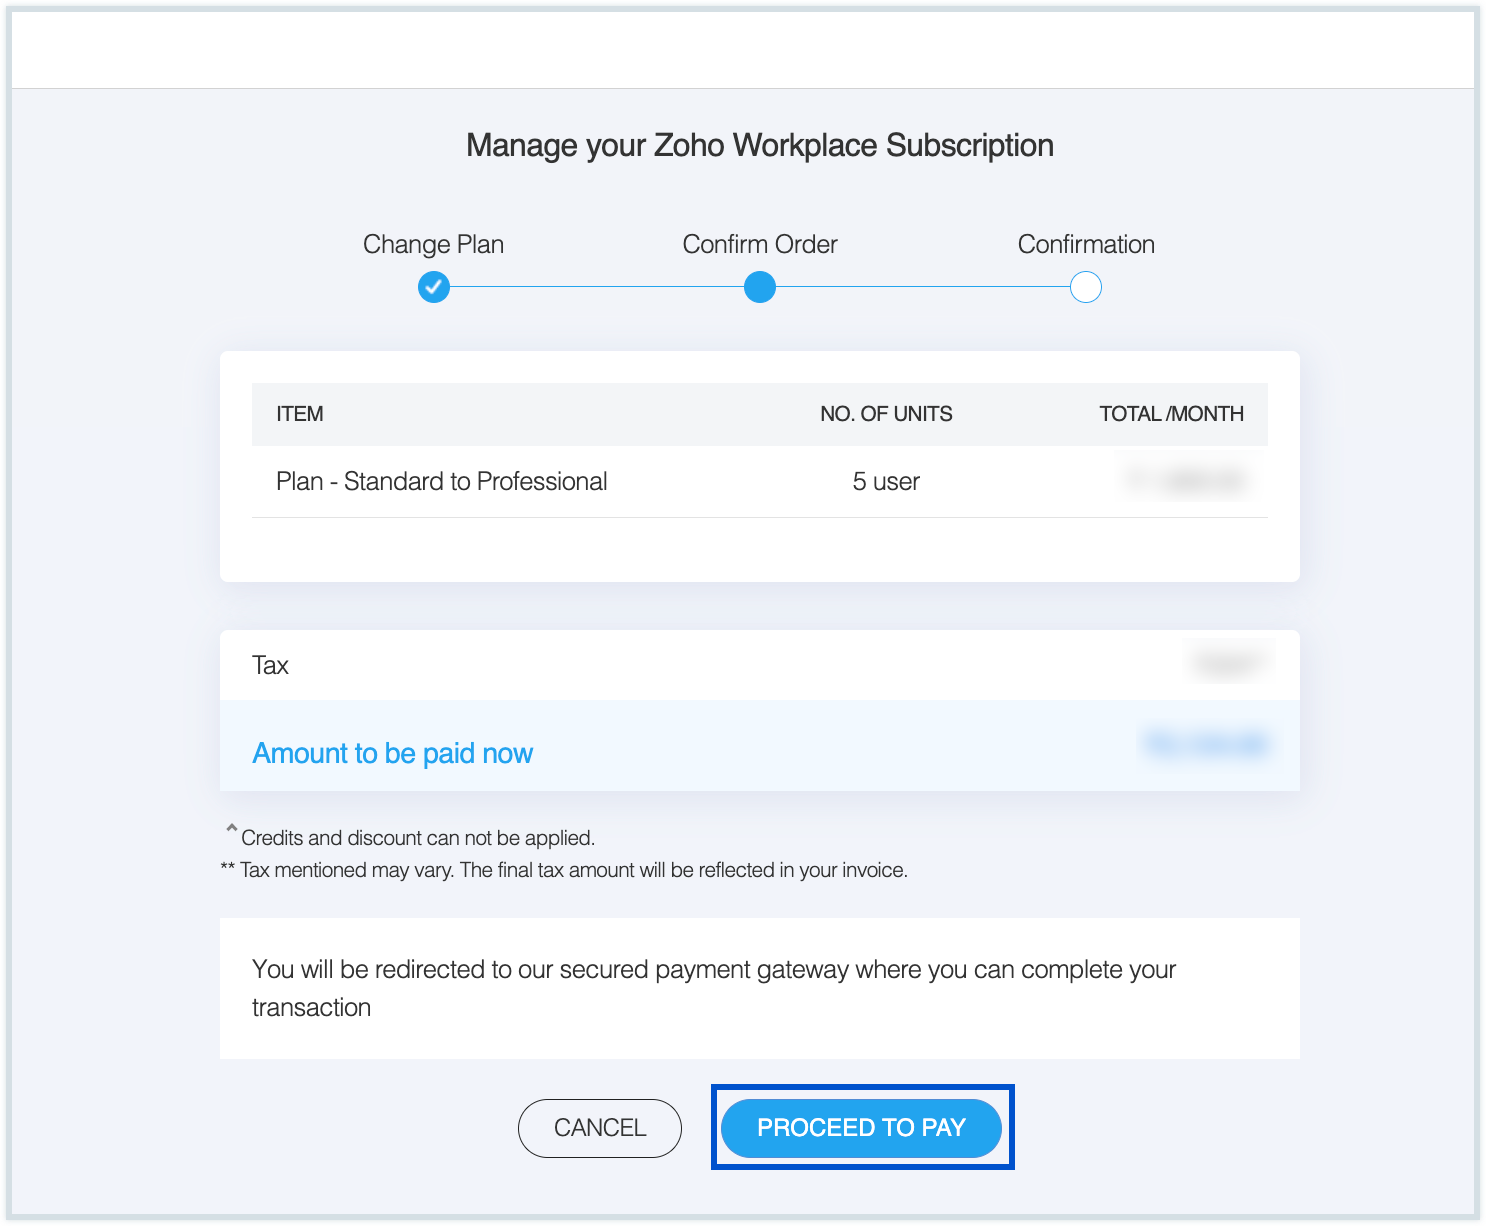
- You will be redirected to our Zoho Payments page for a secure transaction.
- You will see a detailed summary of the pricing along with the total estimated amount payable.
- You can then proceed with the payment using any of the available options based on your preference.
Your bank may reject the transaction if the data provided by you to Zoho Payments does not match their records. You can either change the required data at your bank or use a different card to overcome payment failures. The basic card details you entered will be stored in the Payment Gateway for easy upgrades and renewals in the future. If you want to change the billing address or want to use a different card for subsequent renewals, you can change your credit card details here.
Buy additional licenses for new users
When you subscribe to a paid plan, the number of users should be equal to the number of licenses. To add more users, you need to purchase licenses. The Admin can purchase licenses anytime, from the Zoho Mail Admin Console. When you are in annual renewal mode, the additional licenses purchased will be charged on a pro-rata basis.
Suppose you have 6 user licenses and you go for 1 new license after 6 months, you will be charged for the additional license, only for the remaining 6 months based on the date of renewal. The upgrades/ additional licenses subscribed in the middle of a payment cycle will be charged rounded off from the date of purchase, and up to the immediate renewal date.
Steps to add new licenses:
- Log in to Zoho Mail Admin Console.
- Navigate to Subscription and select Overview from the left pane.
- You can view your plan details along with the list of licenses and add-ons you own. Click Manage Subscription.

- You can also directly access the subscription page from your mailbox. Click on your profile picture in the top right corner of your mailbox, and click the Subscription button.
- Above your subscription details, select Upgrade User/Add-Ons.

- In the Additional users section, specify the number of additional (new) licenses you need. Once done, click Proceed.

- The pro-rata amount for the licenses you purchase based on your renewal date will be displayed. After reviewing your order, click Proceed to Pay.
- The renewals for the organization occur on a single date. Hence, the charges for your current purchase will be based on the next renewal date.
- You will be redirected to our Zoho Payments page for a secure transaction.
- You will see a detailed summary of the pricing along with the total estimated amount payable.
- You can then proceed with the payment using any of the available options based on your preference.
- If your transaction was successful, your account will reflect your new licenses. If the transaction cannot be completed, check and retry the transaction.
Additional storage
Email is not just a mode of communication but serves as a track of previous important communications that you may have to refer to from time to time. The storage requirement for each user varies based on the user's email behavior, the nature of the job, and other communications. Zoho Mail provides various basic storage options, based on the license type and plan allocated for the users. However, some users may need more space for email due to their job requirements. Administrators can choose to buy additional storage units—10 GB, 25GB, 50GB, 100 GB, and 200 GB and allocate them to selected users, who need more storage for their email data.
Note:
- The 5 GB Mail Storage Add-on has been deprecated for all new users, effective March 2025. This deprecation will also apply to existing users who have not previously purchased the add-on, and it will no longer be available for purchase.
- If you have already purchased the 5 GB add-on in the past for your organization (whether allocated or unallocated), you may continue to purchase and allocate it as needed.
Additional storage for domain-based organizations
Administrators of an organization can buy additional storage units/ add-ons and allocate them to users based on their specific needs. To buy additional storage,
- Log in to Zoho Mail Admin Console.
- Navigate to Subscription and select Overview from the left pane.
- You can view your plan details along with the list of licenses and add-ons you own. Click Manage Subscription.

- You can also directly access the subscription page from your mailbox. Click on your profile picture in the top right corner of your mailbox, and click the Subscription button.
- Above your subscription details, select Upgrade User/ Add-Ons.

- In the add-on options available, specify the number of units you would like to purchase. For example, if you want to purchase 100 GB for one user and 25 GB for another, you can purchase one 100 GB unit and one 25 GB unit.
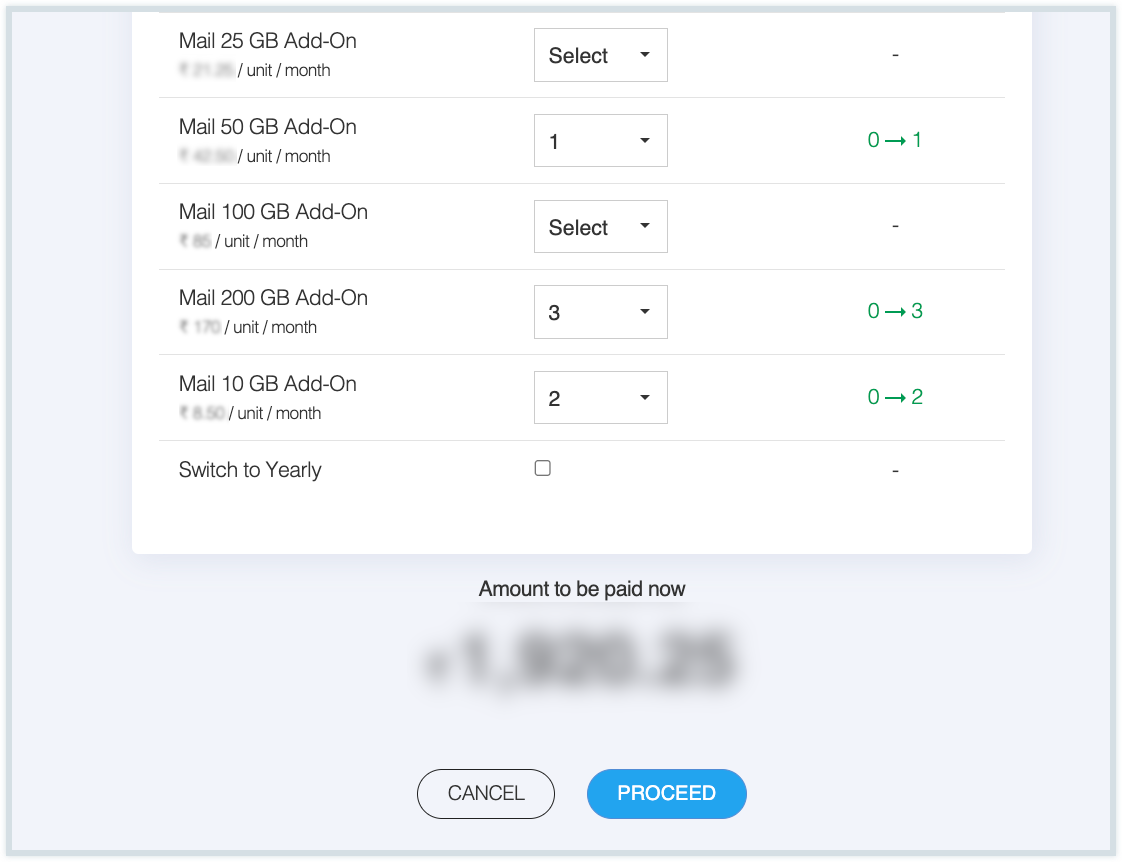
- After selecting the required units of storage, click Proceed.
- The pro-rata amount for the licenses you purchase based on your renewal date will be displayed. After reviewing your order, click Proceed to Pay.
- The renewals for the organization occur on a single date. Hence, the upgrades/ additional licenses subscribed in the middle of a payment cycle will be charged only for the time remaining up to the immediate renewal date.
- You will be redirected to our Zoho Payments page for a secure transaction.
- You will see a detailed summary of the pricing along with the total estimated amount payable.
- You can then proceed with the payment using any of the available options based on your preference.
- If your transaction was successful, your account will reflect your new add-ons. If the transaction cannot be completed, check and retry the transaction.
If you need to provide additional storage for multiple users, purchase multiple units accordingly. For instance, buying two 25 GB units will allow you to assign 25 GB each to two different users. Similarly, if a user requires more than 200 GB, multiple add-ons can be purchased and allocated to the same user.
Allocate additional storage
Once you’ve purchased additional storage units, the next step is to assign them to users based on their individual storage needs. Zoho Mail allows administrators to flexibly distribute the purchased add-on storage either for Mail Storage or eDiscovery Storage, depending on the user’s role and usage patterns.
Follow these steps to allocate additional storage:
- Log in to Zoho Mail Admin Console.
- Navigate to the Users section in the left pane and click on the user you want to allocate additional storage units. You can also use the universal Search bar to find the respective users with ease.

On the user profile page, navigate to Storage in the left menu and choose either Mail Storage or eDiscovery Storage, depending on your requirement.
- The Mail storage space is for all mailbox data such as folders, configured POP/IMAP accounts, archived emails and trash emails.
- The eDiscovery storage is for email retention and backup.
Note:
If you do not see the option to assign eDiscovery storage, your current subscription plan may not support this feature. Learn More.
- Enter the number of additional storage units you want to allocate to that user. There is no limit to the number of units you can assign to a single user.
- Once done, click Update.
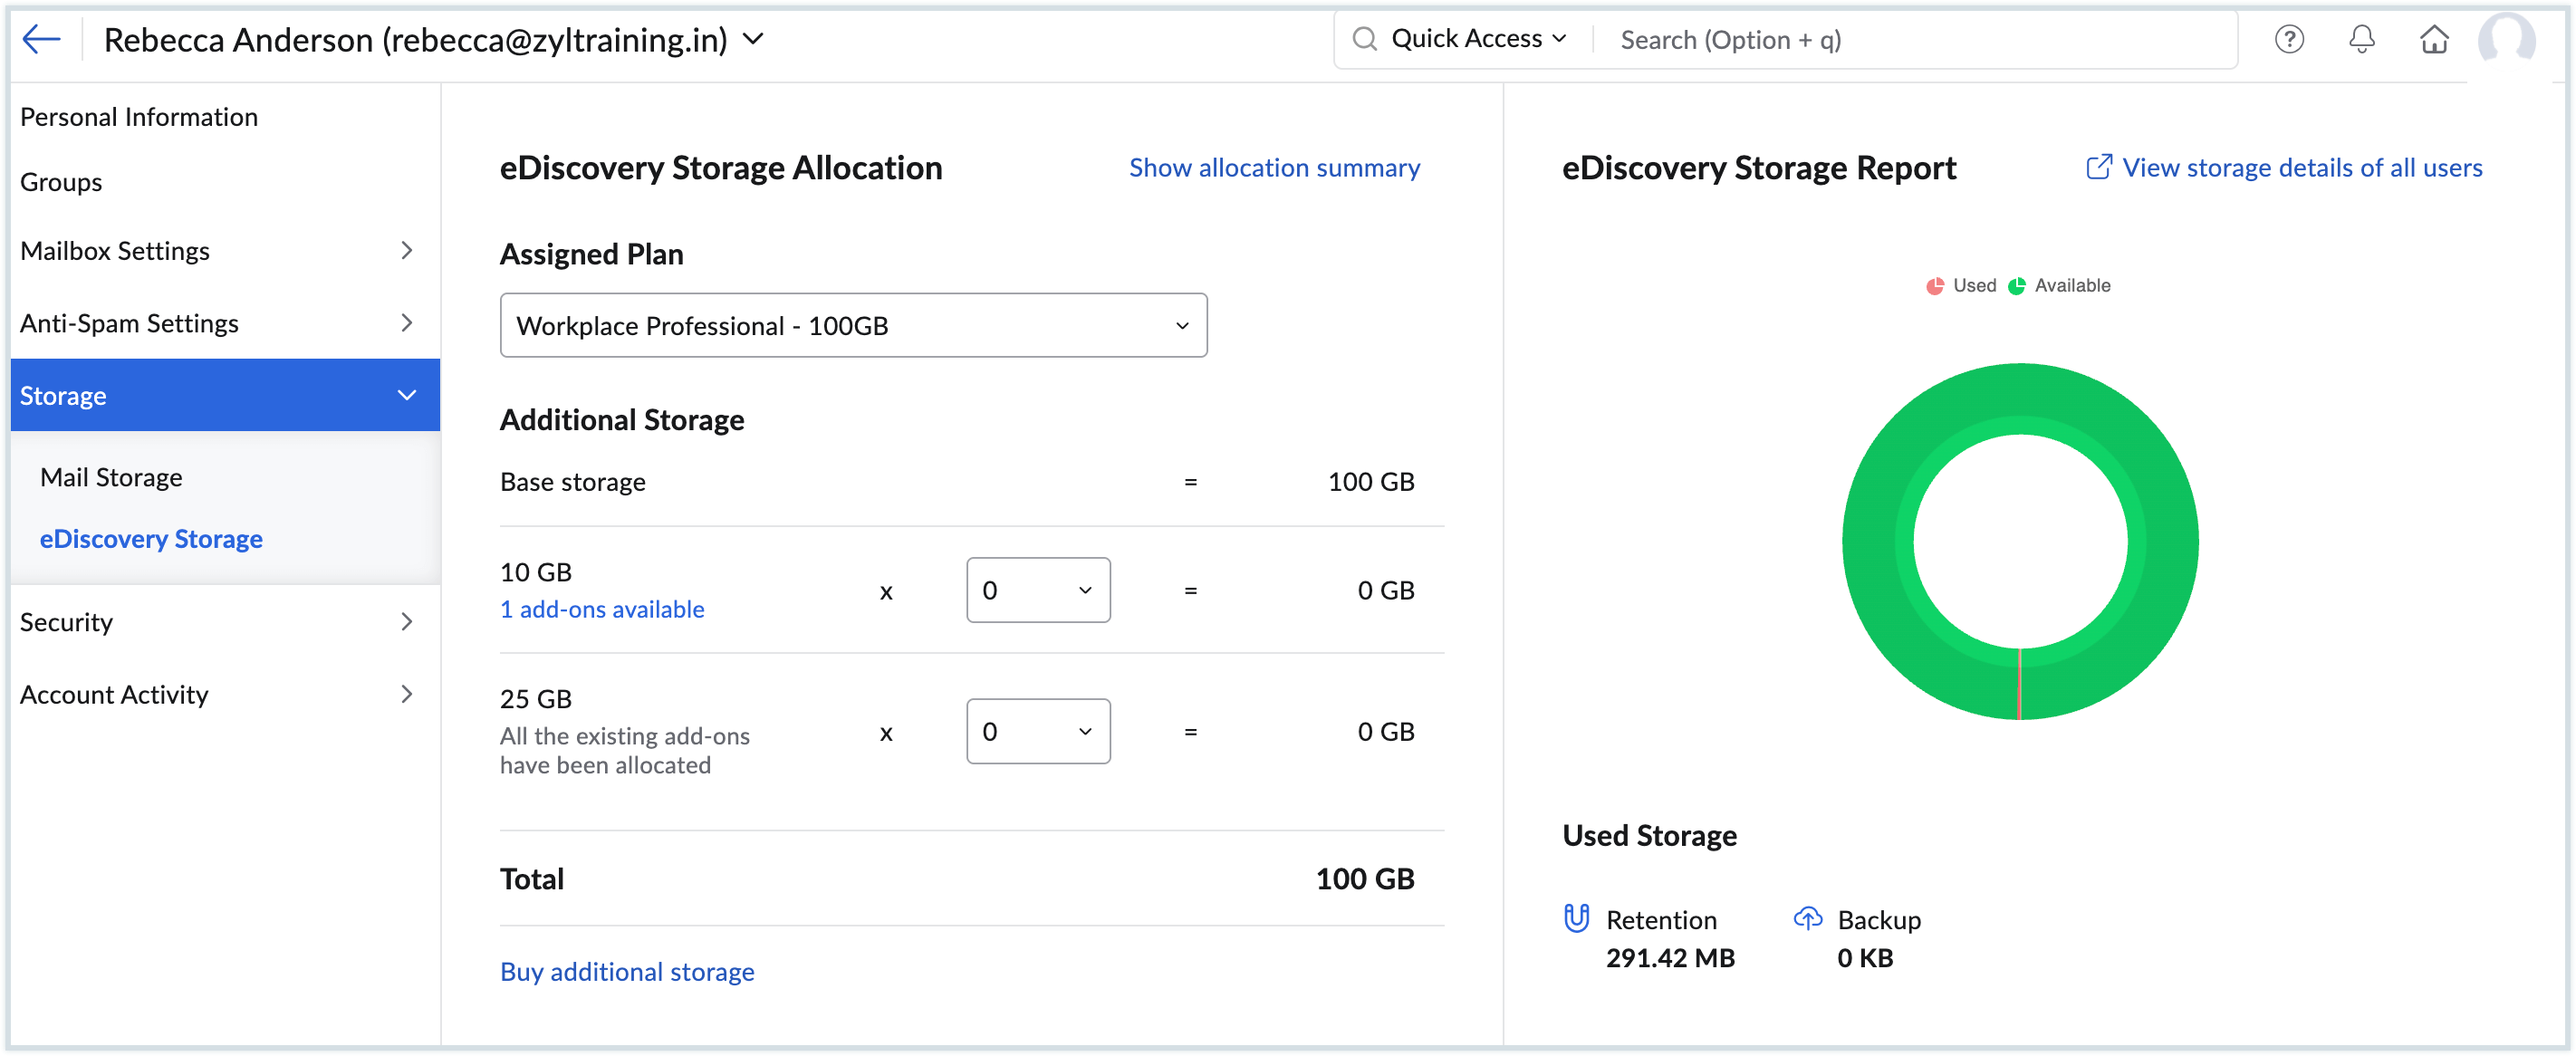
You have successfully assigned additional storage to the user. You can also view the summary of all add-ons you purchased and used by clicking Show allocation summary or Buy additional storage from this page
Auto Allocation of additional storage units
The Auto-allocation feature helps in automatically assigning storage resources for users within your organization. When Auto-allocation is enabled, storage units will be automatically allocated to users with mailboxes reaching their maximum storage limit. As an admin, you can define this maximum limit in the Admin Console. This makes sure that the user in need gets timely storage units and can also prevent their account from getting automatically blocked.
To switch on the Auto-allocation of storage units,
- Log in to Zoho Mail Admin Console.
- Navigate to Subscription and select Settings from the left pane.
- Toggle the Auto-allocation option to ON position.
- Set the Maximum Limit between 60% and 100%.

Once enabled, all unused, pre-purchased storage units will be automatically allocated when a user’s account reaches the specified threshold. The system allocates storage from smaller to larger units starting with smaller units and scaling up as needed.
Note:
- Auto-allocation is only possible if the admin has already purchased additional storage that hasn’t yet been used.
- Auto-allocation will not apply to users requiring eDiscovery Storage. Any allocation of eDiscovery storage must be done manually by the administrator from the Admin Console.
Switch to a yearly plan
- Log in to Zoho Mail Admin Console.
- Navigate to Subscription and select Overview from the left pane.
- You can view your plan details along with the list of licenses and add-ons you own. Click Manage Subscription.

- The complete plan details will be displayed. Next to the plan details, in the Manage Subscription section, select Move to yearly.

- After you've chosen this, in the order Confirmation screen, you will be shown a summary of your bill amount. Click Proceed to Pay and finish your payment.
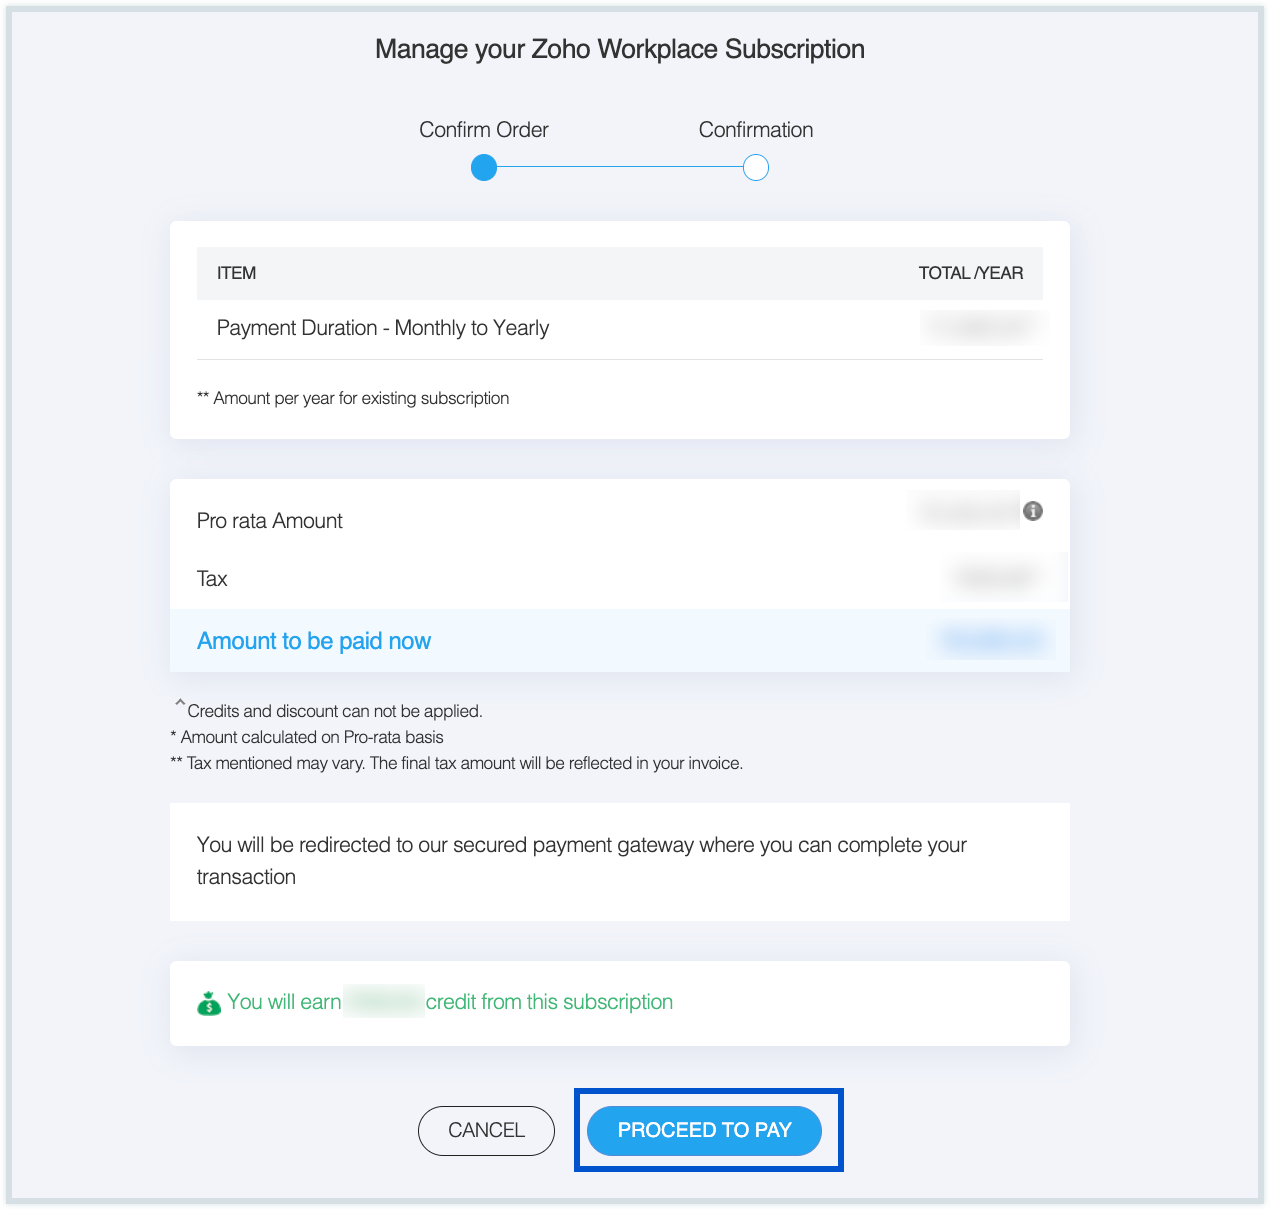
You will now be moved to the yearly plan and renewal cycle.
Payment Modes
Zoho Workplace and Zoho Mail support a variety of secure payment methods to suit your convenience. We ensure a transparent billing process with no hidden fees or additional charges for administrators. You can choose to pay using any of the following supported card types:
- Mastercard
- Visa
- American Express
- JCB
- Discover
Note:
- In addition to the above card options, you can also pay via Paypal. However, the cards listed above are not supported for payment in all countries.
- For queries related to online payment options, reach us at payments@zohocorp.com. For Bank transfer or offline payment queries, drop an email to sales@zohocorp.com.
View Payment history and download Invoices
You can view the details of your past payments like upgrades, renewals, and more from the Payment History section. The invoices for each payment made are also available on the same page.
- Log in to Zoho Mail Admin Console.
- Navigate to Subscription and select Overview from the left pane.
- You can view your plan details along with the list of licenses and add-ons you own. Click Manage Subscription.

- In the top right corner, click Your Store Details and then click Transaction History.

- On the transaction history page, you can view all the past payments and renewals.
- You can search for the transactions or filter the details from the list of transactions.
- Hover over the PDF icon to View or Download the invoice in pdf format.

Change Credit Card Details
You can modify the credit card details stored with us, for other future upgrades or renewals. To change your card details,
- Log in to Zoho Mail Admin Console.
- Navigate to Subscription and select Overview from the left pane.
- You can view your plan details along with the list of licenses and add-ons you own. Click Manage Subscription.

- In the top right corner, click Your Store Details and then click Payment Method.

- Under Payment Method, navigate to the card you wish to modify.
- Click the Edit button to make the necessary changes.
- To add a new payment method, click Add Payment Method, enter the new card details, and click Update. Your card details will be updated successfully.
- To remove a payment method, click the Delete button next to the respective card if you no longer wish to use it for payments.
You can also update your Billing Address, add additional Recipient Addresses, manage Credits, add Notification Recipients, or monitor your Zoho Subscription Balance within this section.
Change Offline payment mode to Online mode
For users who have purchased any of our paid plans via offline mode, you have the option to switch your payment mode from offline to online. To update your subscription mode to online:
- Log in to Zoho Mail Admin Console.
- Navigate to Subscription and select Overview from the left pane.
- You can view your plan details along with the list of licenses and add-ons you own. Click Manage Subscription.
- Click the Update Payment Method button in the top pane.

- In the Payment Details page, enter the required billing details.
- Once done, click Update and make the payment.
Downgrade Subscription
We understand that your organizational needs may evolve over time, and you might prefer a plan that better aligns with your current usage. If you wish to downgrade your subscription, you can do so seamlessly by following the steps below:
- Log in to Zoho Mail Admin Console.
- Navigate to Subscription and select Overview from the left pane.
- You will see your current plan details, along with the number of licenses and any add-ons associated with your account. Click on Manage Subscription.

- In the Manage Subscription section, select Change Plan to view all available plans, including your current one.

- Choose the plan you'd like to downgrade to, and click the Downgrade button next to it.
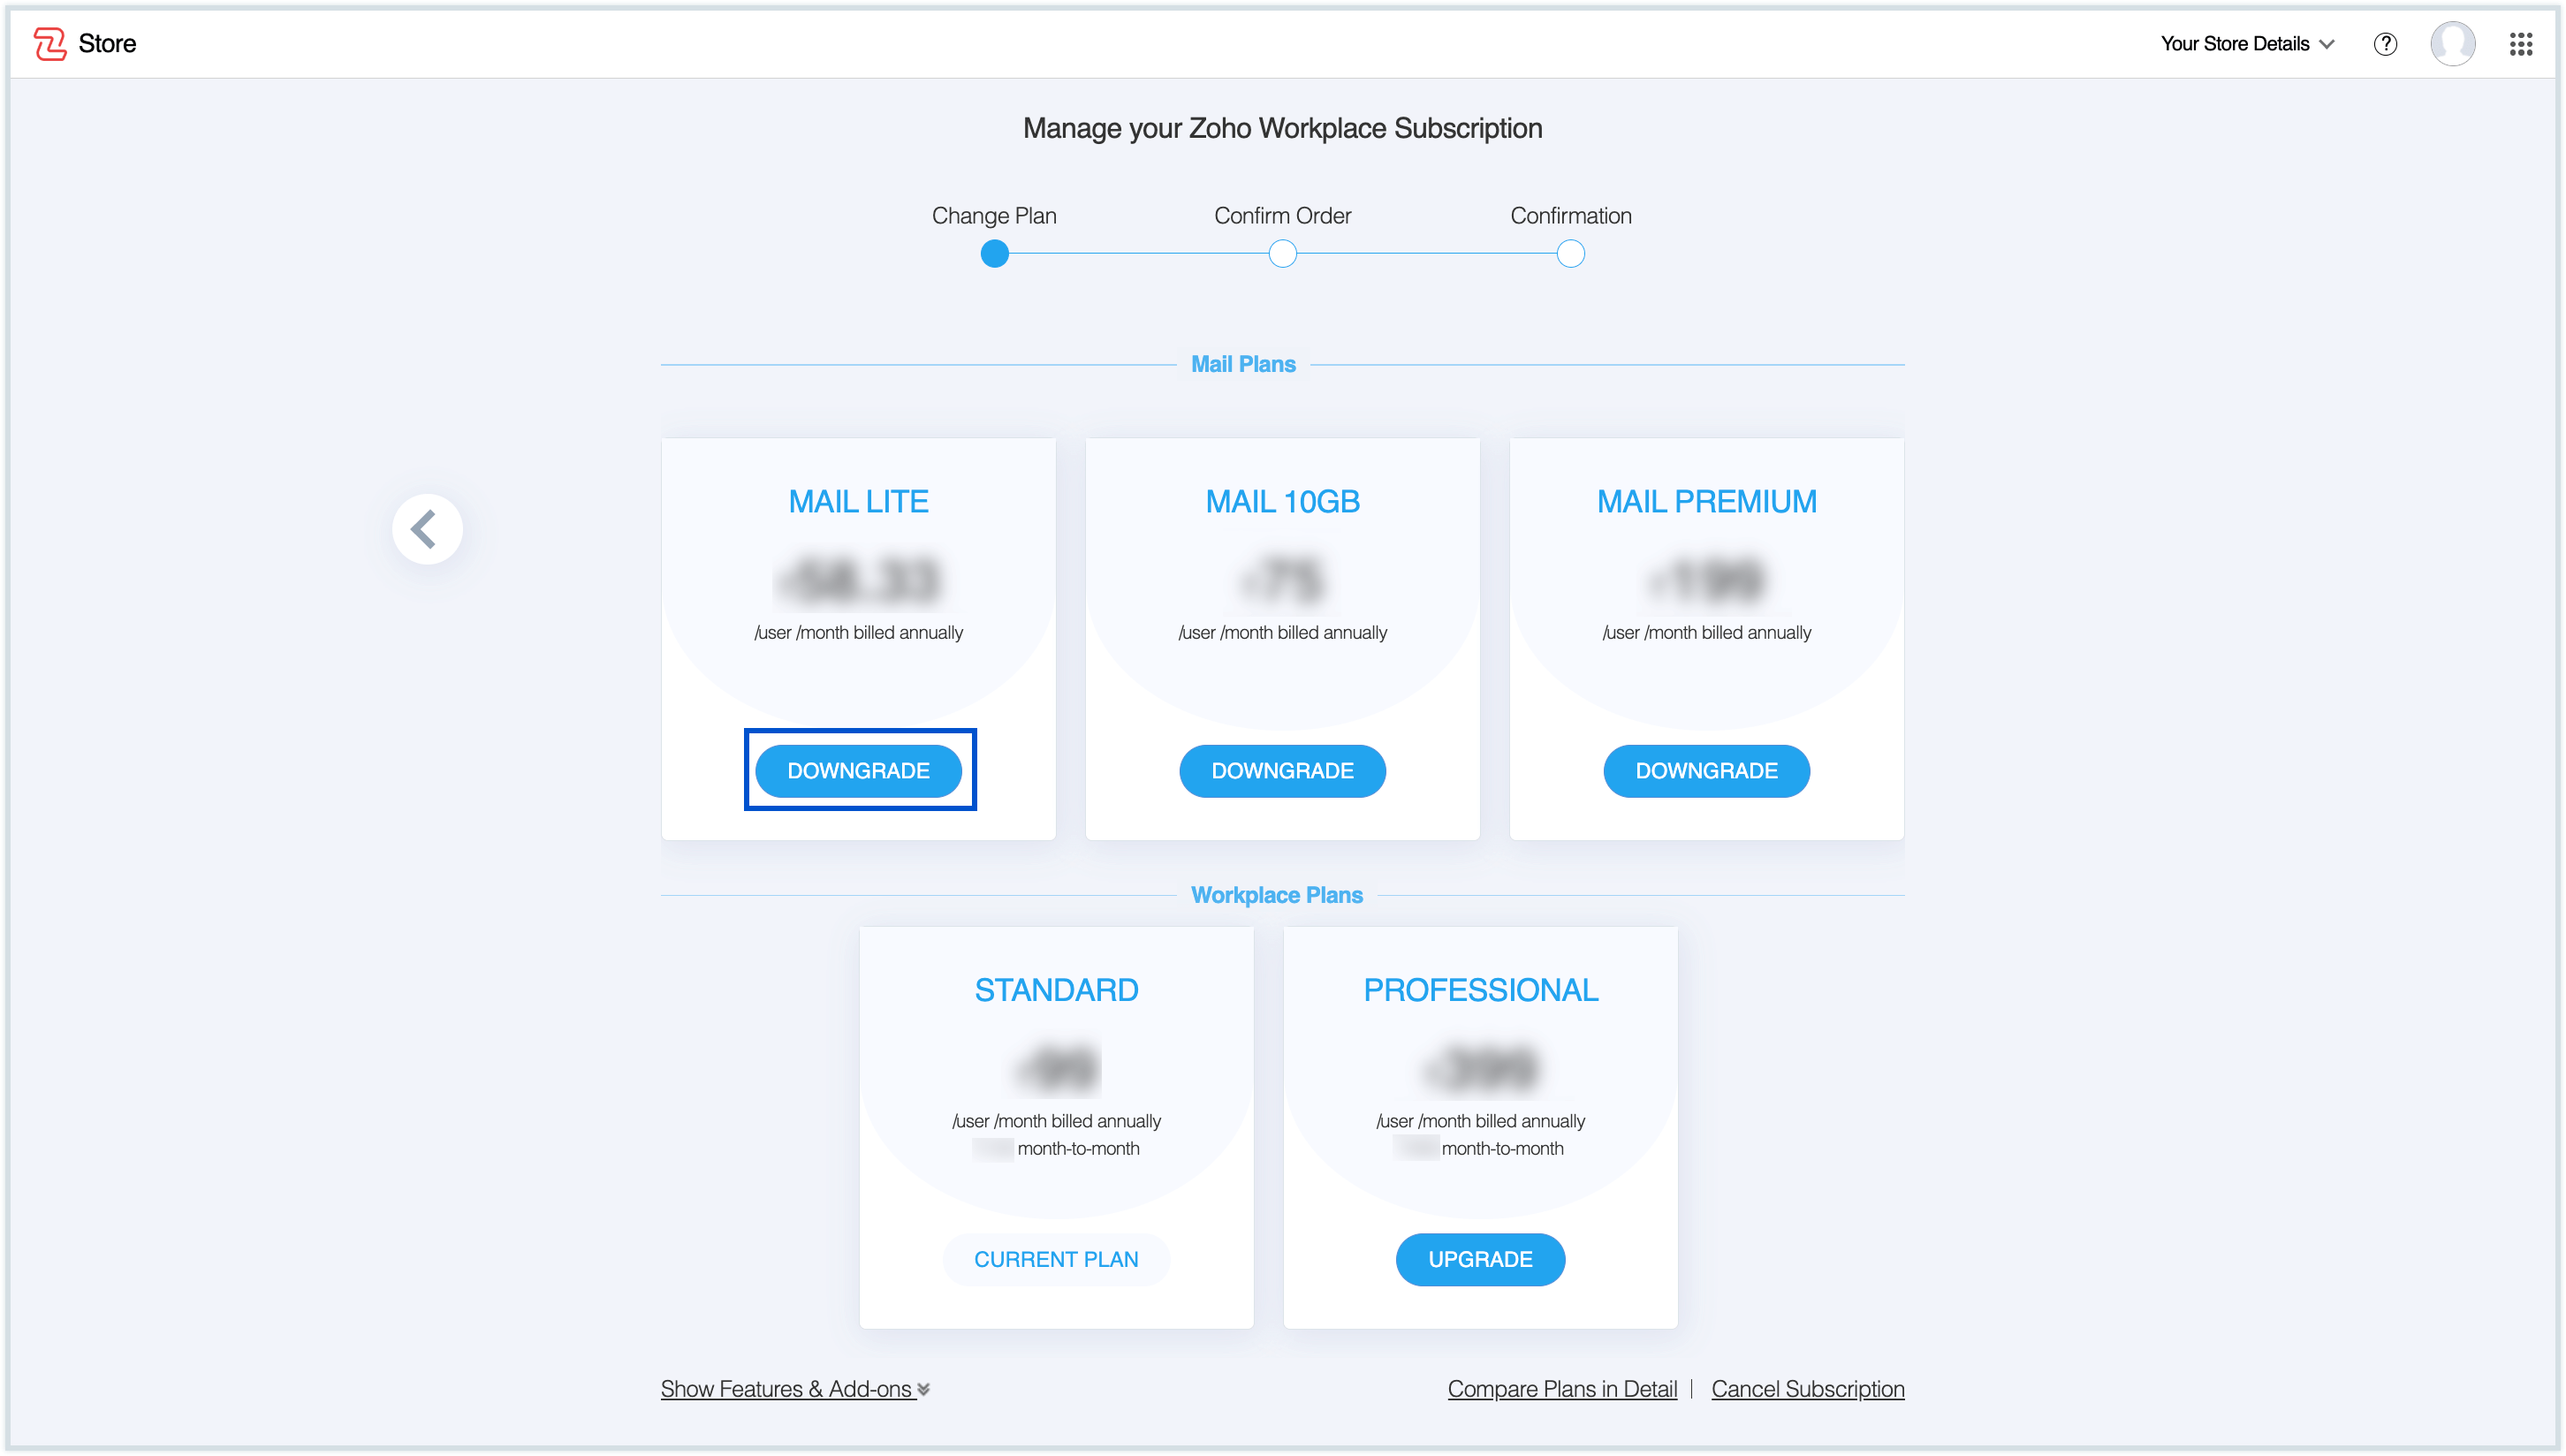
- Review the details of your selected plan. Once you've verified everything, click Proceed to Pay to continue.
- You will be redirected to our Zoho Payments page for a secure transaction. You can then proceed with the payment using any of the available options based on your preference.
Note:
- When you downgrade to a lower plan, you will lose access to the features available in your current plan. This includes storage, exclusive features, configurations, and productivity tools, which will no longer be accessible once the downgrade takes effect. For detailed information on what each plan offers, please visit our pricing page.
- If you're on a monthly subscription, downgrading your plan will require switching to a yearly billing cycle.
Cancel Subscription
If you feel that your current subscription plan no longer suits your needs, you always have the option to downgrade. However, if you still wish to cancel your subscription and stop further renewals, follow the steps below.
- Log in to Zoho Mail Admin Console.
- Navigate to Subscription and select Overview from the left pane.
- You will see your current plan details, along with the number of licenses and any add-ons associated with your account. Click on Manage Subscription.

- In the Manage Subscription section, select Change Plan to view all available plans, including your current one.

- Scroll down the plan details displayed, to view the Cancel Subscription link. Click the link to cancel your subscription.
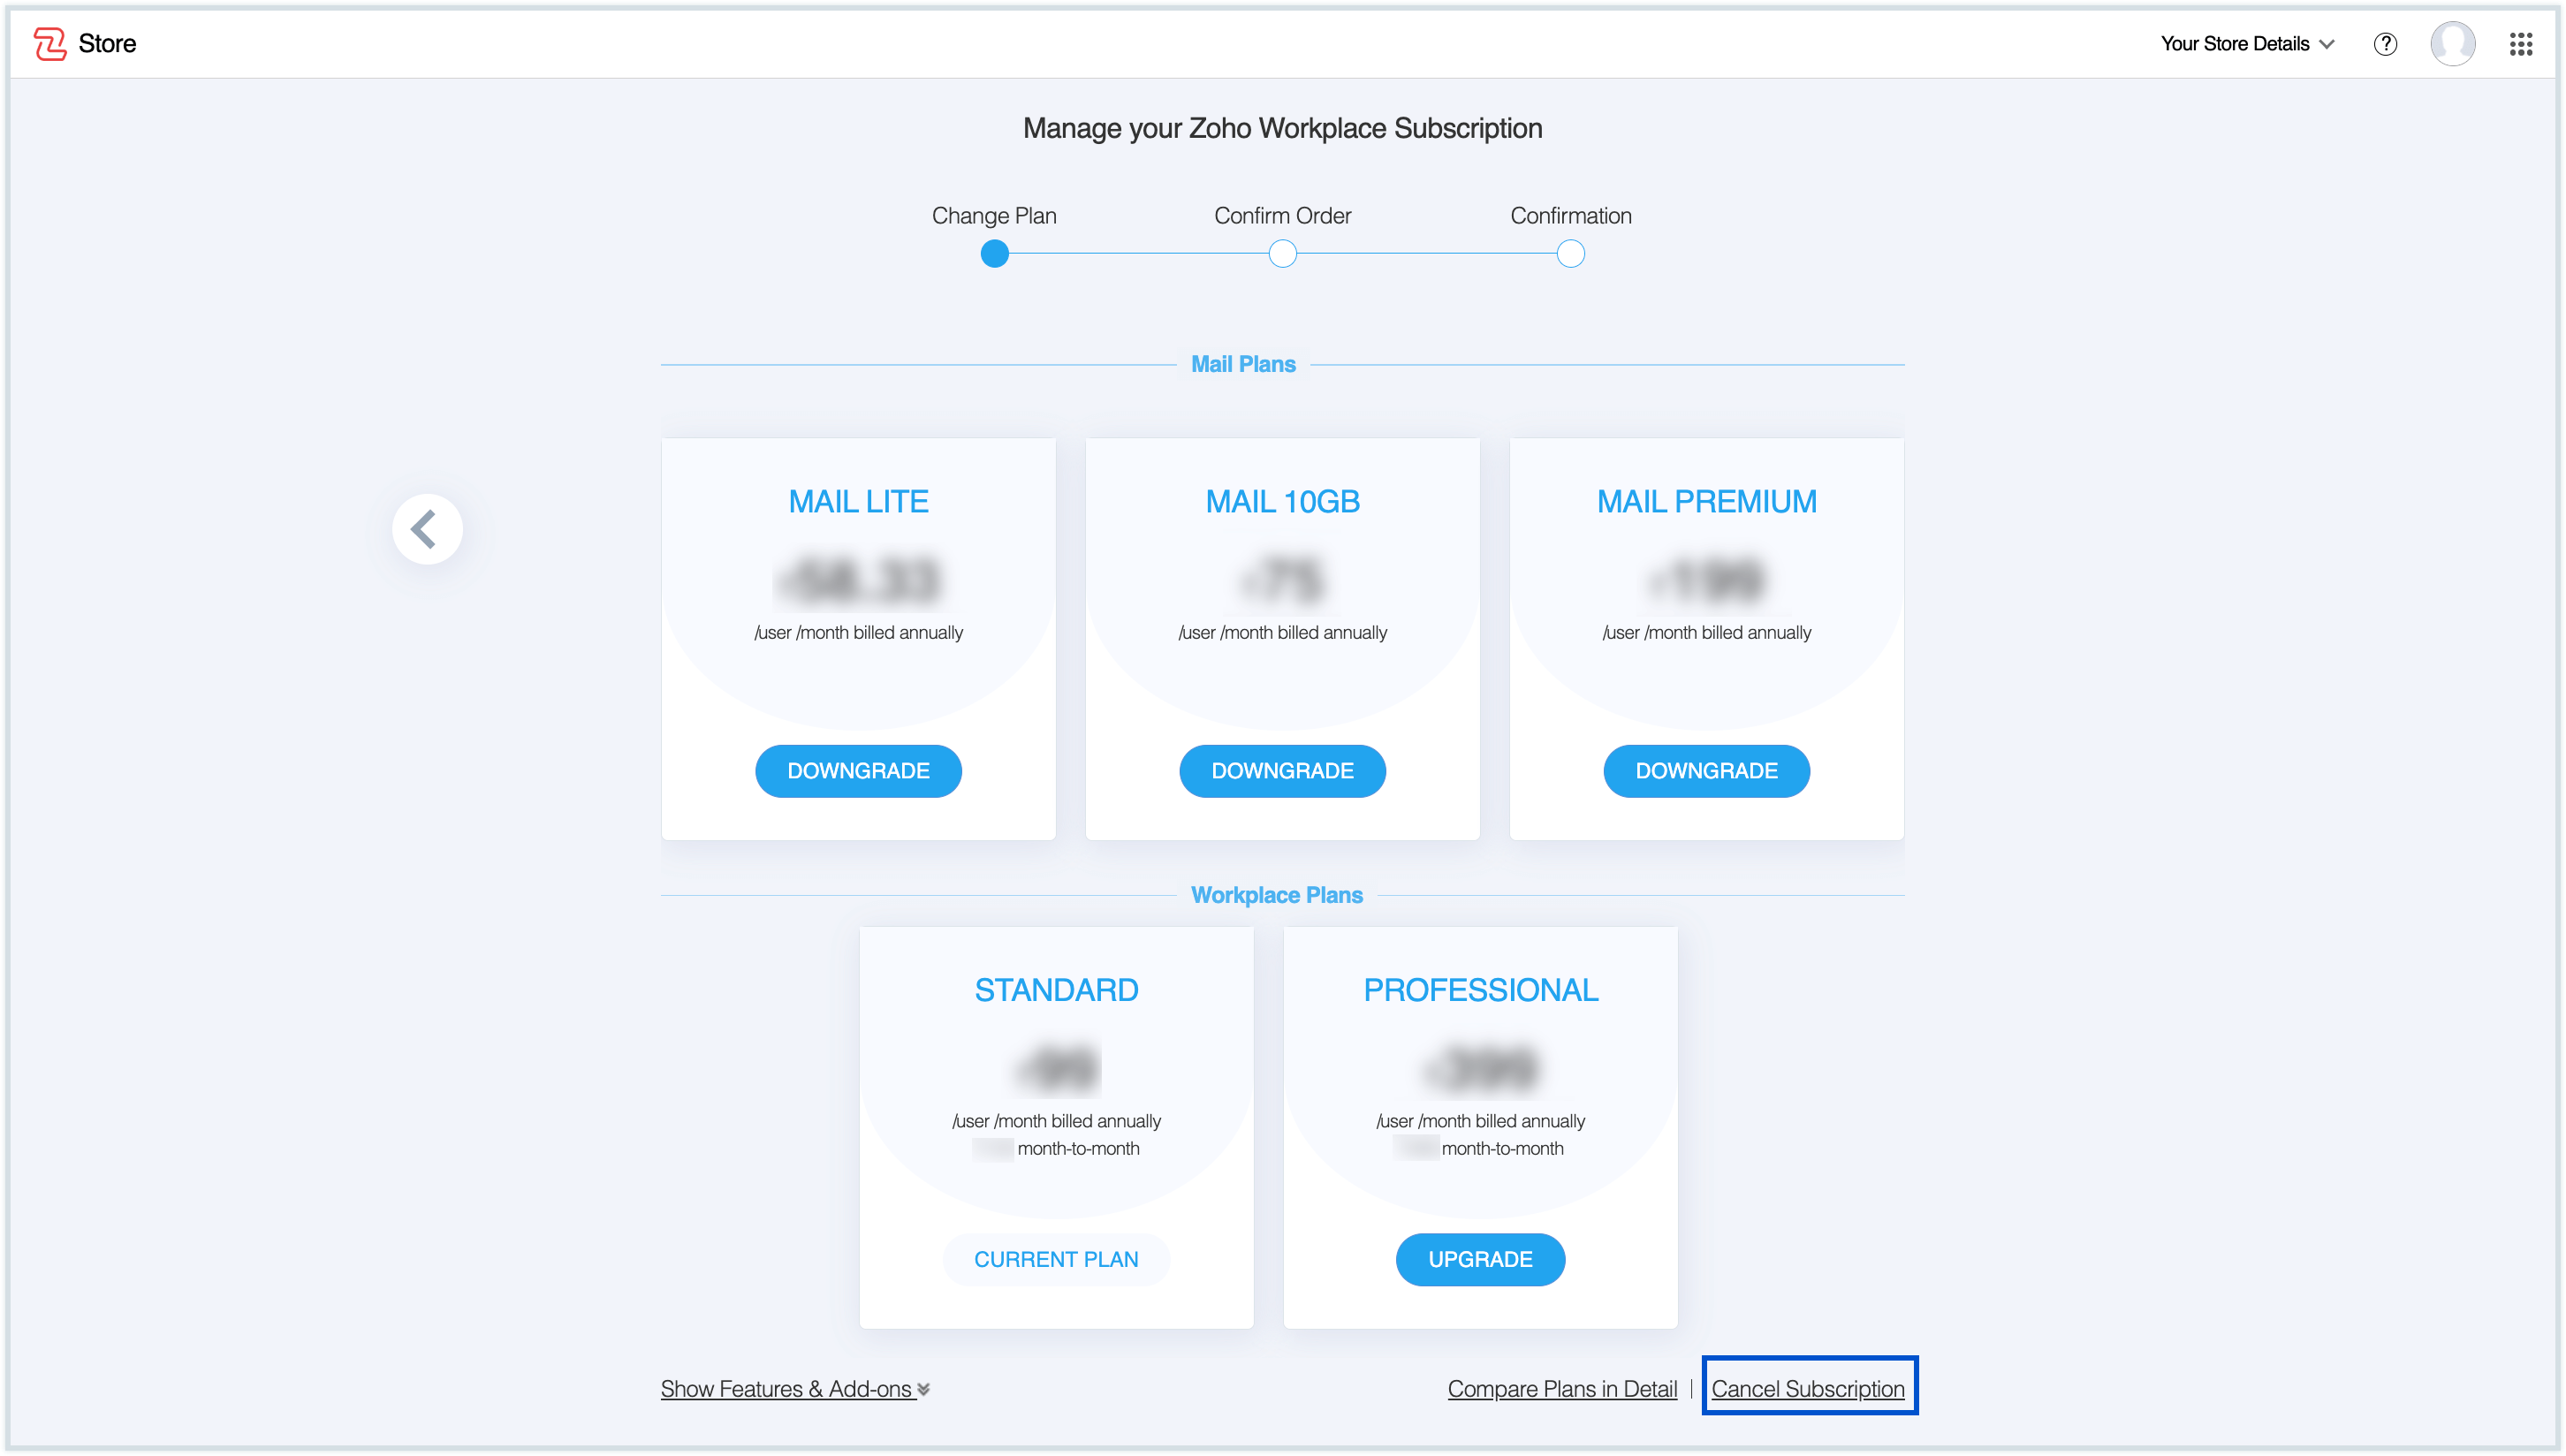
- Enter the required details and follow the on-screen instructions to cancel your subscription.
- Once you cancel your subscription, your Zoho Mail account will be automatically moved to the free plan. All premium features you have been using will be disabled, and you’ll be limited to the features offered in the free version of Zoho Mail.
- In certain regions, free plans may not be available. If this applies to your region, canceling your subscription will result in your organization account being locked and inaccessible. This includes all users within your organization, who will also be unable to access their emails or use the Zoho Mail service. To regain access, you will need to subscribe to a paid plan again.
- Ensure that you have backup of all the data before canceling your subscription, as the data can't be recovered once the organization has been deleted. Please contact our support at support@zohomail.com for assistance.
To receive the pro-rated refund, send an email to the below-mentioned email address based on your plan type:
- If you purchased your subscription online, raise a pro-rate refund request to payments@zohocorp.com with your account and subscription details.
- If your subscription was activated offline, raise a pro-rate refund request to sales@zohocorp.com.
Note:
There will be strictly no refund (Full or Pro-rated) in cases where the account is terminated or suspended or blocked for usage by Zoho due to a violation of our Terms of Service including, but not limited to phishing, impersonation, fraud, and violation of any applicable laws.