Zoho Analyticsにユーザー登録する
- Visit the Zoho Mail homepage, fill in the required details, and click SIGN UP FOR FREE to create your account.

- Enter the seven-digit verification code sent to your registered mobile number in the provided text box and click Verify.メモ:
- 今後、この携帯電話番号を使用してZoho Mailアカウントにサインインできるようになります。
- 前に入力した携帯電話番号を変更する場合は、認証ページに記載されている手順に従ってください。
- 認証コードが送られてこない場合は、[コードの再送信]をクリックします。
- お客さまの携帯電話番号が宣伝目的に使用されることはありません。
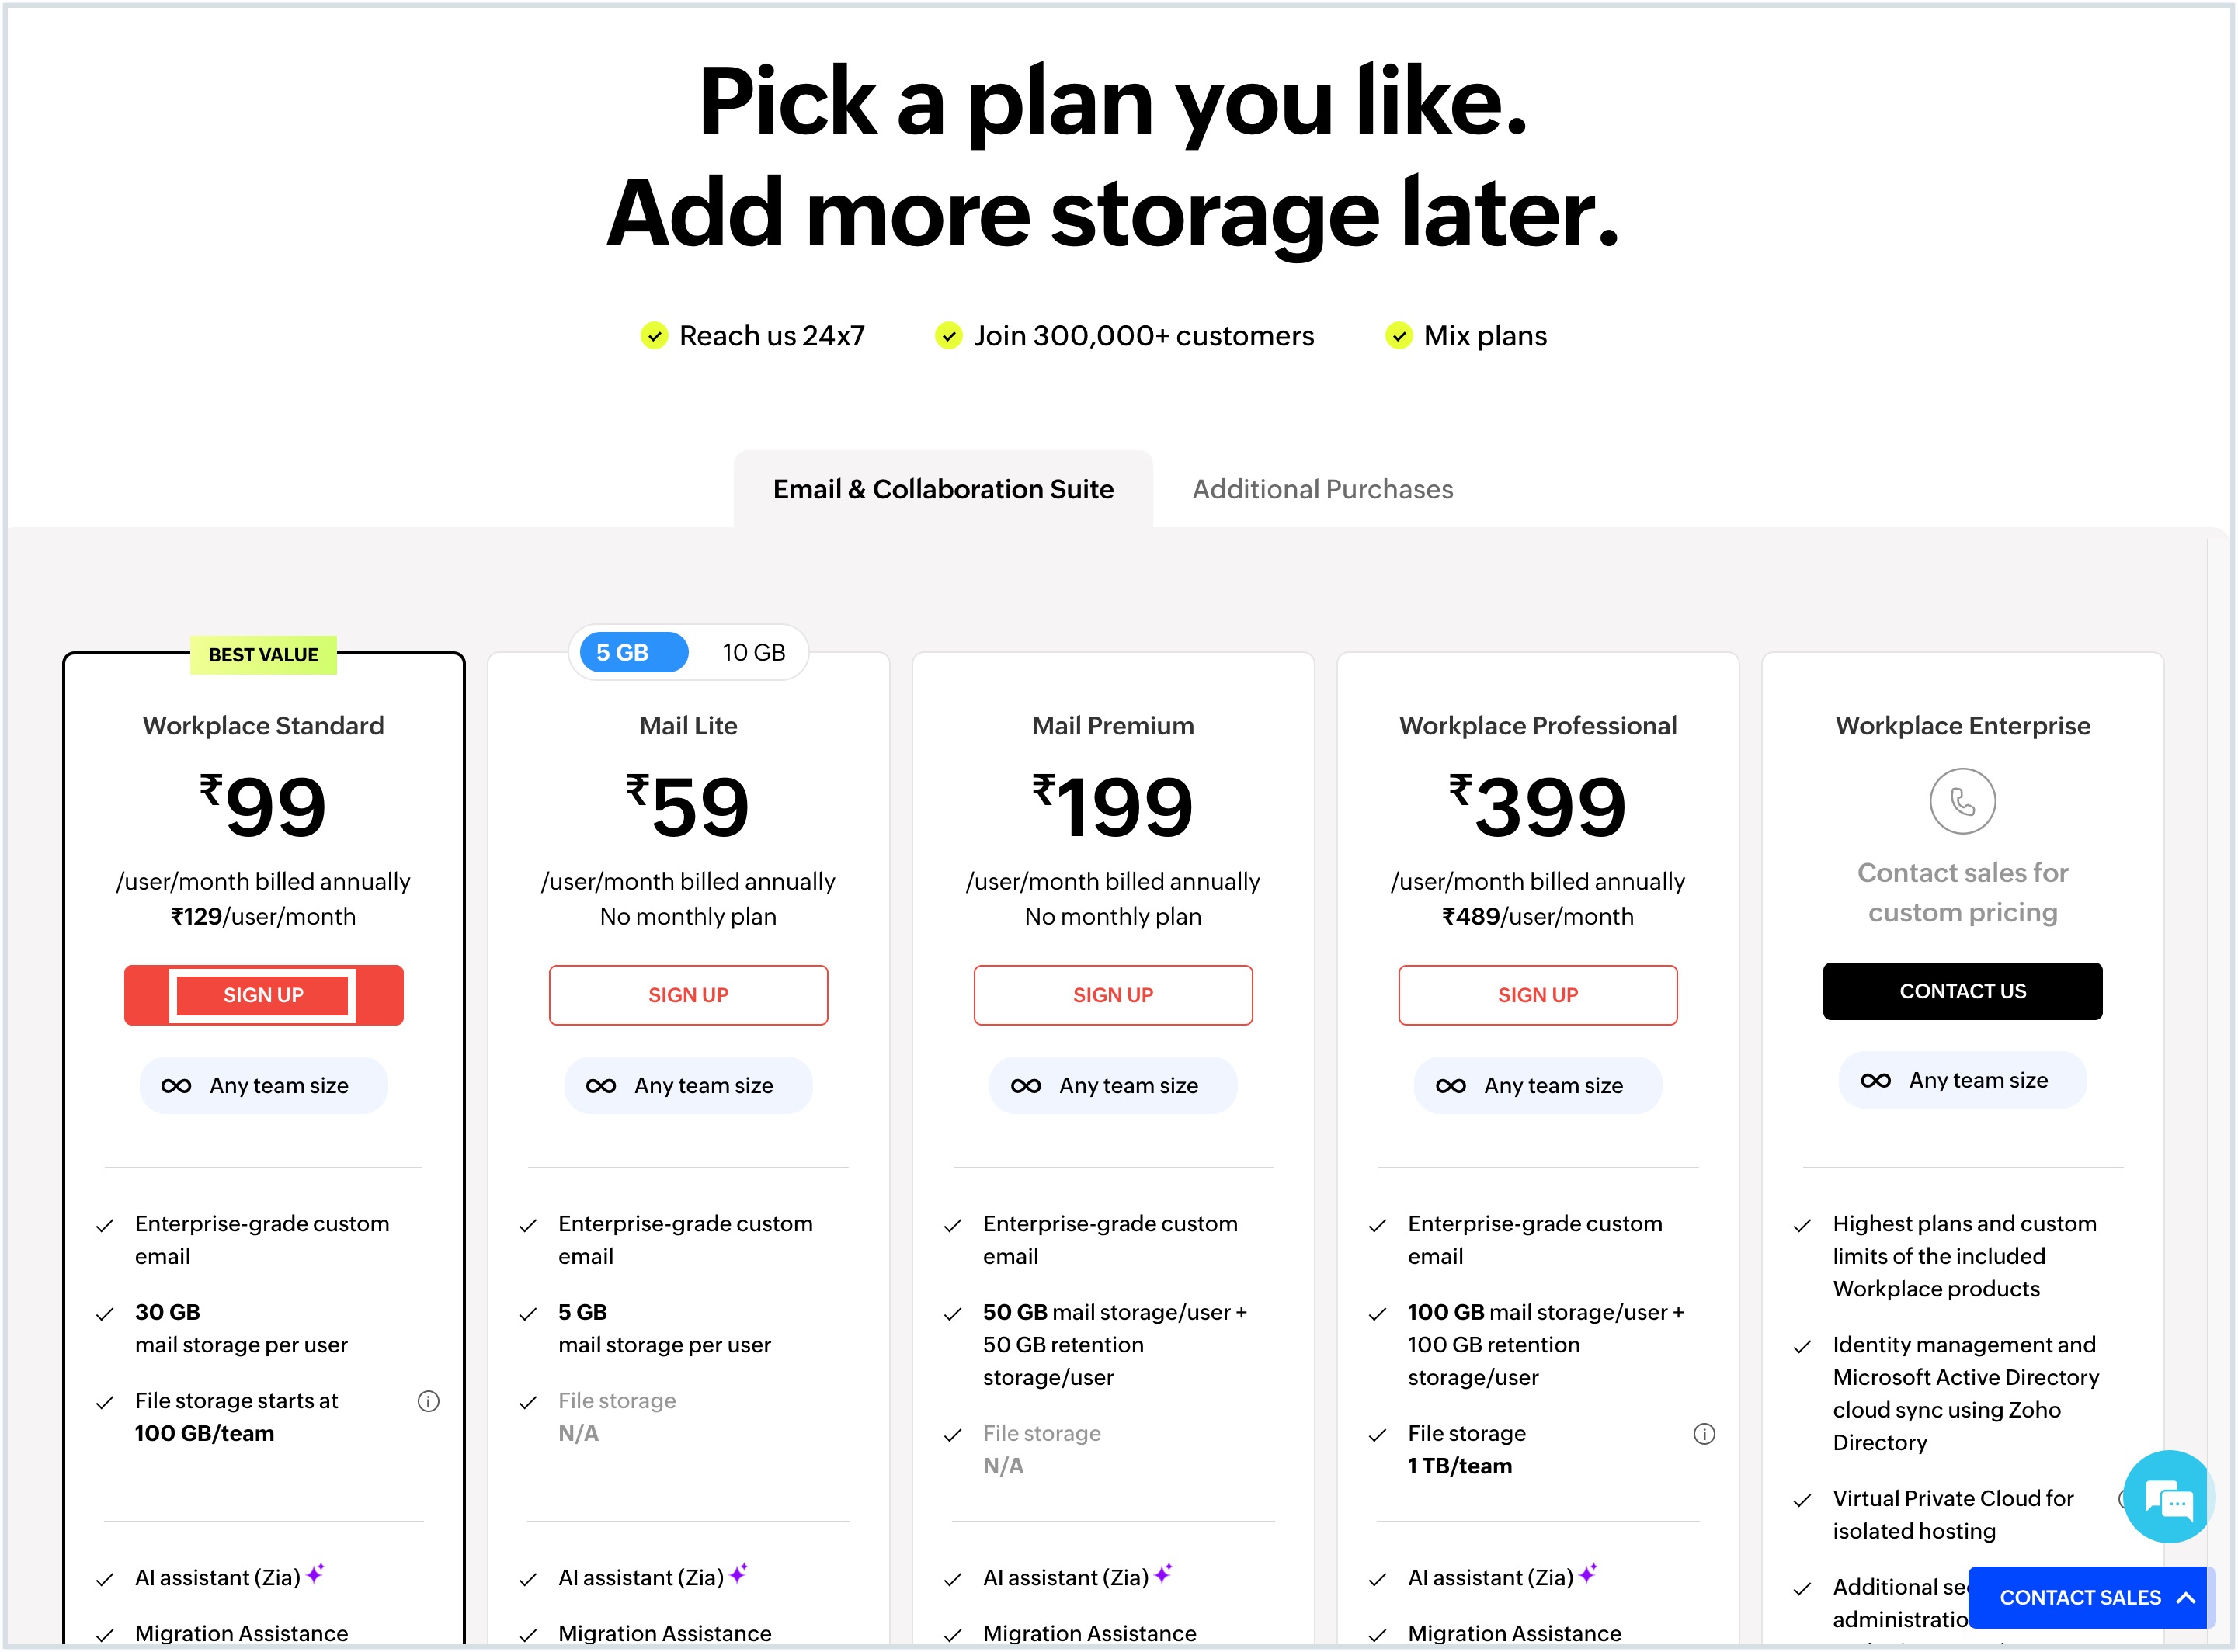
- Then, choose the appropriate plan for your organization from the hosting page and click Buy Now to continue with the domain setup.
 メモ:
メモ:- Please note that the pricing displayed in the above screenshot is subject to change. For the most current and accurate information regarding our plans and pricing options, we recommend referring to our Pricing page.
- If you have any questions or need further clarification about our pricing structure, please drop an email to sales@zohocorp.com.
- メモ:Zoho Mailには、記載されている有料プランとは別に、ビジネスメールユーザー向けの無料プランも用意されています。
ドメインの追加
すでに所有しているドメインの使用
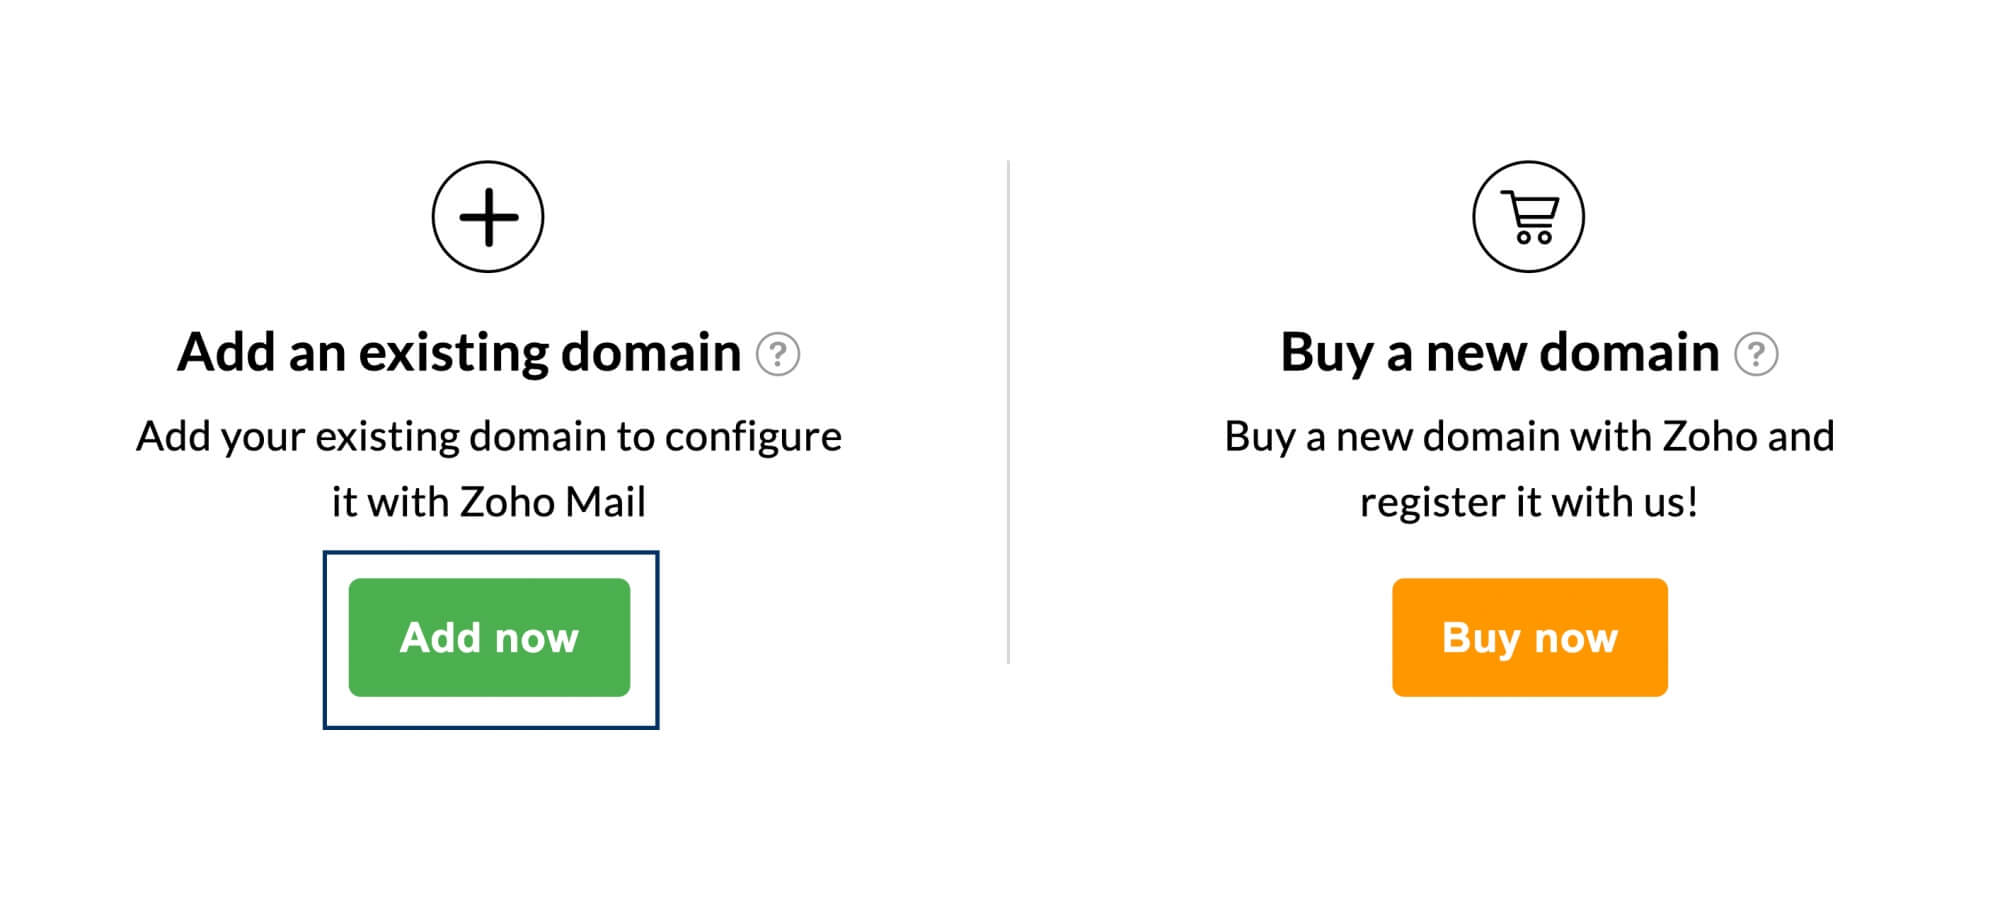
- Click Add now under the Add an existing domain section on the Domain Addition page.

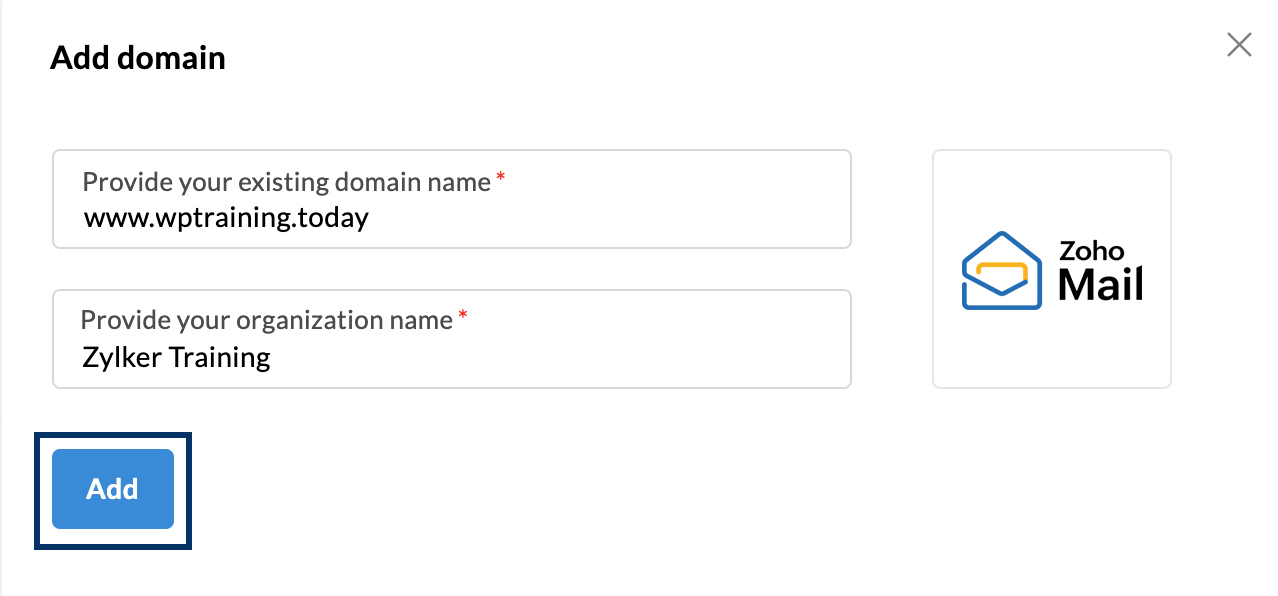
- Provide your Domain address (for example, zylker.com) and the name of your organization in the pop-up. The organization name that you provide here will be used for all future references. You can also edit it later in the Admin Console.
- Click Add now to proceed.

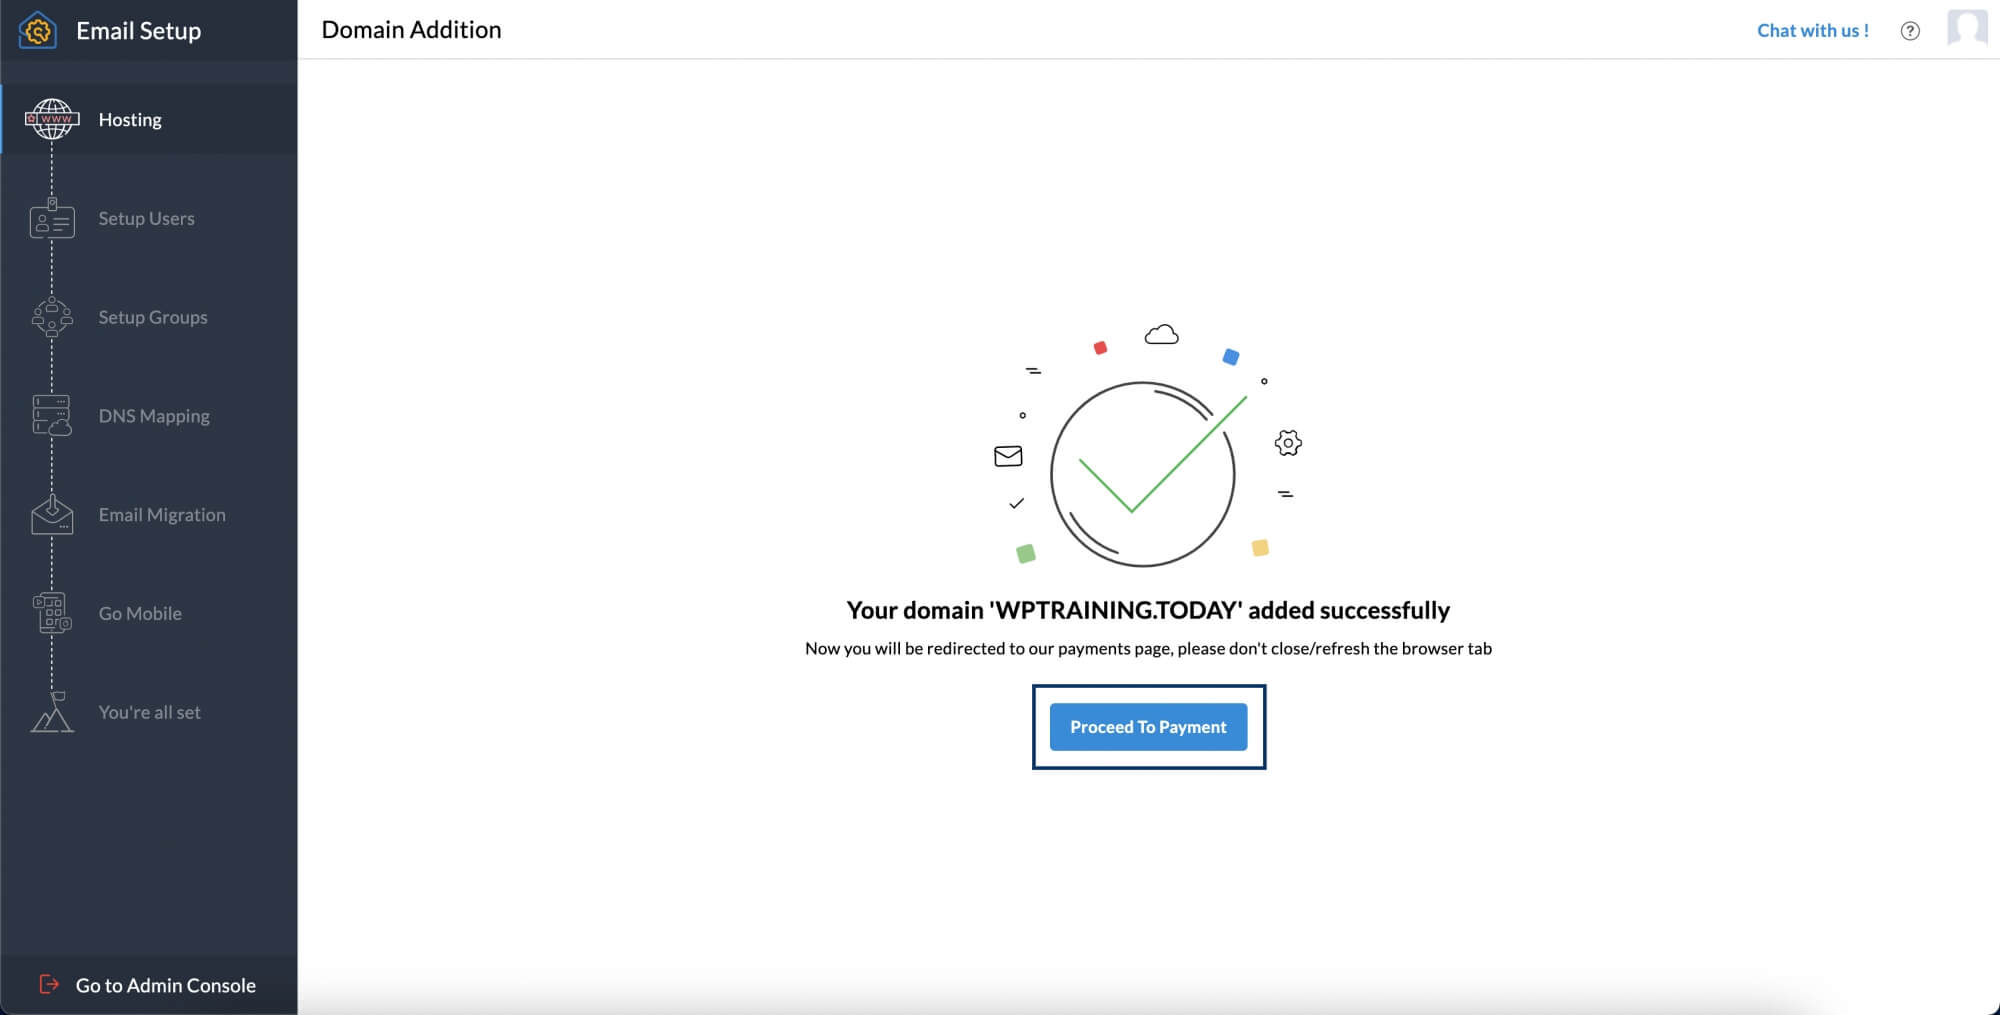
- Once your domain gets added, you will be required to buy your subscription. Click Proceed To payment.

- 支払いページにリダイレクトされます。 Enter the number of users and complete your payment to proceed further.
You can still update your plan at this stage. Select Change my plan to choose the option that works best for you.
Buy-domain
新しいドメインの購入
ドメインを所有していない場合は、ドメインの購入をZohoがお手伝いします。現在、この機能は、特定のデータセンターに対してのみご利用いただけます。 If you don't find this option, you can simply buy a domain from a provider of your choice and continue to set up Zoho Mail using the Add an existing domain option.
The Buy Domain through Zoho Mail option is available only to the users in US and IN DCs.
新しいドメインを購入するには:
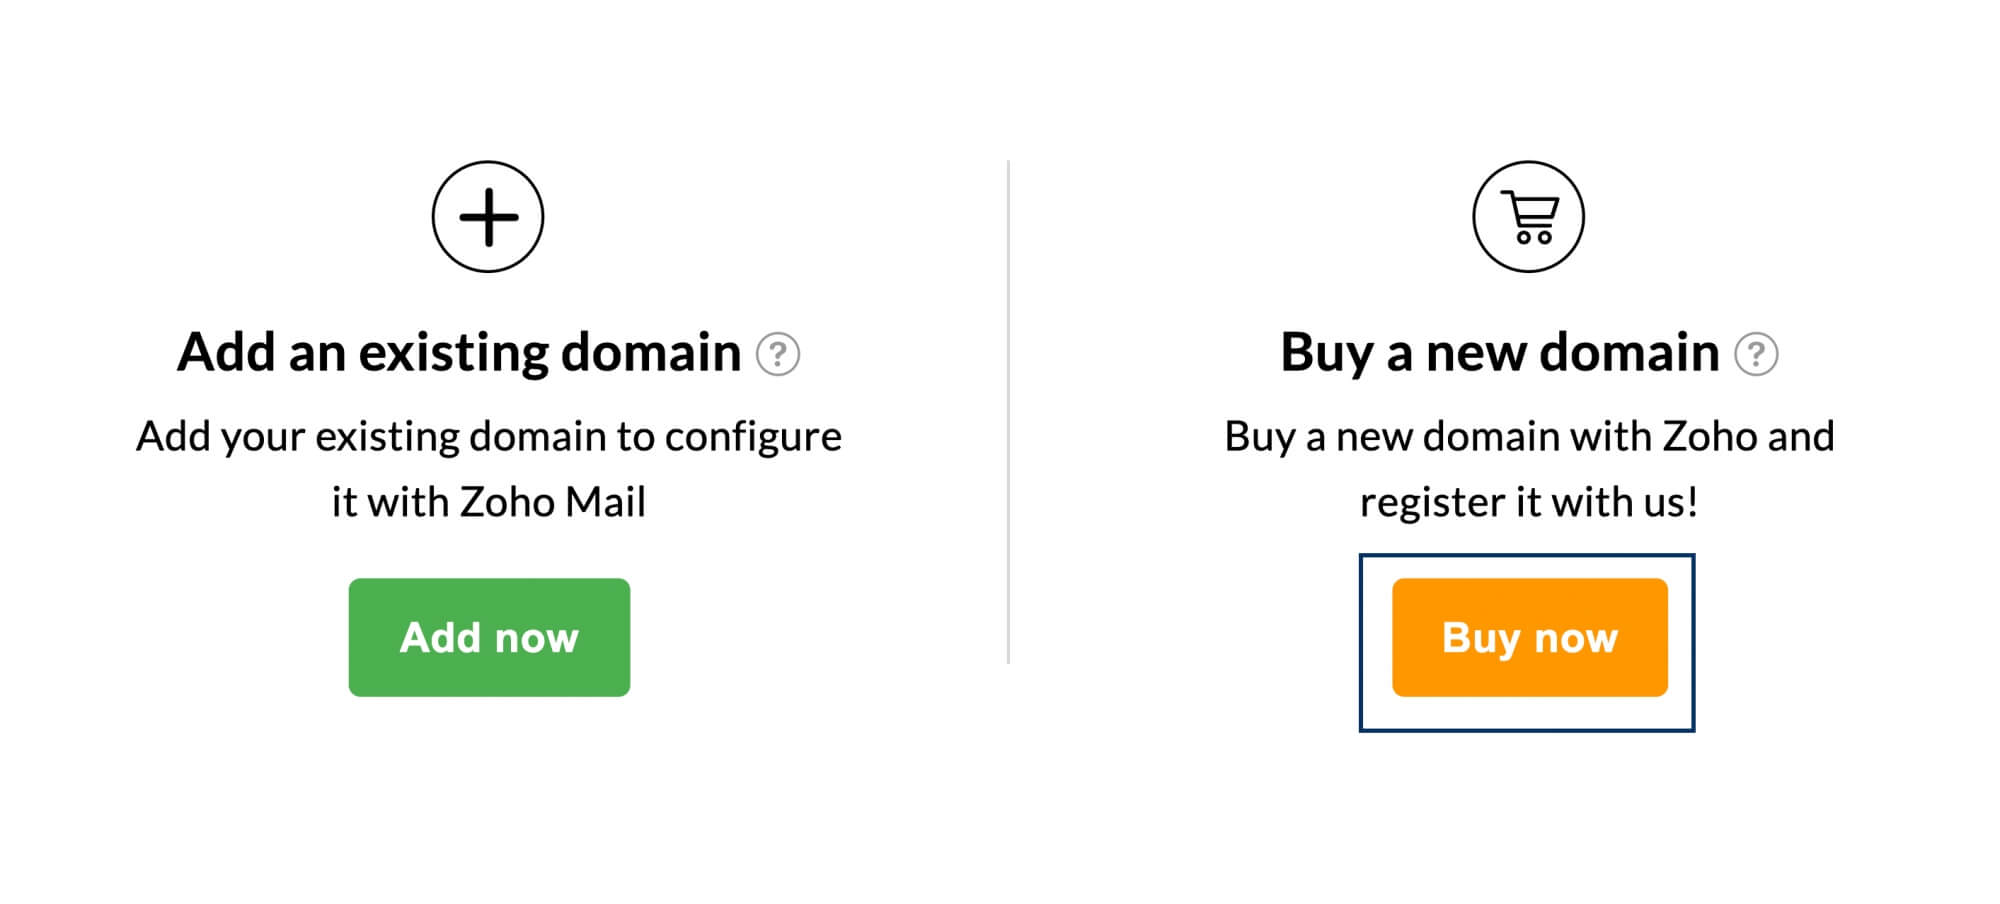
- Click the Buy now option under Buy a new domain section.

- Type in your preferred domain name in the text box provided and click the search icon or press enter.
- All the available domains based on your search parameters will be listed in the Buy Domain section. ドメインの横にある[検証]アイコンをクリックすると、メモ:
- Check the Keep your registration information private option if you don't want your domain details to be visible in DNS lookups.
- Check the Renew domain automatically each year option if you want your domain subscription to be renewed automatically.
- Click Proceed once you have finalized your domain name for your business.
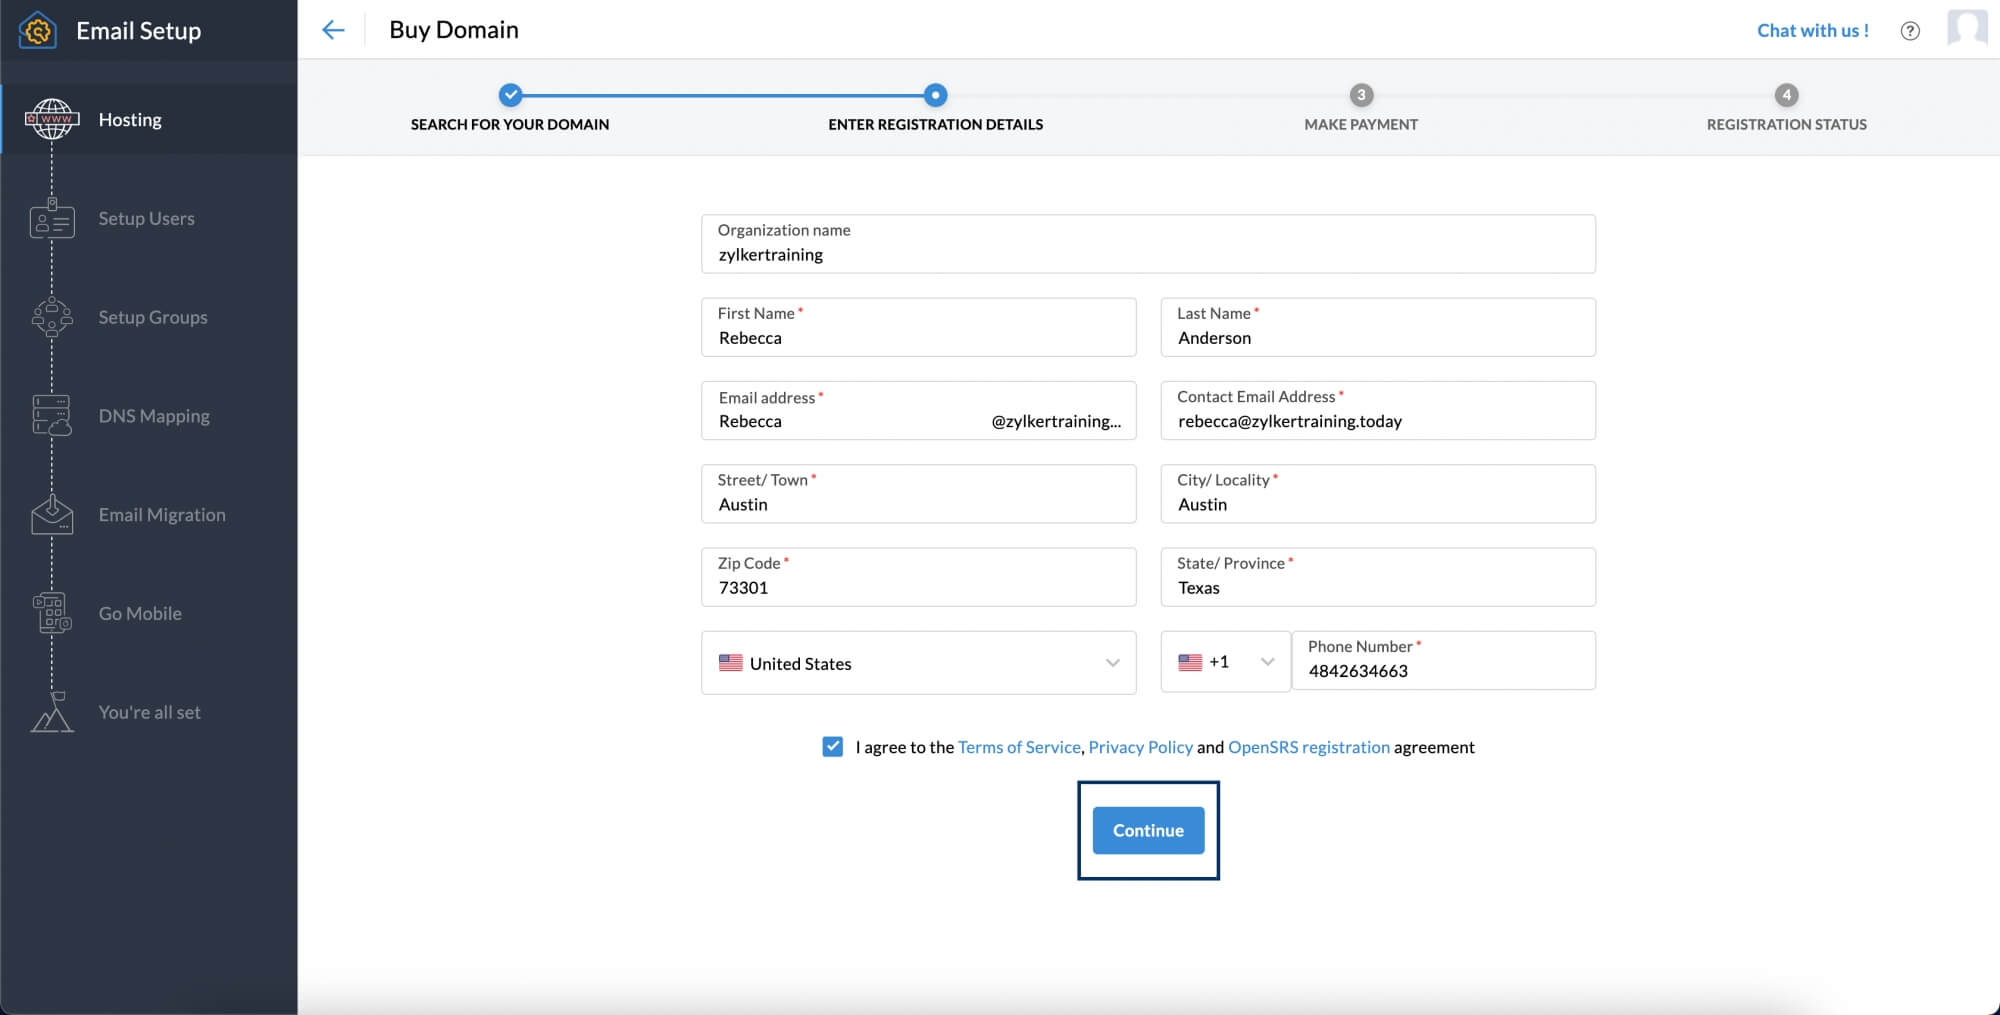
- Enter the requested details in the Domain Registration page.
- Agree to the terms and conditions of Zoho and the domain registrar and click Continue.

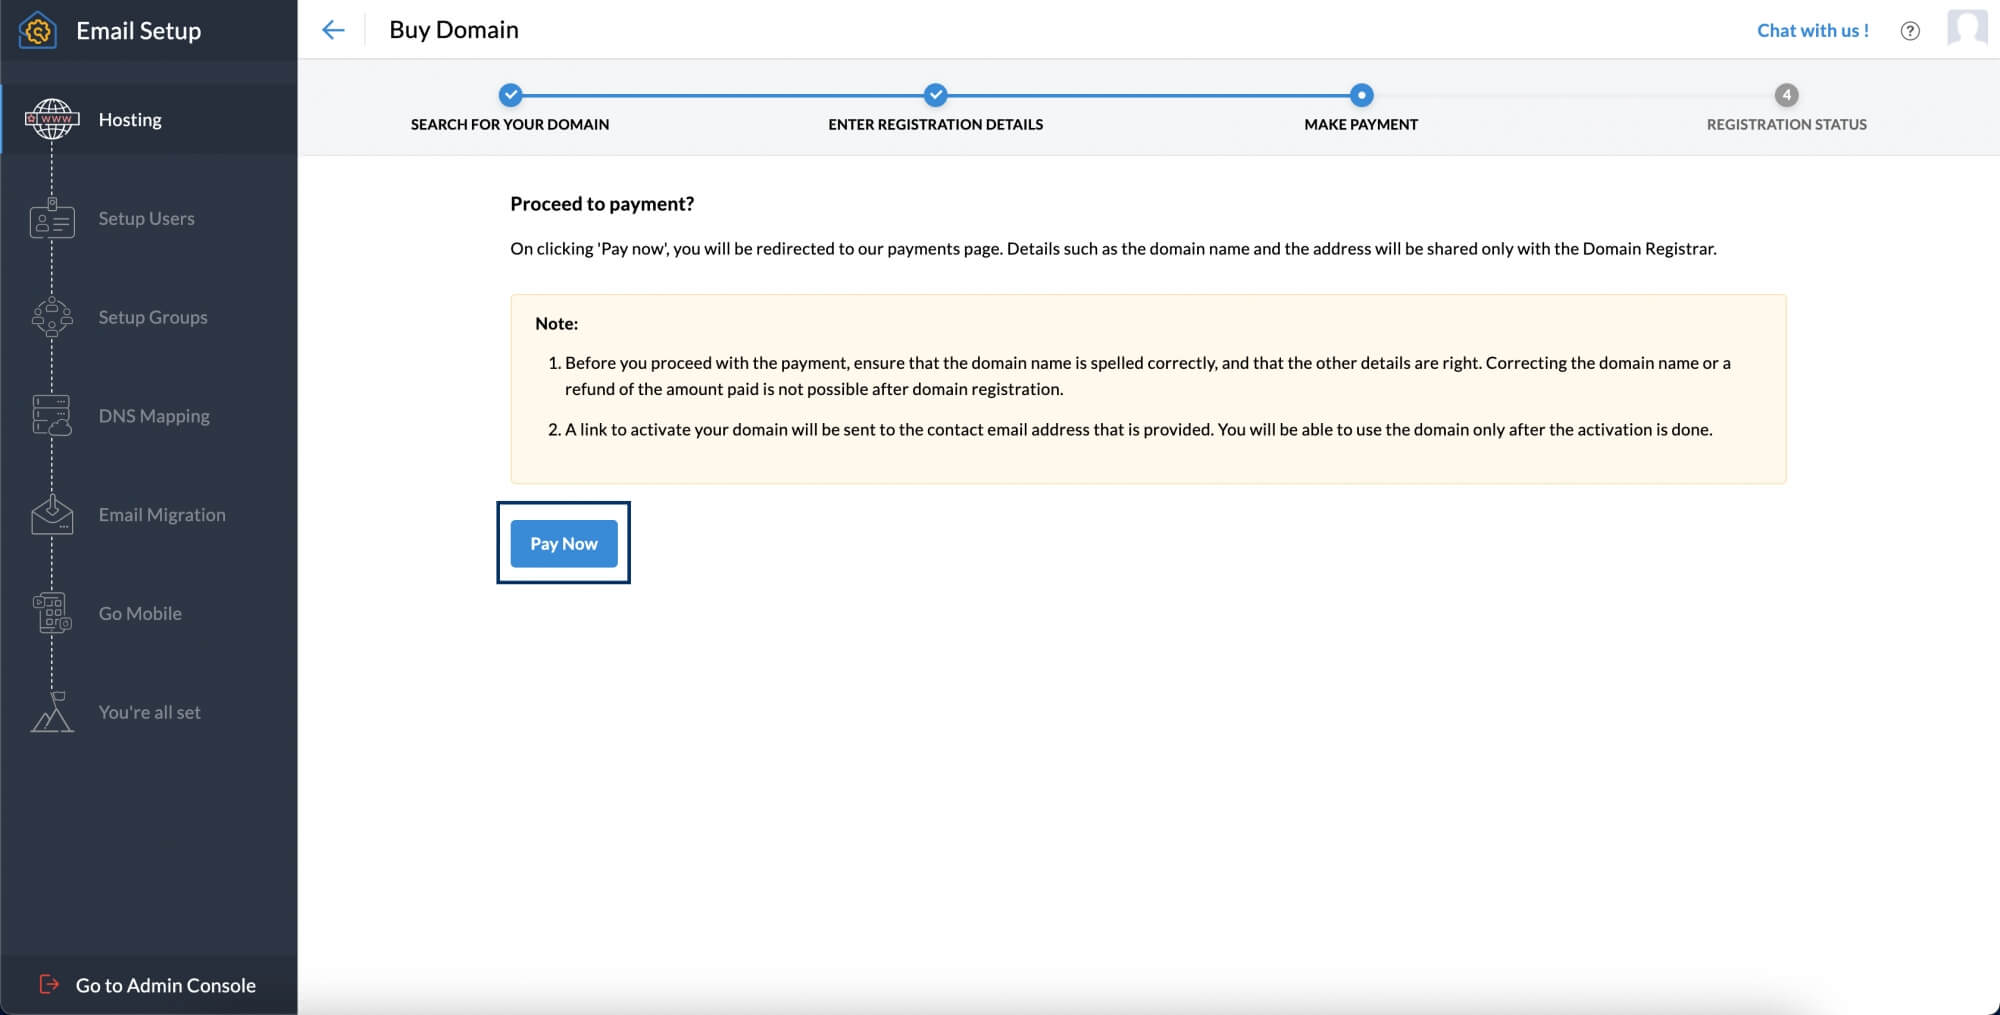
- Click Pay now, and you will be redirected to the Zoho Store page to continue with the payment process.

支払い
- Provide details such as the No. of User IDs you would like to procure and any add-ons you might require in the Plan Details section and click Continue.
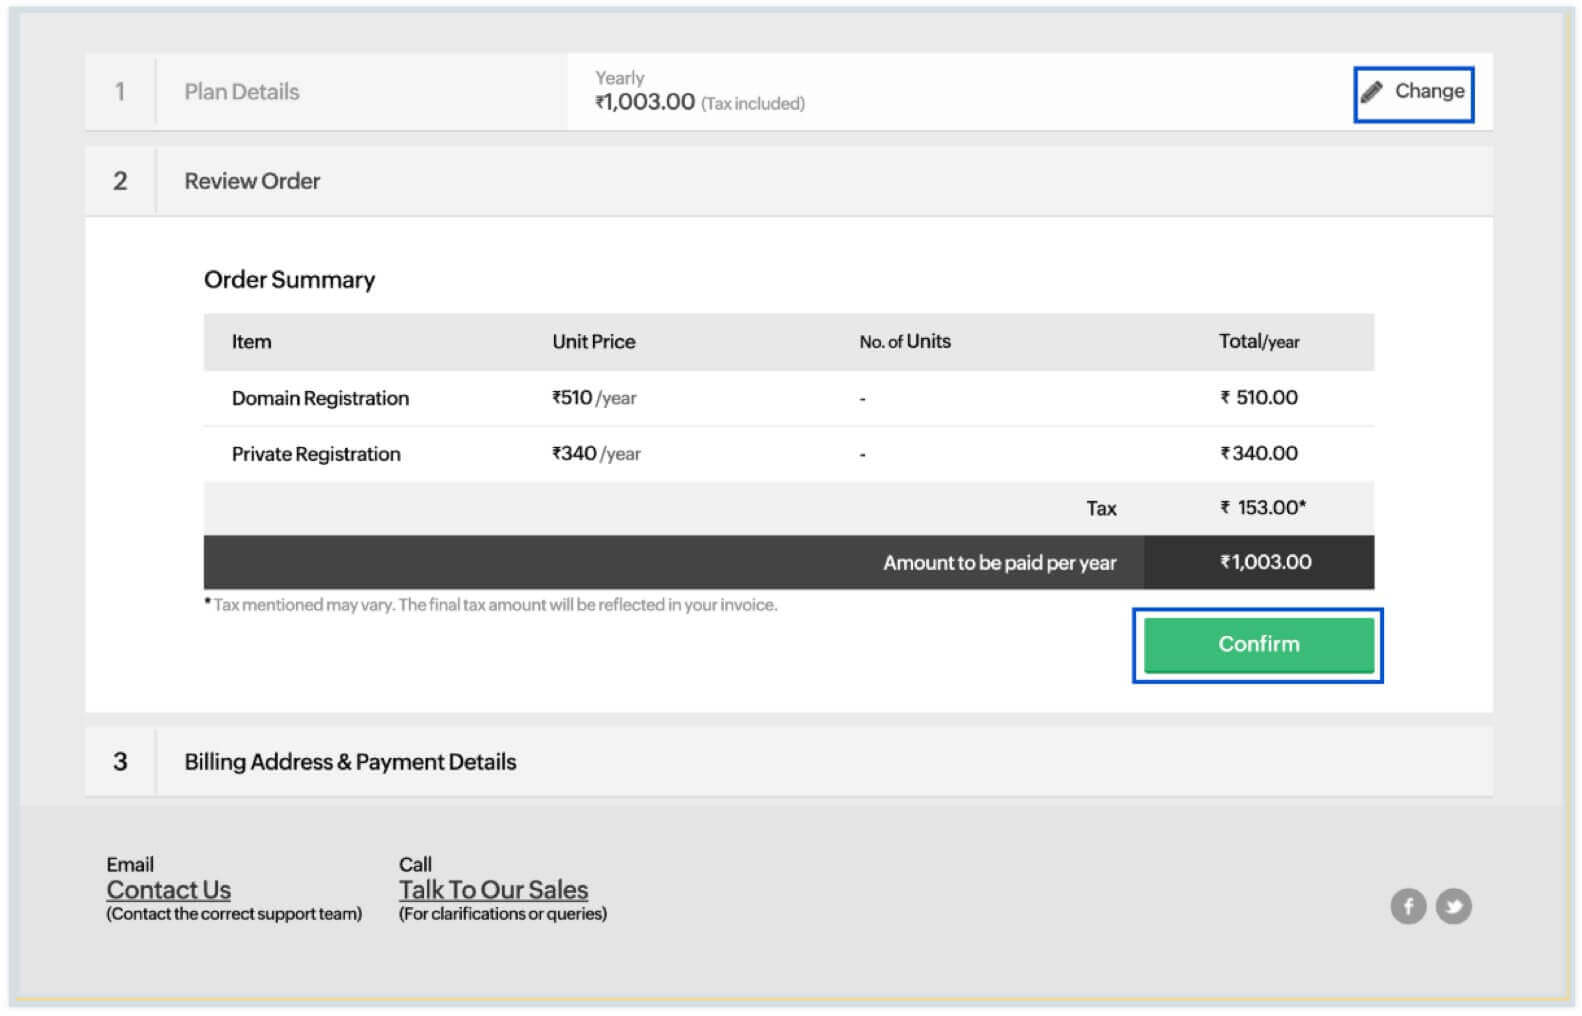
- 購入の詳細を確認し、[確定]をクリックしてください。
 メモ:
メモ:メモ:修正を加える場合は、[プランの詳細]に移動し、編集アイコンをクリックして、前の手順を繰り返します。
- Enter your billing address and payment details, then click Make Payment.
上記のすべての手順が実行され、支払いが完了すると、Zoho Mailアカウントの設定ページに移動します。
ドメイン所有権の確認
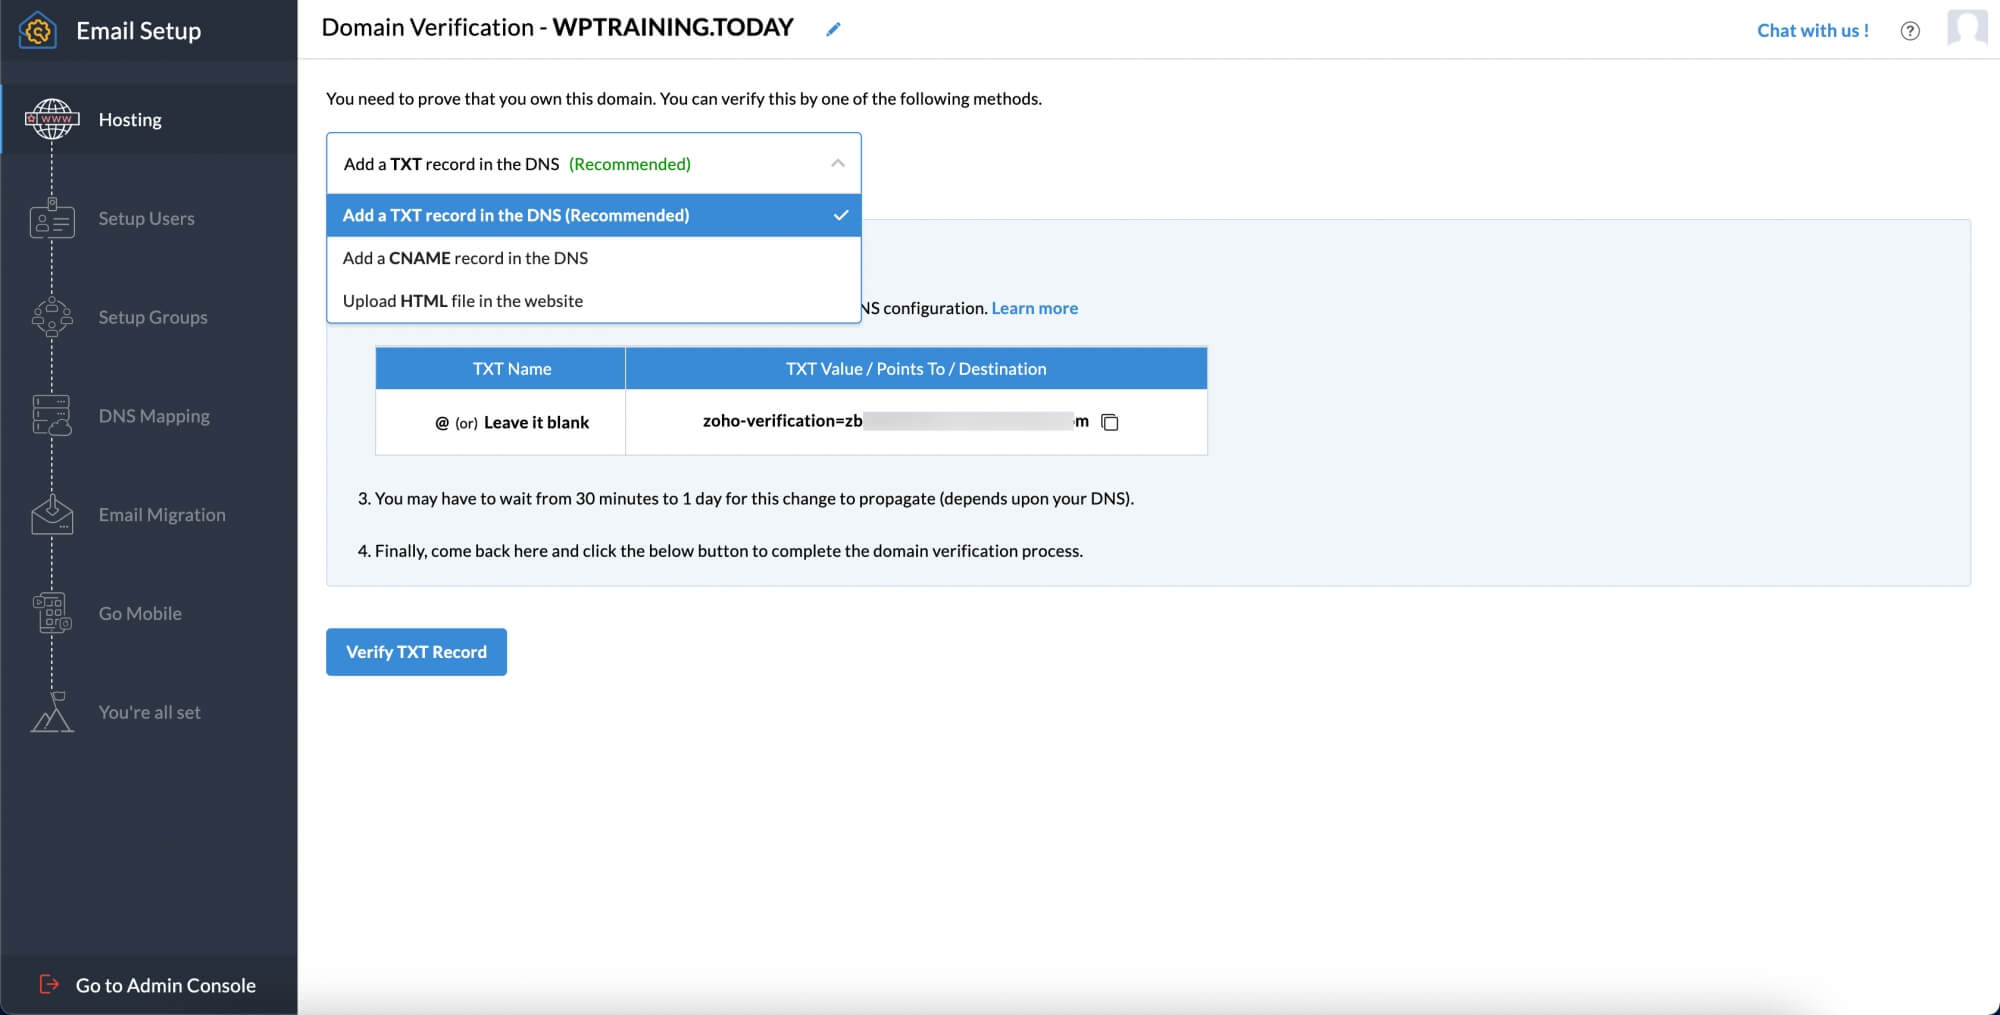
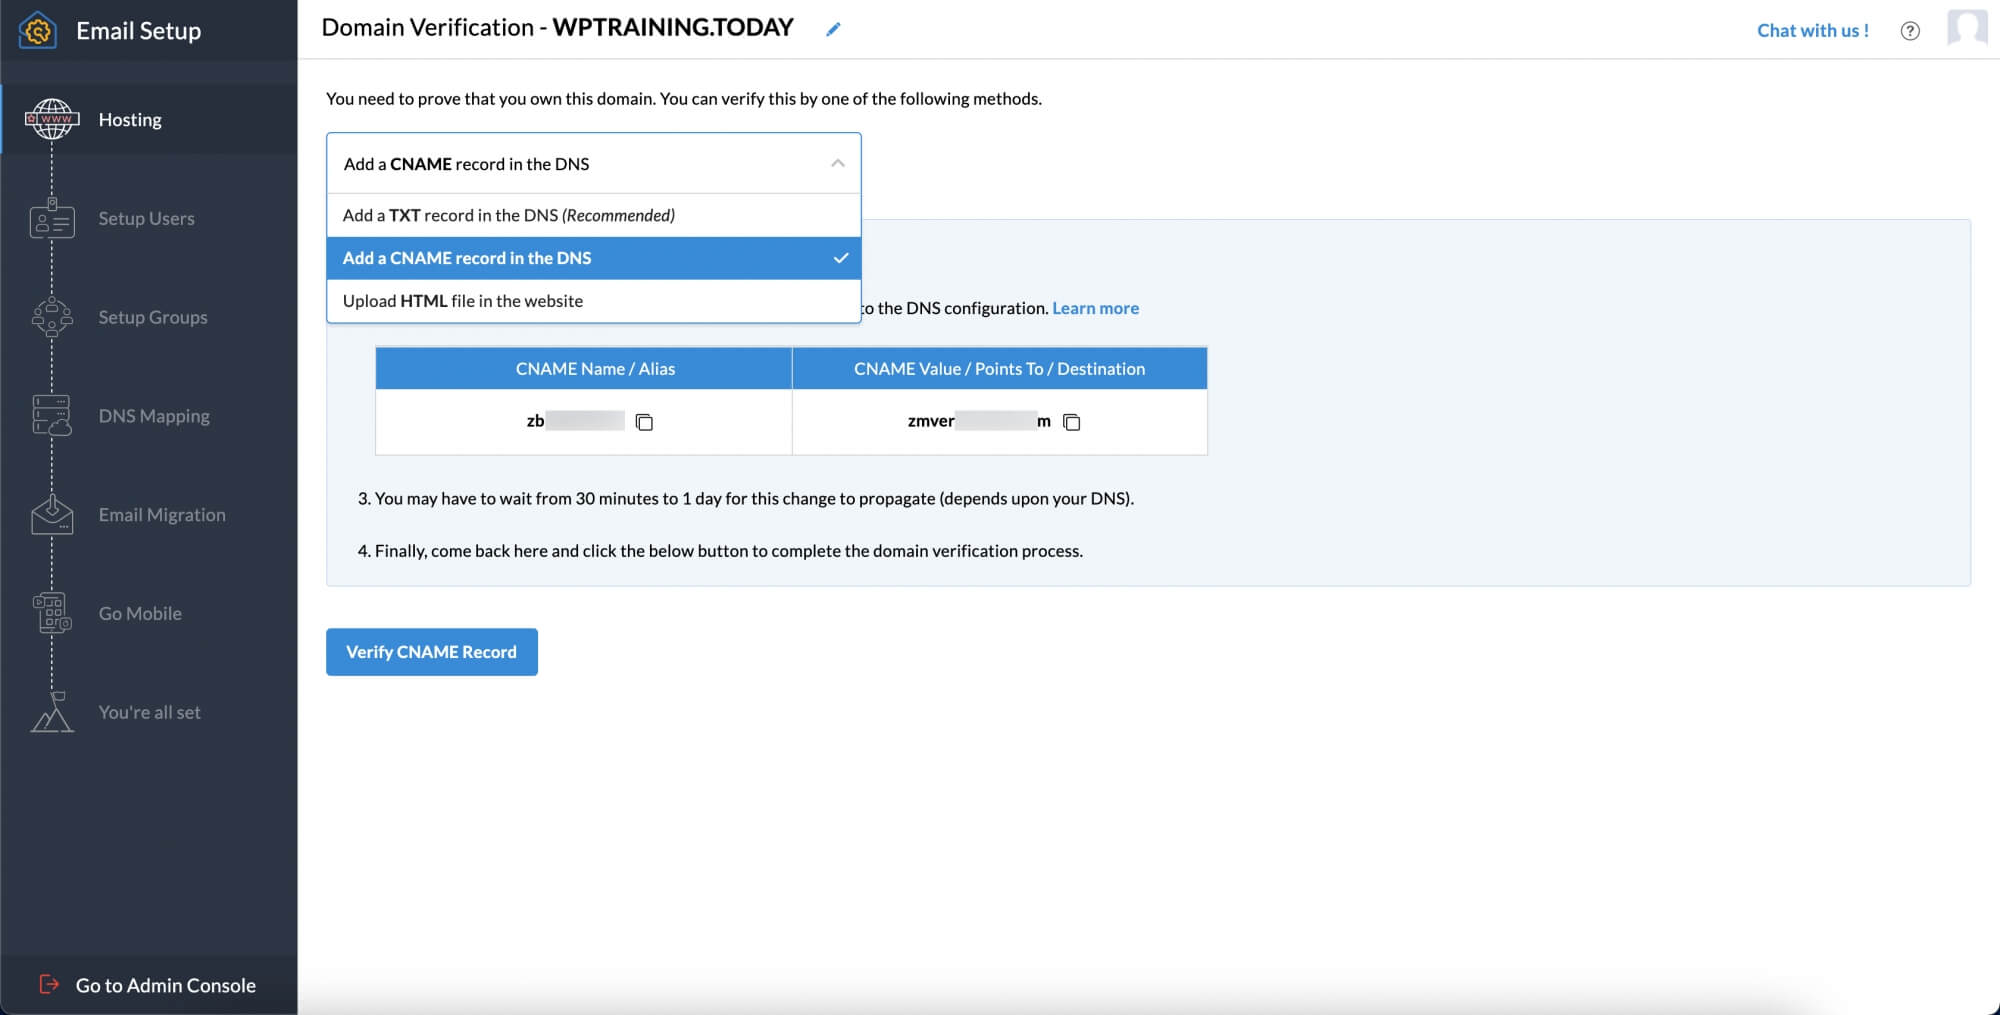
After successfully adding your domain, proceed to verify your domain. You can choose your authentication method—TXT, CNAME, or HTML, by accessing the drop-down menu.
ドメインの所有権を確認する前に、表示されたドメイン名が正しいことを確認します。スペルミスがある場合や変更が必要な場合は、[編集]をクリックし、必要な修正を行います。
TXTメソッド
TXT方式でアカウントを確認するには、ドメイン登録業者のDNSページにアクセスする必要があります。
- Select Add a TXT record in the DNS from the drop-down at Zoho's Domain Setup page.

- ドメイン登録業者のアカウントにサインインします。
- ドメイン管理ページまたはDNSレコードページに移動します。
- TXTレコードを追加するオプションを見つけ、[追加]をクリックし、一覧から[TXT]を選択します。


- TXTレコードを追加するには、[ホスト]項目と[値]項目の情報が必要になります(項目のタイトルはプロバイダによって異なる場合があります)。これらの情報は、Zohoのドメイン設定ページで確認できます。
- For the Host field, you can either leave it blank or enter "@" or give your domain address (for example: "zylker.com")
- [値]項目に対しては、Zohoのドメイン設定ページから値「zoho-verification=zb1*******.zmverify.zoho.***」(ドメインごとに一意)をコピーし、[TXT値]項目に貼り付けます。
- TTLが編集可能な場合は、最短の存続時間を選択すると、確認がより迅速に行われます。
- 完了したら、[保存]をクリックします。

- 1~2時間待ってから、Zohoのドメイン設定ページの[TXTで確認]ボタンをクリックします。
メモ:ここに記録されているスクリーンショットとプロセスは、ドメインプロバイダGoDaddyのものです。お使いのドメイン登録業者によってはページの表示が異なる場合があります。
CNAME方式
CNAME方式でアカウントを確認するには、ドメイン登録業者のDNSページにアクセスする必要があります。
- Choose Add a CNAME record in the DNS from the drop-down at Zoho's Domain Setup page.

- ドメイン登録業者のアカウントにサインインします。
- ドメイン管理ページまたはDNSレコードページに移動します。
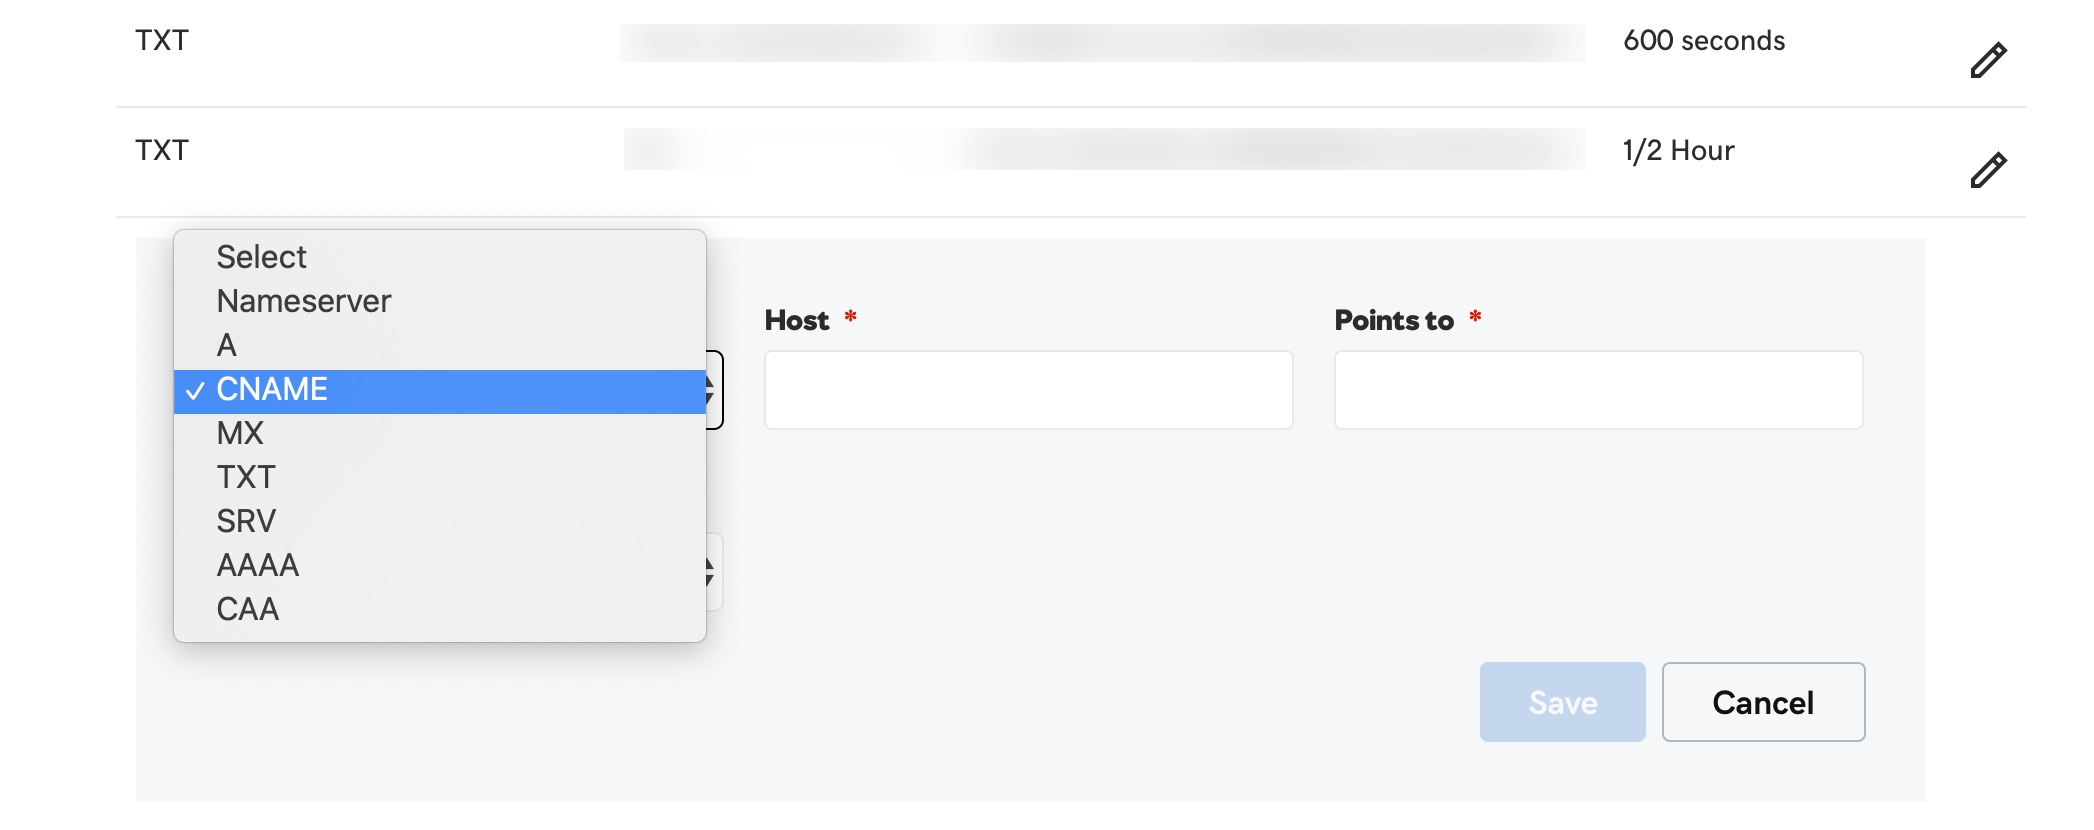
- CNAMEレコードを追加するオプションを見つけ、[追加]をクリックし、一覧から[CNAME]を選択します。


- CNAMEレコードを追加するには、[ホスト]項目と[値]項目のデータが必要になります(項目のタイトルはプロバイダによって異なる場合があります)。これらの情報は、Zohoのドメイン設定ページで確認できます。
- [値]項目に対しては、Zohoのドメイン設定ページから値「zb15*****4」(ドメインごとに一意)をコピーし、DNSページに貼り付けます。
- [指し示す先]項目に「zmverify.zoho.com」と入力します。** *.***."
- TTLが編集可能な場合は、最短の存続時間を選択すると、確認がより迅速に行われます。
- 完了したら、[保存]をクリックします。

- 1~2時間待ってから、Zohoのドメイン設定ページの[TXTで確認]ボタンをクリックします。
メモ:ここに記録されているスクリーンショットとプロセスは、ドメインプロバイダGoDaddyのものです。お使いのドメイン登録業者によってはページの表示が異なる場合があります。 Refer to this help document for provider-specific instructions.
Organization Setup
組織へのユーザーの追加
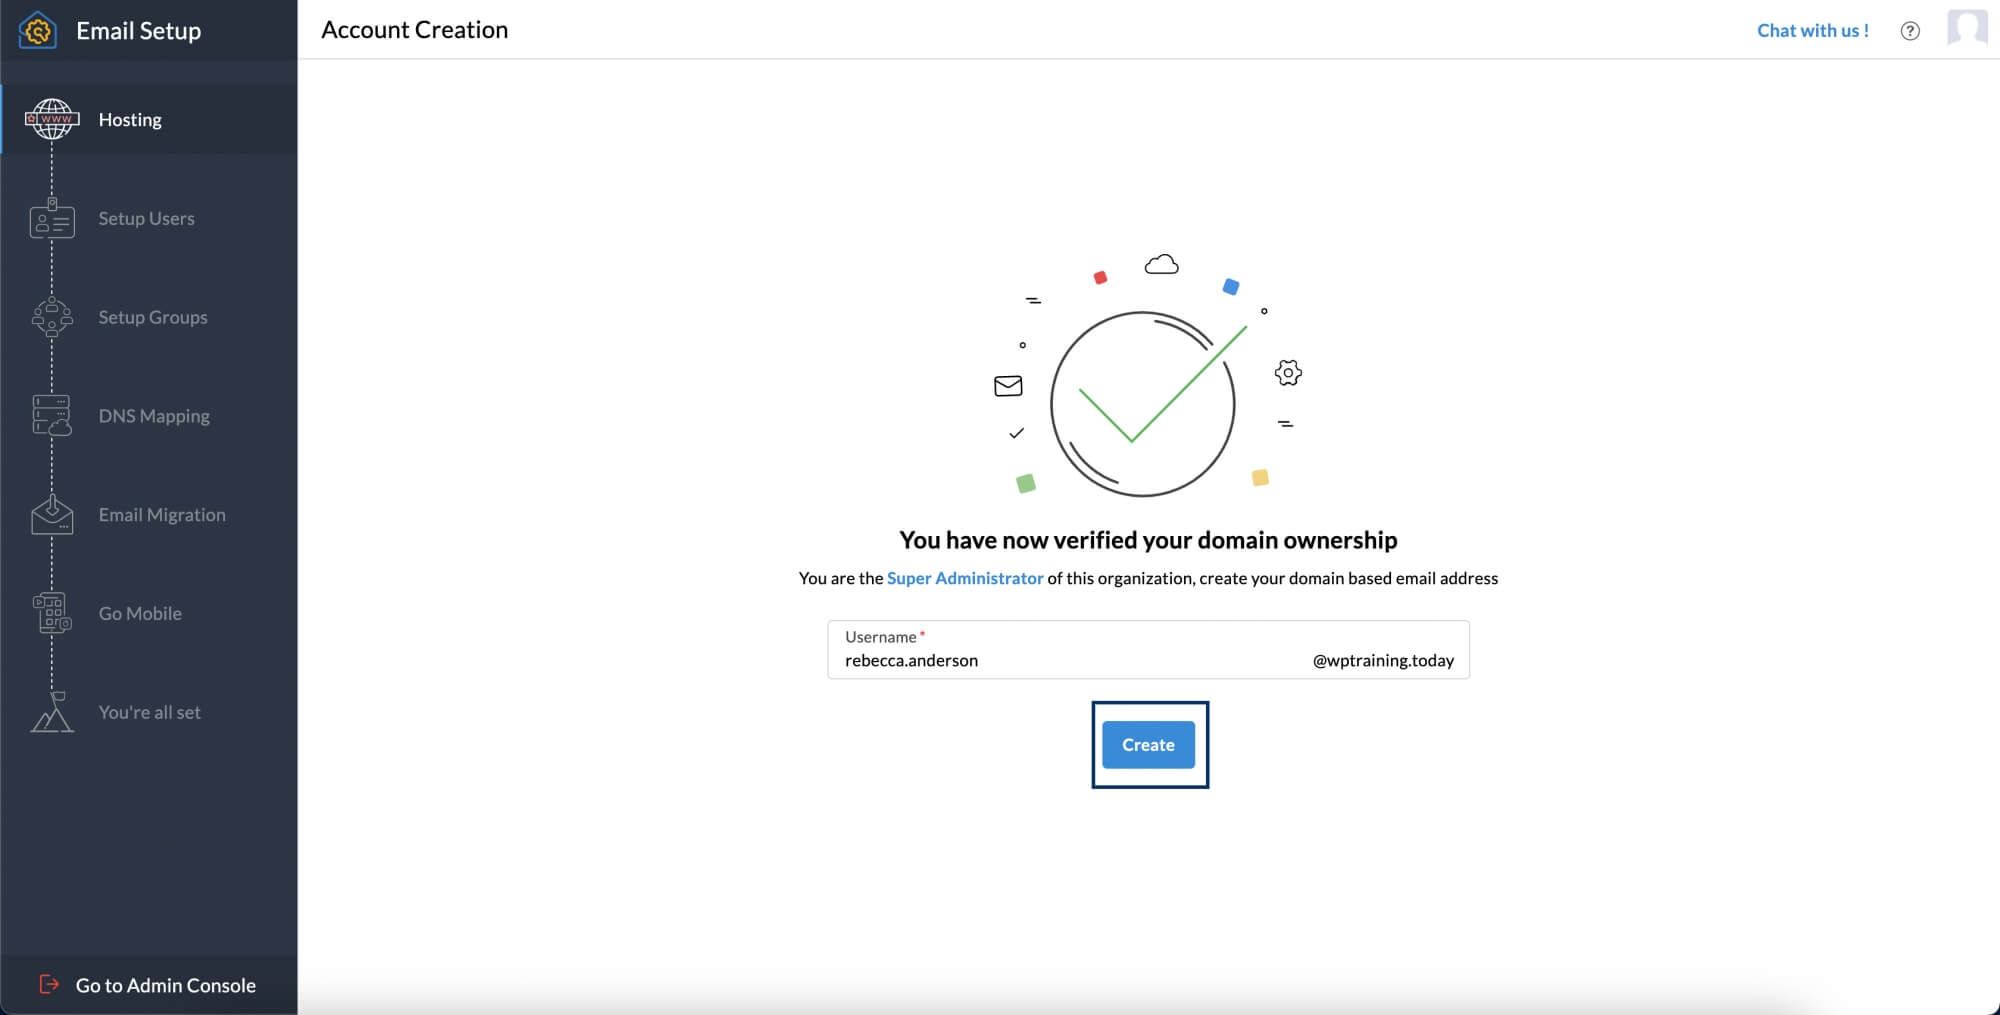
ドメインが正常に確認できたら、ドメインに基づいて最初に作成するユーザーの名前を入力するよう求められます。初期設定では、最初に作成されたユーザーがスーパー管理者になります。スーパー管理者は、組織内のすべてのユーザーに対してすべての権限を持ちます。
- ユーザー名を入力したら、[アカウントの作成]をクリックします。

- After adding the super admin, you will be taken to the Users page where you can start adding users to your organization.
- メモ:Zoho Mailでは、お客さまの都合に合わせて複数の方法でユーザーを追加できます。
- 1人ずつユーザーを追加する。
- CSVファイルからユーザーをインポートする。
- Invite a user to be a part of your organization.
- Google Workspaceからの移行
ユーザーを追加すると、組織内にそのユーザーのアカウントが作成されます。ユーザーに、自分のアカウントにアクセスするための一意のメールアドレスとパスワードを提供します。
ユーザーの追加
- [追加]ボタンをクリックします。
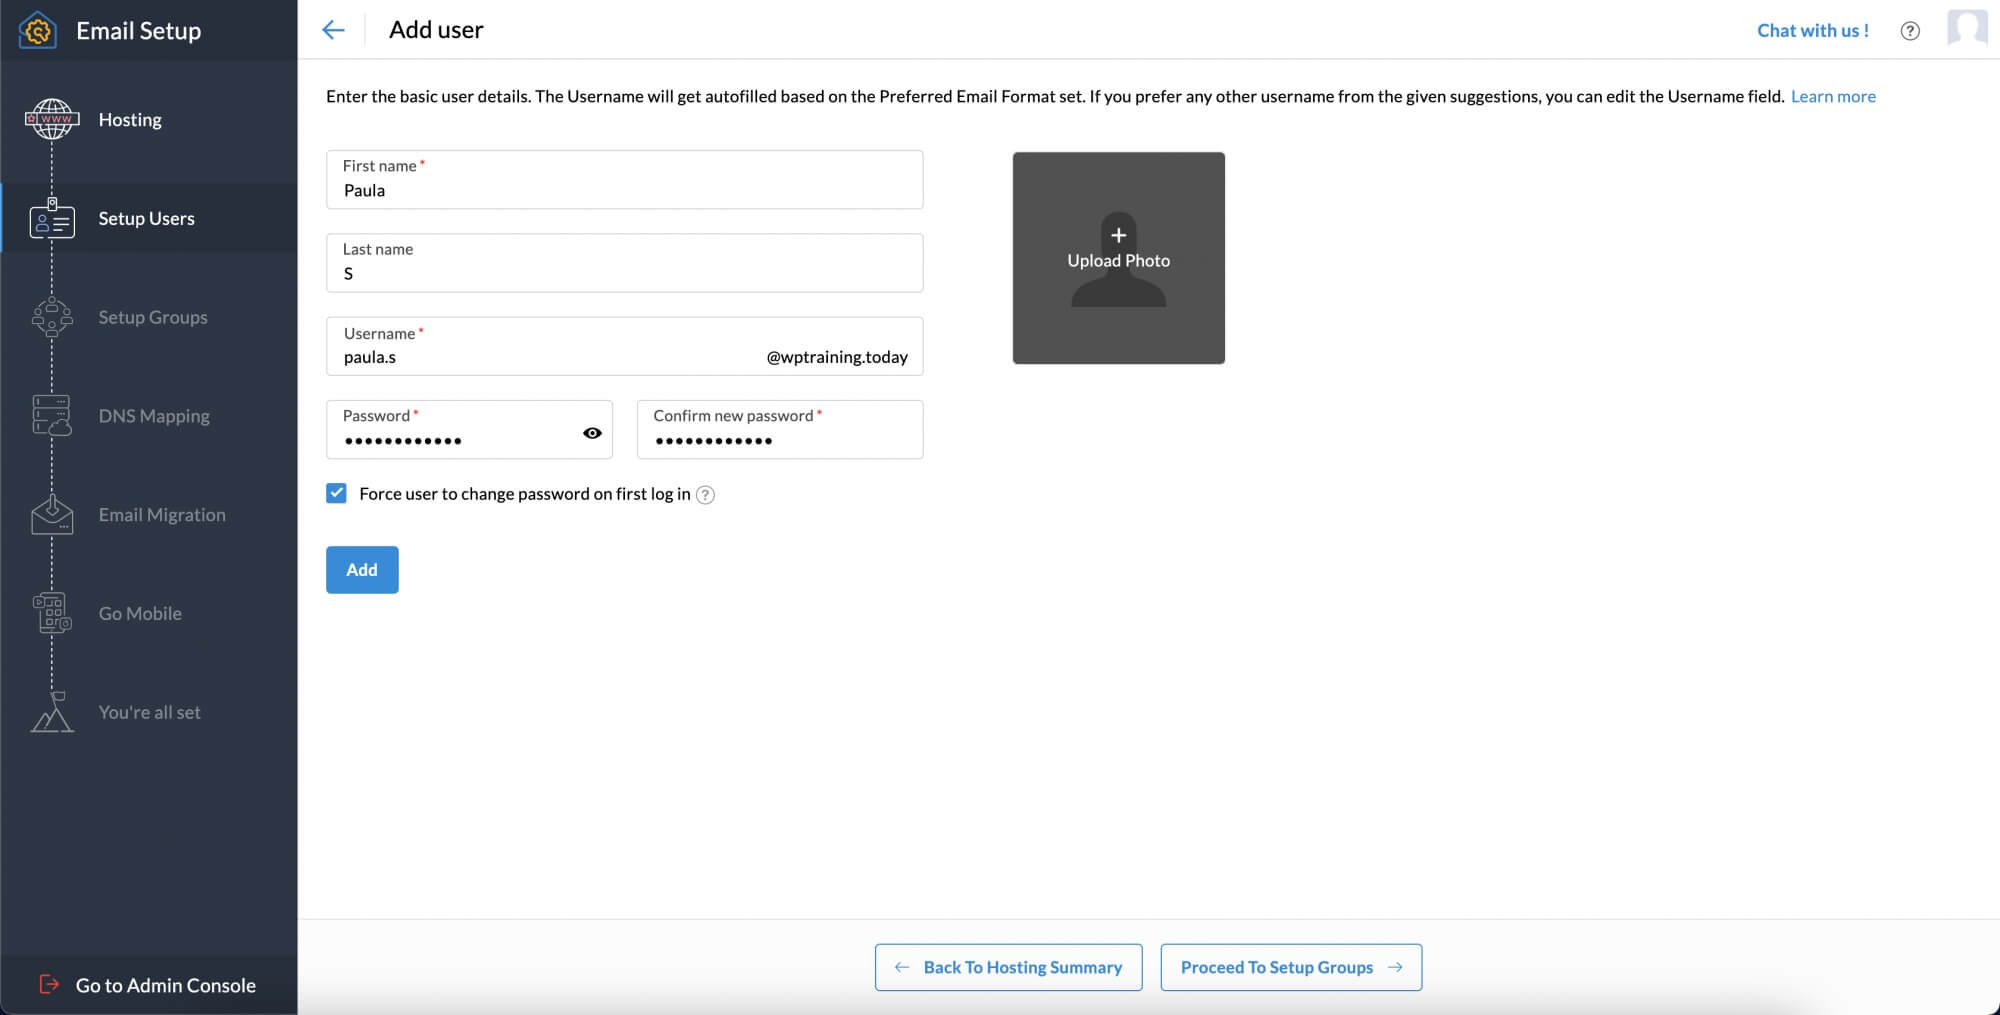
- Enter the desired First Name and Last Name in the respective fields. Now, the username will be auto-populated based on the preferred email format.
- You can either create a password manually or click Auto-generate to create a password for the user automatically.メモ:
The password must have a minimum of 8 characters and contain at least one numeric digit, one uppercase letter, one lowercase letter, and one special character.
- セキュリティ要件に応じて、[最初のサインイン時にパスワードの変更を強制]をオンにすることもできます。メモ:
Check the Force user to change the password option if you want the user to be prompted to change the password of their account during their first login attempt. The user will not be able to enter or access their account before changing the password.
- You can also select Send credentials via email to share the login credentials with your desired recipients.メモ:
Check the Send credentials via email option if you want to share the new credentials with the intended users. You can send the credentials to up to 5 recipients.
- Click Add to finish creating the user account in your organization.

- 上記の手順を繰り返して、必要な数のユーザーを追加します。
Import User(s) from other Zoho services
To import users from your organization using other Zoho services, select the Other Zoho Users option from the top pane. Users associated with your other Zoho services will be listed below, allowing you to easily import them into Zoho Mail by creating an email account for each user.
.CSVファイルを使用したユーザーのインポート
The Username, Password, and First Name fields are mandatory in the .CSV file.
- Click the Import option and then select Import using CSV file option and then click Start Import.

- .CSVファイルは、Zoho SheetsやExcelなどのスプレッドシートアプリを使用して作成できます。
- You can download the sample file from the import from CSV section.

- .CSVファイルを準備できたら、[ファイルの選択]ボタンをクリックし、.CSVファイルを選択します。
- All the users listed in your .CSV file will be displayed for you to further scrutinize the users you want to add to your organization. You can choose to import all or a selected number of users depending on your requirement.
- After selecting the users you want to import, click Proceed.

- Give a name to your import for future reference. さらに、該当するボックスをオンにすることで、初めてサインインするときに設定されているパスワードを強制的に変更させることもできます。
- Once done, click Start. You don't have to wait for the import to complete. You can check the status of your import by coming back to the Import via CSV page in the Admin Console.

- メモ:この機能は有料アカウントでのみご利用いただけます。
- To know more about other methods of user creation, refer here.
グループ
グループリストまたはメーリングリストは、共通の目的を持つユーザーのグループによって共有される共通メールアドレスです。グループアカウントにメールが送信されると、グループのすべてのメンバーにメールのコピーが配信されます。グループを作成するには:
- [グループの作成に進む]をクリックして、コントロールパネルの[グループ]セクションを開きます。 Once there, click Create a new group.
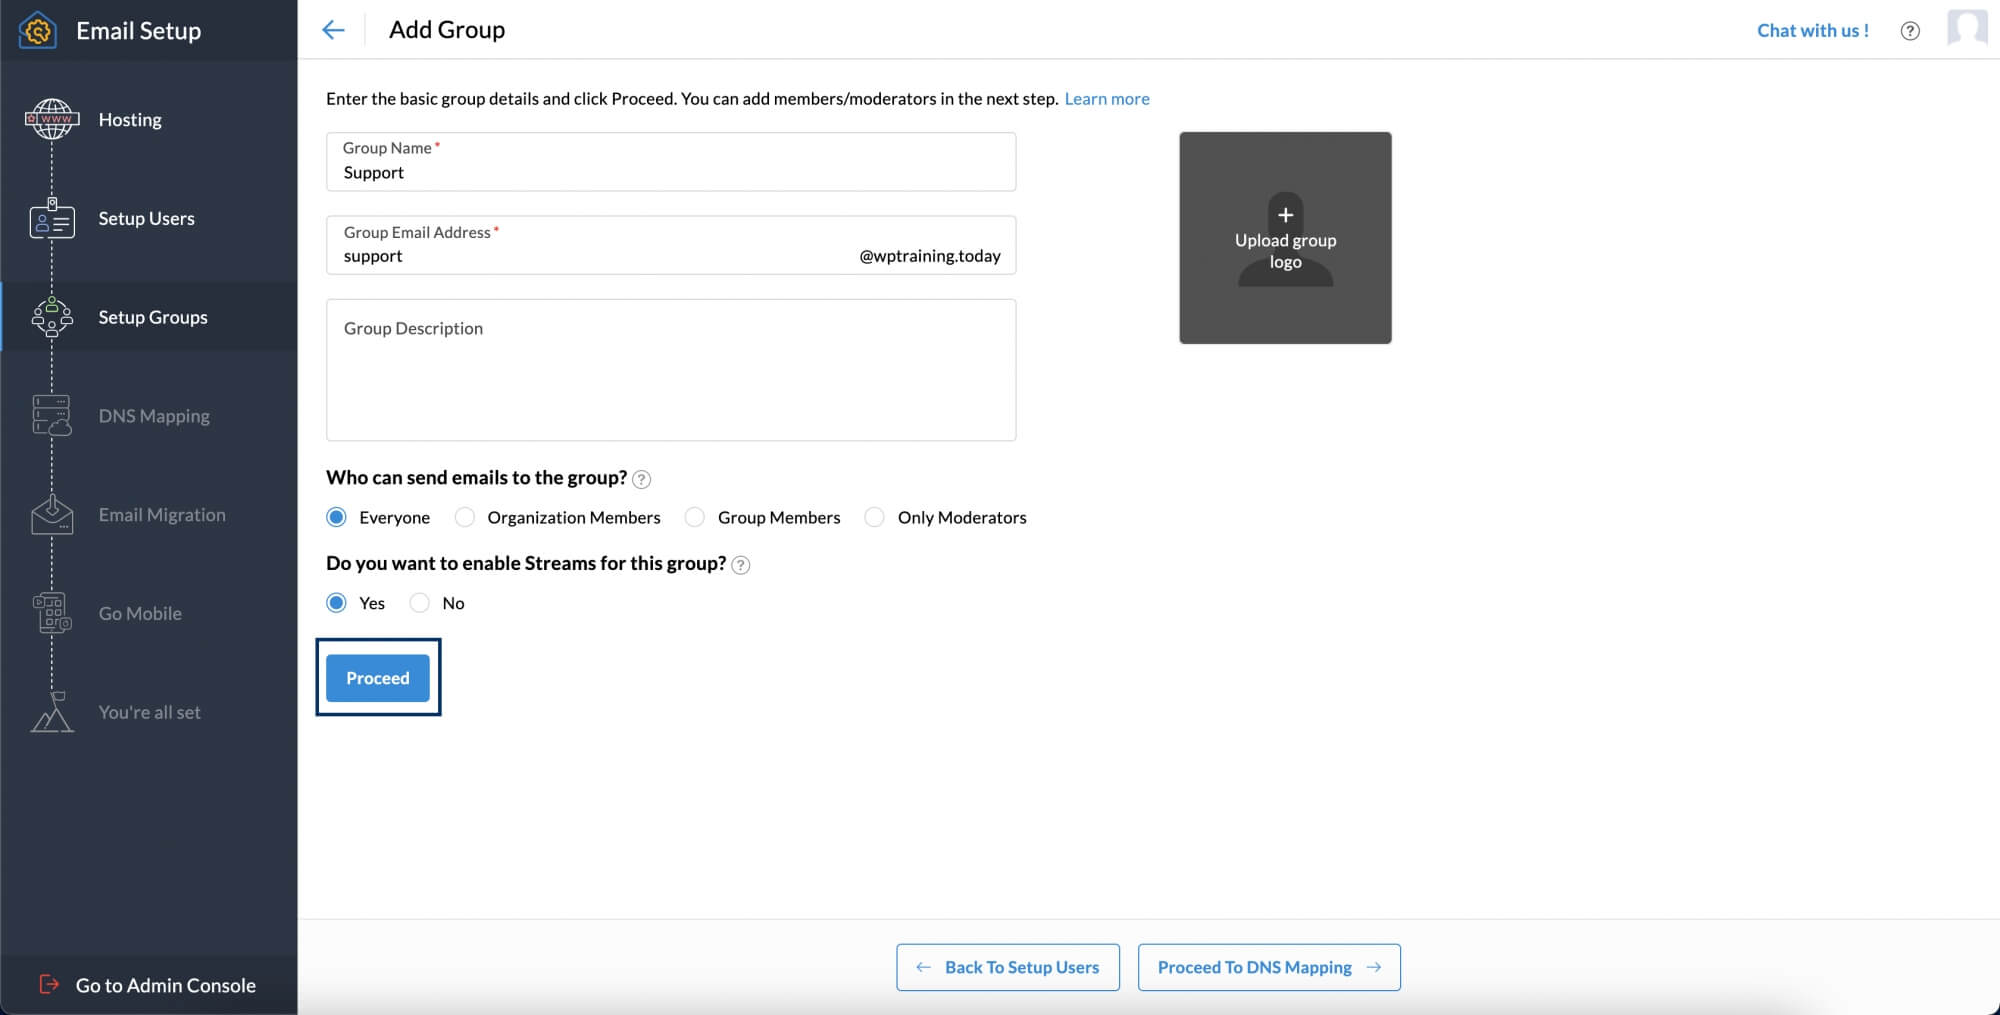
- Enter your group name, group email address, and description. You can also choose the access level of the group depending on your requirements.
- After choosing if you want to enable streams for the group, click Proceed.

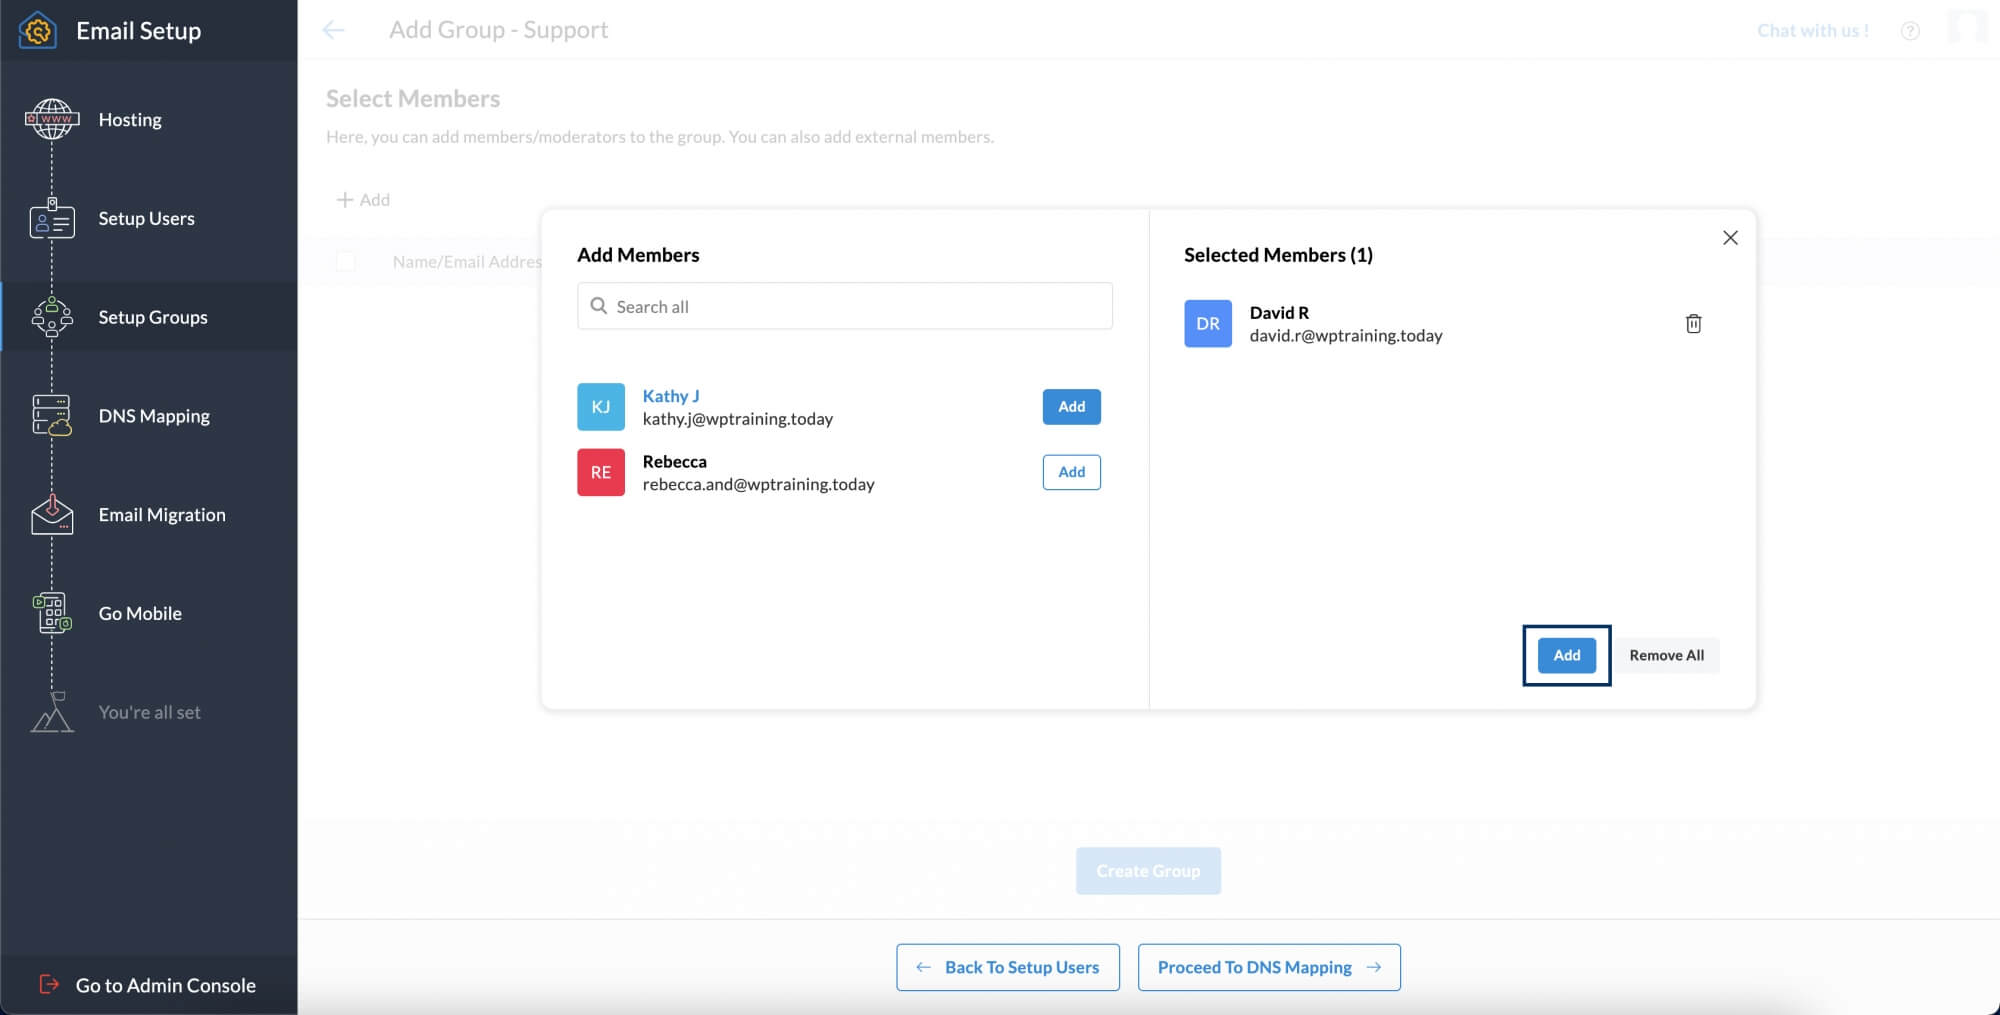
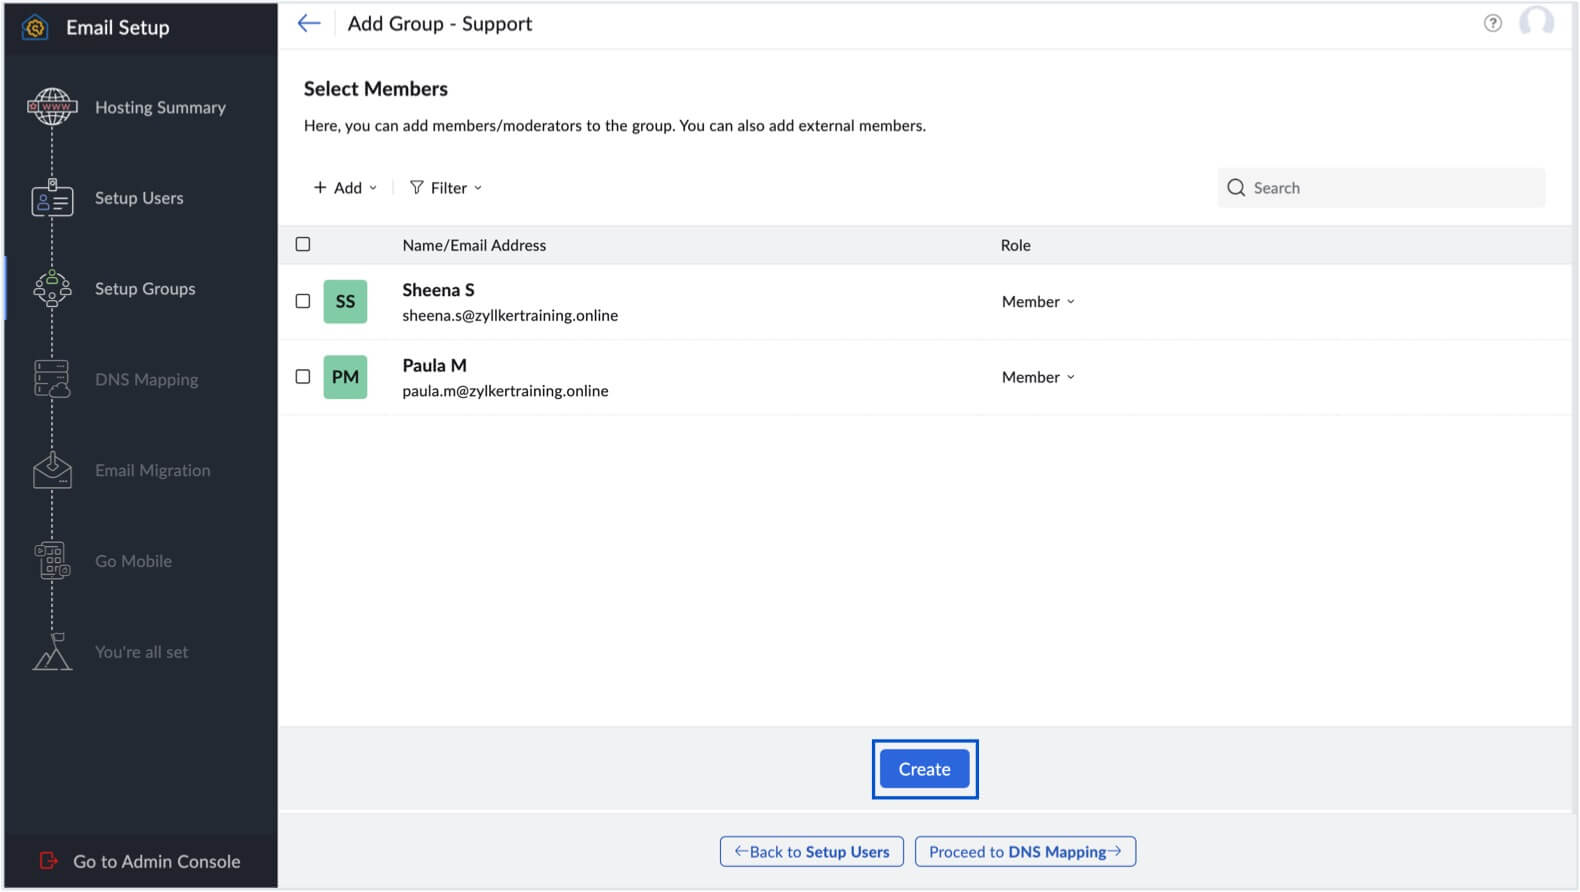
- Click Add on the Select members page to add users to your group.

- 次のいずれかのオプションを選択して、グループにメンバーを追加できます。
- Search and add organization users: Select this option to add users from your organization. Click the + symbol next to the user on the Add Members pop-up to add them to your group and click Add.

- Add members using email address: Select this option to add members using email addresses. Enter the desired email addresses, separated by commas in the Add group members pop-up and click Add.

- Add all organization users: Select this option to add all your organization users to the group. Click Create in the confirmation pop-up.

- Search and add organization users: Select this option to add users from your organization. Click the + symbol next to the user on the Add Members pop-up to add them to your group and click Add.
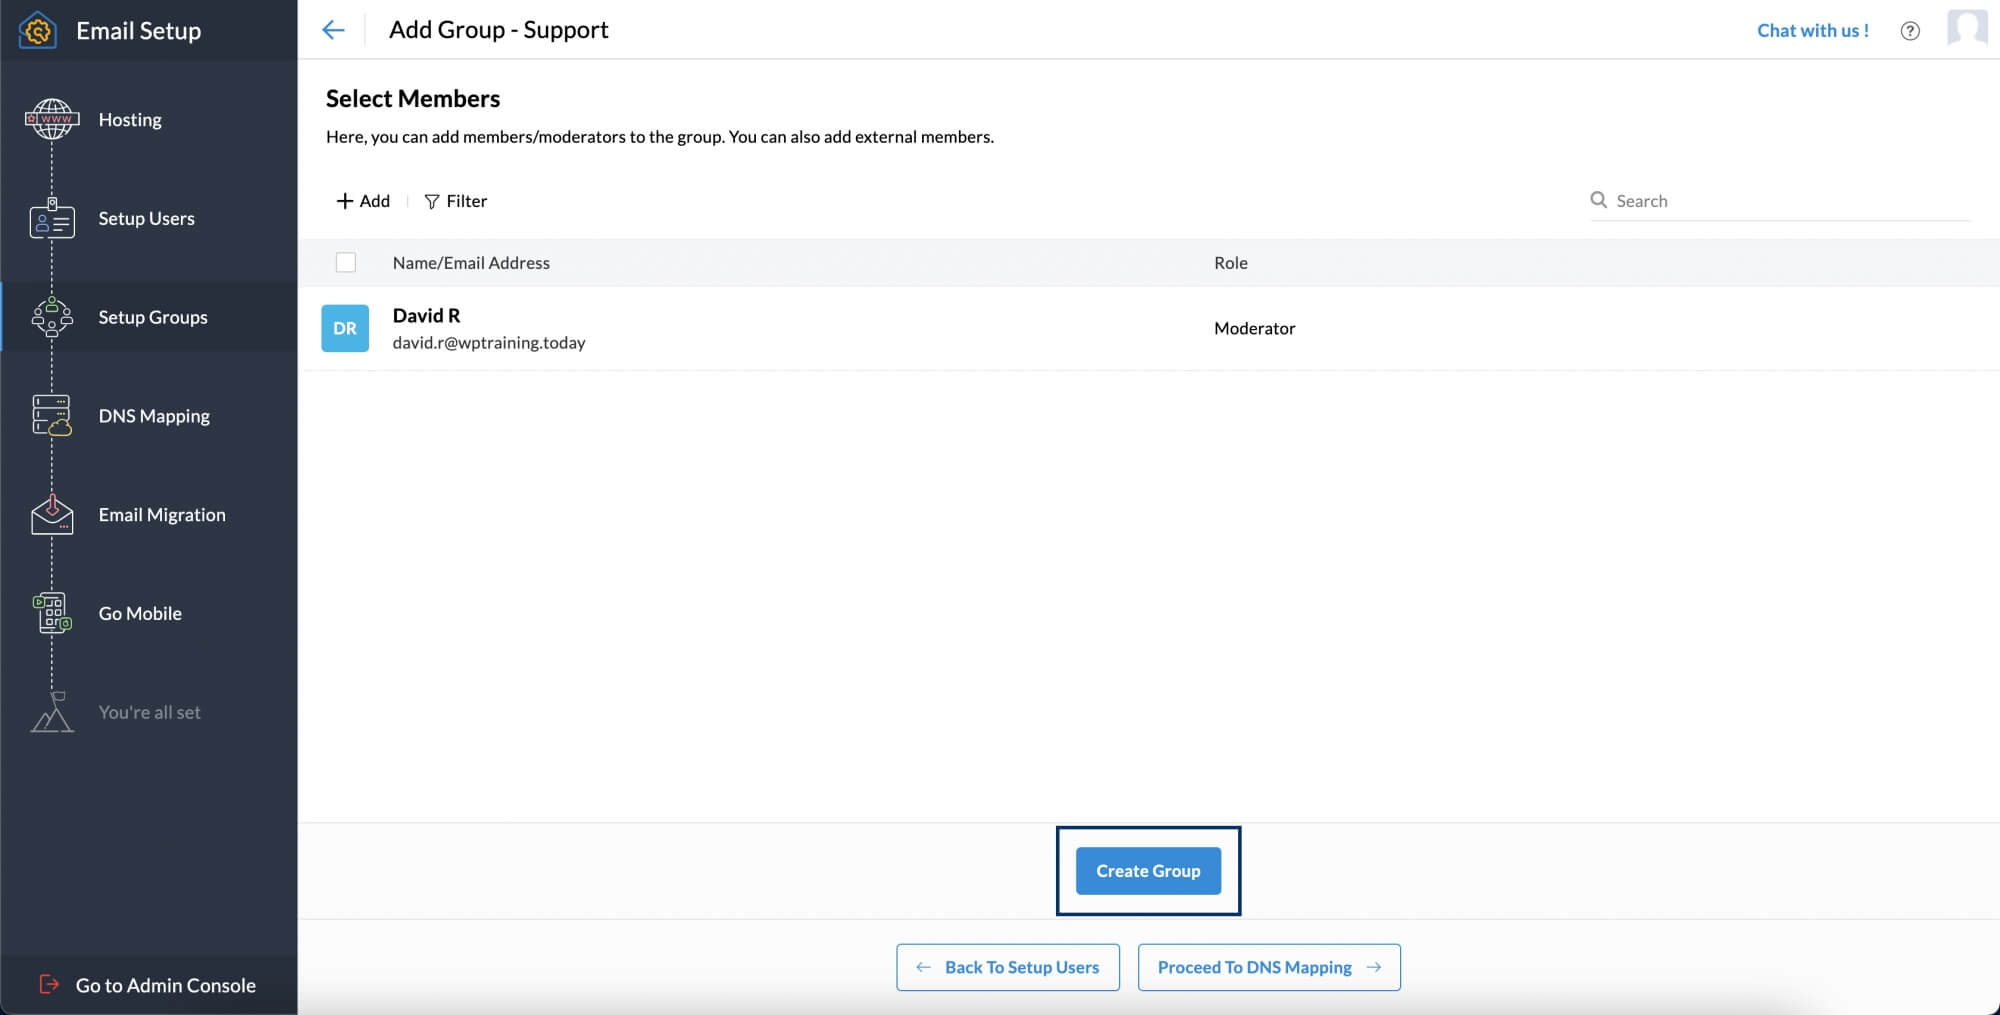
- You can change the role of a user—to Member or Moderator, by clicking the role of the respective user.

- Click Create, once done. Now click Proceed in the Confirm Action! Page to create a group.

- この手順をスキップして、後でグループを追加することもできます。 But, if you want to migrate data from other services, it's recommended you create your distribution lists right away.
- グループの詳細については、このヘルプドキュメントを参照してください。
DNS Mapping
これは、ビジネス用メールを設定する上で最も重要な手順の1つです。作成したユーザーやグループがメールを受信できるようにするには、お客さまのドメインのMXレコードをDNSホスティングプロバイダ(DNSマネージャー)に設定する必要があります。MX(Mail eXchange)レコードは、ドメインのメール受信サーバーを指定する、DNS内の特別なエントリーです。
We also recommend adding SPF and DKIM records to prevent email spoofing. メールのなりすましとは、メールが実際の送信元以外の誰かによって送信されたかのようにメールの送信元を偽ることです。 Adding SPF and DKIM records will ensure valid emails from your domain get delivered to your recipient and also prevent email spoofing.
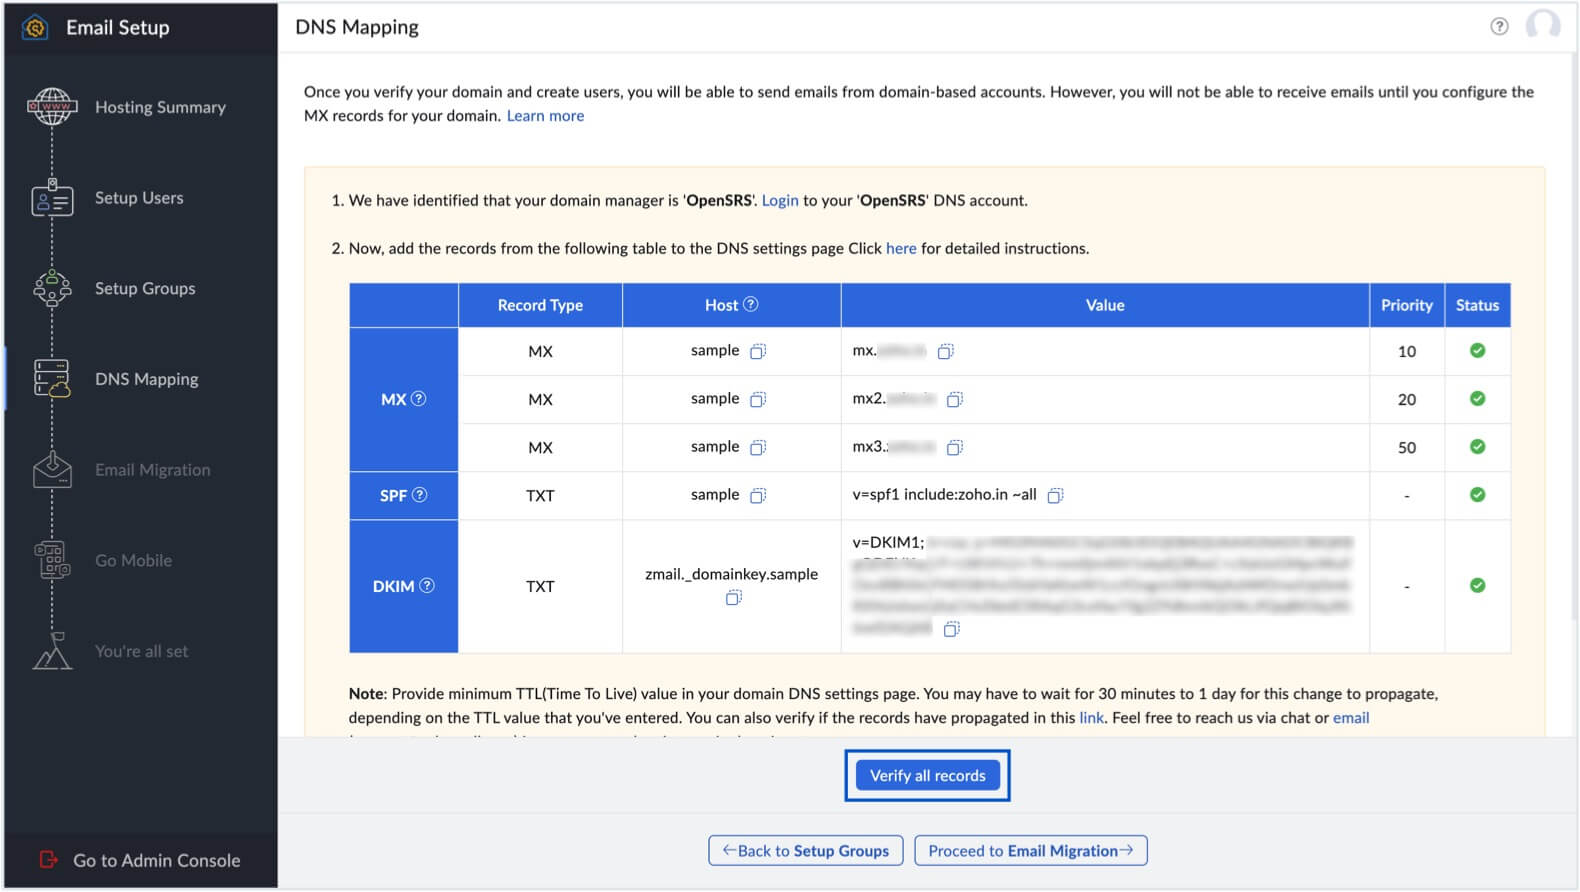
- If you have purchased your domain from us, we will automatically configure your email delivery and add SPF and DKIM records. In that case, you might not see the following steps.
- The MX, SPF, and DKIM records used below are generic and can change depending on the data center you are using Zoho Mail from. In order to avoid confusion, refer to the records displayed in your setup screen for your domain-specific MX, SPF, and DKIM records.
- 以下のスクリーンショットはGoDaddyのものであり、お使いのドメイン登録業者のユーザーインターフェイスとは異なる場合があります。
Generic instructions for DNS Mapping
- Click Proceed to DNS mapping on Zoho's domain setup page.
- ドメイン登録業者のWebポータルにサインインします。
- お使いのアカウントでDNSマネージャー/ドメイン管理ページ/DNSコントロールパネルを起動します(登録したすべてのドメインが表示されます)。
- MXレコード/メールサーバー/メール設定を指定するオプションを見つけます(必要に応じて、プロバイダのヘルプページを参照するか、登録業者からサポートを受けてください)。
- If you have any existing MX record entries, it's important to remove them.
- 新しいレコードを追加するオプションを見つけてクリックします。
- 名前/ホスト/サブドメインを「@」と指定するか、空白のままにします。
- Specify the Points to Value as "mx.zoho.***" for the first record and set Priority to 10 and click Save.

- Follow the same steps to add the second (mx2.zoho.***) and third (mx3.zoho.***) MX records for your domain and set Priority to 20 and 50 respectively. you have to add all three MX Records. You have to delete any existing MX records of your previous email service providers for uninterrupted email delivery Learn more.メモ:
Zoho Mail also offers coexistence setup via advanced email routing and integration with external email security solutions. For more details, refer to our help page.
- SPFレコードを追加するには、TXTレコードを追加するオプションを探し、[追加]をクリックして、[タイプ]ドロップダウンから[TXT]を選択します。
- 名前/ホストに「@」を入力します。[TXT値]項目に、v=spf1 include:zoho.com ~allと入力してください。~all" and click Save. If there are multiple SPF records, verification will fail. You've to use either the TXT value of Zoho SPF record or the merged TXT value of the SPF record. 詳細はこちら。

- DKIMレコードを追加するには、TXTレコードを追加するオプションを探し、[追加]をクリックして、[タイプ]ドロップダウンから[TXT]を選択します。
- [ホスト]項目で、値「zoho._domainkey」(セレクターによって異なる)をZohoの[ドメイン設定]ページからコピーし、ドメインのDNSページに貼り付けます。
- [参照先/値]項目で、Zoho Mailの[ドメイン設定]ページから値「v=DKIM1; k=r**; p=***************....****」をコピーし、ドメインのDNSページに貼り付けて、[保存]をクリックします。DKIMレコードの有効性はこちらで確認できます。

- すべてのレコードの[TTL]項目で(編集可能な場合)可能な限り短い時間を選択することで、変更を早期に有効にできます。メモ:
DNS record propagation may take some time, depending on the record type and your domain registrar's TTL settings. The table below provides the approximate propagation time for each record type.
データの種類 Estimated propagation time MX 1 to 2 hours TXT (SPF,DKIM) 4 to 48 hours
3つのレコードをすべて追加したら、Zoho Mailのドメイン設定ページに戻り、[すべてのレコードの認証]をクリックします。MXレコードの認証に成功し、メールが届くまでに約1~2時間、SPFレコードとDKIMレコードの反映に4~48時間かかる場合があります。
メールの移行
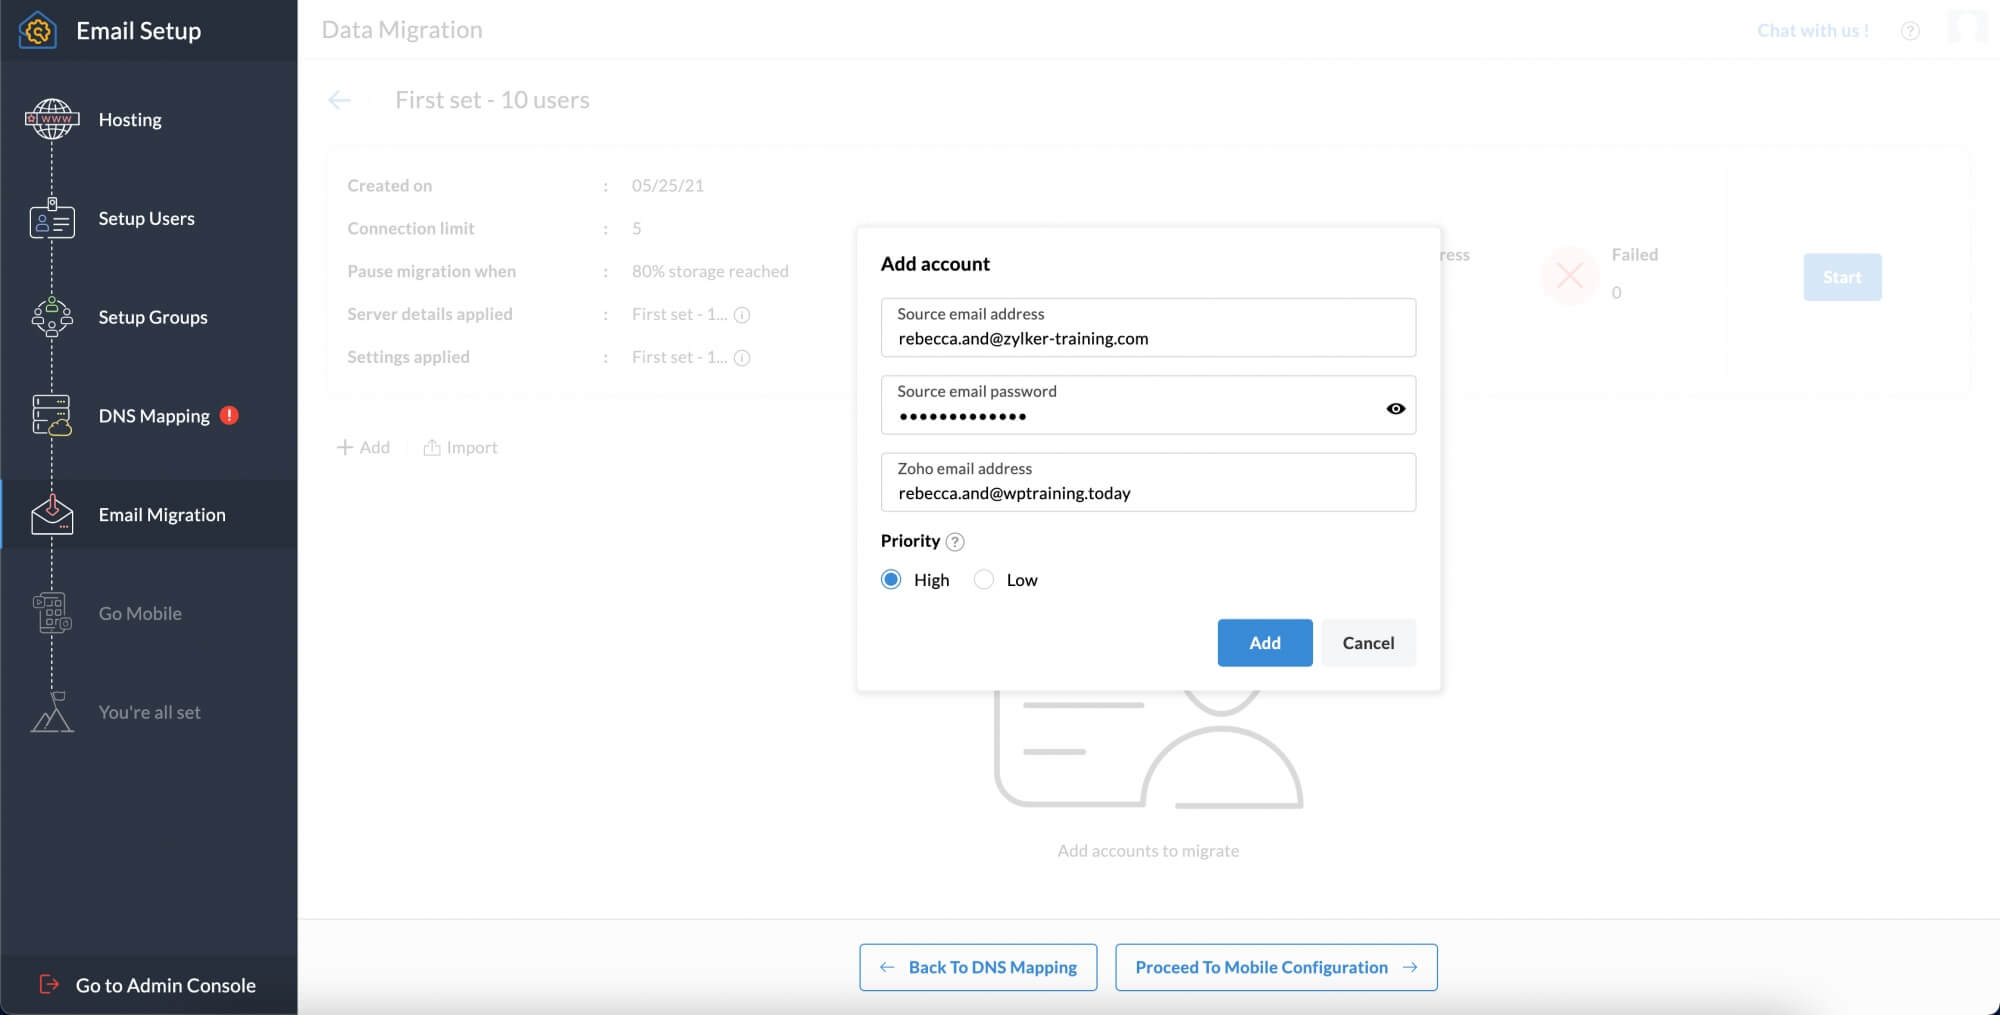
以前のメールプロバイダから切り替える場合は、次のいずれかの移行方法で、以前のサービスプロバイダからZoho Mailにデータを移行できます。
- IMAP/POP移行
- Google Workspaceからの移行
- Office 365からの移行
- Microsoft Exchange Serverからの移行
- Zoho Exchange移行ウィザード
転送を簡単かつ円滑に行うには、適切な移行タイプを選択する必要があります。Zoho Mail移行の詳細については、こちらを参照してください。ご希望の移行方法を選択した後、次の操作を行います。
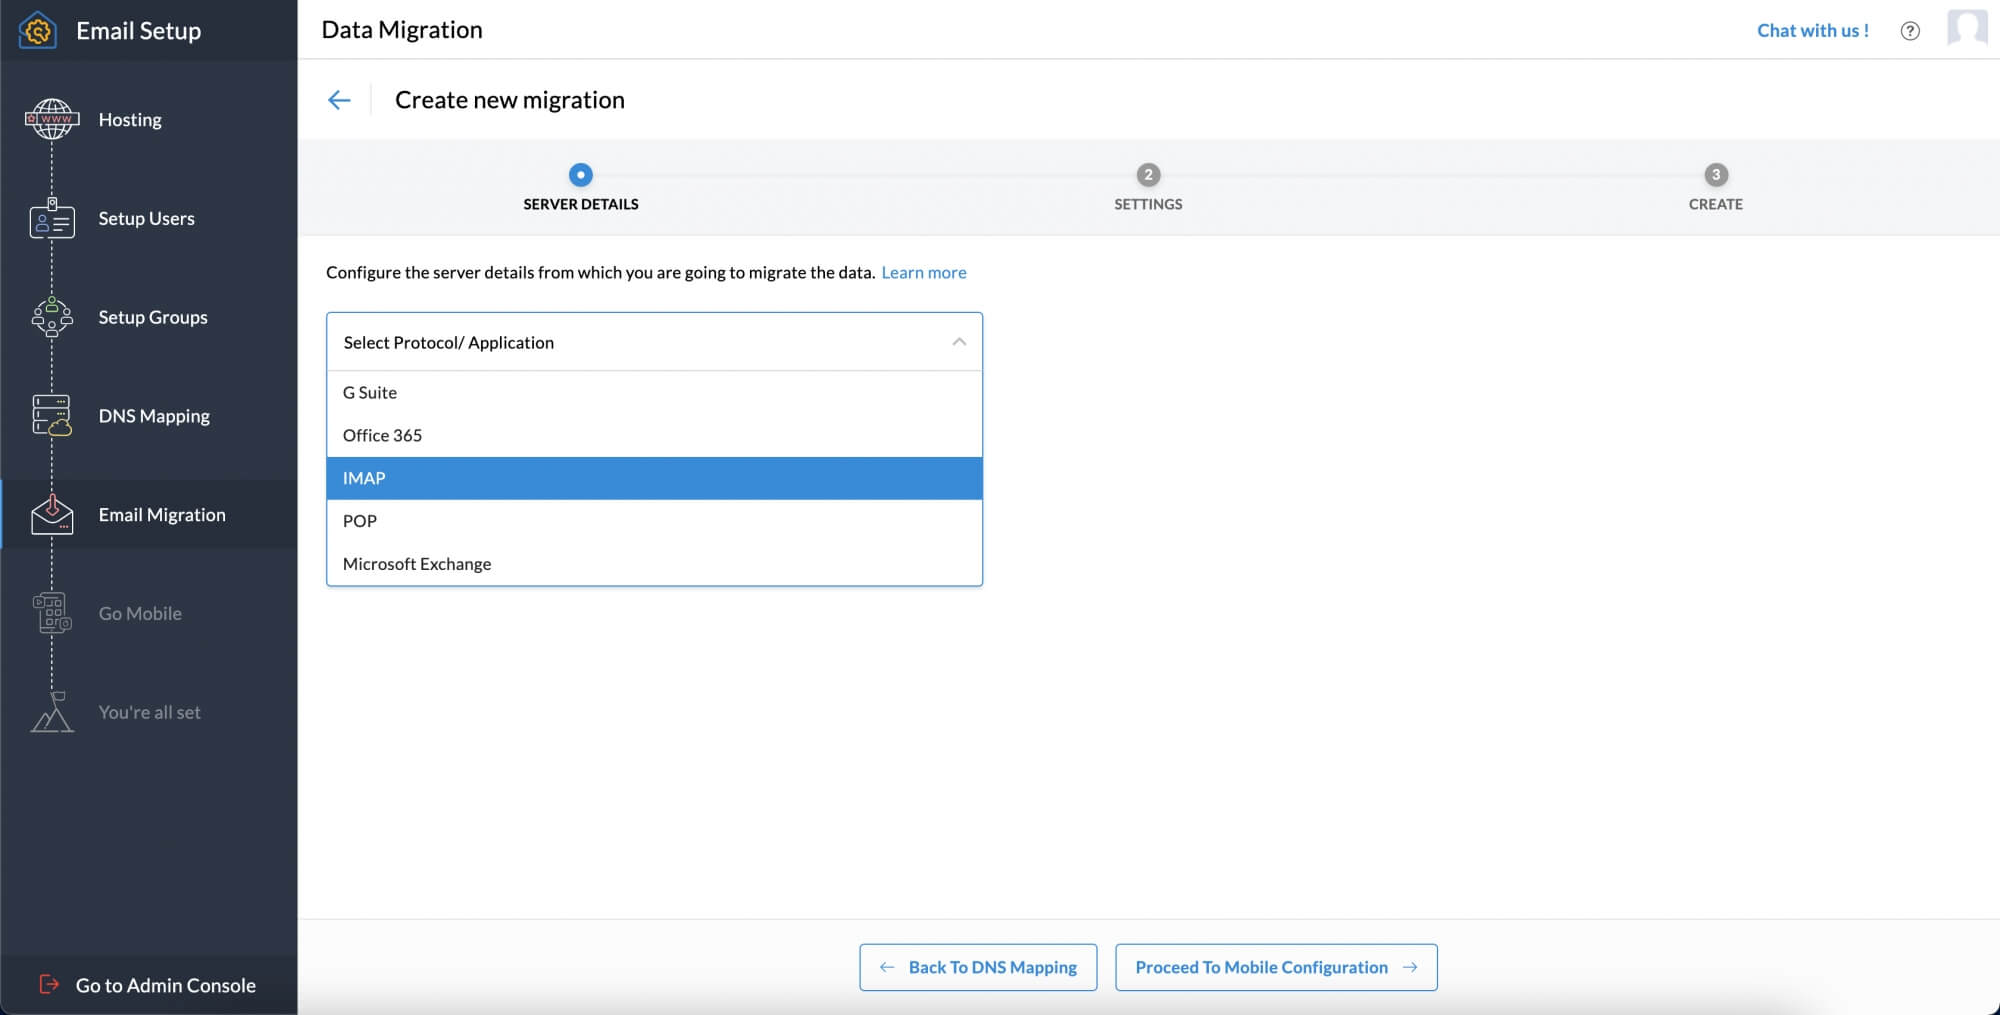
- [移行に進む]をクリックして、移行ページを開きます。
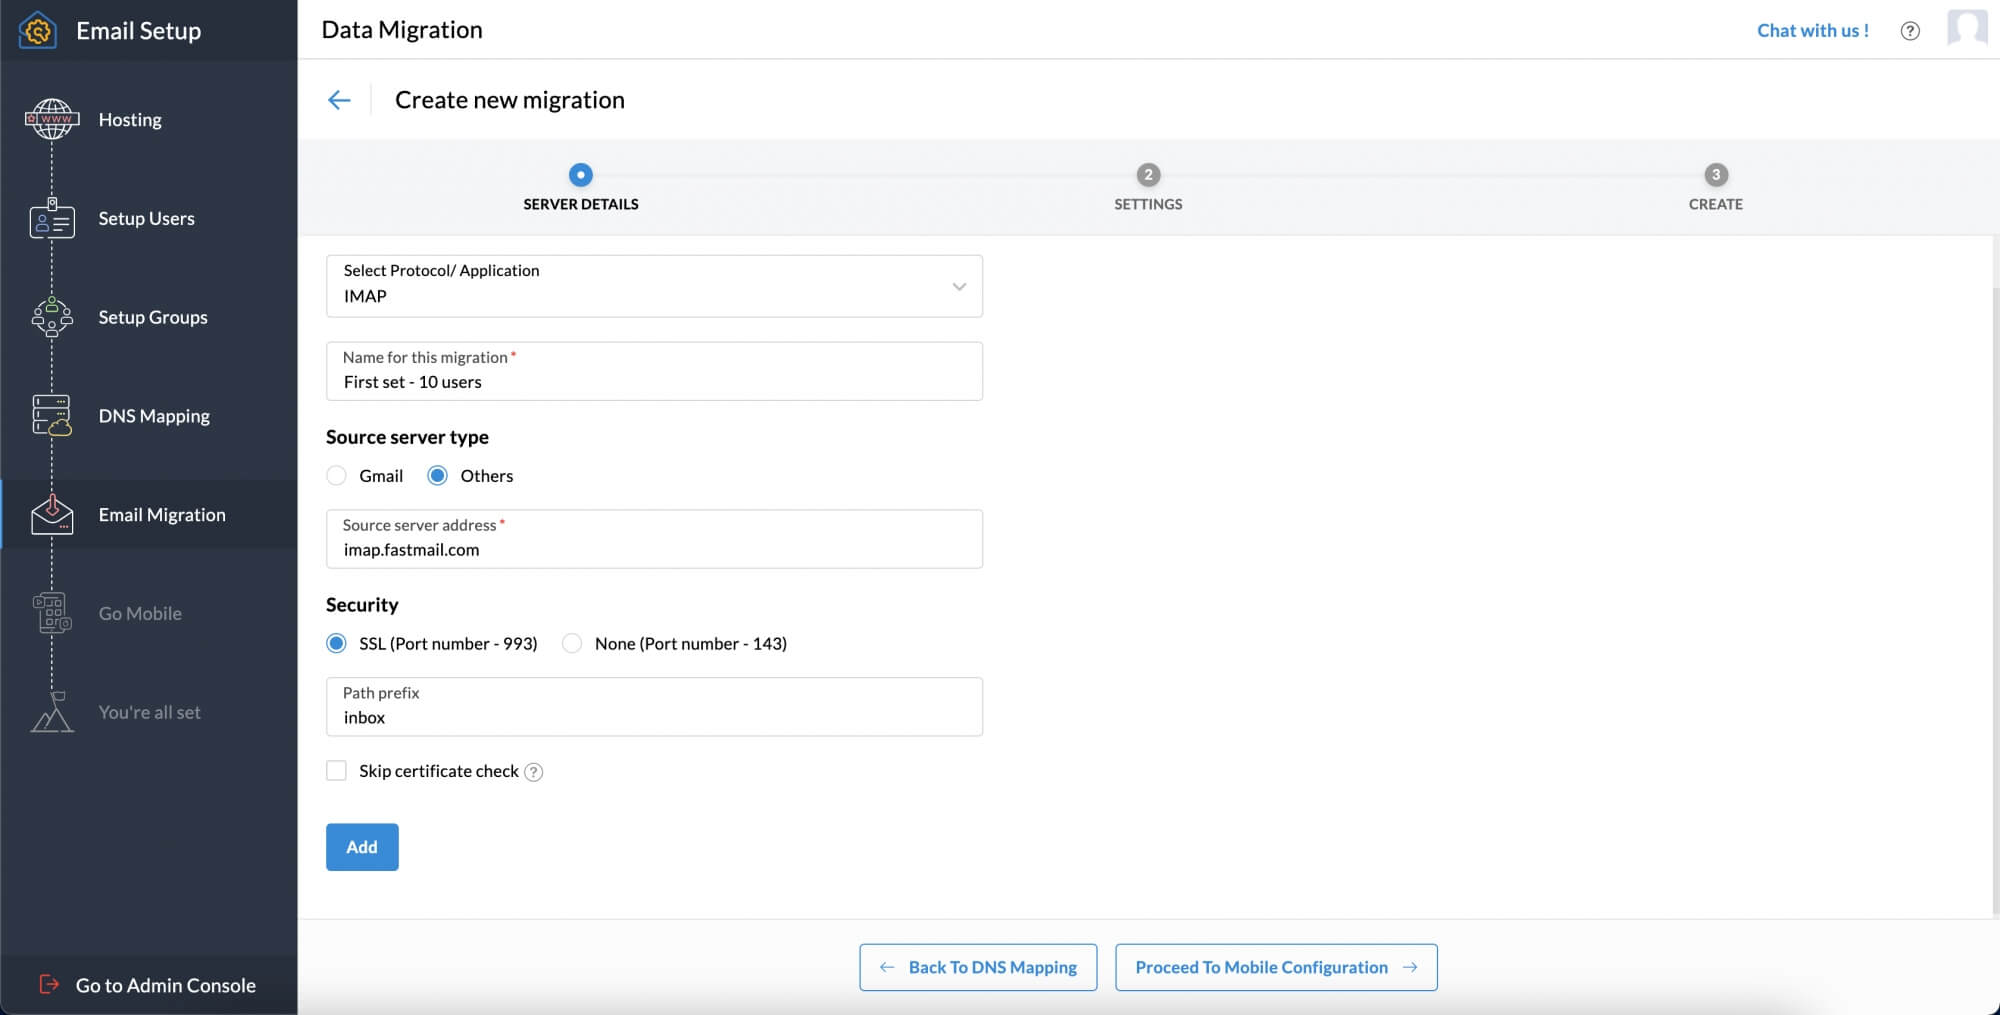
- You can assign a name to this migration by entering your desired name in the Name for this migration field.
- To start the migration process, you have to provide us with your server details. If you're migrating from a Google Workspace or Microsoft 365 account, you will be required to authenticate the same before adding the Migration.
- Select the protocol or application from the drop-down menu.

- Provide the server details from where you want to migrate data. 完了したら、[追加]をクリックします。

- On the Settings page, provide information on which folders to migrate, exclude, and other relevant details. 完了したら、[追加]をクリックします。

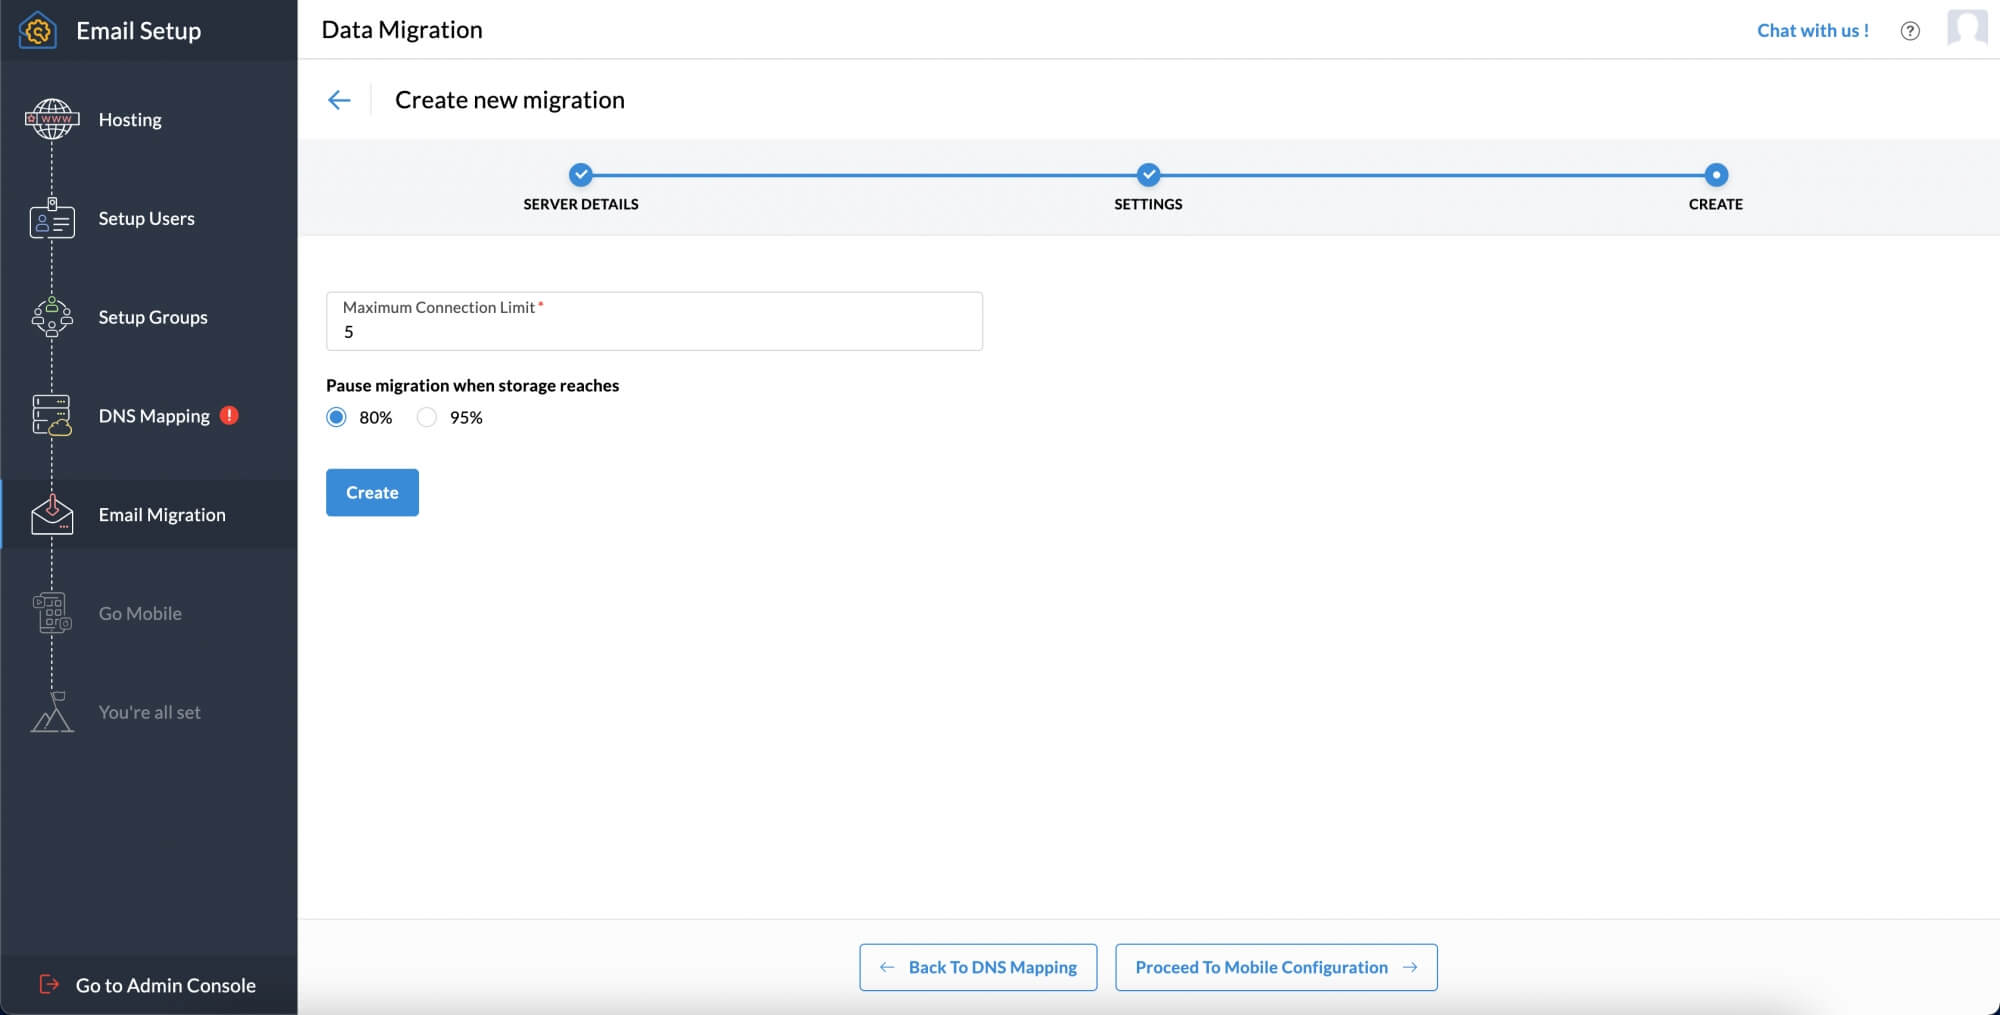
- You can set a maximum connection limit and mention when to pause the migration in regard to the storage. [作成]をクリックします。

- To check your migration settings, go to the Configurations section in the top pane.
- Navigate to the Users section to either add accounts individually or import them using a CSV file.

- After adding the necessary accounts, click Start Migration.
- メモ:以前のメールプロバイダからZoho Mailの各ユーザーアカウントにデータを移行するには、移行を開始する前に、Zoho Mailにユーザーアカウントを作成する必要があります。
- You can migrate your users/emails from different sources such as , Microsoft Exchange, Hosted Exchange, PST / Outlook files, EML format (.eml) files using Zoho Exchange Migration Wizard. Navigate to our Zoho Exchange Migration Wizard help page for more details.
モバイルアクセス
Zoho Mailには、外出中の管理者やユーザーが時間や場所にかかわらずメールを確認できるように設計された複数のアプリがあります。Zoho Mailには、次のアプリがあります。
- Zoho Mail Adminアプリ
- Zoho Mailモバイルアプリ
モバイルアプリの詳細


