Manage user-specific settings in Zoho Mail Admin Console
You can use user-specific mail settings in the Admin Console to perform actions such as adding email alias to users, routing incoming emails of a user to a different account, configure out-of-office replies, put in signatures, and more.
How to view and manage user accounts in Zoho Mail Admin Console
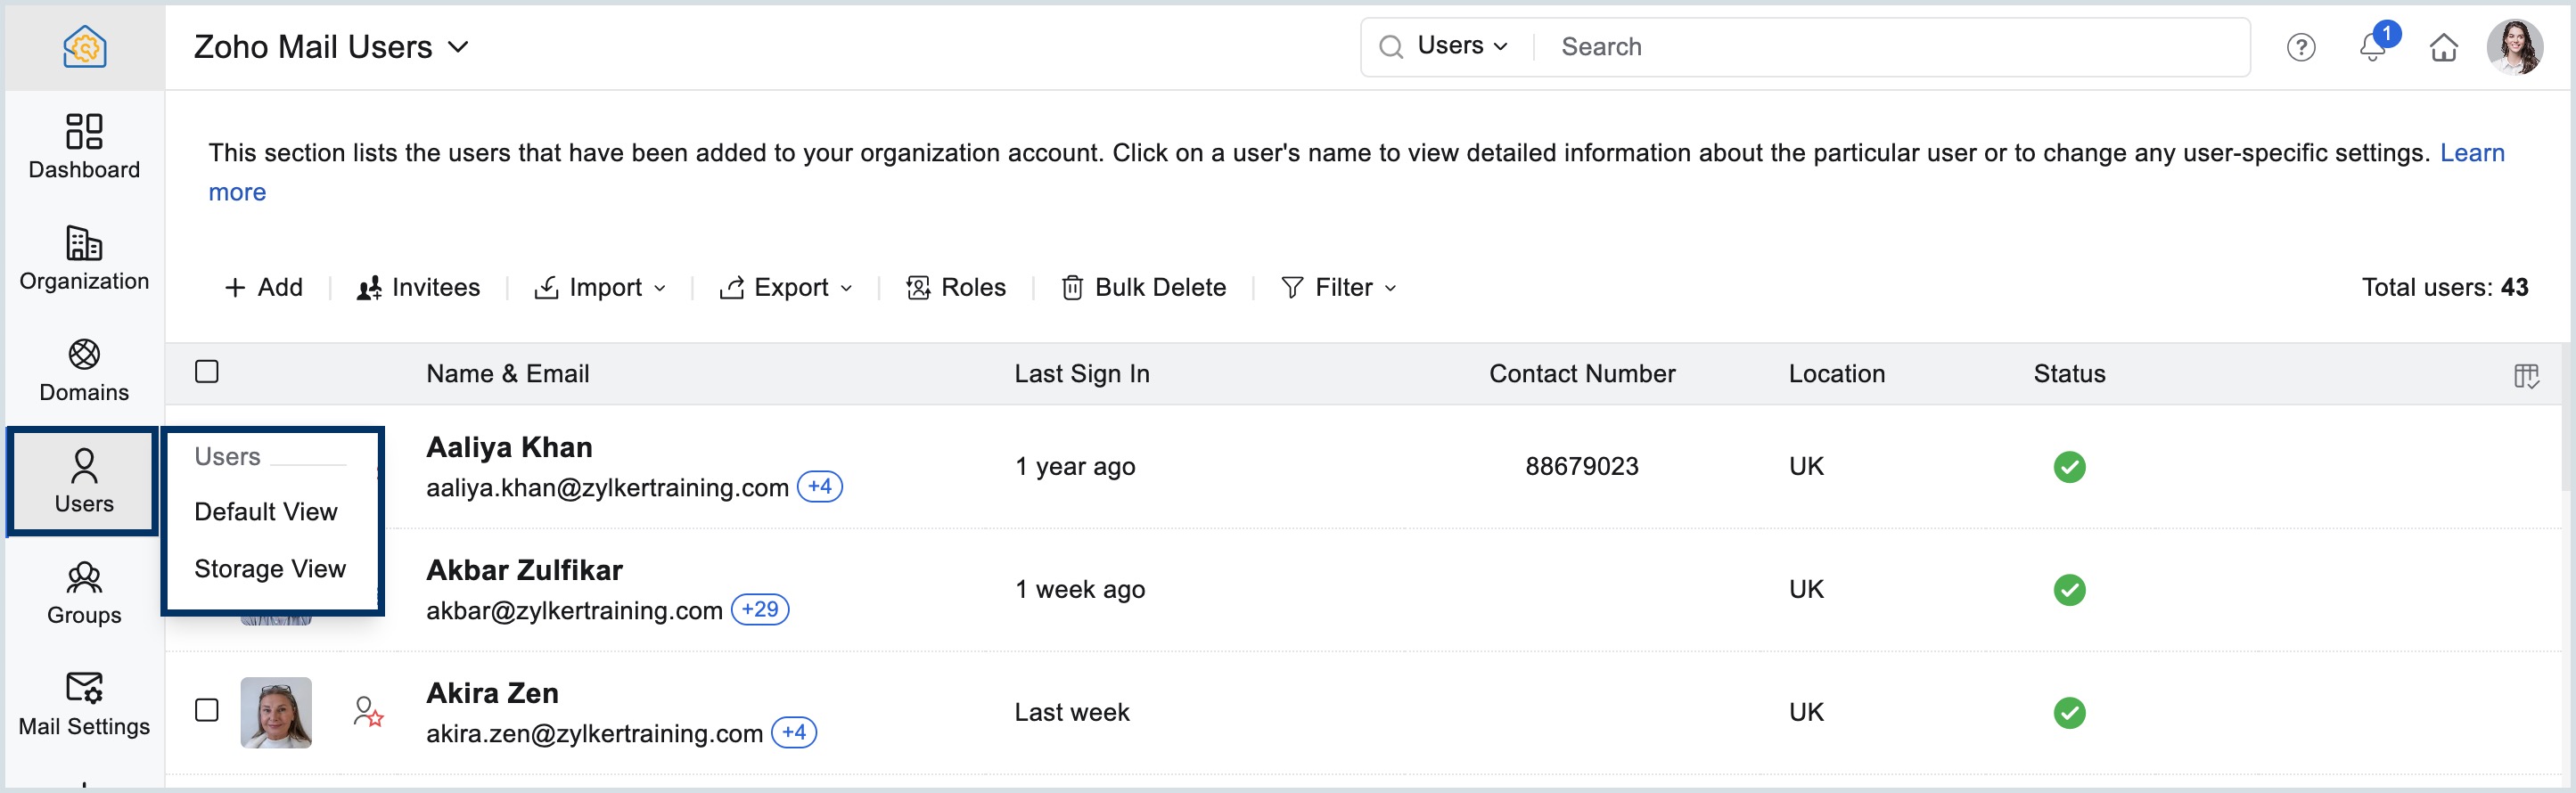
Once you have added the users, you can view their information in the Users section such as their email address, status, contact number, etc. Additionally, you can view the plan assigned to each user, additional storage credited to them if any, and the storage amount they have utilised all from the Users section. You can select the Default view to see the user's personal information and switch to the Storage view to look at their storage information.
To change user views, follow these steps:
- Log in to Zoho Mail Admin Console.
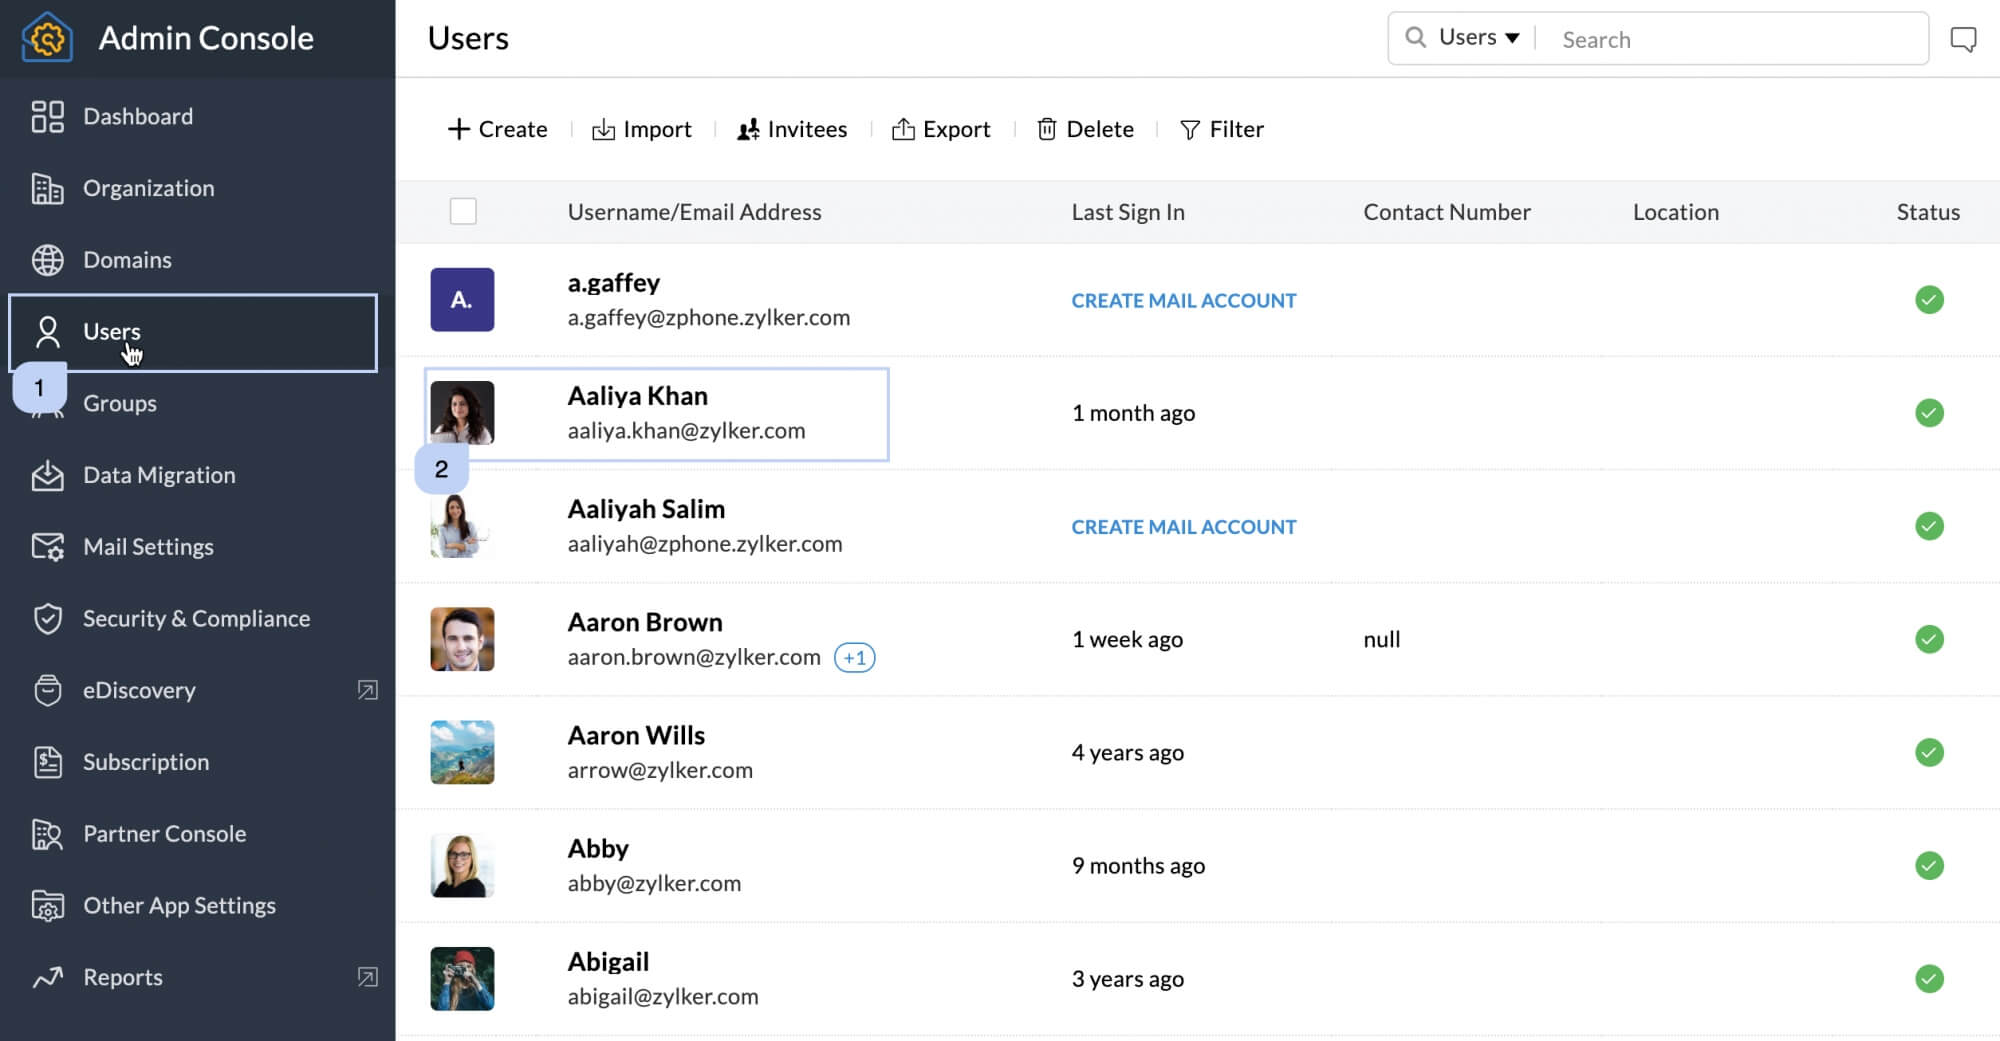
- Navigate to the Users section in the left pane. The users' personal information appears which is the Default View.
- To view the users' storage information, hover over Users and select Storage View. You can see the users' storage information.
- Clicking on Summary will display plan names, the total license count and the used and available no. of licenses.
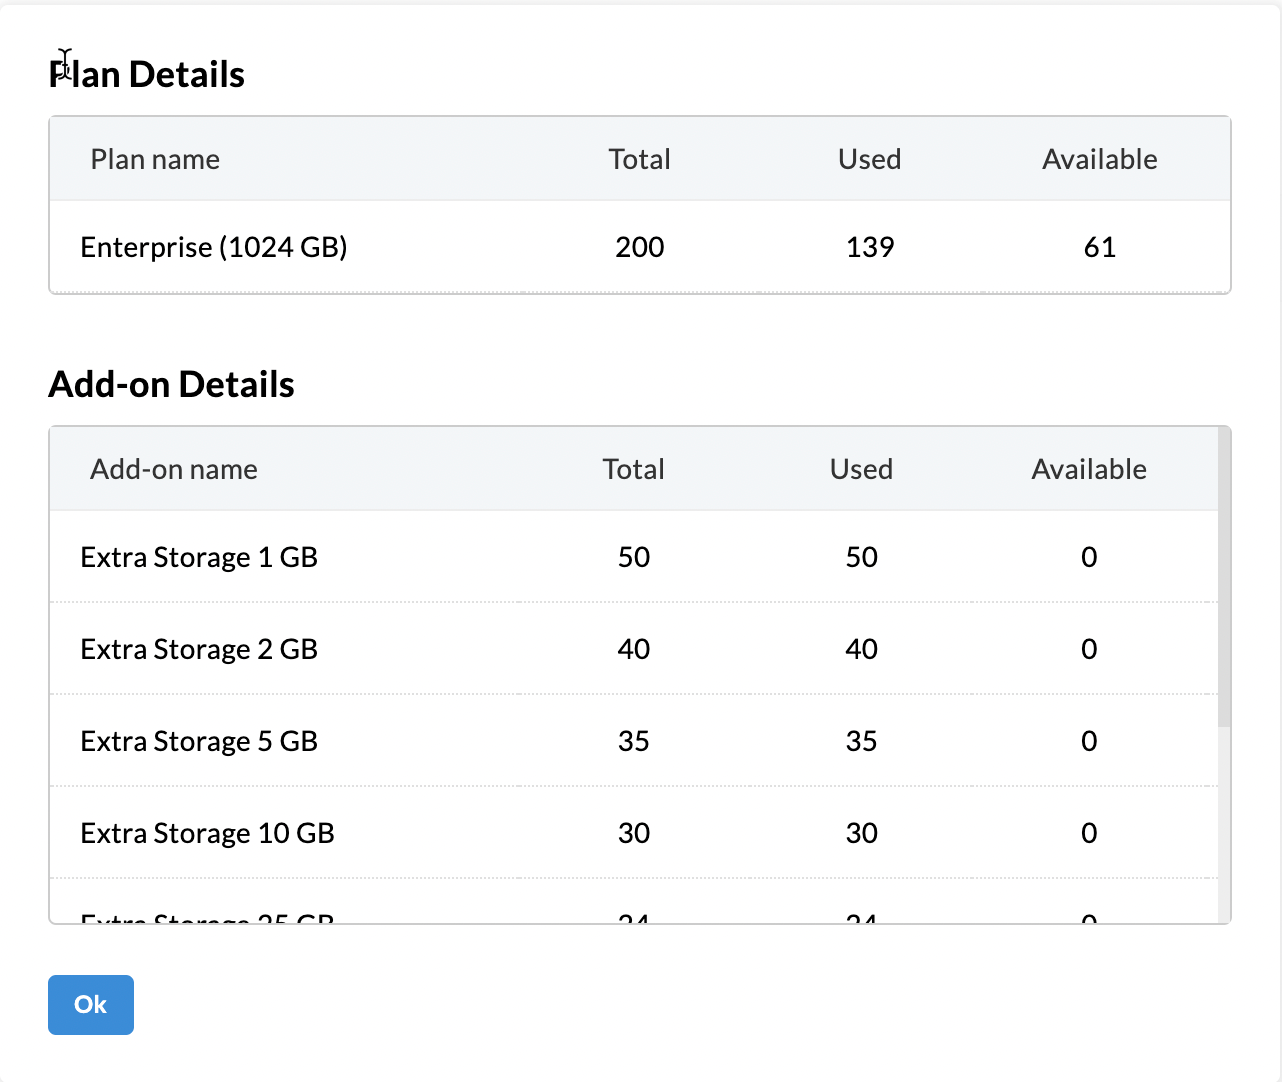
Learn more about User summary report under Admin Reports in Zoho Mail Admin Console.
How to filter users by role, status, or domain in Zoho Mail
Filter option in the Users section allows you to filter out the users based on their roles such as Super admin, admin, and custom admin, user type such as active, inactive, blocked, and expired users. You can even filter users based on their Date of Expiry and Domain name. With the filter option, you can view users based on the desired category and perform necessary action.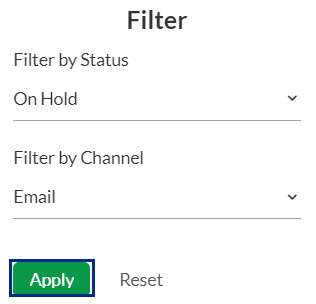
Explore the role-based summary report under Admin Reports.
Manage the columns displayed in the Zoho Mail users list
You can customize the columns displayed in the Users section using the Manage columns option. By default, the Name & Email column cannot be removed from the display.
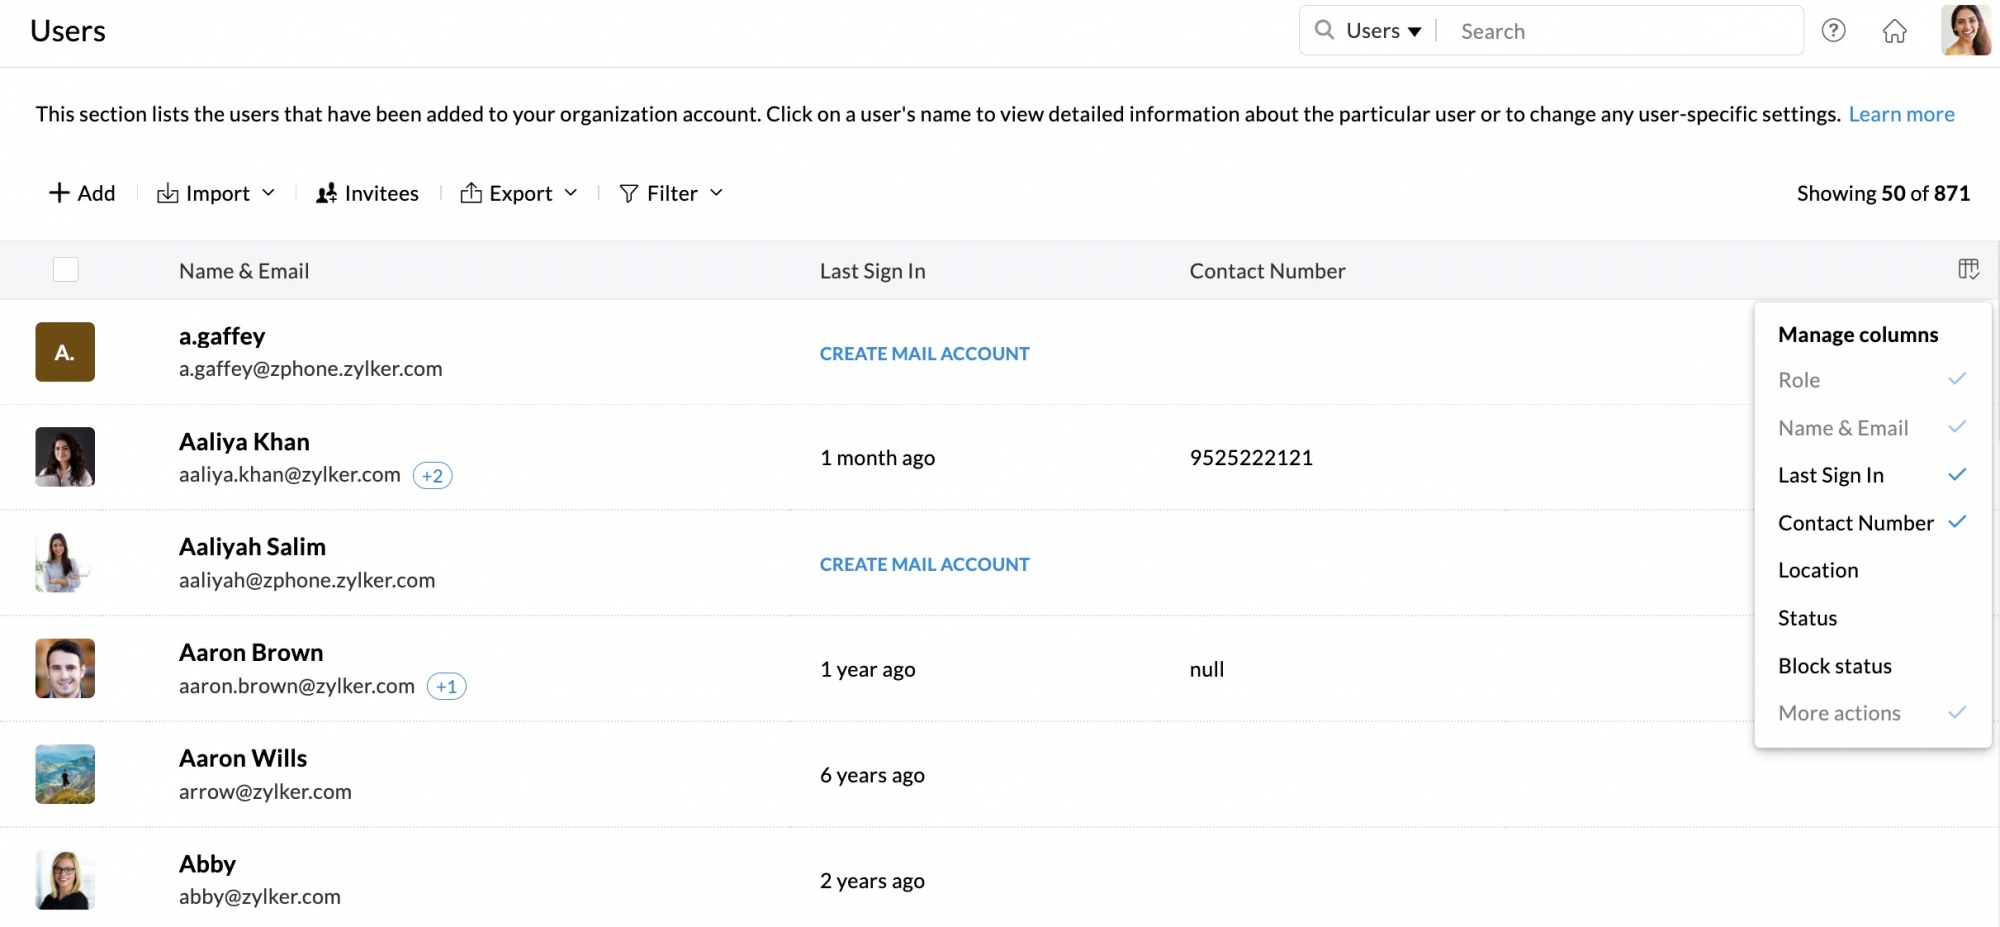
To customize, click on the Manage columns icon on the top right corner and select or deselect the columns from the list:
- Last Sign In
- Contact Number
- Location
- Status
Export user details and email data from Zoho Mail Admin Console
Zoho Mail Admin Console lets admins and Super Admins export user account data from either the Default View or the Storage View in CSV, ZIP, or PST formats, with an option to password-protect the exported file. You can export all users at once, apply filters first, or select specific users before initiating the export.
The default options available for Export are:
- Export email data of users - Exports all emails or date specified emails of the users.
- Export all user details - Exports all users' account details, storage information, and more. However, emails of the users will not be exported.
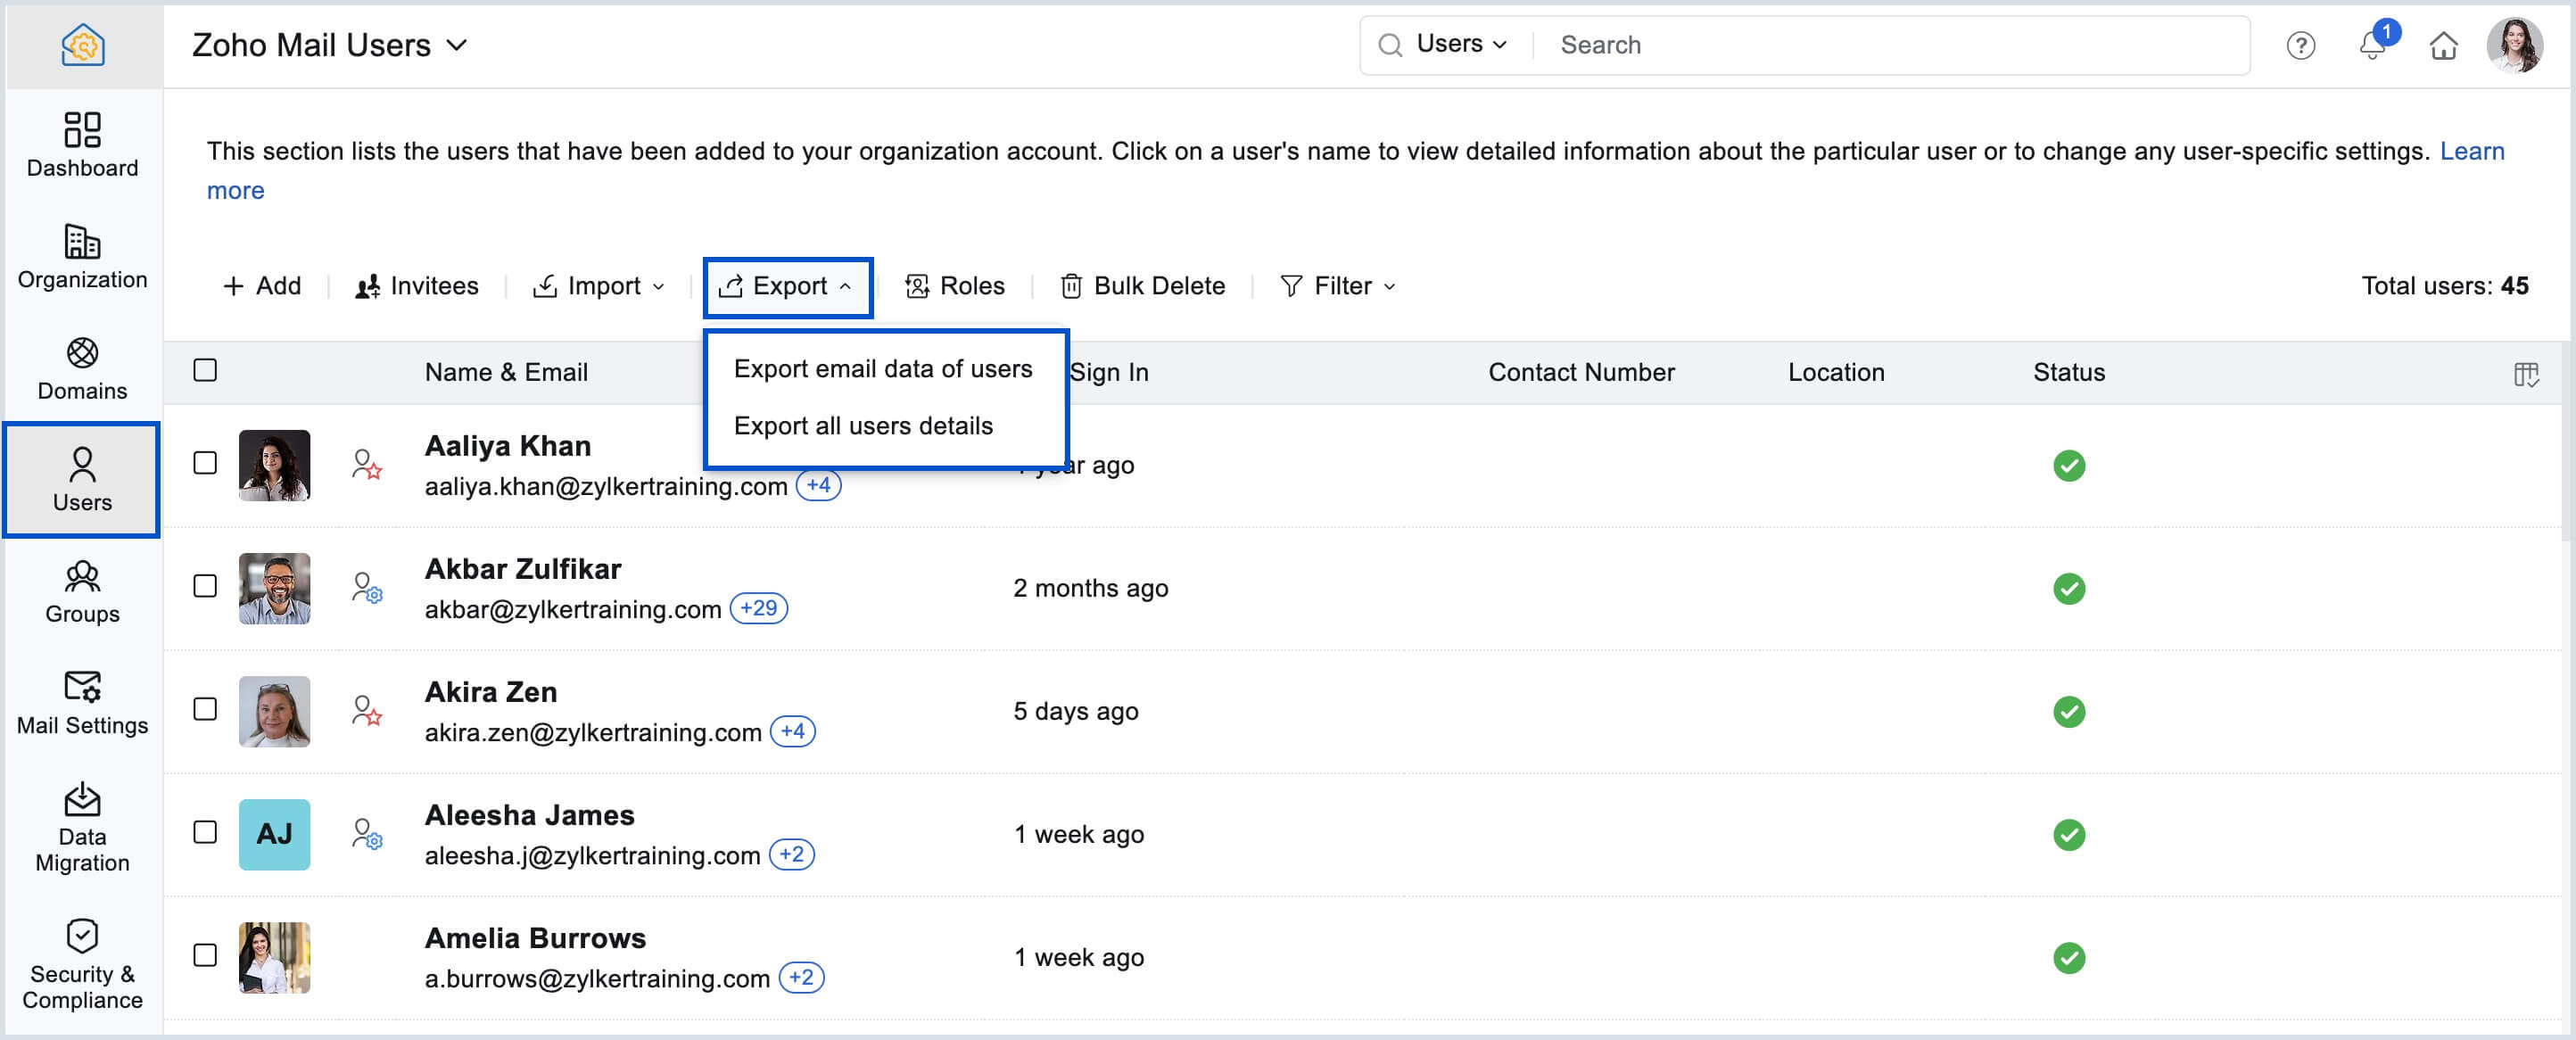
Export email data of users
Export email data of users allows you to export all the emails of the user or emails pertaining to specific period of time. Here you can select the date range for the emails to be exported. You can even enable password protection for the exported file and choose the export file type as Zip or PST format.
On selecting Export email data of users from the drop-down, you will be redirected to Mail Settings > Export Mail Account page. Click on the Schedule new export button to schedule a new export. Refer to the help page for the steps to export email data of users.
Export all user details
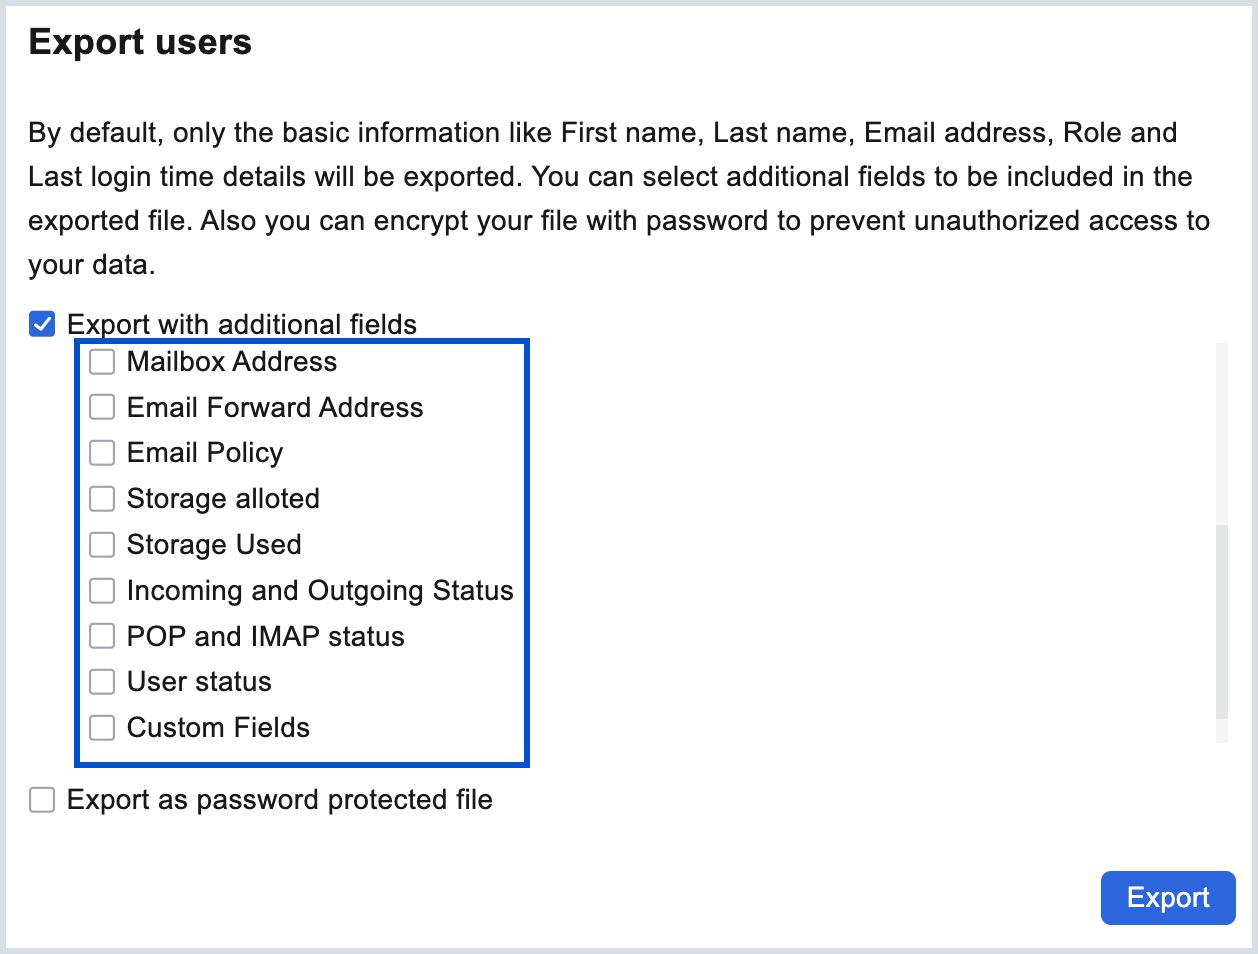
Apart from default user information, Export all users details allows you to include additional user details like storage used, Email aliases, Email Policy, and more. You can enable the option to export your email data as password protected file. Follow the below steps to Export all user details:
- Log in to Zoho Mail Admin Console.
- Navigate to Users section on the left pane.
- Choose either the Default View or Storage View from the Users section.
- Click Export on the top pane and select Export all user details from the drop-down menu.
Select the desired option from the Export users pop-up window.
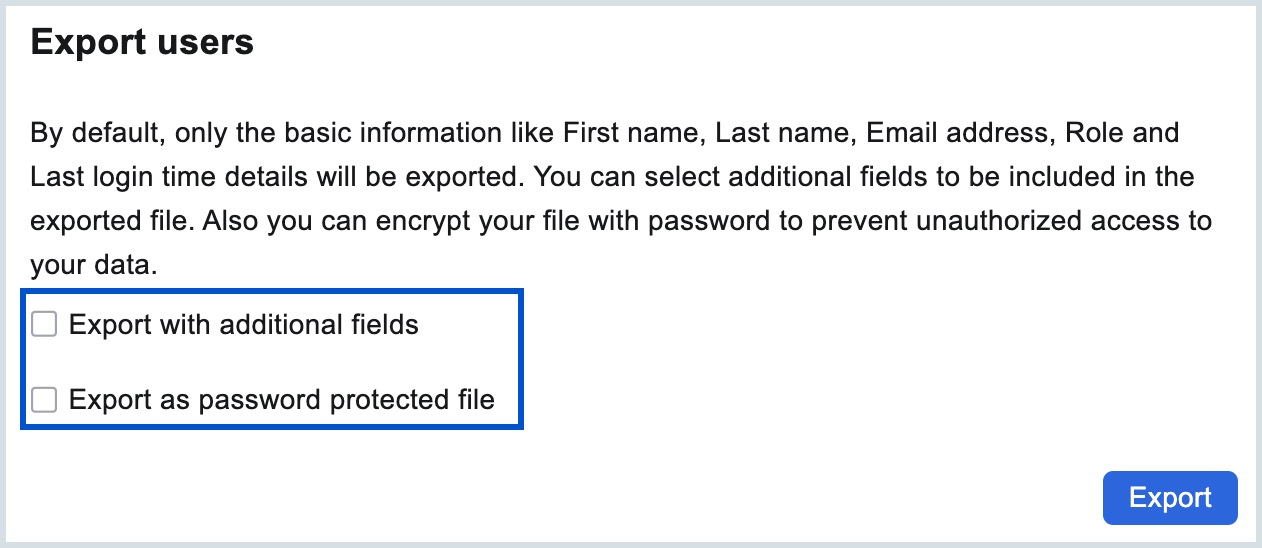
Note:
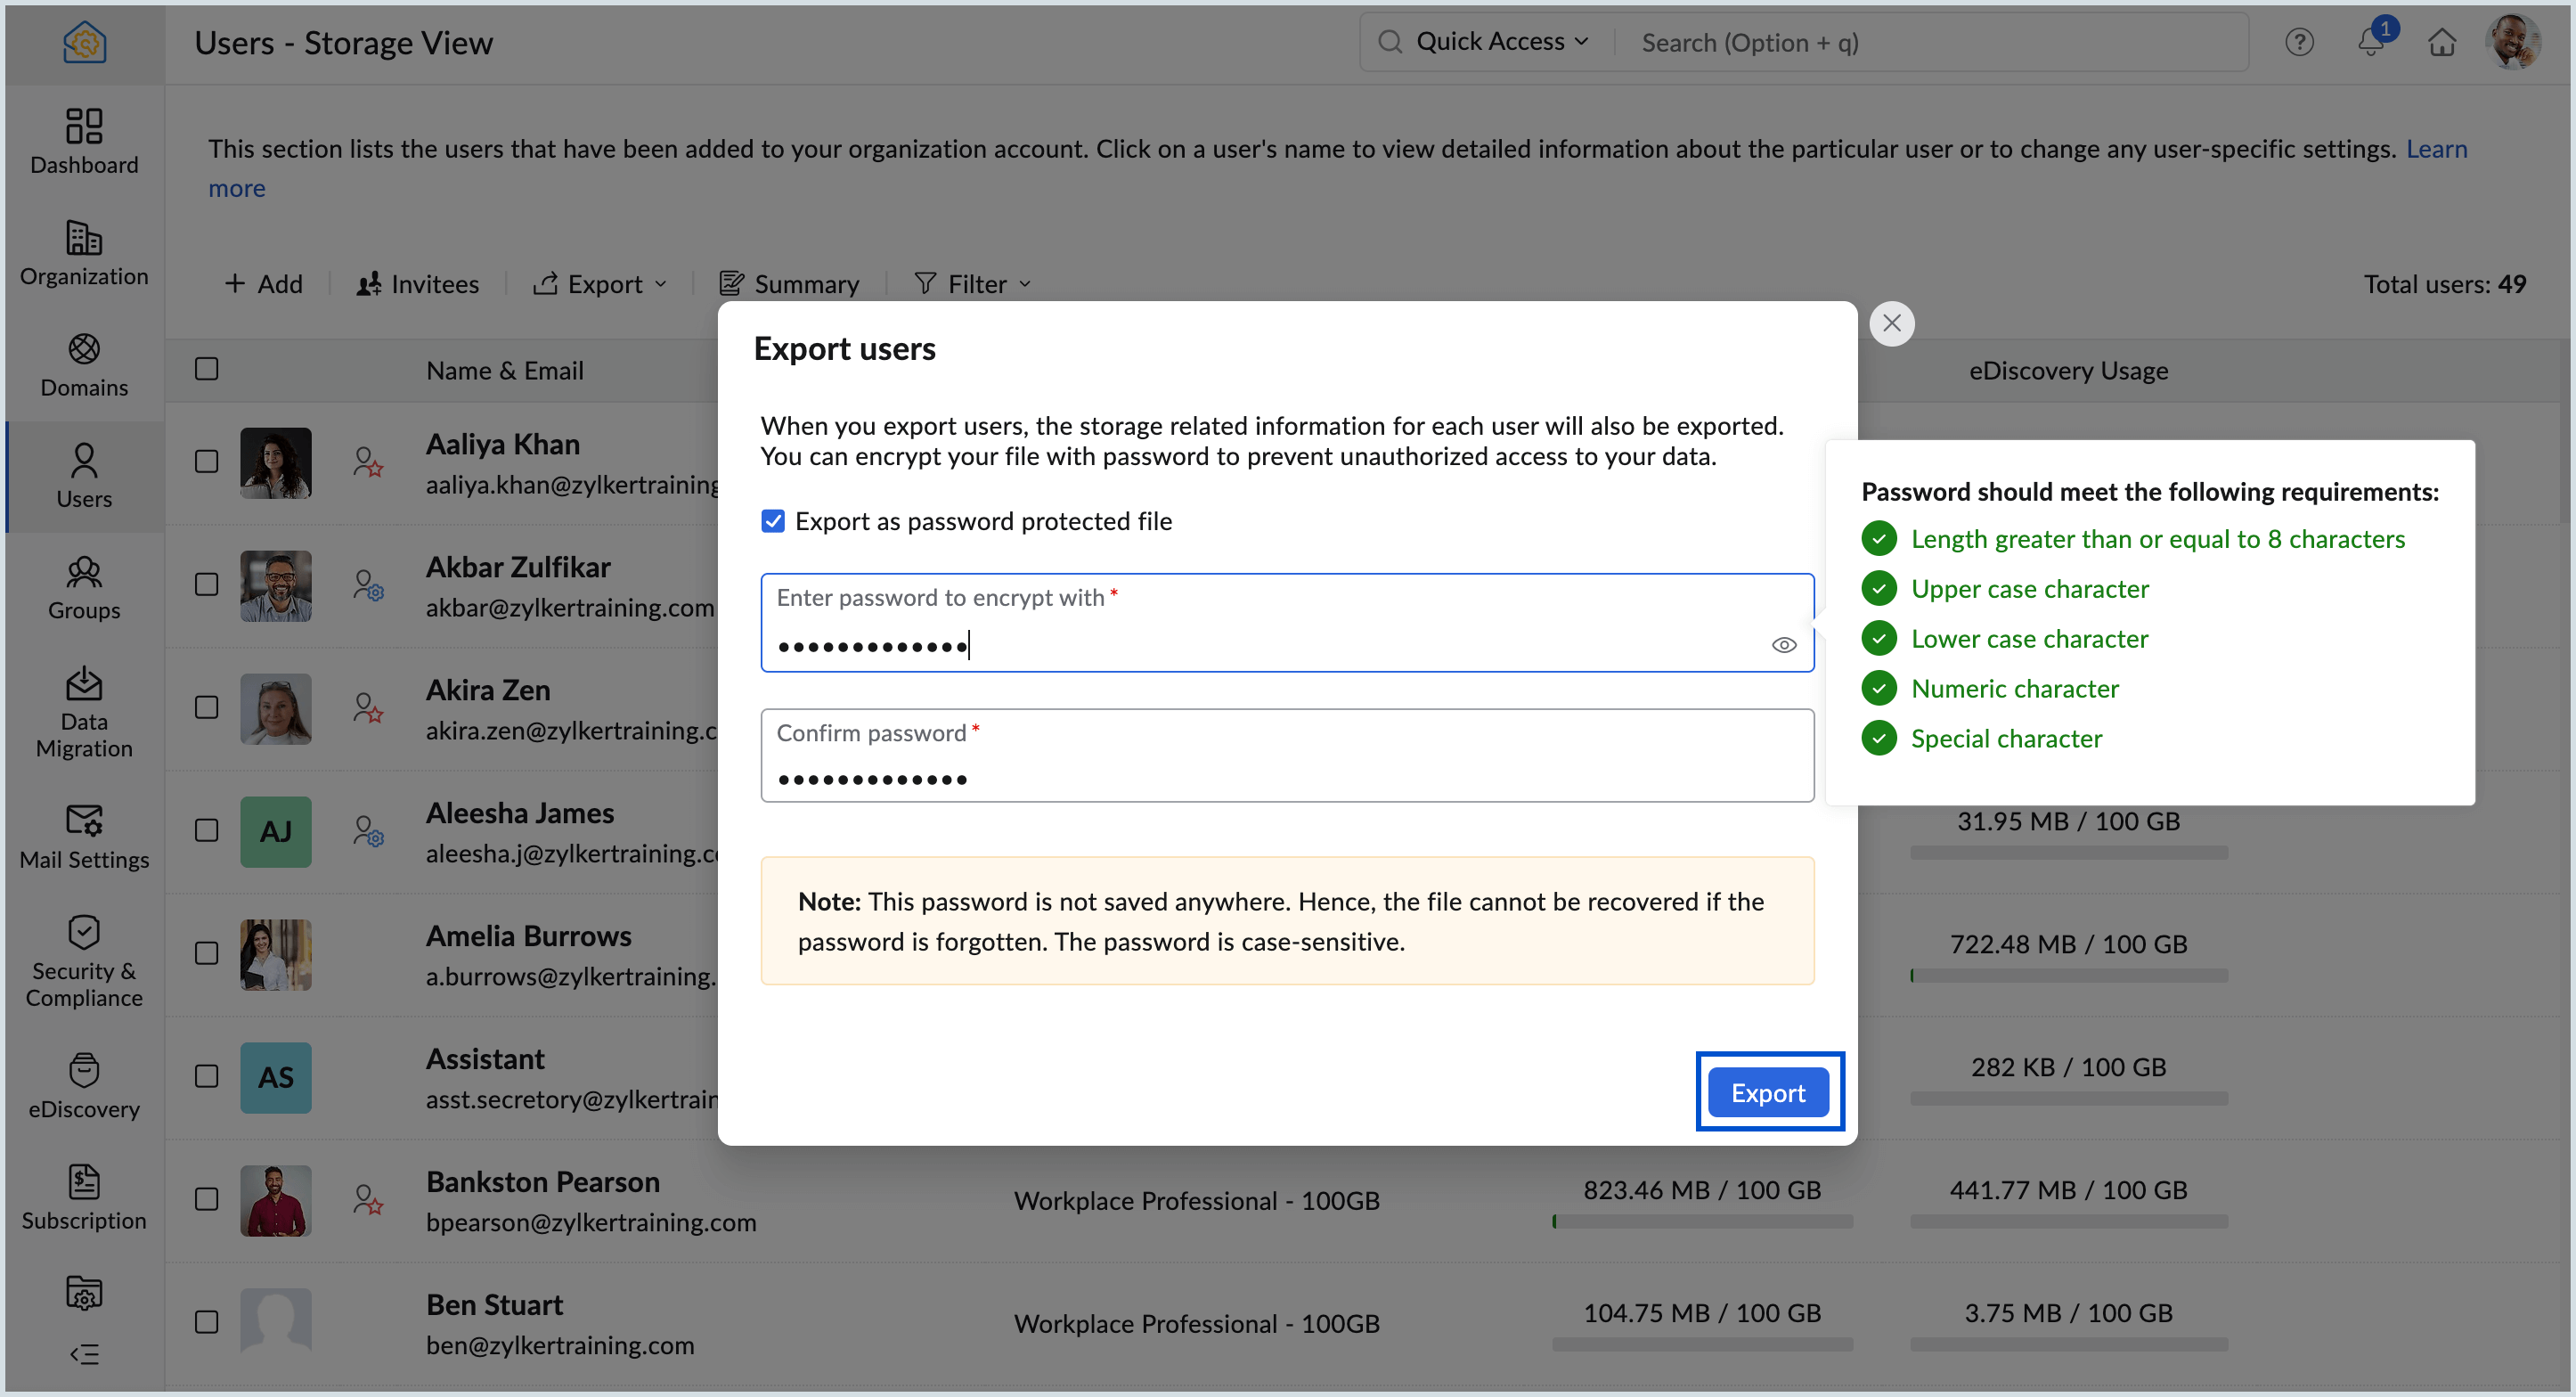
When exporting user data from the Storage View, the export will include only the following columns: First Name, Last Name, Email Address, Storage Allotted (in GB), Storage Used (in GB), and Storage Usage Percentage %.
- Export with additional fields allows you to select preferred fields from the list to be exported along with default user details.
- Export as password protected file allows you to set a password for the file to be exported.
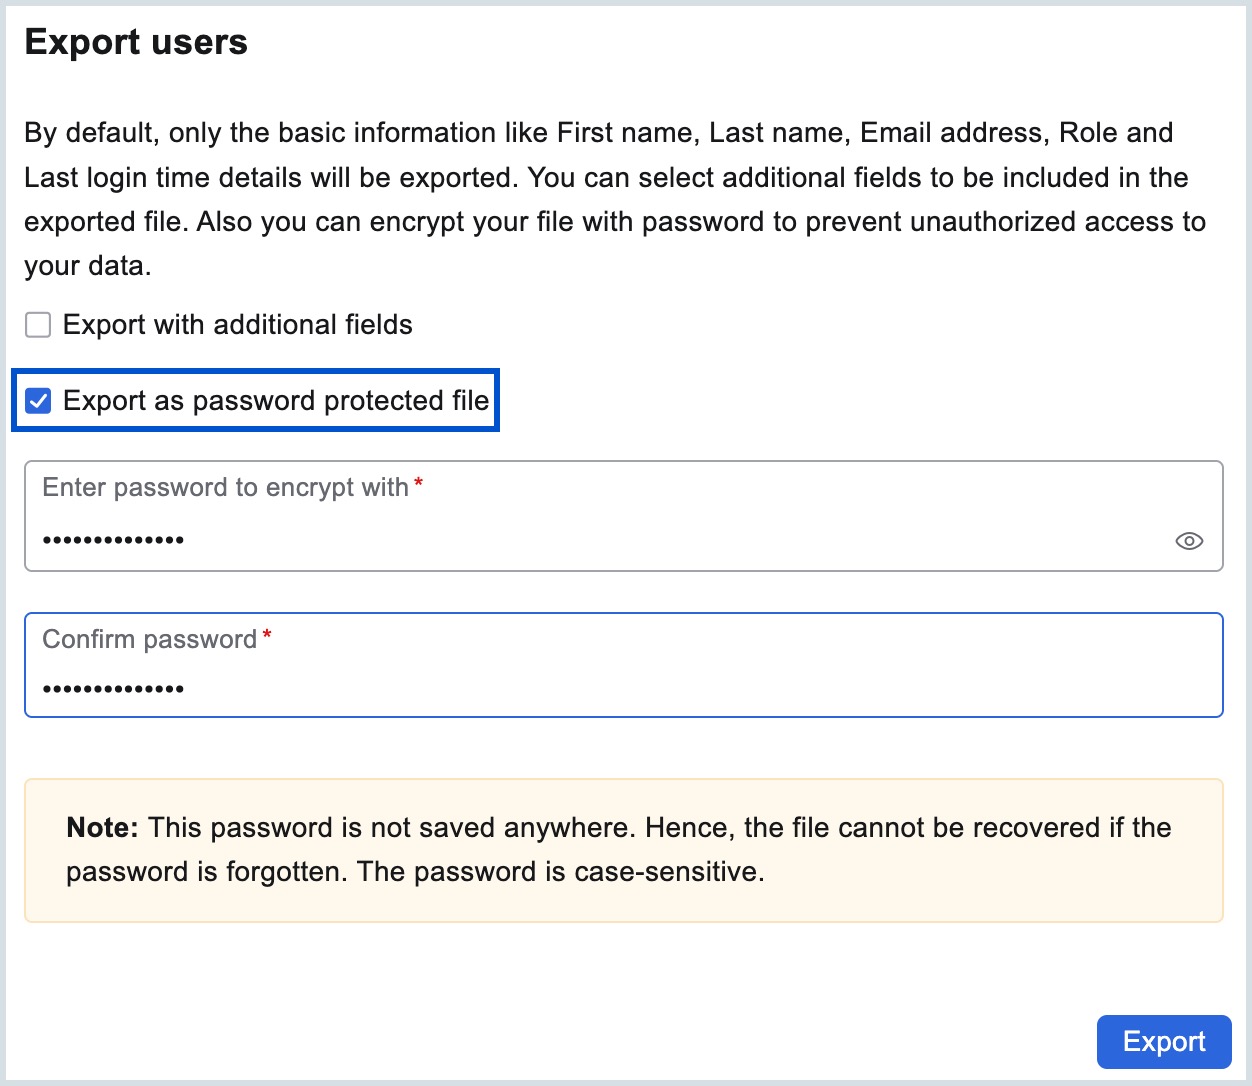
- Finally, click Export.
You have now successfully scheduled your export. Upon completion, an email will be sent to your registered email address with a link to download the exported file. When you click the link, the file will be downloaded in Zip format which is readable as .CSV file.
Additionally, export options are available for filtered and selected users from the list of users displayed.
Export filtered users' details
You can use the filter option from the top menu to select user based on their role, user type, and more. These filtered users can be exported by following the below steps:
- Log in to Zoho Mail Admin Console.
- Navigate to Users section and choose either the Default View or Storage View from the Users section.
- Select Filter option from the top menu.
- Select the desired filter option from the drop-down list. For example: Administrators. All the users with the filtered role or type will be displayed. Here, all users with Administrators role will be displayed.
- Click Export from the top menu and select Export filtered users details from the drop-down.
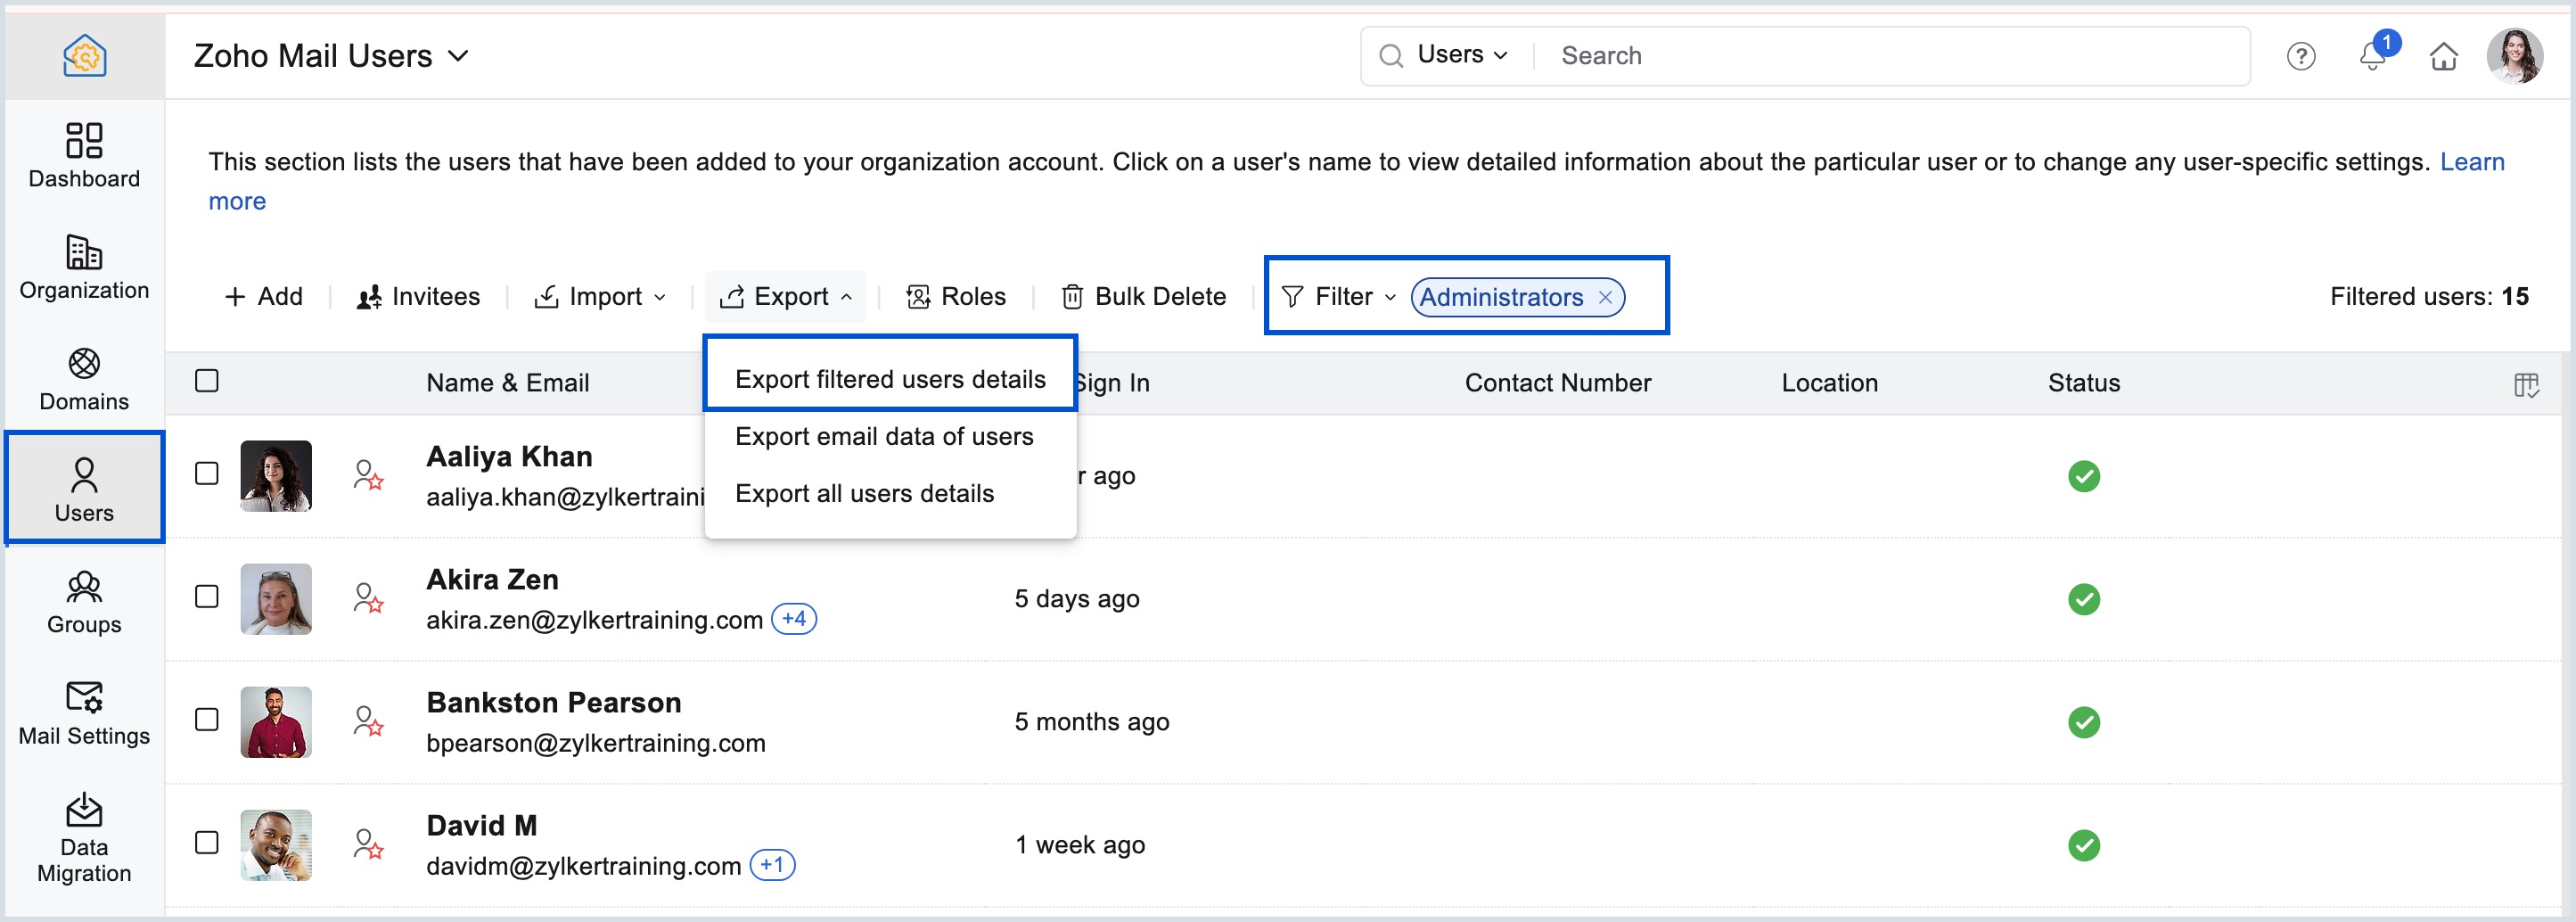
- Follow the steps to export user details that has been filtered out.
Export selected users' details
To export multiple users or more than one user simultaneously, you can select the desired users and export. Follow the below steps to export selected users:
- Log in to Zoho Mail Admin Console.
- Navigate to Users section in the left pane and choose either the Default View or Storage View from the Users section.
- Select the desired users to export.
- Click Export from the top pane and select one of the desired action from the drop-down.
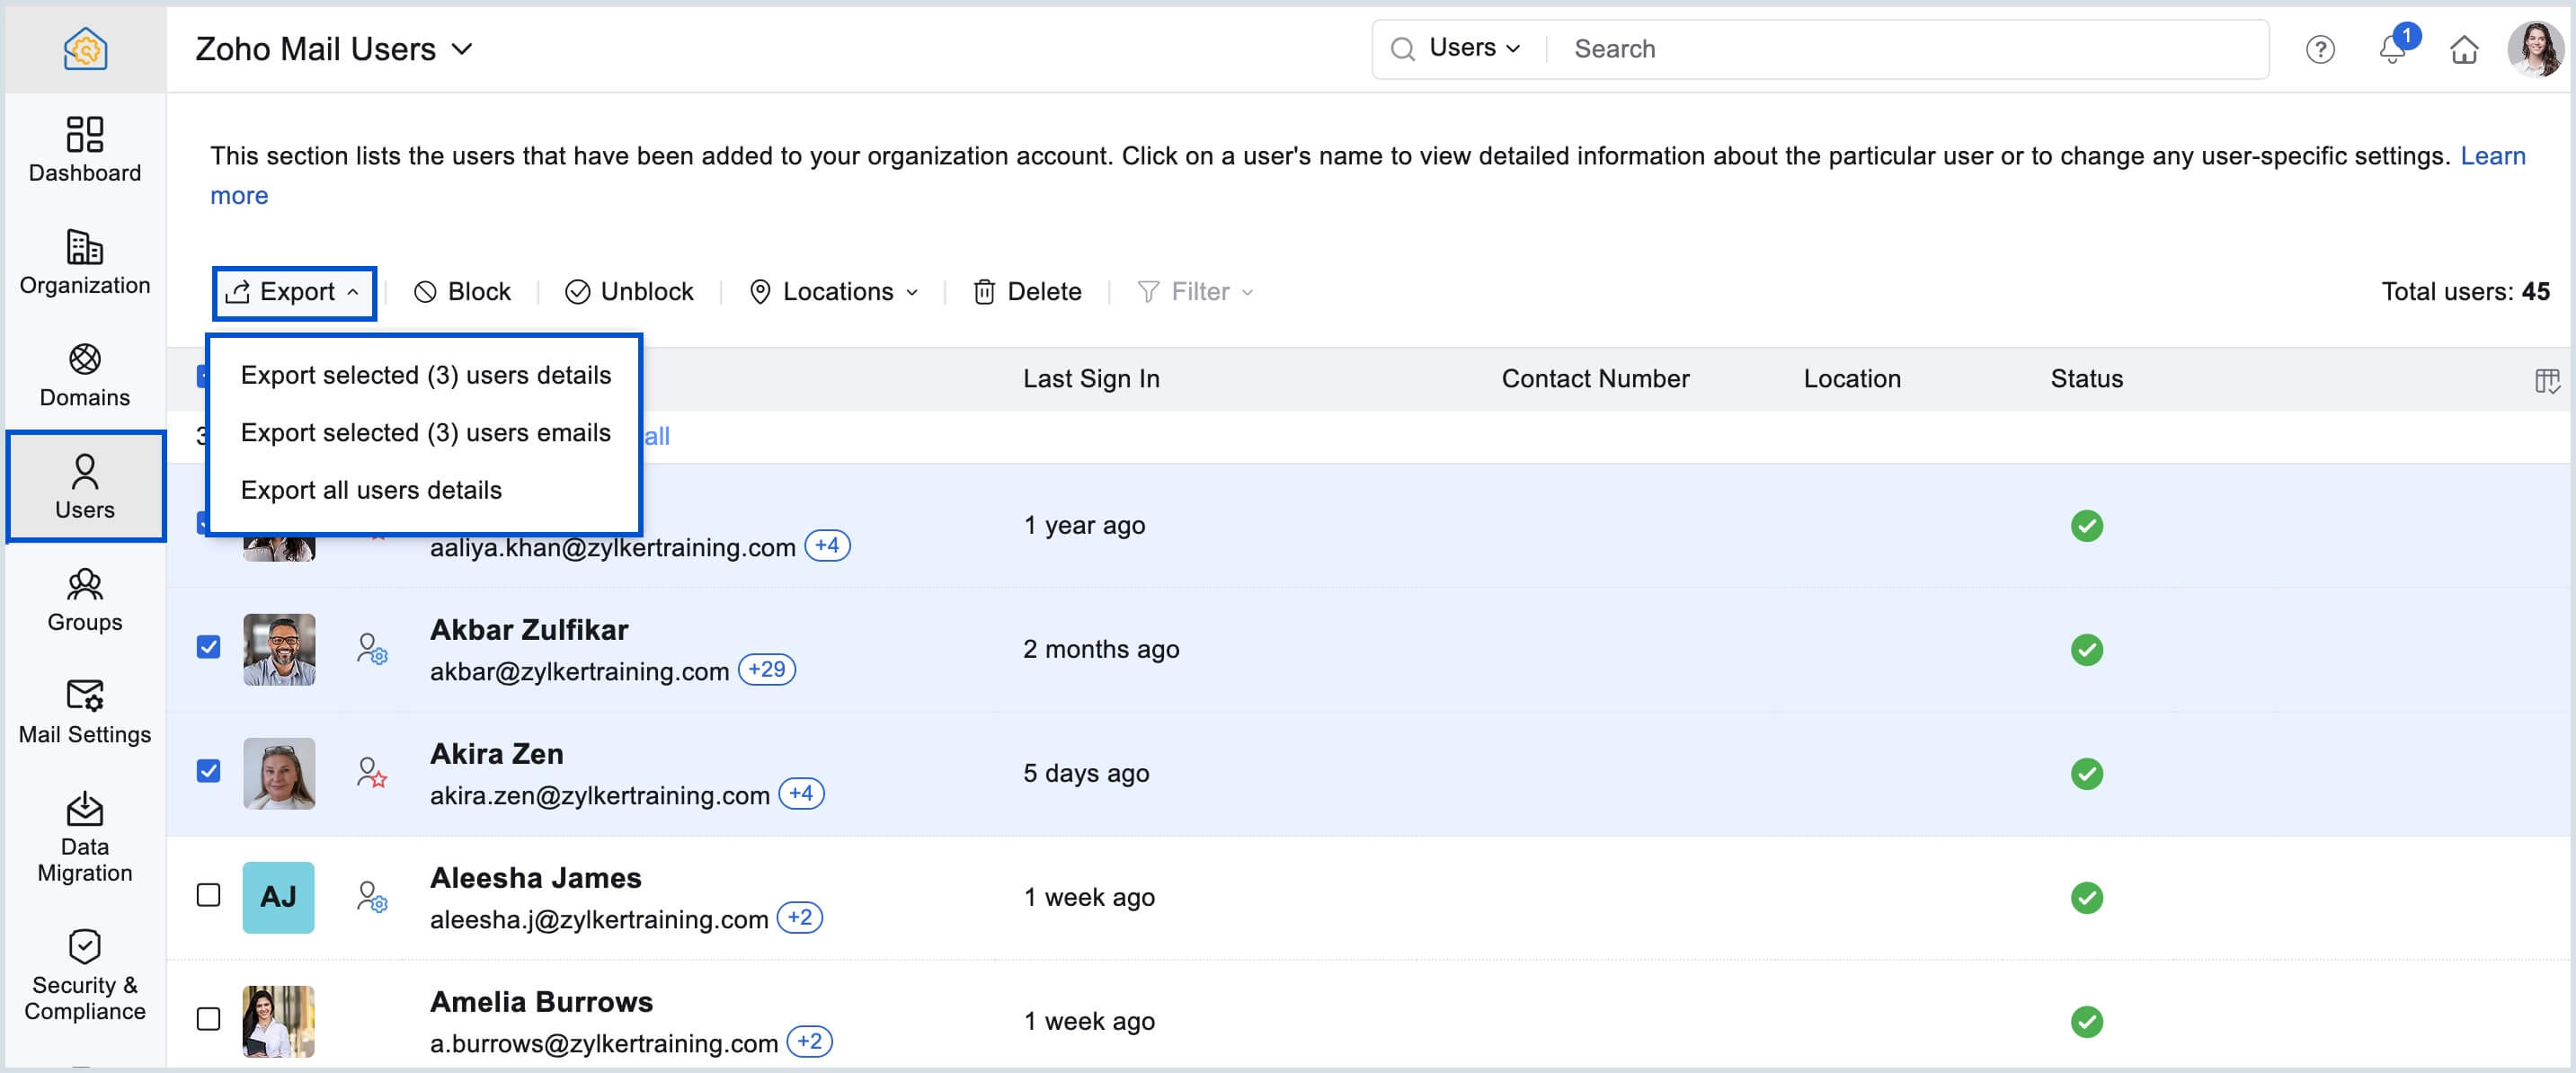
- Export selected (count) users details allows you to export selected users with additional fields and set a password for the exported file. However, the emails of the selected users will not be exported.
- Export selected (count) users emails enables you to export all emails or specified date range emails of the selected users. You can set password for the exported file and choose the format of the file as Zip or PST.
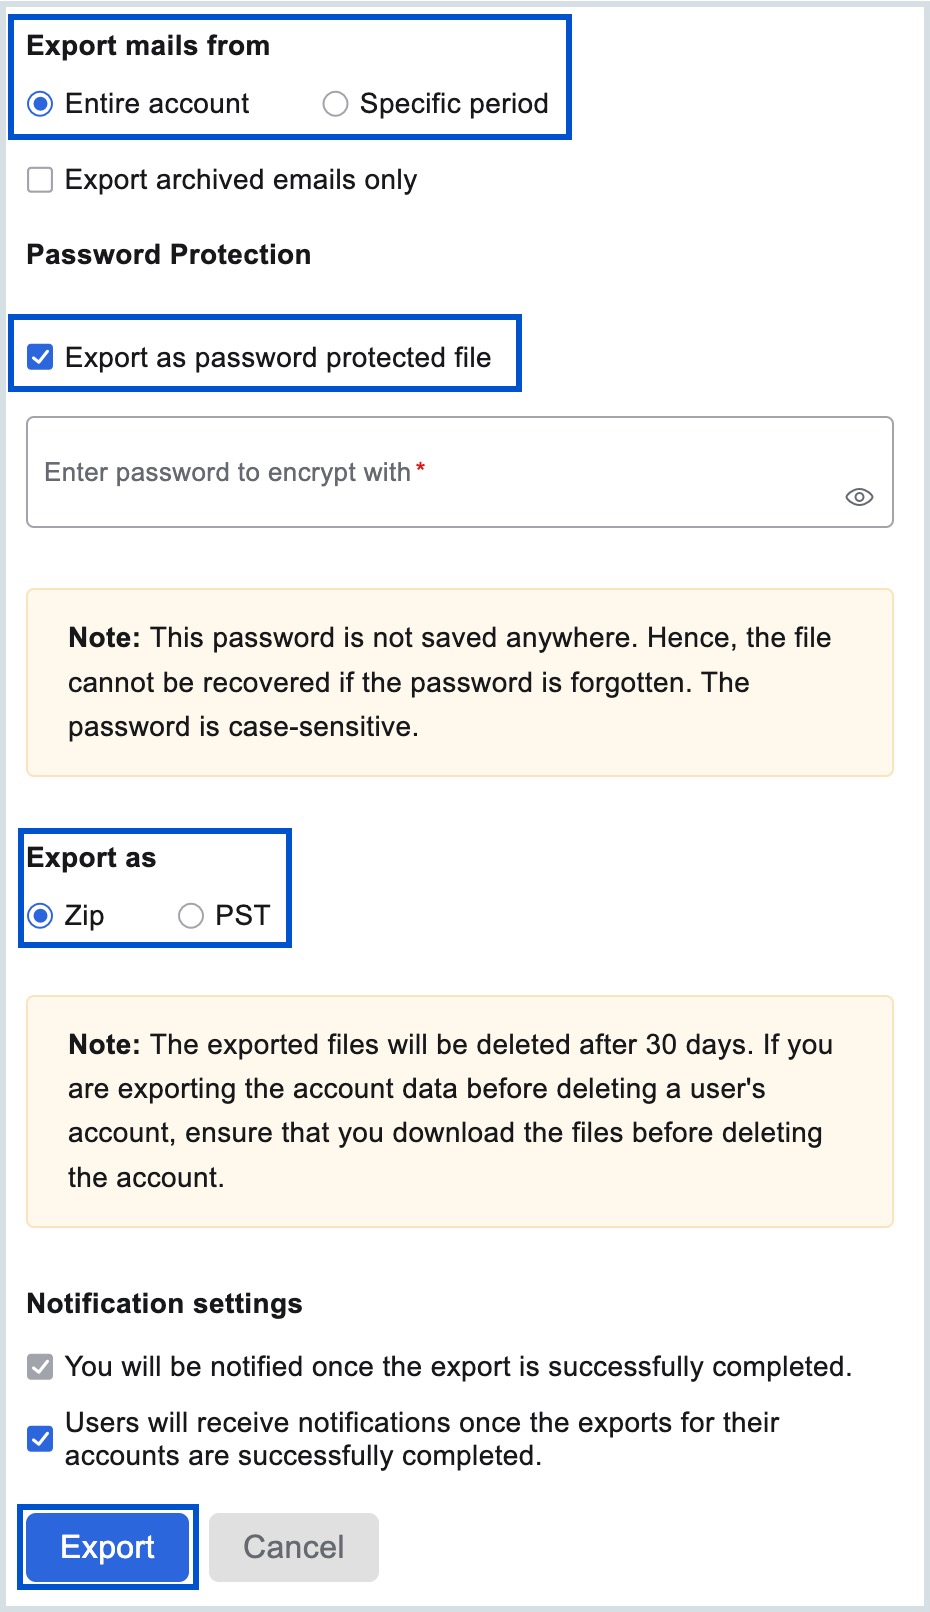
- Once the desired choices are done, click Export to complete the export action.
How to edit user information in Zoho Mail Admin Console
Admins can update any user's personal details, role, or service access (Mail, Calendar, Contacts) at any time from the Users section in the Admin Console. Changes made to the fields under Personal Information are automatically synced to the user's Zoho People profile.
To edit user data, follow these steps:
- Log in to Zoho Mail Admin Console.
- Navigate to Users in the left pane. You will be taken to the user listing with all the users of your organization.
- Select the user whose information you'd like to edit.
- Under Personal Information, click Edit.
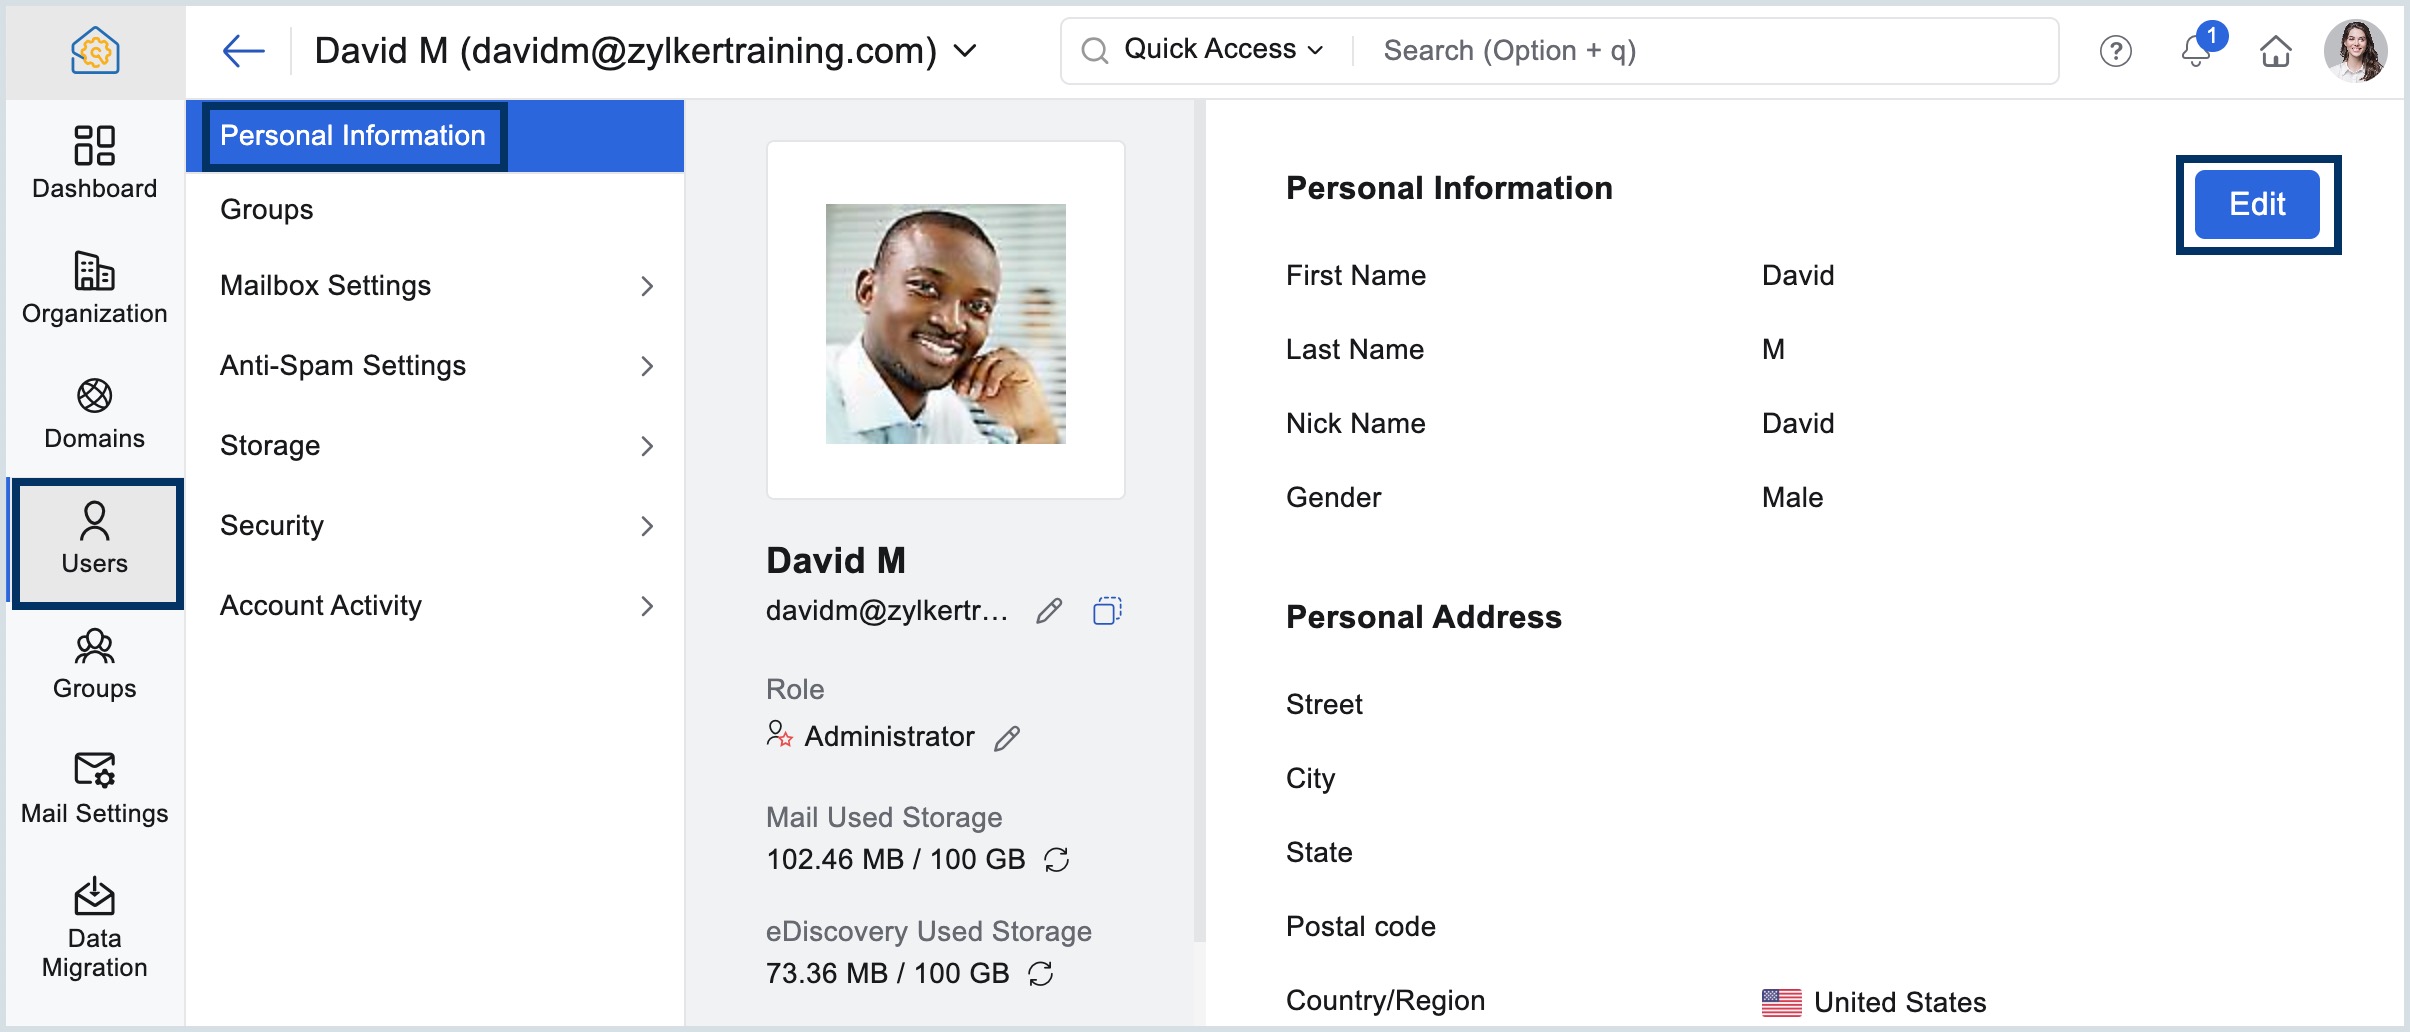
- Update existing details or add new ones.
- Click on Save Changes.
You will also have the option to update the details of the user's Zoho People information or add new details.
- Click on Work Fields under Personal Information.
- Update the existing information or add new details.
- Click on Save Changes. Refer to learn more about adding Zoho People details while creating new users.
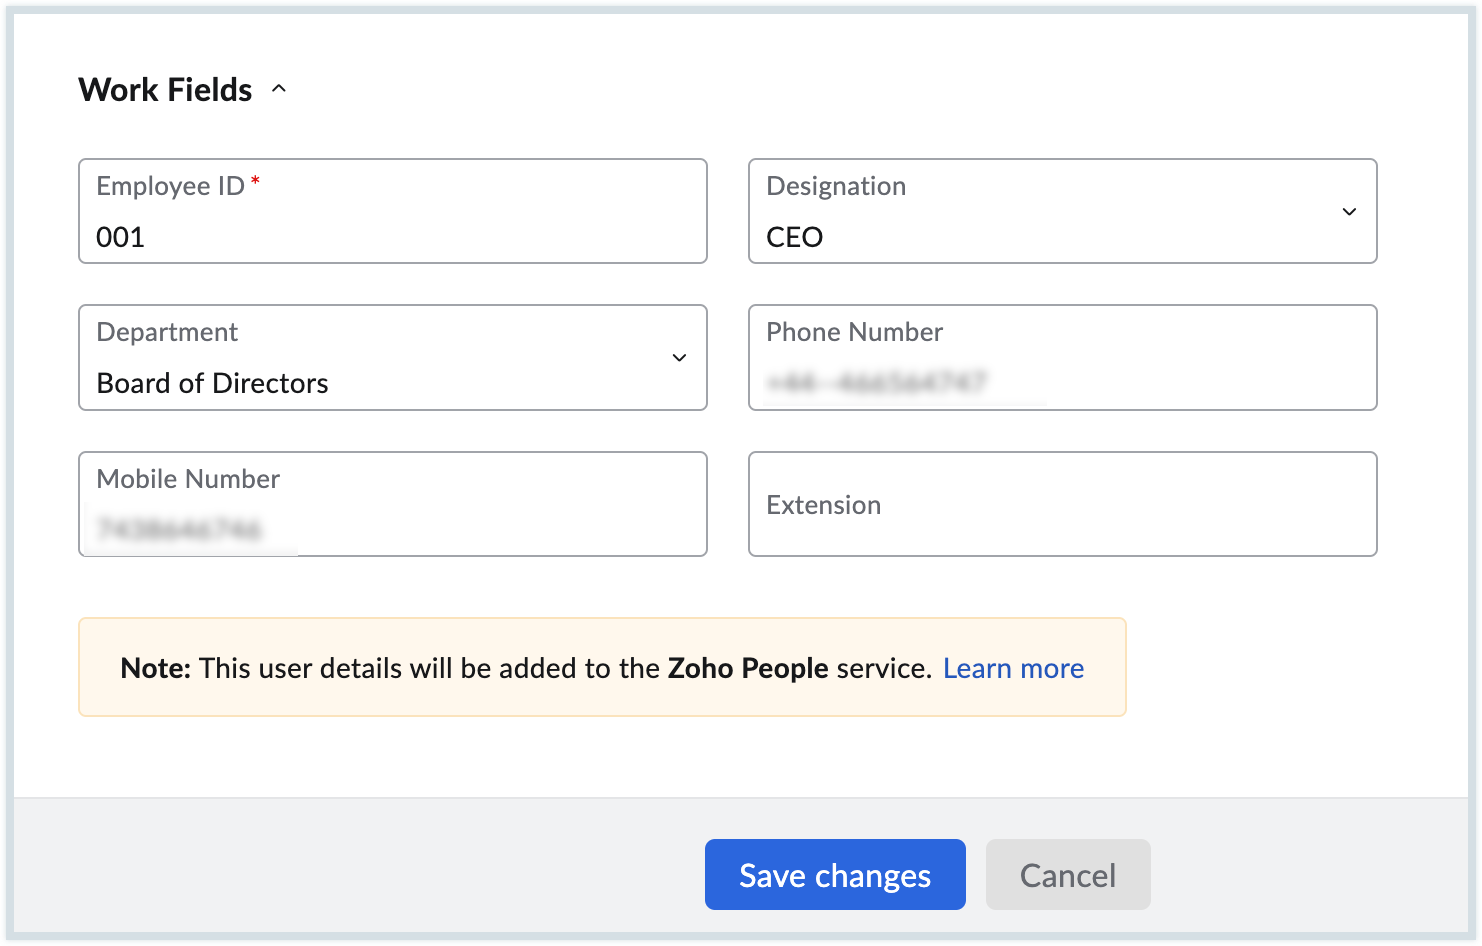
Note:
The Work Fields option will only be available to our paid users.
Can a Zoho Mail Admin block or unblock a user's email access?
The Block option in Zoho Mail Admin Console suspends both incoming and outgoing email access for one or more users without deleting their accounts. Admins can select multiple users at once using checkboxes and apply or Unblock from the top menu in the Users section.
- Log in to Zoho Mail Admin Console.
- Navigate to Users in the left pane. You will be taken to the user listing with all the users of your organization.
- Select the users you would like to Block or Unblock by clicking the checkbox next to their profile picture.
- After selecting the users, click Block or Unblock at the top menu.
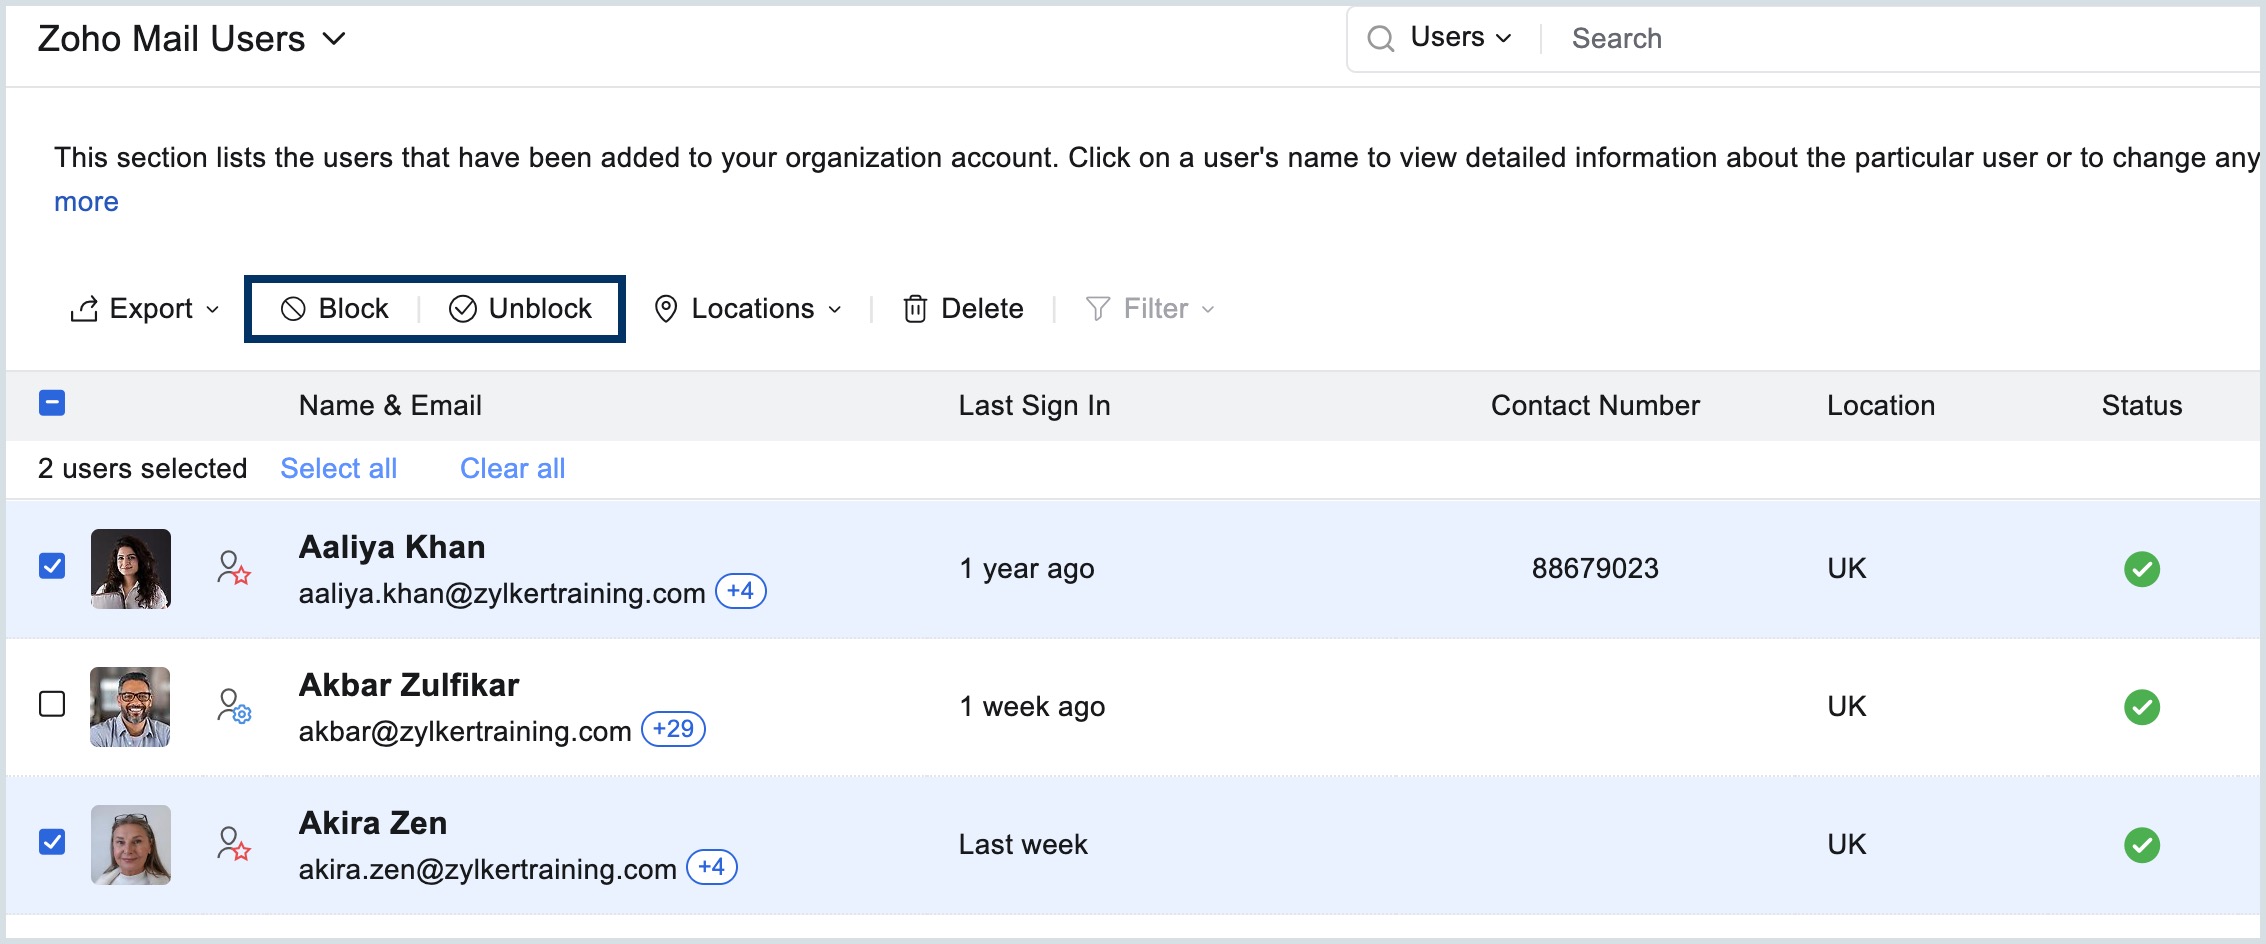
- Confirm your selection in the pop-up window again.
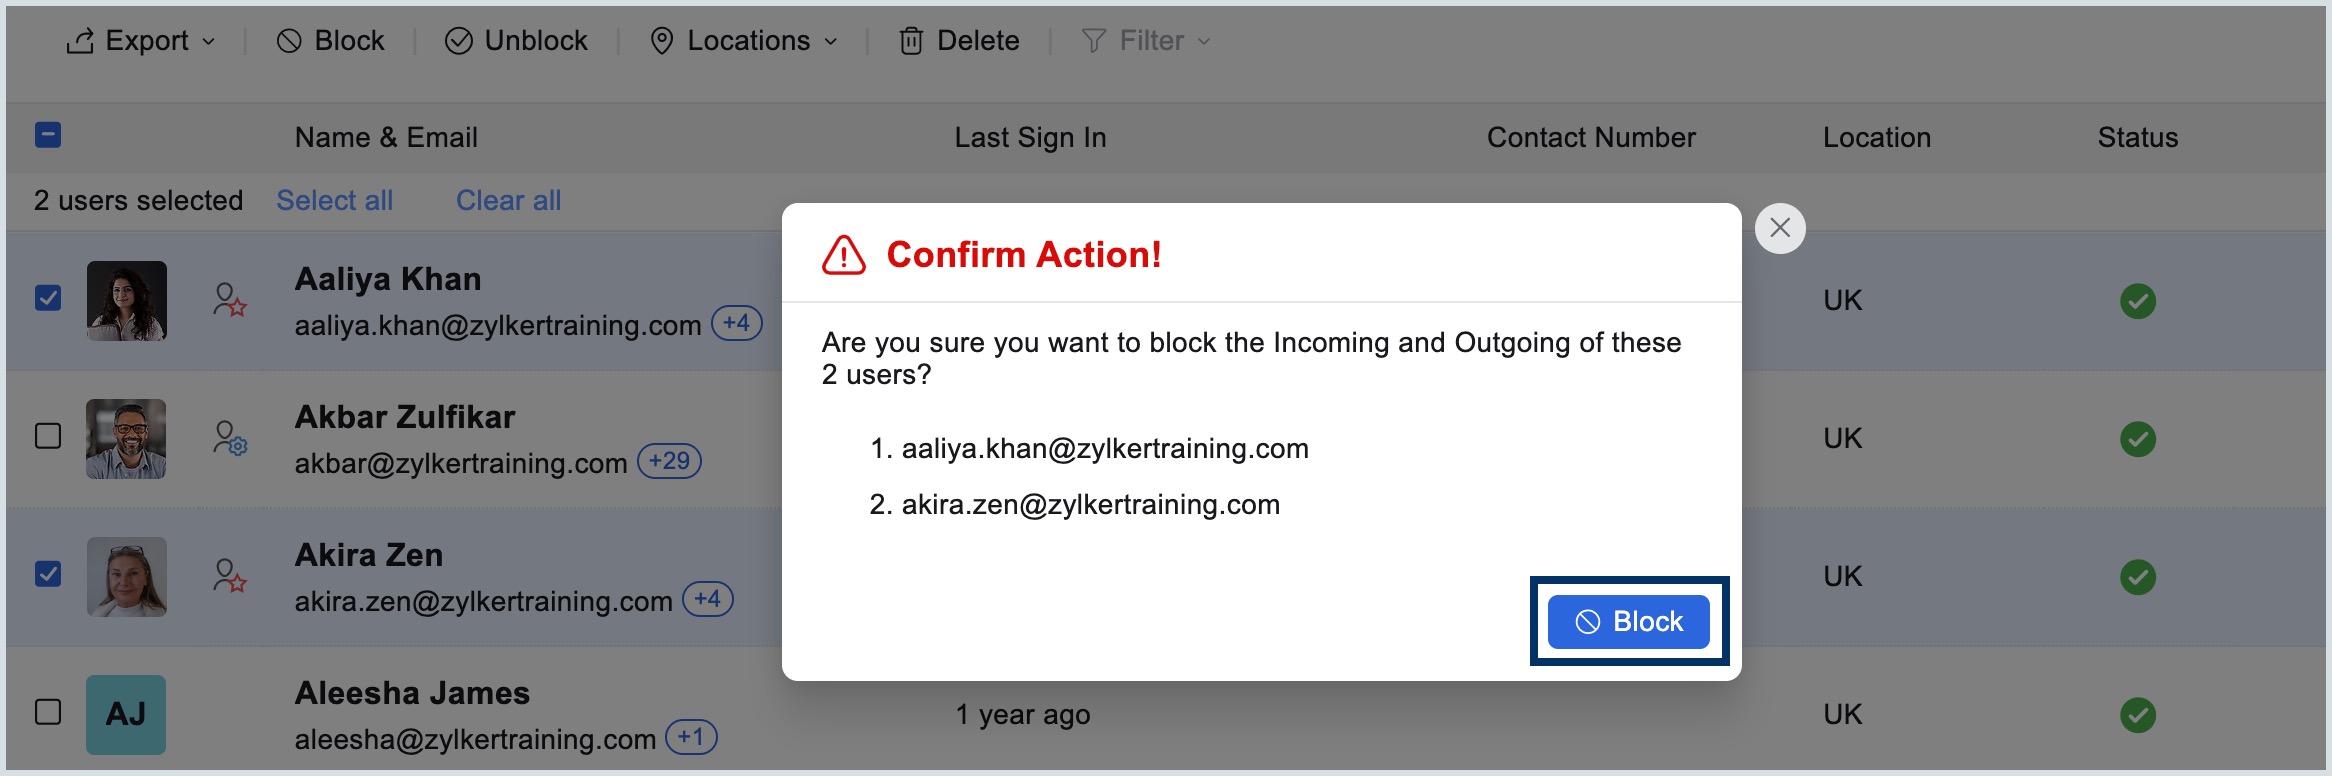
Similarly, you can unblock blocked users by following the same steps and clicking Unblock.
Learn more about Blocked user report under Admin Reports.
How to reactivate a deactivated user account in Zoho Mail
When a user account has been deactivated or marked as inactive, it must be reactivated for the user to regain access to their account. Once reactivated, users can resume their normal activities within their mailbox and access other Zoho applications (such as CRM, Projects, and Invoice). To reactivate a user account, follow these steps:
- Log in to Zoho Mail Admin Console and select Users in the left pane.
- Navigate to the user whose account you want to reactivate.
- Click the Activate icon next to the user's name under the Status column.
- Select the actions you want to resume when reactivating the account, enter the administrator credentials, and click Enable to reactivate the user account.
Note:
When an account is reactivated, any restrictions that were applied during deactivation such as removal from groups, email alias removal, and blocking of email forwarding will not be automatically reinstated. These settings must be manually re-configured or re-added, as they are removed during the deactivation process.
How to deactivate a user account in Zoho Mail Admin Console
Administrators have the option to deactivate user accounts from the Admin console. When a user is deactivated, their access to their mailbox and to all other Zoho applications (including CRM, Projects, and Invoice) is suspended, along with a set of additional restrictions within their mailbox, as chosen by the admin.
Steps to deactivate a user
- Log in to Zoho Mail Admin Console.
- Navigate to Users in the left pane.
- Click the Inactivate icon next to the user whose account you want to deactivate under the Status column.
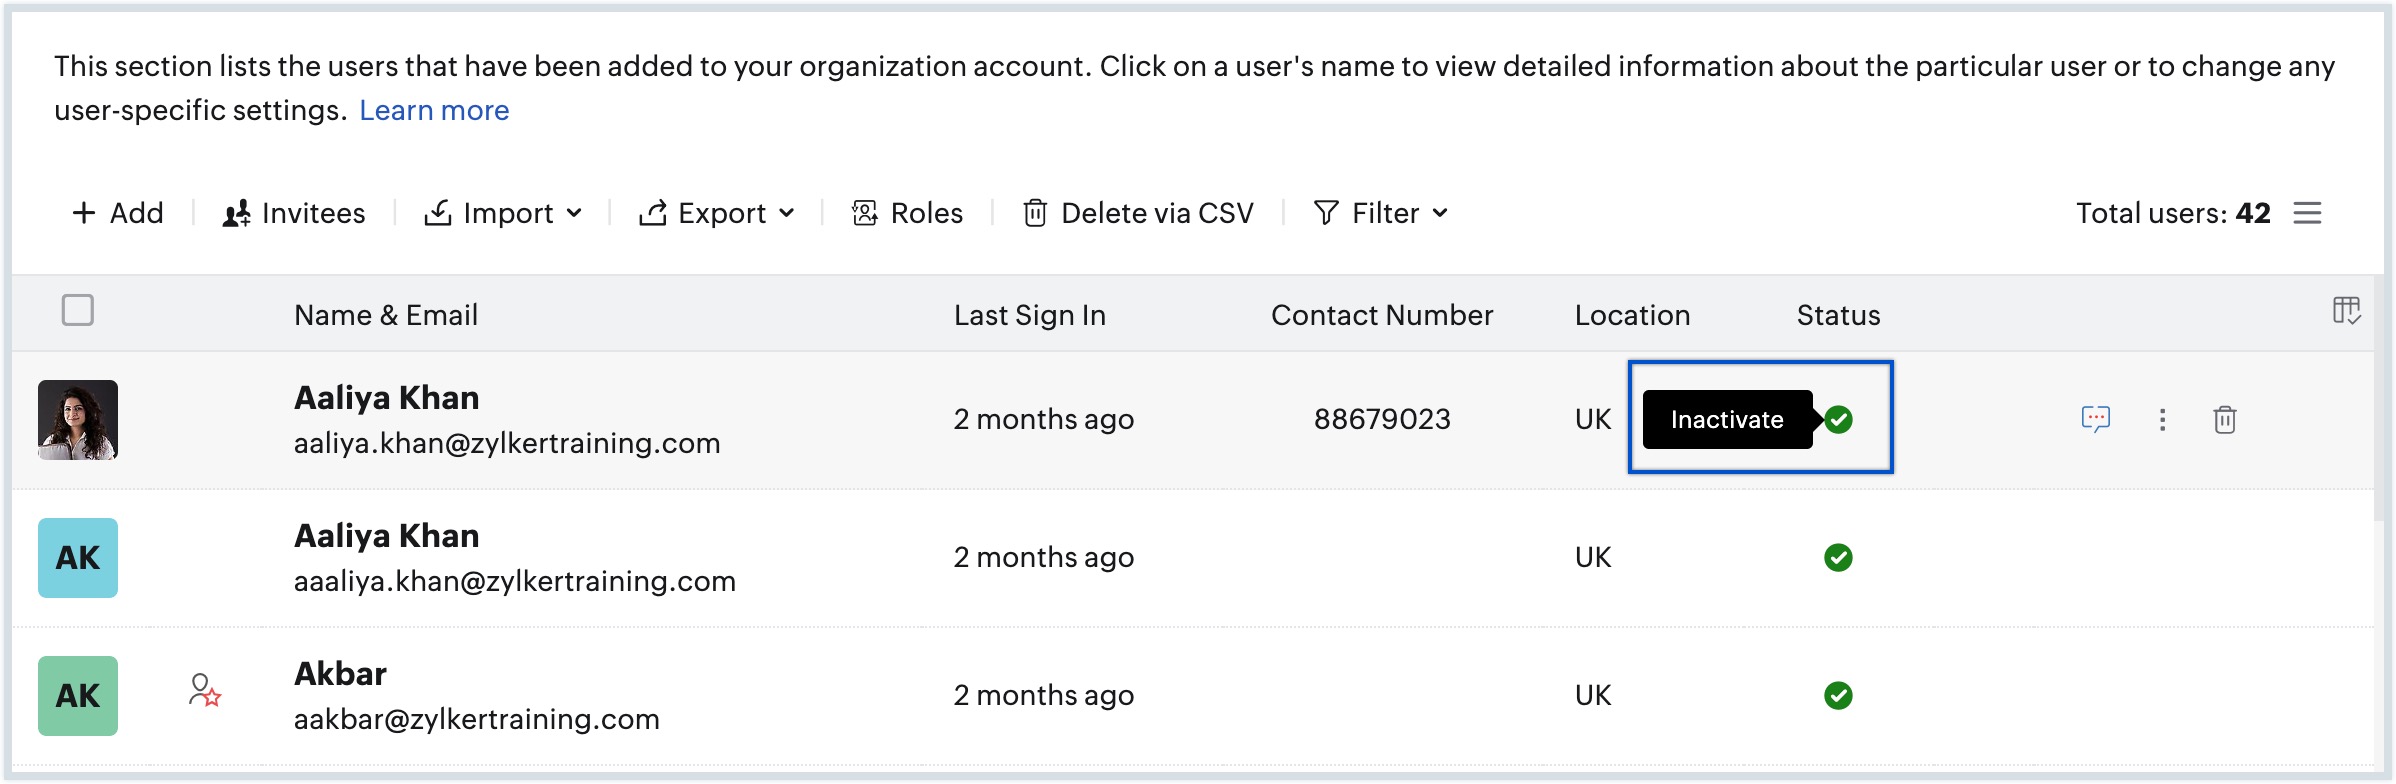
- The following actions will be automatically performed during user account deactivation. If necessary, you can deselect the actions you do not want to perform using the checkboxes in the dialog box that appears.
- Block incoming emails : Block incoming emails: When selected, all incoming emails to the user will be blocked, and a bounce message will be sent to the sender indicating that delivery failed.
- Block email forwarding : When selected, any email forwarding configured for that specific user will be blocked and removed.
- Remove from group : When selected, the user will be removed from any groups they are currently associated with.
- Remove email aliasing : When selected, all alternate email addresses (aliases) associated with the user will be removed.
- Click Disable.
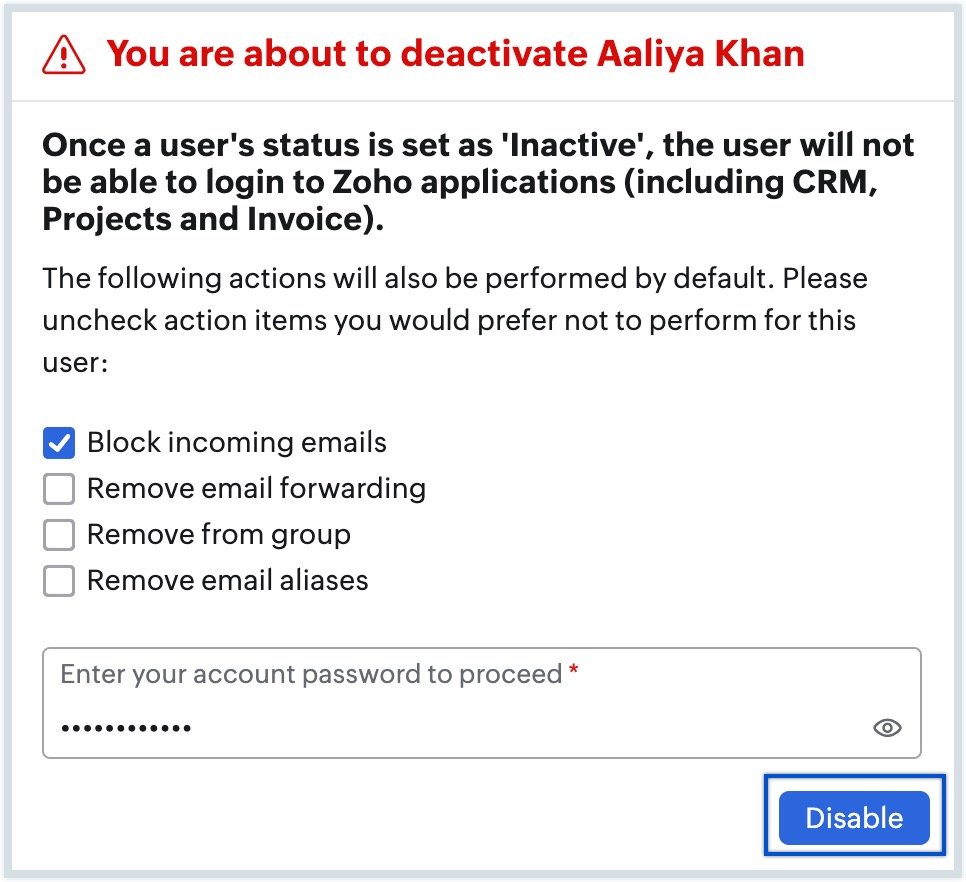
- You'll be prompted to re-authenticate your session to verify your identity for security reasons.
Administrators can also change the status of a user from their User profile page by following the below steps:
- Navigate to Users in the left pane
- Select the user whose account you want to enable or disable.
- Choose Personal Information on the left pane and select Active/Inactive from the Status drop-down.
Once deactivated, the user cannot log in to their account or access any Zoho applications until reactivated by the admin.
Note:
- Every time you activate or deactivate a user account, it is mandatory to re-authenticate your session using the MFA (Multi-Factor Authentication) method configured on your account for security purposes.
- If you do not have MFA configured for your account, you will be prompted to re-authenticate your session using your account password in a new tab or window, depending on your browser preference.
What happens when a Zoho Mail user account expires?
A user account is said to be expired when the account has reached the pre-defined date set by the organization's admin. This is often used for temporary employees, contractors or interns who will need access to the account for a limited period of time. This way, the organization's security is intact and minimizes the risk of compromised credentials. After the expiry date, the user account is marked as inactive, where the user loses access to their emails, contacts, or any other resources associated with the account.
Post expiration, the account can either be extended for a certain period of time set by the admin or reactivated permanently. Once reactivated, users can resume their normal activities within their mailbox and access other Zoho applications (such as CRM, Projects, and Invoice). Follow the below mentioned steps to reactivate an expired user account.
Steps to reactivate or extend expiry date of an expired user account
- Log in to Zoho Mail Admin Console.
- Navigate to Users in the left pane.
- Select Expired users from the drop-down of the Filter option in the top pane to filter out the expired user accounts amongst other users.
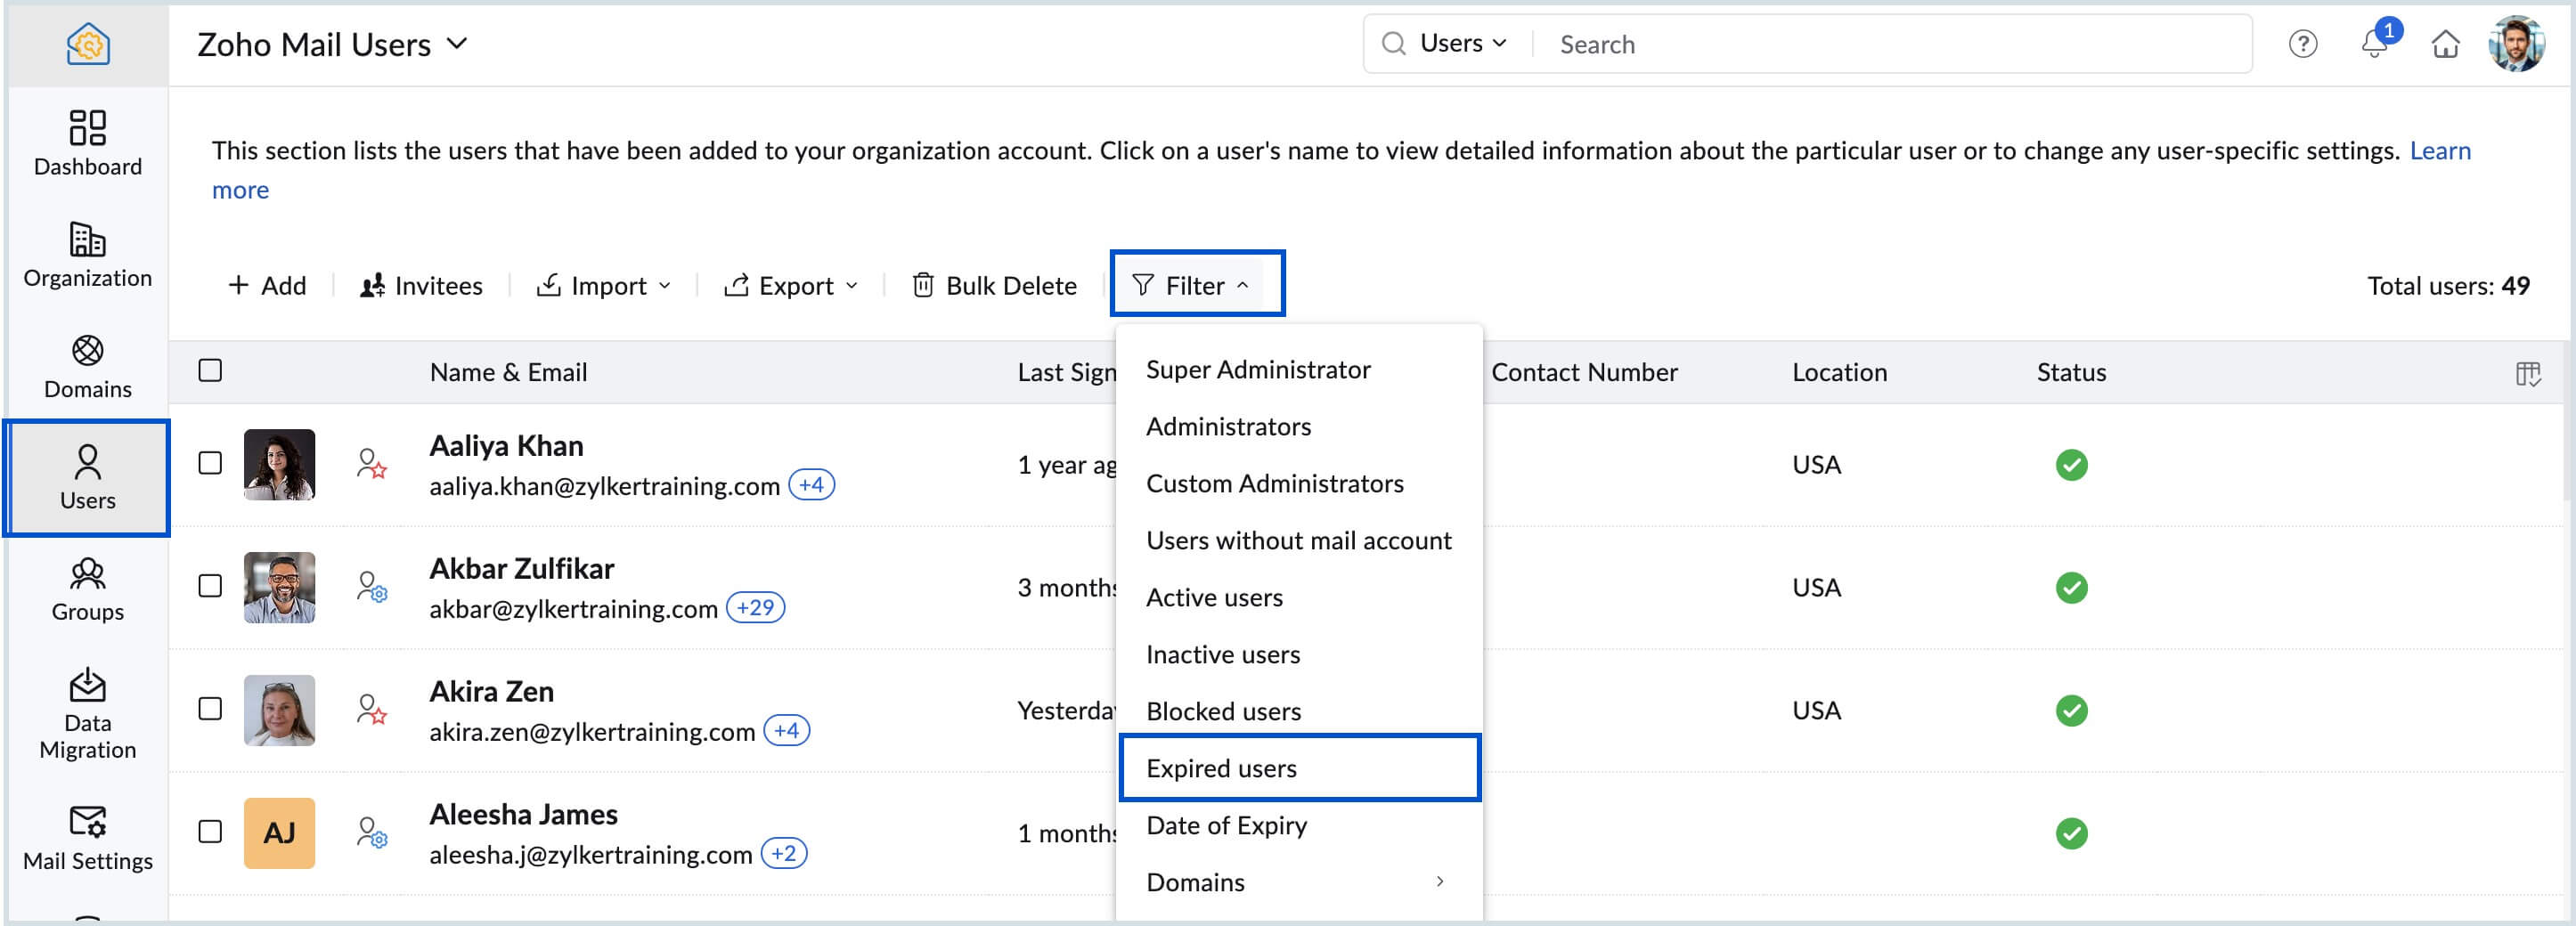
- Click on the user whose account needs to be reactivated from the displayed list.
- Select Auto-expiry on section under the Personal Information of the user.
- You can even access the Reactivate dialog box from the link provided in the top pane.
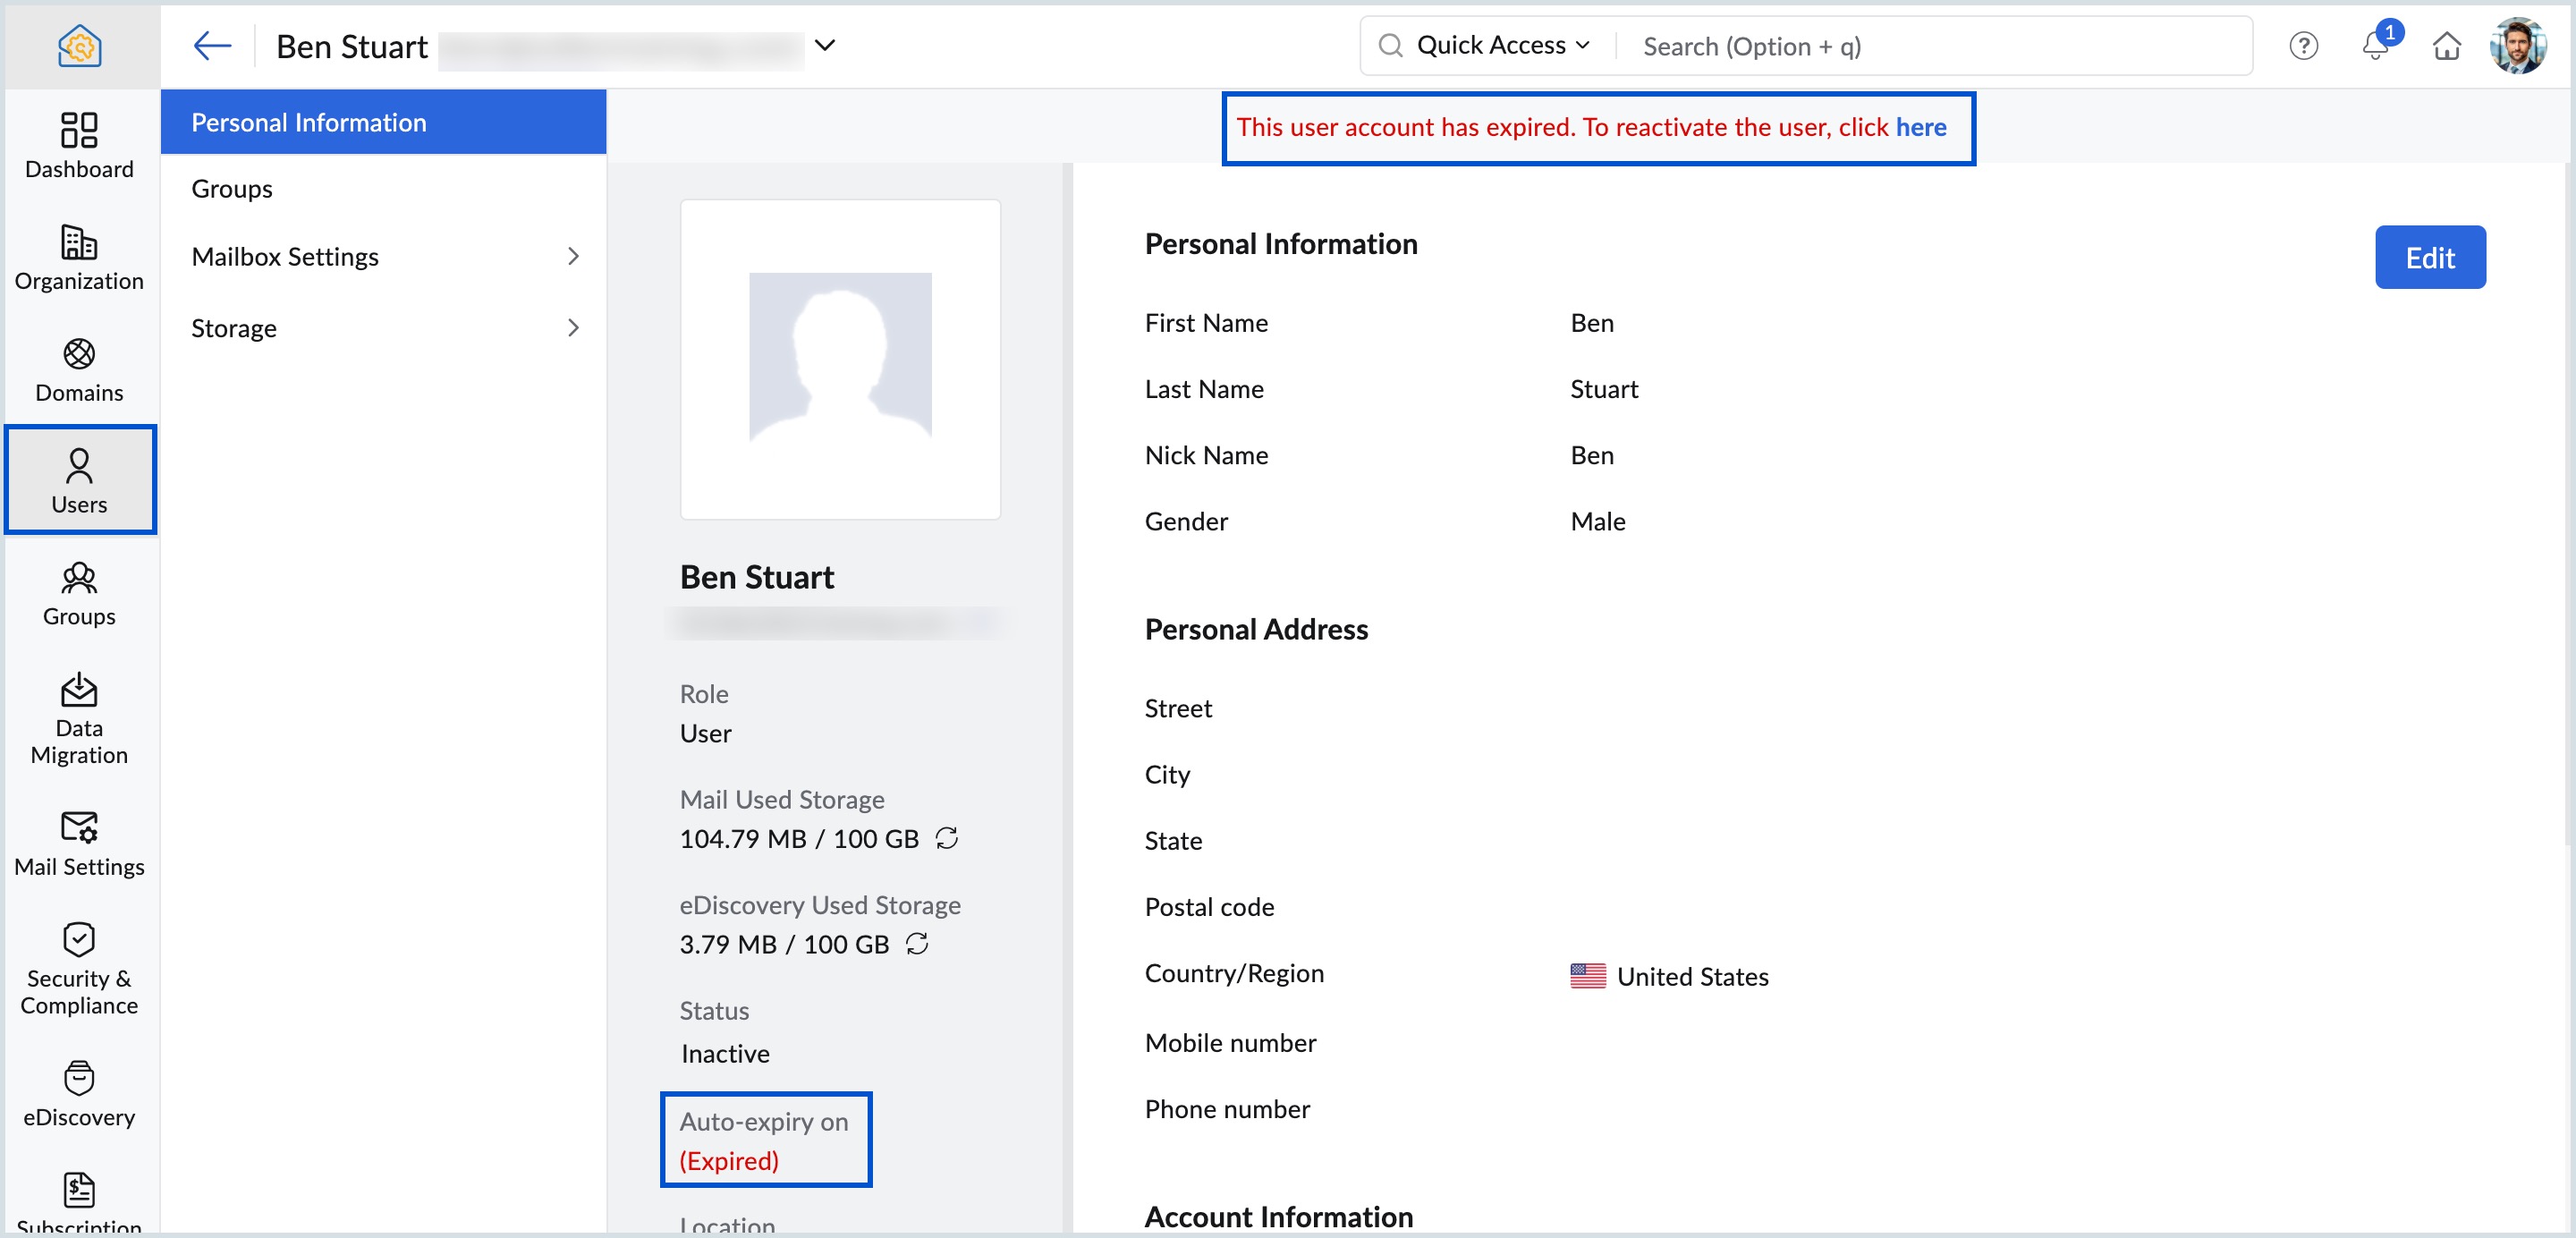
- In the Reactivate user dialog box, you can perform either of the below options:
- Click Reactivate to permanently activate the user's account.
(or) - Select the Extend expiry date checkbox to activate the user account to the specified time limit and click Reactivate.
The user account is now activated.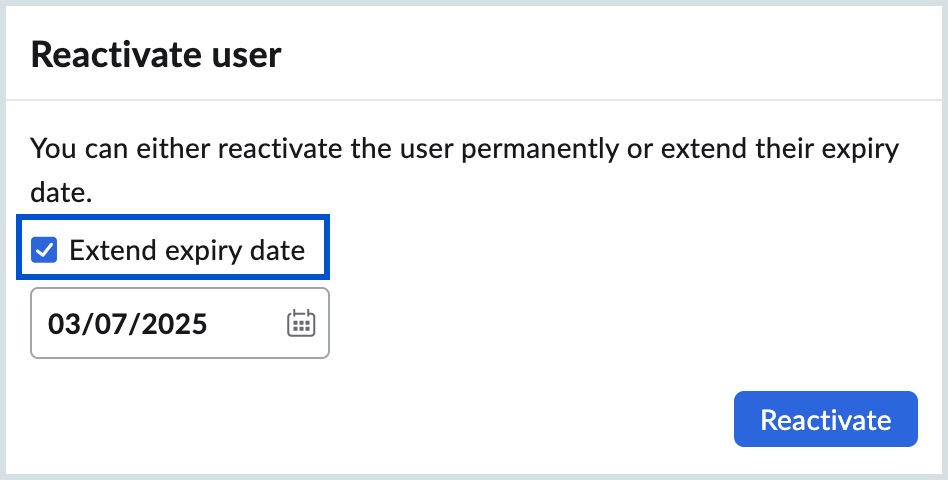
- Click Reactivate to permanently activate the user's account.
The expiry date can be extended within the range of 30-720 days. Extension of expiry date cannot be selected below or above this value. Know the steps to set the auto-expiry date when a user is added from the admin console.
Assign and change email policies for users in Zoho Mail
Zoho Mail's Email Policy is a configurable set of privileges and restrictions that controls what a user can do within their mailbox, such as sending attachments, using POP/IMAP, or accessing external domains. Admins can assign or change a policy for an individual user directly from the Mailbox Settings section in that user's profile.
To assign an Email Policy to a particular user at a time, follow the steps below:
- Log in to Zoho Mail Admin Console.
- Navigate to Users in the left pane, and click on the user you want to assign an Email Policy.
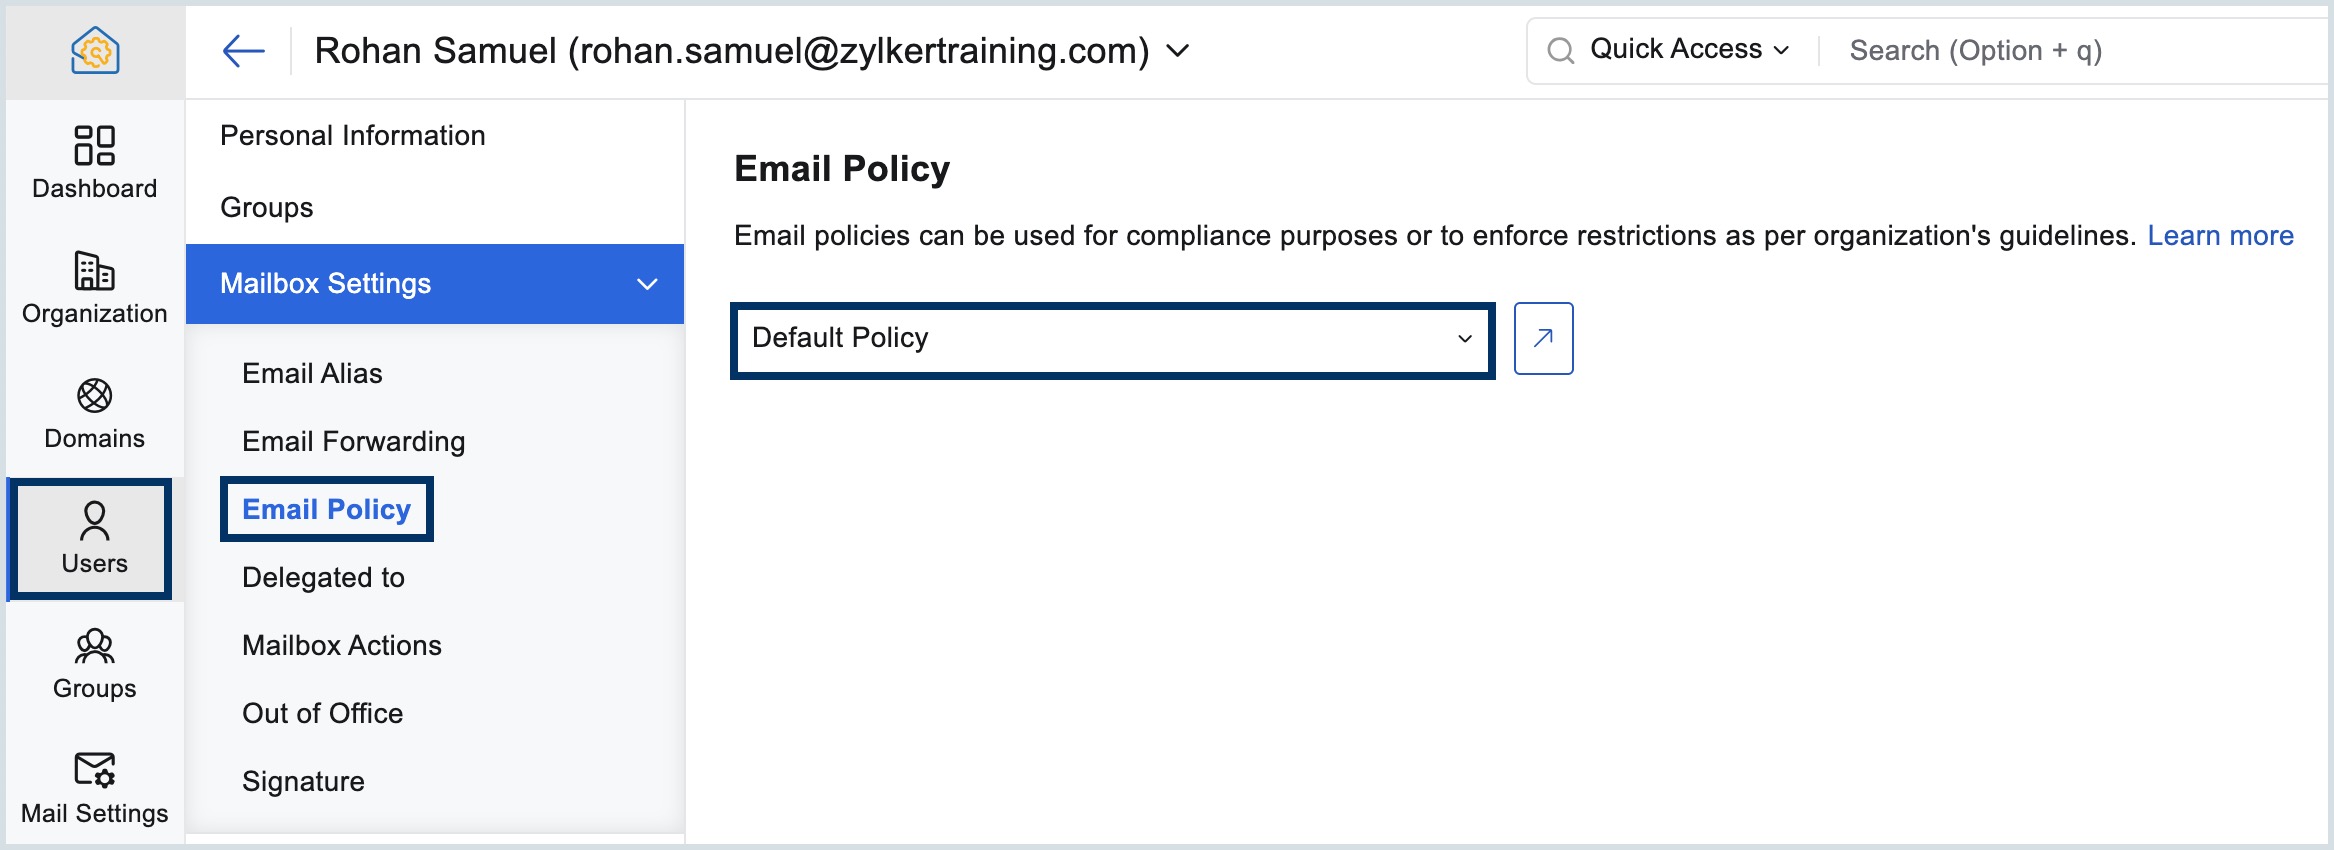
- On the user page, click Mailbox Settings from the left pane.
- On the user page, click Mailbox Settings from the left pane.
- Click Email Policy and choose the policy you want to apply to the user.
- If you are sure about the change, click Change in the pop-up.
You have successfully changed the email policy of the particular user. You can also click the pop-up icon, next to the drop-down, to reach the Email Policy section on the Mailbox settings page. Refer to our email policy help page to apply a policy to multiple users in bulk.
What is an email alias in Zoho Mail and how does it work?
Email Alias can be understood as nicknames of a user's default mailbox address. With the help of an email alias, a user can have multiple email addresses within one mailbox. That is, all the emails sent to the alias account will be delivered to the same mailbox as the primary account. Email aliases are handy for small and medium-scale organizations or organizations with multiple domains where a single person might be performing multiple operations.
Email alias behaviors:
- When you add an email alias, the user will be able to send/ receive using the email alias.
- The additional email aliases will be added to the From drop-down, using which the user can select the From address for the particular email.
- The email alias can be used for only one user and cannot be reused unless the first created one gets deleted.
- Once added, the email alias can be used to login into the account.
- The email alias can also be used to configure email clients.
- Email Filters can be used to organize the emails that arrive at different email aliases.
- Use 'To/ Cc' contains filter condition
- Apply the action Move to folder/ Apply label for classifying emails.
For example, say David is the marketing head of Zylker Inc. and his primary email account is david.r@zylker.com. While he uses his primary address for communication with his colleagues, he wanted to have a much more generic and memorable email address for performing external operations like sending newsletters. But instead of creating a new mailbox where he will have to log in to a completely different account, his administrator gave him an email alias, marketing@zylker.com. Now all the emails marketing@zylker.com receives will be forwarded to his primary mailbox david.r@zylker.com.
Note:
Email aliases will be available only to the free/ paid users who have their domains configured in Zoho Mail and not to the users who are using Zoho's domain.
Create an email alias for a user in Zoho Mail
Follow these instructions to create an email alias:
- Log in to Zoho Mail Admin Console.
- Navigate to Users in the left pane, and click on the user you want to assign an Email Alias.
- Select Mailbox Settings on the left pane and select Email Alias.
- Click the Add button.
- Enter an Alias username and then choose the domain using which you want to create the alias.
- If required, select "Set as Mailbox Address" to set this alias as the user's default mailbox address.
Once done, click the Add button.
Note:
- If you encounter the error "This operation has been restricted" while trying to add an email alias, please send an email to support-as@zohocorp.com with the email address you are trying to create. Our concerned team will review the request and respond within 24–48 hours.
- If your account reaches the maximum number of email aliases, contact support@zohomail.com.
Are you thinking about Domain Alias? You can create aliases for all your employees with another domain. Click to learn more about Domain Alias.
How to edit, delete, or reassign an email alias in Zoho Mail
Zoho Mail allows admins to edit, delete, or reassign an existing email alias from the Email Alias section under Mailbox Settings.
Note:
You cannot modify the user's primary email address.
Follow these steps to modify an email alias:
- Log in to Zoho Mail Admin Console and navigate to Users on the left pane.
- Click on the desired user and select Mailbox Settings on the left pane.
- Select Email Alias, and hover over an alias to view the available options.
- Edit - Update the alias for possible typos.
- Delete - When an alias is no longer required, you can delete it.
- Reassign - Quickly reassign an existing email alias to a different user, instead of deleting it from one user and recreating it for the new one.
- To reassign an email alias,
- Hover over the email alias that you wish to reassign.
- Click the reassign alias icon.
- Search for the desired user and click Select.
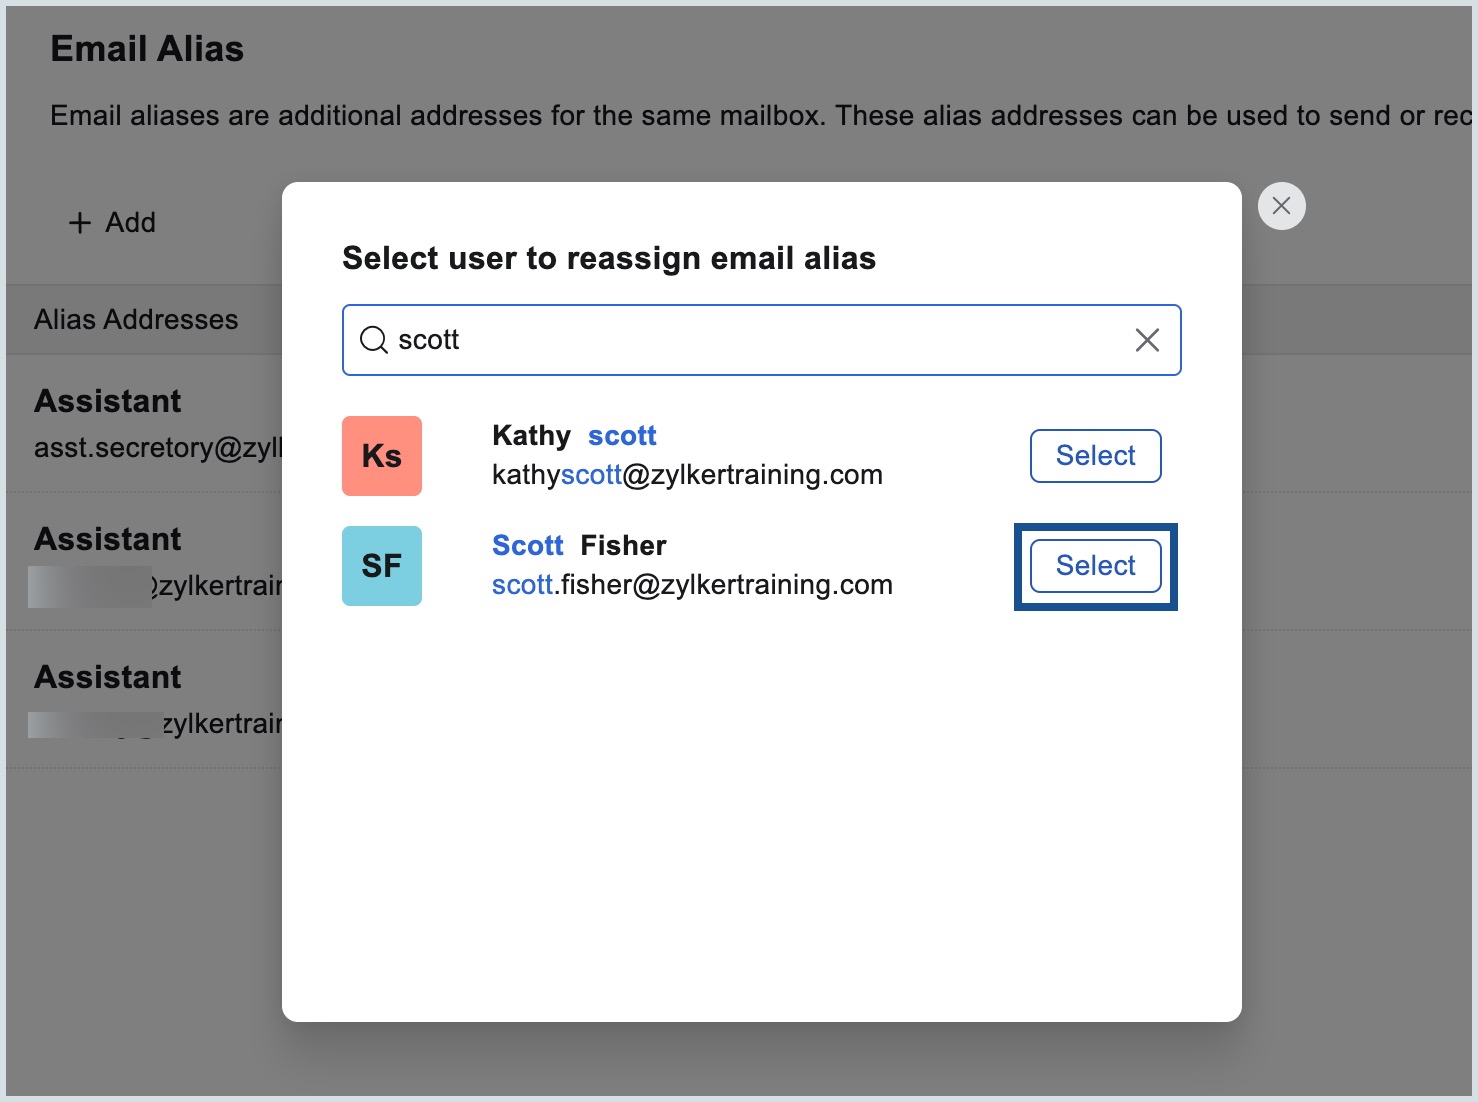
- Click Submit in the confirmation pop-up.
You have now successfully reassigned an existing email alias to a different user.
How to change the default mailbox address for a Zoho Mail user
The default email address or mailbox address of an account is usually the email address given by the administrator during the creation of a user's mailbox. But you can change the default mailbox address to a different one. If you want to provide a different email address for the same user, this option is better than deleting the current address and providing a different one because all the current settings, contacts, emails, and so on of the user can be retained.
It can be due to spelling errors or any mix-ups during the time of creation. For example, say David's (the marketing head of Zylker Inc) email address was created as daviid@zylker.com with a spelling mistake.
You can change the default mailbox address by,
- Creating a new email alias by selecting the "Set as Mailbox Address" checkbox. The newly created email alias will be set as the default email address.
- Setting an existing email alias as the default mailbox address.
Set an existing email alias as the default address
If a user already has an email alias, Admin can promote it to the default mailbox address directly from the Email Alias section under Mailbox Settings.
- Log in to Zoho Mail Admin Console.
- Navigate to Users in the left pane, and click on the user you want to change the default mailbox address.
- Select Mailbox Settings from the left menu and select Email Alias. You will find all email aliases created for that user in the Alias Addresses table.
- Hover over the Alias address you want to mark as default and select Set as mailbox address to make it default.
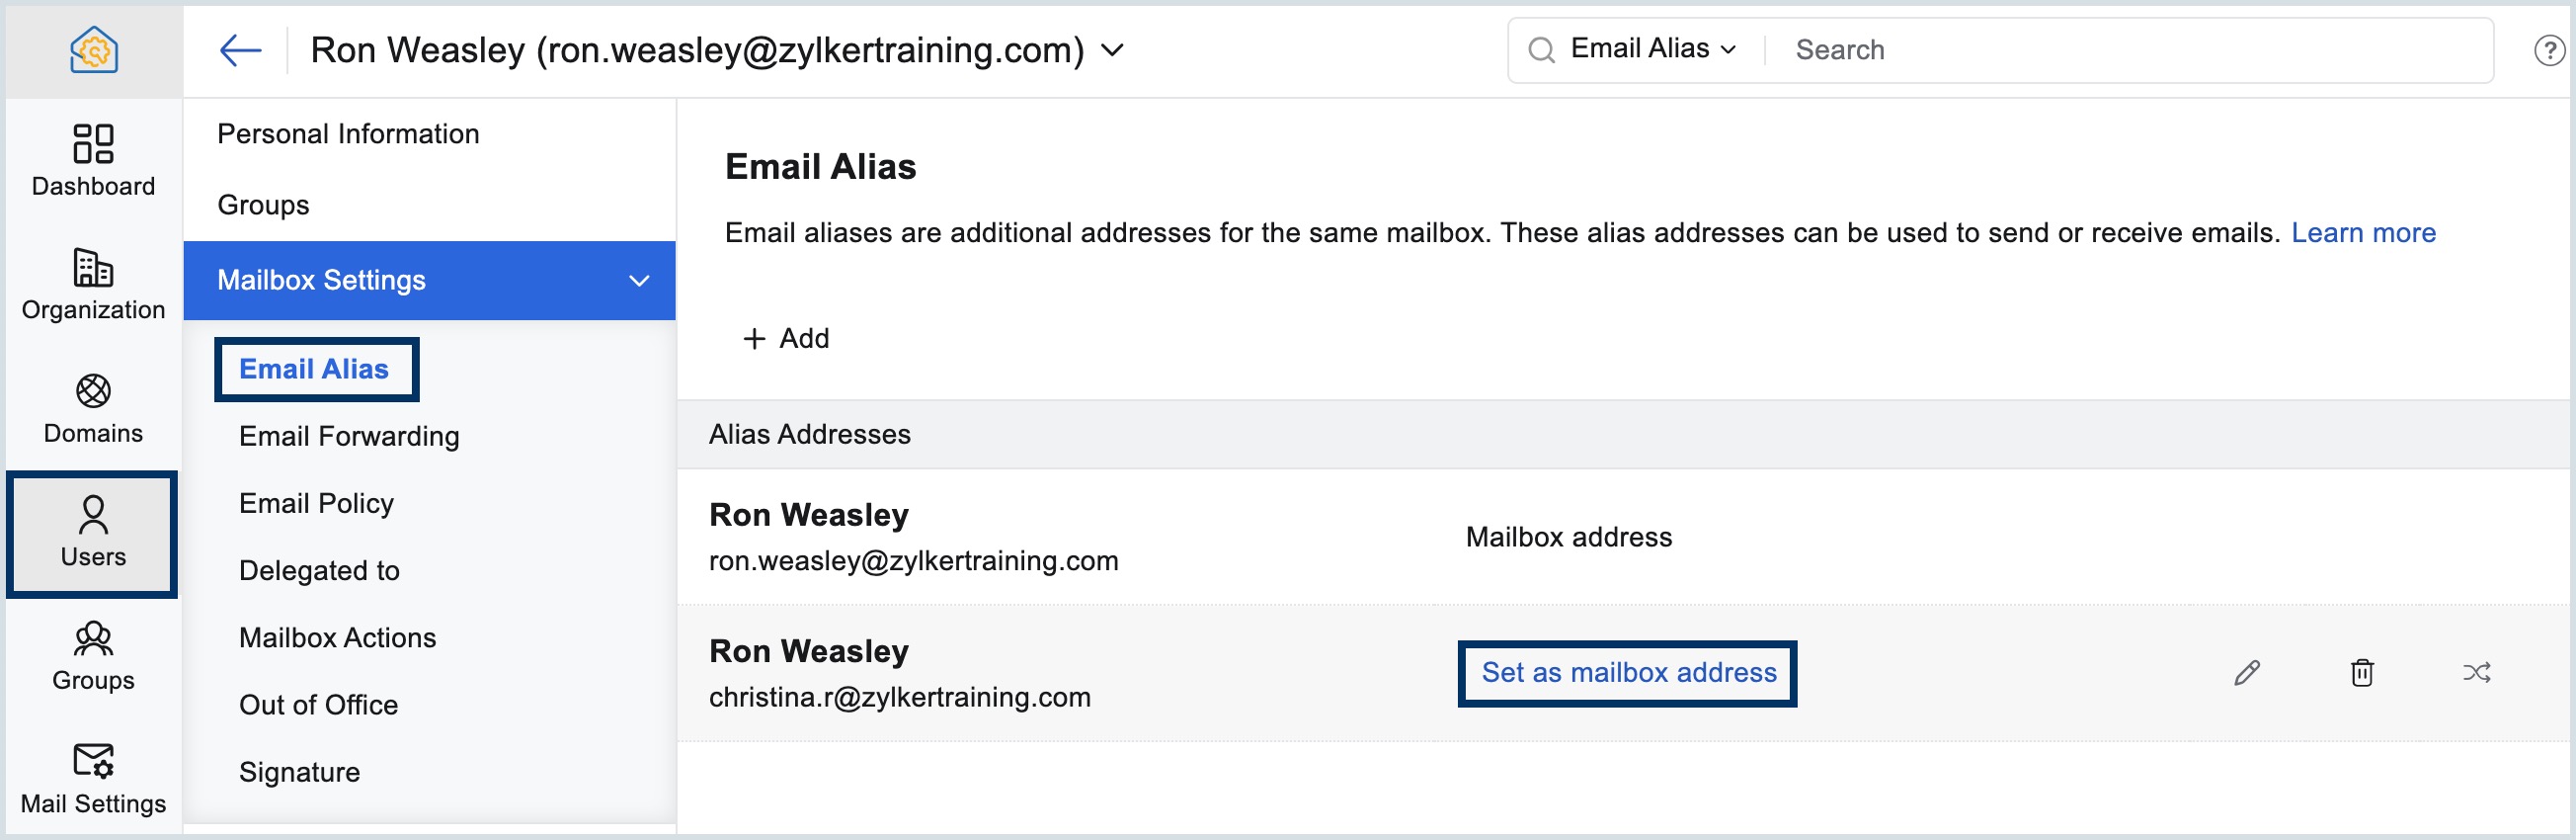
- In the pop-up, click Change.
- If needed, hover over an alias address and click the delete icon to remove an email alias.
Can a Zoho Mail user log in with an external email address?
Apart from using the email addresses you created under your organization, you can also use other email addresses you own from different providers as your Login Address. For example, if you have a personal email address you would like to use as the login address in Zoho Mail, you can do so by configuring that address under the Login Email Address section.
- Log in to Zoho Mail Admin Console.
- Navigate to Users in the left pane, and click on the user you want to add an existing email address.
- On the user page, click Security from the left menu.
- Select Login Email Address and click Add.
- Enter the email address you would like to add and the Admin Password for authentication.
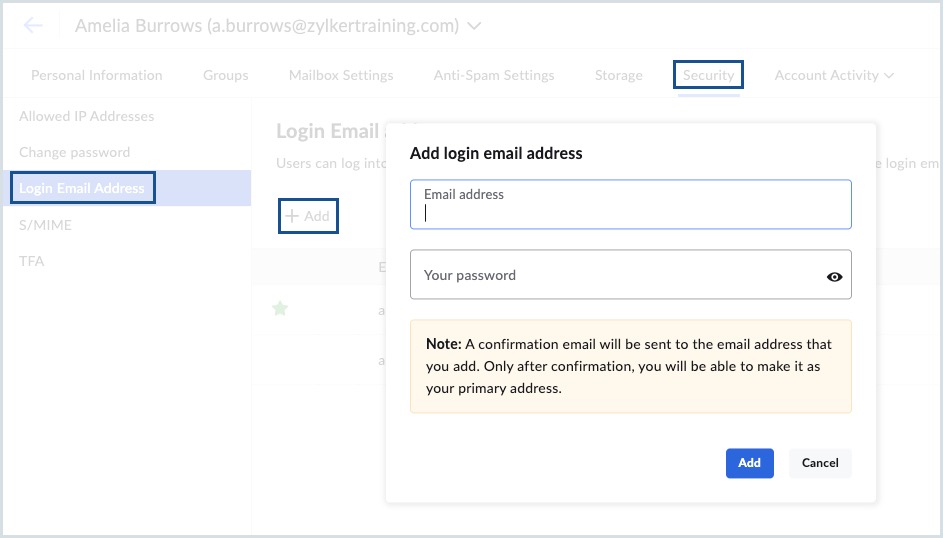
- Once done, click Add.
- You will be prompted to re-authenticate your session before proceeding with this action for security reasons.
A confirmation email will be sent to the email address you added and after you confirm the validity and ownership of the email, the address will be available as a login address.
Explore External from addresses report under Admin Reports.
Set any other email address as your primary email address
When you have multiple email addresses added, you can choose one of the email addresses to be your primary email address. To set an email address as your primary one, follow the steps below:
- Log in to Zoho Mail Admin Console.
- Navigate to Users in the left pane, and click on the user you want to set a primary email address.
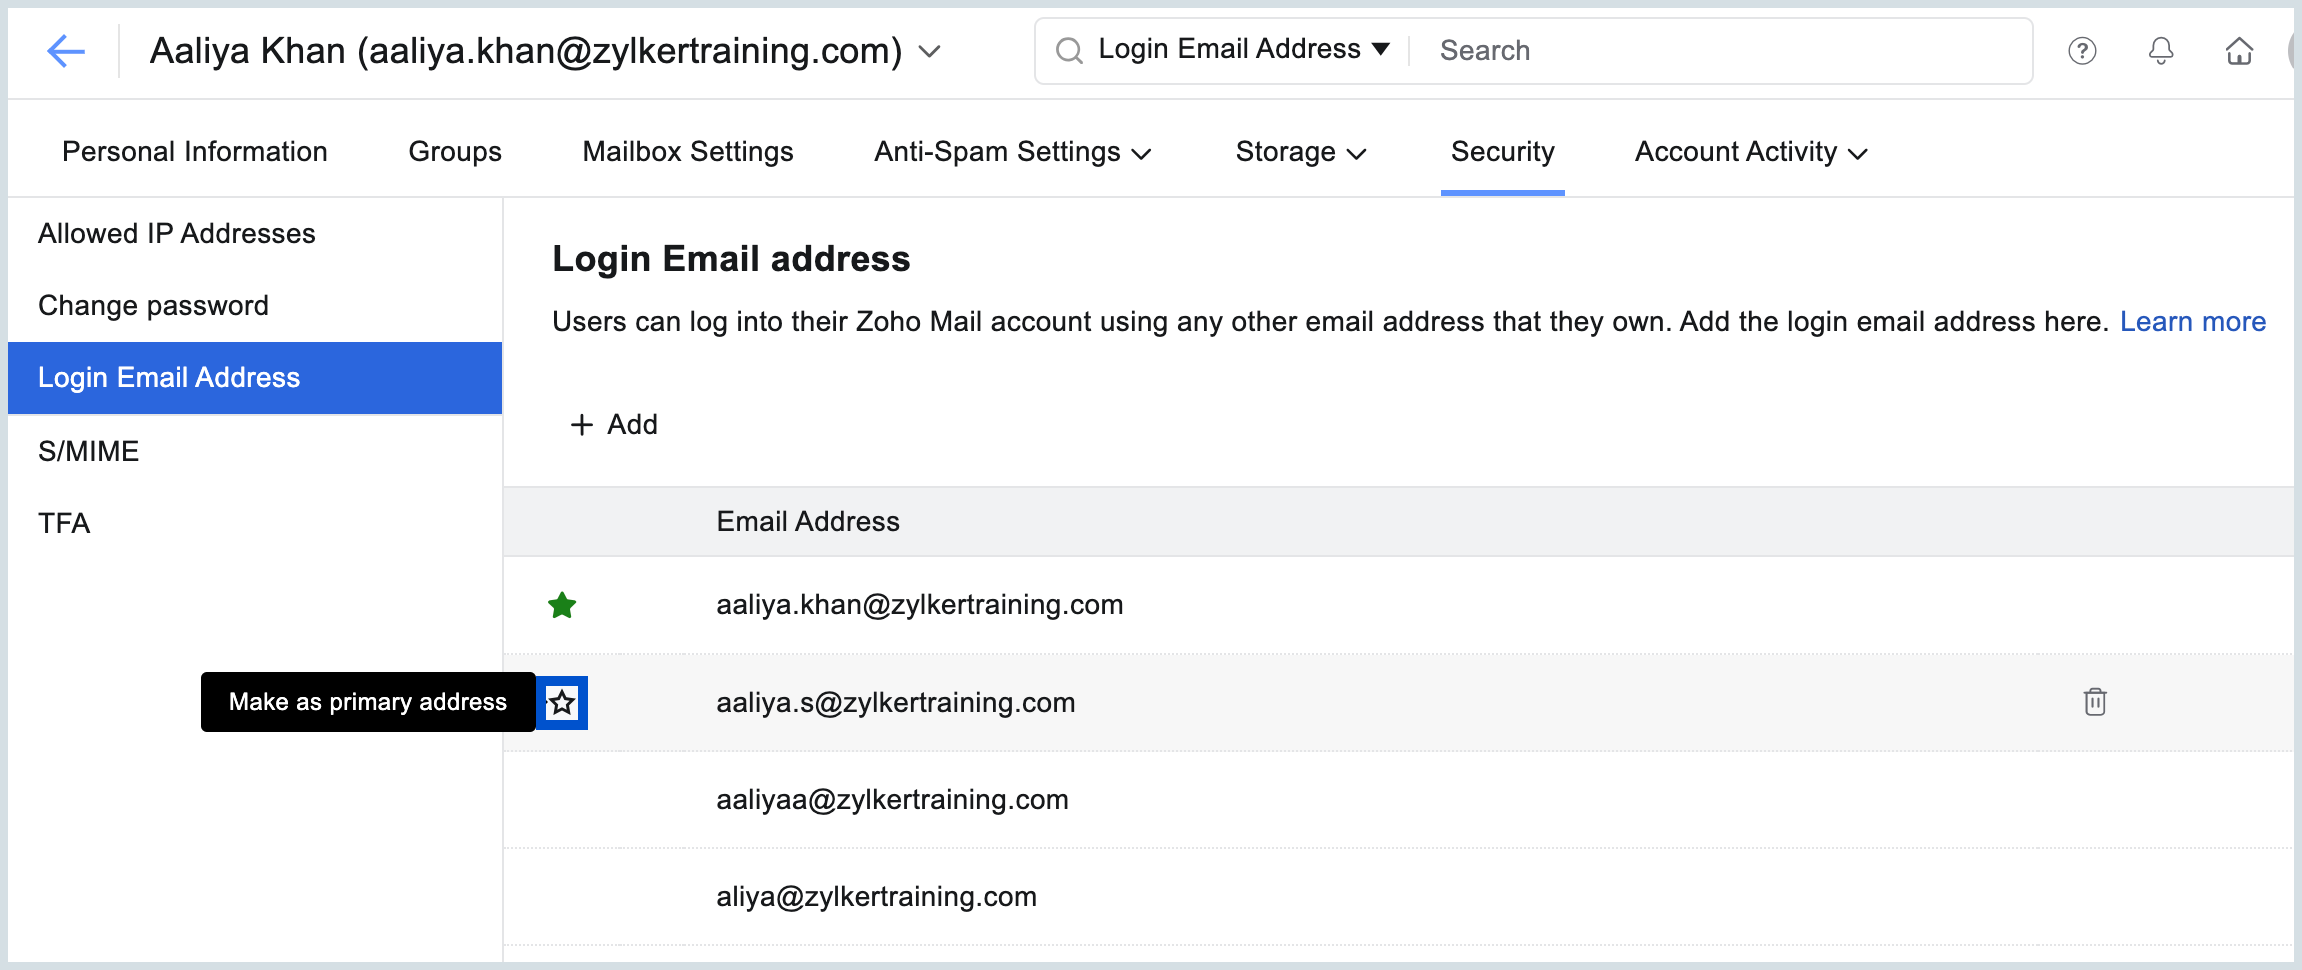
- On the user page, click Security from the left menu.
- Select Login Email Address and click on the Star icon to make it your primary email address.
- You will be prompted to re-authenticate your session before proceeding with this action for security reasons.
Note:
- Every time you add or change the primary login email address of a user account, it is mandatory to re-authenticate your session using the MFA (Multi-Factor Authentication) method configured on your account for security purposes.
- If you do not have MFA configured for your account, you will be prompted to re-authenticate your session using your account password in a new tab or window, depending on your browser preference.
- This additional re-authentication step helps protect your account by ensuring that only authorized users can perform this sensitive action.
How to set up email forwarding for a user in Zoho Mail Admin Console
Email forwarding, when configured, forwards all emails received by a user to the given forwarding email address. Email forwarding can be performed by users for themselves from their mailbox, or by administrators from the Admin Console. It is usually configured by the Administrator for delegation/ back-up purposes.
For example, say David, the marketing head of Zylker Inc., is on leave for a month. His work was piling up and the Associate marketing head, Rebecca was pulled in to take over temporarily. For Rebecca to respond to messages from clients or customers, the administrator configured email forwarding from David's account. Now, Rebecca's mailbox will receive a copy of all emails sent to David.
Note:
The Email forwarding option is available only for organizations that use one of our paid plan. If your organization is currently under a free plan, you must upgrade to a paid plan. For more details, please refer to our pricing page.
Steps to configure Email Forwarding
- Log in to Zoho Mail Admin Console.
- Navigate to Users in the left pane, and click on the user you want to configure email forwarding.
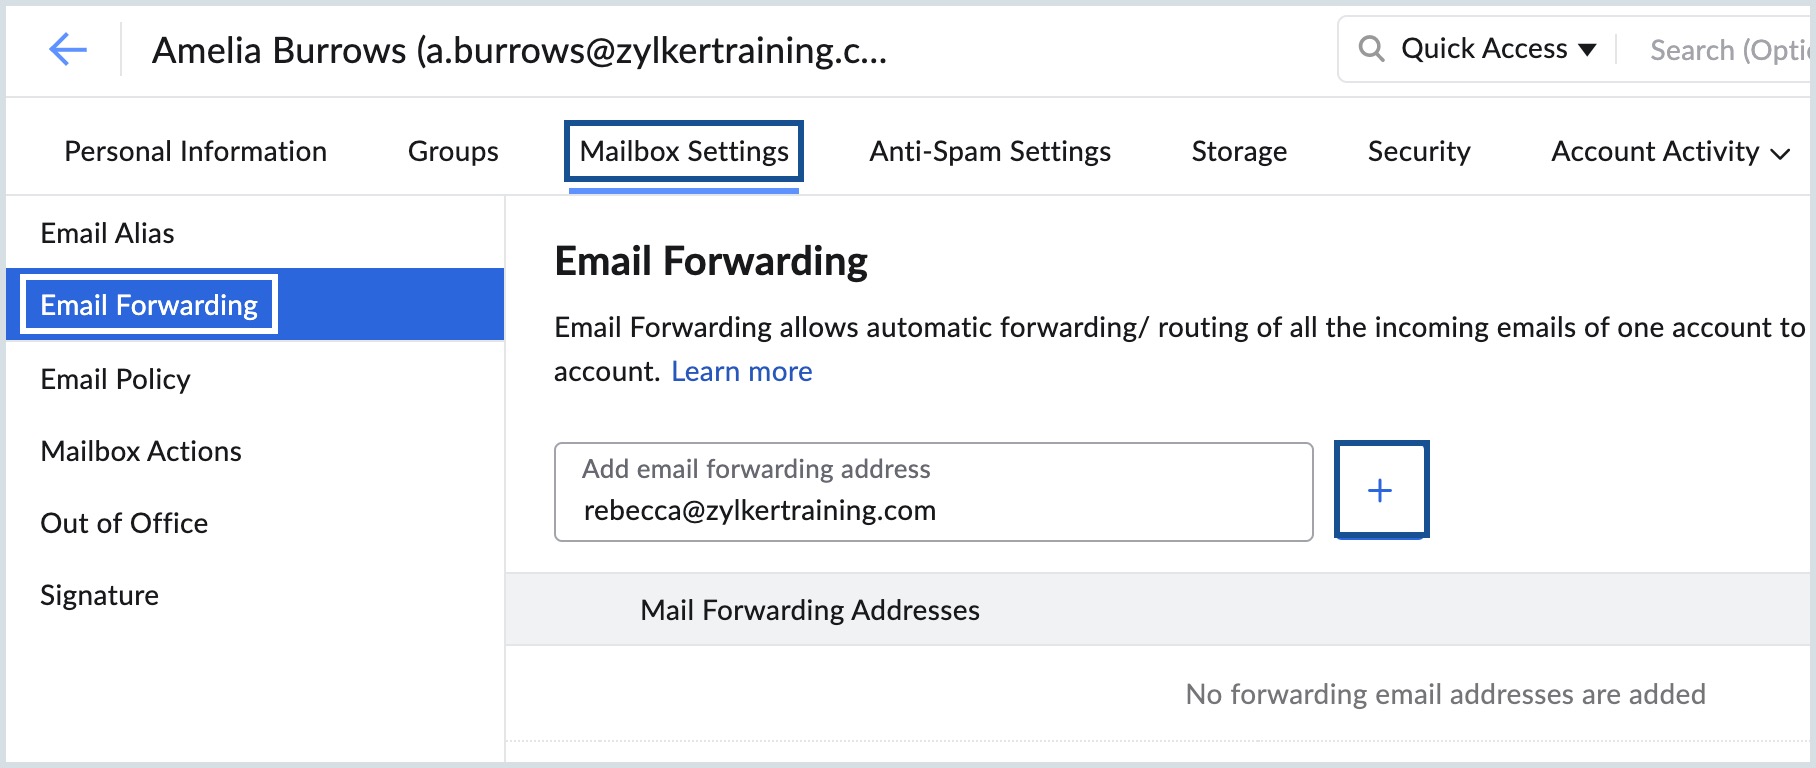
- Select Mailbox Settings on the left pane and choose Email Forwarding.
Enter the email address you want the user's emails to be forwarded to, and click the button.
 Note:
Note:
A verification process is required for external email addresses. But, verification will not be required if the email forwarding address is from within your organization.- Click Add in the confirmation dialog that appears.
- Select Delete Zoho Mail's copy, to move the email to the primary user's Trash folder after forwarding the email.
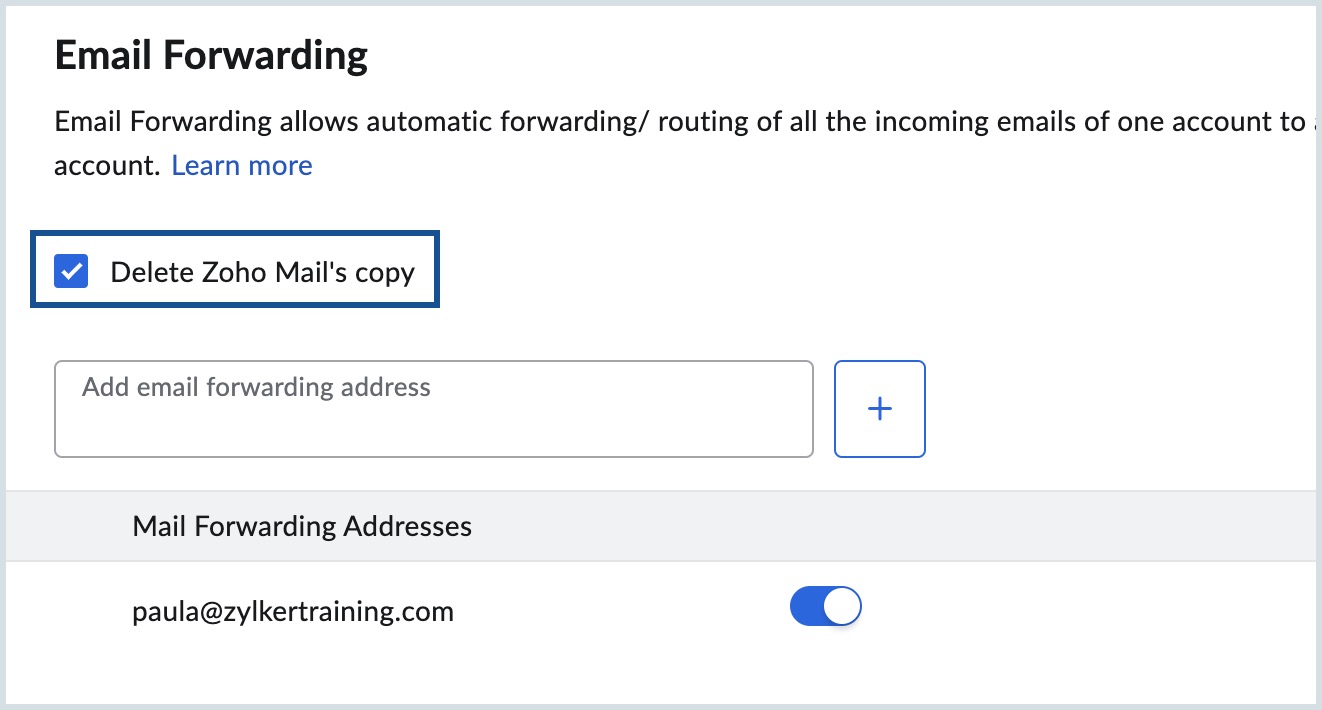
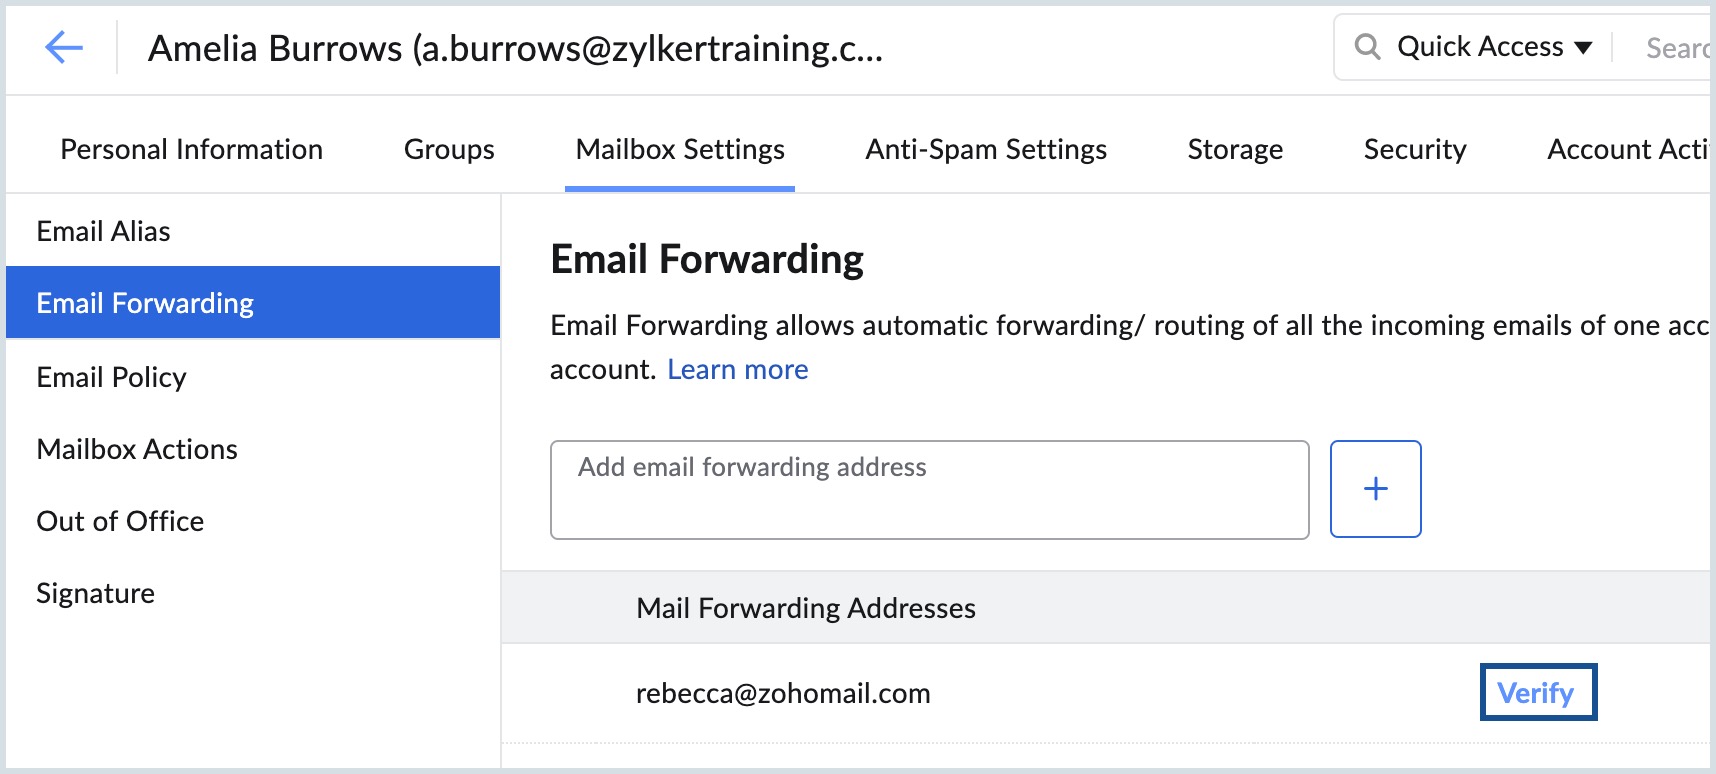
- If you have configured an external email address, you would have received an email with a Verification Code.
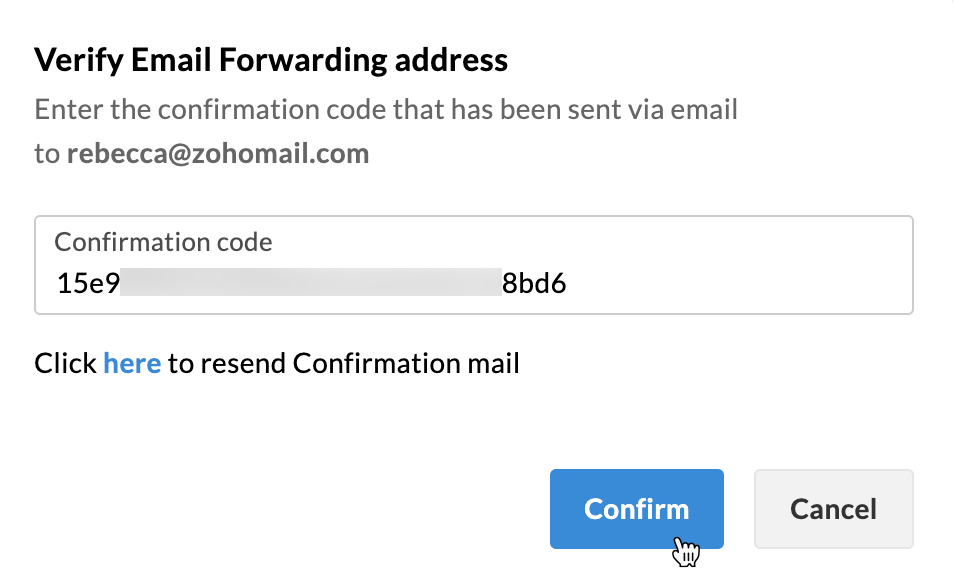
- Click Verify and enter the Verification Code.
- After entering the verification code, click Confirm.
Know how a user can enable Email Forwarding from his or her Zoho Mail account.
Learn more about Forwarding summary report under Admin Reports.
Enable and disable email services for individual users in Zoho Mail
Mailbox Actions enable Administrators to allow or restrict different services available in Zoho Mail. For example, say David, the marketing head of Zylker Inc., wants to sync his emails, calendar, and contacts from the email server to his mobile device. You, the administrator, can make an exception for David and give him ActiveSync access by simply going to Mailbox Actions. Now, except David, all other users will not have the ActiveSync access.
To access Mailbox Actions, follow these steps:
- Log in to Zoho Mail Admin Console.
- Navigate to Users in the left pane, and click on the user you want to disable/enable an email service.
- Select Mailbox Settings on the left pane and select Mailbox Actions.
- You can toggle the switch next to the feature to enable or disable the respective service.
| Mailbox Action | Description |
|---|---|
| Incoming | If disabled, that particular user can't receive any emails. The Incoming option is enabled for all users by default. |
| Outgoing | If disabled, that particular user can't send emails. The Outgoing option is enabled for all users by default. |
| Spam check | If disabled, Zoho Mail will not process that user's emails for spam. This includes all server-level Zoho Mail spam checks and also the ones configured by an admin. Spam check is enabled to all users by default. |
| Quarantine check | If disabled, the 'to-be quarantined' emails of that particular user will not be quarantined and will be sent to the user directly. Disabling Quarantine check will not disable spam check. Quarantine check is enabled to all users by default. |
| POP access | If disabled, that particular user can't access his/her email account in other email clients via POP. When enabled, the POP access is applied to All the emails in the account by default. If you want to provide POP access to the user but want to limit it to emails received after a particular date, click Emails received after the selected date, choose the desired date and select Update. |
| IMAP access | If enabled, that particular user can access his/her email account in other email clients via IMAP. IMAP access is disabled to all users by default. |
| ActiveSync | If enabled, that particular user can access his/her email account in mobile devices using Active Sync protocol. ActiveSync is disabled to all users by default. |
Note:
All the above-mentioned actions will only affect the particular user you make changes to.
How to configure an Out-of-Office for a user in Zoho Mail
Out-of-office response can be added by users themselves, or administrators, or both. This option for admins is particularly helpful when the user is unavailable to configure an out-of-office response by themselves. For example, say David, the marketing head of Zylker Inc., is on long leave due to a medical emergency. The administrator, in order to not leave his emails unattended, can configure an out-of-office response until he comes back.
To configure an out-of-office reply from Admin Console, follow these steps:
- Log in to Zoho Mail Admin Console.
- Navigate to Users in the left pane, and select the user you want to add an out-of-office response.
- Click Mailbox Settings and select Out of Office. The out-of-office message configured by the user appears.
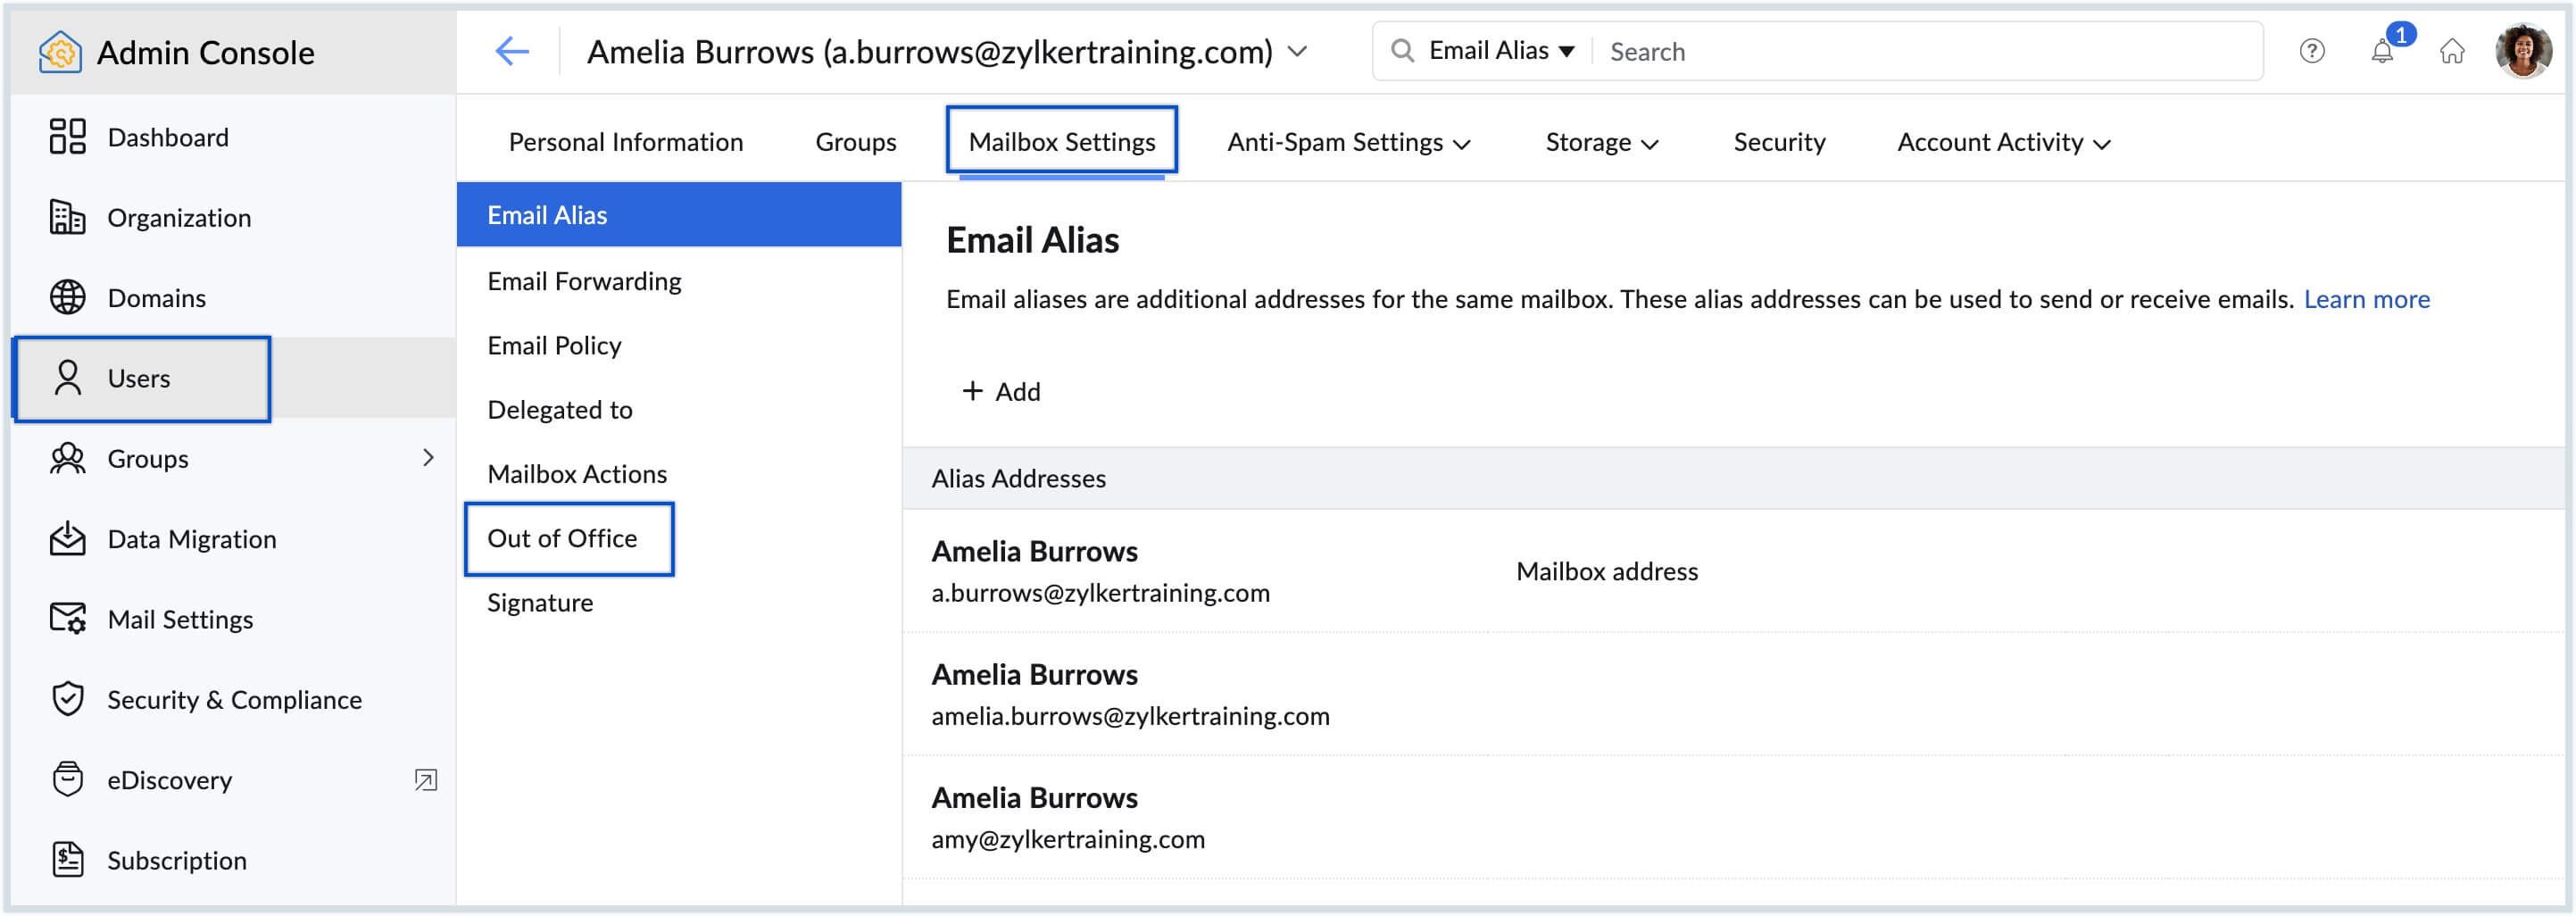
- Proceed to edit the existing out-of-office response, or click Delete at the bottom of the section to create a new out-of-office response.
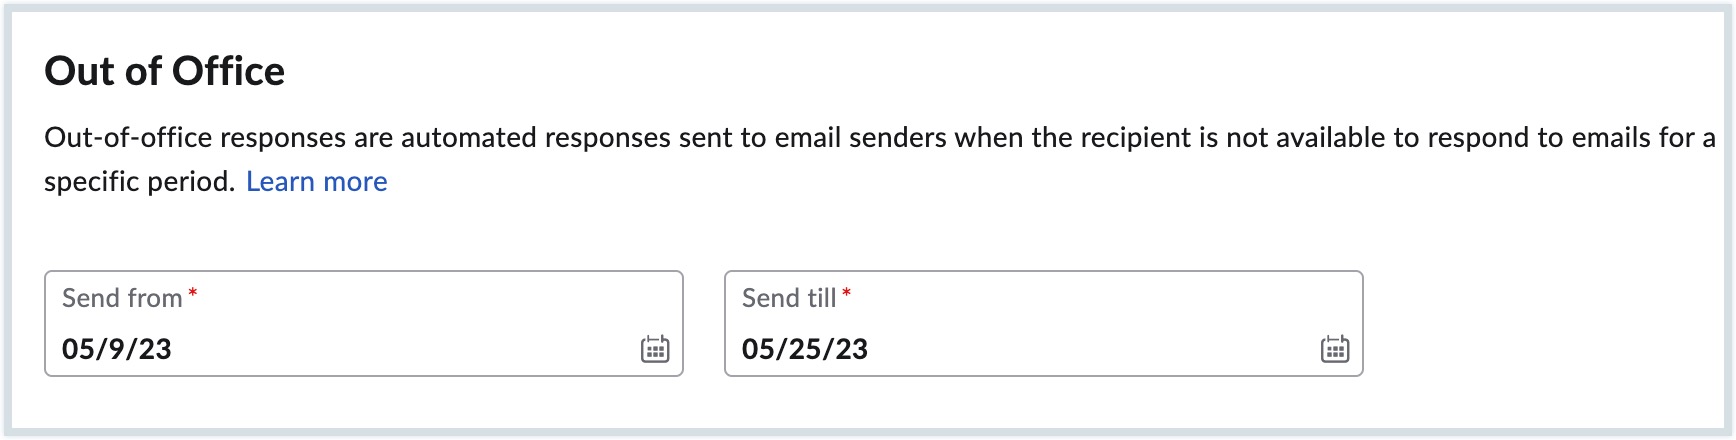
- Select the From/ To date for which you want to configure the out-of-office message.
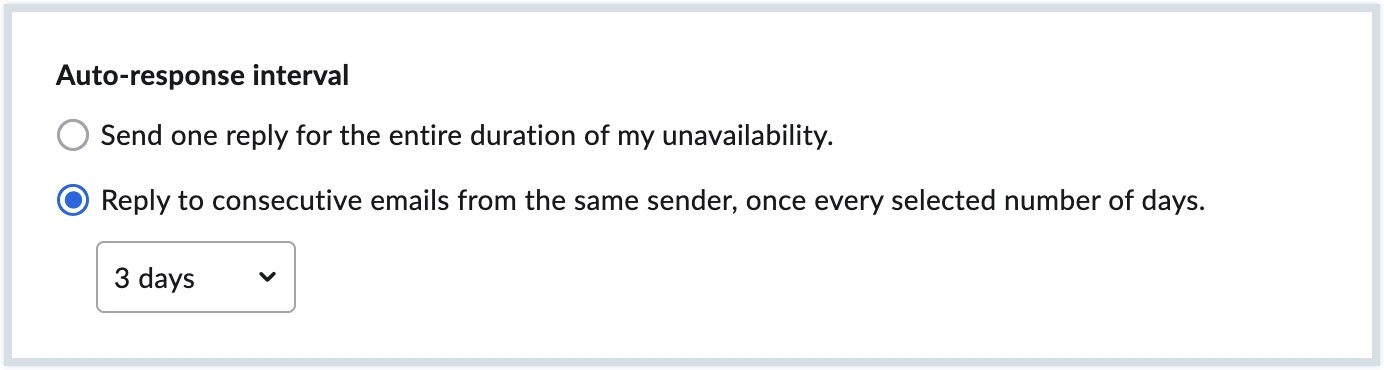
- Choose the Auto response interval using the options given below:
- Send one reply for the entire duration of my unavailability
- Reply to consecutive email from the same sender, with the gap of selected days
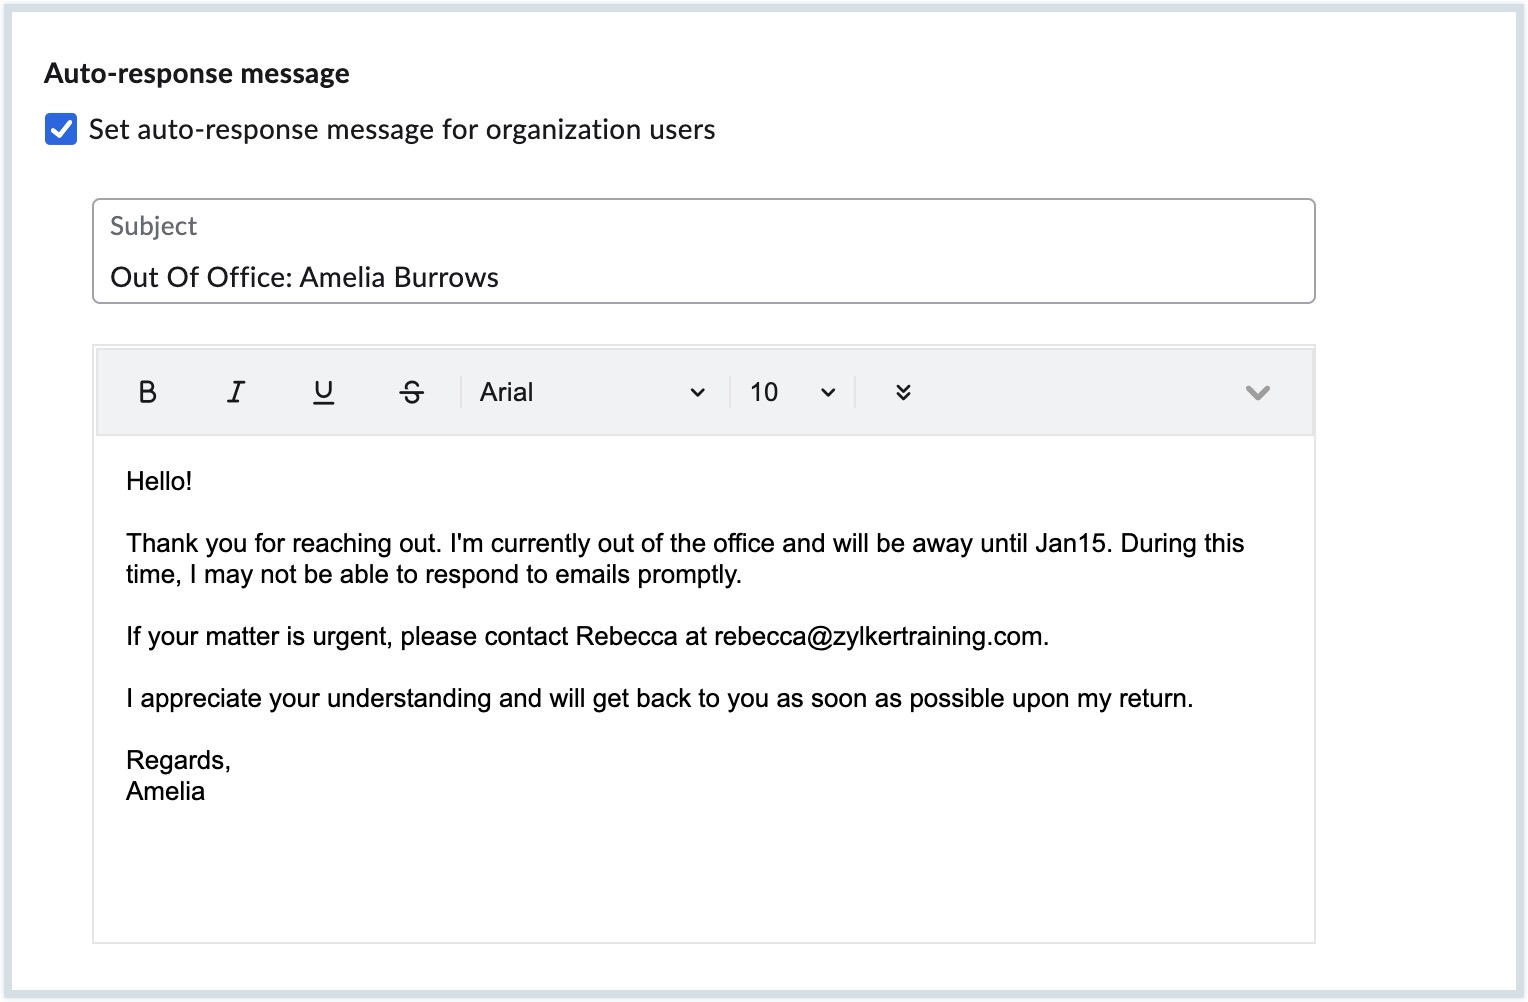
- Select the Set auto response message for organization users checkbox to send out of office messages to emails sent by your organization members only.
- Specify the subject and the out-of-office email content.
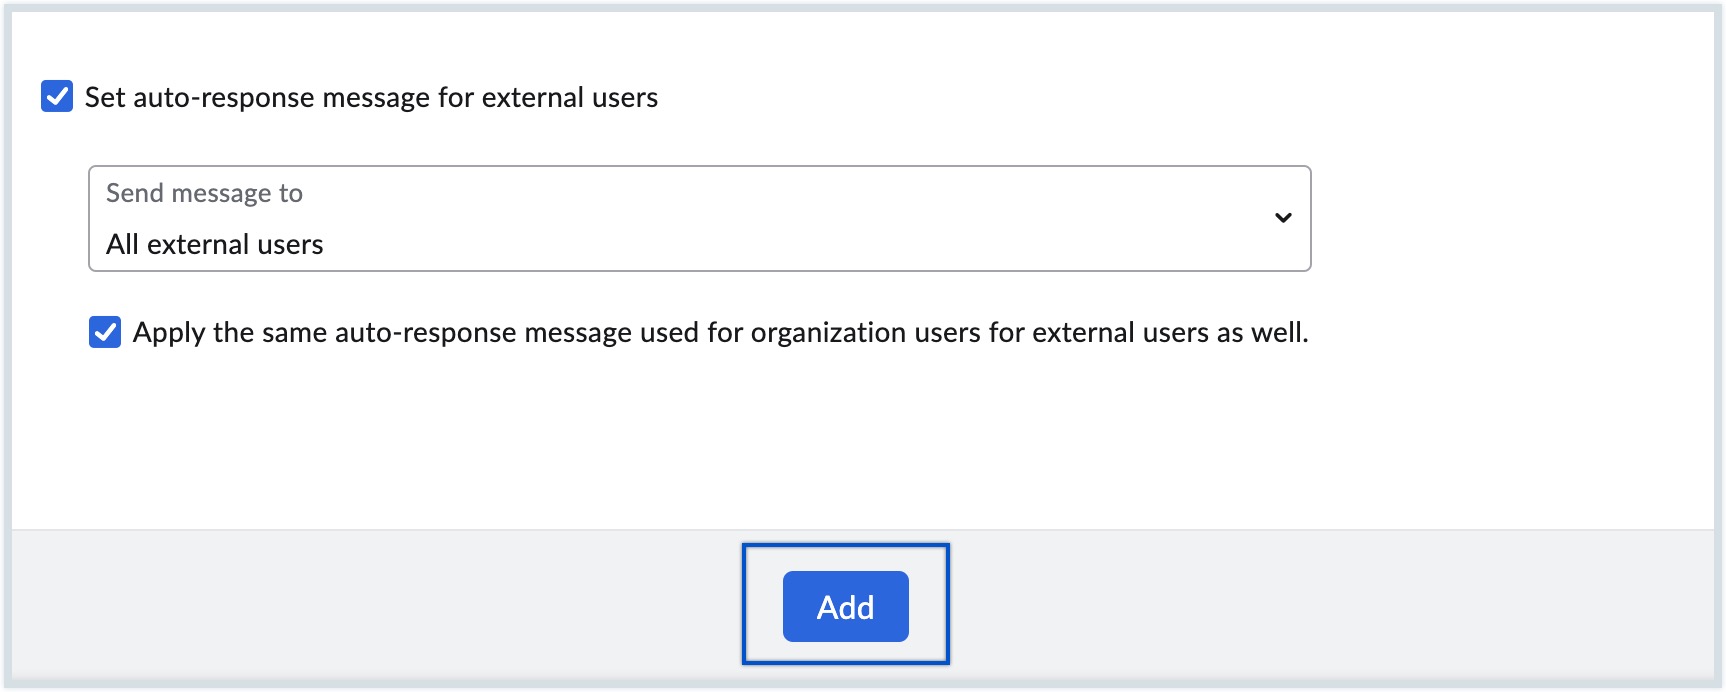
- Select theSet auto response message for external users checkbox, to send out of office messages to external senders.
- Select who should get your out-of-office messages from the external users in the Send Message to dropdown.
- Select the checkbox to use the same auto-response for both organization and external users. If not, create a new auto-response by entering the subject and content in the fields below, and click Add.
Know how a user can set up Out-of-Office from his/her Zoho Mail account.
Explore Out of office user report under Admin Reports.
Setting a separate Out-of-Office message for external users in Zoho Mail
Zoho Mail allows admins to configure unique out-of-office responses for external users. This involves setting up specific automated messages designed for individuals who are not part of your organization.
Steps to set up an out of office response for external users
- Log in to Zoho Mail Admin Console.
- Navigate to Users in the left pane and select the user.
- Click Mailbox Settings and choose Out of Office.
- Choose the From/ Till date and select the preferred Auto response interval from the list according to your preferences:
- Send one reply for the entire duration of my unavailability
- Reply to consecutive email from the same sender, with the gap of selected days
- Select the Set auto response message for external users checkbox under Auto response message.
- In the Send Message to dropdown, select one of the options:
- All External users
- External users only in my contact
- External users not in my contact
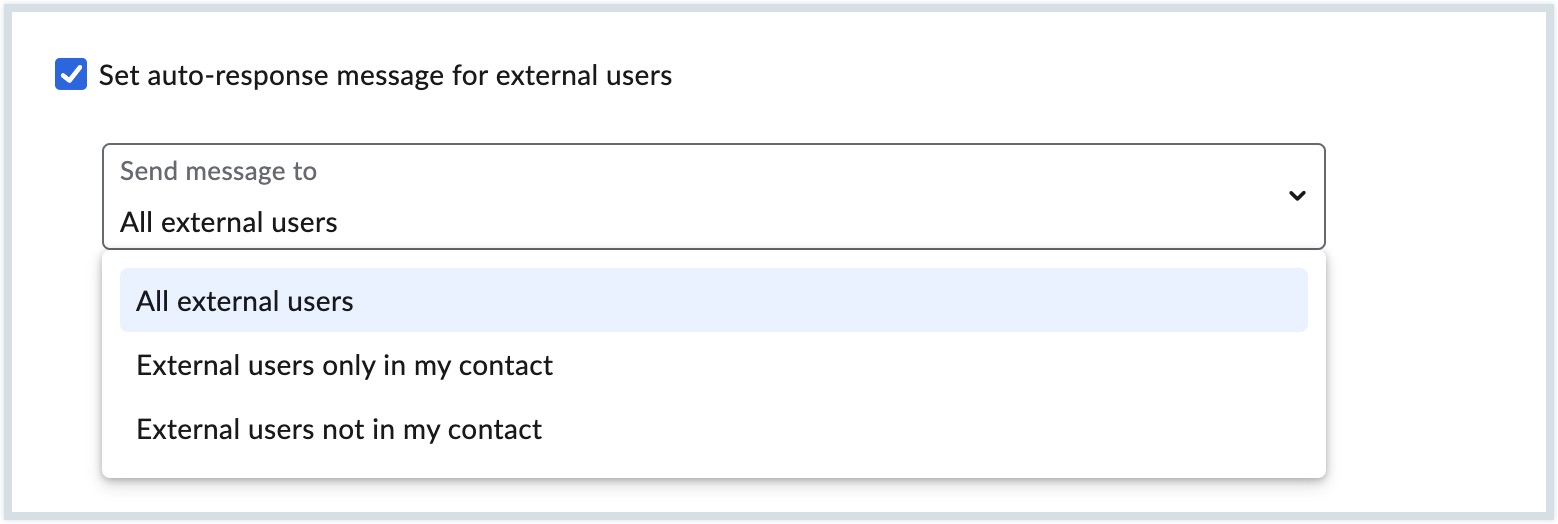
- Select the checkbox to use the same out of office reply you have set for organization users to external users as well. If not, create a new auto-response by entering the subject and the email content in the fields below.
- Once done, click Add.
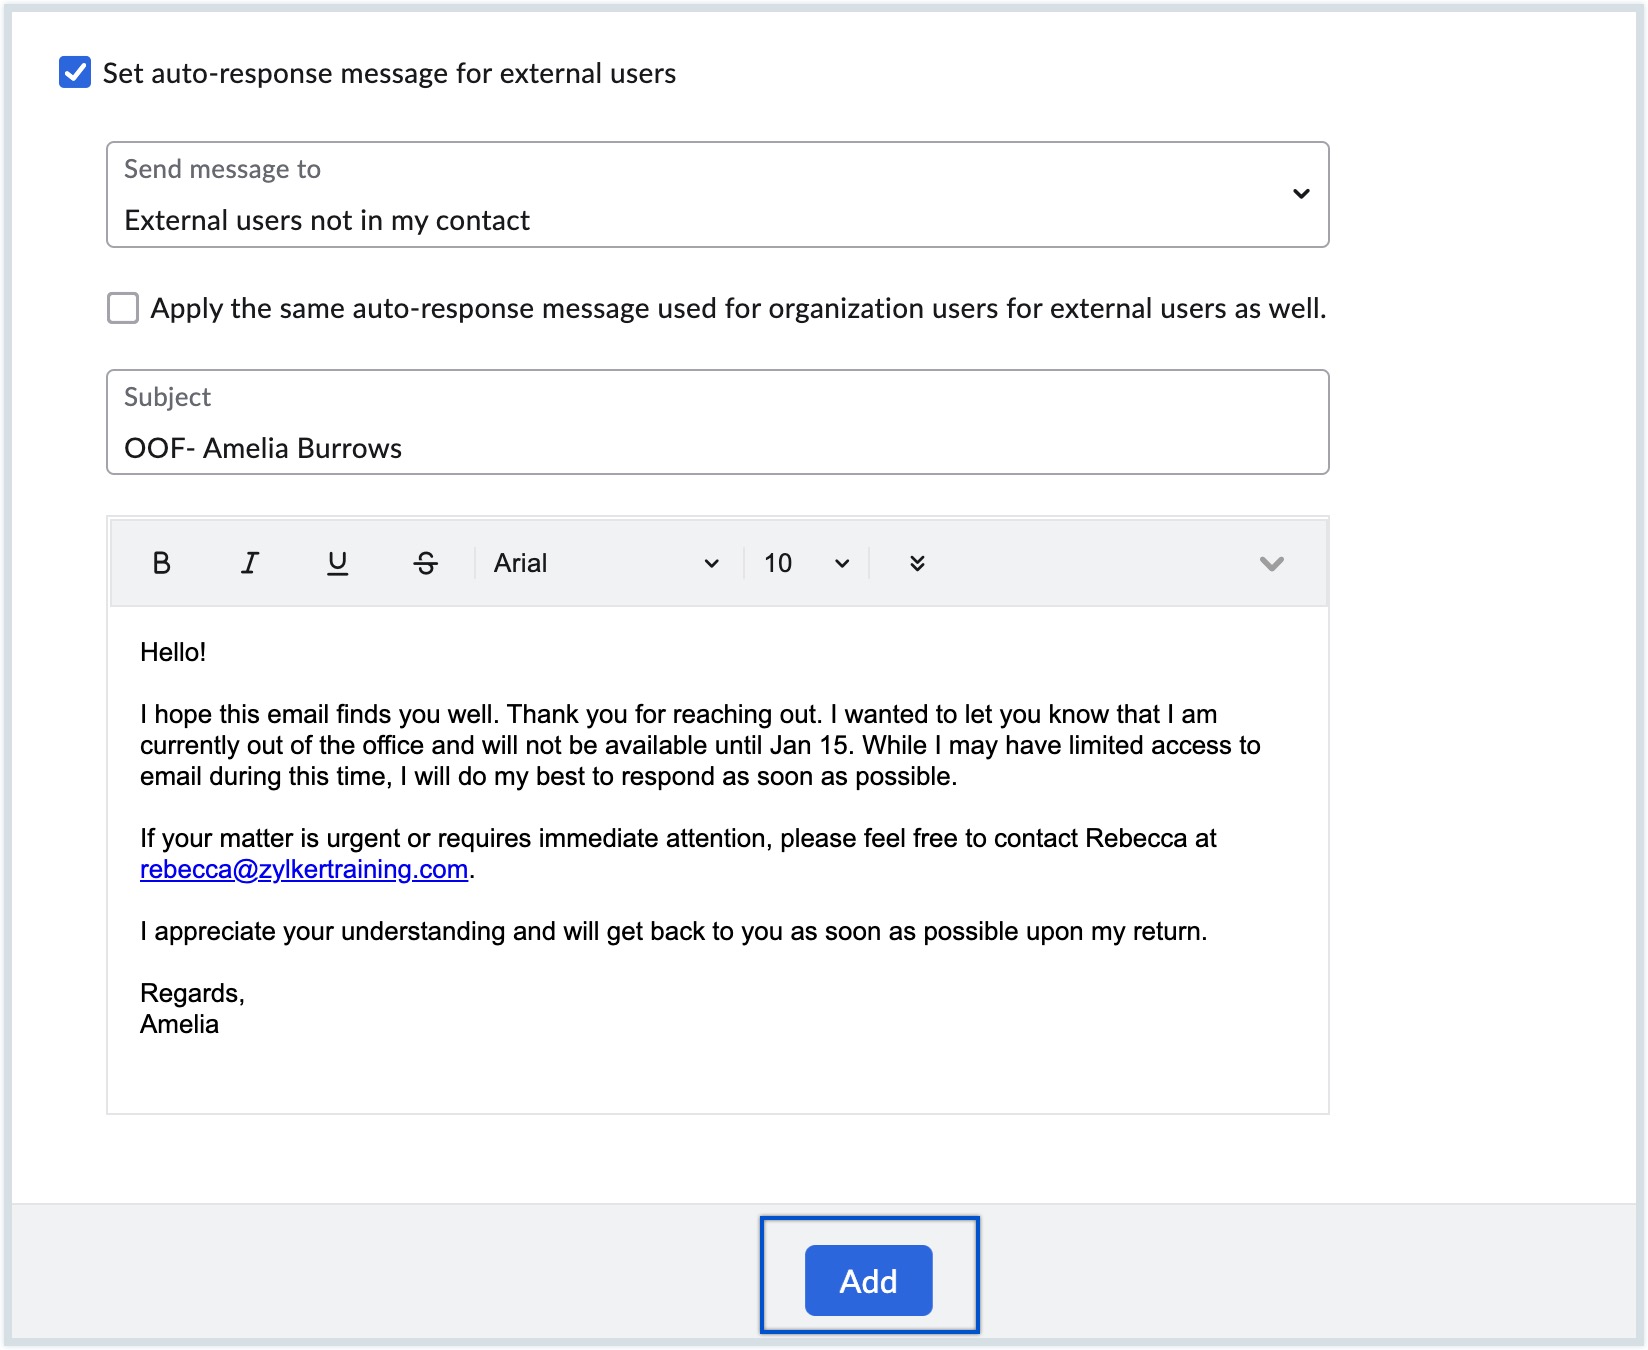
Note:
The out-of-office reply added from the Admin Console can be viewed by the user from their mailbox.
How to add an email signature for a user in Zoho Mail Admin Console
Zoho Mail Admin Console allows admins to create and assign email signatures for individual users across the organization, ensuring brand consistency in outgoing communication. A single signature can be mapped to multiple email aliases belonging to the same user.
To add a signature for the user, follow these instructions:
- Log in to Zoho Mail Admin Console.
- Navigate to Users in the left pane, and click on the user you want to add a signature.
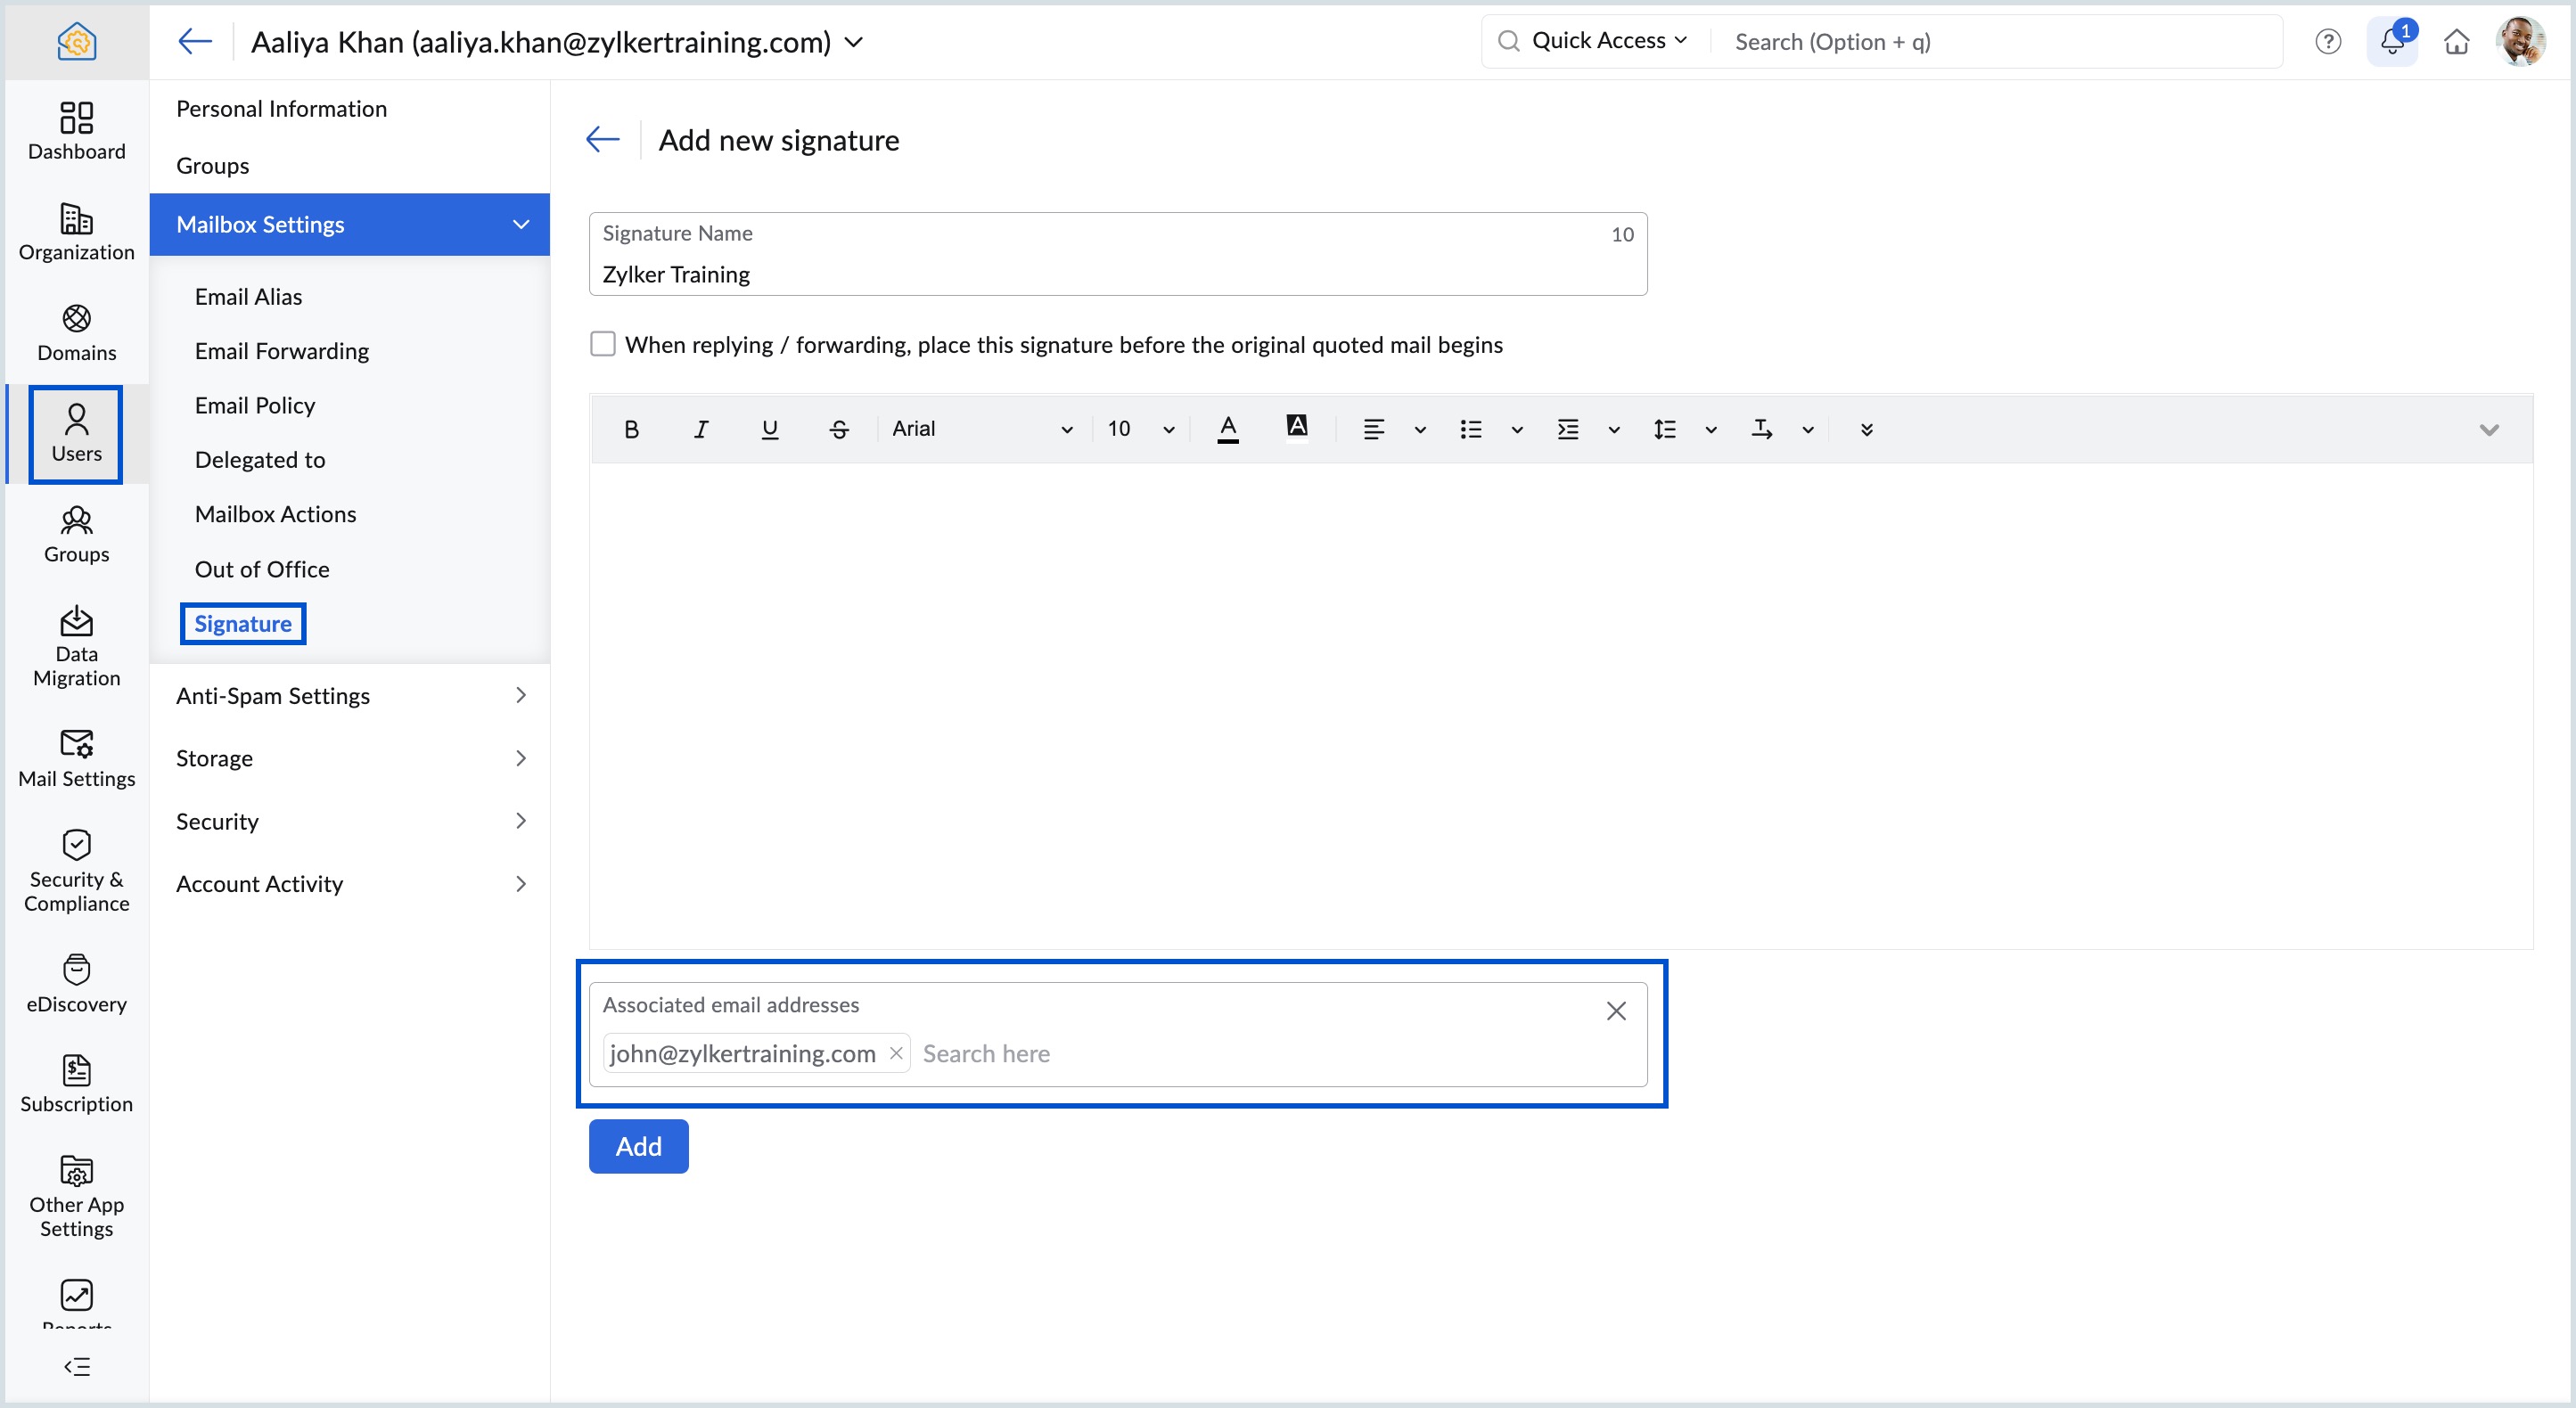
- Select Mailbox Settings and choose Signature.
- In the Signature section, click Add new signature to open the signature composer.
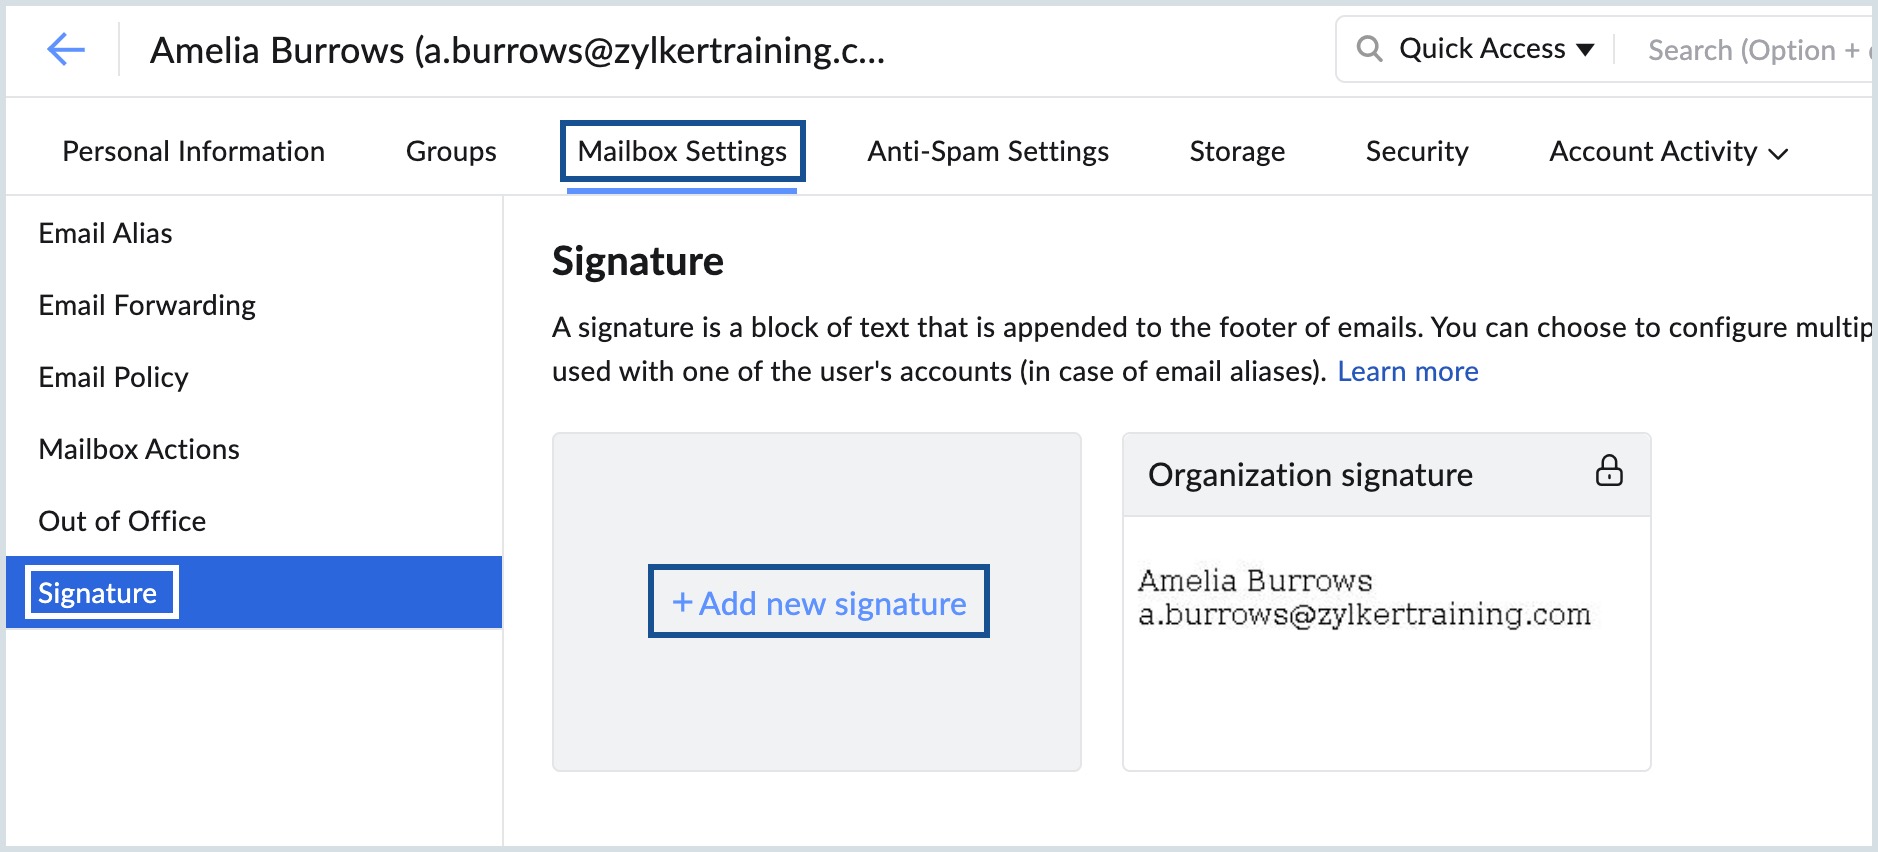
- In the composer, give a name for your signature and then the content of the signature.
- You can associate one signature to different aliases of the same user. To do that, click the button in the Associated email addresses column. Check all email addresses you want to associate the signature with.
- Once done, click Add.
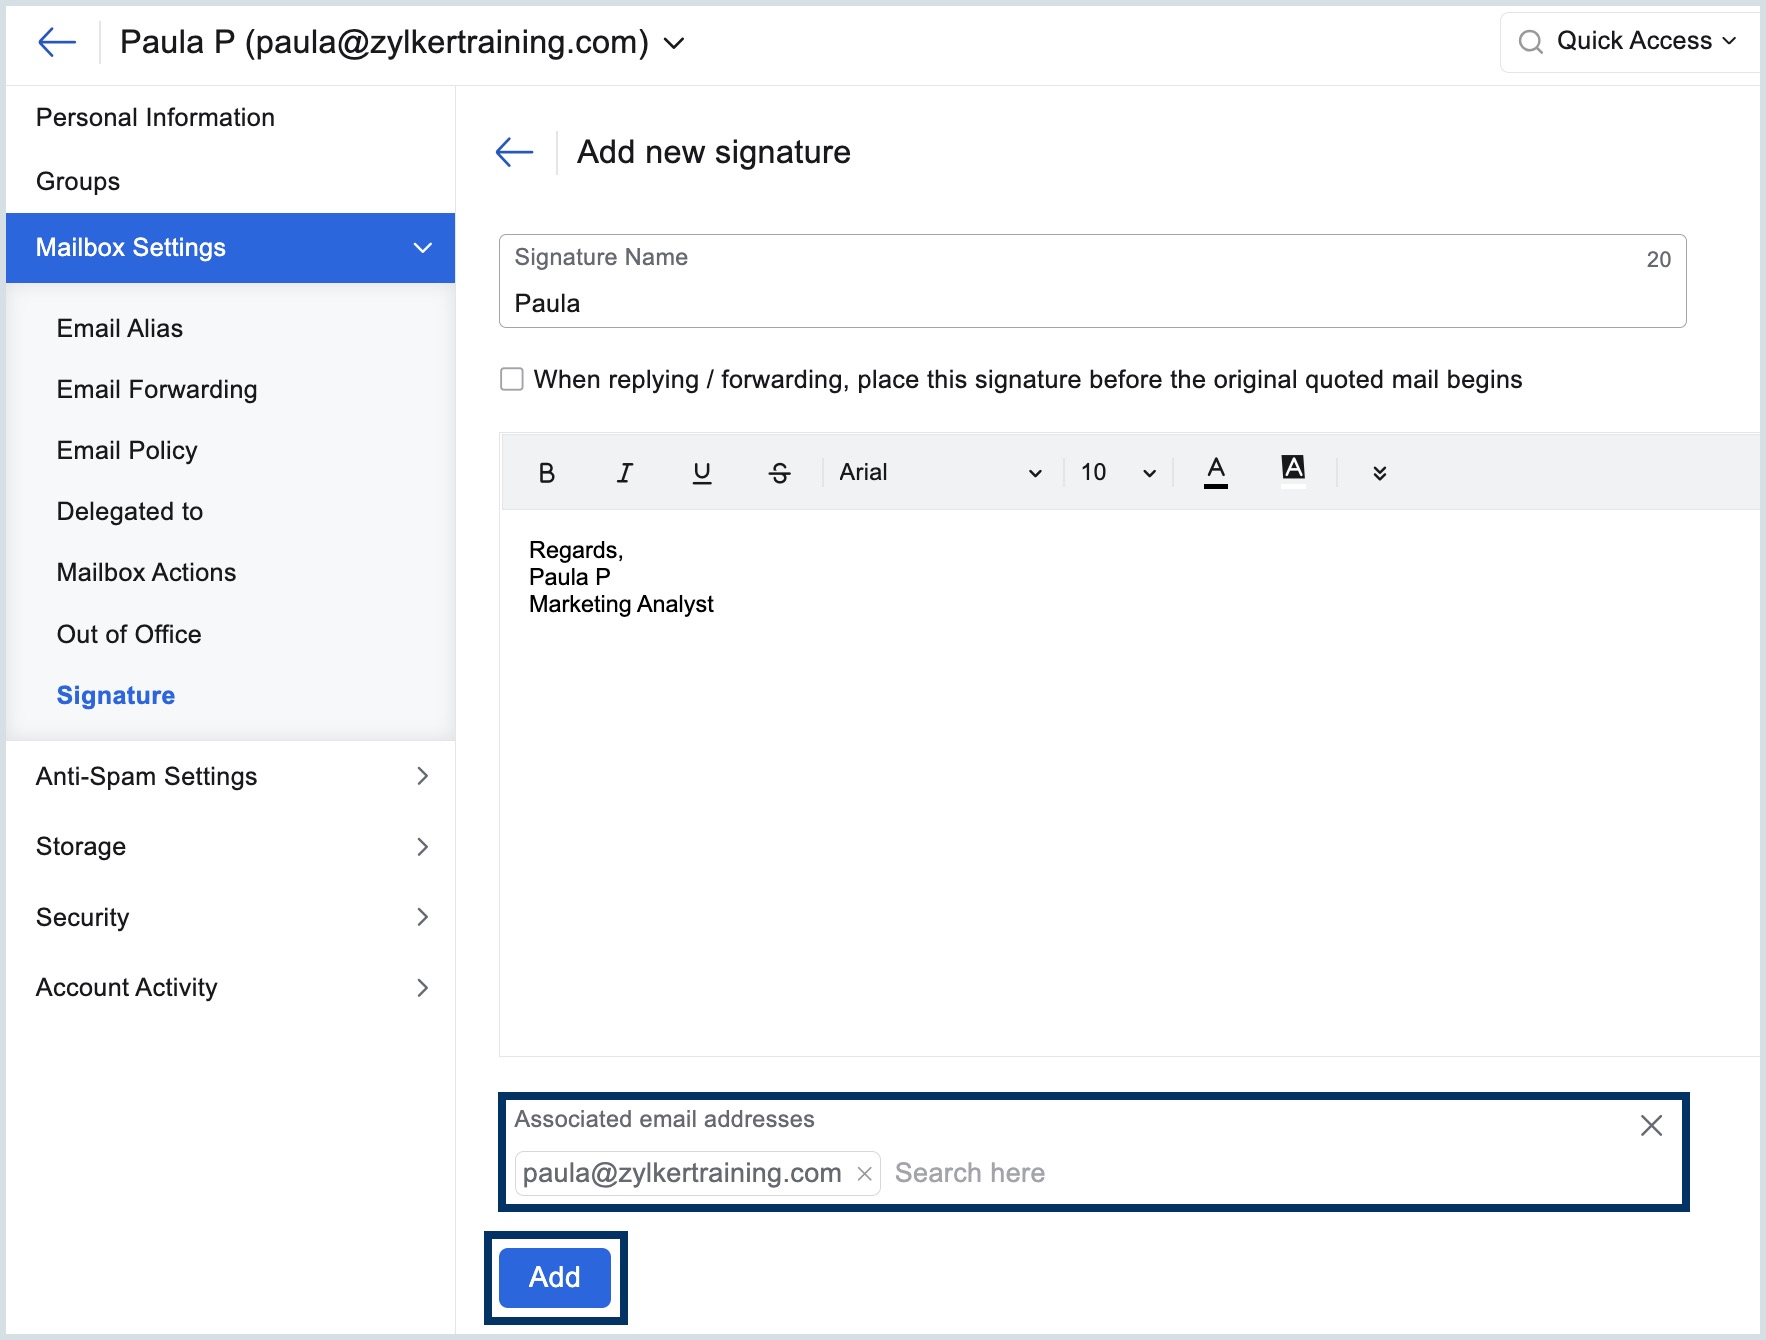
Note:
- Users will not be able to edit or change the associated email address of the signature created by Administrators.
If your configured email signature isn’t appearing while composing a new email, ensure that the signature configured in the Admin Console is properly mapped under the Associated Email Address for the respective user.
Learn how a user can set a signature from his/her Zoho Mail account.
Manage incoming email settings in Zoho Mail
The Incoming Email Settings section lets you manage user-level anti-spam controls in Zoho Mail by adding email addresses or domains to four lists; Allowed, Blocked, Trusted, and Rejected. These anti-spam settings work alongside the organization-level spam control policies.
These settings include:
- Allowed List: To prevent legitimate emails from being marked as spam, administrators can add the relevant domains, or email addresses to the Allowed List. This ensures that the emails are delivered directly to the user's inbox. Being on the Allowed List does not guarantee inbox delivery — emails that fail spam checks may still land in the Spam folder.
- Blocked List: The Blocked List contains email addresses or domains that you specifically designate as spam. Once added, all incoming messages from these sources are automatically directed to the user's Spam folder, preventing unwanted or potentially harmful emails from reaching the inbox. Even if the domain passes the SPF test, emails from a blocked domain will still be marked as spam.
- Trusted List: The Trusted List allows you to add email addresses that should be excluded from spam processing. Emails received from entities on the Trusted List will not be subjected to any of the usual spam checks, including SPF, DKIM, or block list validations.
- Rejected List: To block unwanted senders, administrators can add their email addresses to the Rejected List. Emails from these senders are bounced without any checks, preventing them from reaching the user's inbox.
Note:
The organization's Allowed/Blocked list and Trusted/Rejected list takes precedence over the user's Allowed/Blocked list and Trusted/Rejected list.
How to add allowed, blocked, trusted, or rejected email addresses for a user
You can add specific email addresses to a user's Allowed, Blocked, Trusted, or Rejected list from the Incoming Email Settings section. Multiple addresses can be added at once using comma separation, imported, or exported in bulk using a CSV file.
- Log in to Zoho Mail Admin Console.
- Navigate to Users in the left pane and select the preferred user.
- On the user page, click Incoming Email Settings and select Email addresses.
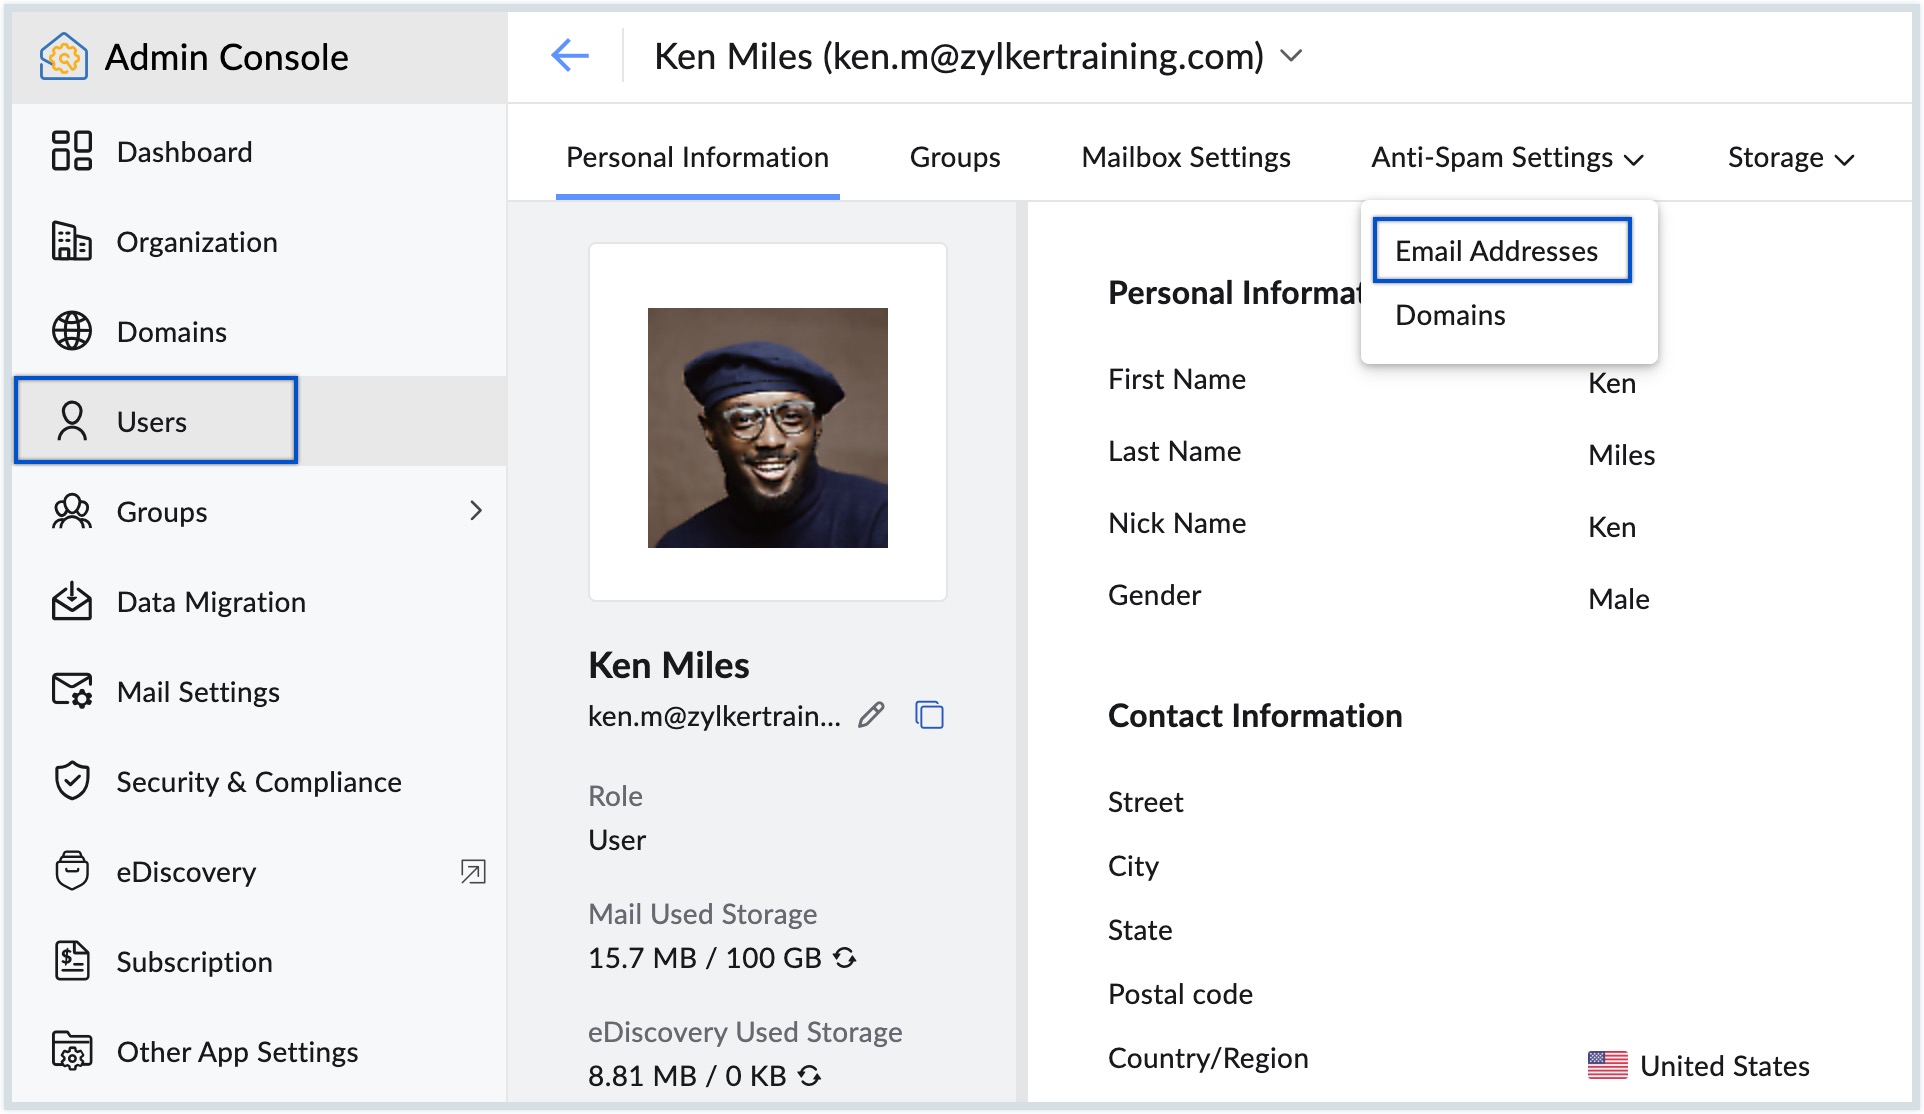
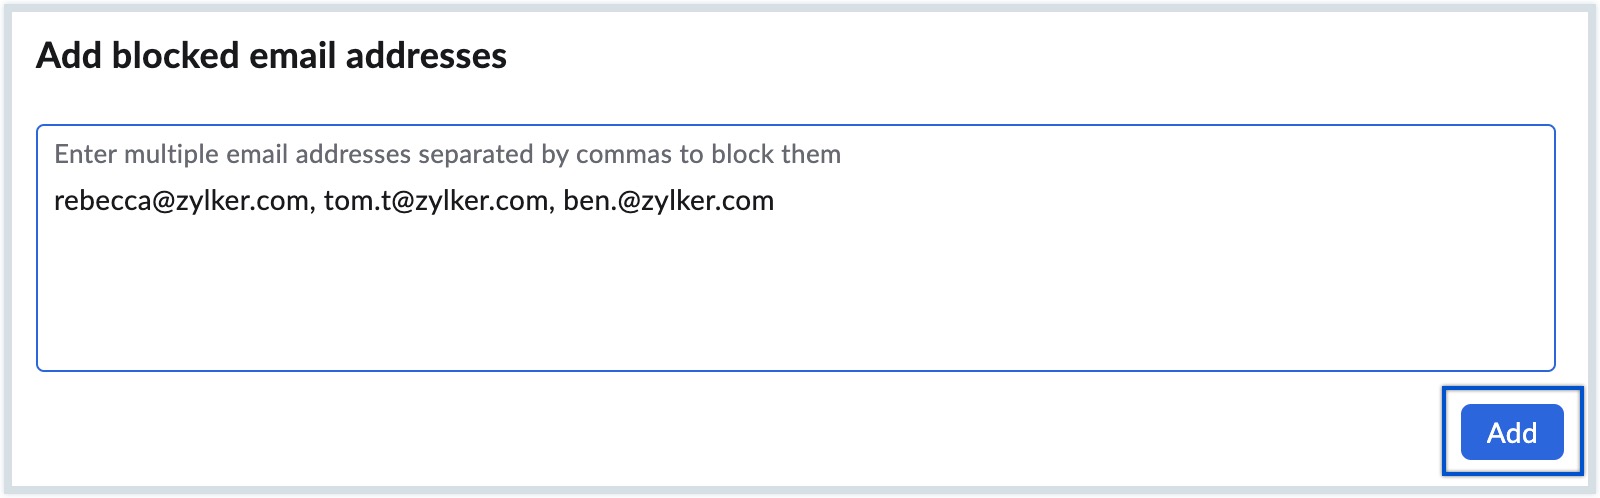
- Click Add under Allowed/Blocked Email Addresses on the top menu within your chosen section, based on whether you're adding the email address to the allowed list or the blocked list.
- Enter one or more email addresses separated by a comma to add to the list, and click Add.
- Navigate to Trusted List / Rejected List section on the top menu and add users based on whether you're adding the email address to the Trusted or Rejected list.
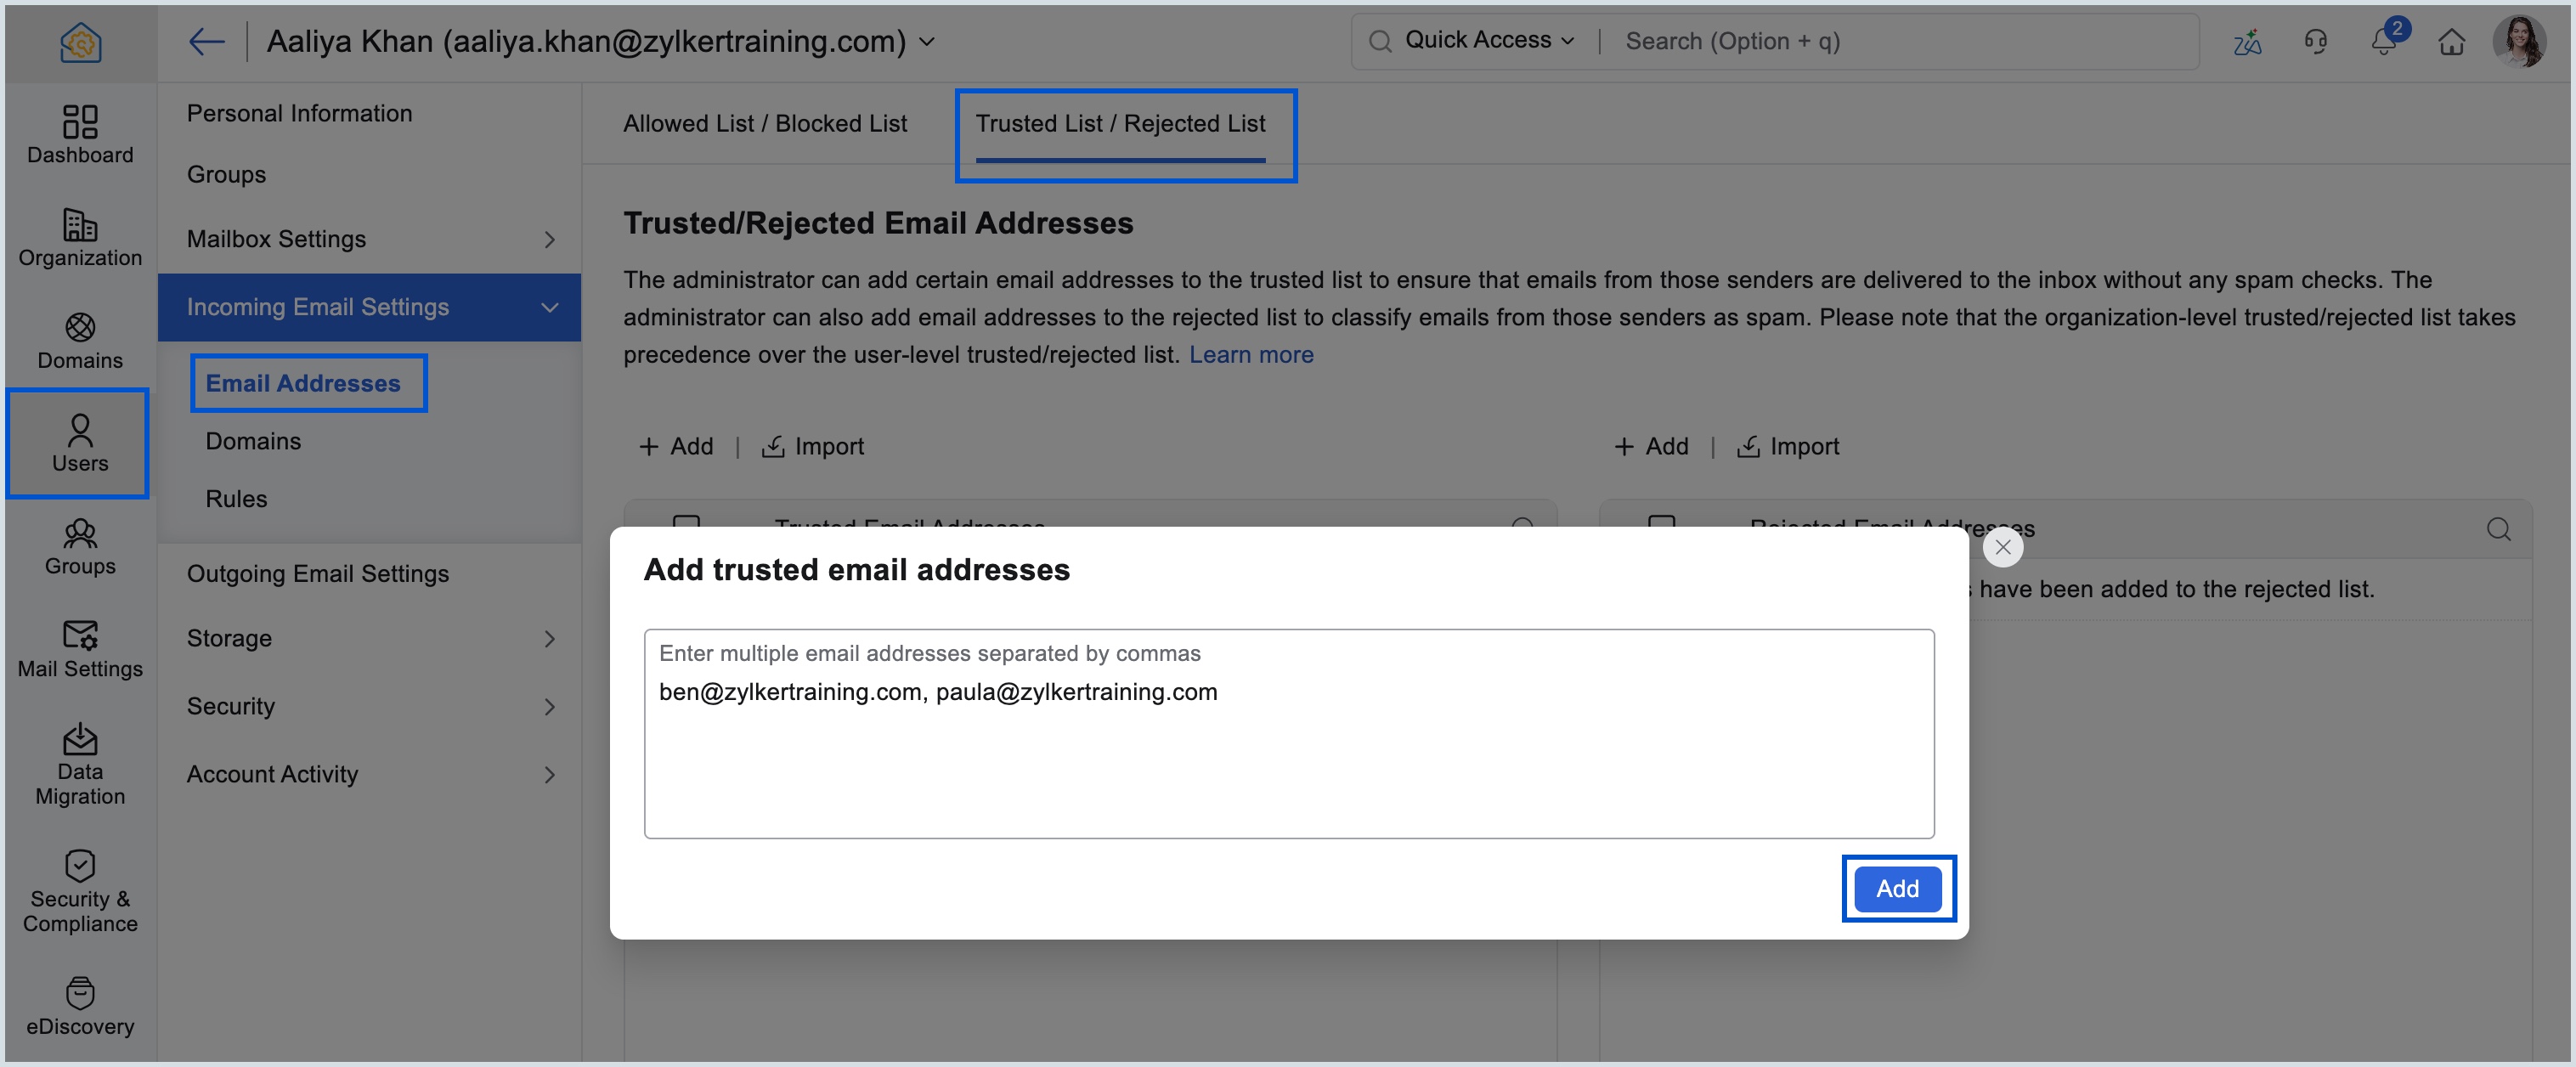
- Enter one or more email addresses separated by a comma to add to the list, and click Add in the corresponding list.
Learn how a user can set an email address under Allowed, Blocked, Trusted, or Rejected list from his or her Zoho Mail account.
Allow or block entire domains for a specific user in Zoho Mail
In addition to email addresses, Zoho Mail lets you add entire domains to a user's Allowed or Blocked list. Once added, all emails from that domain are automatically permitted or blocked, and the entries can be moved between lists or exported at any time.
- Log in to Zoho Mail Admin Console.
- Navigate to Users in the left pane and select the preferred user.
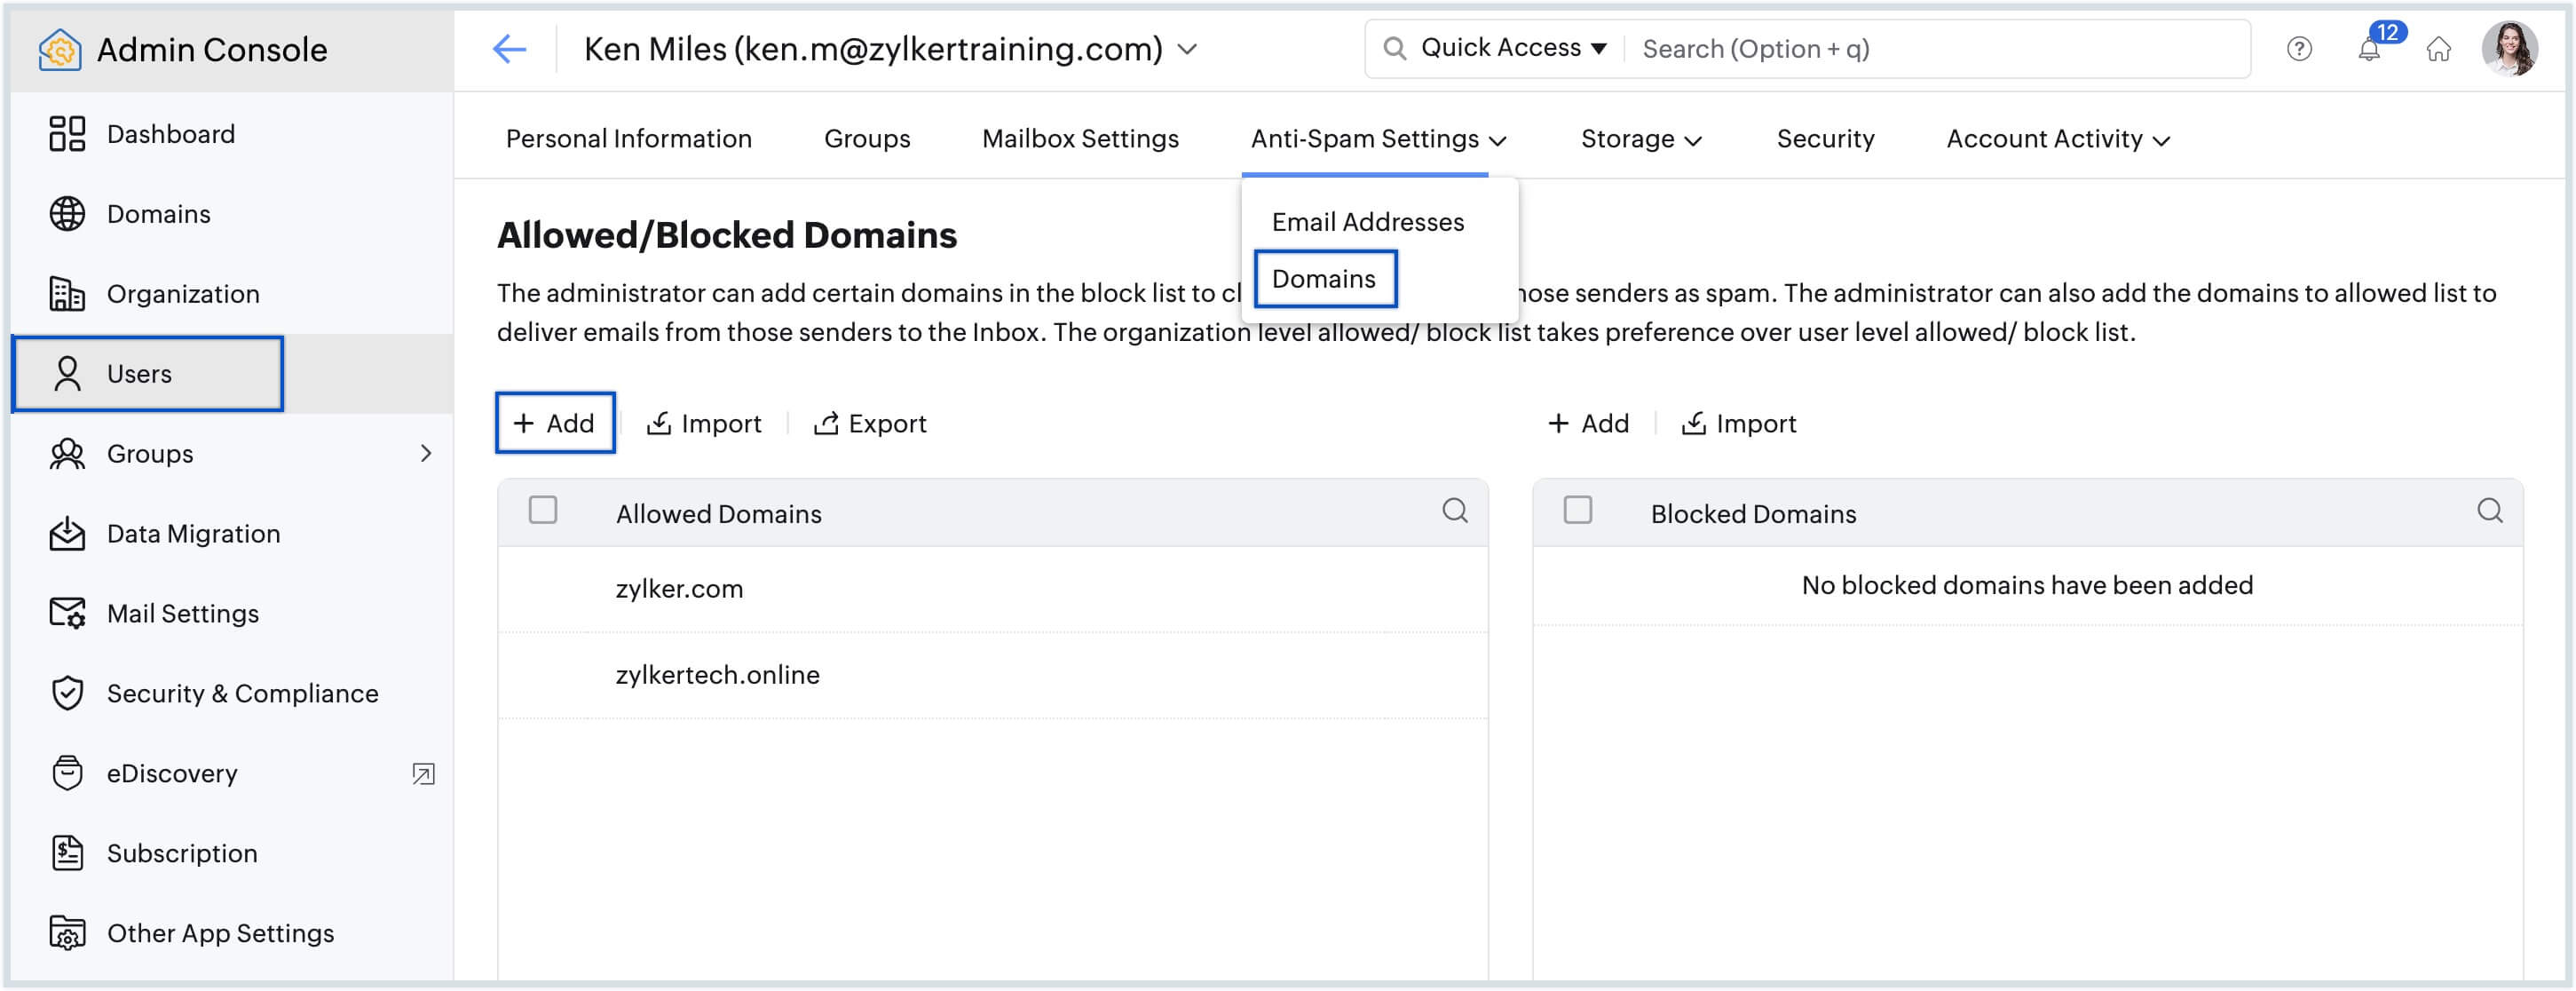
- On the user page, click Incoming Email settings and select Domain.
- Click Add on the top menu within your chosen section, based on whether you're adding the domain to the allowed list or the blocked list.
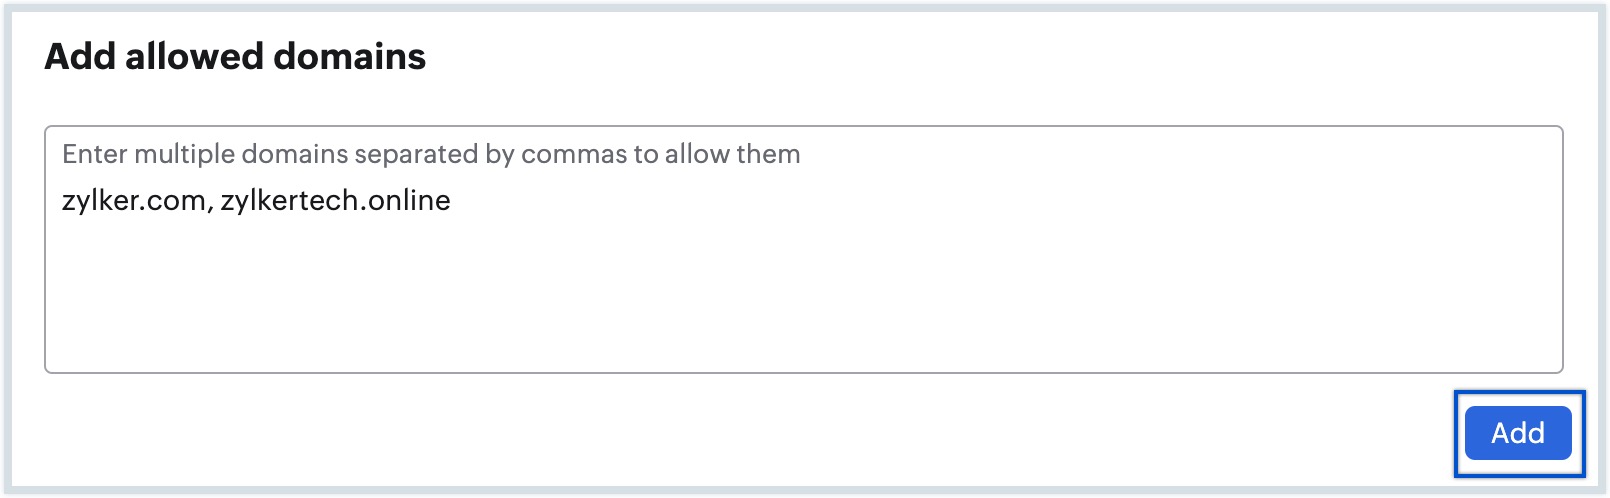
- Enter one or more domains separated by a comma to add to the list and click Add.
To delete an email address or domain from the list, hover over the email address or domain and click the Delete icon.
In case you want to move an email address or domain from allowed list to blocked list and vice versa, you can use the checkbox to select them from the list and then click Move to Allowed List / Move to Blocked List in the top menu based on your preference.
You can also add email addresses or domains to these lists by clicking on the Import option from the top menu. Click the Import icon in the top menu from the preferred section and upload the relevant CSV file. Information in the file will be added to the selected allowed or blocked list. You can download any list of your choice by clicking on the Export option.
Note:
Adding email addresses or domains to the Allowed List/Blocked List does not 100% guarantee email delivery/rejection. The emails will be processed as per the Delivery Action specified in the organizational Spam Control settings.
View and manage incoming email rules for a user in Zoho Mail
The Rules section lists all active incoming mail rules that apply to the selected user, along with their conditions and actions. You can review the rule details, edit the rule, or export the full list of rules in CSV format.
Below are the list of actions you can perform under Rules.
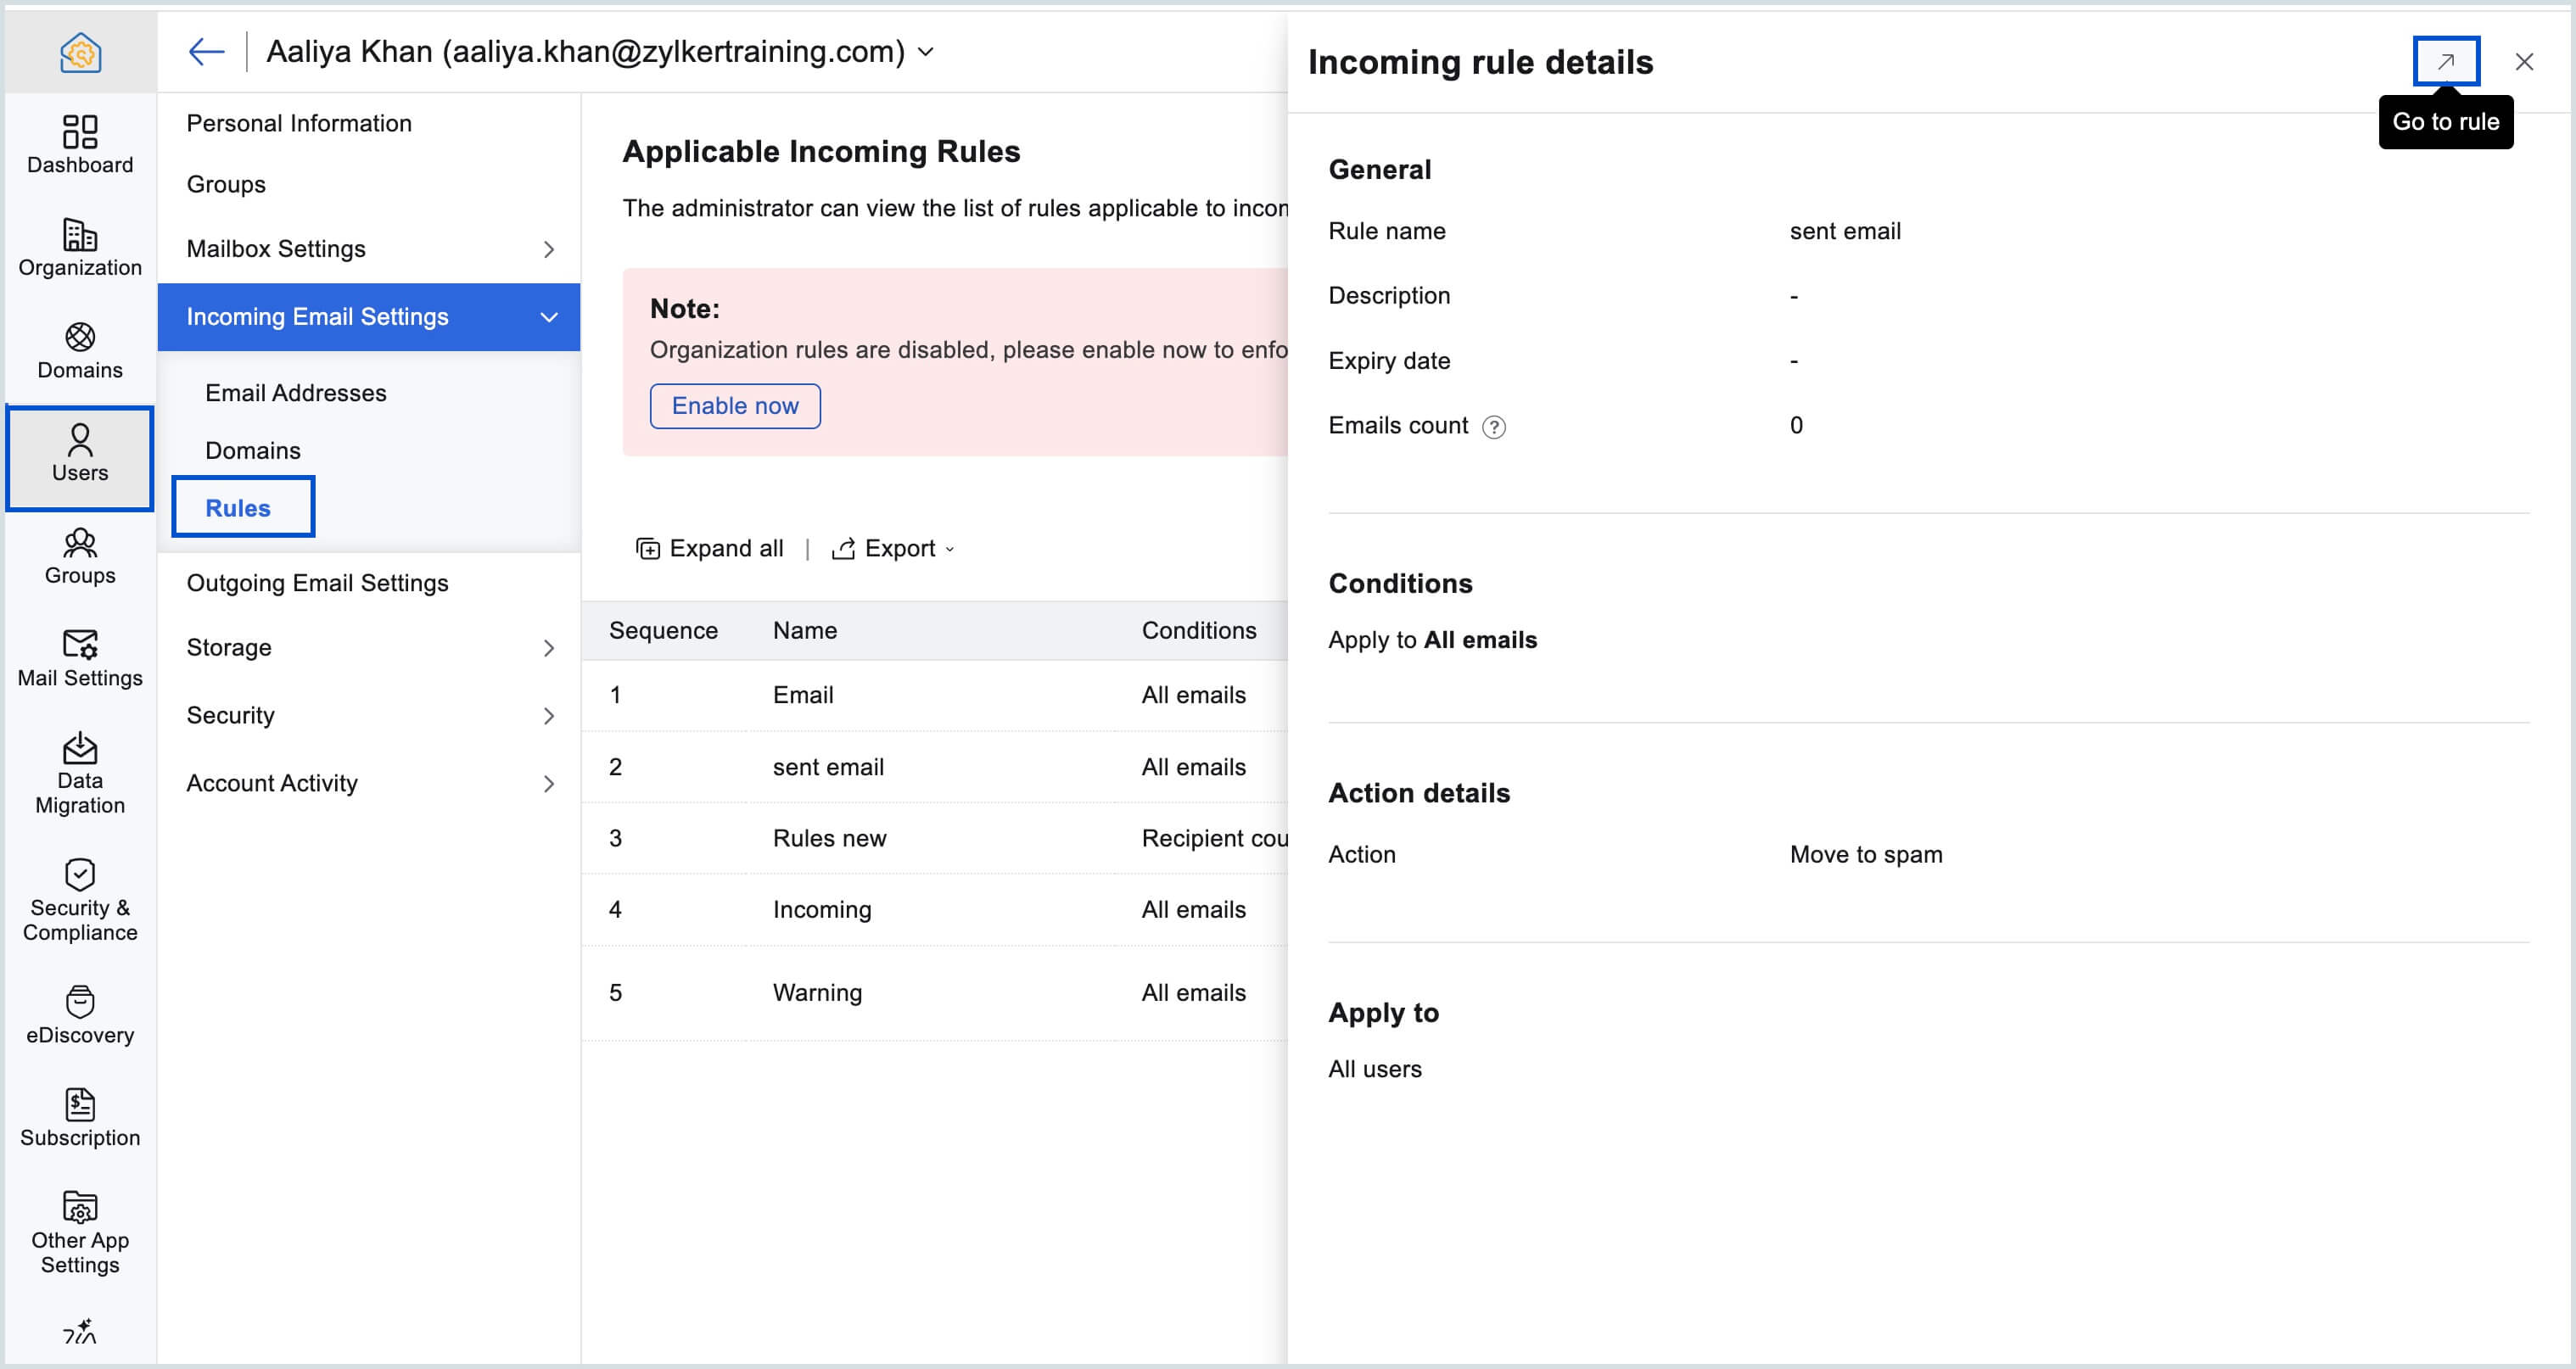
- Select a specific incoming rule and view the details like Actions, Conditions, and Apply to without having to move outside of the current page.
- Click on the Go to rule icon on the top-right corner to view the selected Rule in the Mail Settings > Rules > Incoming Rules section.
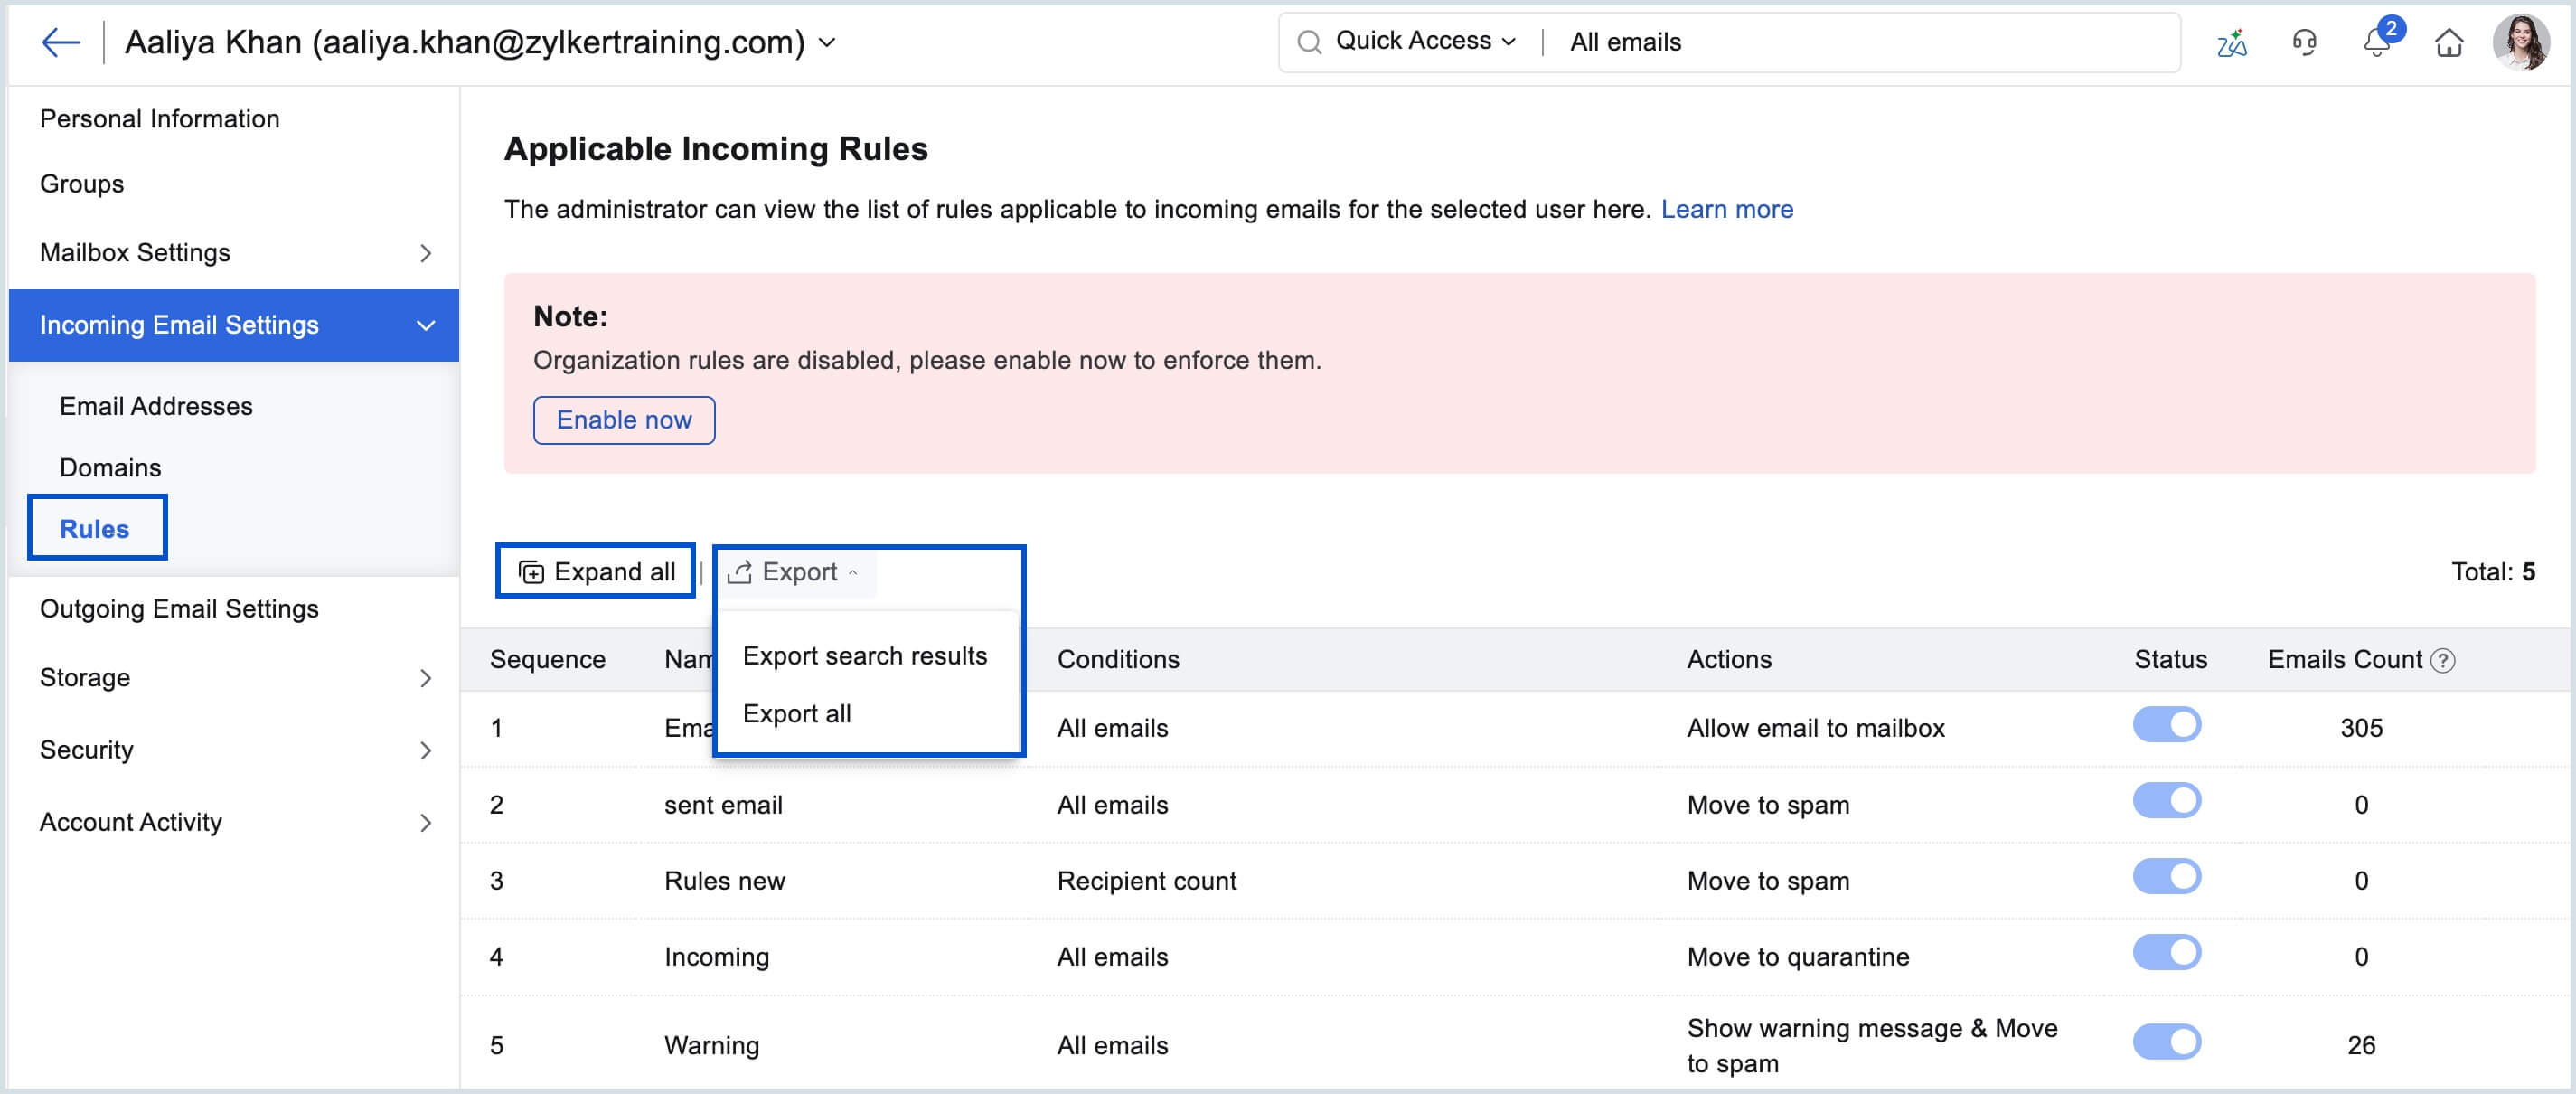
- Select Expand all to view the rule conditions in detail.
- Click Export icon and choose either Export search results/Export all to export the listed incoming rules in CSV format.
View and manage outgoing email rules for a user in Zoho Mail
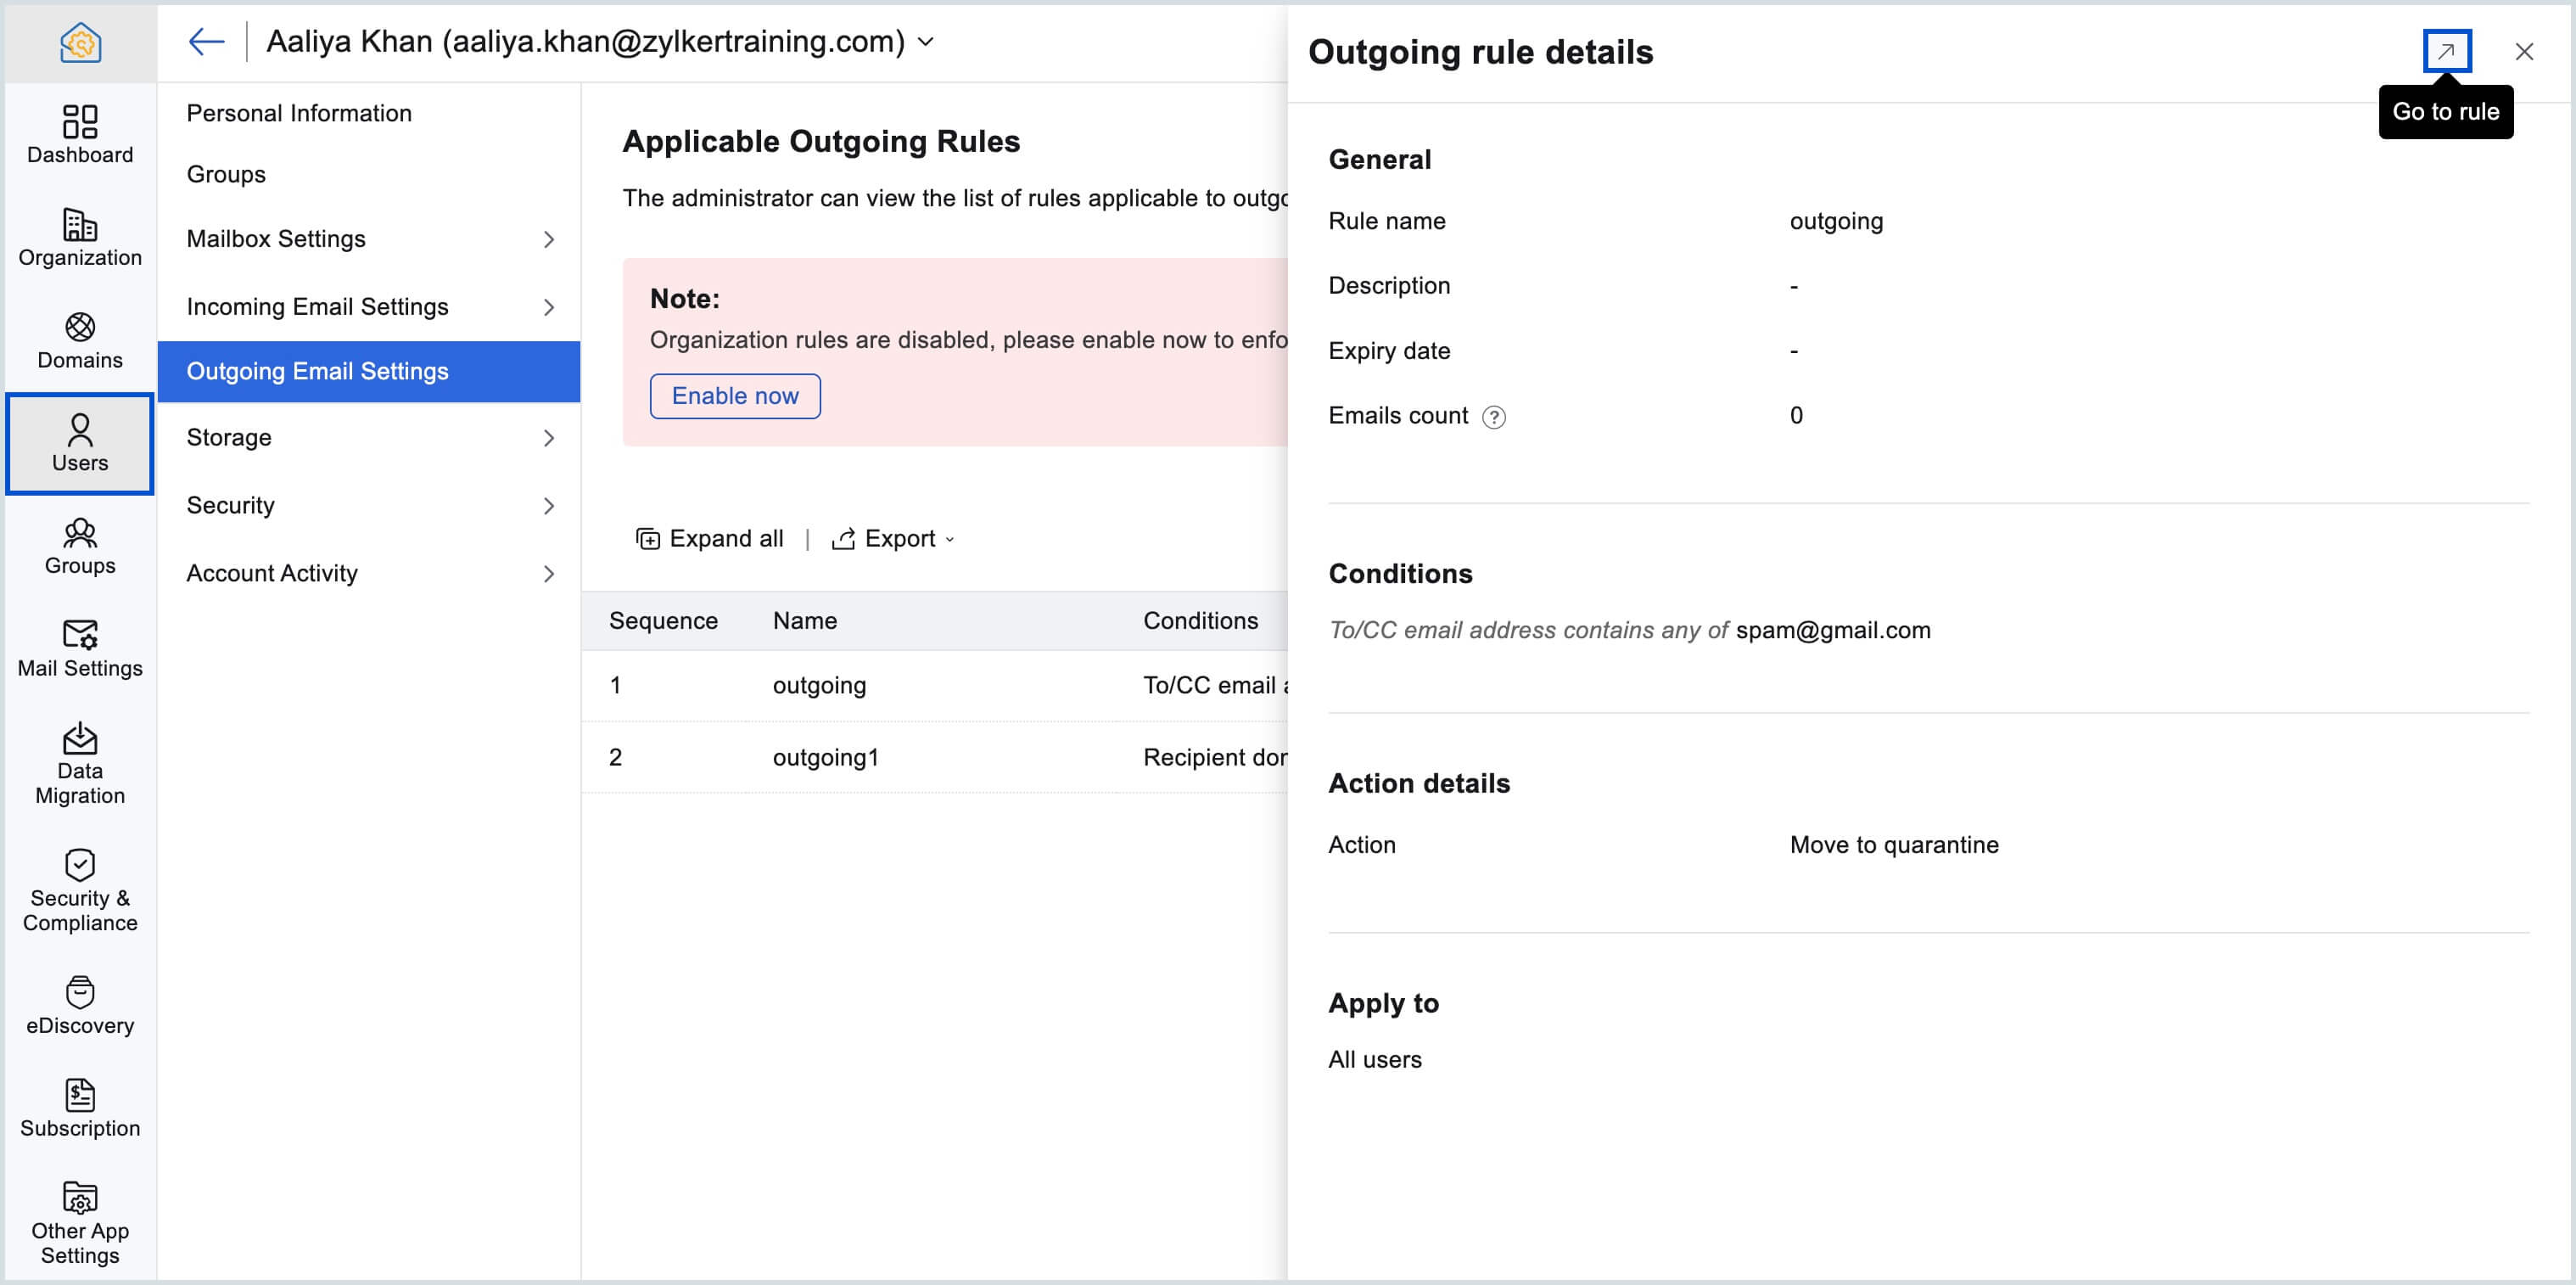
Outgoing Email Settings section lists all active outgoing mail rules that apply to the selected user, along with their conditions and actions. You can review the rule details, edit the rules, or export the full list in CSV format.
- Select a specific outgoing rule and view the details like Actions, Conditions, and Apply to without having to move outside of the current page.
- Click on the Go to rule icon on the top-right corner to view the selected Rule in the Mail Settings > Rules > Outgoing Rules section.
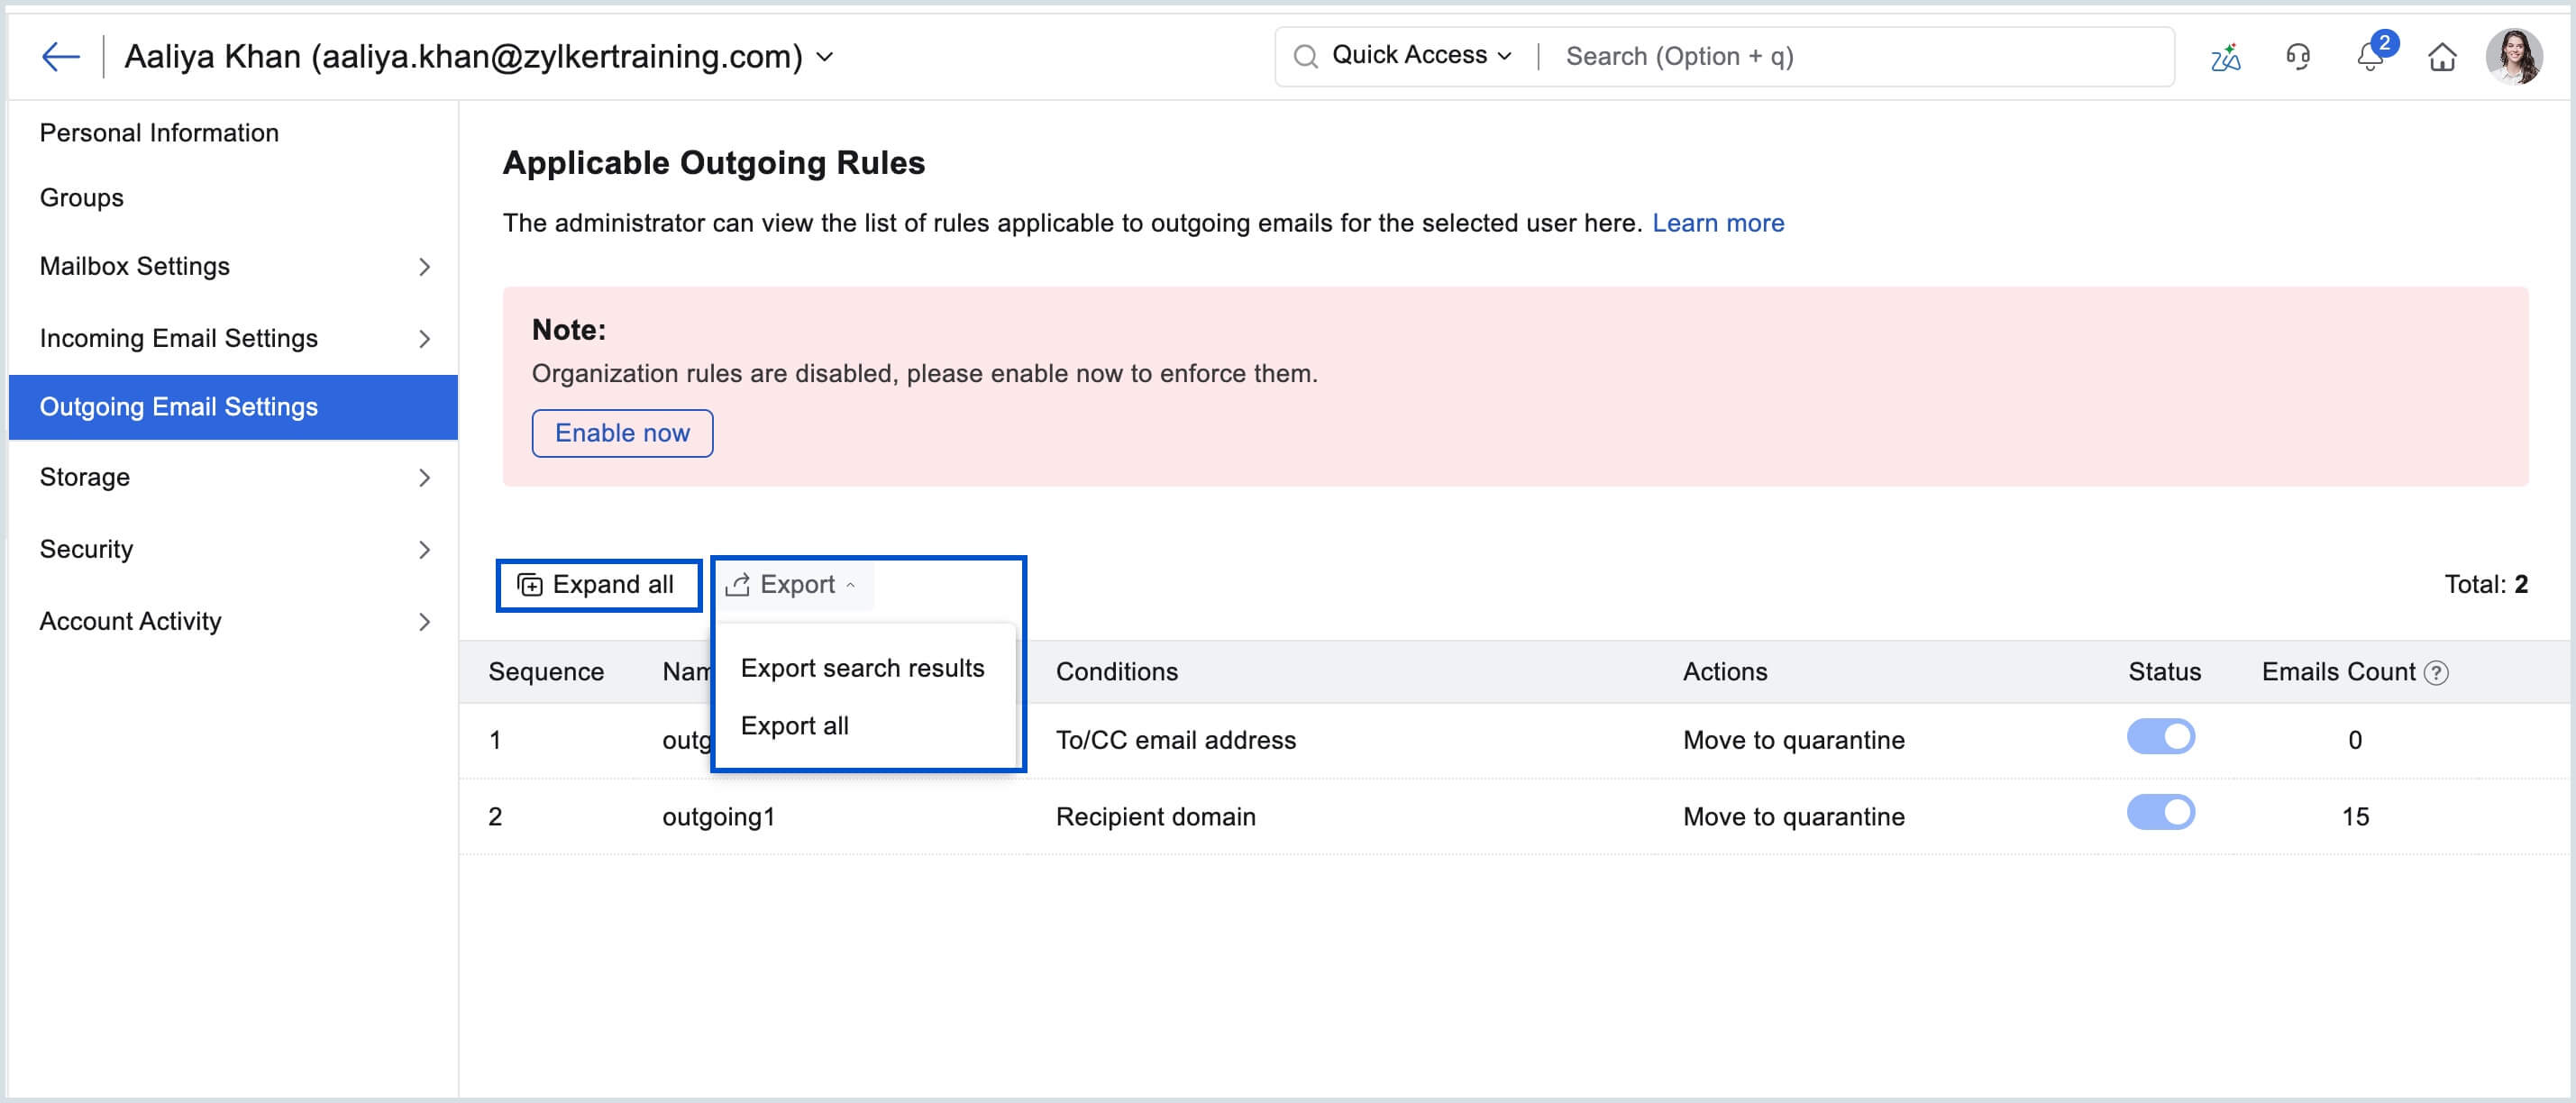
- Select Expand all to view the rule conditions in detail.
- Click Export icon and choose either Export search results/Export all to export the listed outgoing rules in CSV format.
Monitor user account activity in Zoho Mail Admin Console
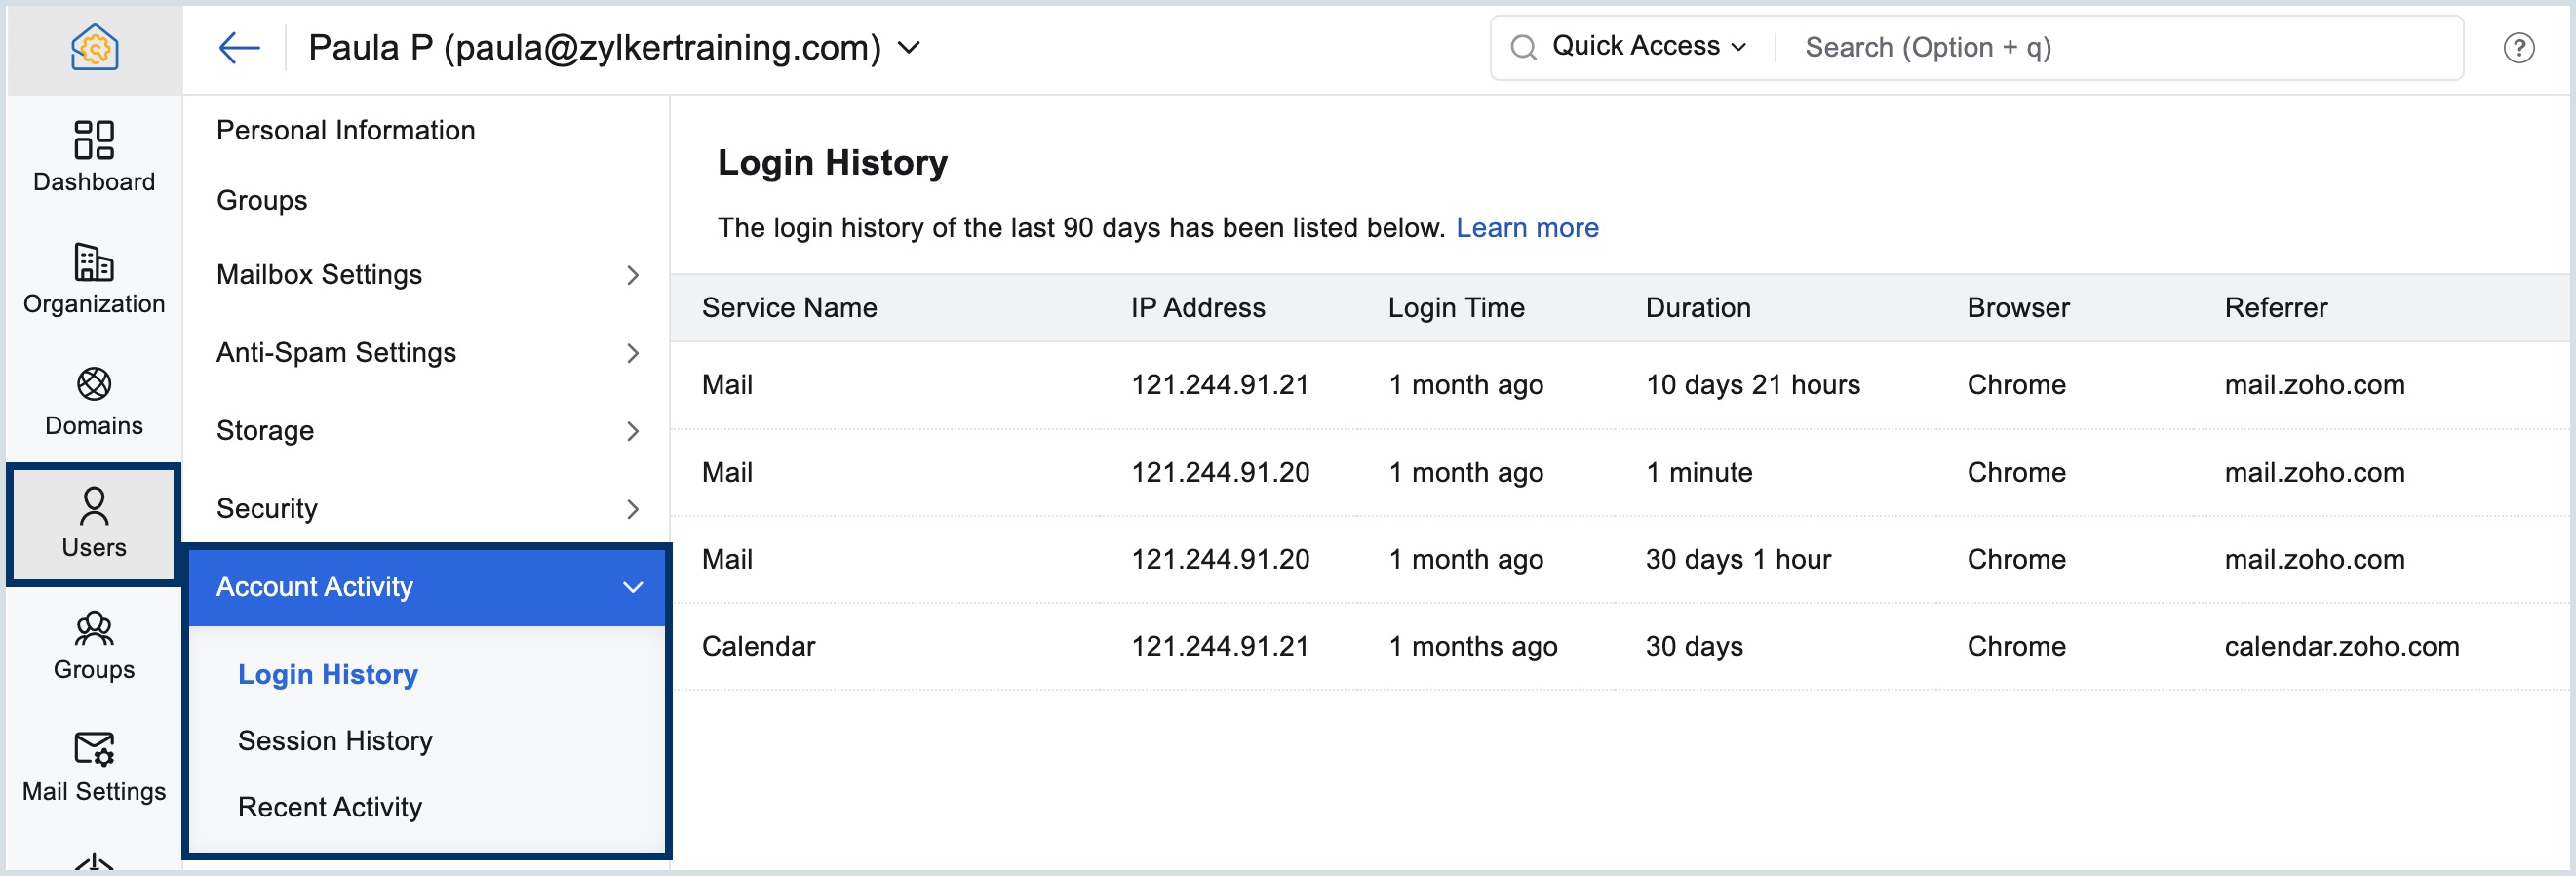
The Account Activity section in Zoho Mail Admin Console gives admins a complete list of each user's login history, active sessions, and recent activity. This is useful for security audits, compliance reviews, and diagnosing suspicious access patterns.
What does login history show in Zoho Mail Admin Console?
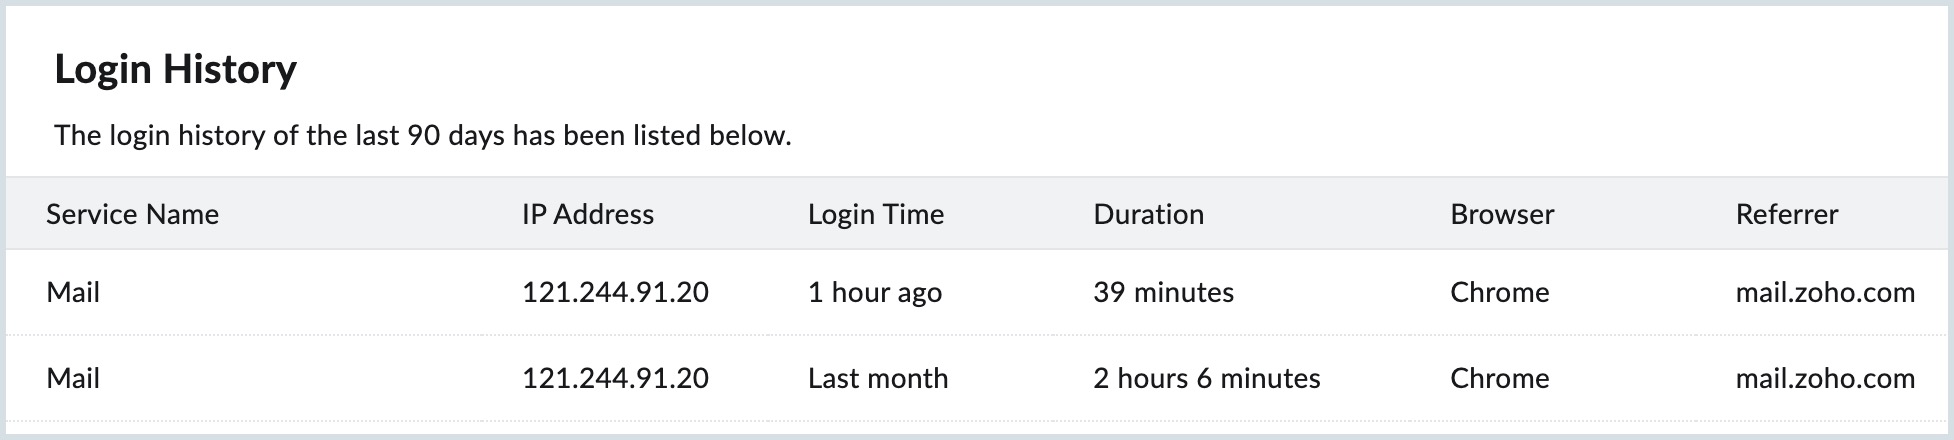
The Login History log records every login event for a user over the last 90 days, including the time, IP address, browser, session duration, and application used to sign in. Admins can use this to identify unauthorized access or verify that a user's account is being used as expected.
Know more about the Login activity reports under Admin Reports.
What is session history in Zoho Mail and how does it work?
The Session History section shows all currently active logins for a user across different devices. For example, one session from a laptop and one from a mobile device would show as two active sessions.
Note:
Only users with the role as an Admin, Super Admin, or User Management Admin can end an active session that is listed under the Session History.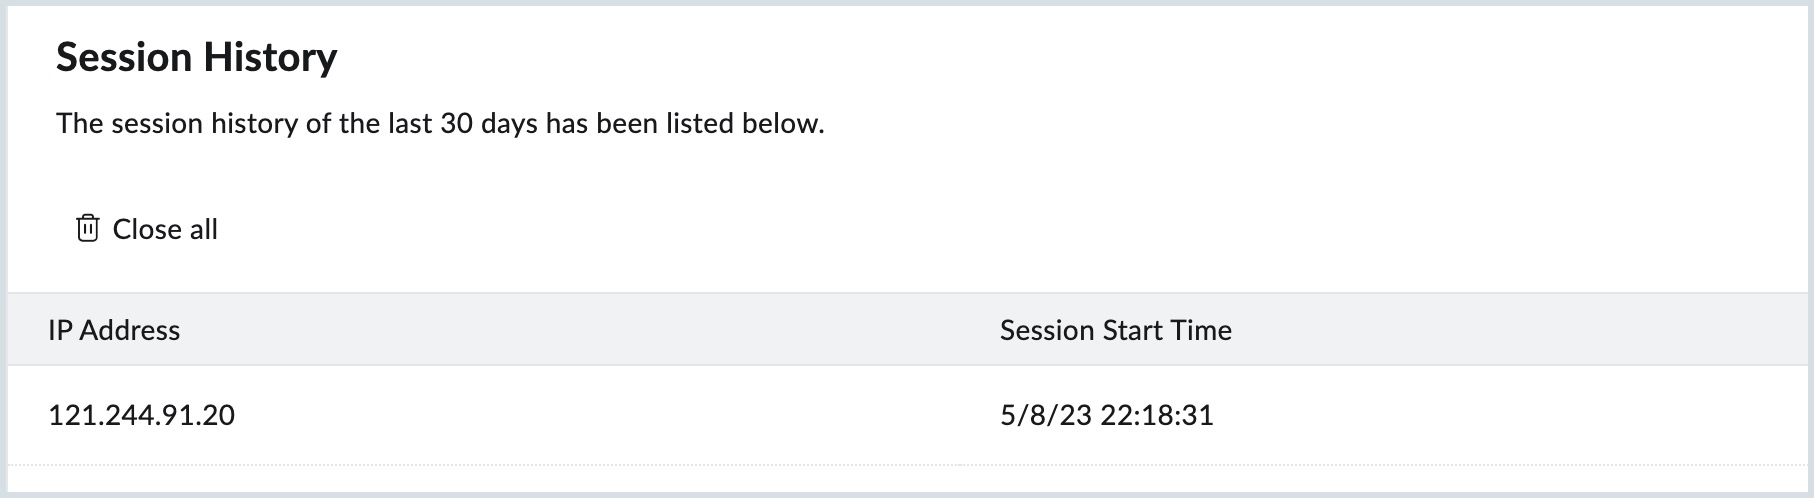
Once they sign out of their accounts, there will be no active sessions.
Learn more about the Session history report under Admin Reports.
What does the recent activity tab show in Zoho Mail Admin Console?
The Recent Activity lists the recent events made on the user account by the admins and moderators. For example, events such as adding the user to a group, deleting the user, changing the role of the user, etc., are some of the events recorded here.
The members who performed those events along with the time will be displayed next to the event. You can access the Audit Logs right from the Recent Activity tab which contains the detailed organizational activities.
You also have the option to specify a particular day/week/month, or a custom timeline and the recent activities for that day/timeline will be displayed.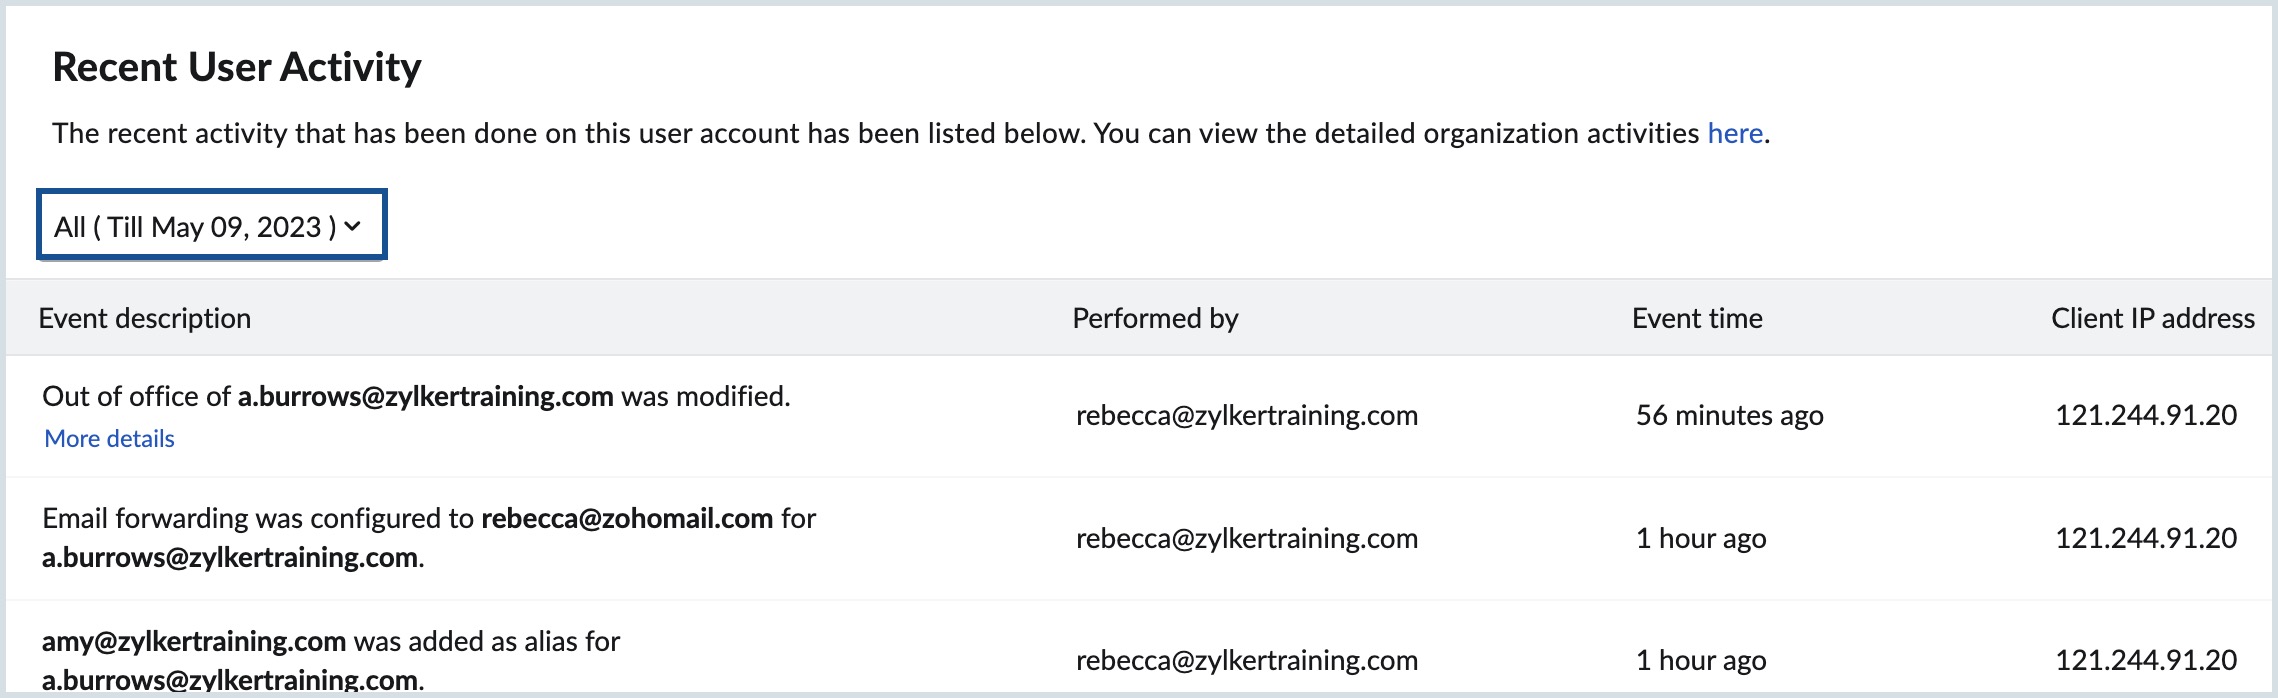
Frequently asked questions (FAQs)
What settings are removed when a Zoho Mail user account is deactivated?
When a user account is deactivated in Zoho Mail, the admin can choose to automatically block incoming emails, remove the user from all groups, remove all email aliases, and disable email forwarding. These settings are not automatically restored when the account is reactivated, they must be manually reconfigured by the admin.
What is the difference between blocking and deactivating a user in Zoho Mail?
Blocking a user in Zoho Mail suspends only their incoming and outgoing email access, while the account itself remains active. Deactivating a user goes further by suspending access to the mailbox and all connected Zoho applications such as CRM, Projects, and Invoice. This optionally removes group memberships, email aliases, and forwarding settings.
Can a Zoho Mail admin set an out-of-office reply on behalf of a user?
Yes. Admins can configure an out-of-office auto-reply for any user directly from the Admin Console, which is particularly useful when a user is unavailable due to leave or a medical emergency. Admins can set the duration, auto-response interval, and separate messages for internal organization users and external senders.
How many email aliases can be added to a user in Zoho Mail and can they be reassigned?
Zoho Mail allows admins to add multiple email aliases to a user, and each alias can be used to send, receive, and log in to the account. If an alias is no longer needed for one user, it can be directly reassigned to a different user using the Reassign option in the Email Alias section, without needing to delete and recreate it.
What does the account activity section show for a user in Zoho Mail Admin Console?
The Account Activity section provides admins with a complete audit trail for each user, covering Login History (last 90 days including IP address, browser, and session duration), Session History (all currently active logins across devices), and Recent Activity (admin and moderator actions such as role changes, group additions, and account deletions). Admins can also access the full organizational Audit Logs directly from the Recent Activity tab.