Widgets in Cliq
A new widget development flow is now available, built around tab configuration. Define your tabs, control their behavior, and add the logic for each tab independently.
Learn more about the new development flow →
Widgets in Cliq serve as a unified control panel, providing a structured, customizable interface for displaying information. From a single location, you can track, manage, and control various aspects of your workflows.
Whether it's pulling data from different apps, showing live updates, or enabling quick actions, these widgets streamline your workflow. Rather than switching between multiple tabs or tools, users can view information, perform tasks, and monitor everything from one cohesive space.
Widgets serve as the presentation layer for business logic, allowing developers to surface data from internal systems, third-party services, or Cliq functions in a unified, interactive format. They support a wide range of textual and visual elements to make the displayed data more actionable.
Understanding a widget's structure
Before you start building a widget, it is valuable to understand the basic structure and hierarchy of widgets in Cliq.
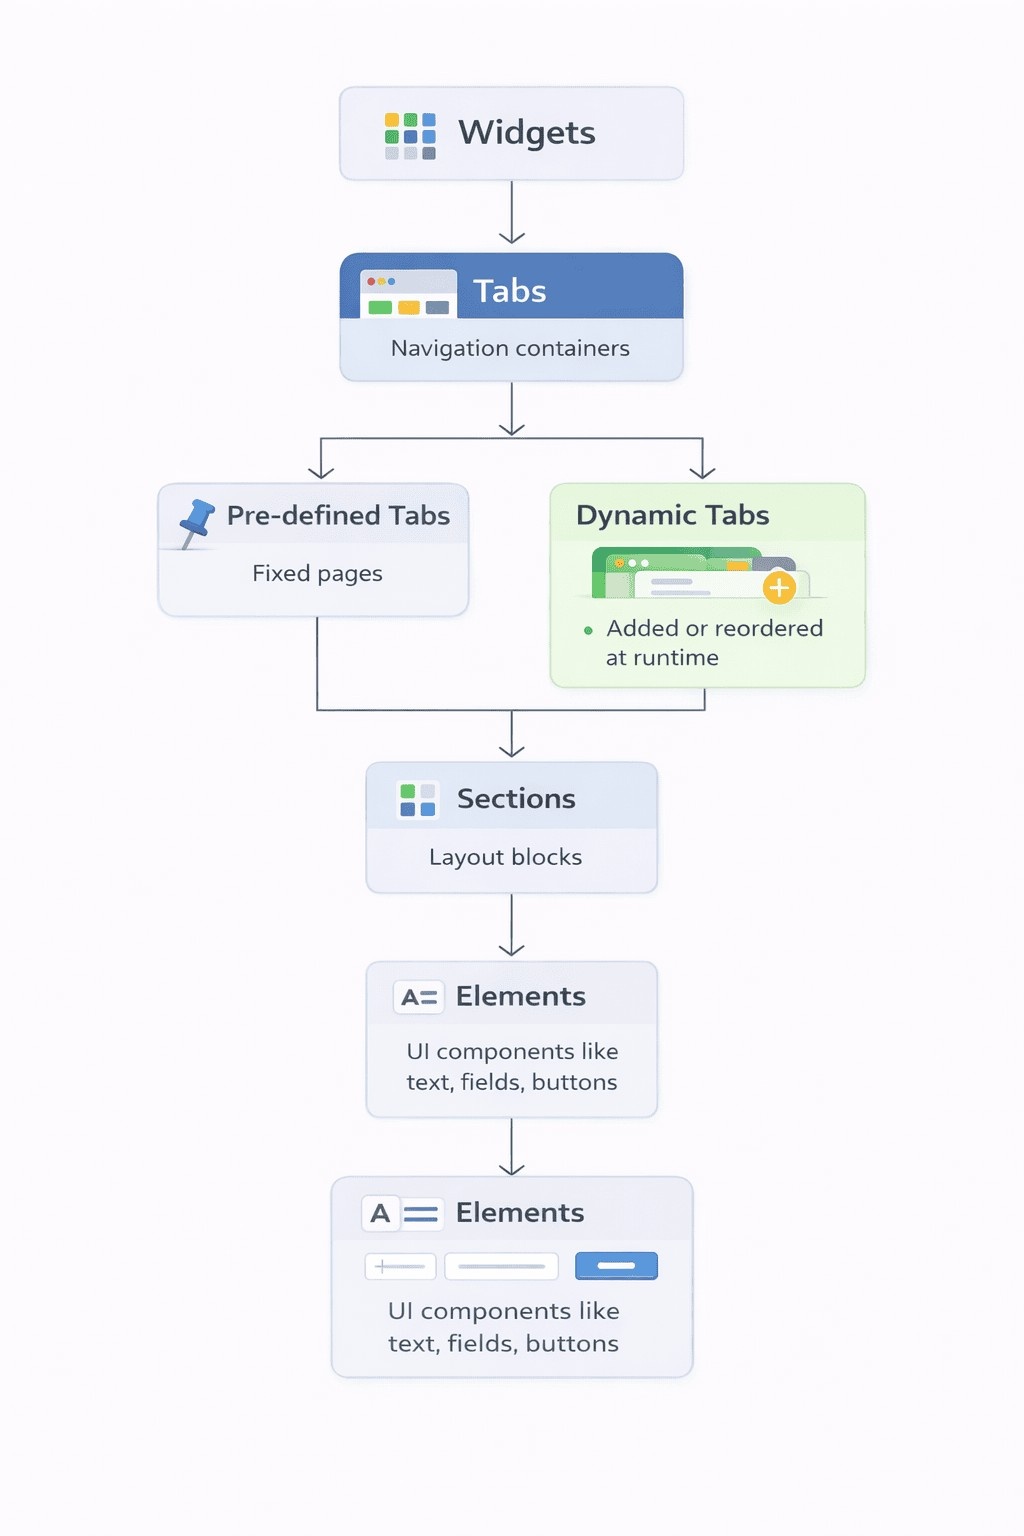
Widgets - Tabs - sections - elements
Tabs divide the widget interface into distinct logical areas, helping users navigate between different functions or data categories.
Each tab is made up of sections that organise related information into groups of similar content.
Sections contain individual elements, such as text, tables, images, and other content types that form the core visual and informational parts of the widget.
In summary, Widgets in Cliq are composed of tabs, each containing sections that hold various elements.
Tabs
Cliq widget tabs function similarly to tabs in a web browser. They are labelled, clickable areas that each contain a mix of different sections and elements. You can think of a tab as the outer container for your widget’s components.
To switch between tabs, simply click on them. Just like in a browser, the currently selected tab is highlighted to distinguish it from the others.
Tabs can be classified in two ways: by their configuration and by their view type. These classifications determine how tabs are set up and displayed within a widget.
New Widget Development Flow
A new development flow has been introduced for widgets, replacing the existing approach. Widgets can now be built based on tab configuration, allowing the tab configuration to define the tabs available in the widget, their order, and whether each tab is enabled, disabled, or hidden.
Classification based on tab configuration
Tab configuration controls the existence and behaviour of tabs inside a widget. It defines which tabs a user sees, the order in which tabs appear, and whether a tab is enabled, disabled, or hidden.

Tab configuration can be defined in two ways: predefined and dynamic
Predefined tabs
Predefined tabs are static tabs declared during development and remain constant for all users who access the widget. This approach is suitable when the widget serves a single purpose, and the information structure does not vary across audiences.
A maximum of 5 predefined tabs can be created in a widget, and developers can reorder and rename them.
Pre-defined tabs can be added as chat tabs, allowing users to access and view them directly, ideal for tracking tickets, viewing customer profiles, or monitoring project updates without leaving the chat.

How to add pre-defined tabs?
After entering the widget details, the page for editing and defining the tabs will open.
Click the "Add Tab" button, enter the tab name, and then click the "Save" button.

Once you have saved a predefined tab, you can edit its name, add scripts or logic, and delete it if necessary.

To add a new tab, click the "Add Tab" button with the plus icon
You can create up to five predefined tabs. You can reorder them by hovering over a predefined tab and dragging it to your preferred position.

Dynamic tabs
Dynamic tabs are generated at runtime based on provided logic that evaluates user roles, permissions, data availability, or other business conditions. You can dynamically configure which tabs are displayed in your widget, and even return up to 50 tabs per response in chunks to efficiently support large-scale navigation.

Dynamic tabs consist of two handlers that define when a tab appears and what it displays.
Tabs: To define the list of tabs and manage the specific visibility rules for each tab.
View: To specify the content and layout that should be displayed when a particular tab is selected.
How are dynamic tabs rendered?
This widget's development approach uses a structured sequence for tab handling.
When a widget is opened, pre-defined tabs are displayed first. If static tabs exist, dynamic tabs are rendered according to logic, or they are loaded directly.
All dynamic tabs must be declared only in the tab handler, along with their tab_view_type.
The tab_view_type options are: classic, which displays tabs in a standard layout, and kiosk, which uses a grid-based layout specifically for mobile devices. This is optional, and if not specified, the default view type is classic.
Modifying dynamic tabs
Dynamic tabs can be modified at runtime using these operations:
Operation | Purpose |
add | Adds a new dynamic tab at the end |
add_after | Inserts a dynamic tab after a specific tab |
add_before | Insert a dynamic tab before a specific tab |
remove | Remove an existing dynamic tab |
Tab handling and search behaviour in dynamic tabs
Search handling in Tabs
When a user performs a search in the tab sidebar, the search term is passed to the Tabs Handler within the target map under the name attribute.
Developers can use this value to dynamically return relevant tabs based on their custom logic.
The handler can return up to 50 tabs per response, and these search results are appended to the existing tab set. This enables scalable, seamless navigation without reloading or replacing the entire tab structure.
Modifying existing tabs
Developers can also return a new array of up to 50 tabs to modify the tab set as needed.Active tabs
The list of active tabs is included in the target key under the tabs attribute. This allows developers to:Understand the current tab state.
Avoid duplicate additions
Apply conditional add or remove logic safely.
Example Usecase:
Let's consider a real-world business scenario involving a logistics dashboard built with a Cliq widget, where the displayed content varies based on a user's role in Cliq.

The widget features a predefined tab titled "Homepage" that is accessible to all users, providing common information and statistics. The user interface for this tab is defined in the predefined tab's code editor. For pre-defined tabs, the logic can be specified individually.

Script for predefined tab - Homepage
sections = List();
elements = list();
// Cover Image for the Widget
data = list();
imgMap = Map();
imgMap.put("url","https://www.zoho.com/sites/zweb/images/cliq/help/logisticsprologo.jpg");
data.add(imgMap);
elements.add({"type":"images","data":data,"style":{"view":"carousel","size":"large"}});
elements.add({"type":"text","text":"\n\n"});
sections.add({"id":"coverImage","elements":elements});
elements = list();
elements.add({"type":"title","text":"Logistics Dashboard"});
sections.add({"id":"tagline","elements":elements});
dataList = list();
eachData = Map();
eachData.put("title","💰 733,284");
eachData.put("description","Sales");
dataList.add(eachData);
eachData = Map();
eachData.put("title","📥  6,000");
eachData.put("description","Restocking Frequency | Bi-weekly");
dataList.add(eachData);
eachData = Map();
eachData.put("title","⌛ 4.2");
eachData.put("description","Average Processing Time (hrs)");
dataList.add(eachData);
eachData = Map();
eachData.put("title","🚚 12,294");
eachData.put("description","Shipment (in tons)");
dataList.add(eachData);
eachData = Map();
eachData.put("title","📈⚙️ 83%");
eachData.put("description","Utilization %");
dataList.add(eachData);
eachData = Map();
eachData.put("title","⚠️📦 5%");
eachData.put("description","Stockout Risk");
dataList.add(eachData);
elements = list();
elements.add({"type":"cards","data":dataList,"style":{"view":"carousel","size":"small"}});
elements.add({"type":"text","text":"\n\n"});
sections.add({"id":"cardstats","elements":elements});
elements4 = list();
elements4.add({"type":"table","headers":{"Supplier Name","Product Category","Avg. Delivery Time (Days)","Fulfillment Rate (%)","Contract Expiry Date","Price Variability (%)"},"rows":{{"Supplier Name":"GlobalTech","Product Category":"Laptops","Avg. Delivery Time (Days)":"6.5","Fulfillment Rate (%)":"92 %","Contract Expiry Date":"2025-12-31","Price Variability (%)":"1.5 %"},{"Supplier Name":"MedSupply","Product Category":"Medical Devices","Avg. Delivery Time (Days)":"4.2","Fulfillment Rate (%)":"96 %","Contract Expiry Date":"2026-06-30","Price Variability (%)":"2.8 %"},{"Supplier Name":"FreshAgri","Product Category":"Perishables","Avg. Delivery Time (Days)":"5","Fulfillment Rate (%)":"93 %","Contract Expiry Date":"2025-09-15","Price Variability (%)":"5.4 %"},{"Supplier Name":"AutoPartsCo","Product Category":"Auto Components","Avg. Delivery Time (Days)":"3","Fulfillment Rate (%)":"95 %","Contract Expiry Date":"2025-11-20","Price Variability (%)":"3.2 %"}},"style":{"text_align":{"center","center","center","center","center","center"}}});
sections.add({"id":4,"elements":elements4});
deliveryInfo = {{"label":"Delivered","value":1050},{"label":"In Progress","value":493},{"label":"Not Delivered","value":440}};
elements5 = list();
elements5.add({"type":"title","text":"Orders by Delivery Status"});
elements5.add({"type":"percentage_chart","styles":{"preview":"doughnut"},"data":deliveryInfo});
sections.add({"id":5,"elements":elements5});
return {"type":"applet","data_type":"sections","sections":sections};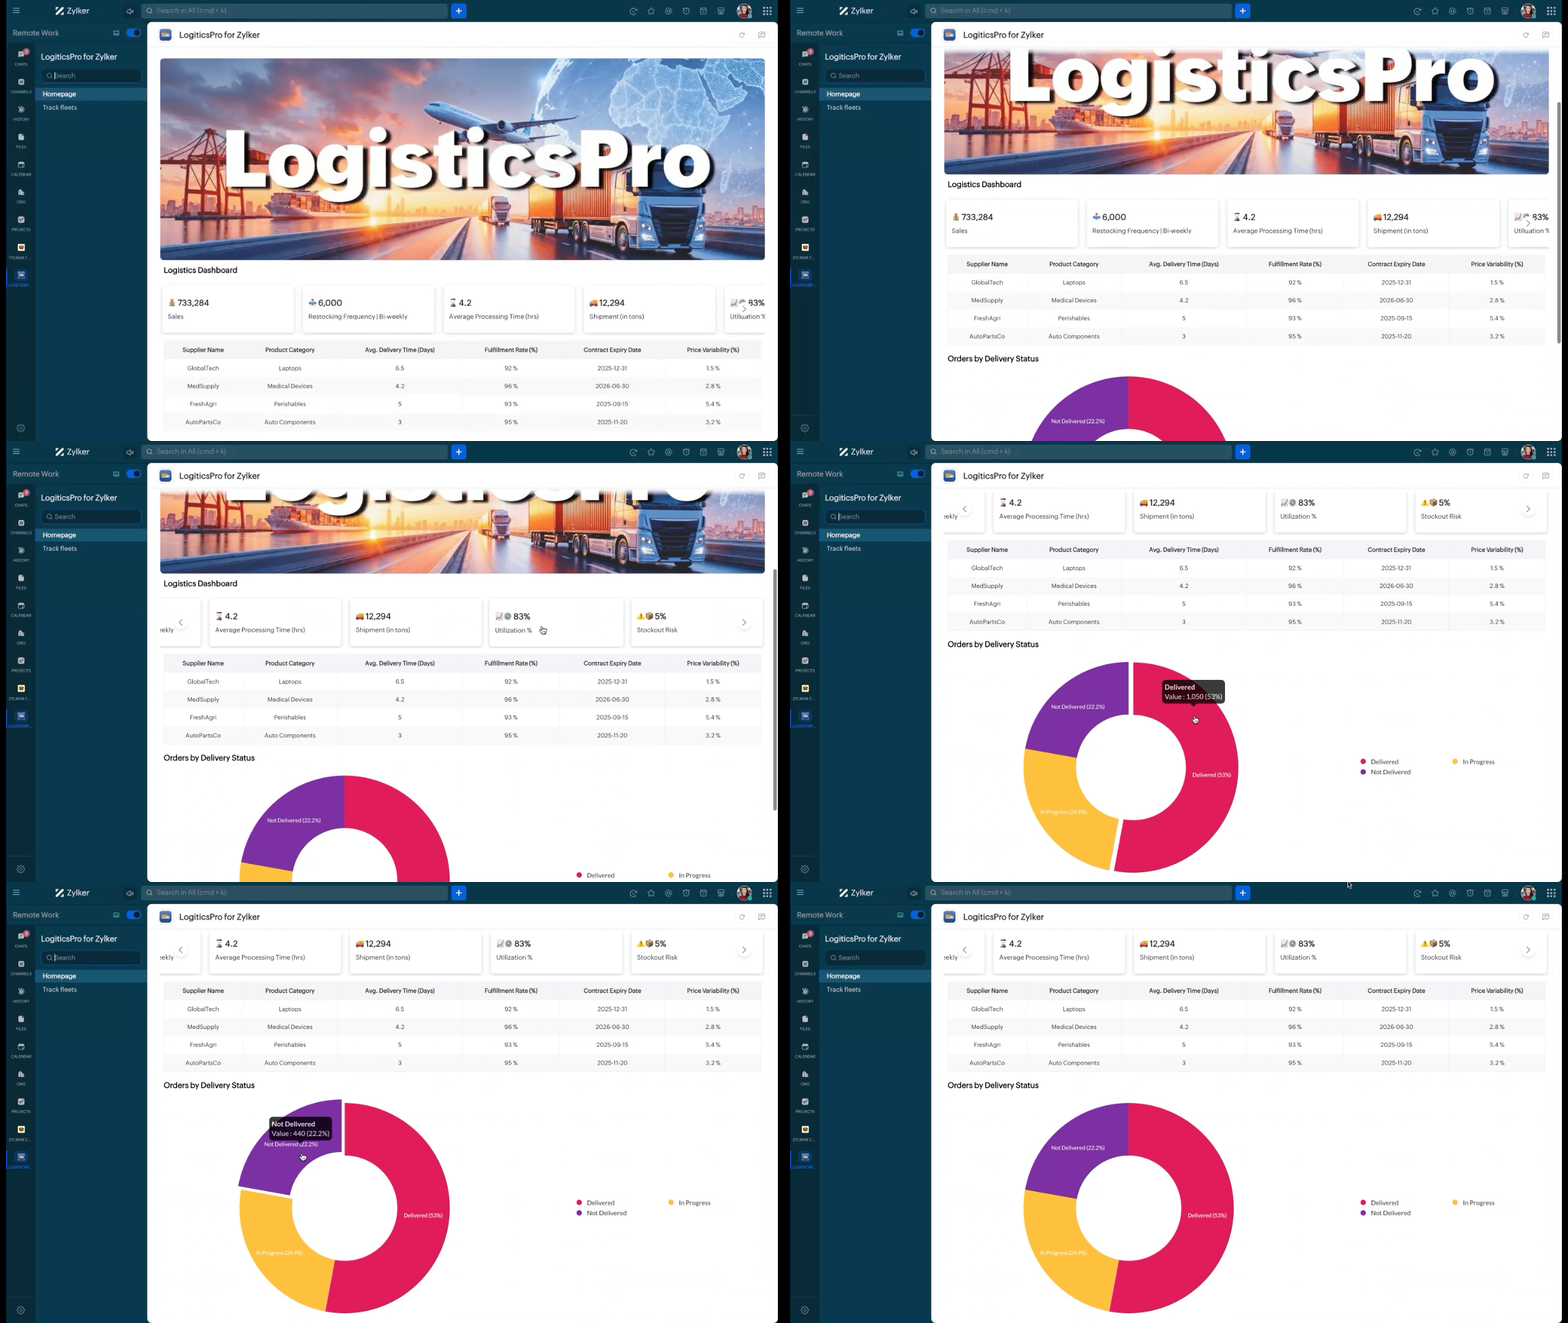
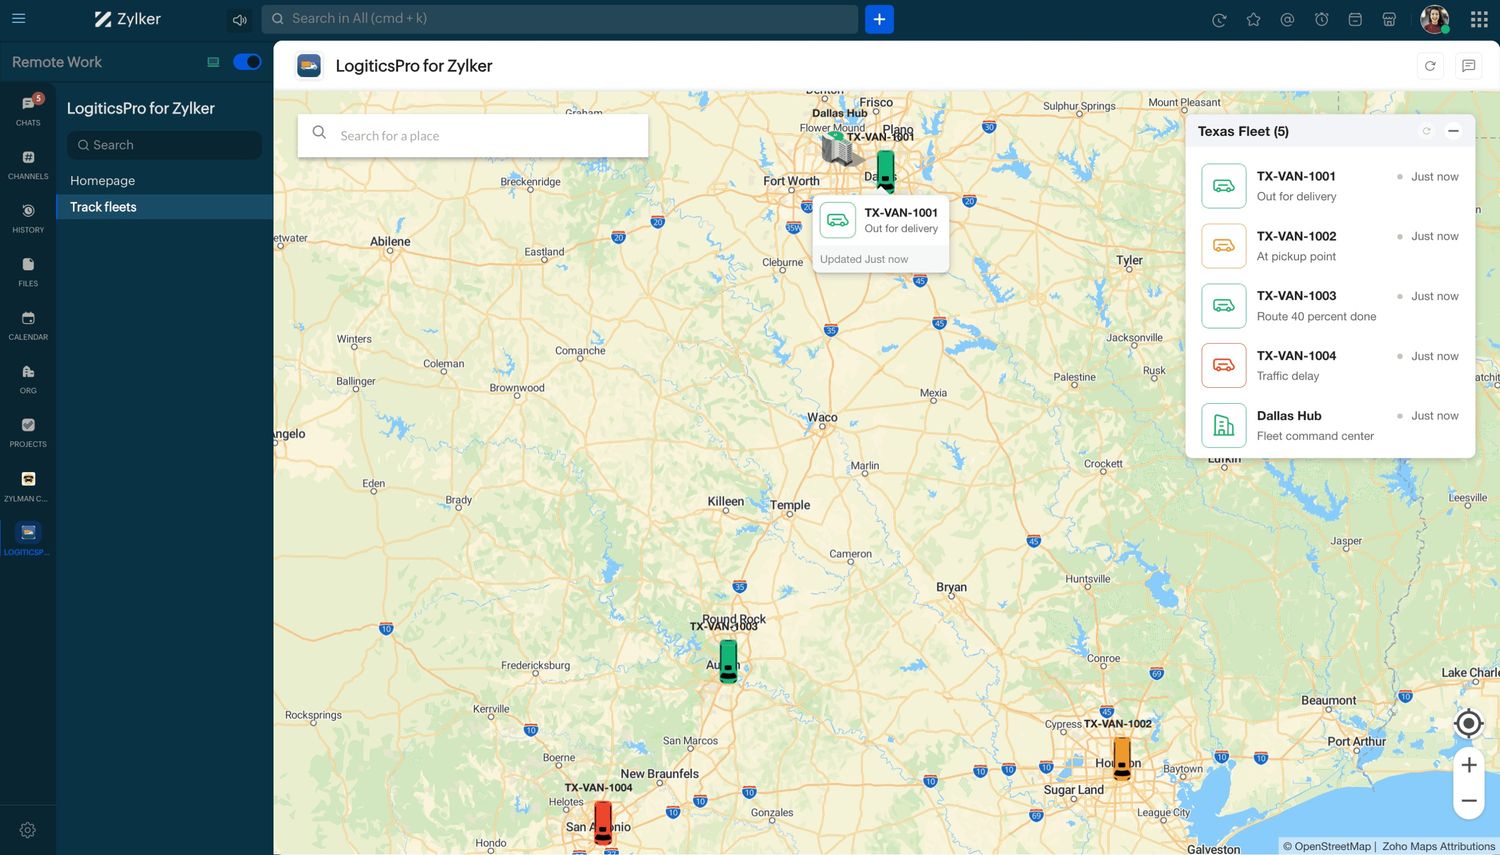
Admins have access to a Track fleets tab, which displays fleet tracking for all scheduled deliveries.
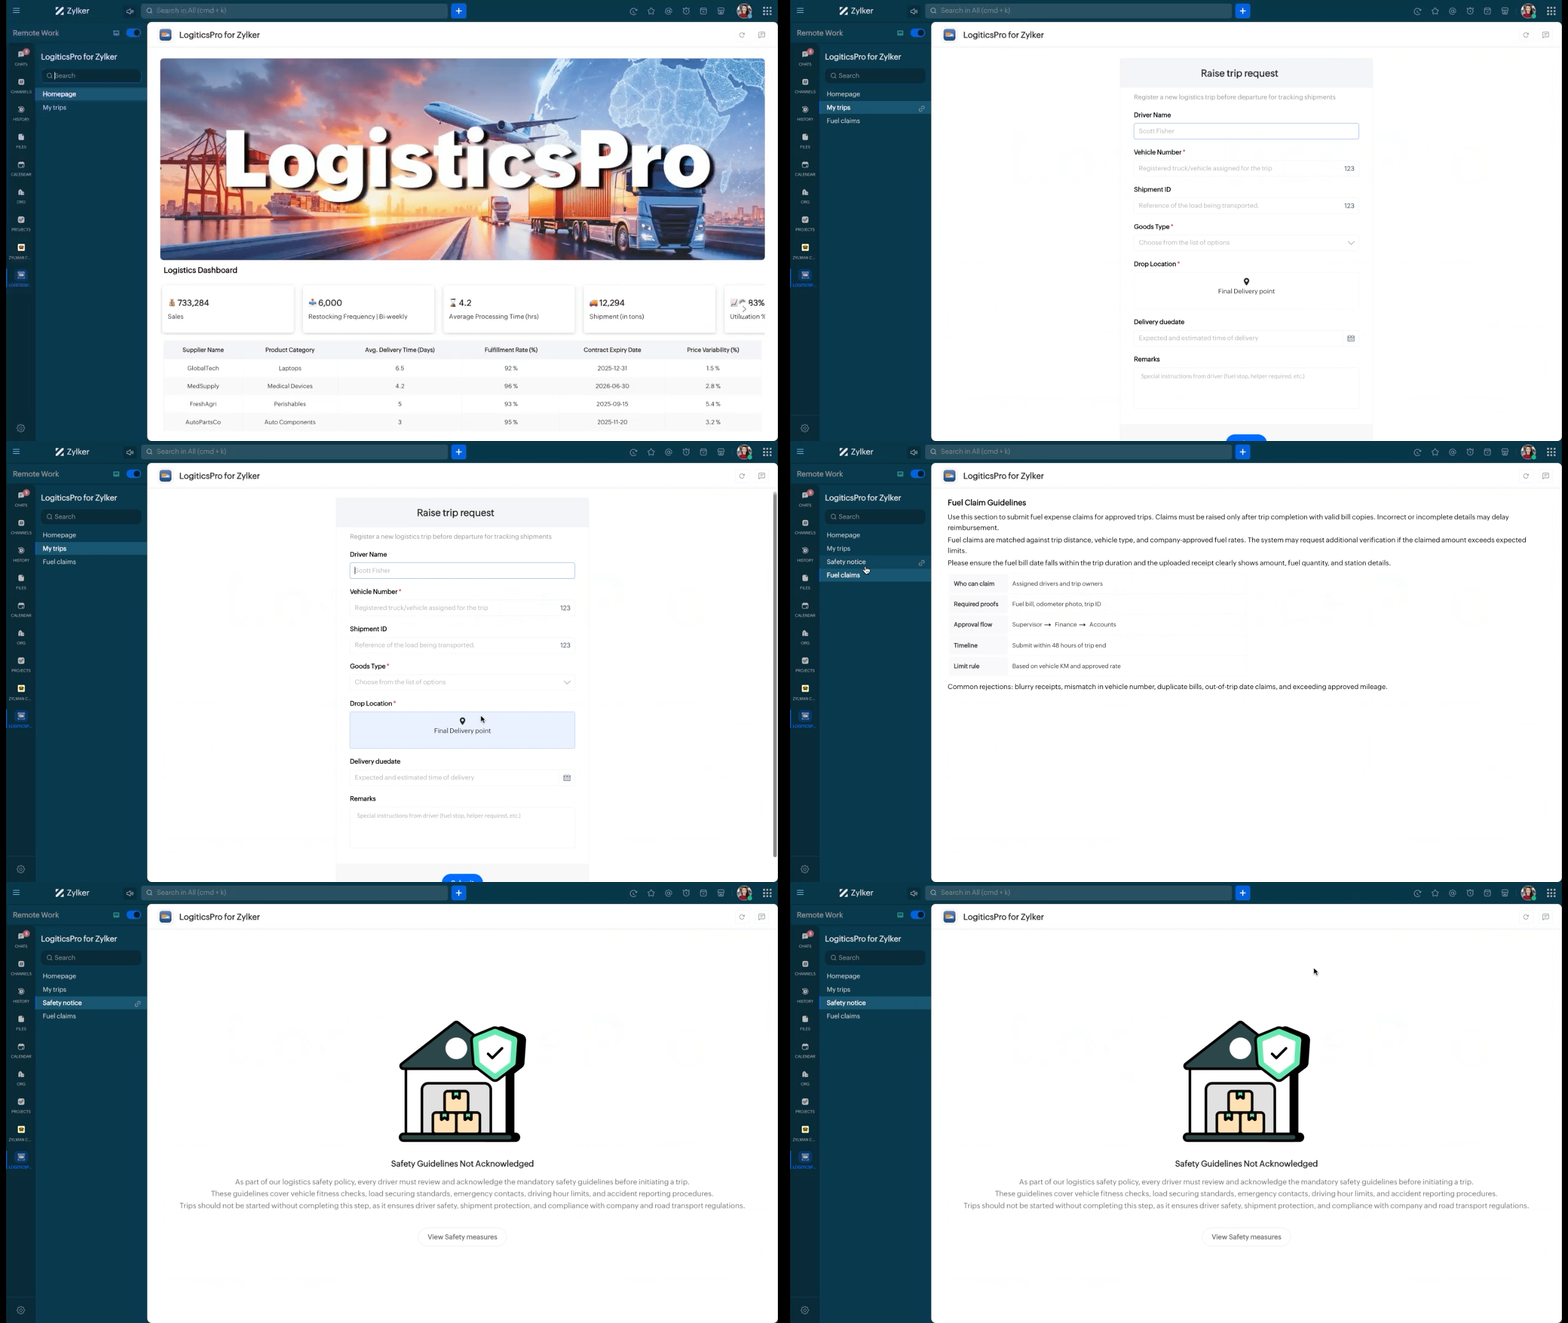
Non-admin users or members can access the trip request tab to create a new logistics trip via a form view. The dynamic tab handler manages the logic for these specific tabs based on user roles.

Script for dynamic tab handler
info user;
adminFlag = user.get("admin");
tabs = list();
if(adminFlag == true)
{
tabs.add({"label":"Track fleets","id":"fleet"});
}
if(adminFlag == false)
{
tabs.add({"label":"My trips","id":"trips"});
}
return {"tabs":tabs,"tab_view_type":"classic"};
All layouts for the dynamic tabs must be included in the dynamic view handler. The fleet tracking map view is exclusively designed for admins.
When regular users navigate from the Homepage tab to the trip request tab, a new tab titled "Fuel Claims" is dynamically added using the add_after operation. This provides users with information on fuel claim rules and regulations before they submit a trip request via the form.
Syntax for add_after :
return {
  "type":"applet",
  "tabs": {{
      "type":"add_after",
      "id":"<EXISTING_TAB_ID>",
      "data":{
          "label":"<TAB_LABEL>",
          "id":"<TAB_ID>"
      }
  }},
  "sections":sections
};
When users switch to the Fuel Claims tab, another tab is added at runtime before the trip request tab using the add_before operation. This new tab, titled "Safety Acknowledgement," displays safety measures and includes a preview video.
Syntax for add_before :
return {
  "type":"applet",
  "tabs": {{
      "type":"add_before",
      "id":"<EXISTING_TAB_ID>",
      "data":{
          "label":"<TAB_LABEL>",
          "id":"<TAB_ID>"
      }
  }},
  "sections":sections
};
All layouts for the dynamic tabs and the operations for dynamic tab handling for both admins and users are defined in the view handler.
Users can specifically navigate to any list of all available tabs using the search bar at the top of the widget sidebar. Hovering over any tab reveals a link icon that lets users copy and share the tab's permalink in any chat.
Script for dynamic view handler
info user;
info target;
elements = list();
sections = list();
footer = Map();
header = Map();
if(target.containKey("id"))
{
id = target.get("id");
}
if(id == "trips")
{
form = {"title":"Raise trip request ","name":"raiseTripRequest","hint":"Register a new logistics trip before departure for tracking shipments","button_label":"Register","inputs":{{"label":"Driver Name","name":"drivername","placeholder":"Scott Fisher","min_length":"0","max_length":"25","mandatory":false,"type":"text"},{"label":"Vehicle Number","name":"vehiclenumber","placeholder":"Registered truck/vehicle assigned for the trip","min":"0","max":"10000","mandatory":true,"type":"number"},{"label":"Shipment ID","name":"shipmentID","placeholder":"Reference of the load being transported.","min":"0","max":"10000","mandatory":false,"type":"number"},{"label":"Goods Type","name":"goodstype","placeholder":"Choose from the list of options","multiple":true,"mandatory":true,"type":"dynamic_select","options":{{"value":"electronics","label":"Electronics"},{"value":"MedicalDevices","label":"Medical Devices"},{"value":"Perishables","label":"Perishables"},{"value":"AutoComponents","label":"Auto Components"}}},{"label":"Drop Location","name":"deliverypoint","placeholder":"Final Delivery point ","mandatory":true,"type":"location"},{"label":"Delivery duedate","name":"duedate","placeholder":"Expected and estimated time of delivery","mandatory":false,"type":"datetime"},{"label":"Remarks","name":"remarks","placeholder":"Special instructions from driver (fuel stop, helper required, etc.)","min_length":"0","max_length":"250","mandatory":false,"type":"textarea"}},"action":{"type":"invoke.function","name":"registerTrip"}};
return {"type":"applet","data_type":"form","tabs":{{"type":"add_after","id":"trips","data":{"label":"Fuel claims","id":"fuelclaims"}}},"form":form};
}
if(id == "fuelclaims")
{
elements = list();
elements.add({"type":"title","text":"Fuel Claim Guidelines"});
elements.add({"type":"text","text":"Use this section to submit fuel expense claims for approved trips. Claims must be raised only after trip completion with valid bill copies. Incorrect or incomplete details may delay reimbursement."});
elements.add({"type":"text","text":"Fuel claims are matched against trip distance, vehicle type, and company-approved fuel rates. The system may request additional verification if the claimed amount exceeds expected limits."});
elements.add({"type":"text","text":"Please ensure the fuel bill date falls within the trip duration and the uploaded receipt clearly shows amount, fuel quantity, and station details."});
sections = list();
elements.add({"type":"fields","data":{{"Who can claim":"Assigned drivers and trip owners"},{"Required proofs":"Fuel bill, odometer photo, trip ID"},{"Approval flow":"Supervisor → Finance → Accounts"},{"Timeline":"Submit within 48 hours of trip end"},{"Limit rule":"Based on vehicle KM and approved rate"}},"style":{"short":false}});
elements.add({"type":"text","text":"Common rejections: blurry receipts, mismatch in vehicle number, duplicate bills, out-of-trip date claims, and exceeding approved mileage."});
sections.add({"id":1,"elements":elements});
return {"type":"applet","data_type":"sections","tabs":{{"type":"add_before","id":"fuelclaims","data":{"label":"Safety notice","id":"safetynotice"}}},"sections":sections};
}
if(id == "safetynotice")
{
return {"type":"applet","data_type":"info","info":{"title":"Safety Guidelines Not Acknowledged","description":"As part of our logistics safety policy, every driver must review and acknowledge the mandatory safety guidelines before initiating a trip.\nThese guidelines cover vehicle fitness checks, load securing standards, emergency contacts, driving hour limits, and accident reporting procedures.\nTrips should not be started without completing this step, as it ensures driver safety, shipment protection, and compliance with company and road transport regulations.","image_url":"https://www.zoho.com/sites/zweb/images/cliq/help/warehouse.png","button":{"label":"View Safety measures","type":"open.url","url":"https://youtu.be/TsAFSimMGeU?si=kjJMqhFPk9Xs6013"}}};
}
if(id == "fleet")
{
currentDate = zoho.currenttime.toString();
UnixTime = currentDate.unixEpoch(user.get("timezone"));
return {"type":"applet","data_type":"map","map":{"id":"texas_fleet_map","title":"Texas Fleet","tickers":{"dallas_van":{"title":"TX-VAN-1001","type":"van","last_modified_time":UnixTime,"latitude":32.7767,"longitude":-96.7970,"info":"Out for delivery","color":"green"},"houston_van":{"title":"TX-VAN-1002","type":"van","last_modified_time":UnixTime,"latitude":29.7604,"longitude":-95.3698,"info":"At pickup point","color":"yellow"},"austin_van":{"title":"TX-VAN-1003","type":"van","last_modified_time":UnixTime,"latitude":30.2672,"longitude":-97.7431,"info":"Route 40 percent done","color":"green"},"sanantonio_van":{"title":"TX-VAN-1004","type":"van","last_modified_time":UnixTime,"latitude":29.4241,"longitude":-98.4936,"info":"Traffic delay","color":"red"},"controlhub":{"title":"Dallas Hub","type":"office","last_modified_time":UnixTime,"latitude":32.8975,"longitude":-97.0404,"info":"Fleet command center","color":"green"}}}};
}
return {};
Admin's POV
User's POV

Difference between previous and current widget development flow
Category | Old Widget Flow | New Widget Development Flow |
Tab Management | Tabs returned within widget code where developer had to handle tabs list and active_tab manually with return statement. | Platform controls tabs list and active tab automatically |
Scalability and Navigation | Mostly static, limited number of tabs up-to 5. | Supports 50+ tabs, instant search, and runtime add/remove/reorder |
Architecture | UI rendering and tab logic mixed together | Clear separation: |
UI/UX | All tab data loaded together | Only selected tab rendered, progressive and personalized experience |
Classification based on tab view type
Once a tab is available, whether through predefined or dynamic configuration, its content must be rendered using one of the supported view types.
View types refer to the layouts or visual structures used to display tab content. They are independent of how the tab was created. Tab views are customizable and can be based on the type and amount of data you want to display.
There are five types of tab views you can create:
Sections View
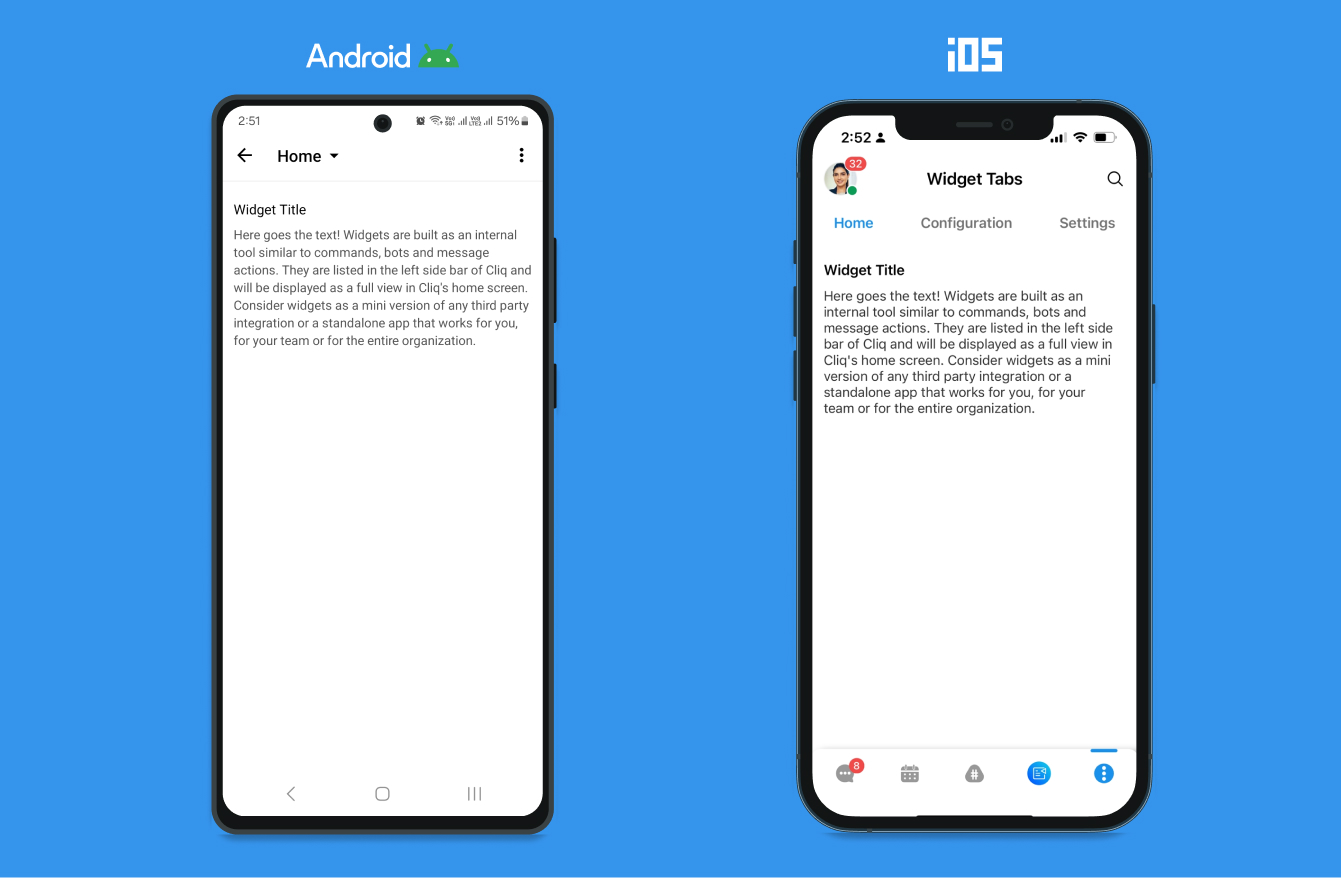
A section view comprises different varieties of display and actionable elements that can hold crucial information. This information can be solely for the users' consumption or even to perform actions right from the section. In addition to supporting all the widget section elements, the sections view also supports a header and footer.
Example:
Create three predefined tabs named Home, Configuration, and Settings. Then, add the following script to the code editor of the Home tab:
elements = list();
elements.add({"type":"title","text":"Widget Title"});
elements.add({"type":"text","text":"Here goes the text! Widgets are built as an internal tool similar to commands, bots and message actions. They are listed in the left side bar of Cliq and will be displayed as a full view in Cliq's home screen. Consider widgets as a mini version of any third party integration or a standalone app that works for you, for your team or for the entire organization."});
sections = list();
sections.add({"id":1,"elements":elements});
return {"type":"applet","data_type":"sections","sections":sections};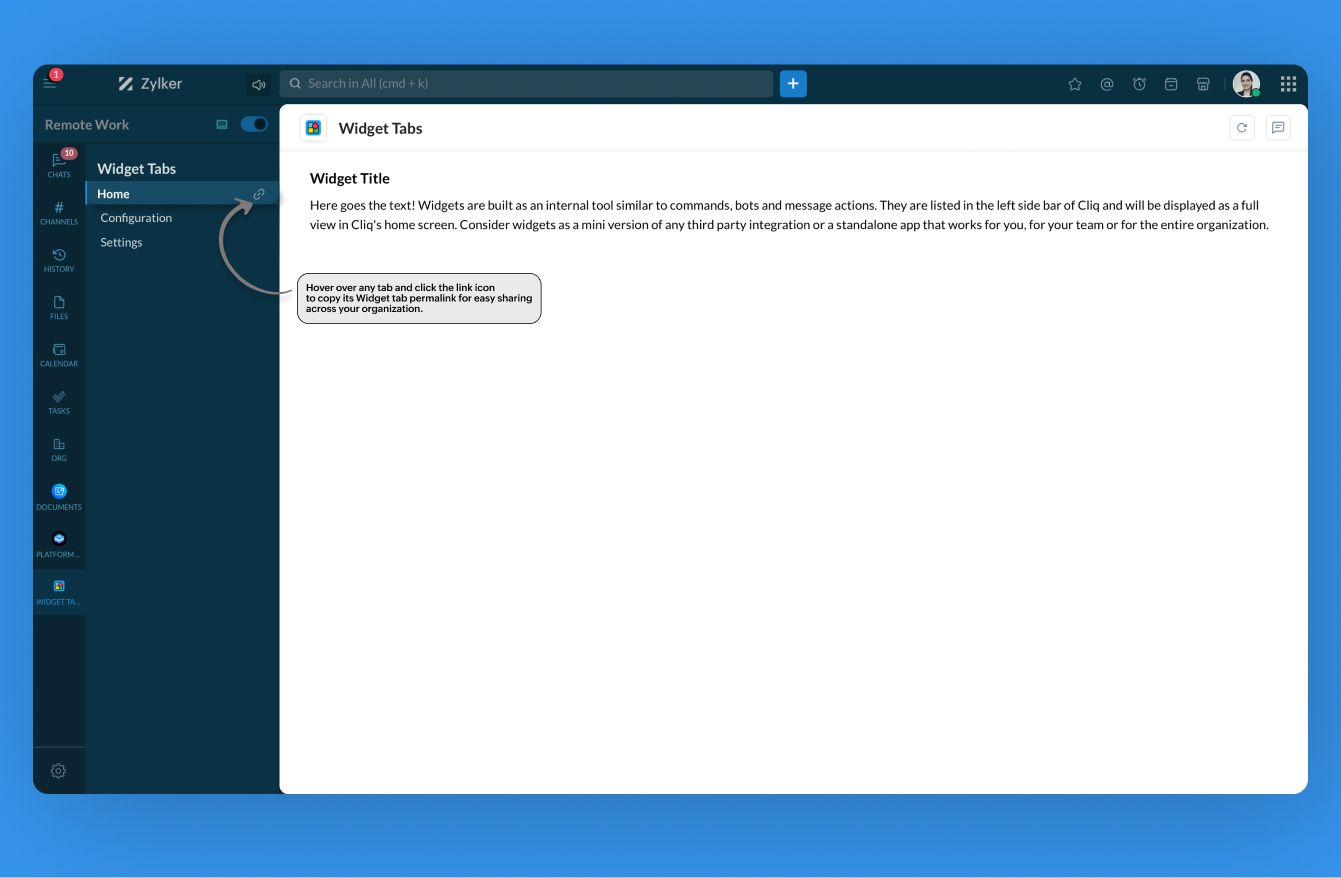
Info View
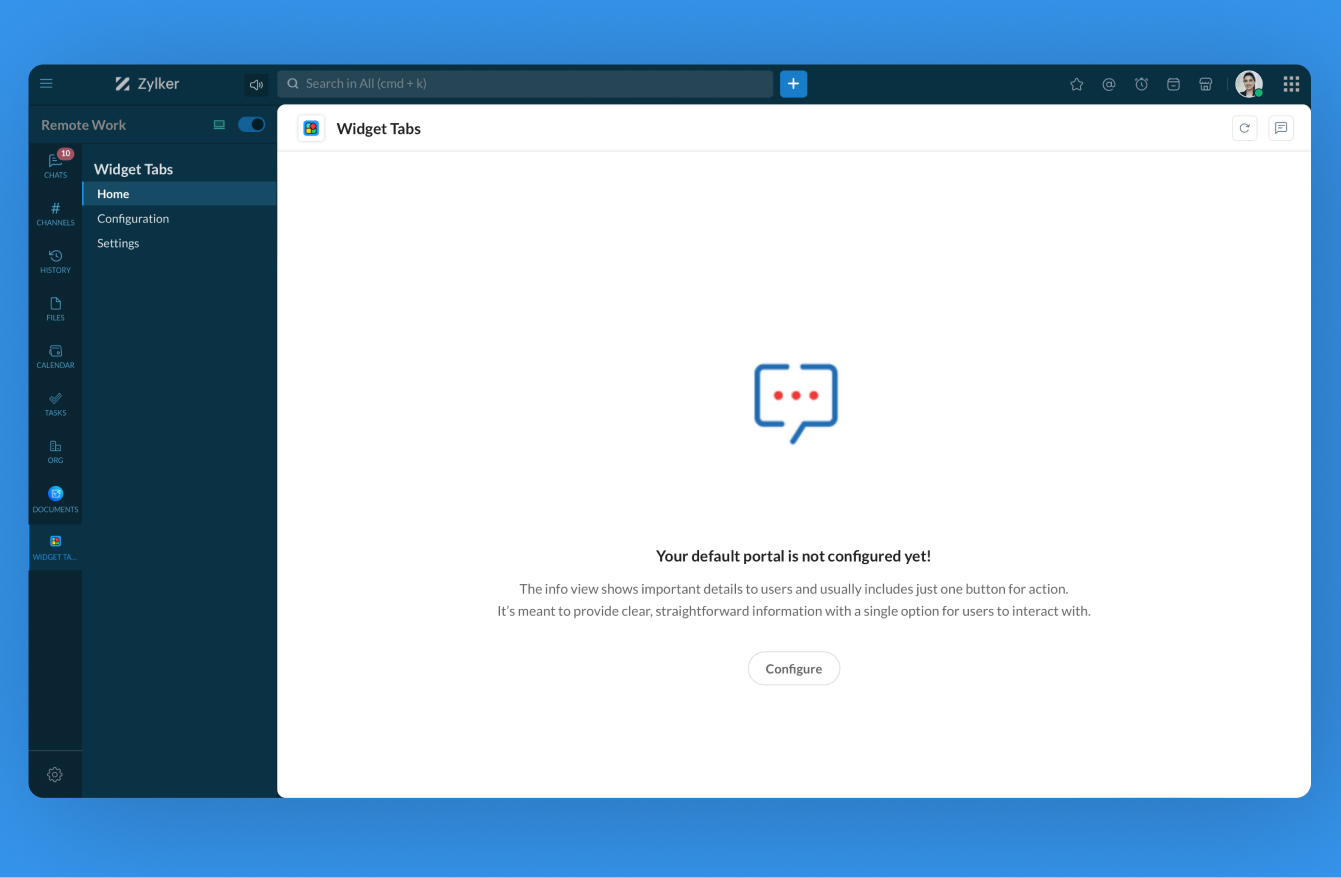
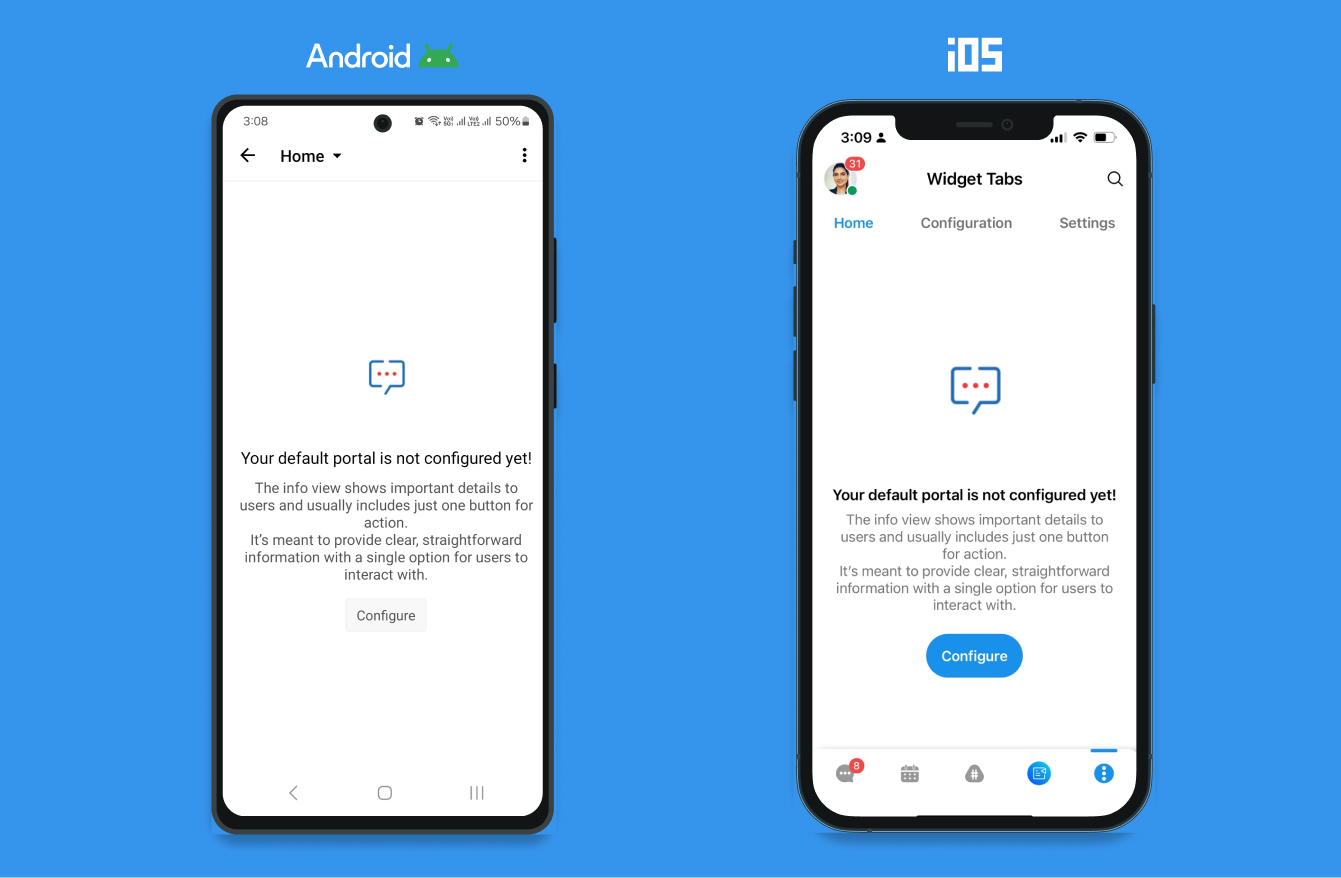
The info view is typically used to display a piece of important information, mainly for user's consumption, with only one actionable element (button).
Example:
Create three predefined tabs named Home, Configuration, and Settings. Then, add the following script to the code editor of the Home tab:
return {
"type":"applet",
"data_type":"info",
"info":{
"title":"Your default portal is not configured yet!",
"description":"Click here to configure.",
"image_url":"https://i.ibb.co/gSP05Yr/Cliq-automation.png",
"button":{
"label":"Configure",
"type":"invoke.function",
"name":"cliqwidget",
"id":"configuration"
}
}};
Web View
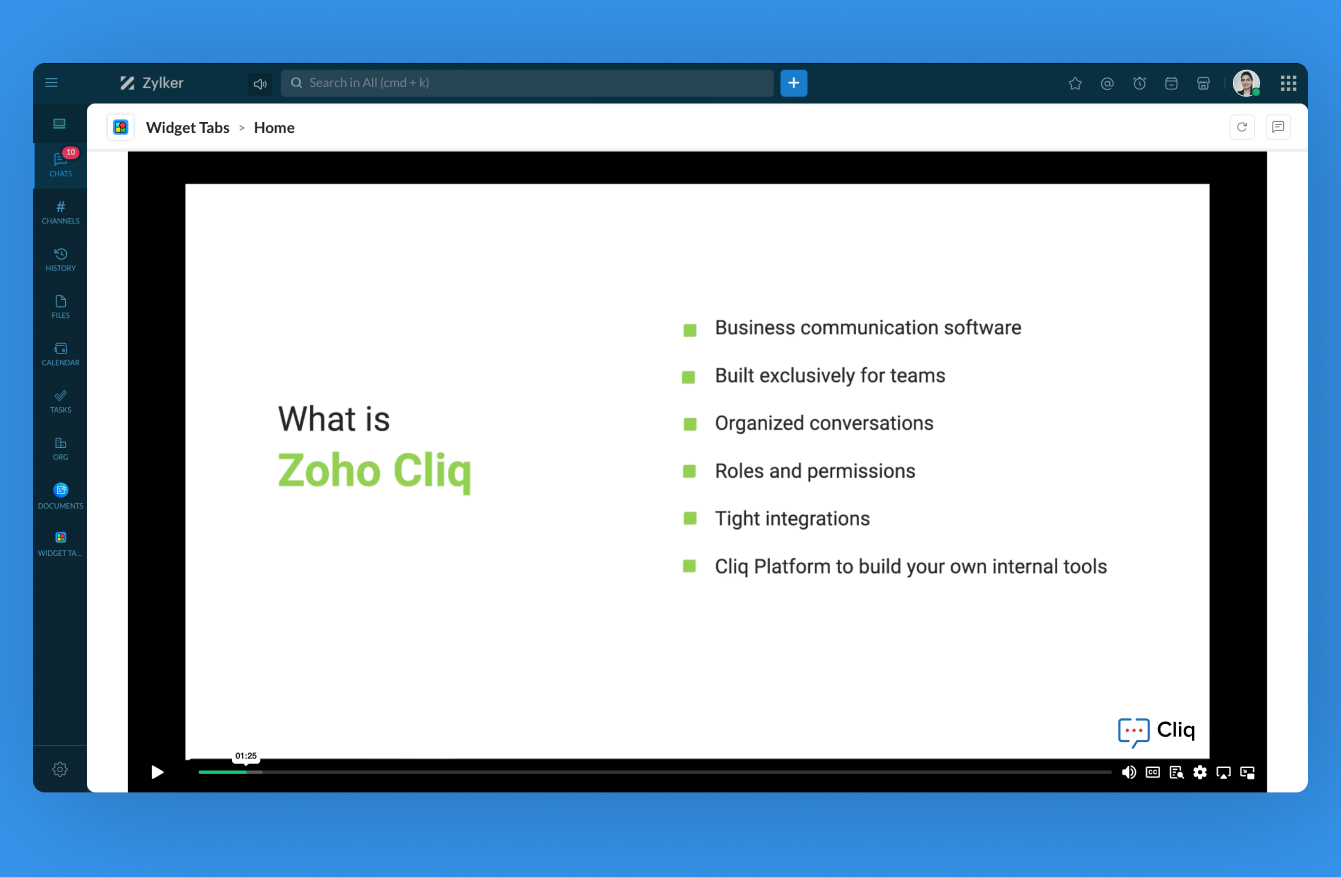
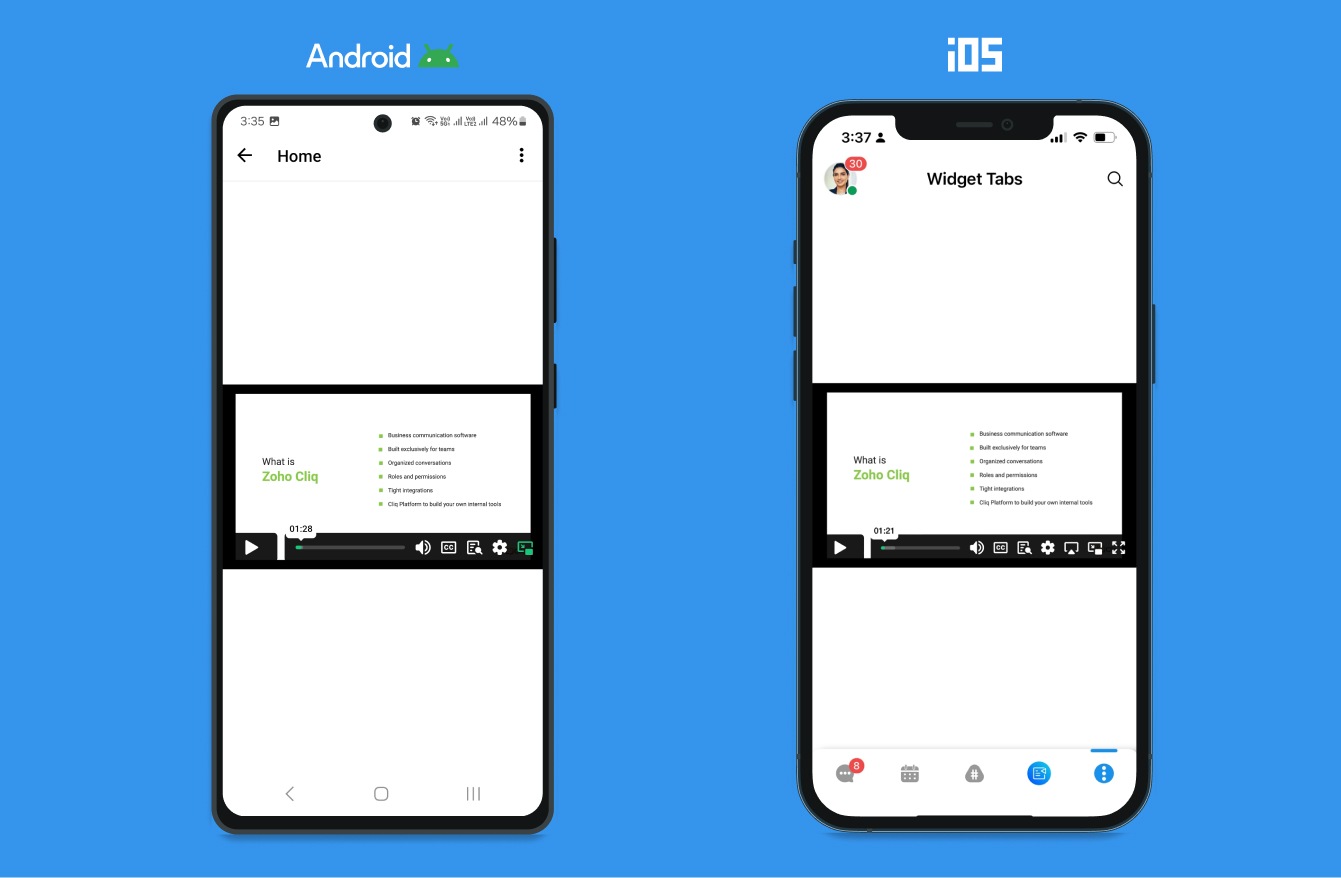
The web view typically loads a web page in an iFrame right inside the widget.
Example:
Create a predefined tab named Home and add the following script to the code editor of the Home tab:
return {
	"type":"applet",
	"data_type":"web_view",
	"web_view":{"url":"https://workdrive.zohoexternal.com/zvideo/742651284?autopause=1&dnt=1&autoplay=1"},
};
Map View
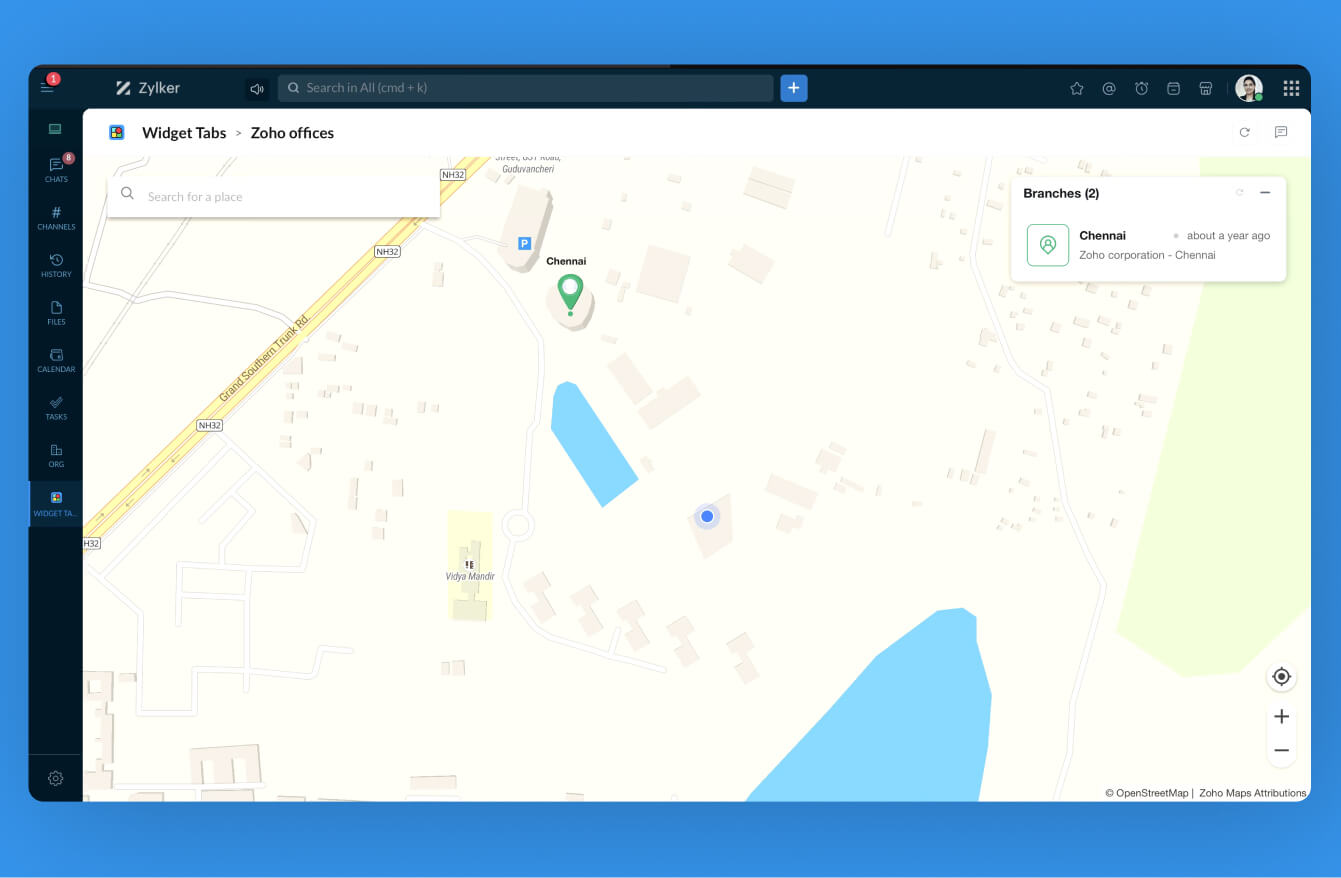
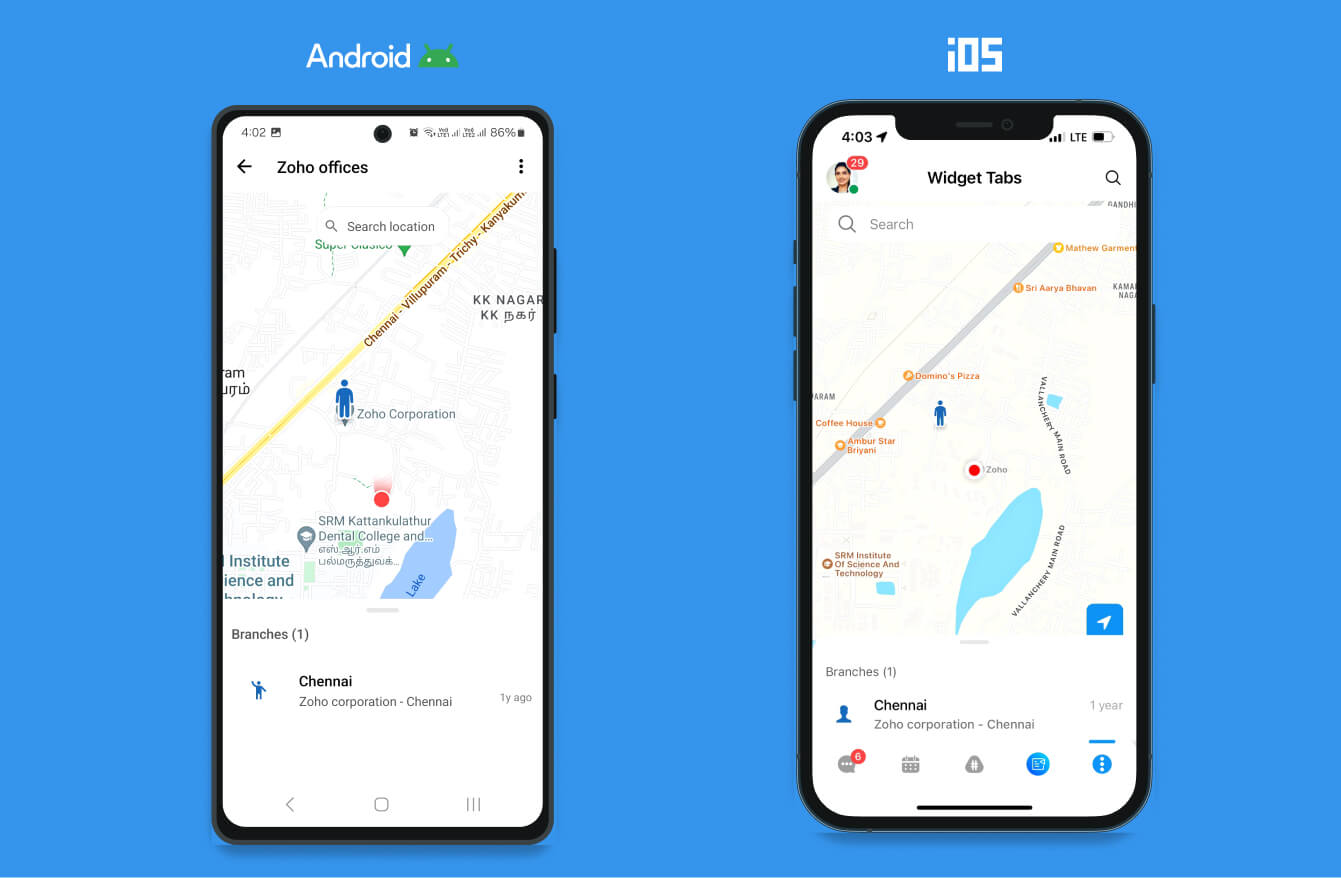
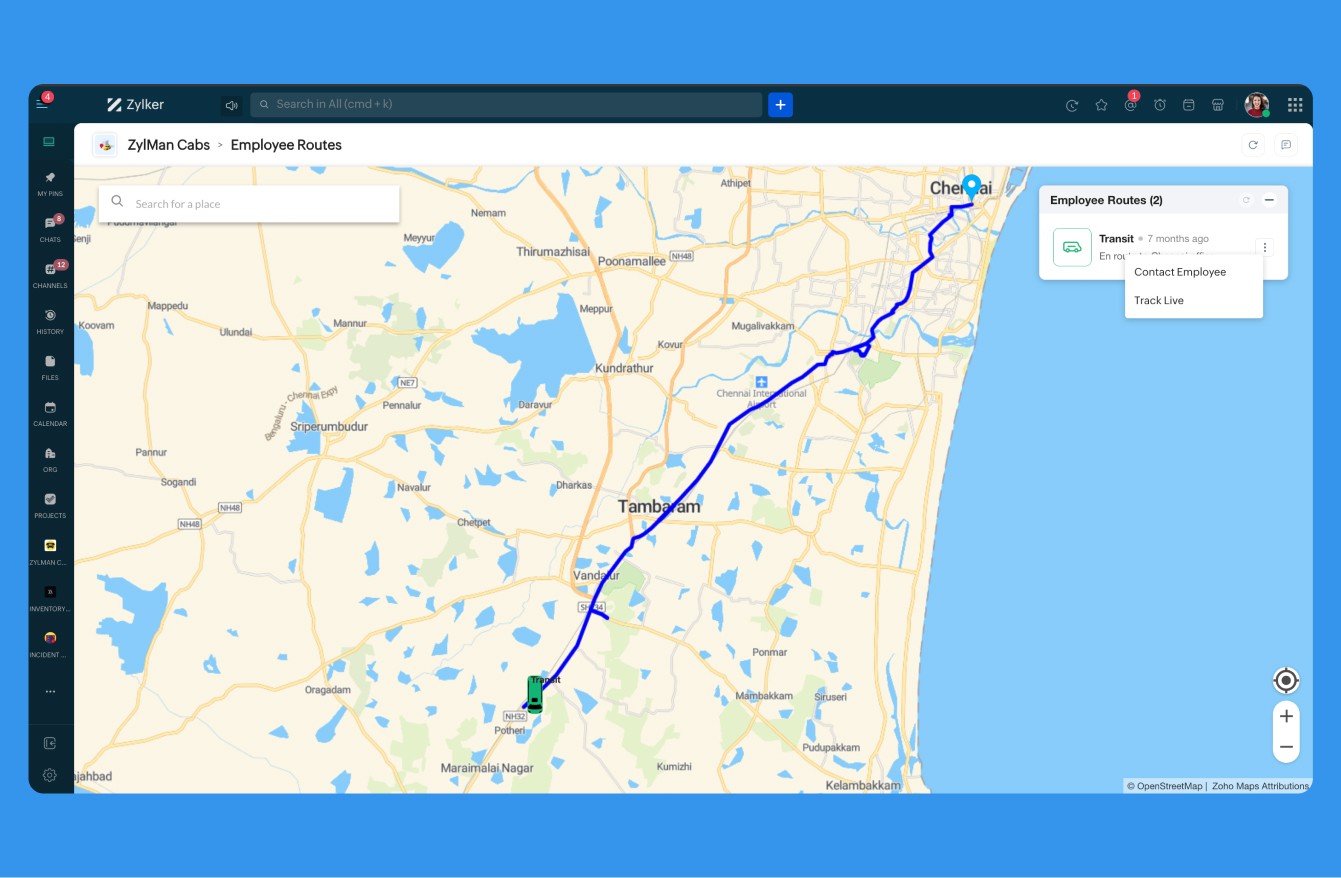
The map view feature renders maps and supports live route tracking within a widget tab. This enables developers to plot tickers and provide real-time tracking.
Example:
Create a predefined tab named Zoho offices add the following script to the code editor of the Zoho offices tab:
return {
   "type": "applet",
   "data_type": "map",
   "map": {
      "id": "zoho_offices_map",
      "title": "Branches",
      "tickers": {
         "chennai": {
            "title": "Chennai",
           "type": "person",
            "last_modified_time": 1674549259421,
            "latitude": 12.8310776,
            "longitude": 80.0493569,
            "info": "Zoho corporation - Chennai"
         }
      }
   }
};
Route tracking in map view
| Attributes | Data Type | Description |
| title* | String (max char - 20) | The ticker's title |
| type* | Allowed values: person | bicycle | motorcycle | car van | bus | plane | office | home | Denotes what kind of object the ticker is tracking |
| last_modified_time* | Long | Denotes the last instance when the ticker was updated |
| info | String (max char - 30) | Used to add specific information about the ticker |
| latitude* | Double | Ticker's latitude |
| longitude* | Double | Ticker's longitude |
| destination | JSON Object | Coordinates of the target location used to trace the ticker's route on the map. See Route tracking in map view below |
| waypoints | JSON Array Maximum: 10 waypoints | Intermediate points the route should pass through between the ticker's position and its destination. Valid only when destination is present. See Route tracking in map view below |
| buttons | JSON Array Maximum: 5 buttons | Call-to-action buttons shown on the ticker's info card. See Ticker buttons below |
Route Tracking in map view
- Route tracking allows you to display a live path on the map from a ticker's current position to a designated destination. To enable route tracking for a ticker, include a destination object containing the destination's latitude and longitude.
- As you provide further updates for that ticker with new latitude and longitude values, the route line and the ticker's position will update in real time for anyone viewing the map.
- If you want the route to pass through specific points instead of going directly to the destination, you can add a waypoints array that can include up to 10 {latitude, longitude} objects, marking the points the route should follow in order.
Note: Waypoints are valid only when a destination is specified.
The destination object attributes:
| Attributes | Data Type | Description |
|---|---|---|
| latitude* | double | Destination latitude |
| longitude* | double | Destination longitude |
The waypoint object attributes:
| Attributes | Data Type | Description |
|---|---|---|
| latitude* | double | Waypoint latitude |
| longitude* | double | Waypoint longitude |
Ticker buttons
Call-to-action buttons shown on a ticker's info card. Each object in the array represents a single button.
| Attributes | Data Type | Description |
|---|---|---|
| label* | string (max char - 30) | Text shown on the button |
| type* | Allowed values: open.url | preview.url | invoke.function | system.api | copy | invoke.form | Selects the button's action |
| emotion | Allowed values: positive | negative | neutral | Outlines the button green (positive), red (negative), or leaves it unstyled (neutral) |
| disabled | boolean | Disables the button |
Refer to Widget map tickers for more information and Use the Add/Update a ticker API endpoint to set buttons for a ticker.
Example:
Create a predefined tab named Employee Routes add the following script to the code editor of the Employee Routes tab:
return {
   "type":"applet",
   "data_type":"map",
   "map":{
      "id":"zoho_offices_map",
      "title":"Branches",
      "tickers":{
         "chennai":{
            "title":"Office",
            "type":"van",
            "last_modified_time":1770128241614,
            "latitude":12.8310776,
            "longitude":80.0493569,
            "info":"Zoho Estancia | Guduvanchery",
            "destination":{
               "latitude":13.0818965,
               "longitude":80.2756638
            }
         }
      }
   }
};
Form View
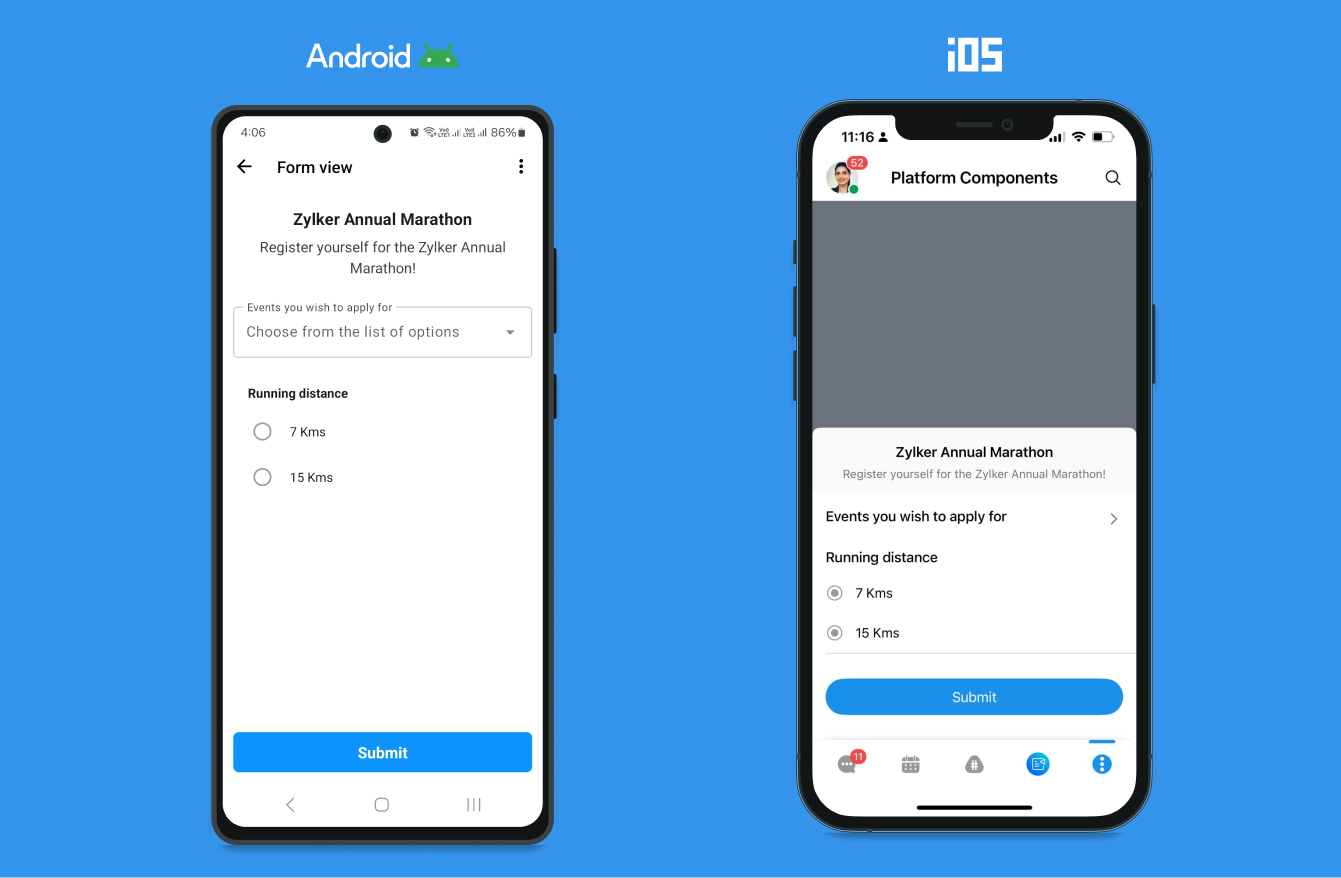
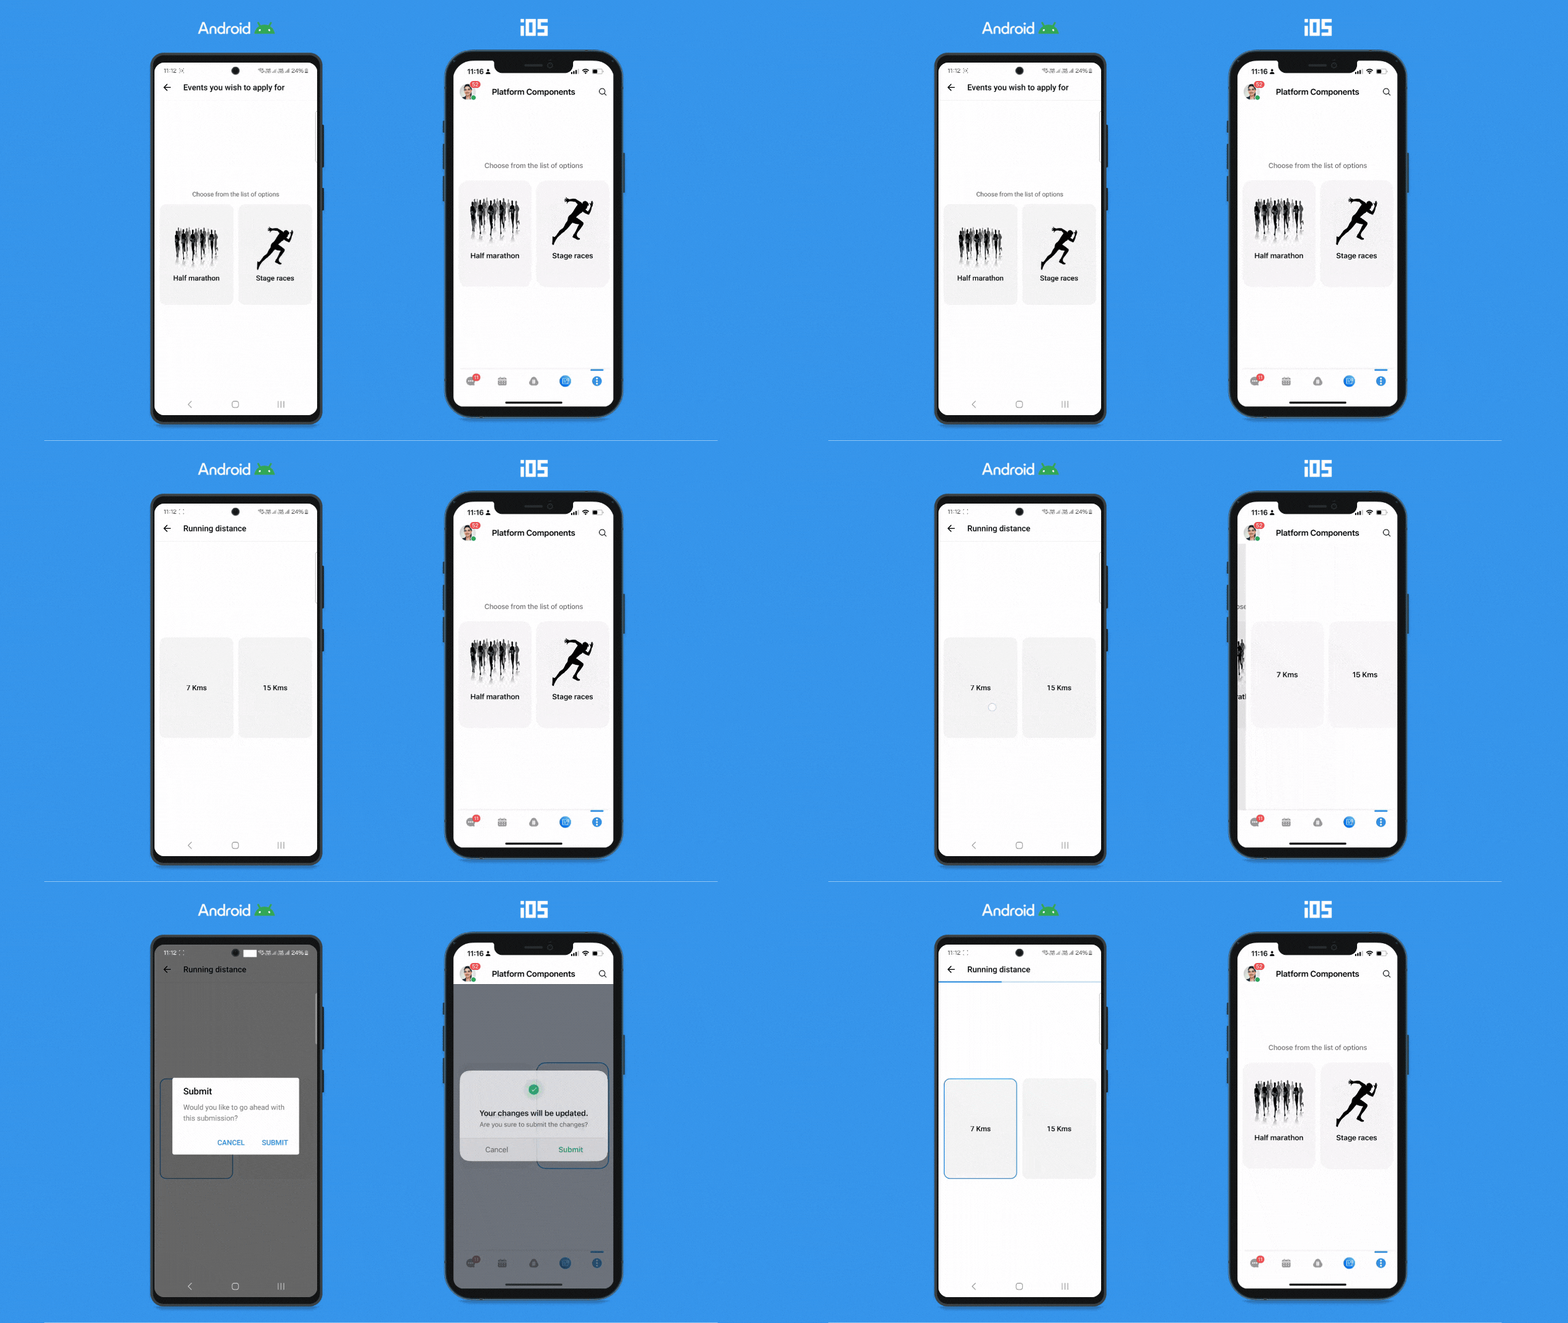
Form view can be used to render a Cliq form within a widget tab. Using the form view, you will have the option to render the tabs and form options in kiosk mode.
Attribute Name | Value | Description |
mode | kiosk | To display an interactive Cliq form within the tab designed for kiosk environments. |
Example:
Create a predefined tab named Form view and add the following script to the code editor of the Form view tab:
form = {
   "title": "Zylker Annual Marathon",
   "mode": "kiosk",
   "name": "marathon",
   "hint": "Register yourself for the Zylker Annual Marathon!",
   "button_label": "Submit",
   "inputs": [
      {
         "name": "select",
         "label": "Events you wish to apply for",
         "placeholder": "Choose from the list of options",
         "multiple": false,
         "mandatory": false,
         "type": "select",
         "options": [
            {
               "value": "half_marathon",
               "label": "Half marathon",
               "thumbnail": "https://w7.pngwing.com/pngs/458/840/png-transparent-people-running-at-marathon-art-half-marathon-running-marathon-miscellaneous-physical-fitness-sport-thumbnail.png"
            },
            {
               "value": "stage_races",
               "label": "Stage races",
               "thumbnail": "https://w7.pngwing.com/pngs/217/130/png-transparent-sprint-long-distance-running-track-field-silhouette-physical-fitness-animals-sport.png"
            }
         ]
      },
      {
         "name": "radio",
         "label": "Running distance",
         "mandatory": false,
         "type": "radio",
         "options": [
            {
               "value": "7",
               "label": "7 Kms"
            },
            {
               "value": "15",
               "label": "15 Kms"
            }
         ]
      }
   ],
   "action": {
      "type": "invoke.function",
      "name": "formFunc"
   }
};
return {"type":"applet","data_type":"form","form":form};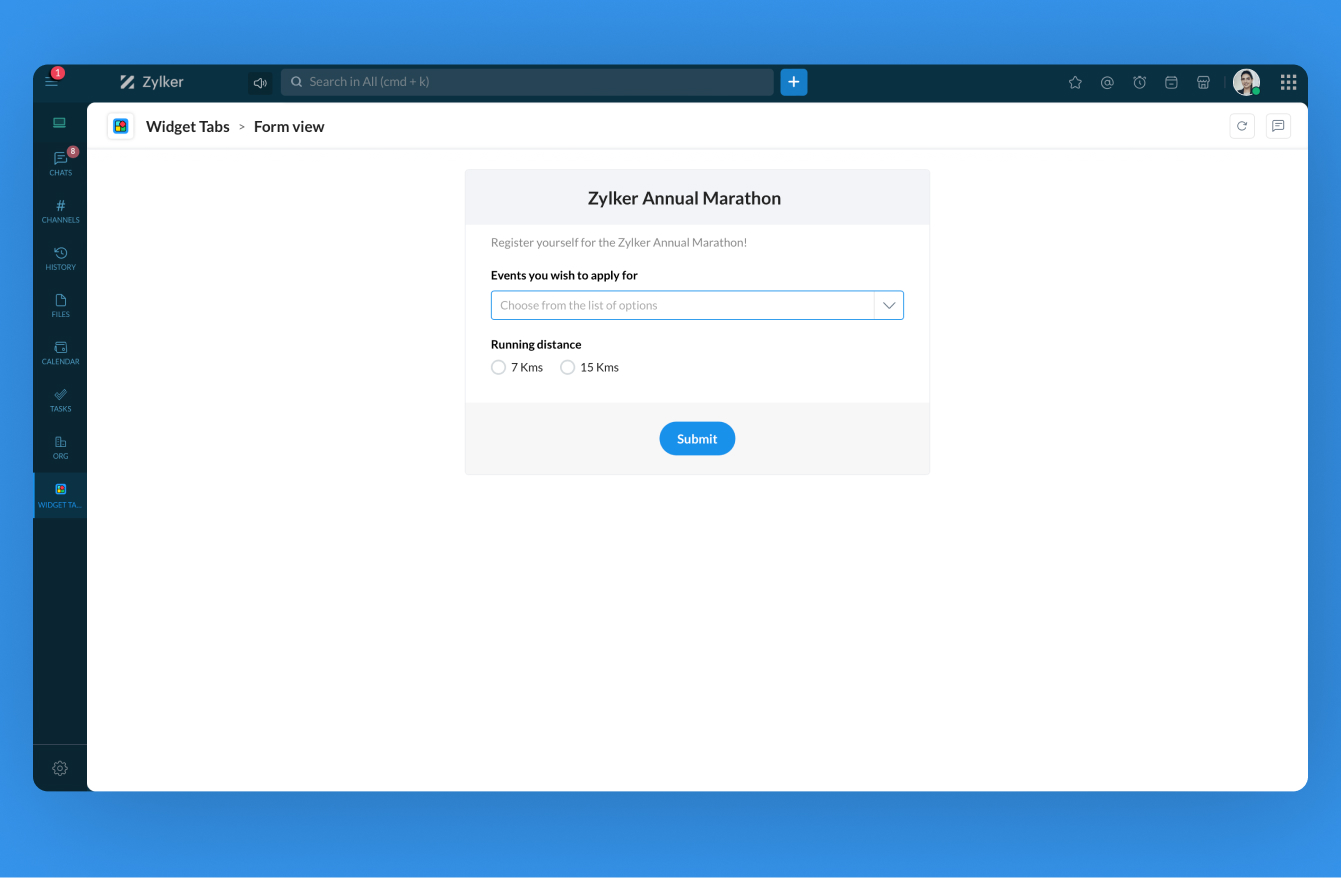
Example of form view tab in mobile devices ( non-kiosk mode )
Example of form view tab in mobile devices ( kiosk mode )
Sections
Each tab is made up of sections. Simply put, a section is a combination of different elements, grouped together.
Note:
- Each tab can contain up to 25 sections, and the maximum length for a section's ID is 50 characters.
- Both Headers and Footers are supported only in sections view
Single Tab View
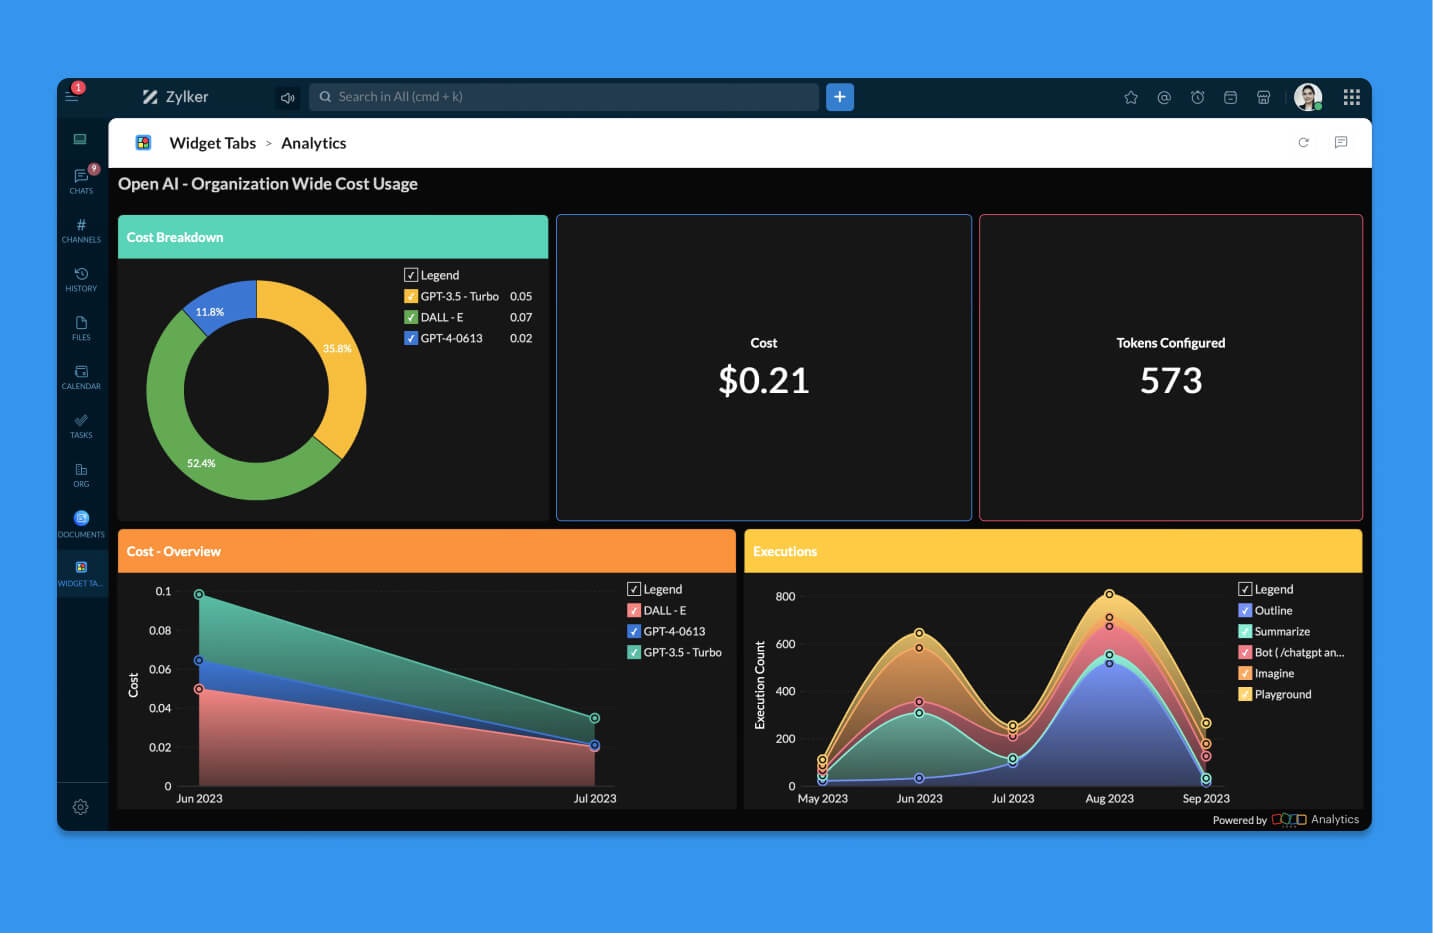
The tab list pane will be hidden when a Zoho Cliq widget has just one tab, allowing a more expansive view of the widget's content. This enables a cleaner and a more focused interface when multiple tabs aren't required.
Headers
Headers are used to display the headings of tabs, which are fixed at the top of sections. There are two types of headers.
Title - Used to display the title of the tab
Breadcrumbs - Indicates the navigational hierarchy and is useful to navigate across data.
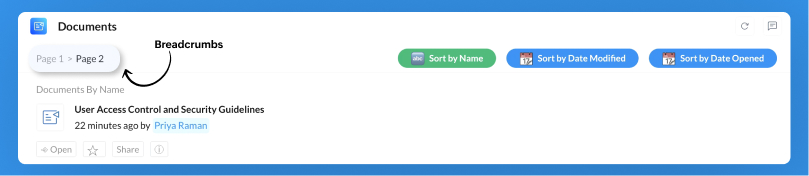
Both title and breadcrumbs can have a maximum of three buttons on the right. The attributes to be passed for creation of a header are listed below :
Attribute Name | Value | Description |
title | String | The display name of the tab. |
navigation | new|continue | Use 'continue' incase of breadcrumb tab navigation |
| Optional The maximum number of buttons supported: 3 | The array list of buttons to be added to the widget header |
Syntax :
button1 = {"label":$ButtonName1,"type":$Type,"name":$FunctionName,"id":$ID};
button2 = {"label":$ButtonName2,"type":$Type,"name":$FunctionName,"id":$ID};
button3 = {"label":$ButtonName3,"type":$Type,"name":$FunctionName,"id":$ID};
header = {"title":$HeaderTitle,"navigation":new|continue,"buttons":{button1,button2,button3}};
Footers
Footers are fixed at the bottom of sections. They can hold text on the left, and, just like Headers, they can also have a maximum of three buttons on the right.
The attributes to be passed for creation of a footer are listed below :
Attribute Name | Value | Description |
text | String | The display name of the footer. |
| Optional The maximum number of buttons supported: 3 | The array list of buttons to be added to the widget footer |
Syntax :
button1 = {"label":$ButtonName1,"type":$Type,"name":$FunctionName,"id":$ID};
button2 = {"label":$ButtonName2,"type":$Type,"name":$FunctionName,"id":$ID};
button3 = {"label":$ButtonName3,"type":$Type,"name":$FunctionName,"id":$ID};
header = {"title":$FooterTitle,"buttons":{button1,button2,button3}};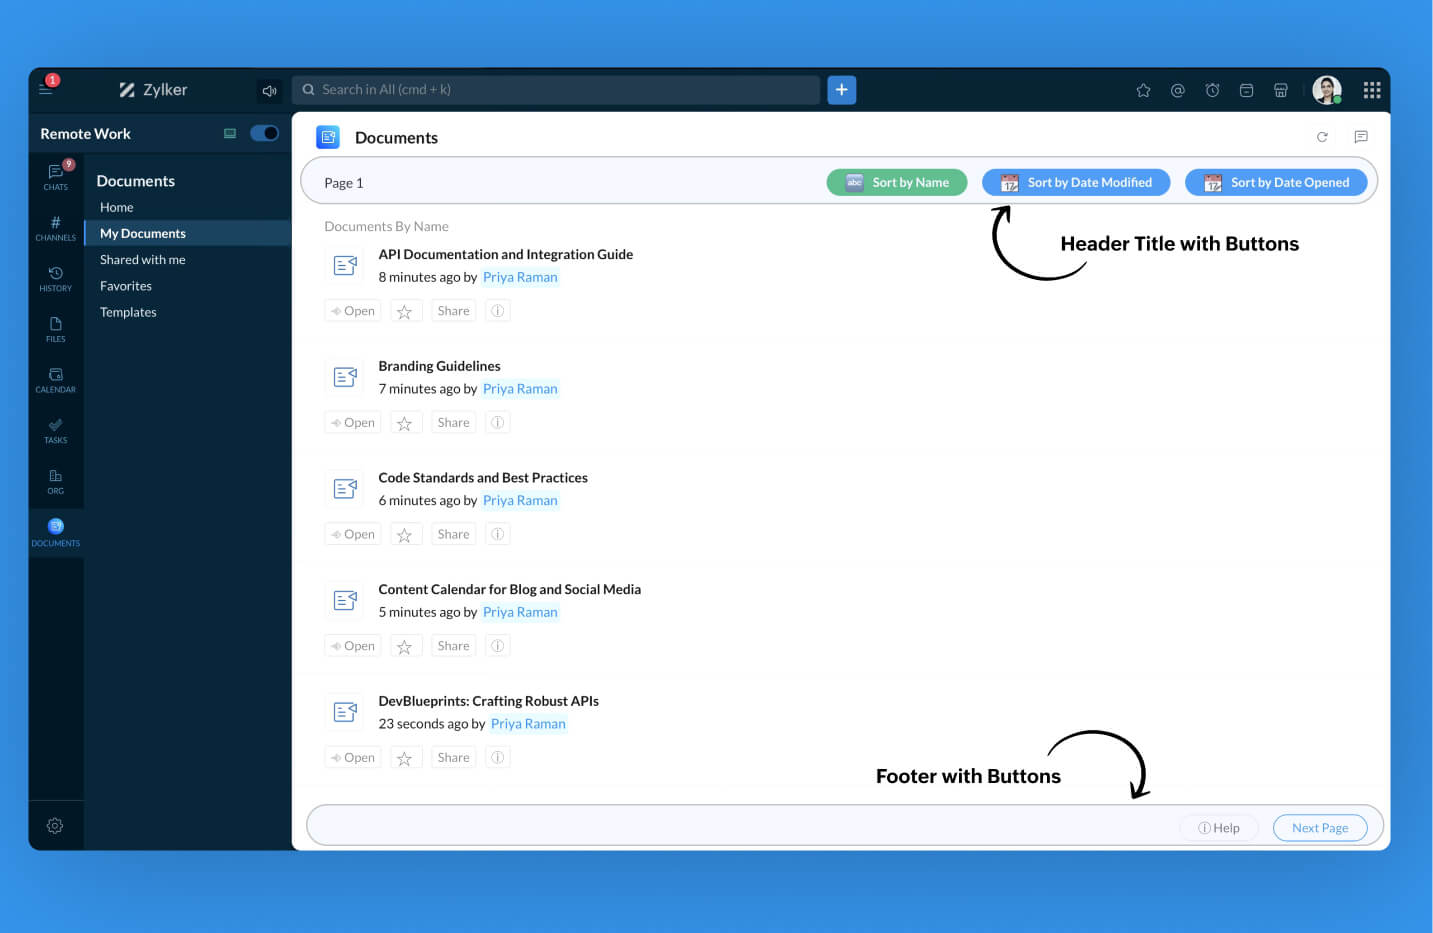
Sample Code to depict usage of Headers, Footers and Breadcrumbs in Cliq Widget :
Let's look at a Sales Performance Tracker Cliq Widget to showcase the Zylker Store's revenue and product distribution stats, effectively utilising headers, footers, and breadcrumbs for a great user experience. Create a predefined tab named Regional sales and add the following script to the code editor of the Regional sales tab:
// Header with button added to filter data
header = {"title":"🏠 Home","navigation":"new","buttons":{{"label":"🔍 Filter","type":"invoke.function","name":"SalesTrackerWidgetButtons","id":"viewComponents","emotion":"positive"}}};
elements = list();
elements.add({"type":"text","text":"The *Regional Sales Dashboard for Zylker Products* showcases strong performance in North America, driven by high demand for Zylker Pro devices. Europe follows with steady growth, while Asia shows potential for improvement in Q1."});
elements.add({"type":"divider"});
elements.add({"type":"table","headers":{"Product Category","Units Sold","Revenue (USD)","Revenue Contribution"},"rows":{{"Product Category":"Premium Electronics","Units Sold":"600","Revenue (USD)":"$400,000","Revenue Contribution":"40 %"},{"Product Category":"Budget Electronics","Units Sold":"500","Revenue (USD)":"$300,000","Revenue Contribution":"15 %"},{"Product Category":"Add-ons","Units Sold":"450","Revenue (USD)":"$150,000","Revenue Contribution":"15 %"},{"Product Category":"Wearable Devices","Units Sold":"350","Revenue (USD)":"$100,000","Revenue Contribution":"10 %"}},"style":{"text_align":{"center","center","center","center"}}});
elements.add({"type":"graph","styles":{"preview":"vertical_bar"},"data":{{"category":"Electronics","values":{{"label":"Jan 20","value":9},{"label":"Feb 20","value":8},{"label":"Mar 20","value":5},{"label":"Apr 20","value":2},{"label":"May 20","value":2},{"label":"Jun 20","value":2},{"label":"Jul 20","value":2},{"label":"Aug 20","value":2},{"label":"Sep 20","value":9},{"label":"Oct 20","value":8},{"label":"Nov 20","value":5},{"label":"Dec 20","value":2},{"label":"Jan 21","value":2},{"label":"Feb 21","value":2},{"label":"Mar 21","value":2},{"label":"Apr 21","value":2},{"label":"May 21","value":9},{"label":"Jun 21","value":8},{"label":"Jul 21","value":5},{"label":"Aug 21","value":2},{"label":"Sep 21","value":2},{"label":"Oct 21","value":2},{"label":"Nov 21","value":2},{"label":"Dec 21","value":2}}},{"category":"Devices","values":{{"label":"Jan 20","value":6},{"label":"Feb 20","value":11},{"label":"Mar 20","value":2},{"label":"Apr 20","value":5},{"label":"May 20","value":2},{"label":"Jun 20","value":6},{"label":"Jul 20","value":3},{"label":"Aug 20","value":5},{"label":"Sep 20","value":6},{"label":"Oct 20","value":11},{"label":"Nov 20","value":5},{"label":"Dec 20","value":3},{"label":"Jan 21","value":5},{"label":"Feb 21","value":7},{"label":"Mar 21","value":4},{"label":"Apr 21","value":6},{"label":"May 21","value":9},{"label":"Jun 21","value":8},{"label":"Jul 21","value":5},{"label":"Aug 21","value":2},{"label":"Sep 21","value":4},{"label":"Oct 21","value":6},{"label":"Nov 21","value":2},{"label":"Dec 21","value":3}}}}});
elements.add({"type":"divider"});
sections = list();
sections.add({"id":1,"elements":elements});
// Footer with button added to display brief stats
footer = {"buttons":{{"label":"View Detailed Insights ➡️","type":"invoke.function","name":"SalesTrackerWidgetButtons","id":"nextPage"}}};
return {"type":"applet","data_type":"sections","sections":sections,"header":header,"footer":footer};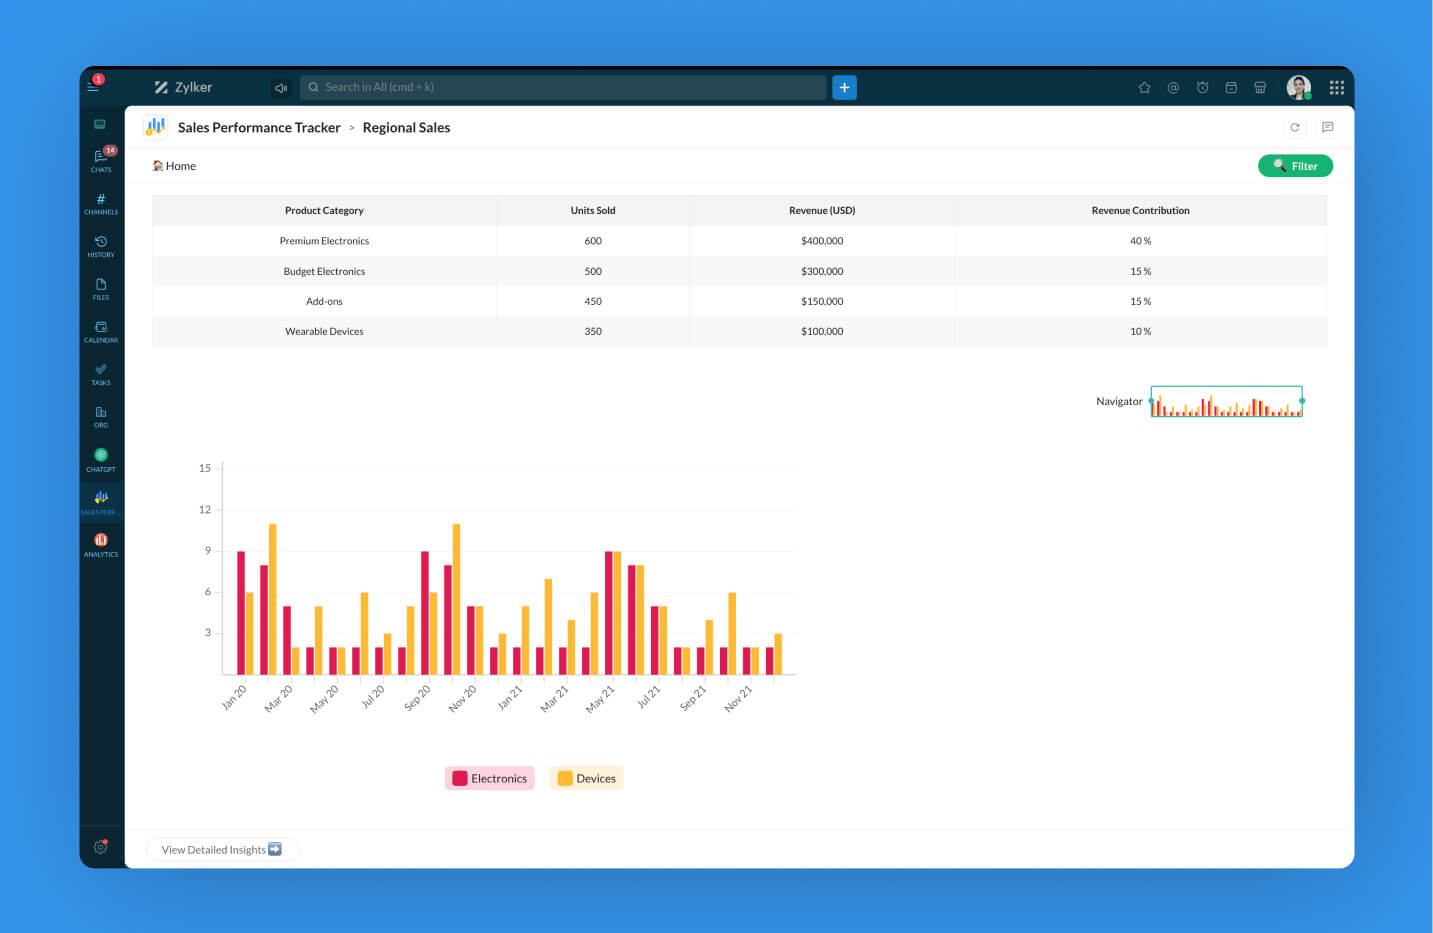
SalesTrackerWidgetButtons - Widget button function
A widget button function to view detailed insights of Zylker Store products, showcasing the usage of breadcrumbs in widgets.
// Functions consist of Target argument via which user can obtain information of the invoked Button such as Button Label , Tab from which the button is clicked etc.,.
buttonLabel = target.get("label");
footer = Map();
if(buttonLabel.equalsIgnoreCase("View Detailed Insights ➡️"))
{
// Navigation value added as continue to proceed with breadcrumbs navigation (Similar to that of Web browser search results)
header = {"title":"Detailed Analytics","navigation":"continue"};
elements = list();
elements.add({"type":"fields","data":{{"Best-Selling Product":"Zylker Prime (38%)\nDominates sales with 700 units and $500K revenue."},{"Fastest Growth":"Zylker Neo (+12%)\nPopular in price-sensitive regions like Asia."},{"Total Products Sold":"1267\nTotal units sold for Zylker product categories."},{"Revenue Leader":"Premium Electronics (38%)\nPrime products contribute the highest revenue."}},"style":{"short":true}});
dataList = list();
eachData = Map();
eachData.put("title","💎 Zylker Prime");
eachData.put("description","The flagship product leads the revenue charts.");
dataList.add(eachData);
eachData = Map();
eachData.put("title","🛍️ Zylker Neo");
eachData.put("description","Affordable and highly demanded in emerging markets.");
dataList.add(eachData);
eachData = Map();
eachData.put("title","🔧 Zylker Flex");
eachData.put("description","Modular design appeals to versatile customers.");
dataList.add(eachData);
elements.add({"type":"cards","data":dataList,"style":{"view":"gallery","size":"medium"}});
elements.add({"type":"divider"});
elements.add({"type":"text","text":"*Product Revenue Contribution Chart*"});
productStats = {{"label":"Zylker Prime","value":40},{"label":"Zylker Neo","value":20},{"label":"Zylker Flex","value":8}};
elements.add({"type":"percentage_chart","styles":{"preview":"pie"},"data":productStats});
elements.add({"type":"divider"});
sections = list();
sections.add({"id":1,"elements":elements});
}
return {"type":"applet","data_type":"sections","sections":sections,"header":header,"footer":footer};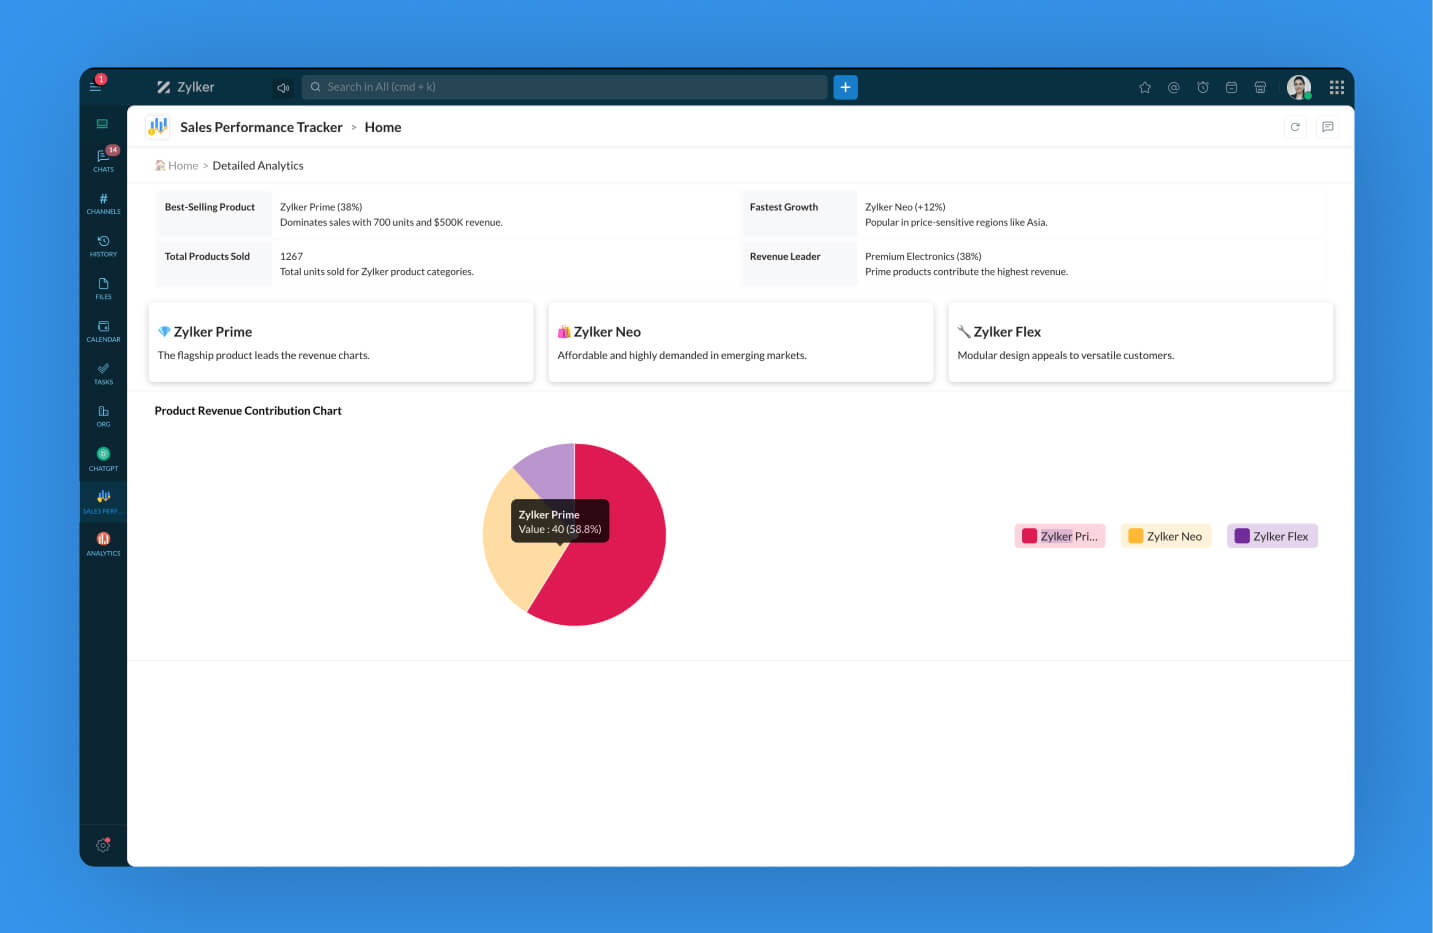
Elements
Section elements are the building blocks of your Cliq widget. They provide the structure, carry the content and layout required to bring your widget to life, precisely! Cliq supports a wide variety of elements to present your content.
Note:
Each section can hold a maximum of 20 elements.